2-level Model Form
The Model Form Framework currently supports 2-level pages, with a set of fields from the parent level, and a grid for the child level. The grid's functionality is driven the same way as the fields are on the parent level, by using the action's write mask. In the following steps, we'll walk through a full-featured 2-level form example.
As in the basic example, create a JS class and set the necessary properties. For this example, we will use the defaultActionName to demonstrate a default action page (as opposed to the basic example, which demonstrates a default detail page). Note that the model you choose should have a child level; in this example, SHOW.Task has a child level called SHOW.TaskMilestone.
define(function(){Ext.ns('SHOW');SHOW.TaskDetailMulti = Ext.extend(One.model.ModelFormContainer, {modelInfo: { modelLevelType:'SHOW.Task'},createActionName:'SHOW.CreateTaskFull',defaultActionName:'SHOW.UpdateTask'});});In the MPT, add a new Create action, set the permissions and the action screen. Make sure that the child level is set to allow creation on the write mask:
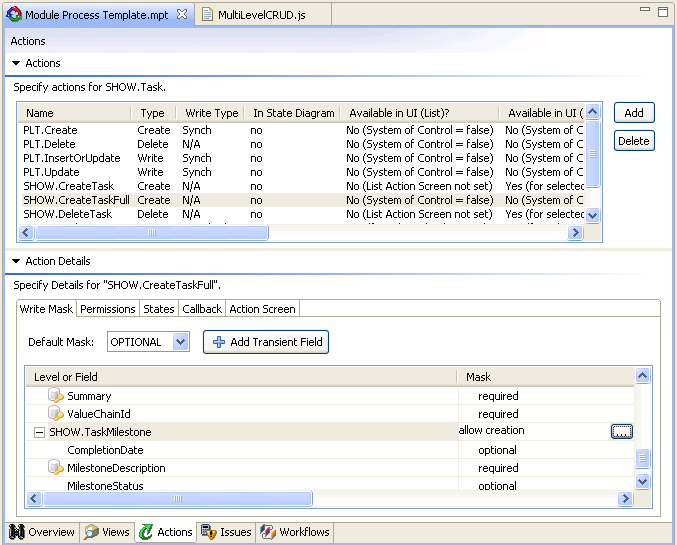
Also, add an Update action where the action mask disallows creation for the parent level but allows it for the child level. Setting the actions' write masks this way allows the user to create instances of the child level in the grid. (Don't forget to set the permissions and action screen!)
In your JS class, add another property called deleteChildActionName and set it to some name. The final code should look something like this:
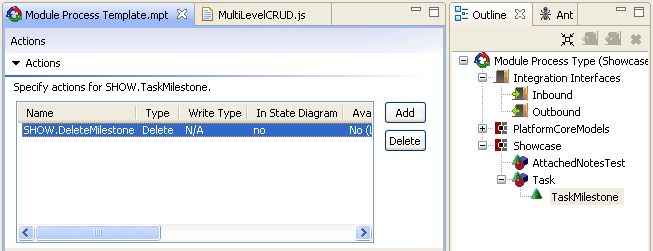
define(function(){Ext.ns('SHOW');SHOW.TaskDetailMulti = Ext.extend(One.model.ModelFormContainer, {modelInfo: { modelLevelType:'SHOW.Task'},createActionName:'SHOW.CreateTaskFull',defaultActionName:'SHOW.UpdateTask',deleteChildActionName:'SHOW.DeleteMilestone'});});Go back to the MPT and, on the child level, add a Delete action with the same name that you specified in the code. This will allow the user to delete existing instances of the child level from the grid.
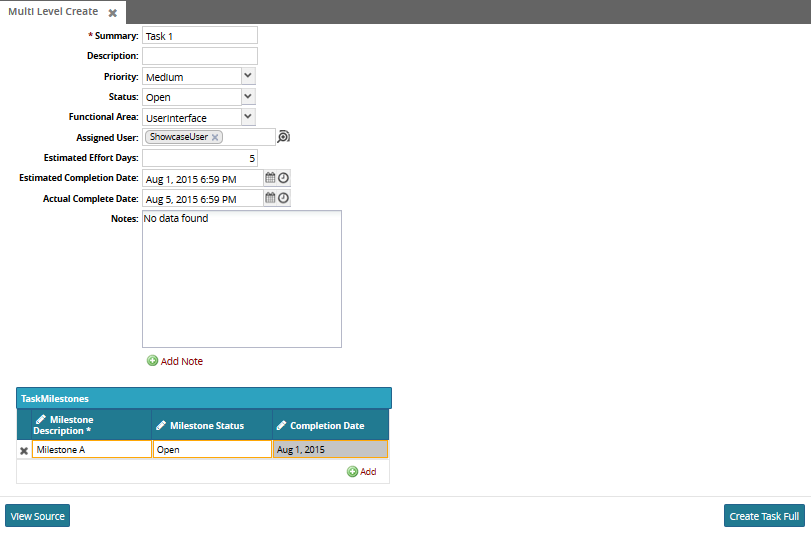
Put your class in the UIMM (without any config) and open it up in NEO. As you can see, an empty grid with an Add link appears at the bottom of the create action page. Fill in the information and click the button.

After it successfully creates the new Model instance, it should load the default update page. You can delete instances of the child level by clicking the "X" icon on that row; it will highlight the entire row in red to indicate it will be deleted when the action is executed but also provides an undo icon for the user.