Bringing it All Together
In this section we're going to bring some of the most important concepts you've learned until now together to create a novel Order Management System in which various organizations are able to collaborate on a shared ordering process in real-time.
Idea in brief: create an Order Management System in which buyers can place a cancellable order for a quantity of a book against a given supplier. Suppliers have the option of fulfilling or canceling orders at their discretion. Each organization should only have visibility into orders in which they are either the buying or selling party. Changes to the state of an order propagate in real-time.
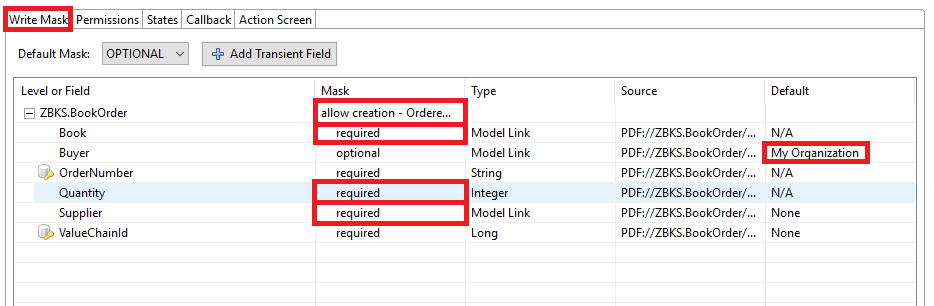
To get started, create a BookOrder model with the following attributes (refer back to Chapter 2's section on “Creating a Model” for a step-by-step guide on how to create models in Studio):
Field Name
Type
Description
Key Field
Internal Check Box
OrderNumber
String
Order number to reference the order by
Natural Key - required; Immutable
No
Supplier
ModelLink to Organization
Organization which this order is placed against
Non-key
No
Buyer
ModelLink to Organization
Organization that initiated the order
Non-key
No
Book
ModelLink to ZBKS.Book
Book that is being ordered.
Non-key
No
Quantity
Integer
Quantity of the book that's being ordered
Non-key
No
State
State
State
Non-key
No
Rebuild the Bookstore module and restart your server.
Re-open the MPT and then Open the Outline tile in Bookstore's Module Process Template.mpt file and select the newly created BookOrder model.
In the Role Type listbox under the Permissions section, select ZBKS.SampleRoleType. For both the Read and Write permissions, select the By Dimension checkbox, select the Organization option, then hit Select…, and finally, select the Buyer checkbox in the dialog that opens:
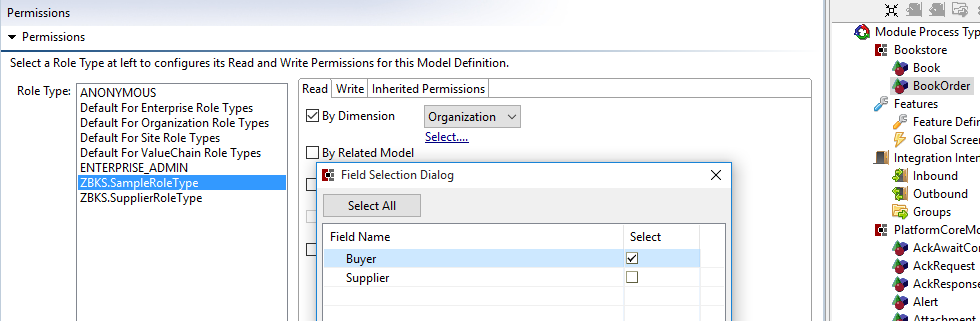
This establishes the read/write privileges for any user with a role type of ZBKS.SampleRoleType only if that role’s organization matches the organization in any given BookOrder’s Buyer field. In other words, if a book’s Buyer does not match the role’s organization, then that role cannot see the BookOrder.
Do the same as above for the ZBKS.SupplierRoleType, selecting the Supplier checkbox instead of the Buyer checkbox in the dialog that opens, in both the Read and Write tabs and save the MPT.
Next, with the BookOrder model selected in the Outline pane, click the Views tab of the MPT and Add a new view with the following properties:
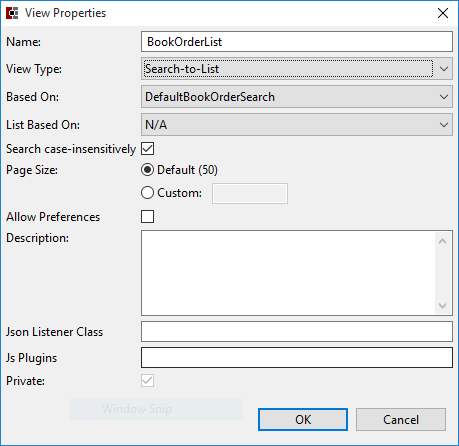
Then click OK.
You should see the new view in the Views section, as well as the details for the Query tab in the View Details section. Select the following fields to be retrieved from the database for this view:
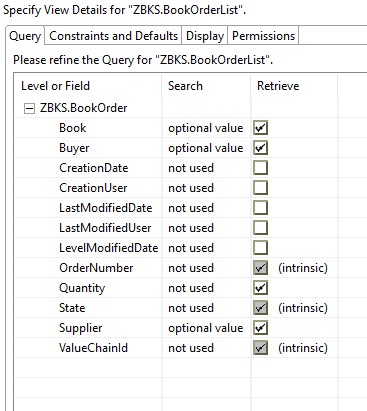
Note that Book, Buyer, and Supplier have been selected as optional search filters.
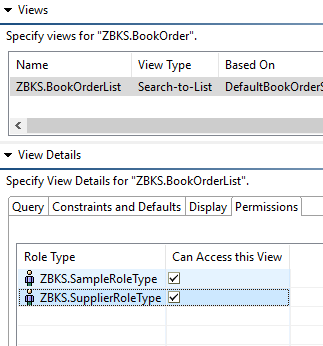
Under the Permissions tab of the new view grant both ZBKS.SampleRoleType and ZBKS.SupplierRoleType access to the view.
Lastly, under the Display tab, select some relevant fields to display.
Now that we have a view defined, let’s proceed to allow buyers to create BookOrders. Select the Actions tab.
Click Add to add another action with the following properties:
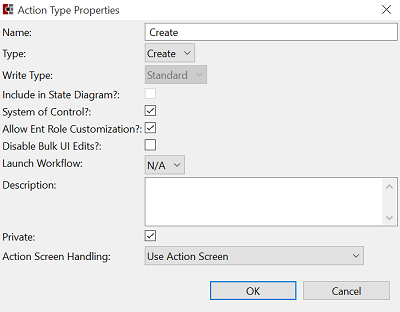
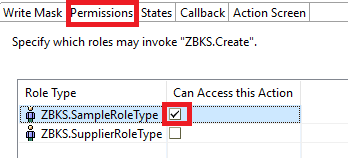
Then modify the permissions to give ZBKS.SampleRoleType permission to create BooktoreOrders.
Finally, define a new action screen for the Create action:
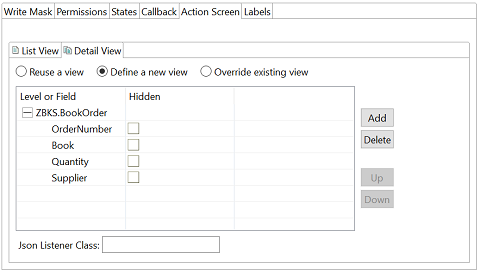
These are the fields the user must enter when he clicks on the Create action in the user interface.
As a last step we will add a menu item for the new BookOrderList view so that we can access it through the user interface. To do this, navigate to the root of the MPT in the Outline tile, and select the UiMetaModel tab on the bottom left. Add the following XML under the other WebAction tags:
<WebActionGroupname="SampleMenuGroup">…<WebActionRefname="BookOrderList"/>…</WebActionGroup>Then add a menu reference to this action inside the WebActionGroup tag:
<WebInfo>…<WebActionname="BookOrderList"><PanelOptions><PanelClass>One.Report</PanelClass><PanelConfig>{viewName: "ZBKS.BookOrderList", customModelName: "Standard ZBKS.BookOrder", autoExecute: true}</PanelConfig></PanelOptions></WebAction>…</WebInfo>Save the MPT, and then Click
 Submit to submit it to the server.
Next, create a form screen for the ZBKS.BookOrder model using User-Defined Pages framework. (Please refer back to Chapter 2's section on "Implementing User-Defined Pages" for a step-by-step guide on how to create User-Defined Pages.)
While creating a User-Defined page select the action "ZBKS.Create" created in step 10.
Routing Rules configuration:
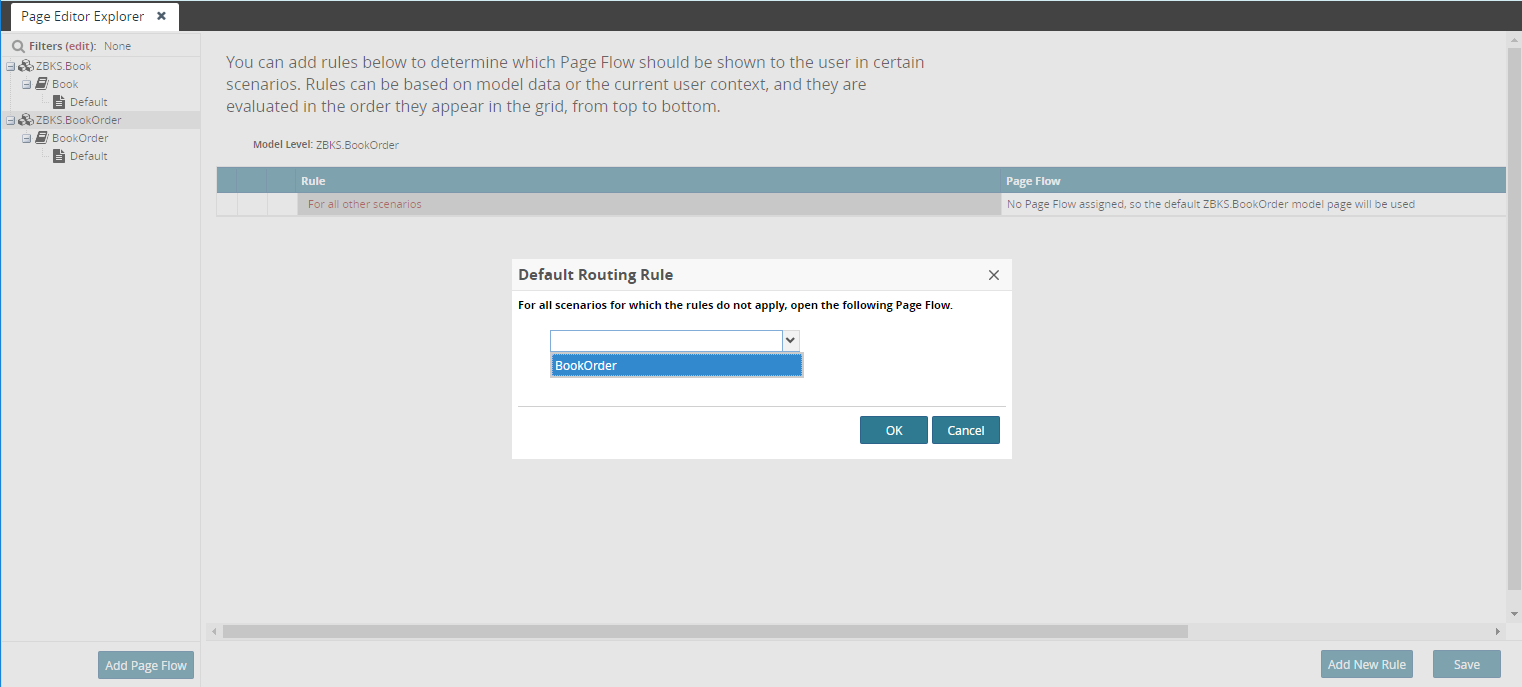
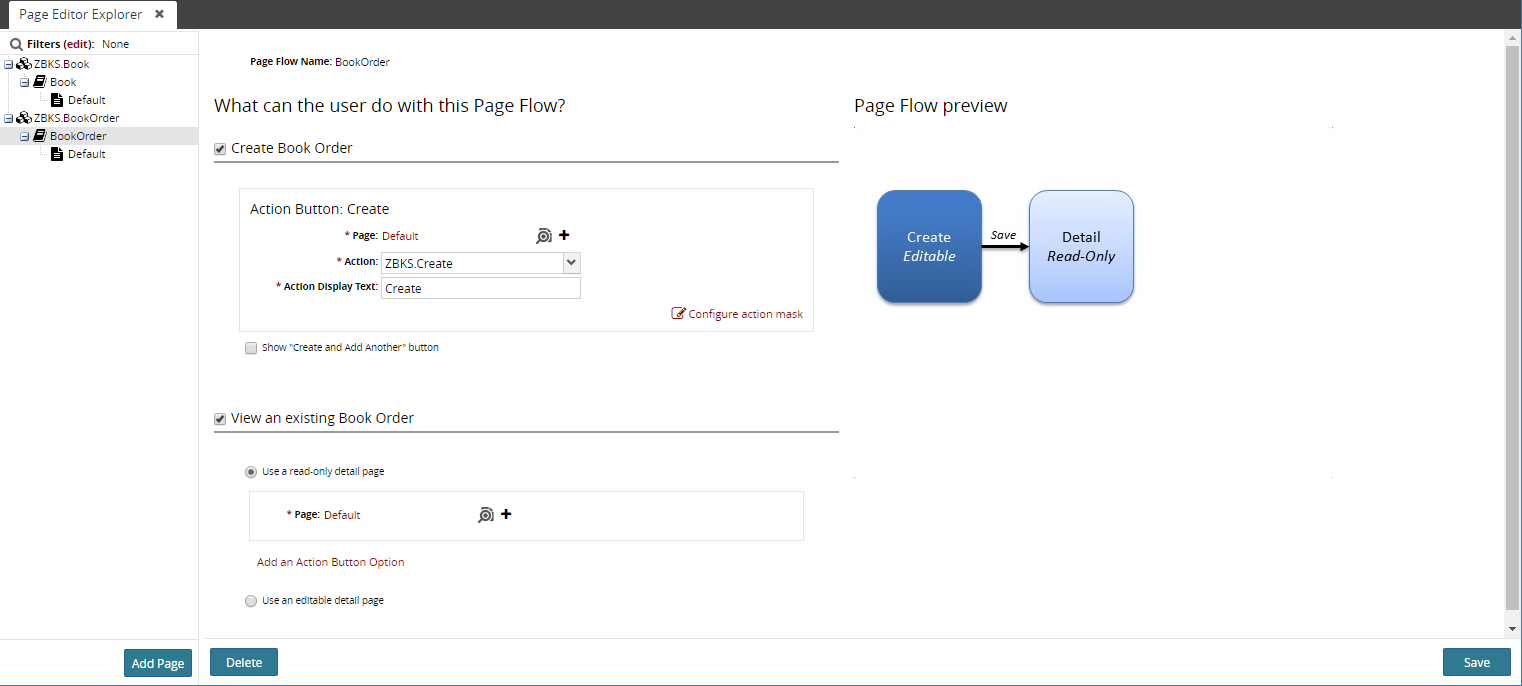
Page Flow configuration:
Page Editor configuration:
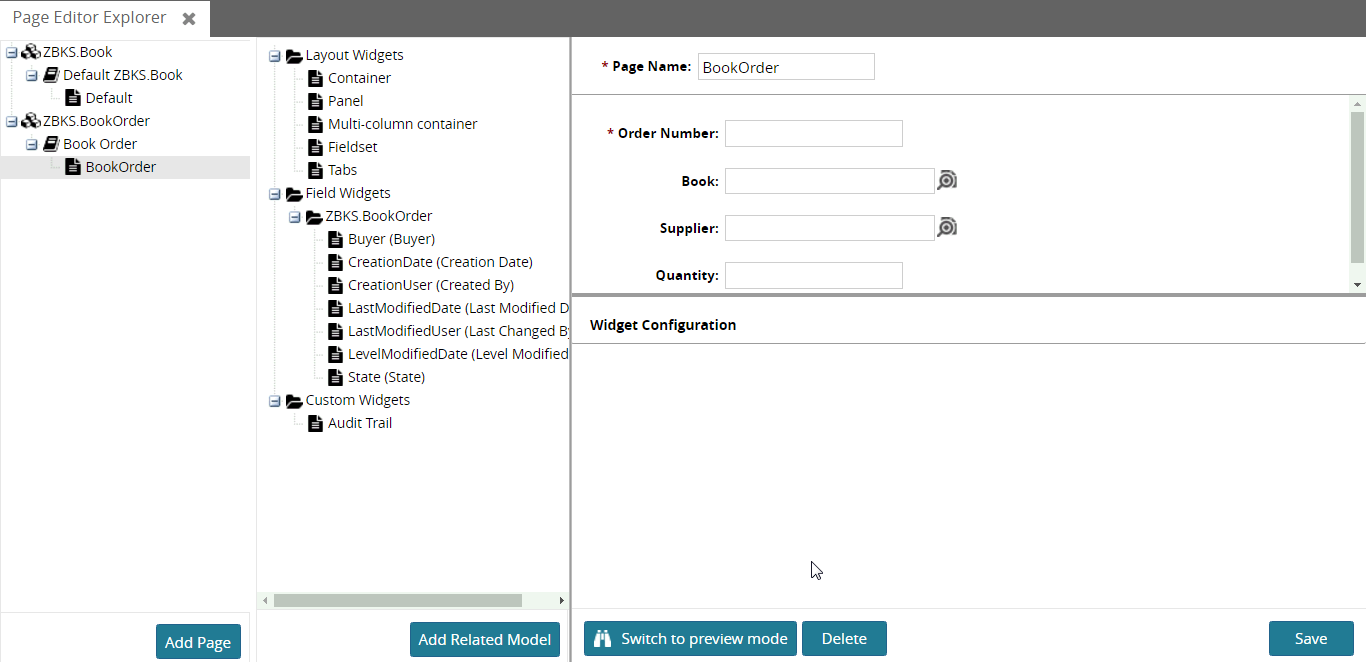
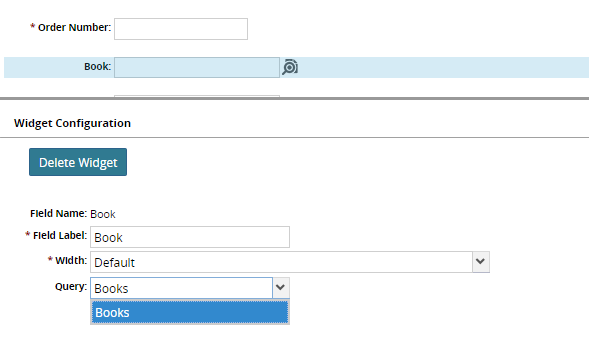
You must also select queries for the model links added to the page. Create web/public/scripts/GlobalRegistry.js (if it doesn't already exist) and add this code:
One.ext.page.PageManager.registerModelLinkQuery({name:'Organizations',modelLevel:'Organization',staticConfig: {pickerView: {targetLevelType:'Organization'}}});One.ext.page.PageManager.registerModelLinkQuery({name:'Books',modelLevel:'ZBKS.Book',staticConfig: {pickerView: {viewName:'ZBKS.BooksByTitle',customModelName:'Standard ZBKS.Book'}}});Then openweb/public/build.jsband add a reference toGlobalRegistry.js:
fileIncludes: [ ...,{path:'scripts/',text:'GlobalRegistry.js'}, ...]Then deploy the Bookstore web files and re-open the Page Editor, and set the newly registered queries for both the Organization and Book model link fields and save:
Add the following WebAction to your UI Meta Model.
<WebActionname="CreateBookOrder"><PanelOptions><PanelClass>One.ext.page.PageFlowDetail</PanelClass><PanelConfig>{ "modelLevel": "ZBKS.BookOrder" }</PanelConfig></PanelOptions></WebAction>Then add a menu reference to this action inside a WebActionGroup tag:
<WebActionGroupname="SampleMenuGroup">...<WebActionRefname="CreateBookOrder"/></WebActionGroup>Now, submit the MPT, reload the UI and create a new book order with the following value.

Logging in as the SupplierUser created in earlier sections of the tutorial, we can now see that a new BookOrder is available for us by clicking on the Book Order List menu. We still don't have any actions available to us, though.
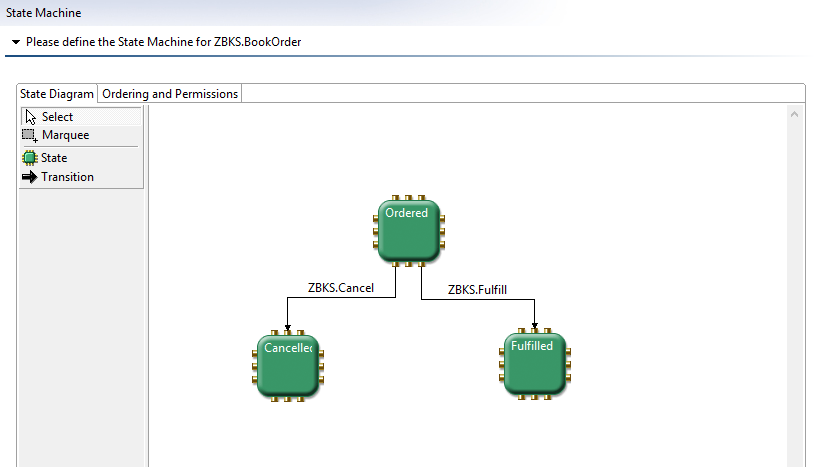
We’ll add some actions and a state machine. To do this we will select open the Bookstore’s MPT and select BookOrder from the Outline pane on the right and navigate to the State Machine tab. Here we will specify three states:
Ordered – the initial state of the BookOrder. Signifies that the order has been placed by the buyer and is awaiting action by the seller.
Fulfilled – signifies that the order has been fulfilled by the seller. A BookOrder can only be moved into this state by the selling organization.
Canceled – signifies that the order has been placed but was canceled by either party involved in the transaction.
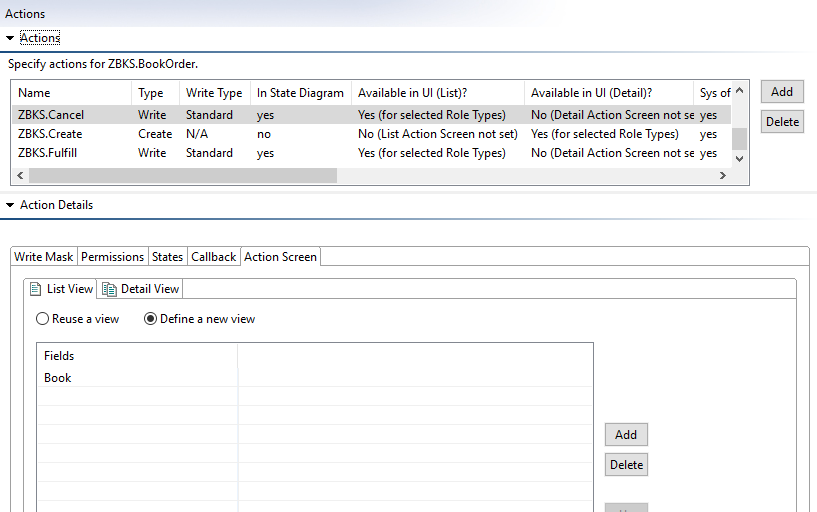
To move the BookOrder between these states we will create a set of Write actions on the BookOrder model:
Fulfill – moves the BookOrder to the Fulfilled state. Executable by a BookOrder’s selling organization.
Cancel – moves the BookOrder to the Cancelled state. Executable by both a BookOrder’s selling and buying organizations.
Be sure to apply the appropriate Permissions to each action and make the action available in the UI by defining a view for it under the Action Screen -> List View tab.
The final step is to mark the actions as transitions between states in the BookOrder’s State Machine:
Open your SQL editor and execute the following queries so you able to see actions on UI:
update zbks_book_order set state ='Ordered';commit;
We’ve now successfully created a multi-party transaction: a buying organization is able to place an order against a selling organization and both organizations are able to see changes to that order in real-time – given, of course, that they have the proper permissions (you’ll recall that we limited access to the BookOrder model to the buying and selling Organizations of a given BookOrder). As an exercise, you may create additional Organizations, Books, and Users to simulate or more complete Order Management System with multiple sourcing organizations.