Create and Deploy a Simple Report
Let's assume we want to create a report that allows us to search for Books in our Bookstore. Let's create a new empty text file in the reports directory called "BookstoreReportTutorial.reports".

newReportFile.jpg
newReportFileName.jpgNow, copy and paste the following XML content into your new reports file:
<?xmlversion="1.0"encoding="UTF-8"?><ReportListxmlns="http://www.onenetwork.com/Platform"><Report><Name>BookstoreReportTutorial</Name><SqlDefName="BookstoreReportTutorial"GroupName="BookstoreReportTutorial">select TITLE, ISBN from ZBKS_BOOK</SqlDef><Retrieval><CustomRetrievalField><FieldReflevelType="Undefined"category="PDF"><FieldName>Title</FieldName></FieldRef><Type>STRING</Type><SimpleMappingsqlName="TITLE"/></CustomRetrievalField><CustomRetrievalField><FieldReflevelType="Undefined"category="PDF"><FieldName>ISBN</FieldName></FieldRef><Type>STRING</Type><SimpleMappingsqlName="ISBN"/></CustomRetrievalField></Retrieval></Report></ReportList>That's a lot of XML to digest at once, so let's break it down and explain what each part means:
"Name" identifies the report as "BookstoreReportTutorial". We will use this name when we reference the report in our UI Meta Model or elsewhere. (Note that we must prefix it with "ZBKS." as all reports are implicitly scoped by their owning module ID.)
<Report><Name>BookstoreReportTutorial</Name>"SqlDef" is the actual query that fetches the data we want to show. Here, we are simply retrieving two columns from the ZBKS_BOOK, without any where-clause.
<SqlDefName="BookstoreReportTutorial"GroupName="BookstoreReportTutorial">select TITLE, ISBN from ZBKS_BOOK</SqlDef>CustomRetrievalFields map columns fetched in the SQL to fields in the user interface. For example, in the CustomRetrievalField below, we use SimpleMapping to map the "TITLE" column to a field called "Title" in the UI of type STRING.
<CustomRetrievalField><FieldReflevelType="Undefined"category="PDF"><FieldName>Title</FieldName></FieldRef><Type>STRING</Type><SimpleMappingsqlName="TITLE"/></CustomRetrievalField>
Next, let's deploy this report to our server so it's available for execution. Click the "Submit" icon to send this to your platform server, just as you would with an MPT file.
Now, let's add this Report to the user interface. Open the Bookstore MPT and add a WebAction in the WebInfo section of the UI Meta model tab, as per below:
<WebActionname="BookstoreReportTutorial"><OneReactPage><ModulePath>PLT/NeoReport</ModulePath><Properties>{"reportName": "ZBKS.BookstoreReportTutorial","autoExecute": true}</Properties></OneReactPage></WebAction>...<RoleTypeUiConfigmenuType="tree"><RoleTypeRef><IntrinsicRoleType>ZBKS.SampleRoleType</IntrinsicRoleType></RoleTypeRef><WebActionRefname="BooksByTitle"/><WebActionRefname="CreateBook"/><WebActionRefname="UserSearch"/><WebActionRefname="UploadBooks"/><WebActionRefname="BookstoreReportTutorial"/> <!-- this row is new --></RoleTypeUiConfig>Please note that the report name is prefixed with the module ID followed by a period.
Submit your MPT to the server and proceed to the next step.
At this point, we can log in and see the report in action. Log in as BookstoreUser/password, select the new Bookstore Report Tutorial menu item, and you should see the following:
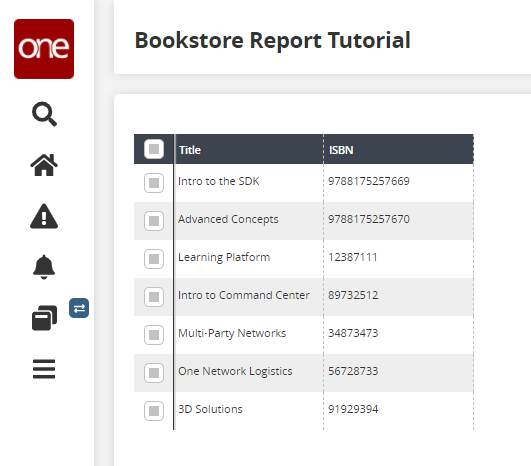
Obviously, there's not much to our report as of yet ... we don't have any filters for the user to search by, and only two columns are retrieved. But this provides the foundation on which we can add those features and many others in subsequent steps of this tutorial.