Custom Page
Adding Template Functionality
There are 2 UI components that need to be added to your custom page to make it use templates:
Add theOne.tpl.TemplatePluginto the list of plugins to your page.
this.plugins = [newOne.tpl.TemplatePlugin({modelLevelType:'SHOW.Task',sysId:this.sysId})];You only need to provide a model level type (and surrogate id, if a detail page) to create an instance of the plugin. When it gets initialized, it will fetch the most relevant template for the current user for the given model level type and construct the corresponding JavaScript class with the template data.
If the page has been constructed with template data, it will have been done by One.tpl.TemplatePlugin and the data will be stored in a property called templatedResponse. If that's the case, we want to display the current template information to the user with a component called One.tpl.TemplateDisplay.
if(this.templatedResponse) {this.templateDisplay =newOne.tpl.TemplateDisplay({currentTemplate:this.templatedResponse.templateData,initialPageConfig:this.initialConfig,isDetailPage:this.sysId});}One.tpl.TemplateDisplay takes additional configuration. The options shown are the minimum necessary for it to function correctly. Once constructed, you can put it anywhere on the page but it is typically put in the top-right corner:
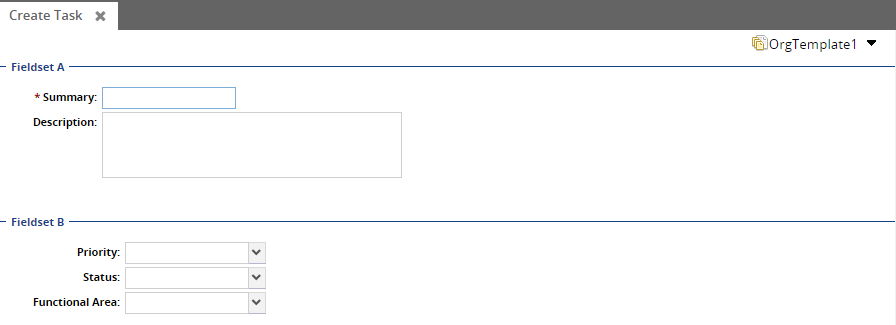
Exploring the Functionality
Before delving into the full power of templates, we'll take a quick look at what is available to the user, now that we've added the UI components to the custom page. If you click the icon next in the One.tpl.TemplateDisplay component, you'll see a menu with a couple of options:
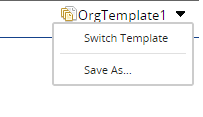
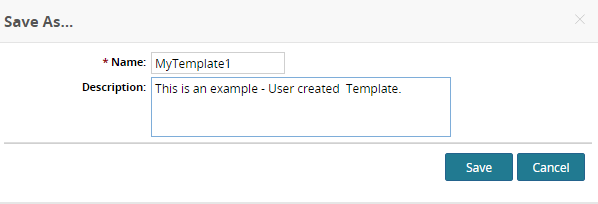
Click Save As. A dialog window appears.
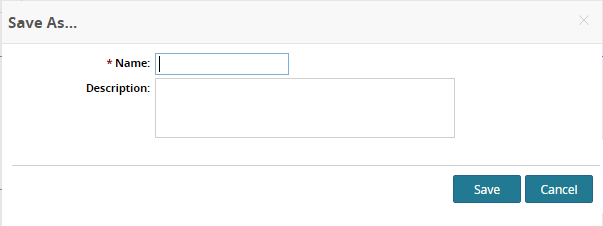
Users create templates from this window. Enter a name and description and click Save:
It should create the new template and switch to it automatically. If you open the template menu again, you should see some new options:
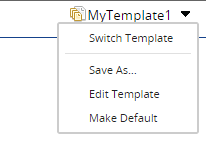
The menu for a User-level template has additional options over an Org-level template such as editing and setting as default. Click the Switch Template option in the menu. It should open a dialog like this:
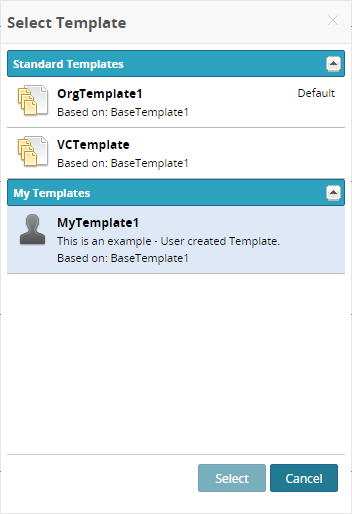
This allows the user to switch to another template if he doesn't want the one that opens with the page by default. The templates are organized into 2 lists: Standard and My Templates. Standard Templates are a combination of VC-level and Org-level templates, and My Templates is a list of User-level templates (templates only created by and available to the current user).
Saving Field Values to a Template
Up until now, we've enabled the most basic template functionality for a model level. There's still some extra work to be done if we want users to be able to set default field values. First, we have to save the current fields' values when the user clicks the Save button on the Save As dialog. We can do this by using a callback provided by One.tpl.TemplateDisplay.
this.templateDisplay = new One.tpl.TemplateDisplay({ ... saveWindowConfig: { onSave: { scope: this, fn: function(dataConfig, viewConfig) { Ext.apply(dataConfig, this.getForm().getValues()); } } }});The callback takes two parameters, dataConfig and viewConfig. These are JSON objects that will get saved into the Template instance's DataConfig and FieldConfig columns in the database. In this example, we are taking the current form values and adding them to the dataConfig object.
The next step is to set the field values on the form when it is constructed with a template. We do this in our Showcase example using the afterRender function:
afterRender: function() { SHOW.TemplateExample.superclass.afterRender.apply(this, arguments); if(this.templatedResponse) { this.getForm().setValues(this.templatedResponse.templateData.dataConfig || {}); }}After deploying your changes to the server, you should be able to set some field values, create a new template using the Save As dialog, and see the values be correctly populated on the form when the new template is loaded.
Using the viewConfig Object
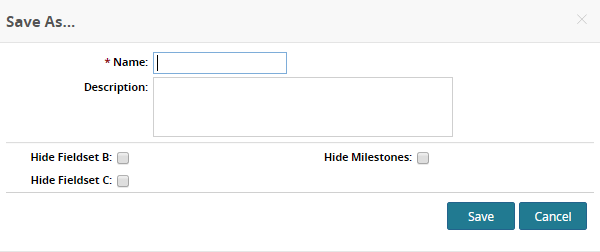
If you want to change the structure of the page but don't want to use another JavaScript class, you can put the logic in the same class by utilizing the viewConfig object. First, we want to add a custom set of fields in the Save As dialog. We do this using another configuration option of One.tpl.TemplateDisplay .
this.templateDisplay = new One.tpl.TemplateDisplay({ ... saveWindowConfig: { formConfig: { xtype: 'form', layout: 'column', items: [{ xtype: 'form', columnWidth: .5, items: [{ xtype: 'checkbox', fieldLabel: 'Hide Fieldset B', name: 'HideFieldsetB' }, { xtype: 'checkbox', fieldLabel: 'Hide Fieldset C', name: 'HideFieldsetC' }] }, { xtype: 'form', columnWidth: .5, items: [{ xtype: 'checkbox', fieldLabel: 'Hide Milestones', name: 'HideMilestones' }] }] }, ... }});After deploying the files to the server, the Save As dialog should have the new form:
Now when the user clicks the Save button, it will fetch the field values for this new form and put them in the viewConfig object. It's passed into the onSave() callback for modification and then written into the Template instance's ViewConfig field. When the template is loaded, the viewConfig will be available for use just like the dataConfig object, and you can utilize its values to decide which parts of the page to hide.
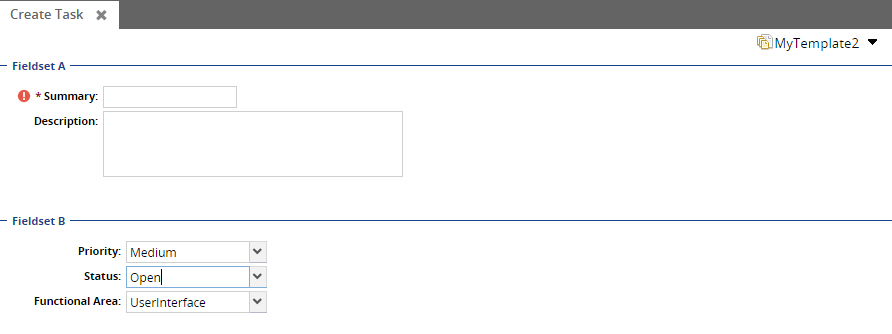
this.items.push({ xtype: 'fieldset', cls: 'template-demo-fieldset', title: 'Fieldset A', items: [ fields.getField('Summary'), fields.getField('Description') ]});var hideFieldsetB = false, hideFieldsetC = false, hideMilestones = false;if(this.templatedResponse) { if(this.templatedResponse.currentTemplate.viewConfig) { hideFieldsetB = !!this.templatedResponse.currentTemplate.viewConfig.HideFieldsetB; hideFieldsetC = !!this.templatedResponse.currentTemplate.viewConfig.HideFieldsetC; hideMilestones = !!this.templatedResponse.currentTemplate.viewConfig.HideMilestones; }}if(!hideFieldsetB) { this.items.push({ xtype: 'fieldset', cls: 'template-demo-fieldset', title: 'Fieldset B', items: [ fields.getField('Priority'), fields.getField('Status'), fields.getField('FunctionalArea') ] });}if(!hideFieldsetC) { this.items.push({ xtype: 'fieldset', cls: 'template-demo-fieldset', title: 'Fieldset C', items: [ fields.getField('AssignedUser'), fields.getField('EstimatedEffortDays'), fields.getField('EstimatedCompletionDate'), fields.getField('ActualCompleteDate') ] });}// etc...