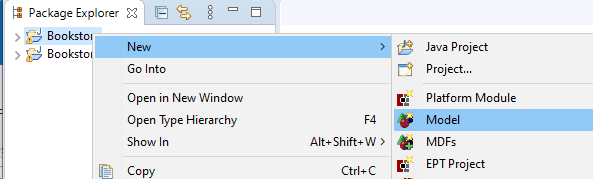
Using the New Model Wizard
In the Package Explorer tile, right-click the Bookstore project, point to New, and then click Model.
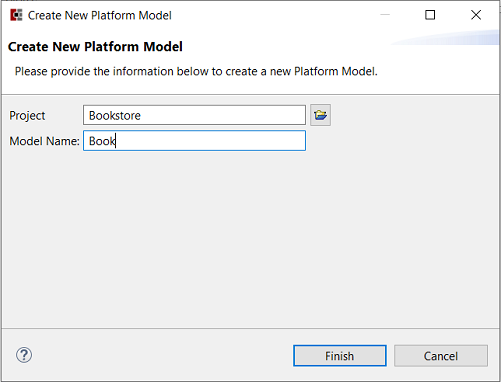
The Create New Platform Model dialog box appears.
Type a name for the new Model. In this case, you will model a Book. Type Book for the model name, and then click Finish.
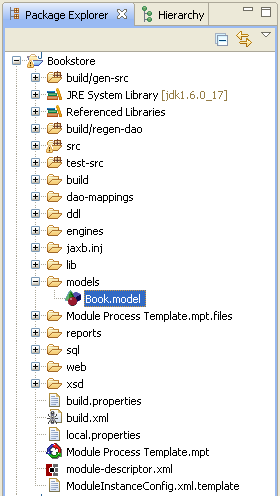
The file, Book.model, appears in the Package Explorer under the Models folder:
Double-click Book.model to open the Model Editor:

The top section of the editor defines key details about the Model.
Detail
Description
Model Name
The name by which the Model as a whole will be referred.
Model Level
The name of the specific level of the Model. (This is more relevant for multi-level models.)
Parent Model
Models can extend each other, which allows a Model to use fields, actions, and views from its parent Models. This field allows you to specify a parent Model.
Model Object
A link to the Java object that represents this model. Until the project is built, this link will be unavailable.
Short Name
The short name for this level of the Model. It is most commonly used to determine the name of the relational table into which the model will be stored. (In this example, ZBKS_BOOK, is the Module Prefix + Short Name.)
Table
Specifies the table in the Oracle database where books will be stored.
Description
Optional description of the model.
Support Audit Trail
Whether to create an additional table ZBKS_BOOK_ADT to store detailed audit information for all changes to this model.
Support Issues
Whether to create an additional table ZBKS_BOOK_ISSUE to allow for the storage of computed Issues.
Support UDFs
Whether to create STR_UDF and NUM_UDF columns on the model as placeholders for storing "user-defined fields", which are configured in the dataset via the SPT.
Enable Templates
Whether to create an additional column SYS_CREATION_TEMPLATE_ID on the model's table which is necessary for full templating support within the UI.
Private
Whether to make the model private or publicly available to any modules which depend on your module. Models are marked public by default.
Deprecated
Discontinued models can be marked Deprecated to indicate they may be removed in future releases.
Attribute Model
Used to specify the table in which Enterprise-Defined Fields are stored for this model.
Anonymizer Dependency
Anonymizer dependencies can be specified in the model editor when you need one model to be anonymized before another in order for your anonymization strategy to work correctly.
We will keep Book "public", i.e. the private check box should be unchecked. We do this for two reasons. First of all, we want to reference it both from public and private classes in our module. Second, we want any module developed on top of Bookstore to be able to use Book model from their code.
To start with, all new Models have several built-in fields. These fields, shown in italics in the Fields table, cannot be removed.
Fields
Description
SysBookId
The surrogate key of the model. Each model has a single field of type long that represents its Primary Key in the database. You will also specify a more meaningful, business-oriented unique key, known as the Natural Key. (For example, ISBN is the natural key for a book). More on this later.
ModelName
As with Platform Transactions, all Models must have a corresponding custom model definition in the SPT where views, actions, permissions, and so forth are defined. This field stores the name of the associated custom model for a given Book.
CreationUser, CreationDate
When a model is created, the user creating it and the date are recorded in these fields and never modified thereafter. (Separate, detailed Audit tables are also available to track field-level changes.)
LastModifiedUser, LastModifiedDate
When a model is updated, the user and the date are recorded in these fields. (Again, Audit tables track field-level changes more specifically.) The LastModifiedDate of the top level is updated if any level of the model is updated.
LevelModifiedDate
When a level is updated, the date is recorded in this field.
ValueChainId
All model instances must belong to a particular value chain. By default, this is the only portion of the Natural Key, so you will need to add at least one additional Natural Key field in order to have more than one model instance in the system.
After the Model has been created, you will need to add fields to it to capture the required semantics. The following table illustrates the different field types supported by Platform:
Field Types
Description
Address
A composite field to represent domestic and international Addresses.
Attachments
Represents documents that can be attached to a Model. The relationship is compositional. If the Model is deleted, the Attachments are deleted. An Attachment cannot be shared by multiple Models.
Boolean
A field type for true/false options.
Date
A field type using date and time format.
DateRange
A range of two dates.
Double
A field type using double-precision floating-point notation. Refer to Java Docs.
Duration
A field type for multiple fields that indicate a span of time, such as days, hours, or minutes. Uses the XSD Duration standard. Refer to Xml schema
Float
A field type using floating-point notation. Refer to Java Docs.
GenericModelLink
A generic model link is a "weak" foreign key reference to any other model in the system. The type of the model can vary.
Integer
A field type for whole numbers. Refer to Java Docs.
Long
A field type that permits larger integer values than the default limit. Refer to Java Docs.
ModelLink
Represents a reference to another Model (including Value Chain Models, Transactions, and other Module Models).
Monetary
A monetary amount and unit of measure, for example, 100 USD (U.S. Dollars)
State
A field to track the current State of the Model in a state machine. You can have at most one State field per Model level.
String
A field type for arbitrary text entry.
String Enumeration
A field type for text options to be selected from a list.
To describe the Book model, you can start by adding the Title field.
Click the Add button to the top right of the Fields table. The Add New Field dialog box appears:
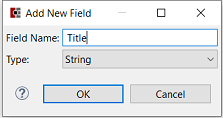
Click OK once you have entered the field name and type as shown in the image.
As you can see, the field has been added: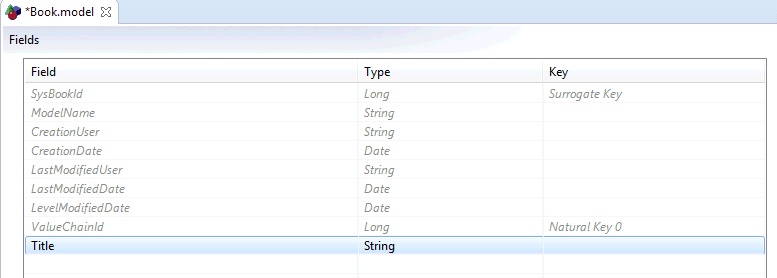
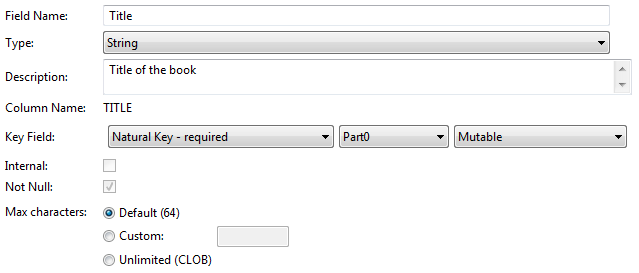
Now we can fill out the rest of the field's information. In Description, type a description for the new field. Column name is an editable field showing the database column where the field will be stored. To ensure that the same Book does not appear twice in the system, make Title part of the Natural Key for this model.
In the Key Field list, select Natural Key. The Part list appears to the right of the Key Field list. For Title select Part 0 of the natural key to make it the "most-specific" part. This will become important later as Platform's auto-complete feature by default works against Natural Key Part 0, among other things. By default, all key fields are Mutable (changes are allowed to the field). Set fields to Immutable if you don't want key fields to be editable from UI.
The Internal checkbox can be selected in cases when you want the field to be available in the database, but unavailable through public interfaces such as XML and CSV Upload. For key fields, the Internal field check box is disabled as the key fields are available in the database and through public interfaces.
Also, by default, all required key fields are Not Null fields.
The following figure shows the Title Field Details:
Add additional fields using the information in the following table.
Please add the fields in the precise order listed below, using the same spelling and case. In Platform, fields are case sensitive and their ordering is significant in the generated XML schema, so careful adherence to these instructions will prevent problems with subsequent tutorial steps.
Field Name
Type
Description
Key Field
Internal Check Box
ISBN
String
International Standard Book Number
Non-key
No
Author
String
Author of the book
Non-key
No
Publisher
String
Publisher of the book
Non-key
No
Published Date
Date
When the book was published
Non-key
No
PublisherAddress
Address
Publisher address
Non-key
No
PublisherWebsite
String
Publisher's website
Non-key
No
QuantitySold
Integer
Number sold worldwide
Non-key
No
Price
Monetary
Price of the book
Non-key
No
PromotionalPeriod
DateRange
The period when the book will be on promotional sale
Non-key
No
Promotional Discount
Double
The discount percentage the book is discounted during the promotional sale
Non-key
No
Rating
Float
On a scale from 1-10, the rating of the book
Non-key
No
ReturnPolicy
Duration
Amount of time after purchase that the book can be returned
Non-key
No
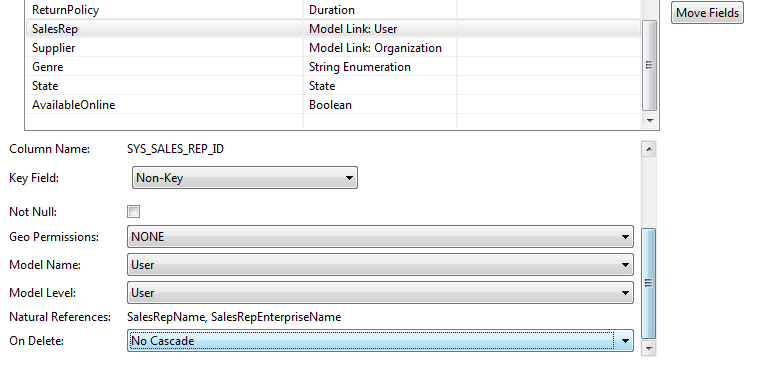
SalesRep
ModelLink to User (see below)
Bookstore employee who is responsible for promotions and sales
Non-key
No
Supplier
ModelLink to Organization (see below)
Organization that supplies books to be sold in the Bookstore
Non-key
No
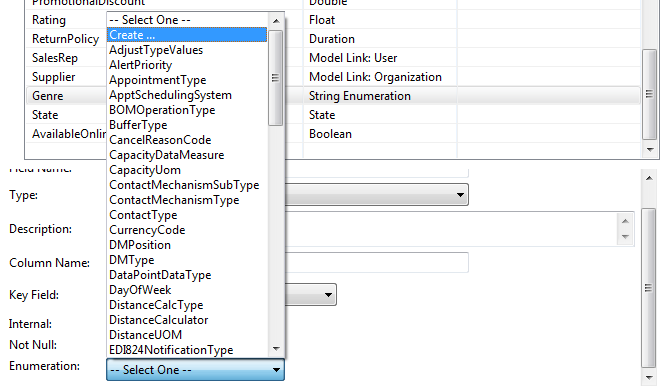
Genre
StringEnumeration (see below)
Book genre
Non-key
No
AvailableOnline
Boolean
States whether the book is available online
Non-key
No
State
State
State
Non-key
No
*For the SalesRep field, select Model Link for the field's type: In the Field Details section, Select User for the Model name and No Cascade for On Delete. We're basically saying we don't want the Book to get deleted if the User it references is deleted.
You will be doing the same thing for the Supplier field, except it will be a link to Organization instead of User.
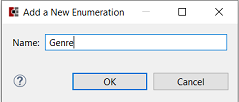
**For the Genre field, we need to create a new enumeration to hold the values. Select the Create... option from the drop-down box:
In the Add a New Enumeration dialog that opens, enter Genre for Name and click OK:
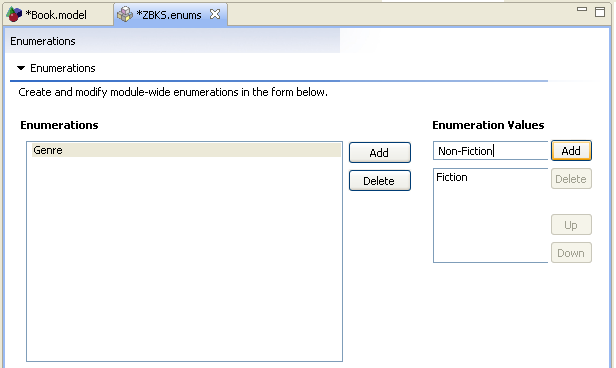
A new file, ZBKS.enums, should be created under Bookstore/models/ and the Enumerations editor should be open. If not, double-click the new ZBKS.enums file. Add the following Enumeration Values:
Fiction
Non-Fiction
Click
 Save to save ZBKS.enums, and then do the same with Book.model. At this point, you are done with the simple Book model. Next you can build and deploy the model to your local Platform instance.
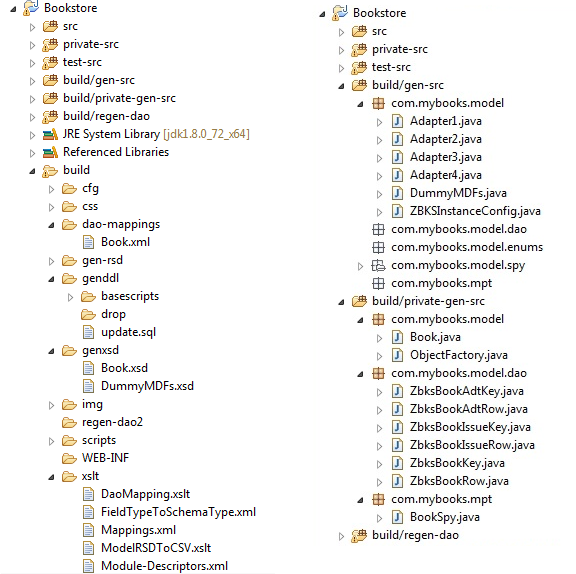
As described earlier, build your Bookstore module by double-clicking the build target in the Ant tile. You should see a BUILD SUCCESSFUL message in the Console. Although an SDK user need only modify a single file to create or update a Model, behind the scenes, the Studio generates several supporting files around the Model, all under the build folder. To view them, in the Package Explorer, refresh the Bookstore project and expand it. In the following figures, several folders have been expanded to show the generated files.
If you made your Book model public, the Java files related to the model will be found under build/gen-src/ .
Many of these classes are used only internally by the Platform. However, the following are intended for use directly by you as a Module developer:
File or Folder
Description
[private-]gen-src/.../model/*.java
Using the JAXB framework, Java classes are generated from the XML Schema that can be used to marshal or unmarshal Model objects into Java representations of the same.
[private-]gen-src/.../model/enum/*.java
This package will contain a typesafe enumeration class for each enumeration defined in your ".enums" file.
[private-]gen-src/.../mpt/*.java
This package contains generated constants for things such as your Module Prefix, JAXB Object Factory, XML Namespace, etc. Also as you add actions to your Module (more on this later), you will see constants for these as well.
genddl
Folder that contains SQL scripts for automatically creating or altering tables to store the Model. Also contains drop scripts that allow you to start from scratch in development. The SQL scripts are automatically applied when you are running in a development environment.
genxsd
An XML Schema is generated to represent the Models for integration purposes.
Now that the model has been built and deployed, restart Platform (also referred to as the server) in order for the changes to take effect. To stop Platform, just close the Platform Console window. To restart Platform, execute run-server from Bookstore/build.xml.
Whenever you add fields to an existing model, you must run ant build and restart the server in order for the changes to be reflected.