Consolidating Shipments (Load Building)
Consolidating shipments, or load building, allows you to add loads (shipments) to a movement to improve operational efficiency by building the equipment to full capacity. The option to consolidate shipments is available from the following Transportation menu options: Awaiting, Shipment Summary, Search Shipments, Search Movements, and Non-Controlled Shipments. The following procedure shows the Consolidate Shipments action option originating from the Search Movements menu option. These procedures are similar to those originating from the other menu options listed above.
Complete the following steps to consolidate shipments (load building):
L og in to the ONE system.
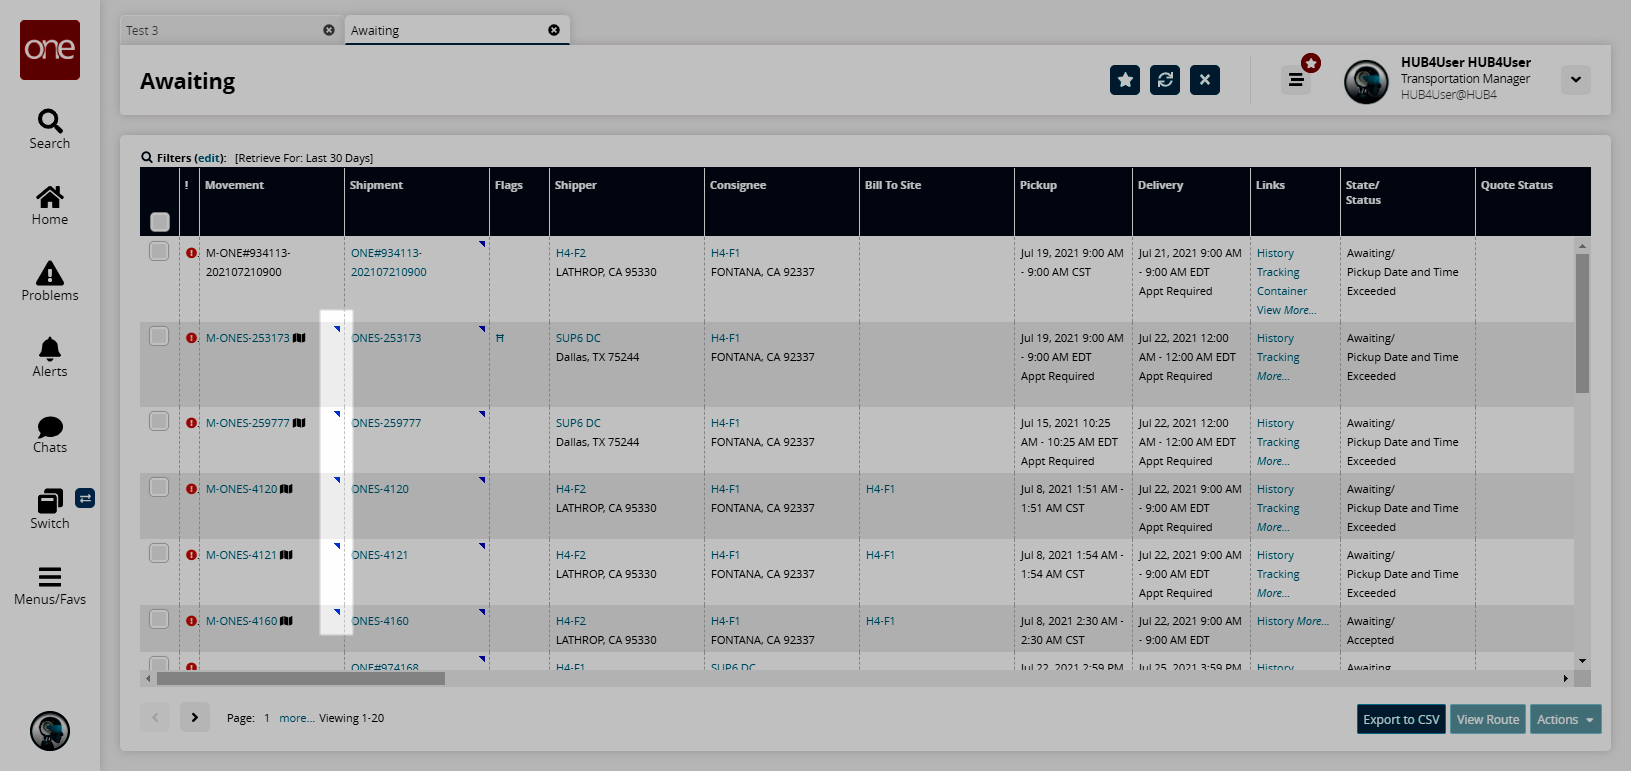
Select Menu/Favs > Transportation > Awaiting.
In the NEO UI, users can click on the Menu/Favs icon on the left sidebar and type in the name of the screen in the menu search bar. For more information, see "Using the Menu Search Bar."
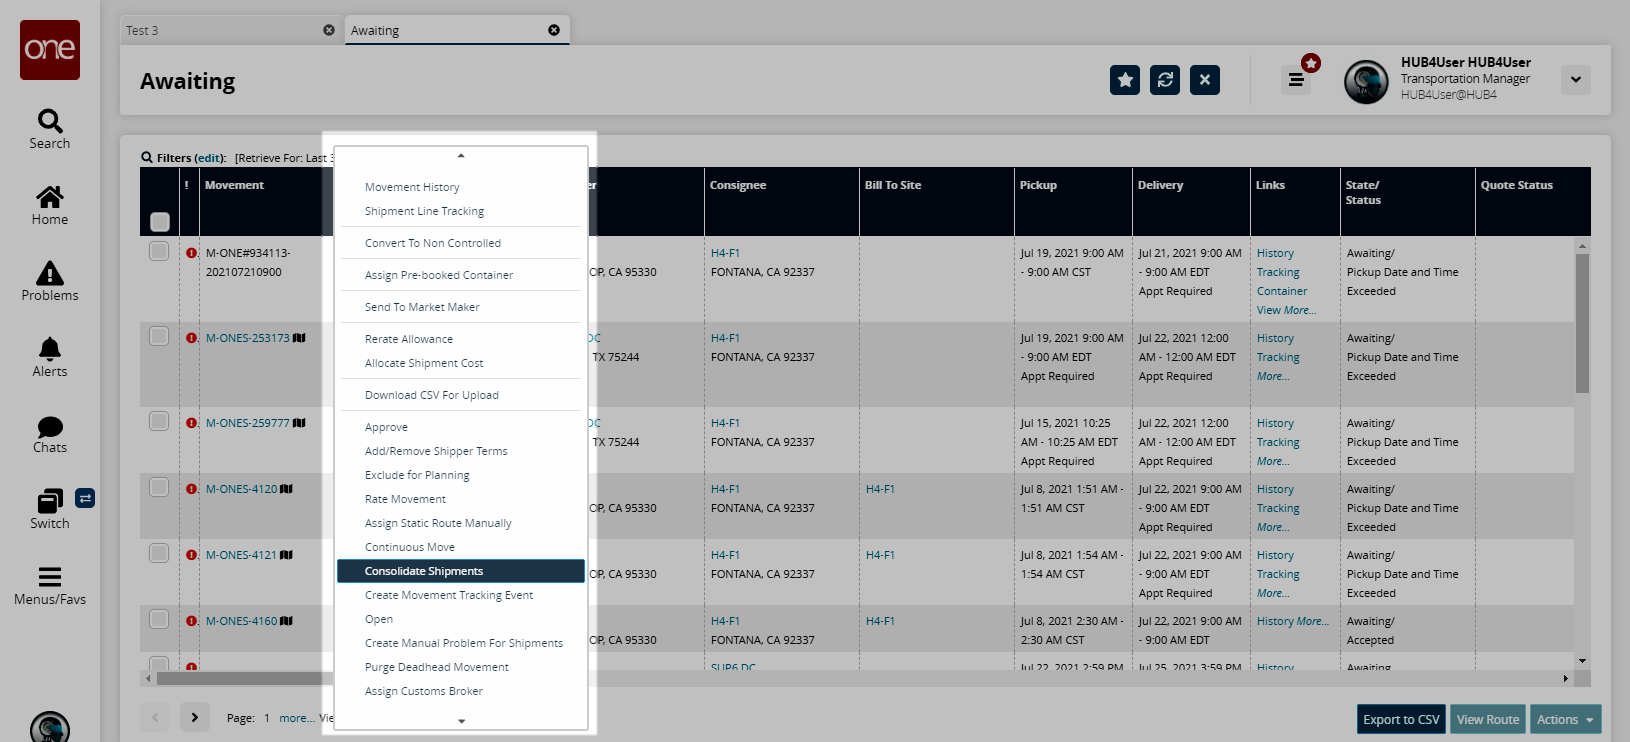
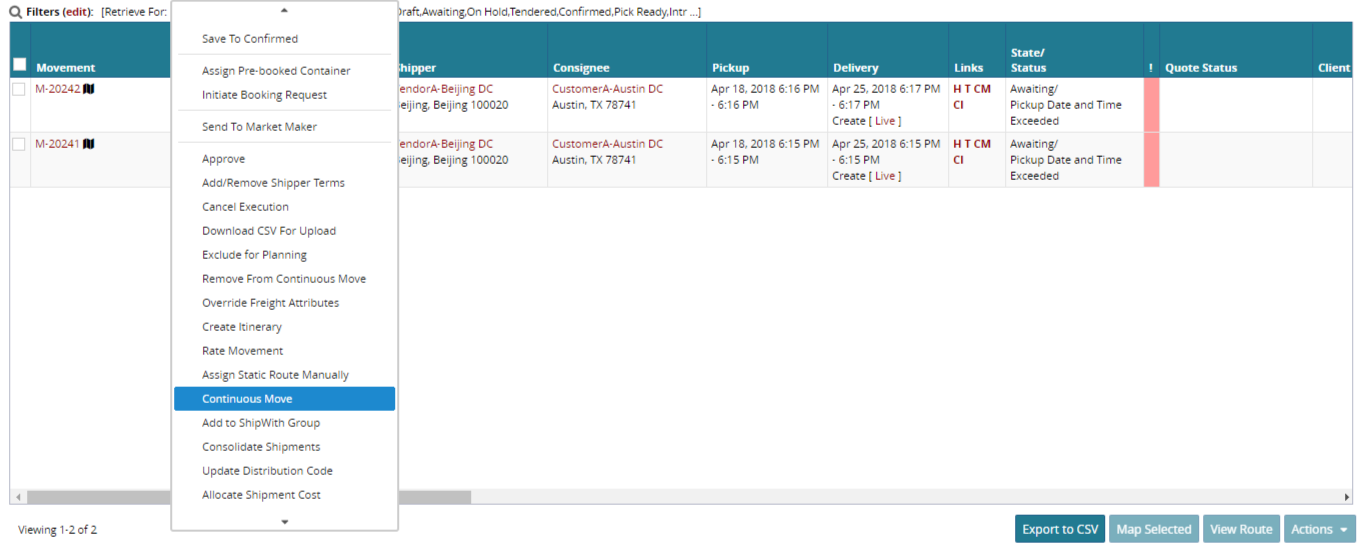
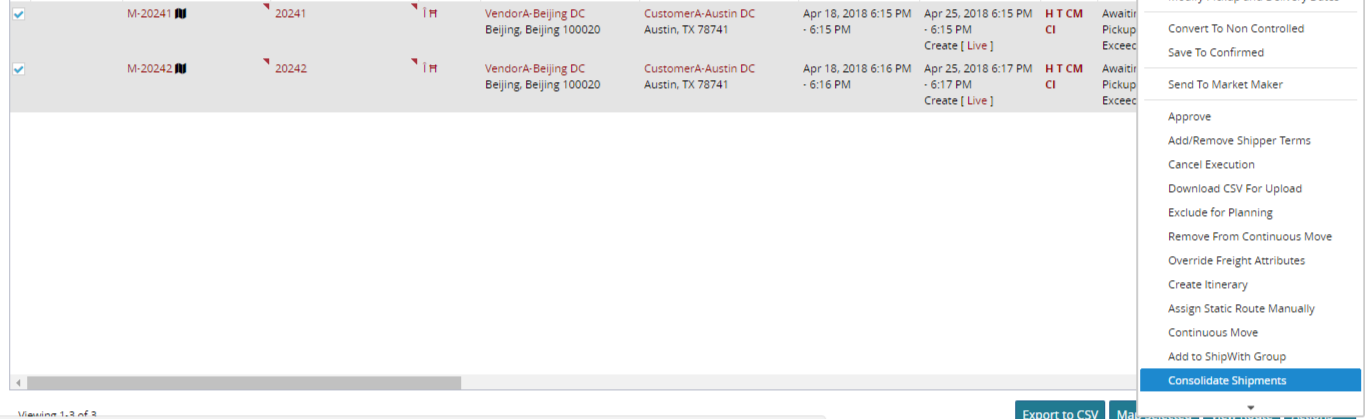
The Awaiting screen appears.Click the pop-up marker in the upper right-hand corner of a Movement cell, and then select Consolidate Shipments.
The Consolidate Shipments screen appears with the Header tab displayed.
Header Tab
The Header tab has summary details for total weight, overweight status, carrier, scale weight, state, stops, total volume, over-dimension status, total cost, size, movement type, and next stop ETA.
The summary tab has editable fields for equipment type, service level, instructions, distance, booking number, equipment number, PRO number, total spaces, travel direction, transportation, commodity code, and rating type.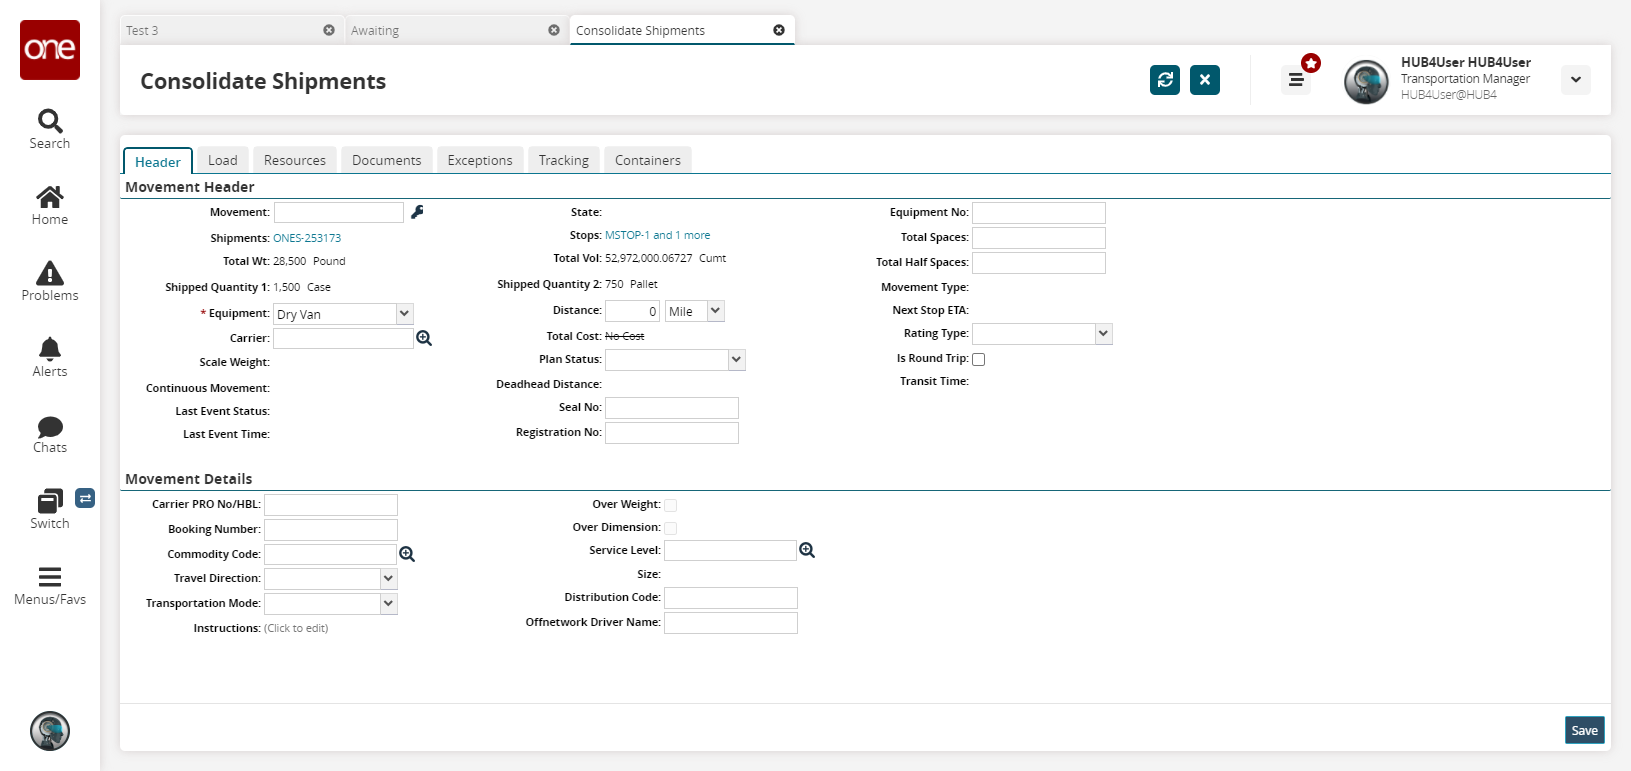
The following table describes the Movement Header section.
Field
Description
Movement
Select the key icon to generate a movement number.
Shipments
This field is populated by the system.
Total Wt
The field is populated by the system.
Shipped Quantity 1
The field is populated by the system.
* Equipment
Select an equipment type from the drop-down menu.
Carrier
Select a carrier using the picker tool.
Scale Weight
The field is populated by the system.
Continuous Movement
The field is populated by the system.
Last Event Status
The field is populated by the system.
Last Event Time
The field is populated by the system.
State
The field is populated by the system.
Stops
The field is populated by the system.
Total Vol
The field is populated by the system.
Shipped Quantity 2
The field is populated by the system.
Distance
Select a distance and a unit of measure.
Total Cost
The field is populated by the system.
Plan Status
Select a plan status from the drop-down menu.
Deadhead Distance
The field is populated by the system.
Seal No
Enter a seal number.
Registration No
Enter a registration number.
Equipment No
Enter an equipment number.
Total Spaces
Enter the total number of spaces.
Total Half Spaces
Enter the total number of half-spaces.
Movement Type
The field is populated by the system.
Next Stop ETA
The field is populated by the system.
Rating Type
Select a rating type from the drop-down menu. The available options are Continuous Move, Dedicated, and Direct.
Is Round Trip
Select the checkbox to indicate this shipment is a round trip.
Transit Time
The field is populated by the system.
Fill out the following fields. Fields with an asterisk ( * ) are required. The following table describes the Movement Details section.
Field
Description
Carrier PRO No/HBL
Enter a carrier PRO number.
Booking Number
Enter a booking number.
Commodity Code
Select a commodity code using the picker tool.
Travel Direction
Select a travel direction from the drop-down menu.
Transportation Mode
Select a transportation mode from the drop-down menu.
Instructions
Click the (Click to edit) text to enter instructions.
Over Weight
Users cannot edit this checkbox. The system will automatically select this checkbox if the shipment's weight exceeds the maximum limits set for the equipment.
Over Dimension
Users cannot edit this checkbox. The system will automatically select this checkbox if the shipment's dimension exceeds the maximum limits set for the equipment.
Service Level
Select a service level using the picker tool.
Size
The field is populated by the system.
Distribution Code
Enter a distribution code.
Offnetwork Driver Name
Enter an off-network driver name.
Click Save.
Load Builder Tab
Click the Load Builder tab.
The values for Weight , Volume , Quantity, and Space show the totals from the shipments listed in the Shipments tab. These values are automatically updated as shipments are added or removed.
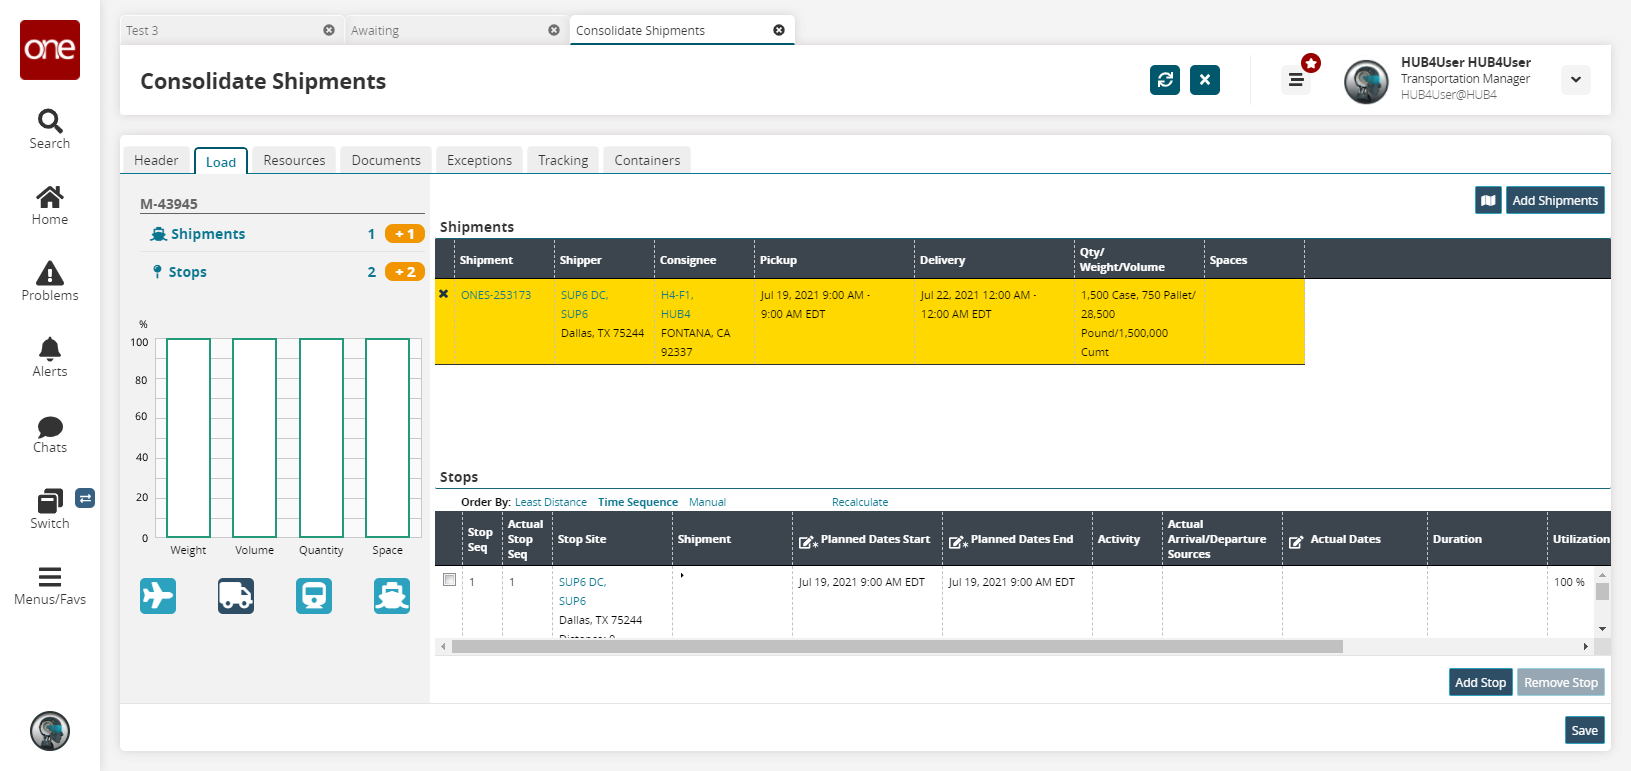
Click the Add Stop and Remove Stop buttons to add or remove a stop.
Click Save.
Resources Tab
Click the Resources tab.
As the loads are added or removed from the movement, the shipments appear in this tab.
The Stops tab lists stops from all the shipments selected to fill the truck. Stops can ordered by least distance, time sequence, or manually. If the manual option is selected, stops can be re-ordered using a drag and drop method.
Documents tab
Note
As required, you can attach a document to this movement. Document files may not exceed 10 MB.
In the Documents tab, click the Upload link.
In the Choose file to upload dialog box, select the file to be attached, and then click Open.
The file name appears in the list of pending attached files.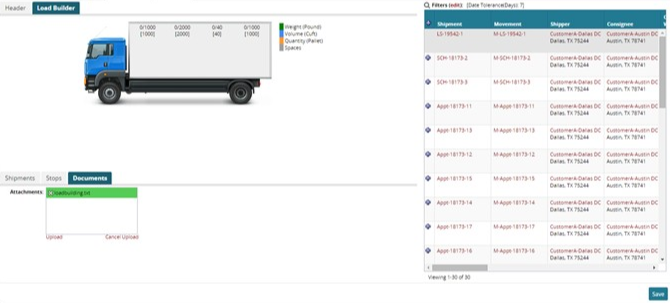
For each additional file to be attached, repeat the previous steps.
Tip
To delete a pending attached file, click the Delete button next to the file name. To cancel the uploading of all pending files, click the Cancel Upload button. The pending attach file names are removed from the list.
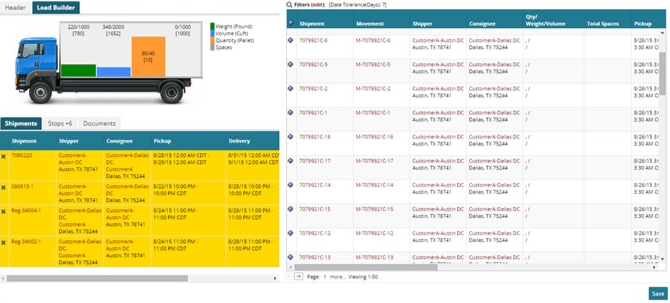
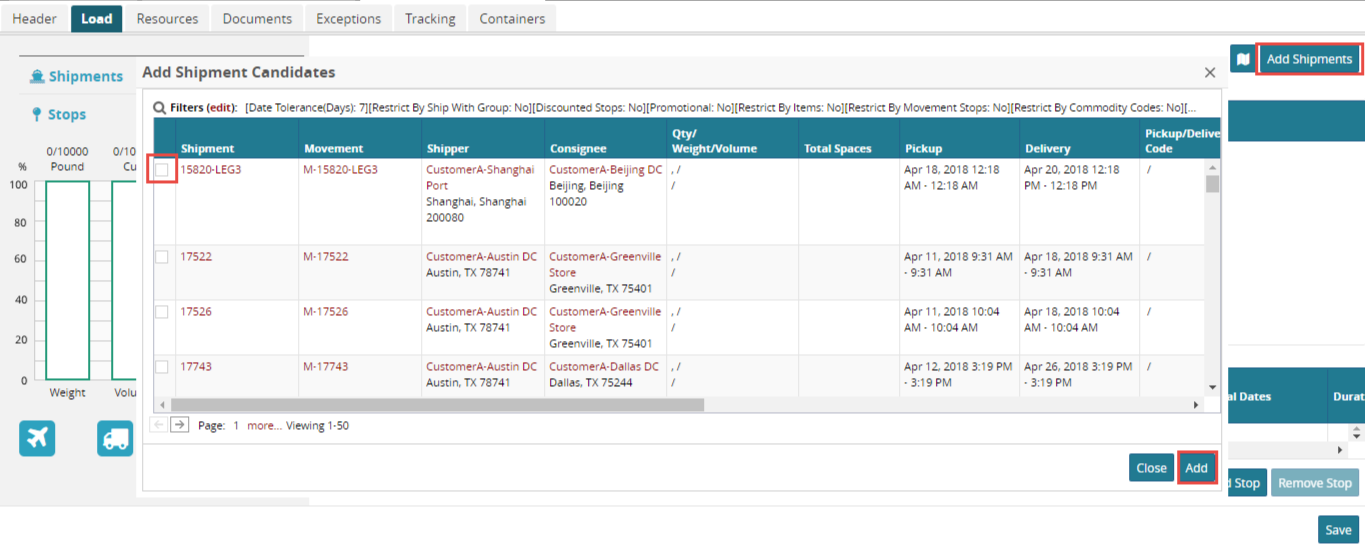
Shipment Candidates
The Shipment Candidates tab lists eligible shipments; which by default are in the Awaiting state, have a date tolerance of 7 days, and have compatible equipment, as well as shipment number, movement number, shipper, consignee, pickup and delivery dates, weight, volume, and quantity.
Select one or more shipments until the truck is full by clicking the Add sign or by dragging and dropping a shipment candidate to the Shipments tab.
In the following figure, after adding a shipment, the truck load is 990 pounds out of 1000 pounds capacity. If a shipment greater than 10 pounds is selected for this movement, the truck capacity will be violated, resulting in a message notification. If shipments with different equipment are selected, equipment compatibility rules will validate the selections.
Managing Stops
To view the stops for the selected shipments, click the Stops tab.
The following figure shows the default Order By option, Time Sequence .
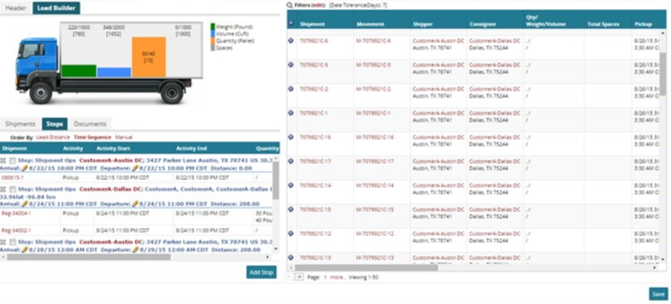
In Order By , click an option: Least Distance , Time Sequence (default), or Manual .
(Order By = Least Distance) Select Least Distance to view stops from closest to farthest.
(Order By = Manual) To edit the Arrival date and time, double-click the Edit button and select a new date and time.
(Order By = Manual) As required, edit the Departure date and time.
(Order By = Manual) To change the order of a stop, click a stop, then drag and drop it in the desired position.
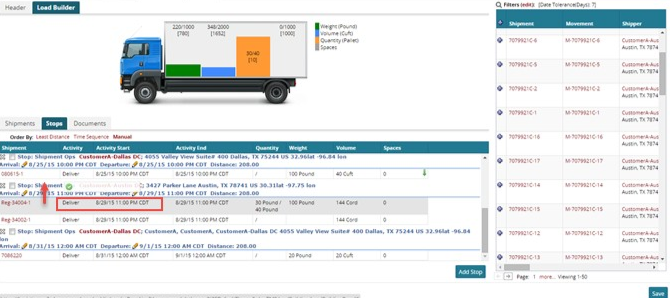
Note
The values for Total Cost and Distance are not updated until the movement is saved.
Saving Consolidated Movement
In the Header tab, select the defaulted movement number, or select a movement number from the selected shipments, or generate a new movement number by clicking the Generate button next to the Movement box.
Click Save .
A success message appears.
Applying Continuous Move
Using the search bar, search for the shipment that you want to consolidate.
Click on the Movement column context menu and select Continuous Move.
From the continuous move drop-down menu, select the move type.
Type
Description
Existing
If you wish to add an existing movement, select Existing and using a picker select the existing move from the database.
New
If you wish to select a new move for the movement, select New.
Click Submit.
Select the checkbox and click Action.
Navigate to Load tab to add more shipment.
Click Add Shipment and select the shipment that you wish to consolidate.
Select the checkbox to add the correct shipment.
Click Add.
Navigate to Container tab.
Select the Container Type using the checkbox.
Click Save.