Managing Your Organization
You can define policies about your organization, including time zone; billing address; default details for equipment, weight UOM, volume UOM, freight terms, and nearest location radius; appointment, commodity, and reason codes; additional charges; and transit time variances.
To set organization policies:
On the Administration menu, click Organization.
The Organization tab appears.
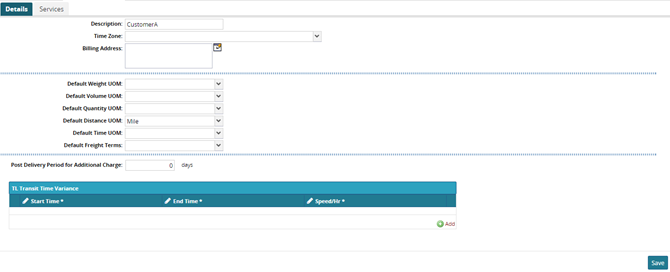
As required, you can edit the Description.
In the Time Zone list, select a time zone option.
In Billing Address, click the Edit button.
The Billing Address dialog box appears.In the data-entry boxes, type the address information for the address, and then click outside the box to close it.
In each of the following lists, select an option: Default Equipment, Default Weight UOM, Default Volume UOM, Default Freight Terms, and Nearest Location Radius.
If you want to show reverse partners, select the Show Reverse Partners check box.
If you want to require load time recalculation on shipment change, select the Require Load Time Recalculation On Shipment Change check box.
Note
You can configure whether Partners can create a shipment without giving enough information to derive commodity codes, appointment codes, and load types. This configuration is valid for pickup, delivery, or both. After configuration, Partners will be required to specify this information when creating a shipment.
In each of these selection lists (Force Commodity Code For Partners, Force Partner Profile For Partners, Force Load Type For Partners, Force Appointment Code, Require Reason Code for Date Change), and (Require Reason, Code for Appointment Date Change), select an option: Pickup, Delivery, or Pickup and Delivery.
Note
When an organization sets this policy, any Partner creating a shipment for this organization must enter a Partner Profile. Logistics does not require the organization itself to define the Partner Profile.
To skip system-provided candidates, select the Skip For System Provided Candidates Policy check box.
In the Post Delivery Period for Additional Charge box, type the number of days after a delivery that additional charges can be made.
To support cost plus at this organization, select the Support Cost Plus check box.
Note
This policy defines settings for transit time. You can configure different transit speeds for your private fleet vehicles throughout the day, so that these will be used in transportation planning.
To add a transit time variance,click the Add button.
A transit time row appears.

To select a time range, click inside the Start Time cell to display the Time button , and then select the time. Repeat this step for the End Time.
To select a speed, click inside the Speed/Hr cell to display the Speed box and the Distance UOM list, and type a speed value and select either the Mile or Kilometer option.
For additional transit time variances, repeat the previous steps.
After all details of your organization have been defined, click Save.
A success message appears.