Creating Contracts with Terms, Line Items, and Holds
Selecting a Template for a New Contract
Complete the following steps to create a new contract:
Log in to ONE system.
Click Menus/Favs > Contract Mgmt > New Contract . In the NEO UI, users can click on the Menus/Favs icon on the left sidebar and type in the name of the screen in the menu search bar. For more information, see "Using the Menu Search Bar."
The New Contract screen displays with the Contract Details tab selected as the default .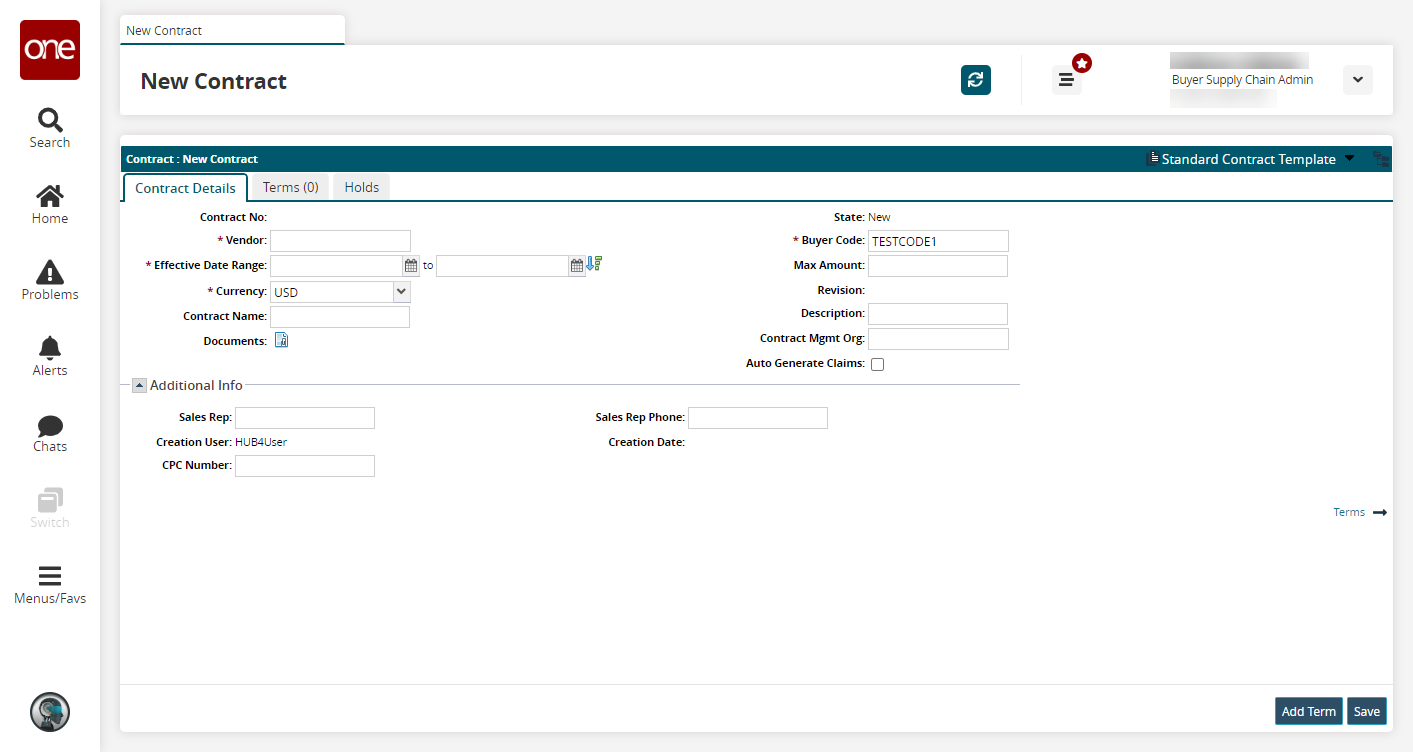
To select a standard or custom template for the contract, click the Manage Template arrow.
Click Switch Template.
The Select Template dialog box appears. The default is Standard Template.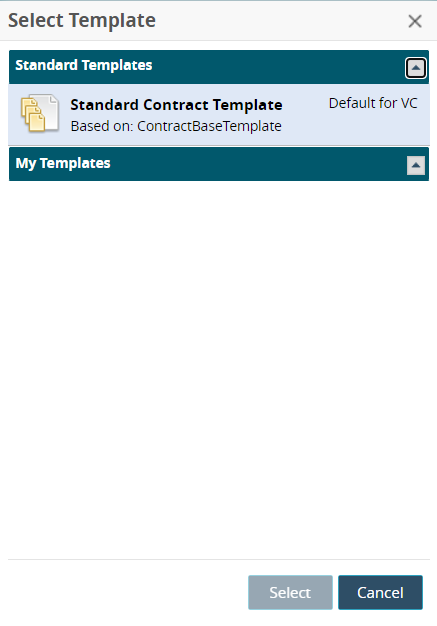
From either the Standard Templates or My Templates sections, click a template option.
Click Select.
The screen displays fields and tabs for the selected template.
Adding Contract Details
The following instructions are based on the default fields in the New Contract screen.
Fill out the following fields. Fields with an asterisk ( * ) are required.
Section
Field
Description
Contract Details
Contract No
This field will populate once the contract has been saved.
* Vendor
Type in the name of a vendor. A list of vendors displays as you type. For a vendor to appear as part of the auto-complete feature, that vendor must exist in the Vendor Master list.
* Effective Date Range
Use the calendar tool to select the beginning and end dates. Users can also select relative dates in a schedule.
* Currency
Select a country currency code from the dropdown list. This field is related to the Max Amount field.
Contract Name
Type in a name for this contract.
Documents
Click the icon to attach a document to this contract. This functionality is only available once the contract has been saved.
State
This field provides the state of the contract in the system.
* Buyer Code
Enter the buyer code.
Max Amount
Enter the number for the maximum amount allowed for this contract. This field relates to the currency selected.
Revision
This field displays the contract revision number.
Description
Enter a description for contract revision.
Contract Mgmt Org
Enter the managing organization for this contract.
Auto Generate Claims
Select the check box to enable automatically generating claims for contract violations.
Additional Info
Sales Rep
Enter the name of the sales representative.
Creation User
This field displays the username of the user who created the contract. It is auto-populated.
CPC Number
Enter the Customers Procedure Code (CPC) number.
Sales Rep Phone
Enter the phone number for the sales representative.
Creation Date
This field auto-populates the creation date of the contract once it has been saved.
Click the Save button.
A green success bar shows, and the screen updates to show new actionable buttons at the bottom of the screen.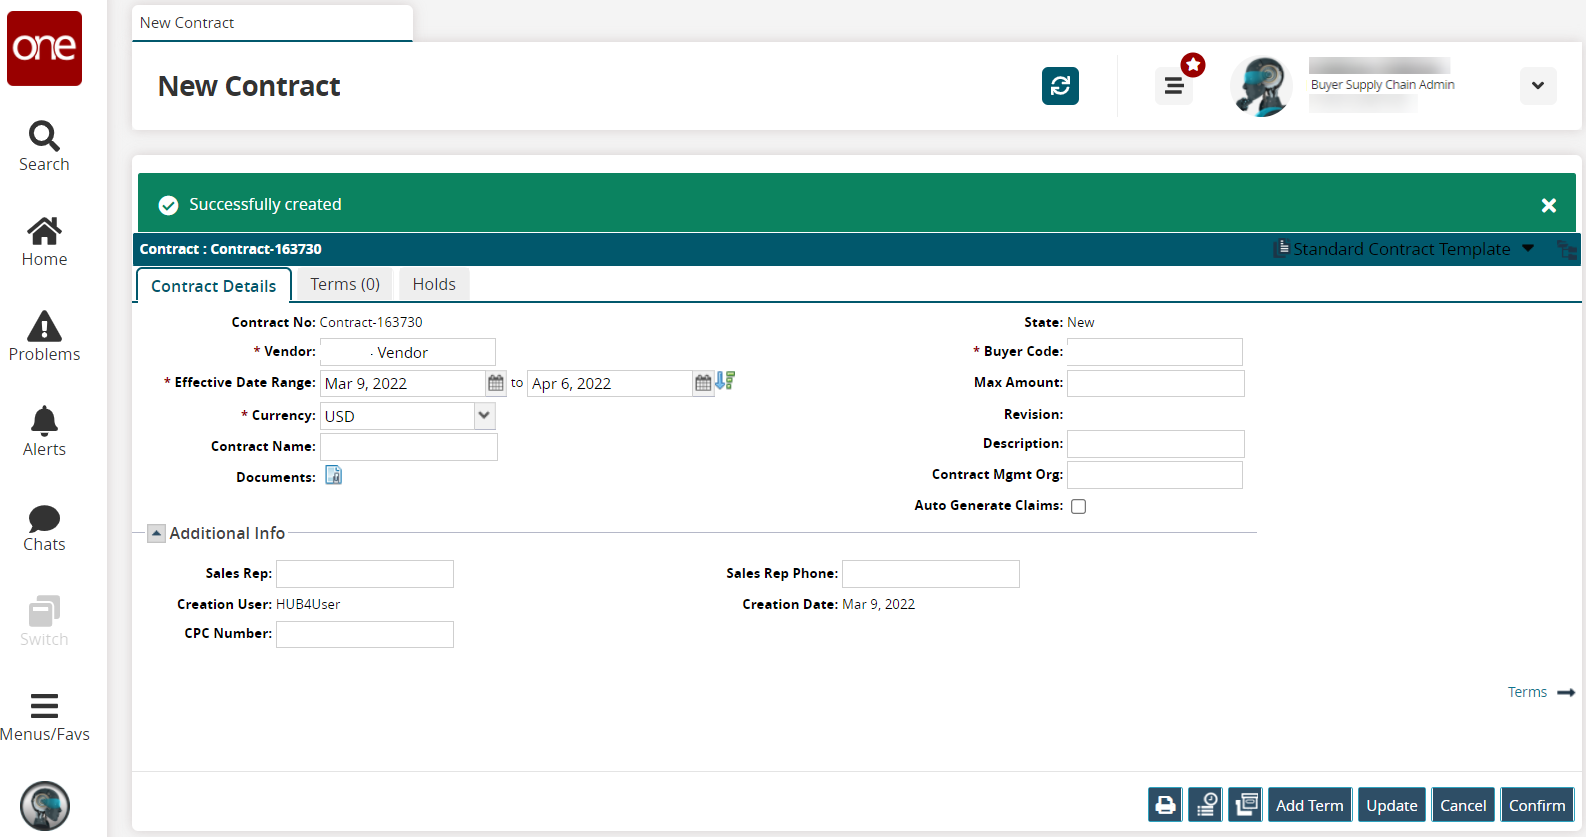
Click the Print button to print this contract.
Click the Audit button.
The contracts' audit trail, indicating any changes made to the contract, displays on a new tab where the information can be exported to a CSV file.Click the Clone Contract button to clone this contract.
A new tab opens with a cloned copy of this contract.Click the Add Term to add terms to this contract.
Instructions for this process are found below in the "Add Terms to a Contract" section of this page. You can add terms at a later date if necessary.Click the Update button if changes are made and need to be saved so the contract can be updated.
A green success bar displays.Click Cancel to cancel this contract.
Click the Yes button to cancel.
A green success bar displays, and the state of the contract updates to Canceled. A Reopen button displays so that the contract can be reopened.Click the Confirm button.
A green success bar displays, and contract is confirmed. New actionable buttons display.Click the Close Contract button to close this contract.
A Confirm popup box displays.Click the Yes button to close the contract.
The contract updates and is closed for any updates. A Reopen button displays so that the contract can be reopened.
Adding Terms to Contracts
You can add one or more contract terms to the contract and assign contract line items to the contract terms.
Complete the following steps to add terms to a contract:
Click the Add Term button on the New Contract screen. You can also click on the Terms tab and the Add Term link to open the same screen as below.
The Term Details tab displays.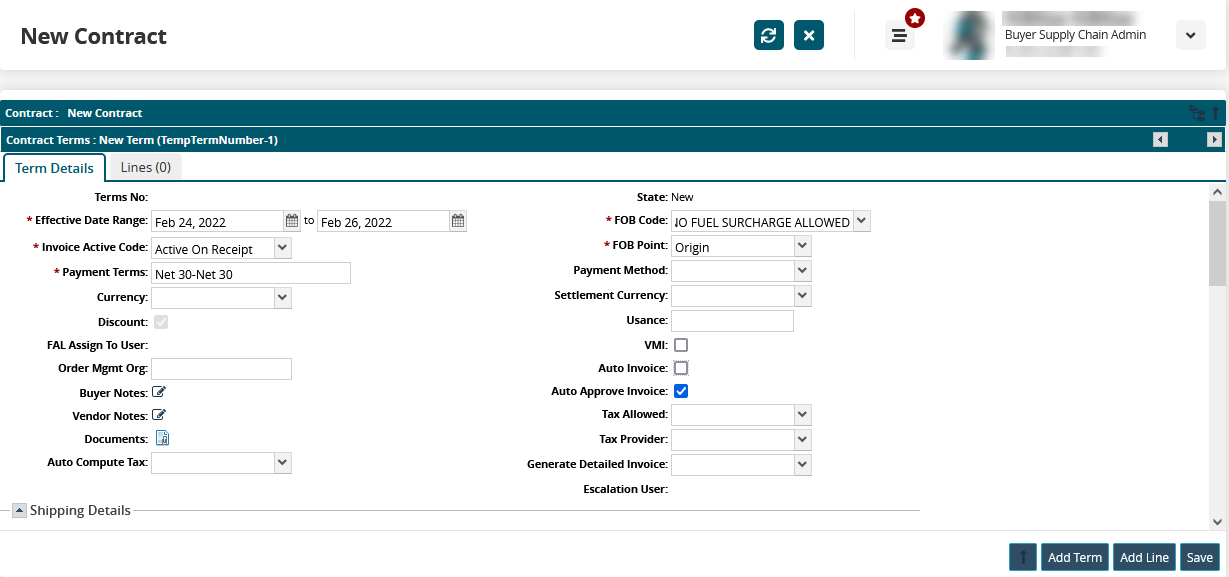
Enter values for fields described in the table below. Fields with an asterisk ( * ) are required.
Field
Description
Terms No
This field auto-populates with an assigned number for this set of terms once saved.
* Effective Date Range
The beginning and end dates auto-populate from the New Contract screen.
* Invoice Active Code
Select an invoice activation code from the dropdown list. The following options are available:
Active on Receipt: The invoice is considered active for validation only after material receipt at the receiving site. The vendor may submit the invoice before the order receipt. The payment due date and discount date will be based on the invoice date provided by the vendor.
Active on Ship: The invoice is considered active for validation immediately after Purchase Order (PO) ship confirmation.
Active on Shipment Confirm: This invoice is considered active for validation upon shipment confirmation.
Consignment: This setting turns on the consignment configuration for the item, Ship To defined in the Contract Terms. The invoice is based on consignment consumption reports for the current pay period and the payment schedule defined in the contract.
* Payment Terms
Enter in payment terms for the contract. The system supports a configurable list of Payment Terms (for example, 2% 10 Net 30) and uses payment terms for invoice generation and validation.
Currency
Select the country currency code from the dropdown list.
Discount
Check the box if a discount will be applied. This field is not available for all terms.
FAL Assign to User
This field auto-populates the Convention on Facilitation of International Maritime Traffic (FAL) user assigned to the contract.
Order Mgmt Org
Enter the name of the order management organization for the contract.
Buyer Notes
This field is where notes from the buyer organization will display.
Vendor Notes
This field is where notes from the vendor organization will display.
Documents
Click the icon to attach documents to the contract terms. This functionality is only active once the terms have been saved.
Auto Compute Tax
Select Yes or No to have these terms include automatically computed tax.
State
This field is auto-populated based on the state of the terms.
* FOB Code
Select a Free on Board (FOB) code from the dropdown list. The FOB indicates when and/or if the seller or buyer is liable for goods that are damaged or destroyed during shipping.
The system validates the invoice based on the FOB Code used to create the PO. Only FOB02 and FOB05 can have separate freight charges in the invoice from the vendor. Only FOB03 and FOB06 can have a separate invoice for freight charges from the carrier.
The following table summarizes FOB codes.
FOB Code
Description
Fuel Surcharge Allowed
Freight Charges in Invoices
FOB01
PREPAID
0
NA
FOB02
PAY & ADD
0
From Vendor
FOB03
COLLECT
0
From Carrier
FOB04
PREPAID
1
NA
FOB05
PAY & ADD
1
From Vendor
FOB06
COLLECT
1
From Carrier
* FOB Point
Select the location where the FOB is activated from the dropdown list.
Payment Method
Select the method for payment from the dropdown list.
Settlement Currency
Select the country code for the currency used for settlement.
Usance
Enter a number for the usance or the period of time (in days) between the bill date and payment due date.
VMI
Select chec k box for Vendor Managed Inventory (VMI) contracts.
Auto Invoice
Check the box to indicate that an invoice is automatically generated by the system on the Ship, Receipt, or Consumption state of the order. Users can create manual invoices for contracts with the Auto Invoice check box unchecked.
Auto Approve Invoice
Check the box to auto-approve the invoice. In this case, t he system automatically triggers the OK-to-pay signal after completing the invoice validation. When the checkbox is not checked, the system validates the invoice and then moves the invoice to the Valid state. The AP user manually approves the invoice to trigger the OK-to-pay signal.
Tax Allowed
Select Yes or No from the dropdown list to indicate that tax is allowed for this contract term.
Tax Provider
Select the tax provider from the dropdown list.
Generated Detailed Invoice
Select Yes or No from the dropdown list to generate a detailed invoice for the terms of the contract.
Escalation User
This field is auto-populated with the user name if an escalation approval process has been established.
Freight Forwarder Partner
This field is visible only if the FOB Code is FOB03 or FOB06. If freight forwarder is defined, then freight invoice can only come from freight forwarder.
The following sections can be expanded and collapsed by clicking on the arrows on the left of the section headers.
Shipping Details

Enter values for fields described in the table below. Fields with an asterisk ( * ) are required.
Field
Description
* Ship To Site
Select Site or Partner Site from the dropdown list and type the site or partner site name. list of available Ship From locations will display as you type.
Shipping Instructions
Enter any instructions for shipping.
Ship From Site
Select the type of site where the order is shipped from from the dropdown list in the first field. Enter the Ship From name in the second field. A list of available Ship From locations will display as you type.
Storage Site
Select Site or Partner Site from the dropdown list and type the site or partner site name. list of available Ship From locations will display as you type.
* Trans Mode
Enter the transportation mode.
Overshipping Tolerance, %
Enter the percentage amount for the tolerance on overshipping.
SAC Code Details

Click the Add SACCode link to add a Services Accounting Code (SAC) details.
A new row displays in the table.Enter values for fields described in the table below. Fields with an asterisk ( * ) are required.
Field
Description
*Code Type
Select the type of service accounting (Allowance or Charge) applied to the contract.
*Code
Select the type of code for the service accounting code. As you type, options entered in the system display.
D260 - Fuel Charge
D270 - Fuel Surcharge
E960 - One-Time-Only Charge
F190 - Palletizing
Flat - Tax (%)
H430 - Storage
Account No
Enter the account number.
*Maximum Amount(%)
Entered the maximum amount allotted to the service or charge mentioned on a given line.
Apply Discount
Select the checkbox to apply a discount.
Click the X to remove a SAC Code.
Penalty Code Details

Click the Add Penalty Code link to add a row for penalty details.
A new row displays in the table.Enter values for fields described in the table below. Fields with an asterisk ( * ) are required.
Field
Description
Code
Select the reason (code) for the penalty from the dropdown list.
*Penalty Method
Select the method of penalty method from the dropdown list. Penalty methods include the following means of how the penalty will be incurred:
Flat
Per Qty UOM
Per Cut Percentage
Per Day
Percentage of Base Price
*Min Cost
Type in the minimum cost for the penalty.
*Max Cost
Type in the maximum cost for the penalty.
*Rate Info
Type the rate amount in the first field. Select the country currency code from the dropdown list in the second field.
Quantity UOM
Select the quantity unit of measure from the dropdown list.
Code Applicable On
Select the level at which the penalty applied. Available options are: All and PO Limit
Click on the X to delete the penalty.
Invoice Tolerances
This feature specifies tolerance percentages in the invoice quantity and price. The invoice tolerance details are hidden from the vendor.
Enter a monetary value in the Line Amount Tolerance field.
Enter an allowed percentage in the Unit Price Tolerance % field.
Enter an allowed percentage in the Line Quality Tolerance % field.
Consignment Details

Enter values for fields described in the table below. Fields with an asterisk ( * ) are required.
Field
Description
Country of Consignment
Select the country code where the consignment occurs from the dropdown list.
Consign Payment Recurrence Type
Select the recurrence frequency for the payment consignment.
If a contract is set with Payment Terms as Consignment, the vendor is paid based upon the consumption of goods by the buyer. The consignment payment schedule can be configured as Weekly or Monthly with specific pay dates. Ex: every Monday for weekly payments or the first day of month for monthly payments.
The system tracks consumption transactions within the payment period and generates inventory consumption reports per pay period. Consignment consumption reports are available to both Buyer Planner and Vendor CSR users. The invoice is generated and validated using consumption transactions for the payment period.
Add Consignment Recurrence Type
Select the recurrence frequency for and additional consignment recurrence.
The consignment additional payment schedule can be configured as Weekly or Monthly with specific pay dates. Ex: Every Monday for weekly payments or the first day of month for monthly payments. In addition, if the vendor needs a consignment payment at the end of the month for the remainder of the month since the last weekly payment, then the vendor can set up an additional payment schedule.
The vendor notification schedule can be configured as Weekly or Monthly with specific pay dates. Ex: Every Monday for weekly payments or the first day of month for monthly payments. The system tracks consumption transactions within the notification period and sends inventory notification reports to the vendor via email.
Consignment Maturity Days
Enter the days for the maturity for consigned inventory. Beyond this period, the inventory is moved from consignment to buyer-owned and is considered consumed by the buyer to generate the invoice transaction. When the maturity date is reached, the buyer’s system sends the inventory consumption transaction through integration.
The system sends a report to the buyer and buyer planner showing the list of POs where the consignment inventory is not consumed within the threshold maturity days.
Consignment Payment Day
Enter the day of the week or day of the month when the consignment payment is due.
Add Consignment Pay Day
Enter the day of the week or day of the month when the additional consignment payment is due.
Discount Details

Enter values for fields described in the table below. Fields with an asterisk ( * ) are required.
Field
Description
Allow On Product
Check the box if a discount is allowed on a particular product.
Allow On Tax
Check the box if a discount is allowed on the tax incurred for the contract terms.
Allow On Service
Check the box if a discount is allowed on the services provided.
Allow On Freight
Check the box if a discount is allowed on freight charges.
Allow On Fuel Surcharge
Check the box if a discount is allowed on fuel surcharges.
Addresses
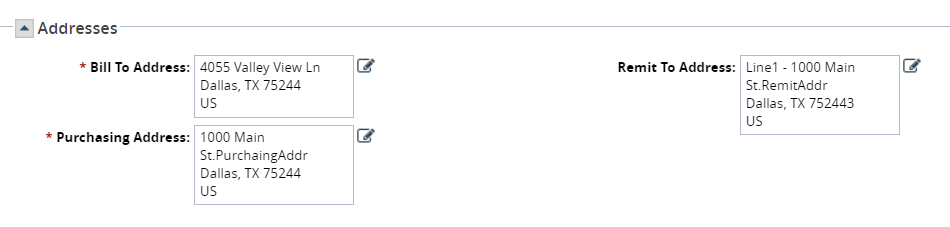
The * Bill To Address, * Purchasing Address, and Remit To Address fields are auto-populated; however you can click on the edit icon to edit or change the address.
Add a Line Item to a Contract
You can add a single or multiple line items to contracts.
Complete the following steps to add line items to a contract:
Click the Add Line button.
A new contract line screen displays.
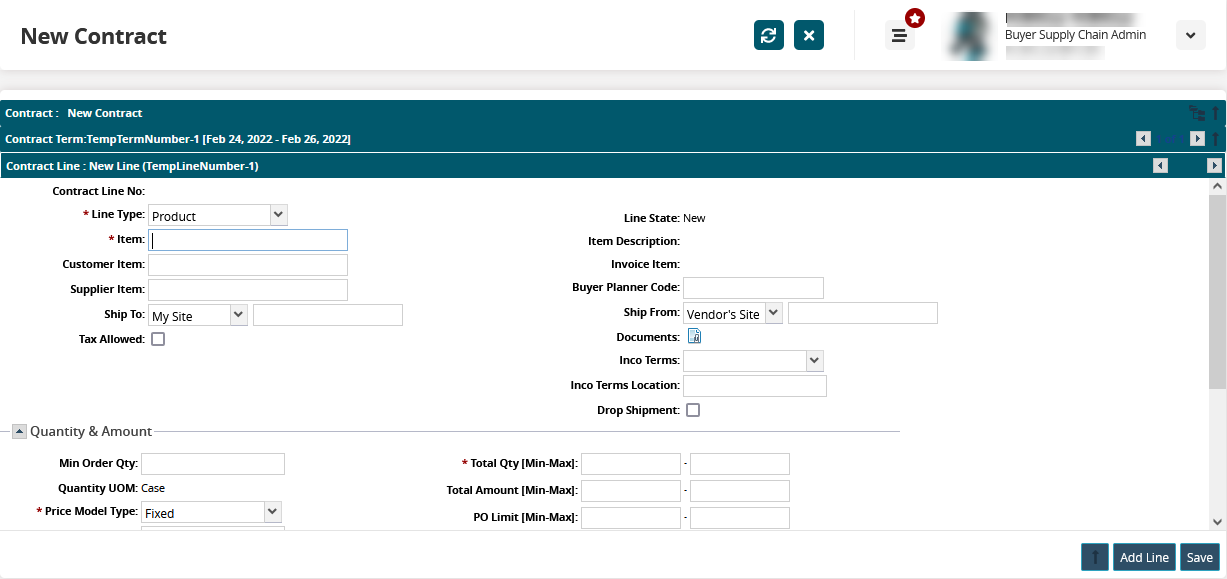
Enter values for fields described in the table below. Fields with an asterisk ( * ) are required.
Field
Description
Contract Line No
This field auto-populates with a system-generated number once the line item is saved to the contract.
* Line Type
Select the line type for the terms from the dropdown list.
* Item
Enter the item name associated with the contracts terms.
Customer Item
Enter the customer item name associated with the line item.
Supplier Item
Enter the supplier item associated with the line item.
Ship To
Select the type of location to ship to from the dropdown list in the first field. Select the specific location in the second field.
Tax Allowed
Check the box to allow tax for this line item.
Line State
This field auto-populates with the line state.
Item Description
This field auto-populates with the item's description when an item is entered.
Invoice Item
This field auto-populates the invoice item associated with the line item.
Buyer Planner Code
Enter the code for the buyer planner.
Ship From
Select the type of location to ship from from the dropdown list in the first field. Select the specific location in the second field.
Documents
Click the icon to attached documents to this line item. You can add documents only after saving the contract.
Inco Terms
Select the Inco Terms (International Commercial Terms: internationally recognized terms of sale) from the dropdown list.
Inco Terms Location
Enter the Inco Terms location.
Drop Shipment
Select this field to enable drop shipping. When this field is enabled, the item, buffer, ACL, or contract line is marked for drop shipping, meaning the item is delivered directly to a customer instead of going to a warehouse first. When this field is disabled, the item, buffer, ACL, or contract line is marked for traditional shipping (to a warehouse first). The field is disabled by default.
Note
The system sends a notification to the CPG Buyer Planner whenever a new contract is created or approved. The system also creates a new AVL record for each new contract line item.
The following sections can be expanded and collapsed by clicking on the arrows on the left of the section headers.
Quantity & Amount
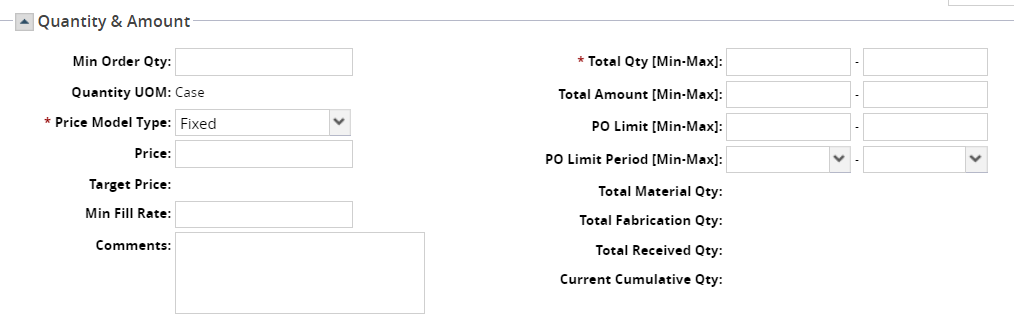
Enter values for fields described in the table below. Fields with an asterisk ( * ) are required.
Field
Description
Min Order Qty
Enter the minimum quantity for orders.
Quantity UOM
This field auto-populates with the unit of measure as it was defined for the item in the system.
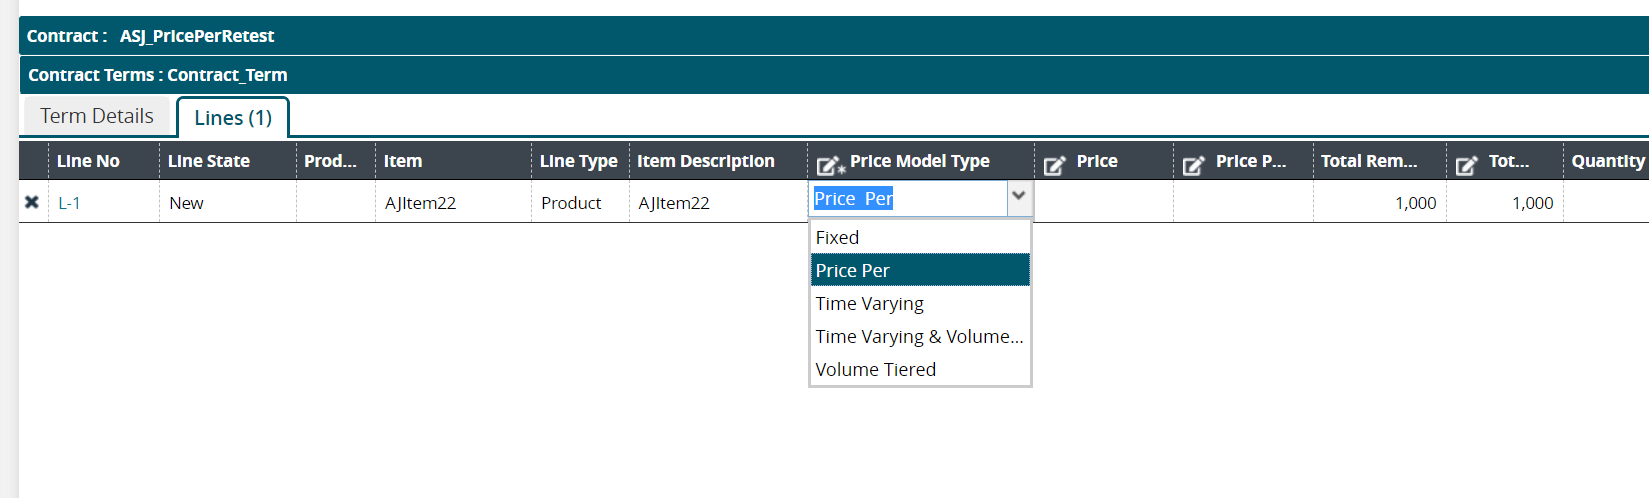
* Price Model Type
Select the type of pricing model used for this line item from the dropdown list.
Fixed: the pricing stays fixed according the terms set in the contract
Time Varying: the pricing is only applicable during a set time. If you select this option and click on the Price field, the following popup window displays to set the conditions for this line term. Fields with an asterisk (*) are required.
a. Click on the Add period button to add a row to the table.
b. Click in the fields to enter data. (The *Start Date and *End Date fields use the calendar tool to select dates. Inco Terms and FOB codes are described in sections above.)
c. Click the OK button.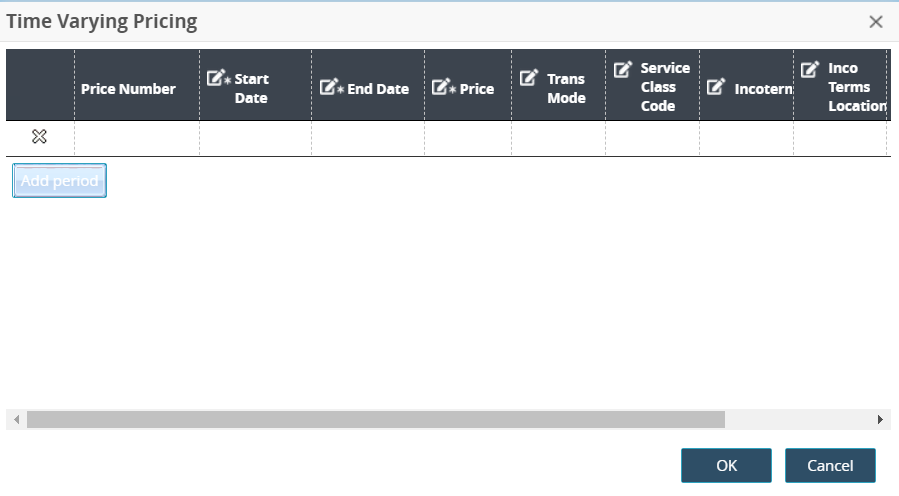
Time-Varying & Volume Tiered: the pricing is set with effective beginning and end dates and tiered volume amounts. If you select this option and click on the Price field, the following popup window displays to set the conditions for this line term. Fields with an asterisk (*) are required, and fields will vary based on the selections.
a. Select a * Price Type from the dropdown list.
b. Select the * Period time frame from the dropdown list.
c. Click the Add period button to add a row to the table and enter data. (The *Start Date and *End Date fields use the calendar tool to select dates. Inco Terms and FOB codes are described in sections above.)
d. Click the Add range button to add a row to the table and enter data.
e. Click the OK button.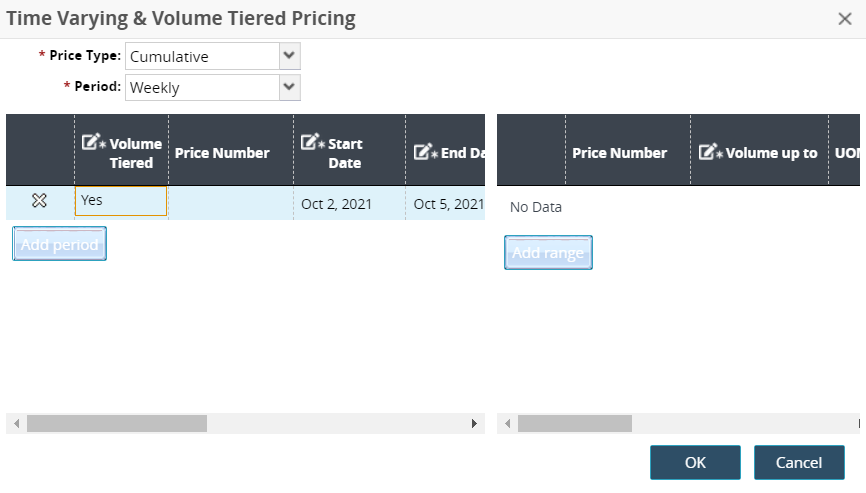
Volume Tiered: the pricing is set according to volume quantity. Normally, discounts are available for larger quantities ordered. If you select this option and click on the Price field, the following popup window displays to set the conditions for this line term. Fields with an asterisk (*) are required, and fields will vary based on the selections.
a. Select a * Price Type from the dropdown list.
b. Click the Add Range button to add a row to the table.
c. Enter data in the fields. (Inco Terms and FOB codes are described in the sections above.)
d. Click the OK button.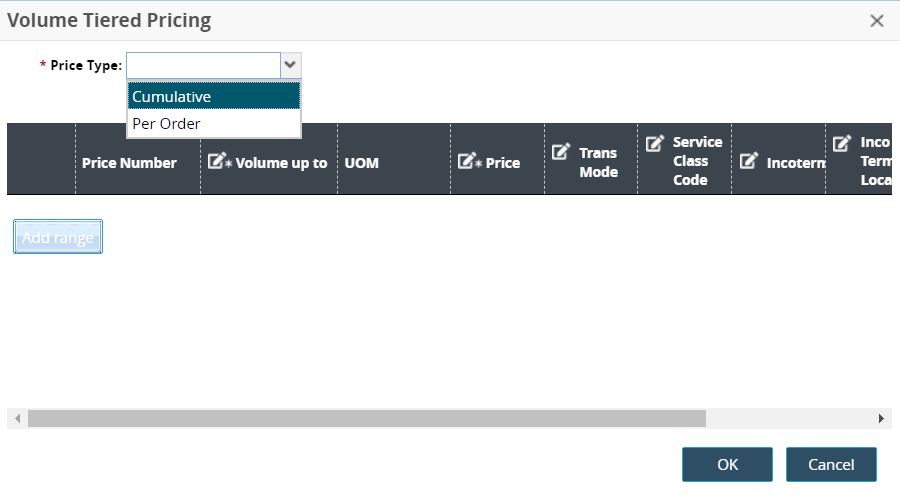
Price Per: the pricing is set according to the price unit of measurement (UOM).
Price
Enter a numerical value for the price.
Price Per
Enter the price unit of measurement (UOM) if Price Per is selected as the Price Model Type.
Target Price
This field auto-populates a target price for the item.
Min Fill Rate
Enter a value for the minimum fill rate.
Comments
Enter comments for the line item.
* Total Qty [Min-Max]
Enter numerical values for the minimum and maximum total quantity.
Total Amount [Min-Max]
Enter numerical values for the minimum and maximum total amount.
PO Limit [Min-Max]
Enter numerical values for the minimum and maximum purchase order limit.
PO Limit Period [Min-Max]
Select validity for the minimum and maximum values for purchase order limits.
Total Material Qty
This field auto-populates with the total quantity of materials.
Total Fabrication Qty
This field auto-populates with the total quantity of items fabricated.
Total Received Qty
This field auto-populates with the total quantity of items received.
Current Cumulative Qty
This field auto-populates with the cumulative quantity at the current date and time.
Lead Time (In Days)

Enter the number of days for the Order Lead Time field to give the contract a lead time for orders.
Enter the number of days for the Target Order Lead Time field to give the contract a target lead time for orders.
Enter the number of days for the Order Ship Confirm Lead Time field to give the contract a lead time for the order's shipment confirmation.
Enter the number of days for the Vendor Commit Lead Time field to give the contract a lead time for the vendor's commitment.
Click the Up arrow to go back to the contract term.
Click Add Line to add another contract line.
Click Save to save the contract.
Adding Holds to the Contract
Complete the following steps to add holds to a contract:
Click the Holds tab on the screen (after the contract has been saved).
Click the Add Hold button to add hold.
The Create Hold popup window opens.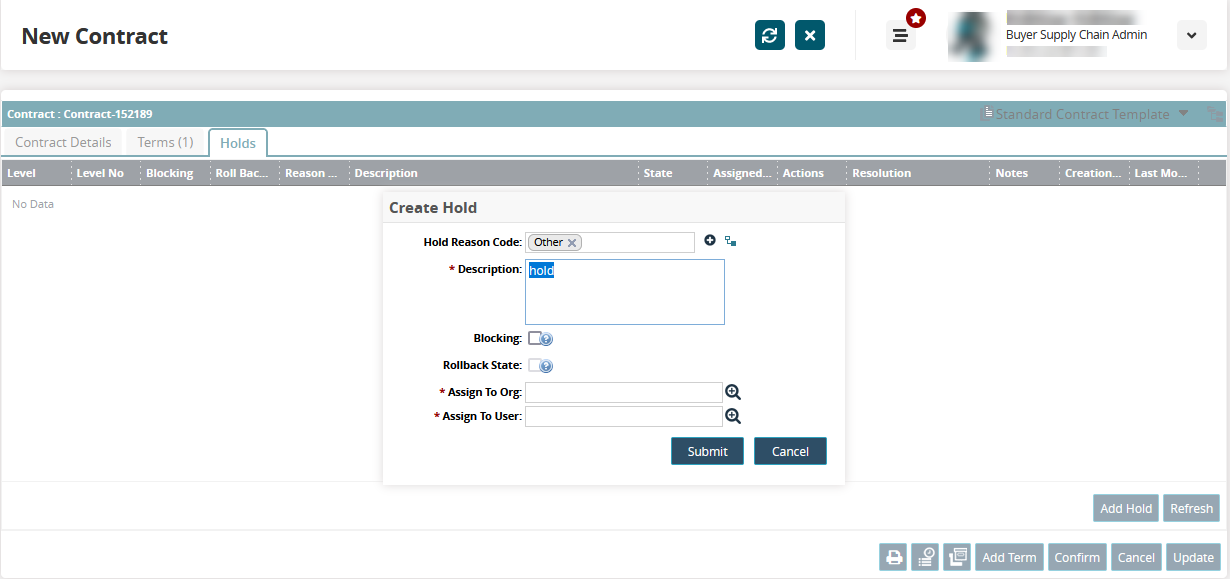
Enter values for fields described in the table below. Fields with an asterisk ( * ) are required.
Field
Description
Hold Reason Code
Enter a reason code for the hold. The default value is Other.
* Description
Enter a description for the hold.
Blocking
Check the box to make this a blocking hold that stops the transaction from moving to different states. Leaving the box unchecked creates a warning hold that allows the transaction to move to different states.
Rollback State
Check the box to allow value updates, but keep the blocking hold in place.
* Assign To Org
Use the picker tool to select the organization the hold is assigned to.
* Assign To User
Use the picker tool to select the organization the hold is assigned to.
Click Submit.
The newly added hold details appear in the table.