Partner Services
Copyright © 2024 One Network Enterprises - A Blue Yonder Company
All rights reserved. Printed in the United States of America, 2024. No part of this document may be reproduced, stored in a retrieval system, or transmitted in any form or by any means, electronic, mechanical, photocopying, recording, or otherwise, without prior written permission of One Network Enterprises, Inc.
Partner Services include Carrier and Supplier services.
Carrier Services
Copyright © 2024 One Network Enterprises - A Blue Yonder Company
All rights reserved. Printed in the United States of America, 2024. No part of this document may be reproduced, stored in a retrieval system, or transmitted in any form or by any means, electronic, mechanical, photocopying, recording, or otherwise, without prior written permission of One Network Enterprises, Inc.
Published November 7, 2024
Carrier Services Overview
The Carrier Services product offers tools that significantly reduce the time spent on manual scheduling, decision-making, and collaboration with shippers.
Carrier Services involve integrating and managing various transportation service providers to facilitate the movement of goods. This includes managing carrier relationships, ensuring compliance with regulations, and optimizing logistics operations.
ONE's suite of carrier services includes the Global Logistics Gateway (GLG) Mobile App. The app provides carriers with standardized processes for services, rating, and tracking. It allows carriers to collaborate with multiple shippers via a mobile app. GLG integrates with tracking data from multiple sources, including EDI, vehicle telematics, and other sources for ocean, air, and rail.
The services shown in this document are indicative of all the functionality and features available in the system. What features are available to you depends on the Services purchased by your Shipper Partner. Some of these features may require you to purchase additional services.
Carrier Integration Services
Integration is an optional service offered by One Network. The Transportation Service Provider can use the Integration Services to perform certain actions and transactions in the Partner Network. The Carrier Service includes several integrations supported at the carrier level.
The Shipper defines the specific transactions/messages to be used by Carriers and supported via integration. Some standard EDI messages supported by One Network include:
Motor Transportation Load Tender
Response to a Load Tender
Transportation Shipment Status Message
Motor Transportation Freight Details
Invoice
Some standard API messages supported by One Network include:
Tender Exchange: The Shipper will send a Booking / Shipment Details (Tender) message to the Transportation Service Provider, and the Transportation Service Provider will respond to the Tender. A Shipper may send a Tender Cancellation or Tender Update message as needed.
Activate Movement for Tracking: The Shipper will send a request to the Transportation Service Provider to activate tracking for a Movement.
Shipment Tracking: The Transportation Service Provider will send shipment status updates or location updates for all transportation modes at the Movement or Shipment level. High-frequency location updates from IoT devices are also supported.
Proof of Delivery (POD): The Transportation Service Provider will provide proof of delivery.
Vehicle Assignment: The Transportation Service Provider will allocate a vehicle to a Movement in One Network to support ELD tracking operations.
Some standard CSV messages supported by One Network include:·
Shipment Tracking: The Transportation Service Provider will send shipment status updates or location updates for all transportation modes at the Movement or Shipment level.
Invoicing: The Transportation Service Provider will send an invoice for a transportation order.
Vehicle Assignment: The Transportation Service Provider will allocate a vehicle to a Movement in One Network to support ELD tracking operations.
Logging in and Passwords
Changing a User's Authentication Method
The Change Authentication Method button is added to the user details screen for users in the Enterprise Admin role.
Complete the following steps to change your authentication method:
Log in as an Enterprise Admin.
Click Menus/Favs > Administration > Users or Menus/Favs > Administration > User > Search User
Note
For more information, see the "Searching Users" section in the current version of the NEO Online Help.
Click the username link under the User Name column.
The username details screen displays.
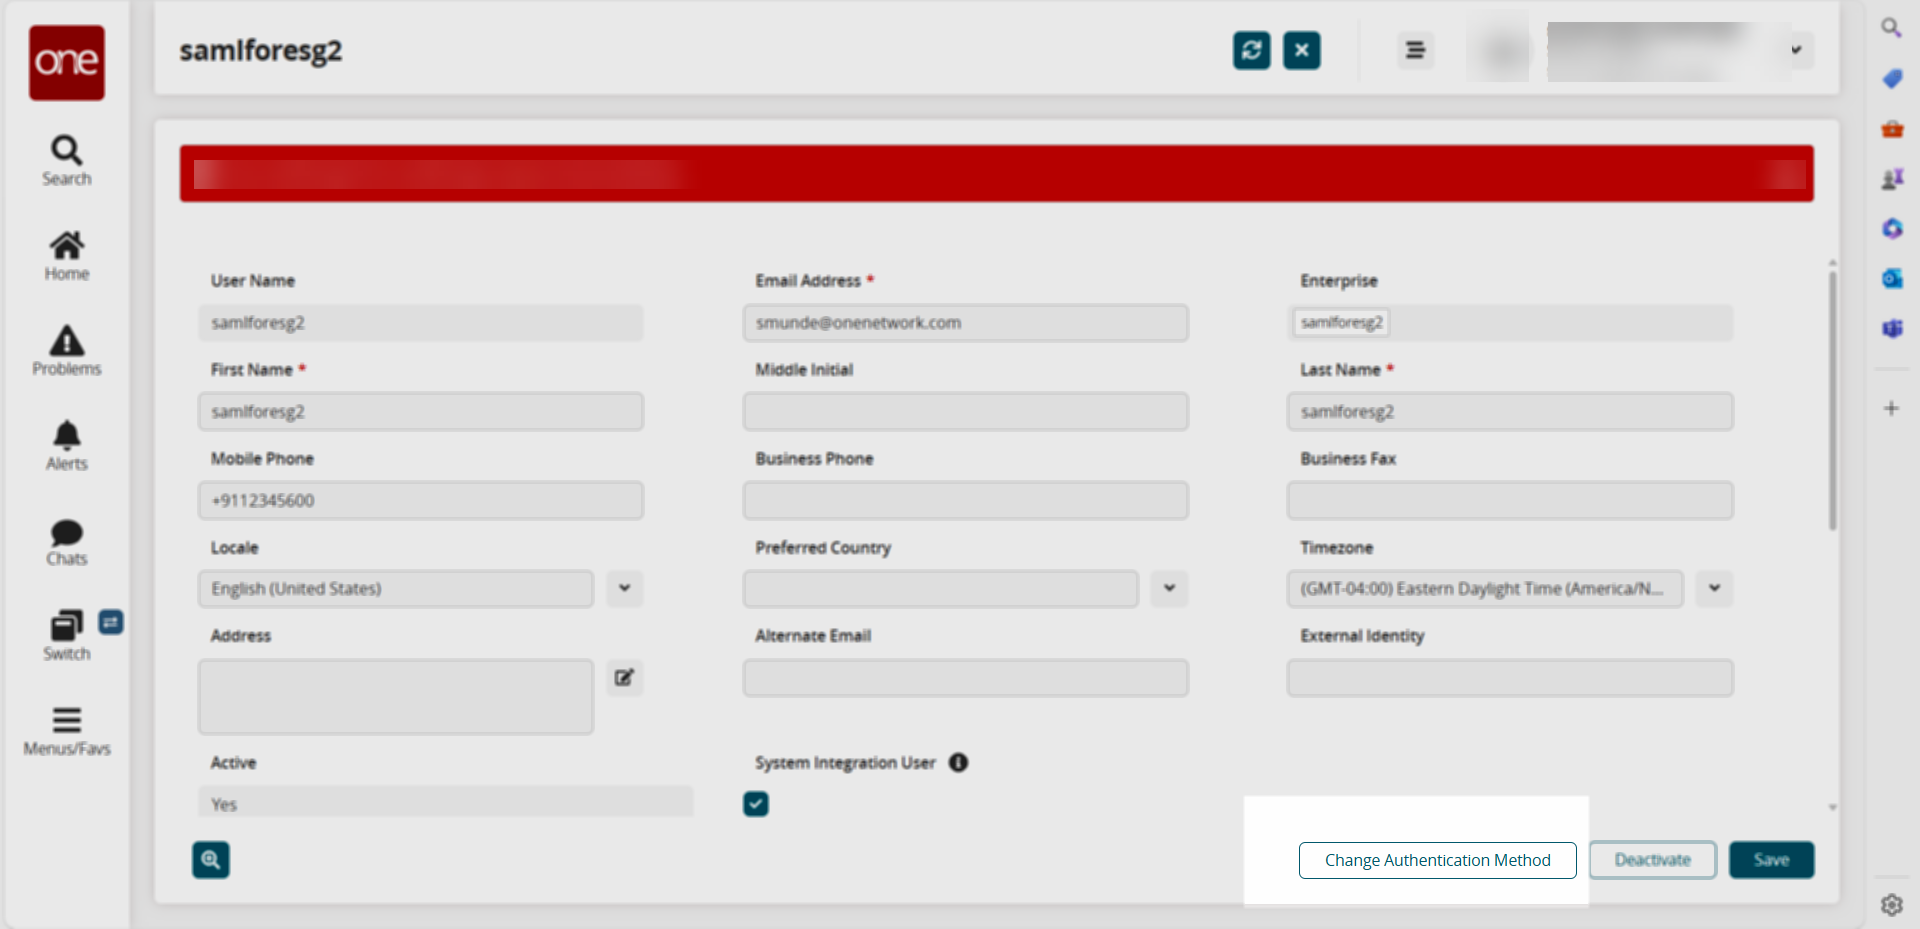
Click the Change Authentication Method button.
The Change Authentication Method window displays.
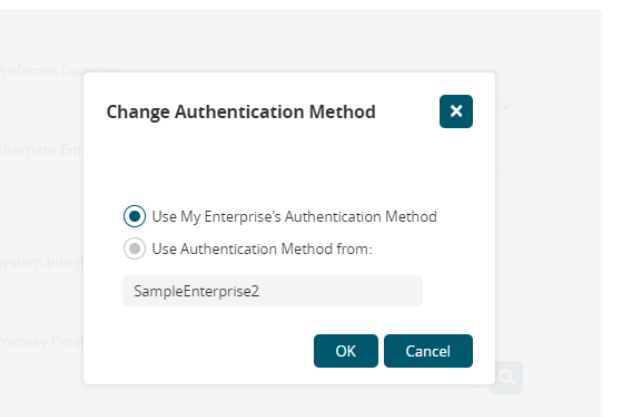
Select Use My Enterprise's Authentication Method or Use Authentication Method from.
For the Use Authentication Method from option, enter the enterprise name in the text field below.
Click OK.
A database transaction occurs, and the authentication method changes for the desired user.
Changing Your Password
Follow this process to change your password. See the "Resetting a Forgotten Password" section of this guide if you have forgotten your password.
Complete the following steps to change your password from the User Profile slide-out:
Click the User Profile button in the top right of the NEO UI dashboard.
The User Profile menu displays.
Click the Change Password link.
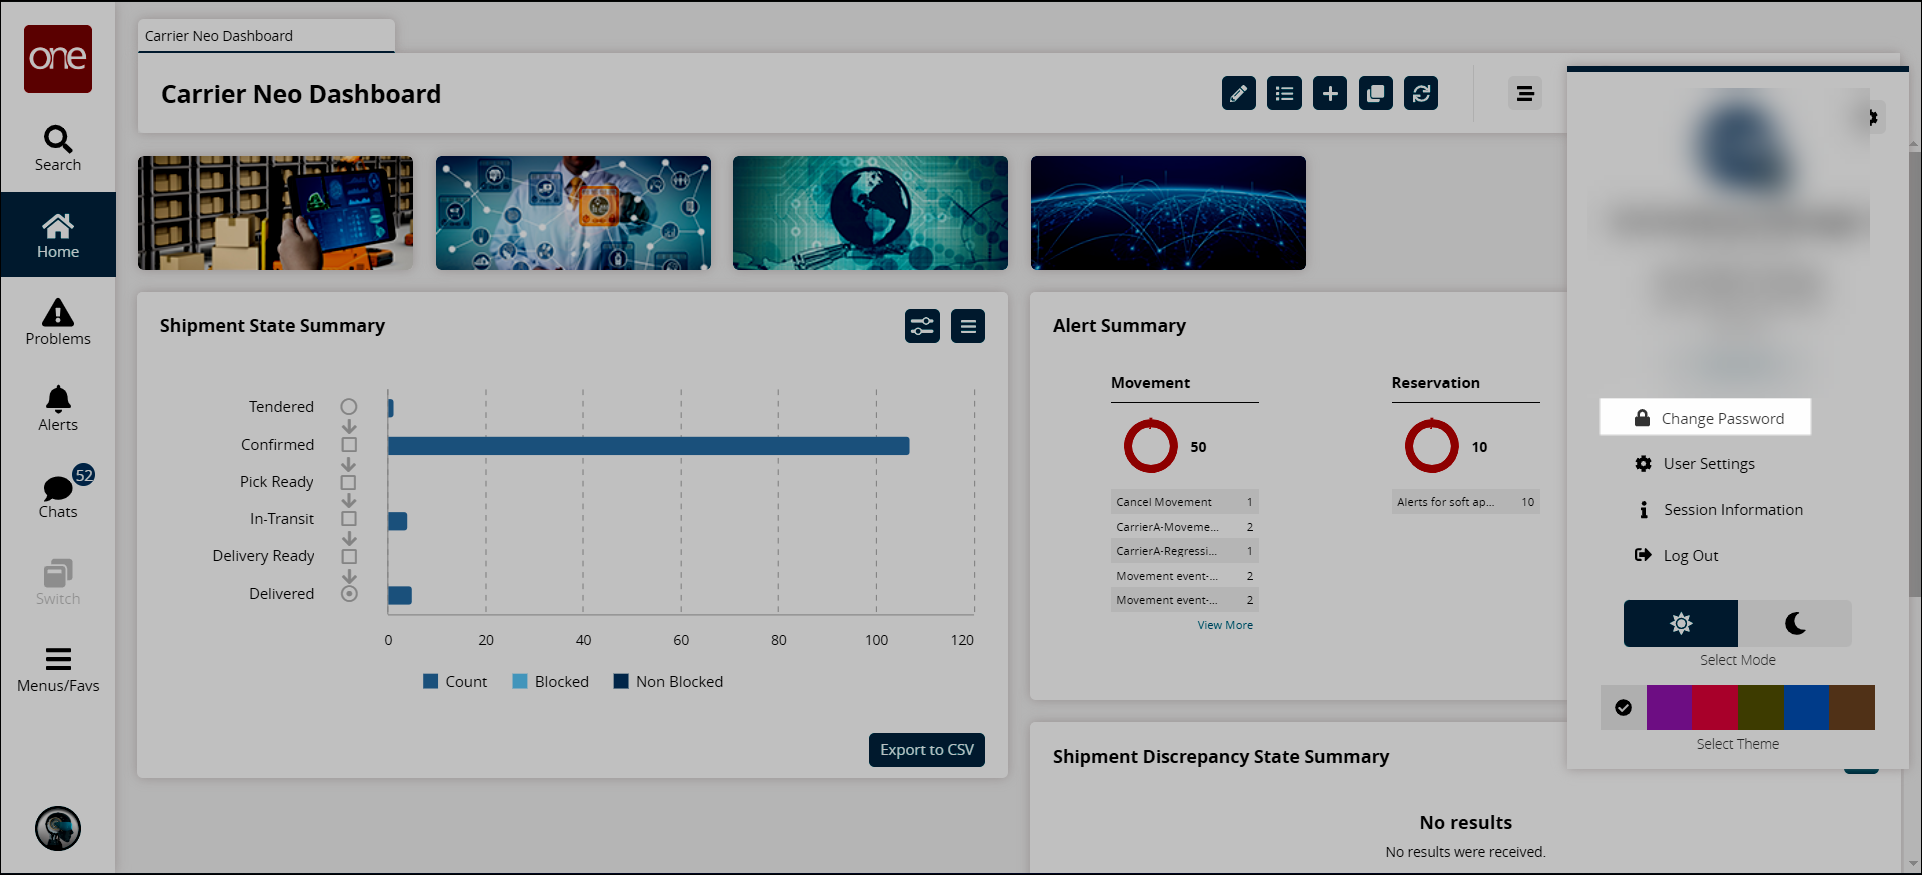
The Change Password dialog box displays.
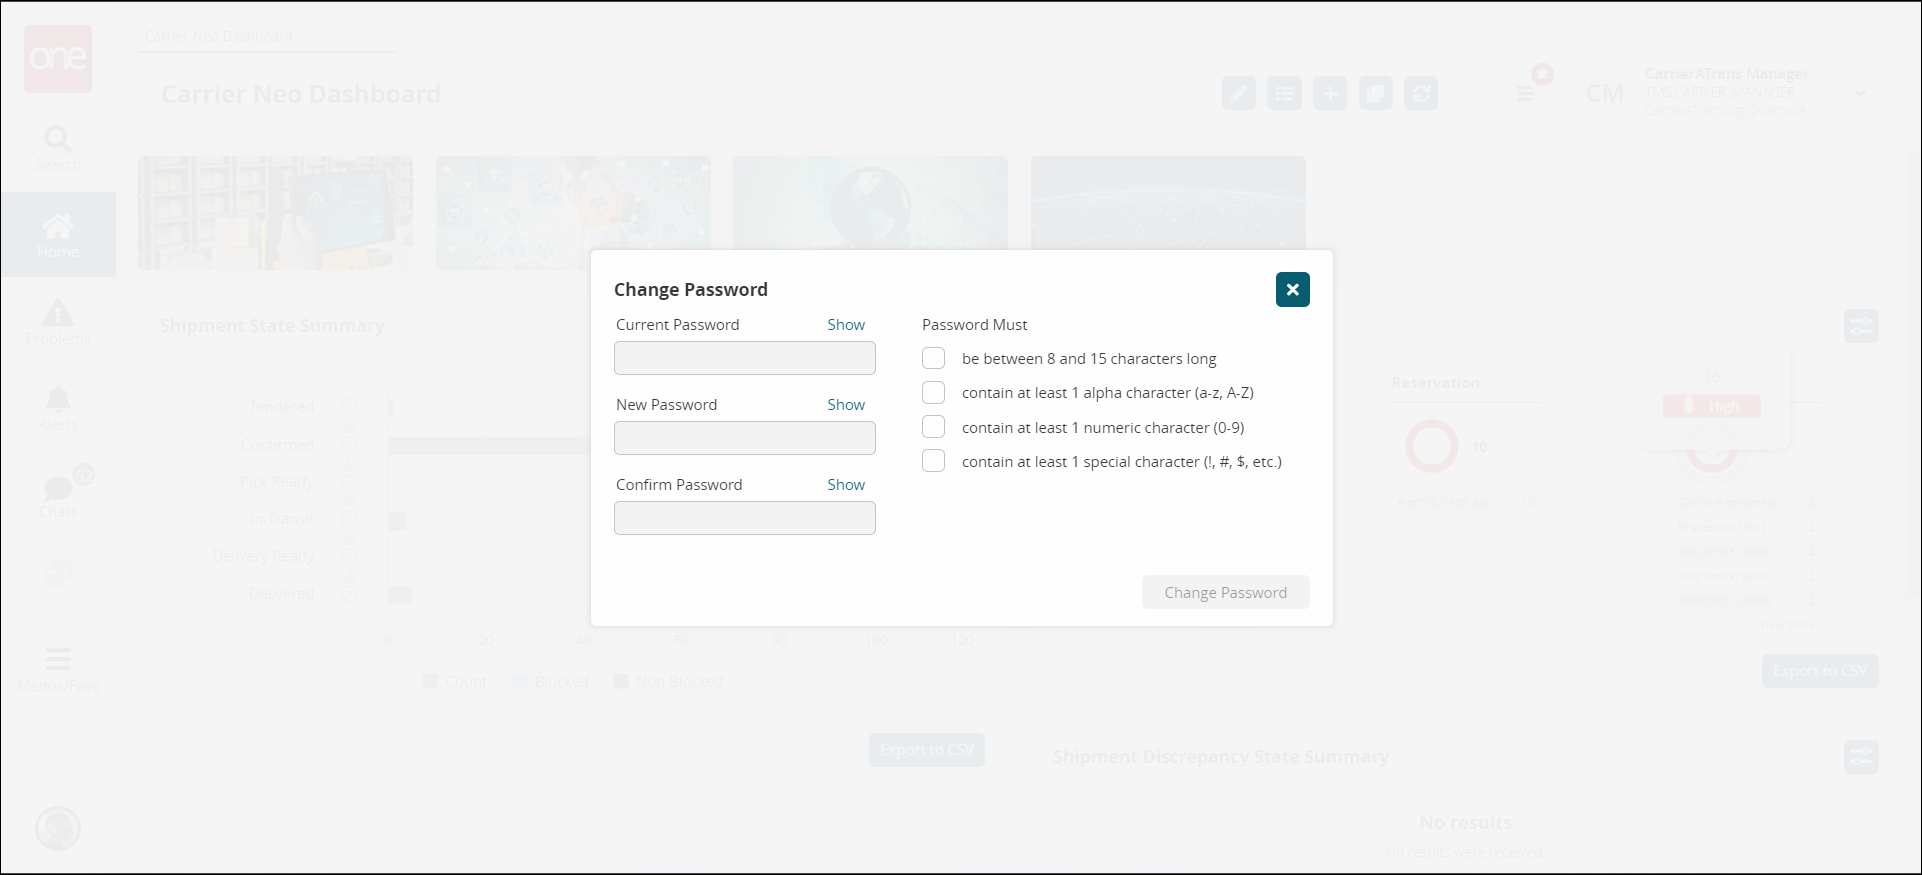
Enter your current password in the Current Password field. (Click the Show link to display the password.)
Type a new password that follows the password rules in the New Password field. (Click the Show link to display the password.)
Re-enter the new password in the Confirm Password field. (Click the Show link to display the password.)
The Change Password button activates if all criteria have been met with check marks in the boxes.
Click the Change Password button.
The new password will be required upon the next login.
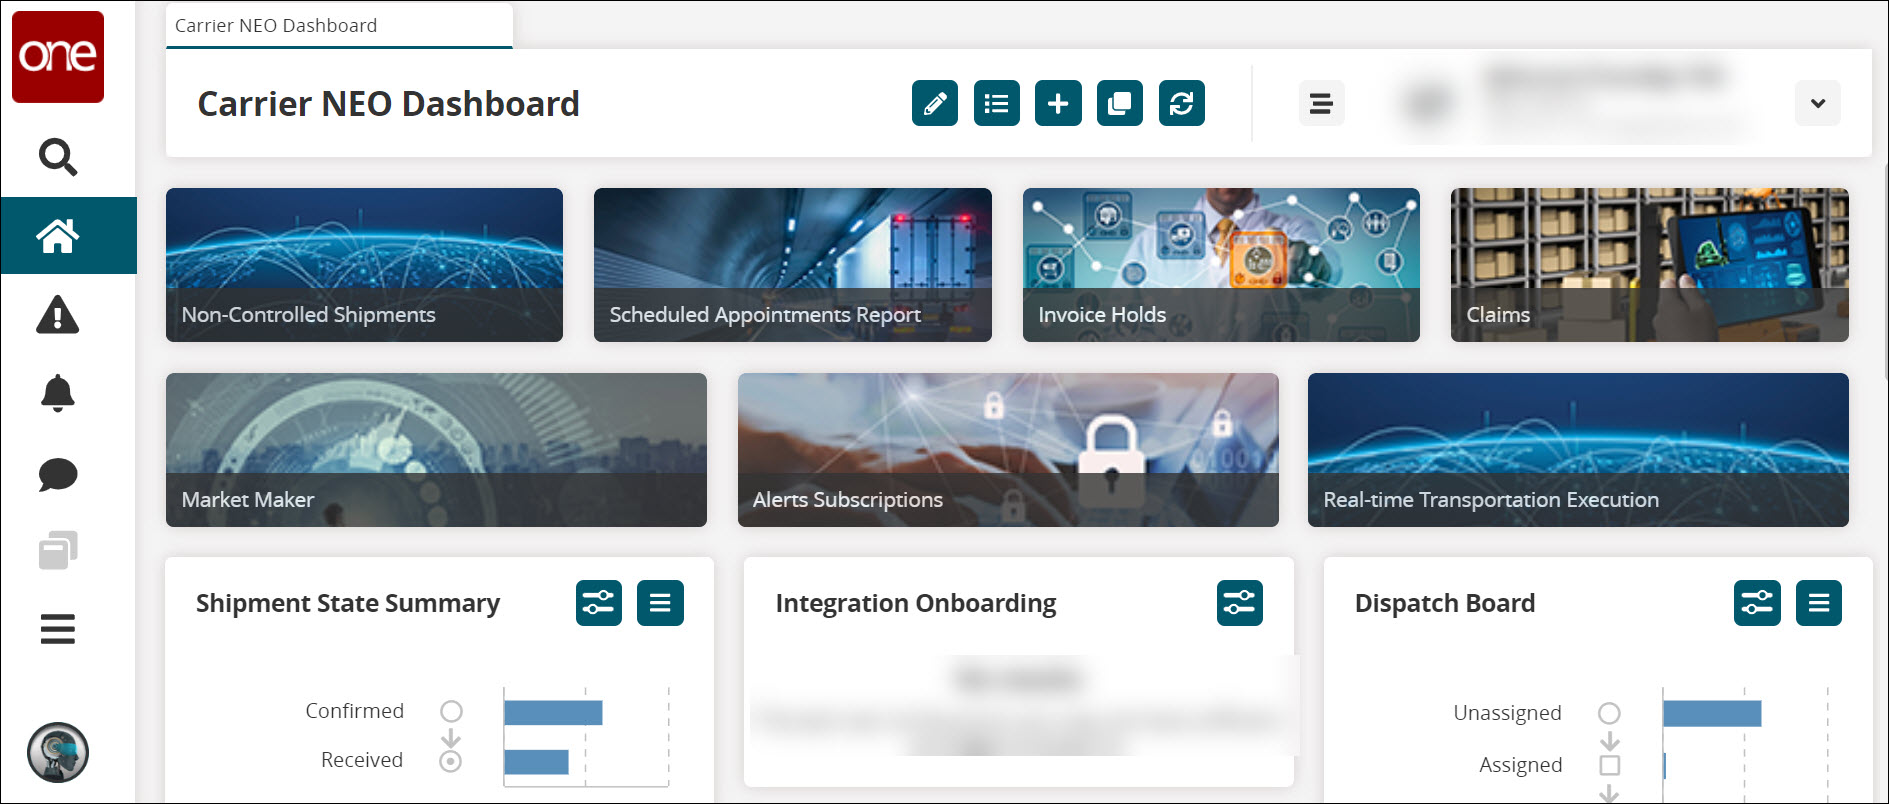
Logging in to NEO and Configuring the Sign-On Screen
Users have a single sign-on screen to log in to the ONE system, and the sign-on screen has configuration features. This sign-on screen is also known as the login screen.
Complete the following steps to log in to the One Network system and the NEO interface:
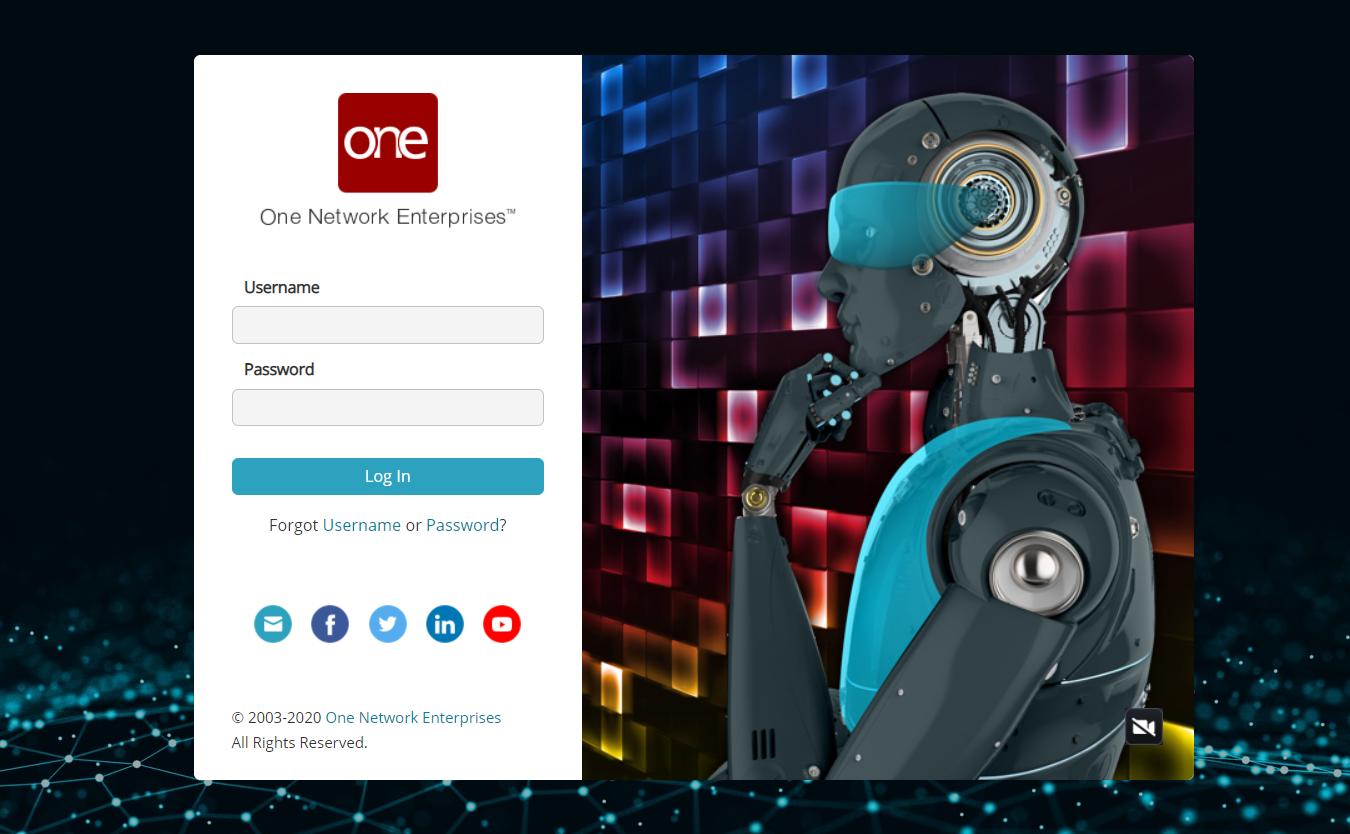
Type in the correct URL in a browser search bar. Typically, this is https://logon.onenetwork.com.
The ONE Network sign-on screen displays with audio and video features. Displays might vary.
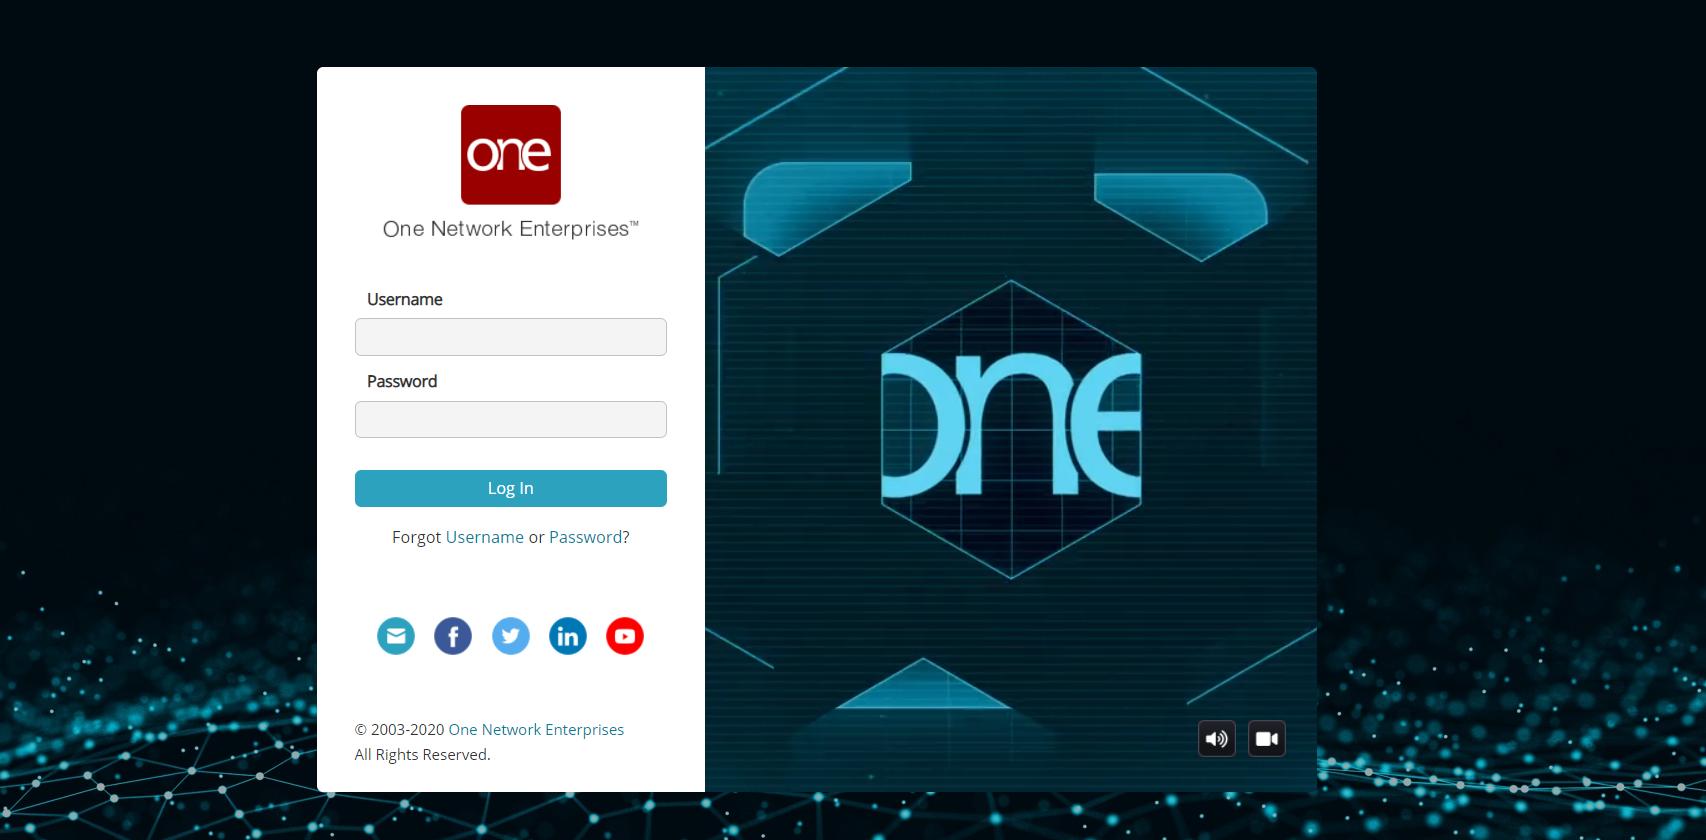
Enter your username in the Username field.
Enter your password in the Password field.
Note
The Username and Password fields are case-sensitive. Enter uppercase and lowercase letters precisely.
Click the Log In button.
Some users are logged in to the ONE system. Some users see a selection of subnetworks, as shown below.
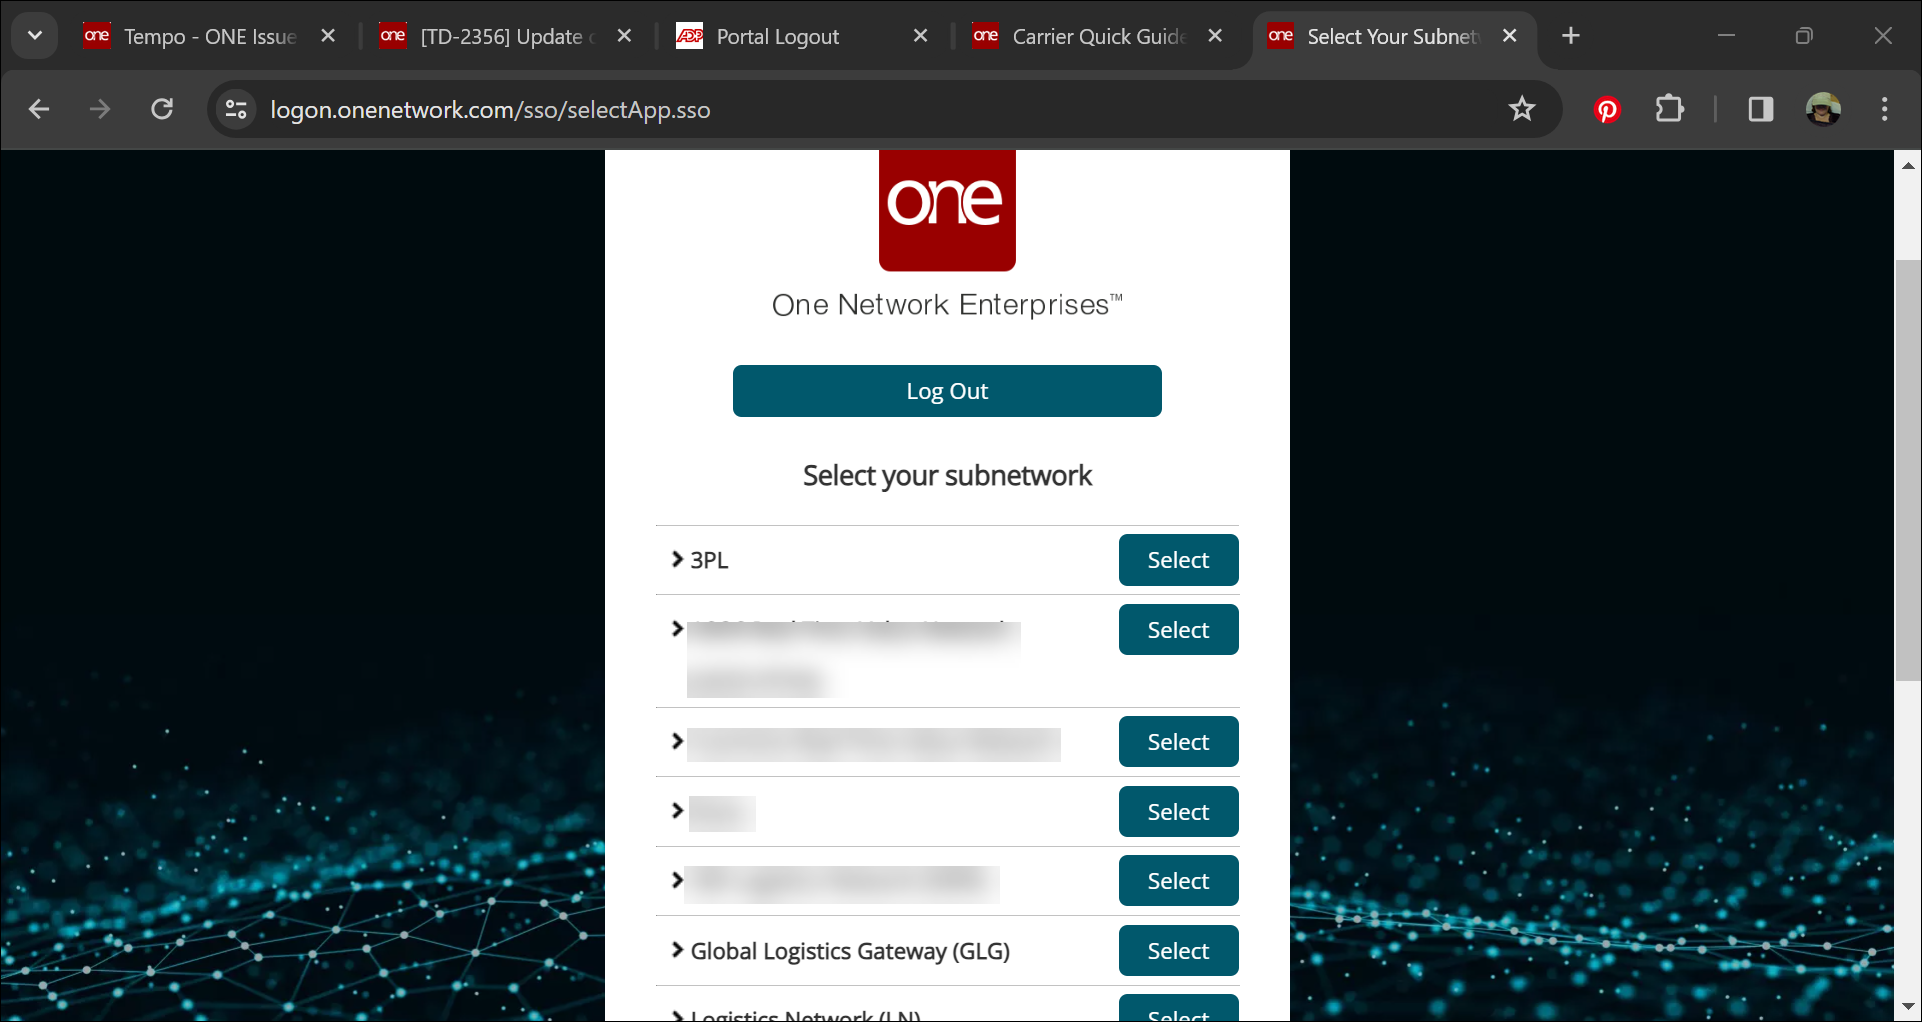
Click the Select button for your network.
Tip
For more information about each subnetwork, click the expansion arrow to the left of each subnet name.
The NEO dashboard assigned to your user role displays.

Complete the following steps to configure the sign-in screen:
Type in the correct URL in a browser search bar.
The ONE sign-on screen displays with audio and video features that play in a continuous loop.
Click the audio (speaker) icon.
The icon changes to show that the audio is turned off for the sign-on screen.
Click the video (camera) icon.
The video loop changes to a static picture of NEO. The audio and video selections remain the same until changed.
Logging out of NEO
Users can log out of ONE's NEO system through the User Profile panel.
Complete the following steps to log out:
Click the arrow button for the User Profile slideout, as shown in the screenshot below.
The slideout displays the user profile and settings options.

Click the Log Out option.
The Log Out confirmation window displays.
Click the Yes button.
The Logged Out screen displays.

Click the Return to Login button to log back in to the ONE system.
Log in to the ONE NEO System with a Temporary Password
When new users are created and when existing users need to have a forgotten password reset for them, a temporary password is sent to them.
Complete the following steps to log in as a user with a temporary password:
Go to https://logon.onenetwork.com/, and log in using the temporary password.
The system will prompt the user to set a new password.
Enter the temporary password in the Current Password field.
Enter a new password in the New Password and Confirm New Password fields.
The user can log in using the new password.
Resetting a Forgotten Password
If a user forgets their password, it can be reset from the login screen using the following procedure.
Users can also change their password after logging in to the One Network system. See the "Changing Your Password" section in the NEO Online Help for more information.
Complete the following steps to reset a password:
Type in the correct URL in a browser search bar. This is typically https://logon.onenetwork.com.
The ONE sign-on screen displays. Displays might vary based on the URL provided to customers or partners.
Click the Forgot Password link.
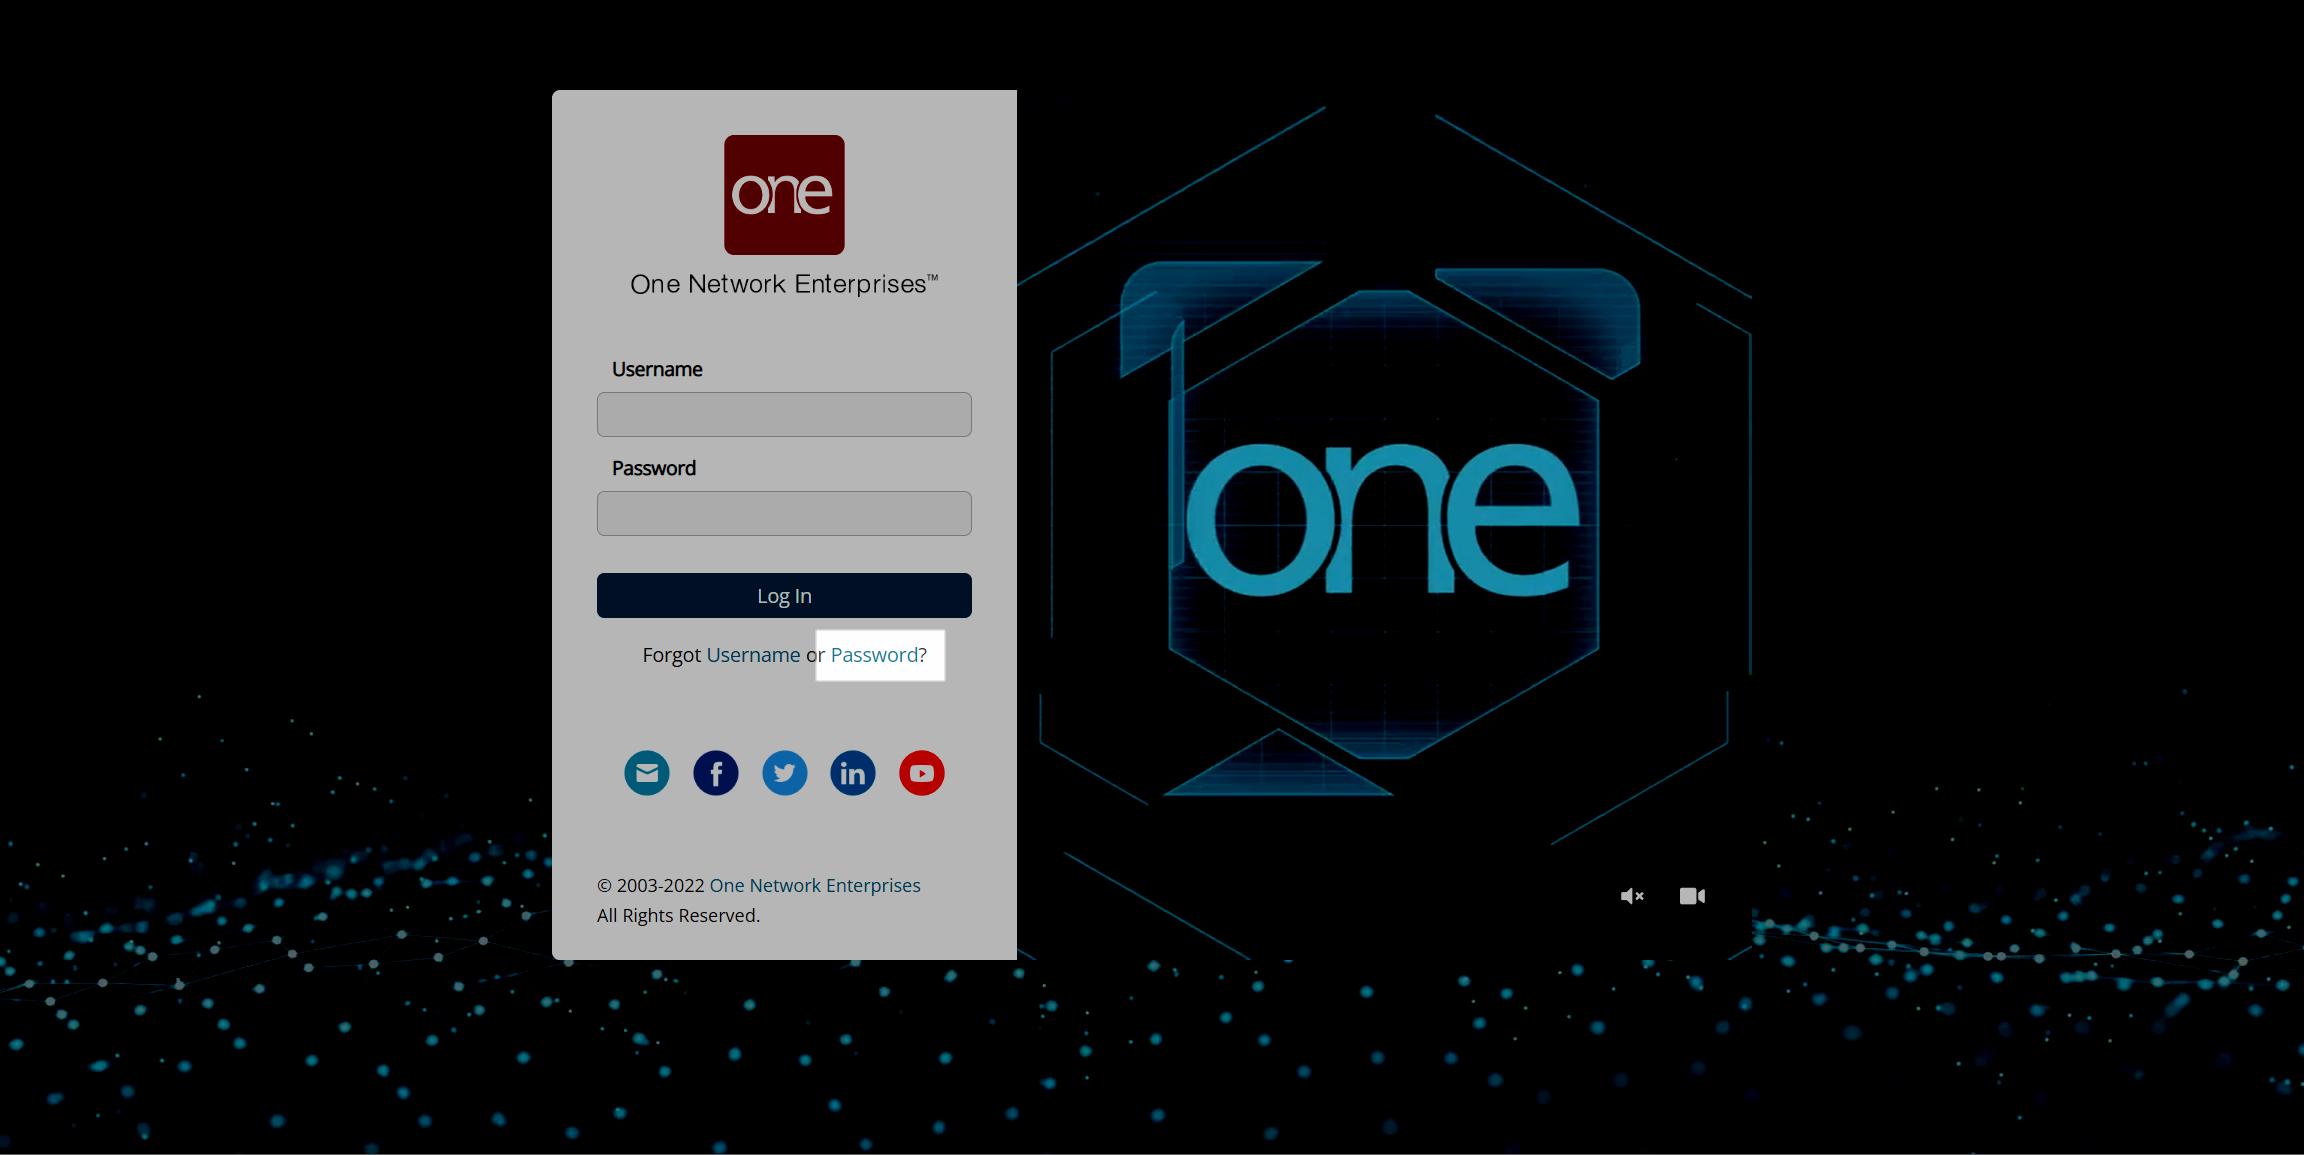
The Password Reset screen displays.

Enter your email address in the Email Address field.
Click the Send Email button.
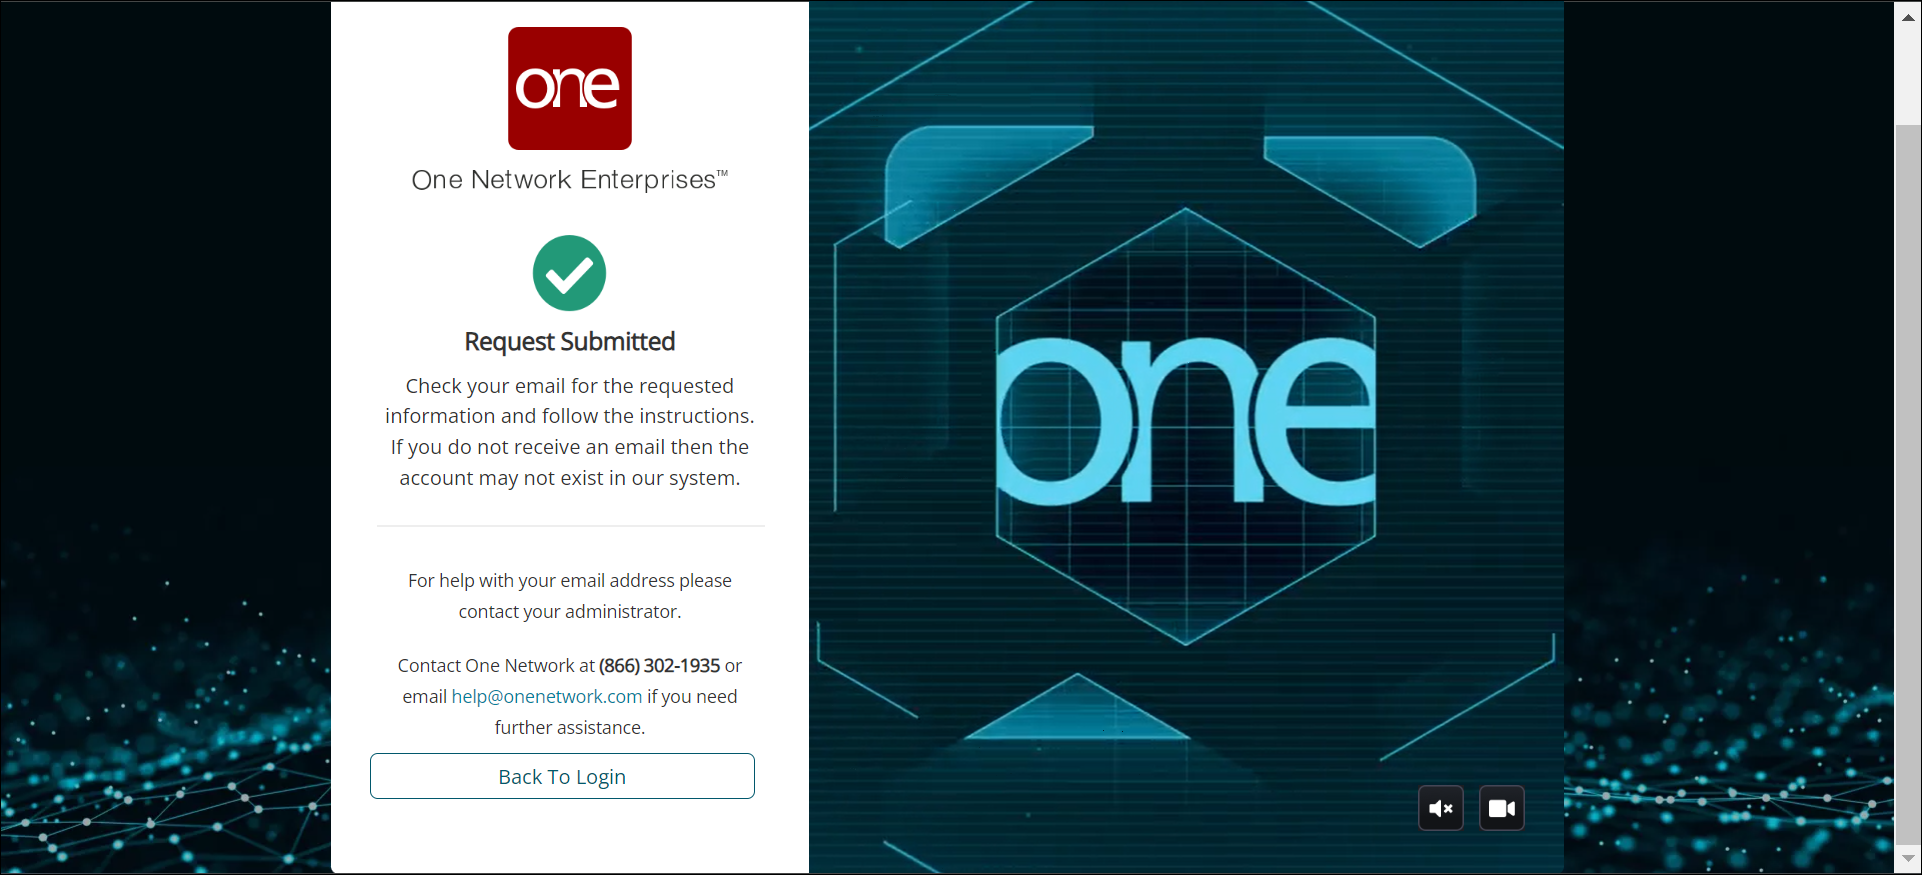
The screen shows a Request Submitted message, and an email is sent to the address you provided.
Note
If you receive an error message stating, “No account exists for the provided email address,” please confirm you entered your email address correctly. Contact an administrator user for your company if you are having issues with your email address or if you do not remember your email address. They can check for it in the system.
If the email address you entered is associated with multiple user accounts, a Username field displays to enter your username.
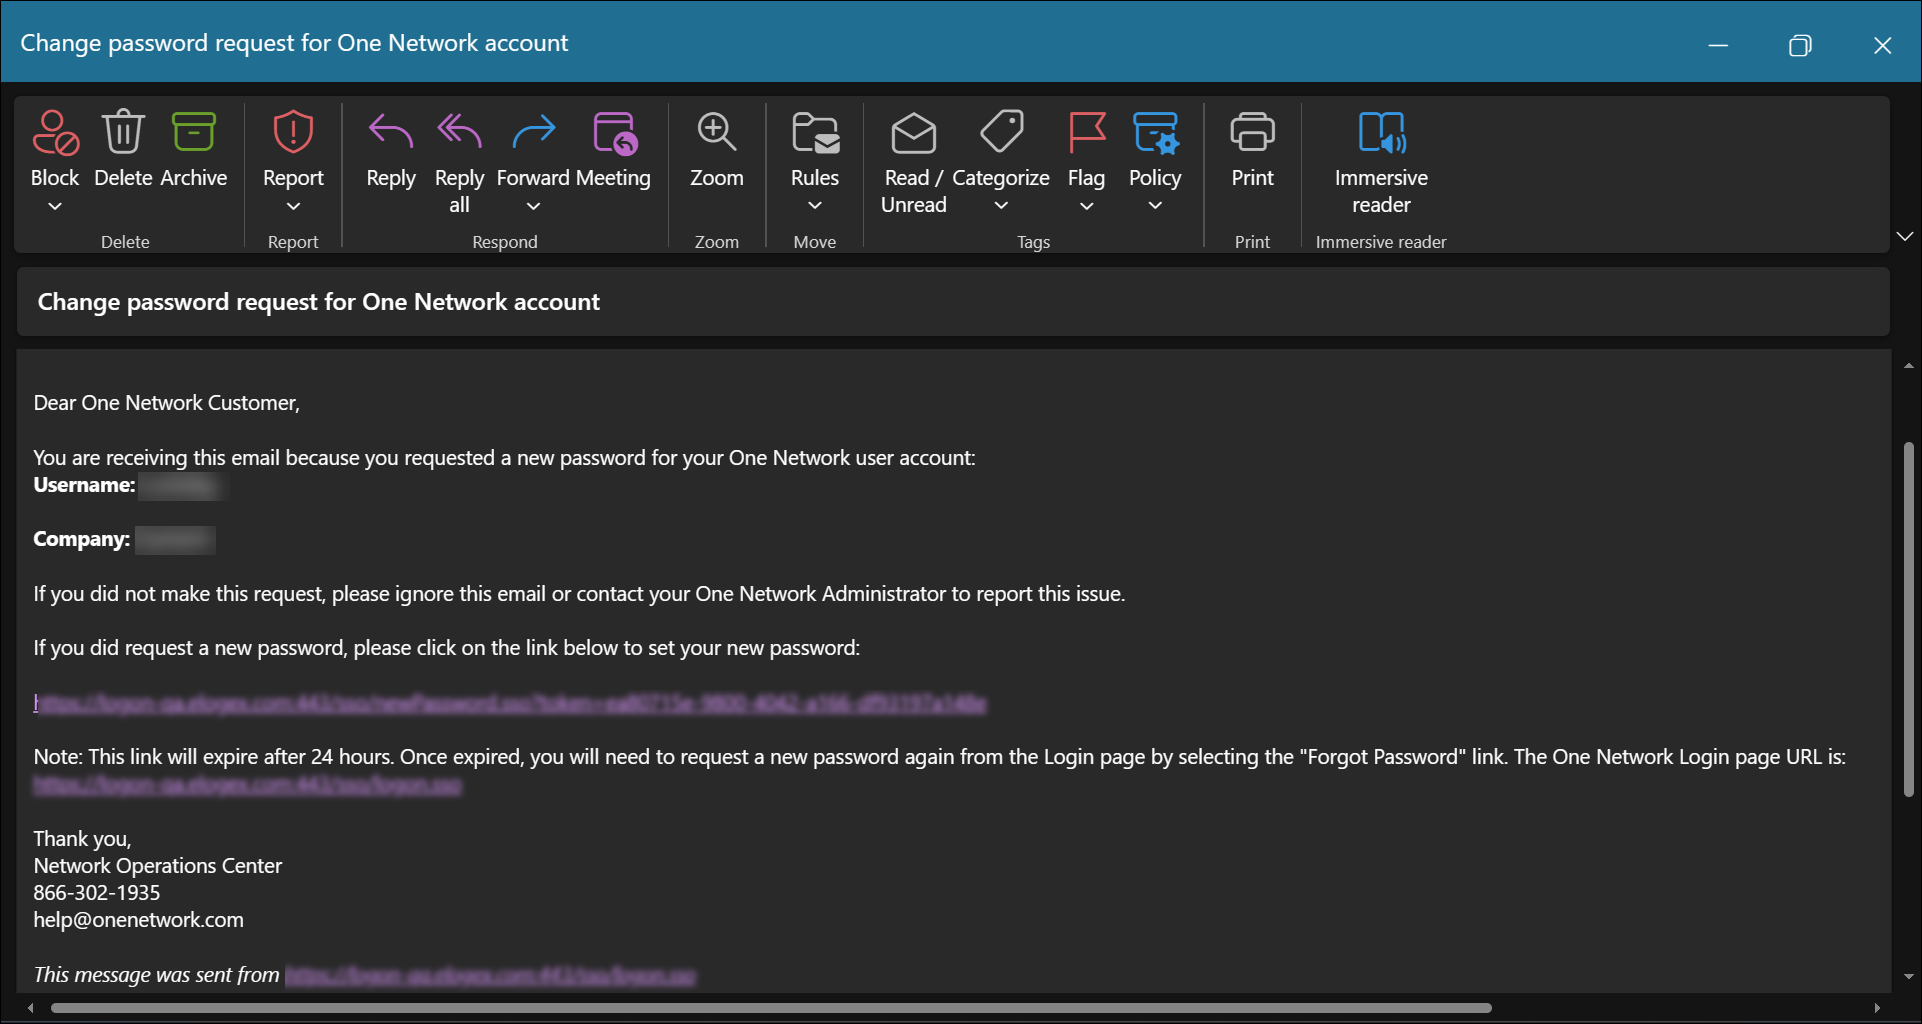
Click the link provided in the email.
The Change Password screen displays.
Note
The link in the email expires after 24 hours and can only be used once. Once expired or used, the user must request a new password again.
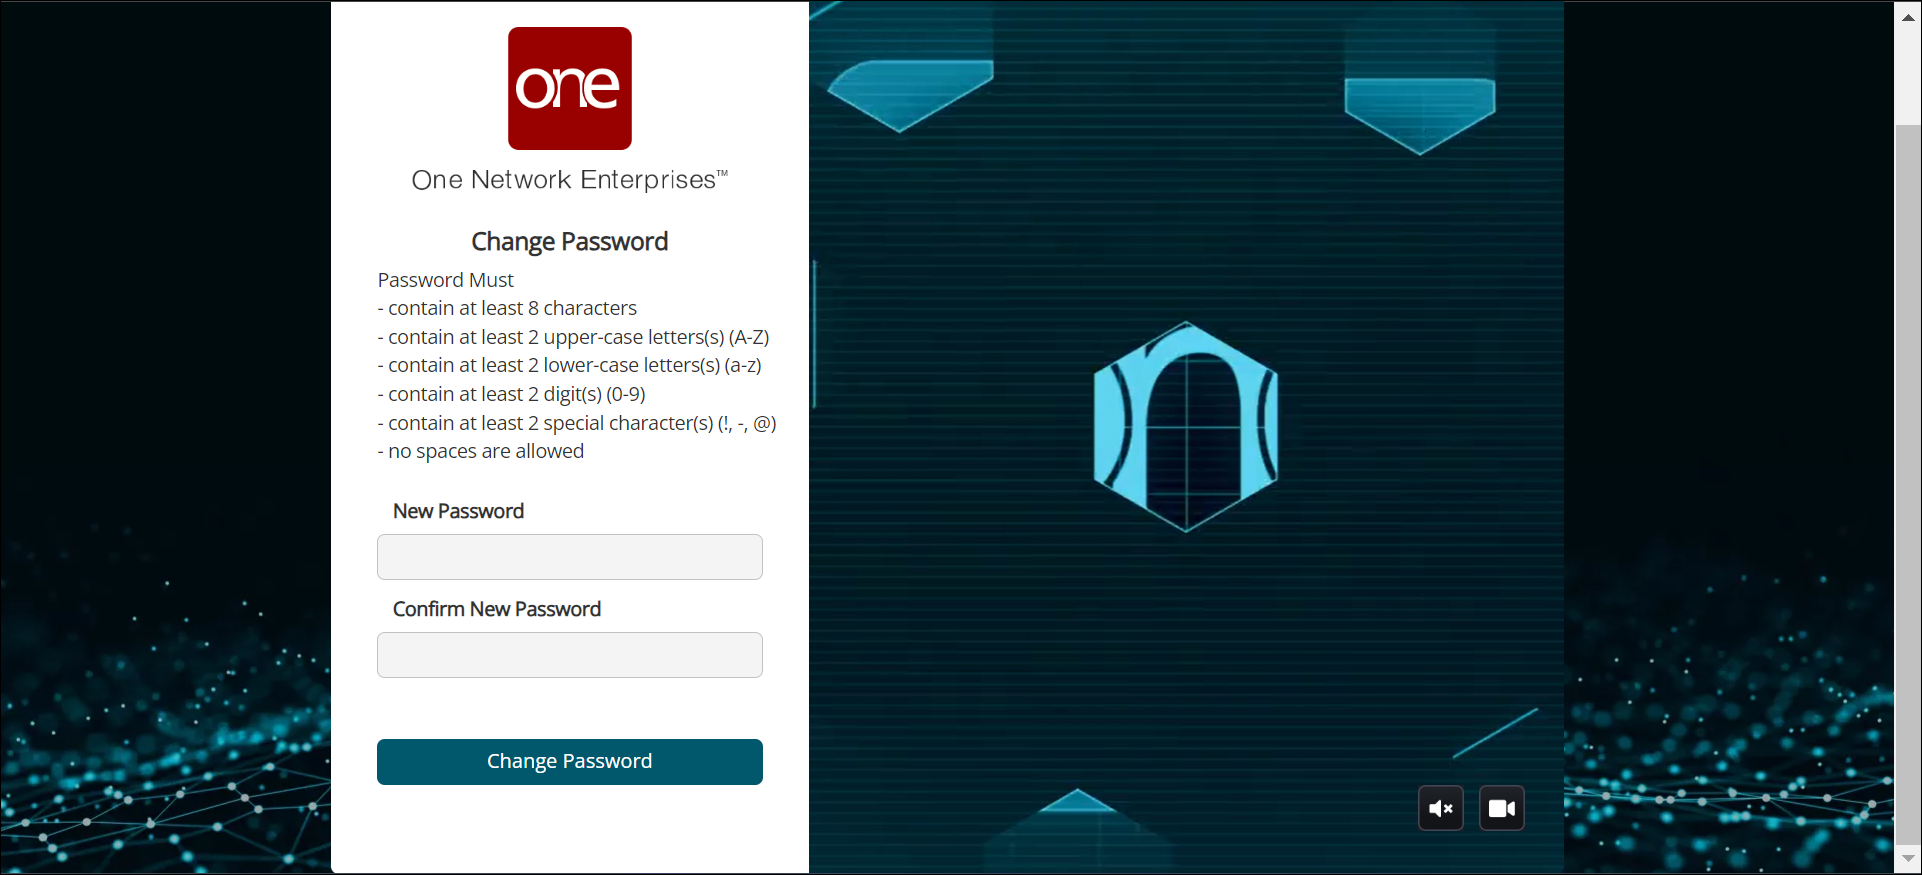
Enter a new password that complies with the password security requirements in both the New Password and Confirm New Password fields.
Click the Change Password button.
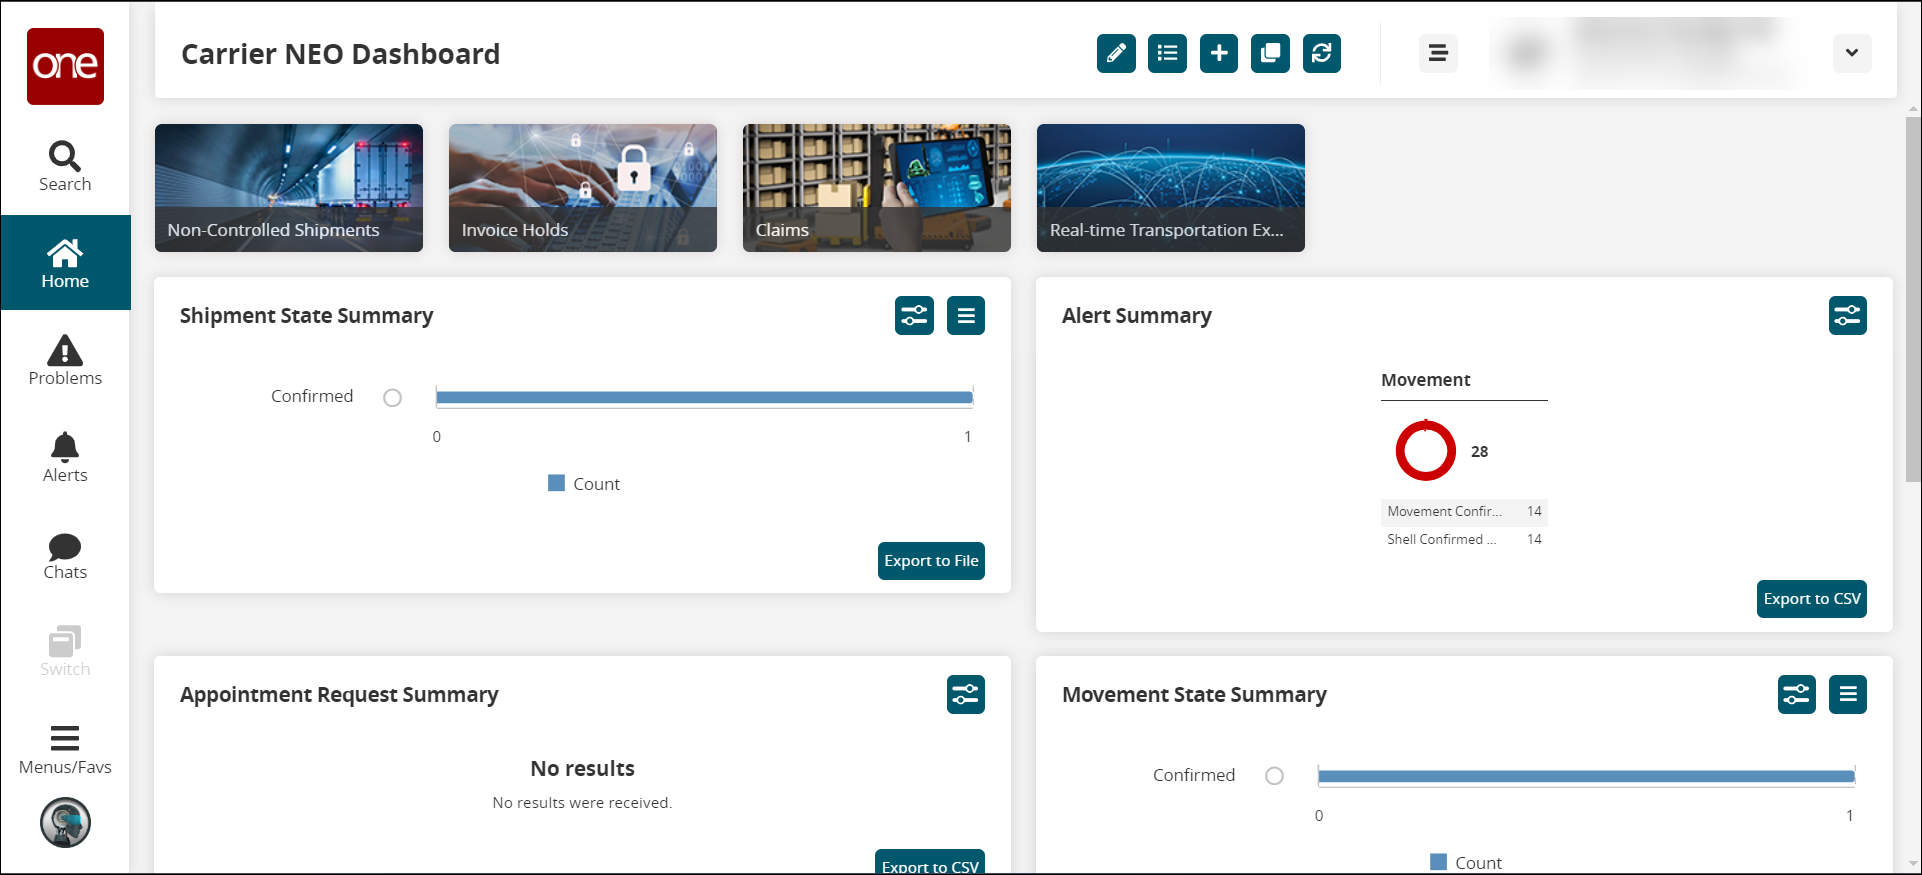
The NEO dashboard established for the user displays. Each user is assigned a ready-made dashboard with the most common elements for their job requirements.
Some users may see a subnetwork screen similar to the screen shown below.

Click the Select button next to your subnetwork name.
The NEO dashboard established for the user displays
Setting a Password for New Users
First-time users receive an email inviting them to log in to the ONE Network system. This email provides links, computer requirements, and support information.
Complete the following steps to set a password as a new user:
Open the email sent by ONE Network.
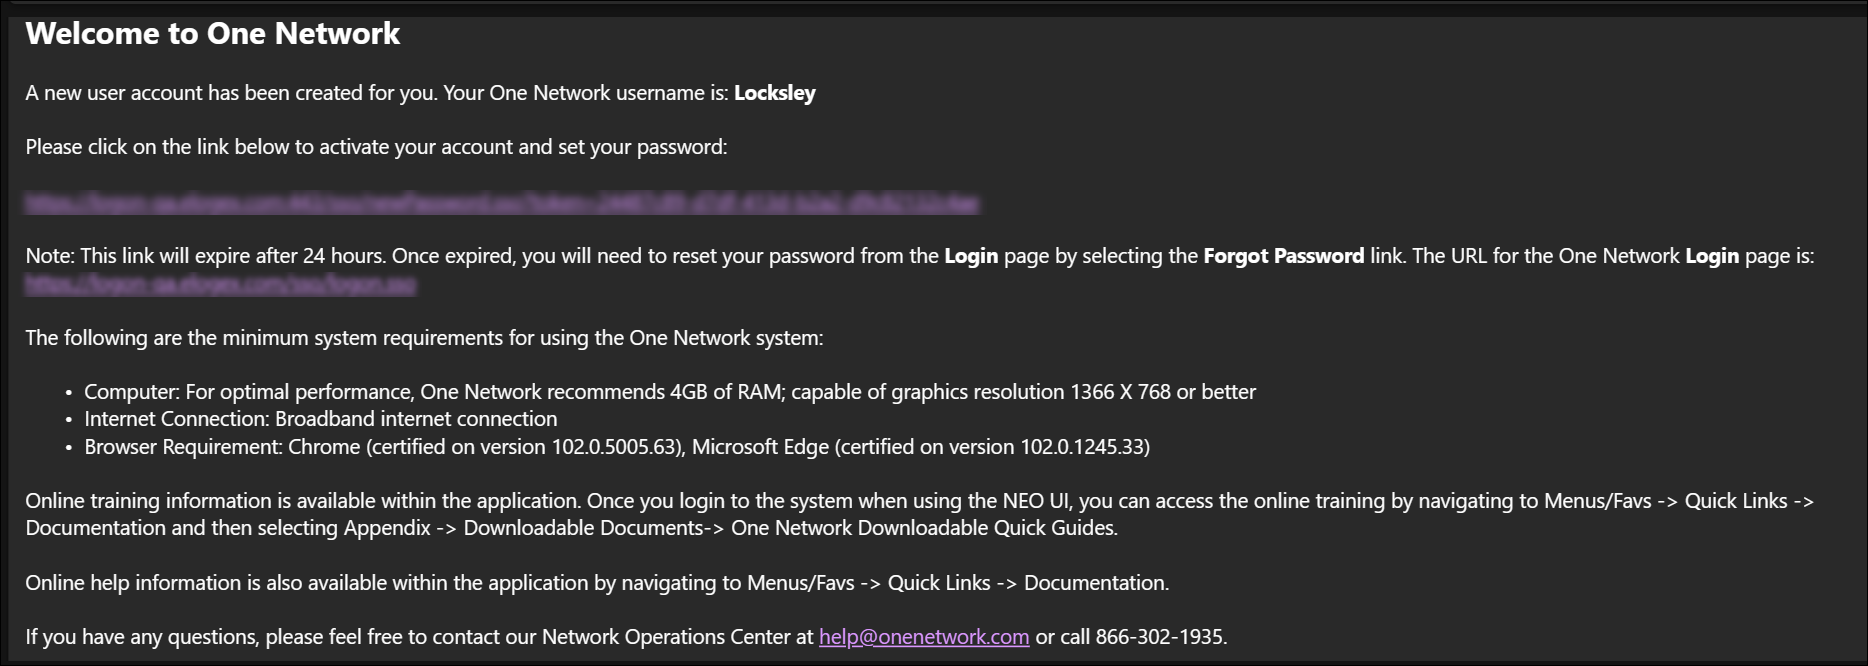
Click the link to activate your account.
The Change Password screen displays.
Enter a password that meets the requirements provided on the screen in both the New Password and Confirm New Password fields.
Click the Change Password button.
The NEO dashboard established for the user displays. Each user is assigned a ready-made dashboard with the most common elements for their job requirements.
Some users may see a subnetwork screen similar to the screen shown below.
Click the Select button next to your subnetwork name.
The NEO dashboard established for the user displays.
Working with Menus
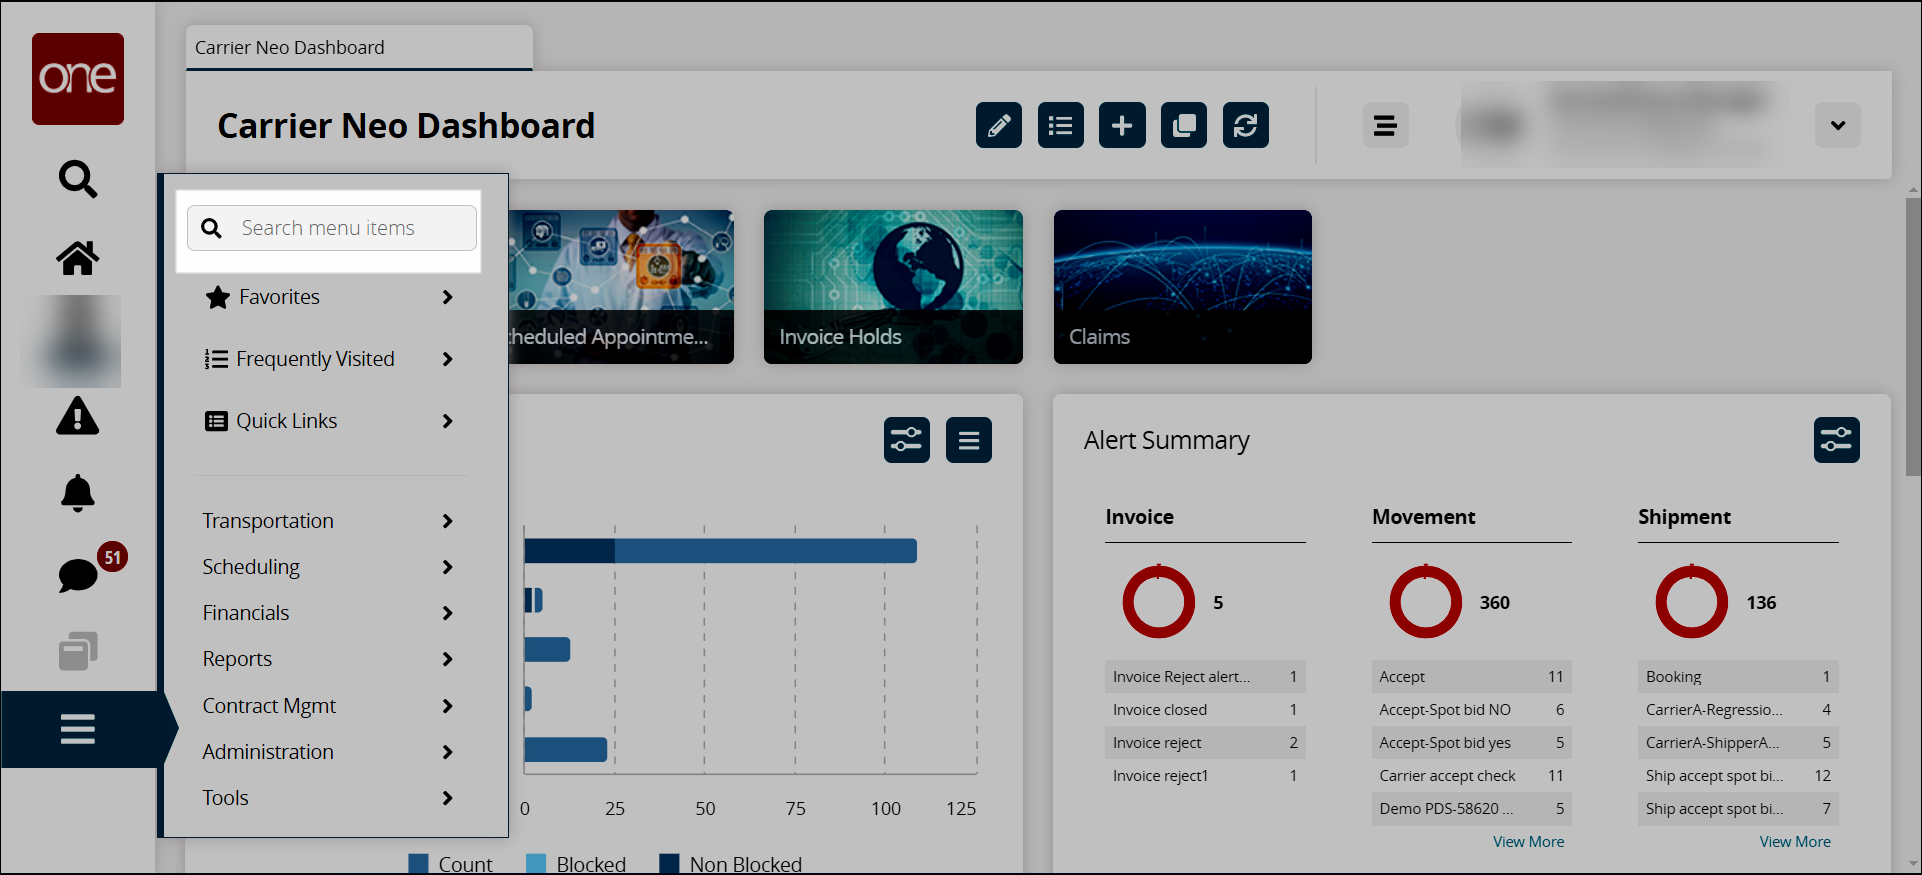
Click Menus/Favs on the left sidebar to display the menus.
Sub-menus will slide out to the right.
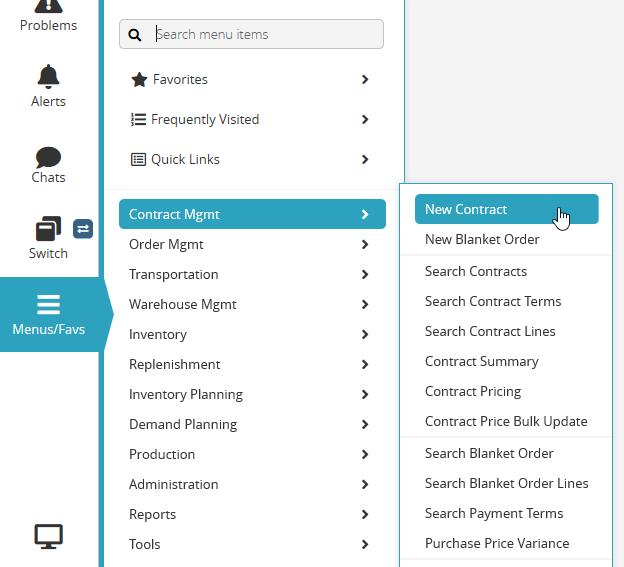
Click one of the submenu options.
The screen displays.
Using the Menu Search Bar
Users who are familiar with menus in their daily work may find it easier to use the menu search bar to get to a specific screen.
Complete the following steps to use the menu search bar:
Click Menus/Favs in the left sidebar of the NEO UI.
Click inside the Search Bar at the top of the slideout menu.
Type in a screen or report name.
The UI displays a list of menu items matching your entry in the search bar. The search is predictive, so partial matches yield results.
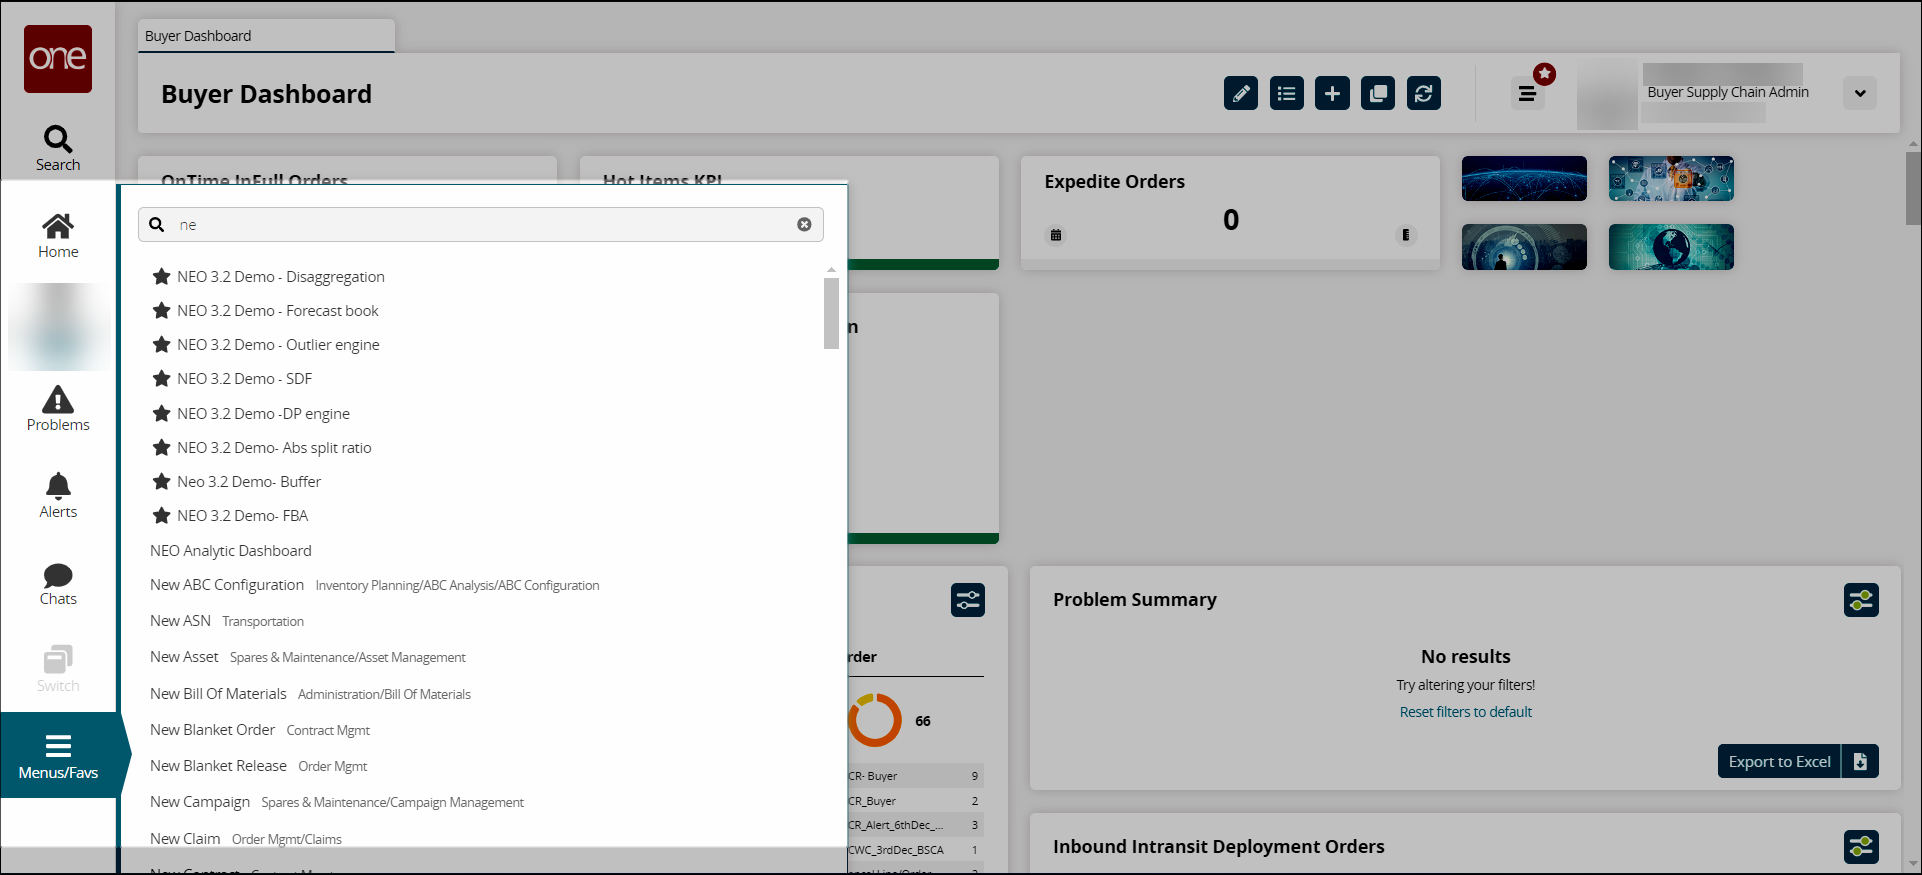
Click the name of the screen or report from the list.
The screen displays.
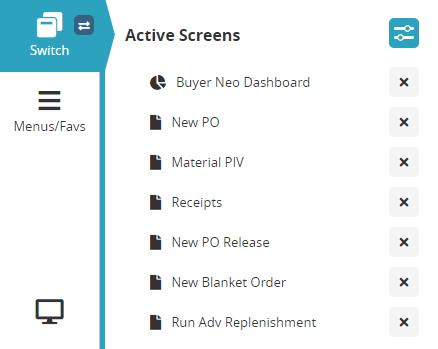
Switching Screens in the NEO UI
In the NEO UI, users may switch between open perspectives (screens) by clicking on the tabs at the top of the screen if they have turned on that setting. (See the "Edit User Settings" section of the NEO Online Help for more information.) If the tab setting is not in use or there are more screens open, users can use the Switch feature to view, move between, or close open screens. The instructions below assume that the user has current screens already open.
Complete the following steps to use and configure the screen Switch feature:
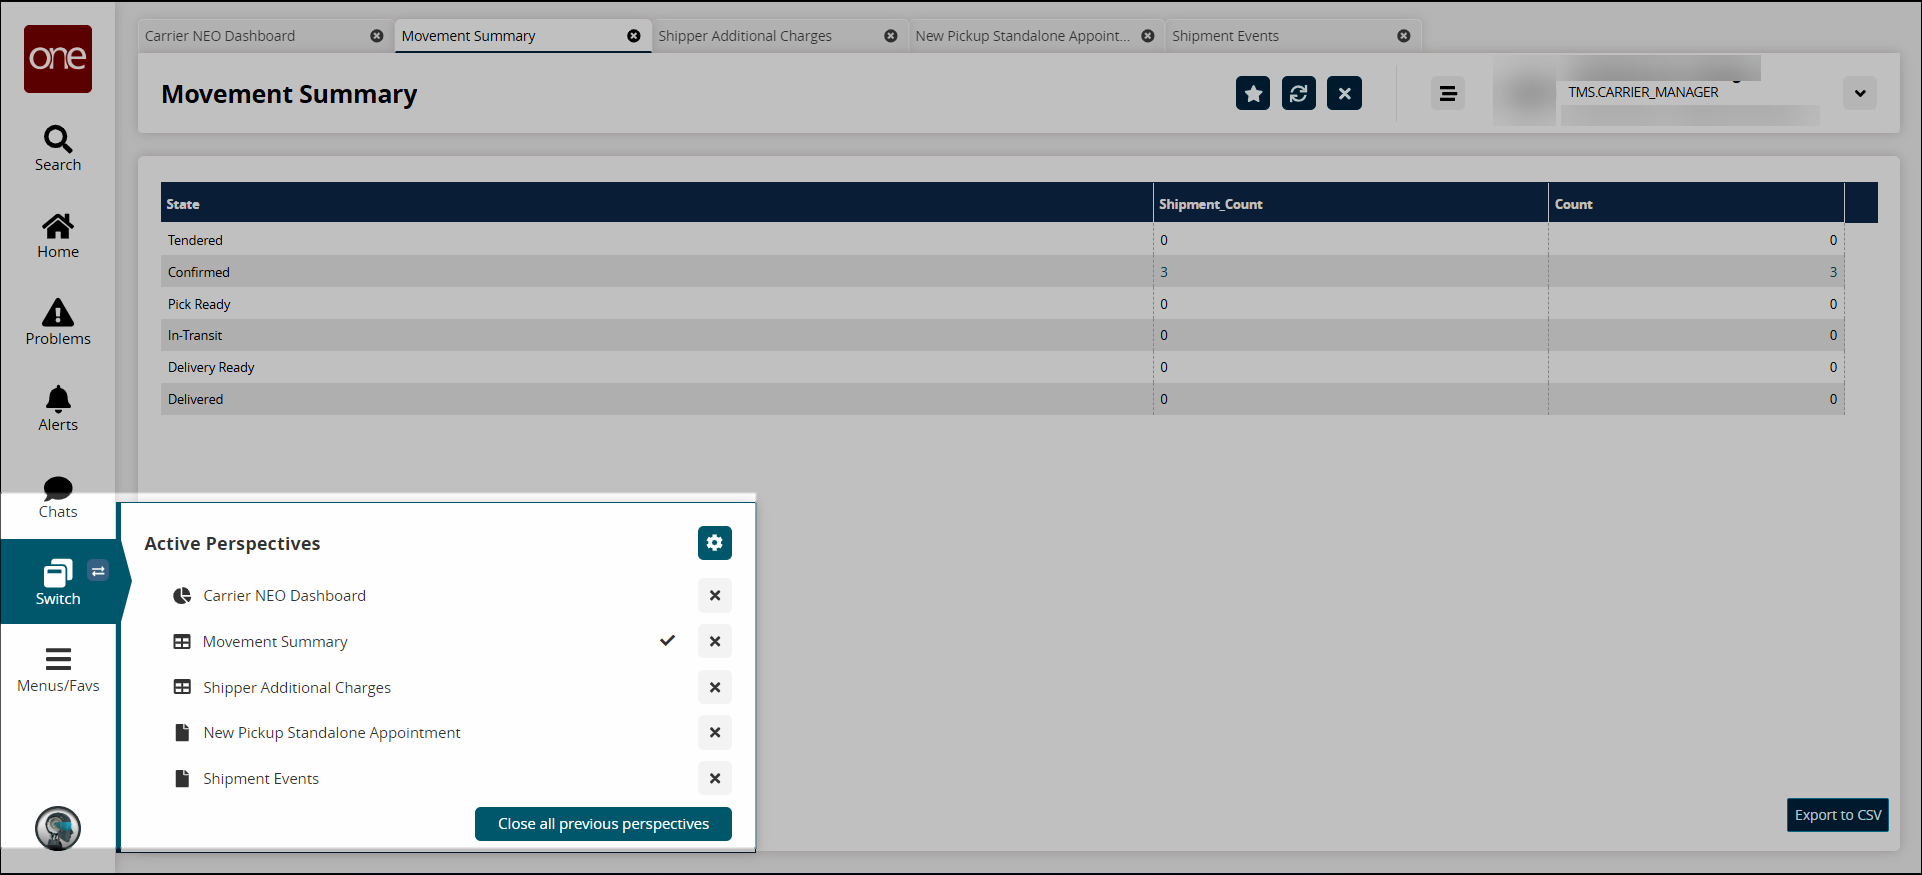
Click the Switch icon on the left sidebar of NEO.
The UI displays the slideout menu of active or open perspectives or screens. The list of screens is based on the current login session as screens do not save from session to session.
Note
If the user has just logged in, the icon is grayed out and inactive.
Click the name of the desired screen to switch to it.
The screen displays.
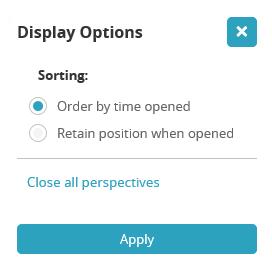
Click the Display Options button.

The Display Options dialog box displays.
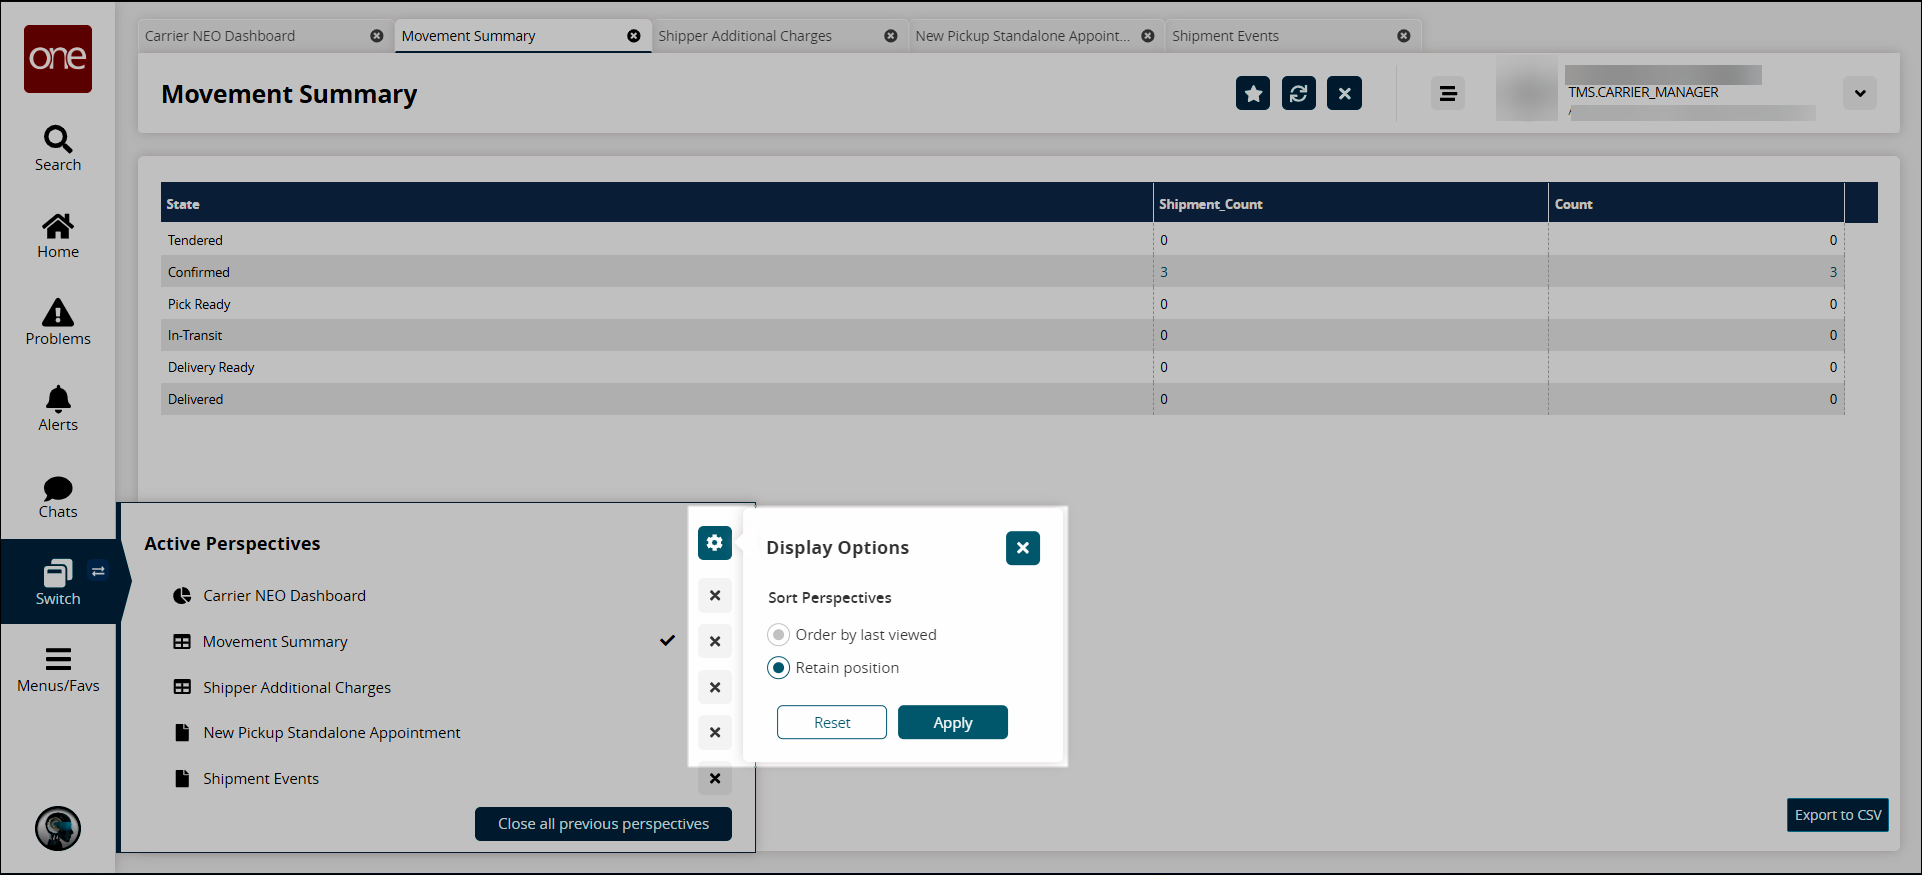
Options for how the list of screens is displayed include
Order by last viewed - The last viewed screen/perspective remains on the top of the list and the rest are in order of last viewed.
Retain position - The order of the screens/perspectives is sorted based on when each was opened.
Click the radio button in front of the display option to select it.
Click the Apply button.
The list of screens reorders based on the selection.
Click the Reset button to return the sort order to the previous setting.
Click the X icon next to a screen/perspective name to close it.
Click the Close all previous perspectives button to close all screens/perspectives.
All the perspectives close.
Note
The number of active screens displayed on the Switch menu is limited to 12. User preferences for the number of screens listed (up to 12) can be adjusted. See the "Edit User Settings" in the NEO Online Help for more information.
Using the Frequently Visited Menu
Frequently visited reports and views (screens) are compiled in the NEO UI in the Frequently Visited menu.
Complete the following steps to find a frequently visited screens:
Click Menus/Favs > Frequently Visited.
A list of the user's most frequently visited screens display.
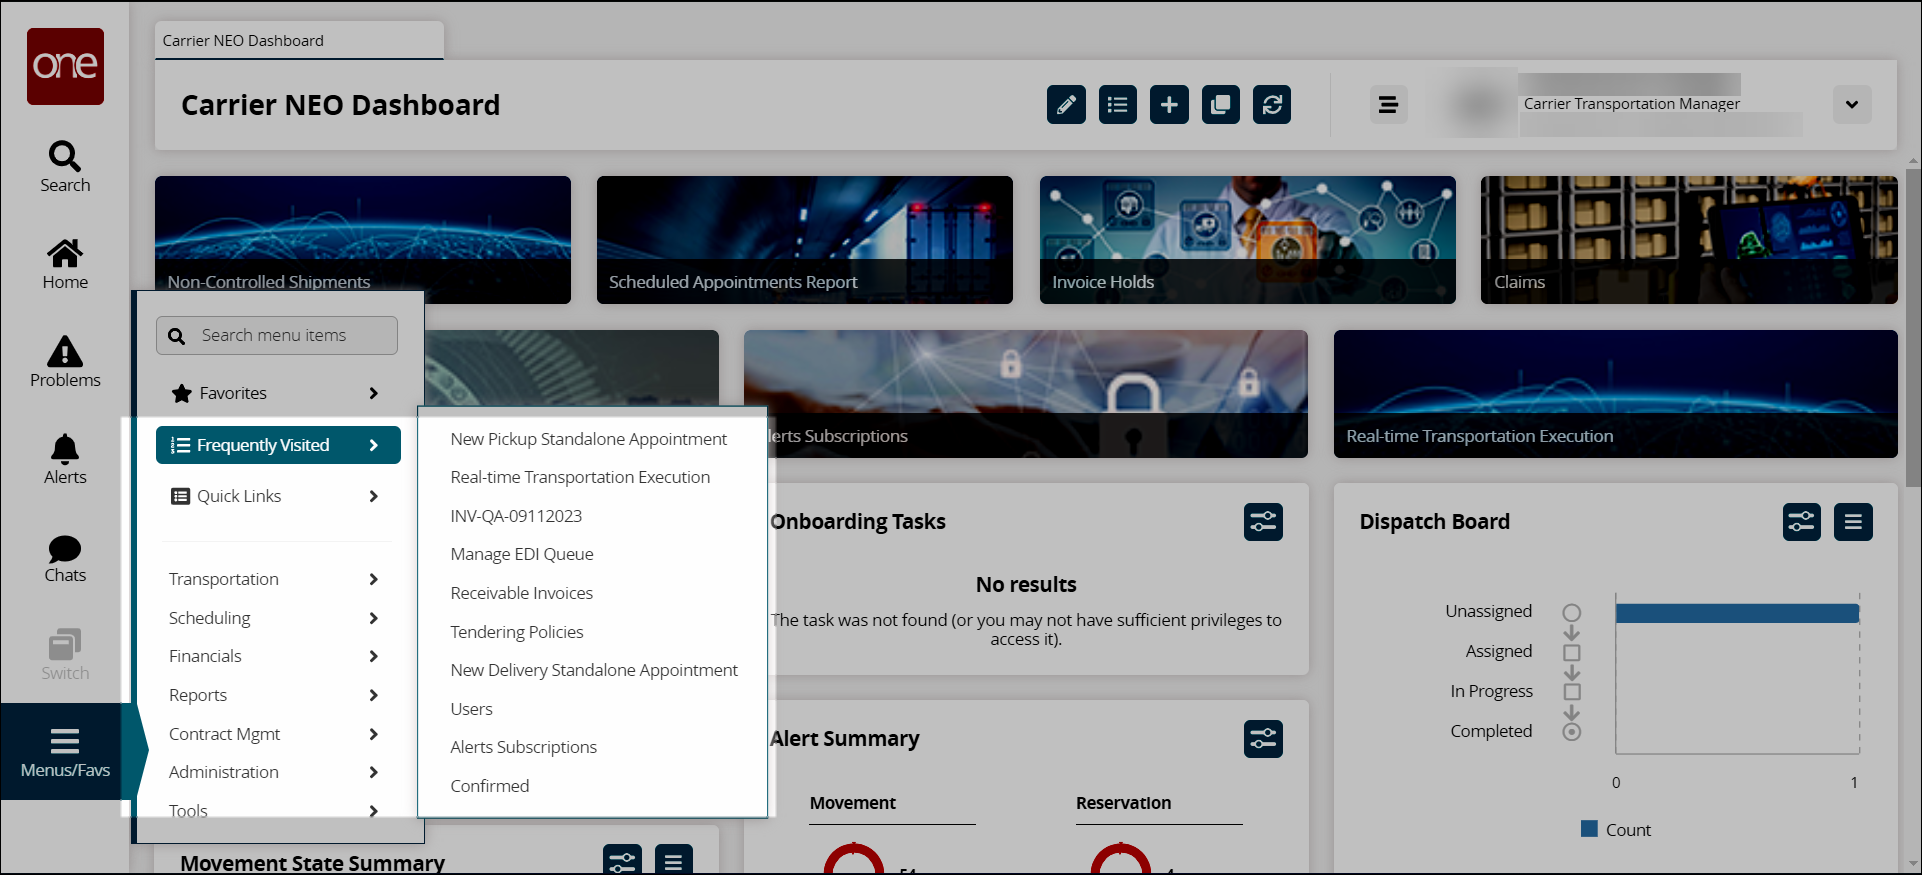
Click the name of the report or view.
The screen displays.
Accessing NEO Online Help Documentation
Complete the following steps to access NEO documentation and the NEO Online Help:
Click Menus/Favs > Quick Links > Documentation.
The NEO Online Help displays.
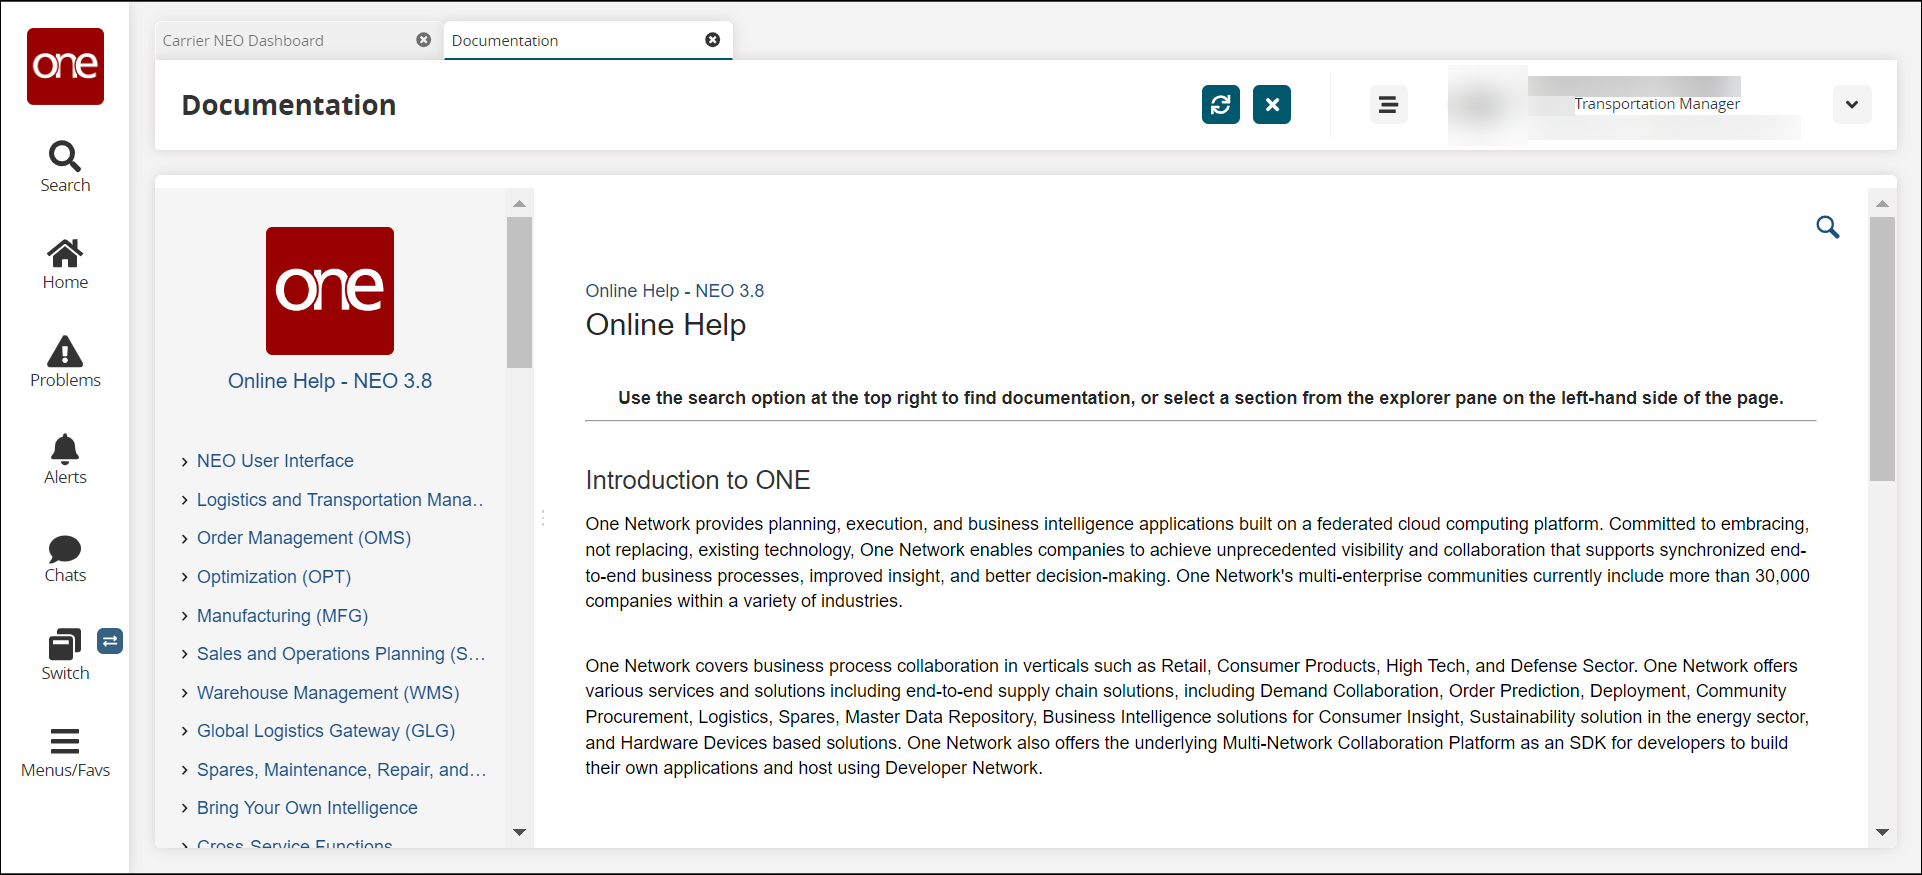
Click the magnifying glass icon in the top right to display the search field to locate information.
Alternatively, click the arrows to expand the left navigation topics, and click the topic desired.
Note
The version of the NEO Online Help and any other documentation provided from this screen is custom to each organization.
Screen Switching
Complete the following steps to configure the Screen Switcher:
Click the Switch icon on the left sidebar of NEO.
The UI displays the slide-out menu of Active Screens (perspectives). The list of screens is based on the current login session; screens do not save from session to session. If the user has just logged in, then theSwitchmenu is cleared, and the icon is grayed out and inactive.
Click the Filter Options button.

The UI displays the Switcher Display Options dialog box.
Options for displays of the screens include:
Order by time opened - The longest opened screen/perspective remains on the top of the list.
Retain position when opened - The order is based on what screen/perspective the user viewed last.
Click the radio button in front of the option to select it.
Click the Apply button.
The list of screens reorders based on the selection.
Click the Close all perspectives link to close all screens/perspectives.
All the perspectives close.
The number of active screens displayed on the Switch menu is limited to 12. User preferences for the number of screens listed (up to 12) can be adjusted in User Settings.
Viewing Keyboard Shortcuts
The NEO UI comes with keyboard shortcuts to help users work more efficiently.
Complete the following steps to display commonly used keyboard shortcuts:
Click Menus/Favs > Quick Links > Keyboard Shortcuts.
The Keyboard Shortcuts Help dialog box displays.
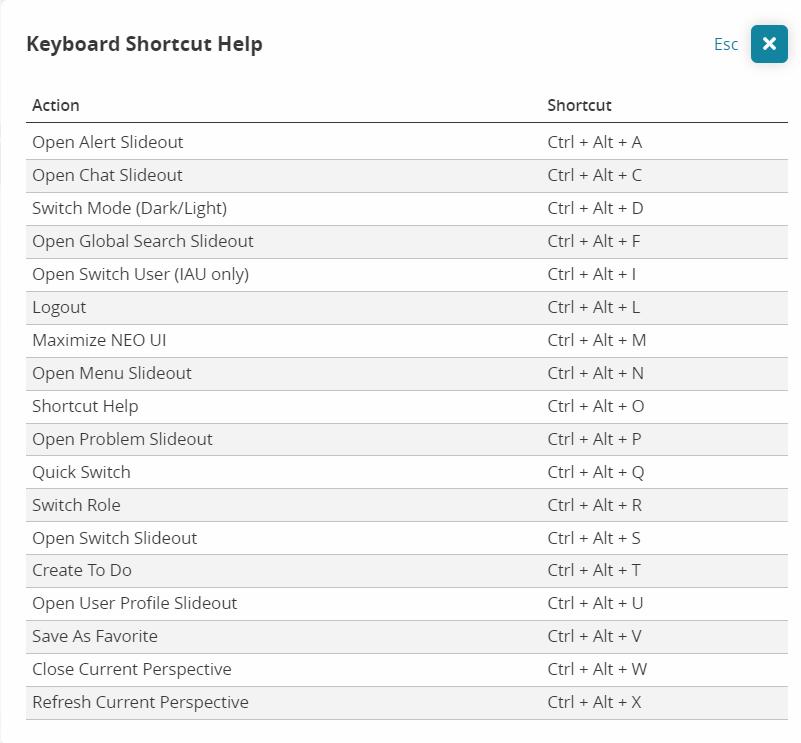
Click the X or press the Escape (Esc) key to close the window.
User Management
Creating and Editing a Role
GLG Carrier Manager users can create roles (role types) for other users in the system. The following instructions define permissions and views for the roles, and then users are added to the role.
Complete the following steps to create a role:
Click Menus/Favs > Administration > Roles.
The Roles screen displays.
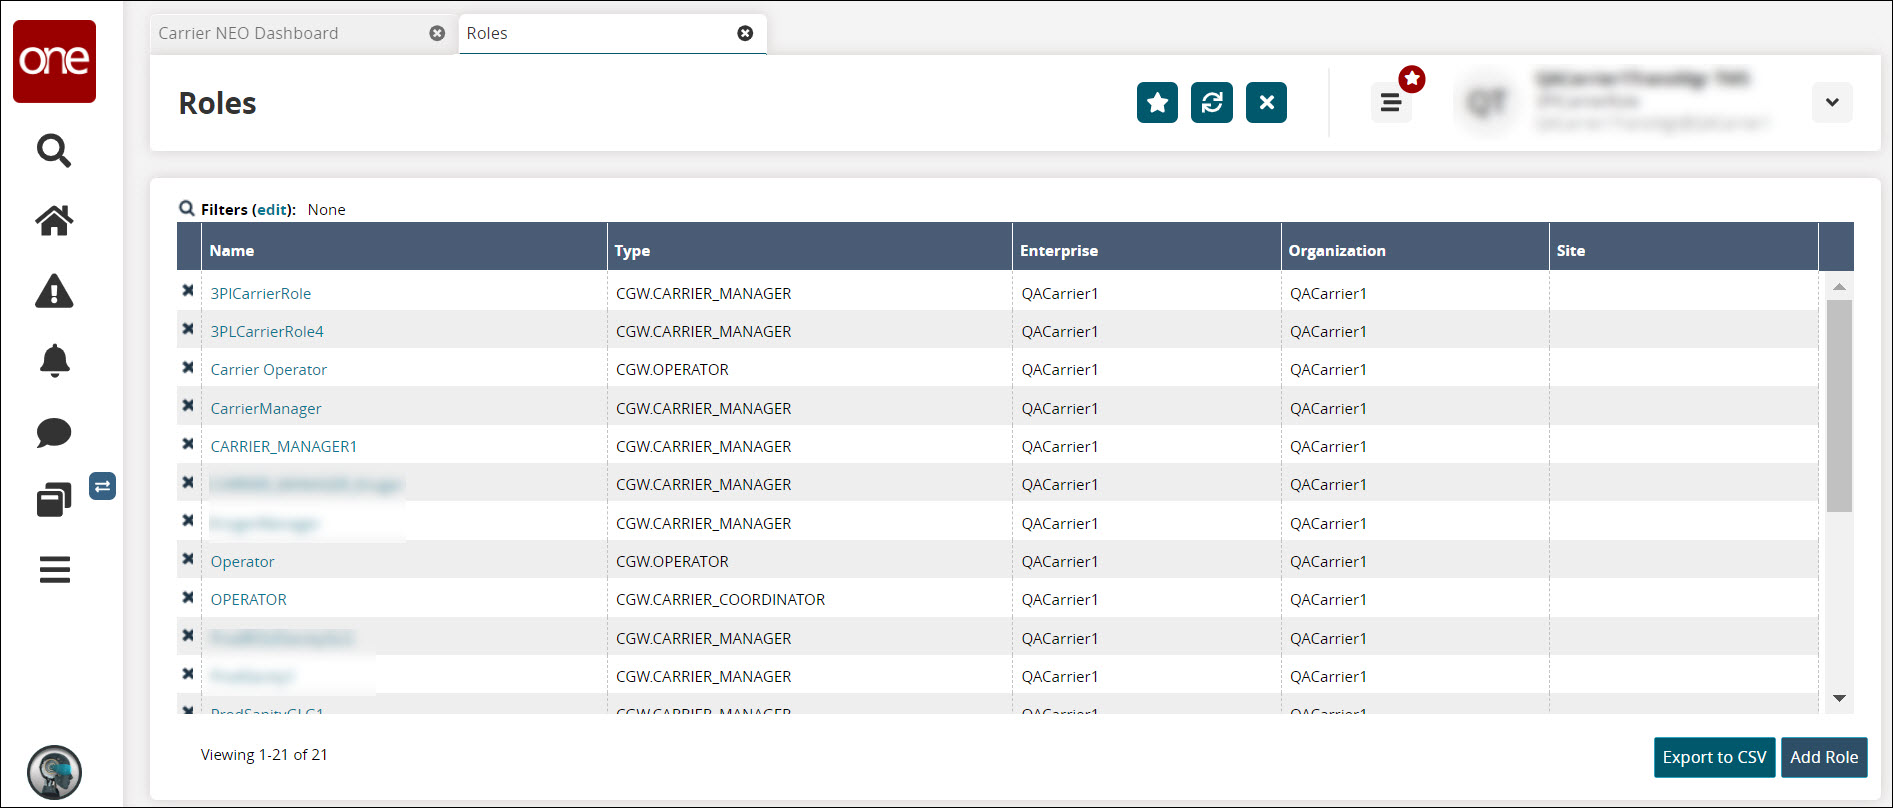
Click the Name link to edit it.
The role's details page displays where users can edit the existing role's information. See the following steps and the pages for each tab for more information.
Click the Add Role button to add a new role.
The Add Role screen displays.

Enter the *Name for the new role. Fields marked with an asterisk (*) are required. This will be the role's name that users can be assigned to.
Select a role type from the *Type Name drop-down menu.
Click the Add button.
The Select Users window displays.
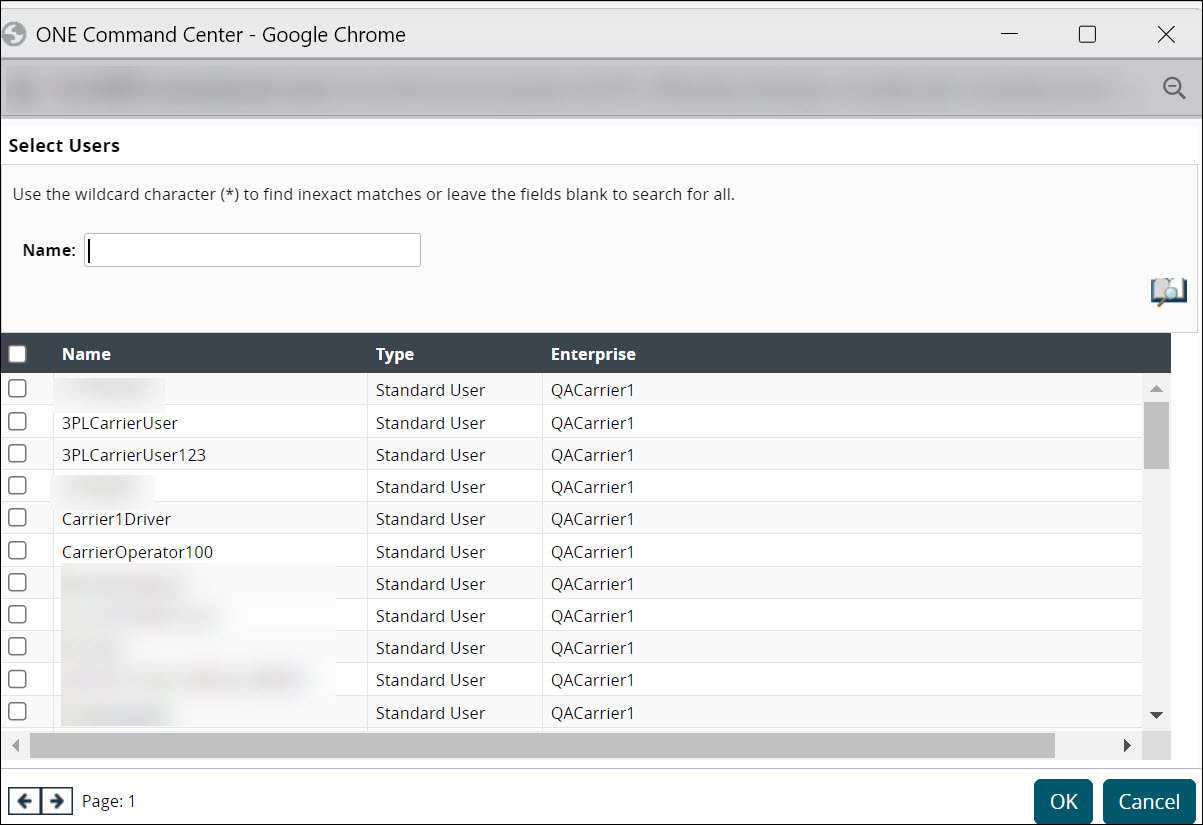
Check the box to select users who can perform this role.
Click the OK button.
The users are added to the Add Role screen in the Users table.
A green success bar displays, and tabs with defining properties display.
Different client users/roles may have different permissions and may or may not be able to perform all functions.
Click a tab to continue to define the role's definitions and properties.
Each tab after the General tab is described in its own section in the NEO Online Help.
Adding a User
ONE Network users with the proper credentials have the ability to add users to the system. Part of this process includes assigning a role to the user profile; a role is a predetermined set of rights and privileges.
Complete the following steps to add a user:
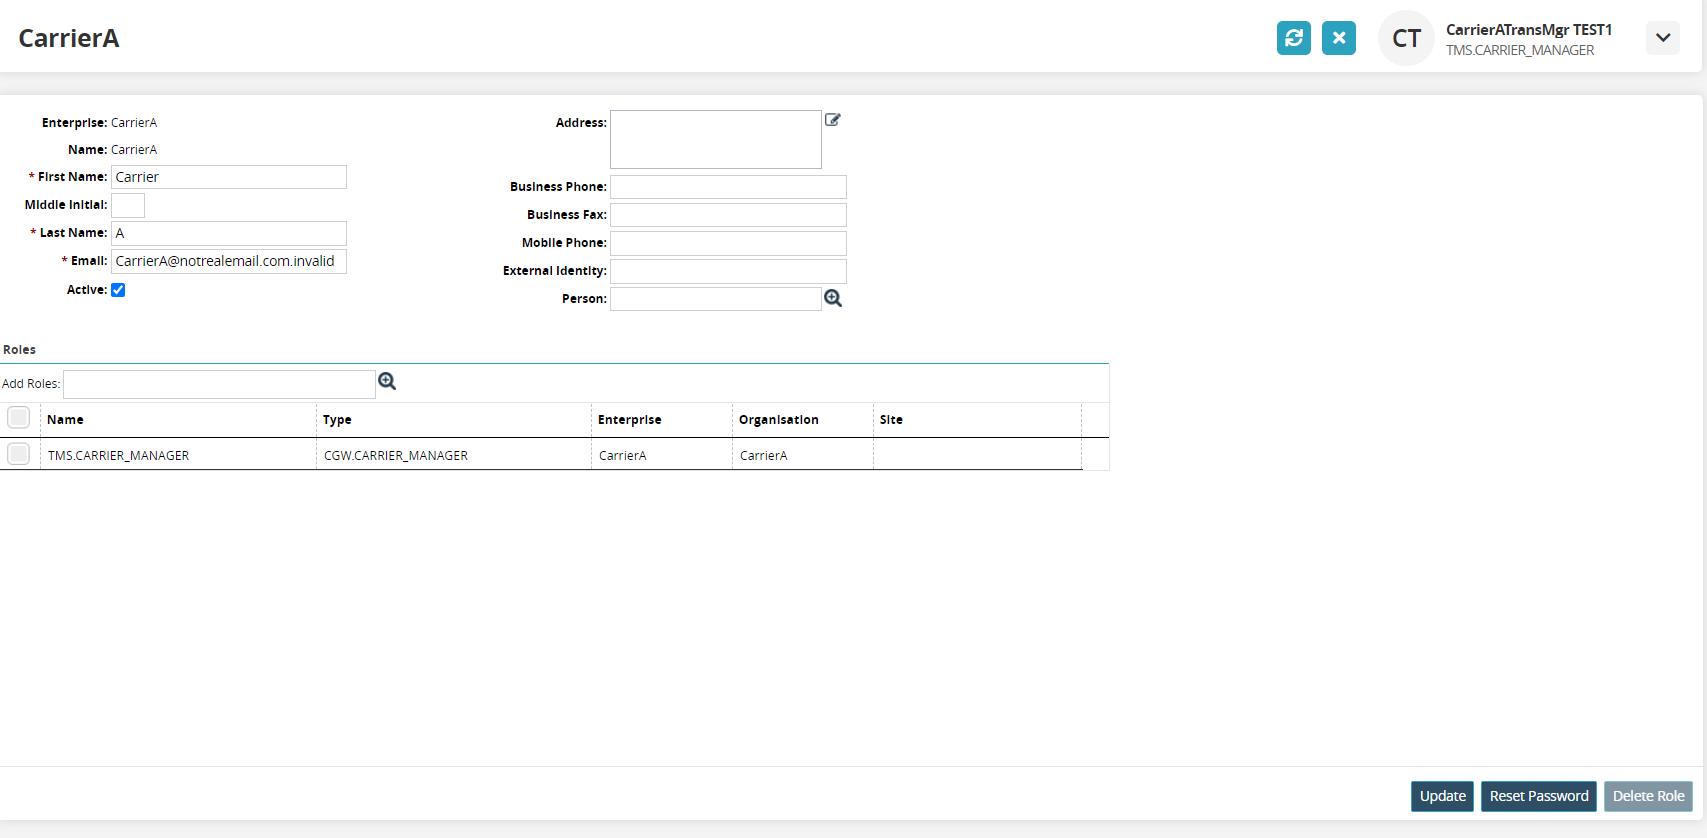
Click Menus/Favs > Administration > Users as a Transportation Manager role.
The Users screen displays.
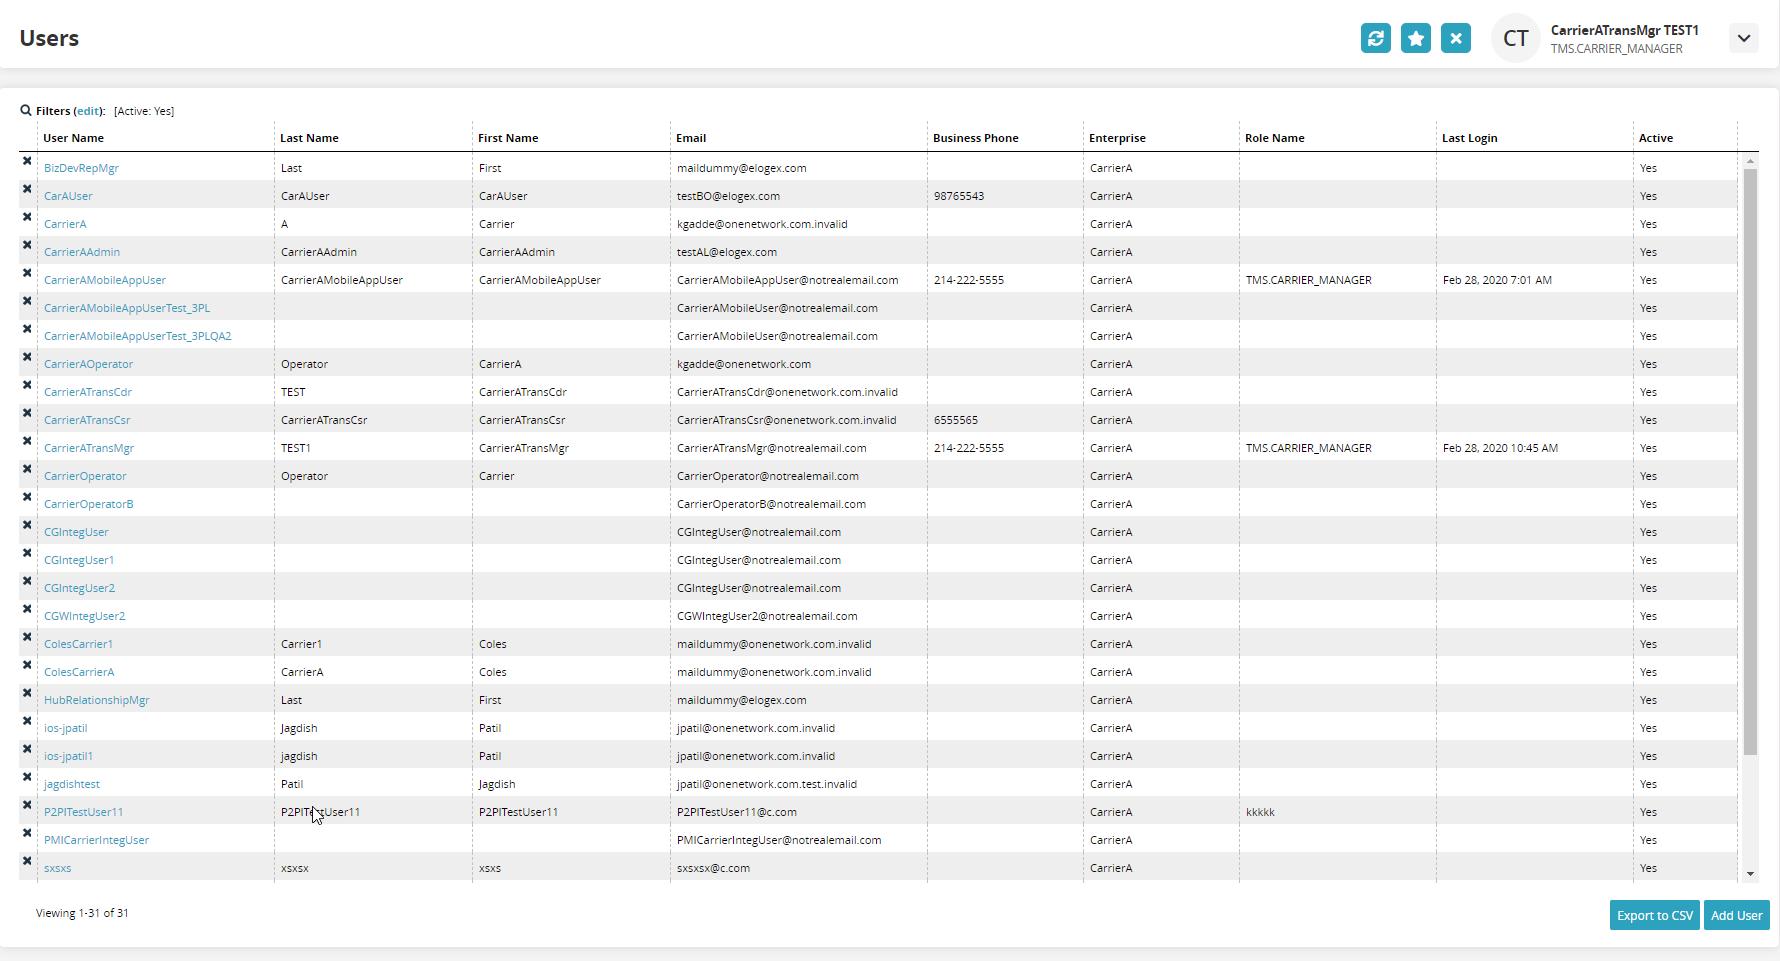
Click the Add User button.
The New User screen displays.
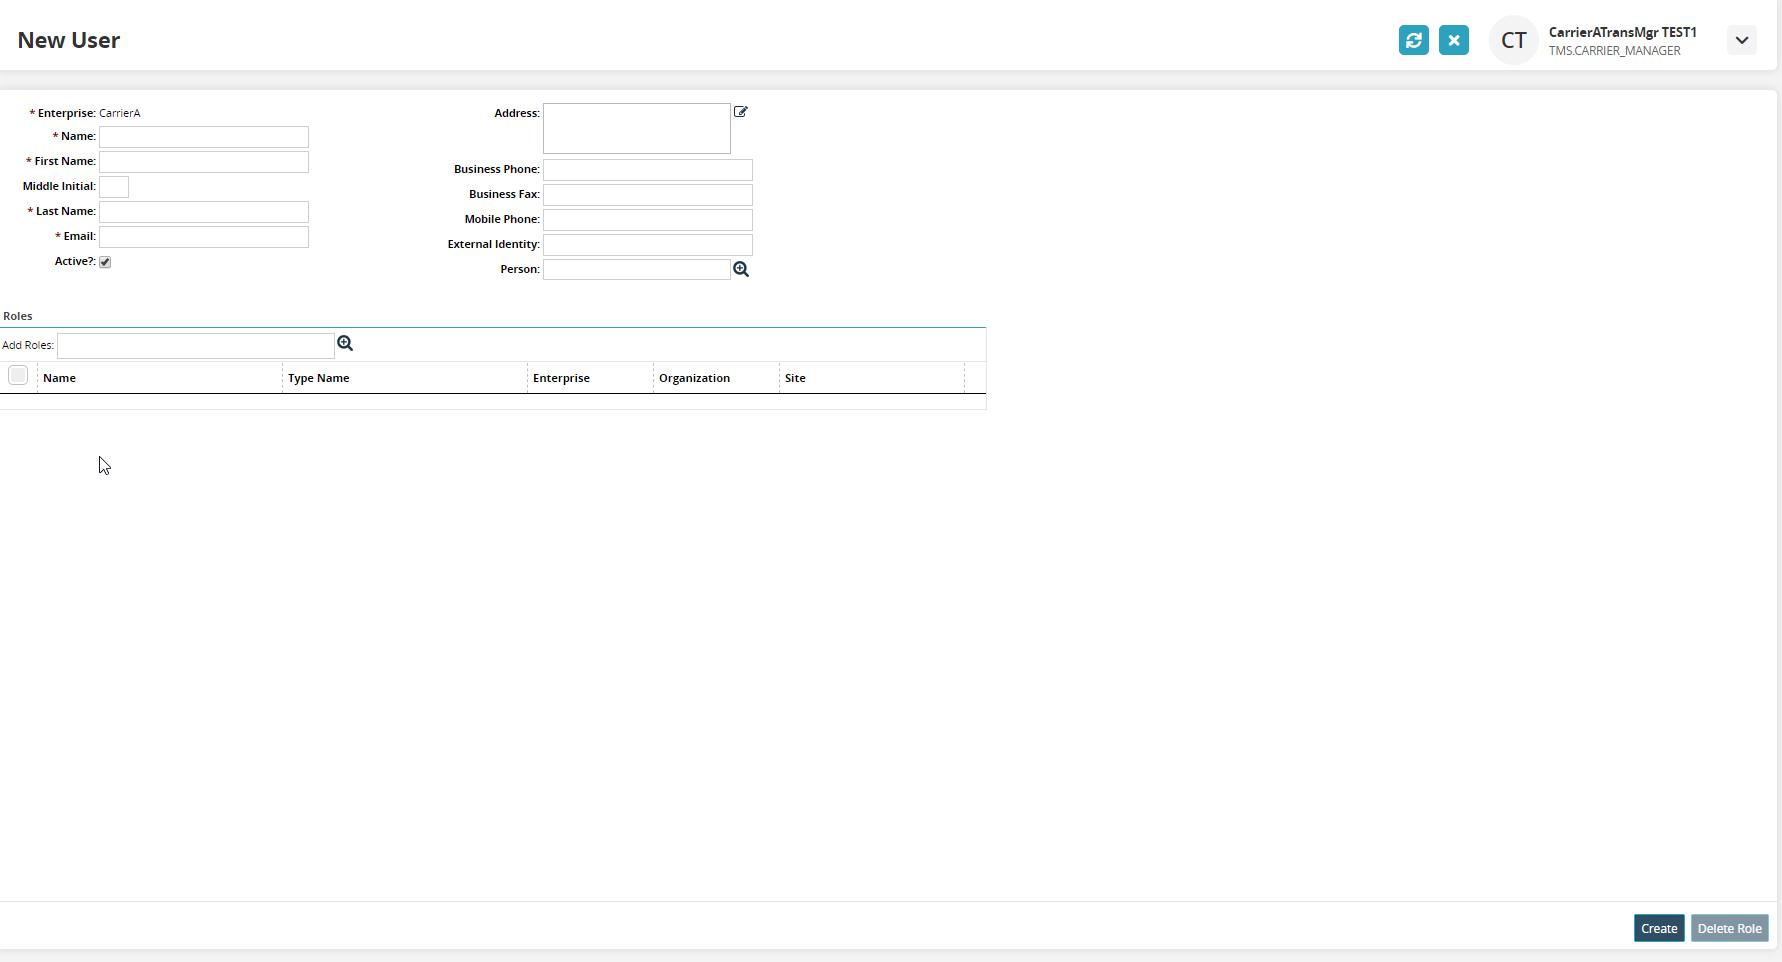
Field
Description
*Enterprise Carrier
This field is auto-populated based on the enterprise of the user.
Address
Type in the address.
*Name
Type in the user name.
*First Name
Type in the first name.
Business Phone
Type in the business phone number.
Middle Initial
Type in the middle initial.
Business Fax
Type in the business fax number.
*Last Name
Type in the last name.
Mobile Phone
Type in the mobile number.
*Email
Type in the email.
External Identity
Type in the external identity.
Active
Check the box to make the user active or inactive.
Person
Use the picker tool to select the person associated with this user.
Add Roles
Use the picker tool to select a role associated with this user. The table will populate upon selection. A user may have multiple roles. Roles can be deleted after they've been added by selecting the role and clicking the Delete Role button.
Admin users have several roles to choose from when assigning roles to a new user depending on the actionable rights and privileges appropriate for the new user.
Carrier Transportation Manager - The Manager role is designed to perform administrative functions for the carrier company. This user can manage users (view/add/delete), view/create roles, view/create regions and lanes, manage Geo permissions, set up auto-accept for tendering, view/accept/reject tenders, view shipments, view/add tracking events, view/schedule/reschedule/cancel appointments, view claims, create/view invoices, and view all available carrier reports.
Carrier Transportation Coordinator - The Coordinator role can view/accept/reject tenders, view/add tracking events, view shipments, view selected reports, and schedule/reschedule/cancel appointments.
Carrier Transportation CSR (Customer Service Representative) - The CSR role supports customers as a view-only user with rights to view selected reports and view shipments in selected states.
Carrier Transportation Operator - The Operator role is designed to equip operators or drivers who are required to provide shipment status updates via the ONE Network mobile app. A user with the Operator role may only access shipments that are dispatched to that user within that carrier company. This user can provide status updates on dispatched loads, enable GPS tracking, and provide Proof of Delivery (POD).
Adding Geo Permissions to a Role
Complete the following steps to add geo permissions to a role:
Click Menus/Favs > Administration > Role.
The Roles screen displays.
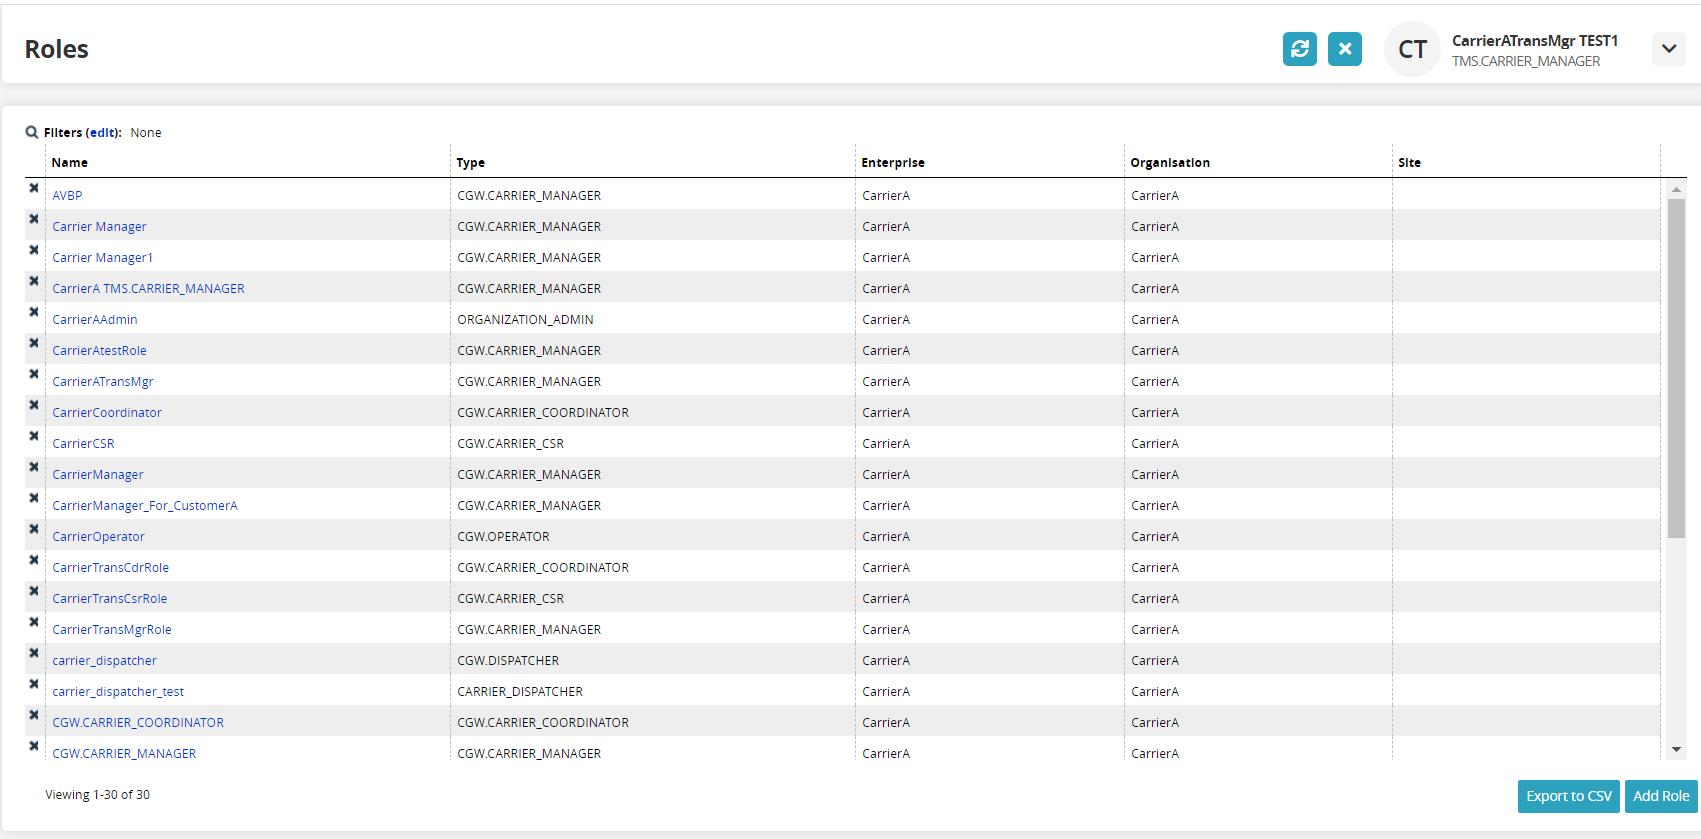
Under the Name column, click a Role link.
The role's screen displays.
Click the Geo Permissions tab.
The Geo Permissions tab displays.

Click the Add button.
The Select Geo Lane window dialog box displays.
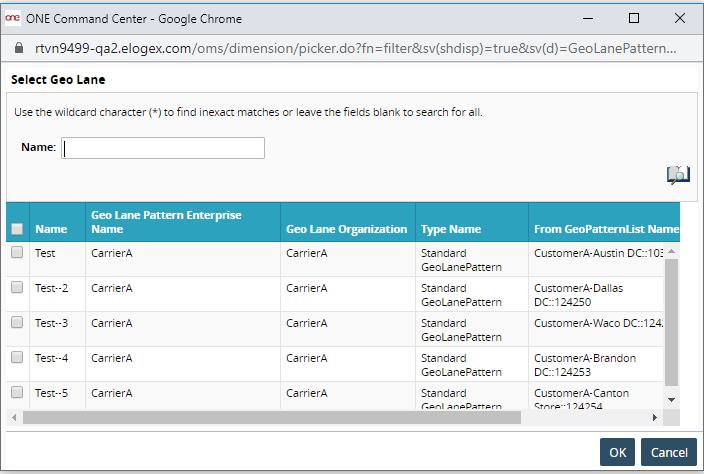
Click the checkbox in front of the lane to be added.
Click the OK button.
The lane is added to the role.
Creating a Public Profile
Carriers who operate in ONE Network have the ability to work with multiple ONE Network Customers (Shippers). Carriers can leverage a single ONE Network Carrier enterprise account to collaborate with multiple customers and, therefore, enable global visibility of transportation operations in ONE Network.
To receive partnership requests from Shippers in One Network, you must first have a Public Profile. Companies can have multiple Public Profiles to represent various operating groups within their company. ONE Network Carriers should all have default public profiles that are published when they join the Network. The default Public Profile can be edited to suit your company's needs.
Complete the following steps to create a public profile:
Click Menus/Favs > Administration > Public Profile.
The Public Profile screen displays.
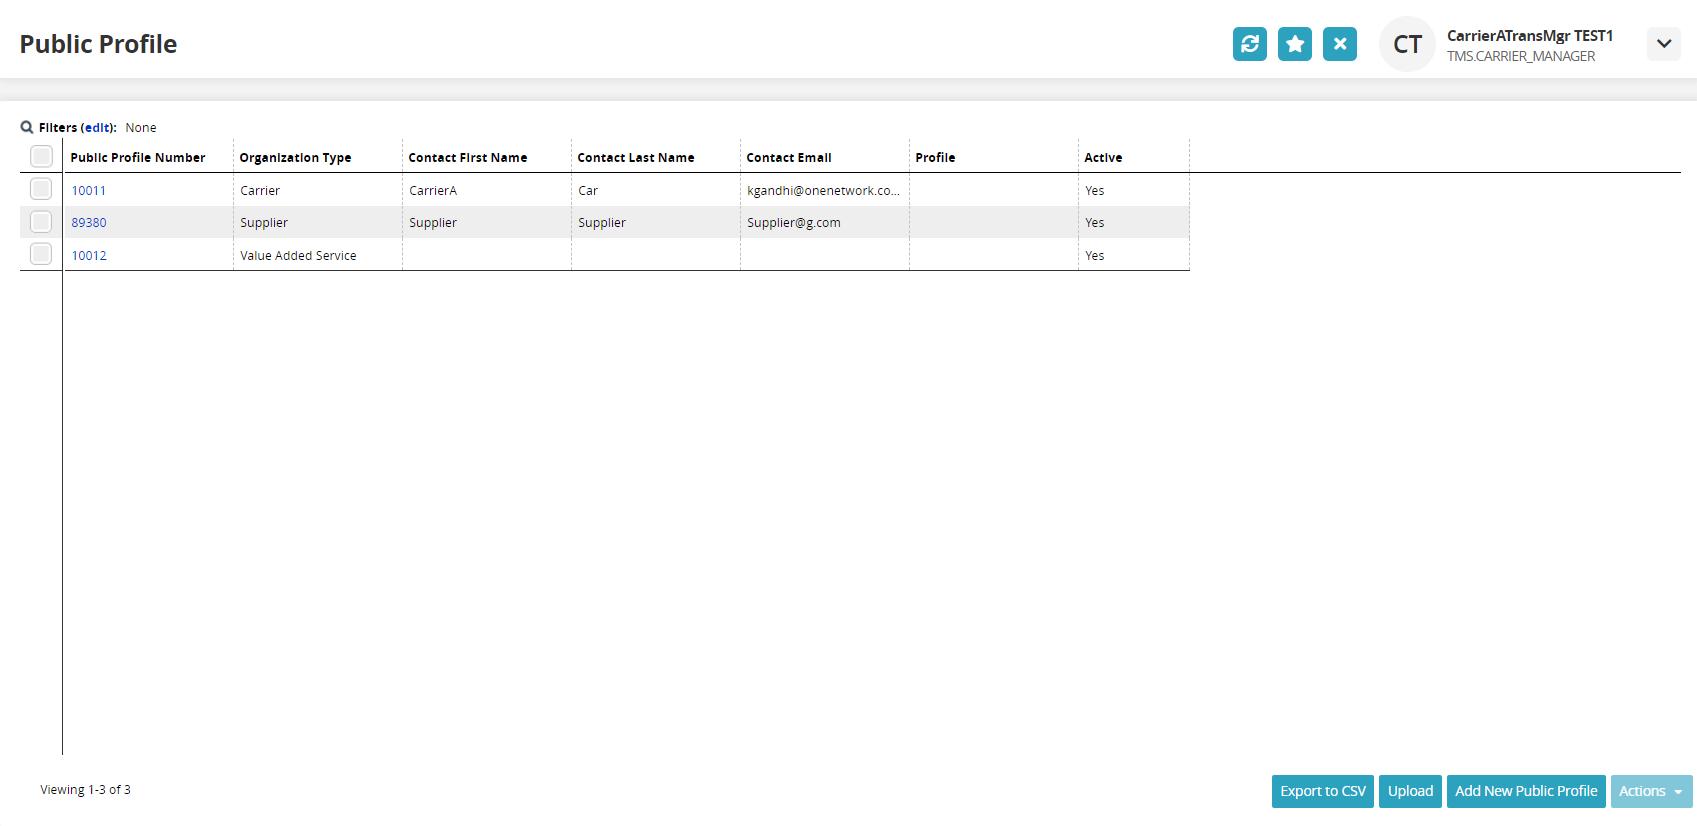
Click the Add New Public Profile button.
The Add New Public Profile screen displays.
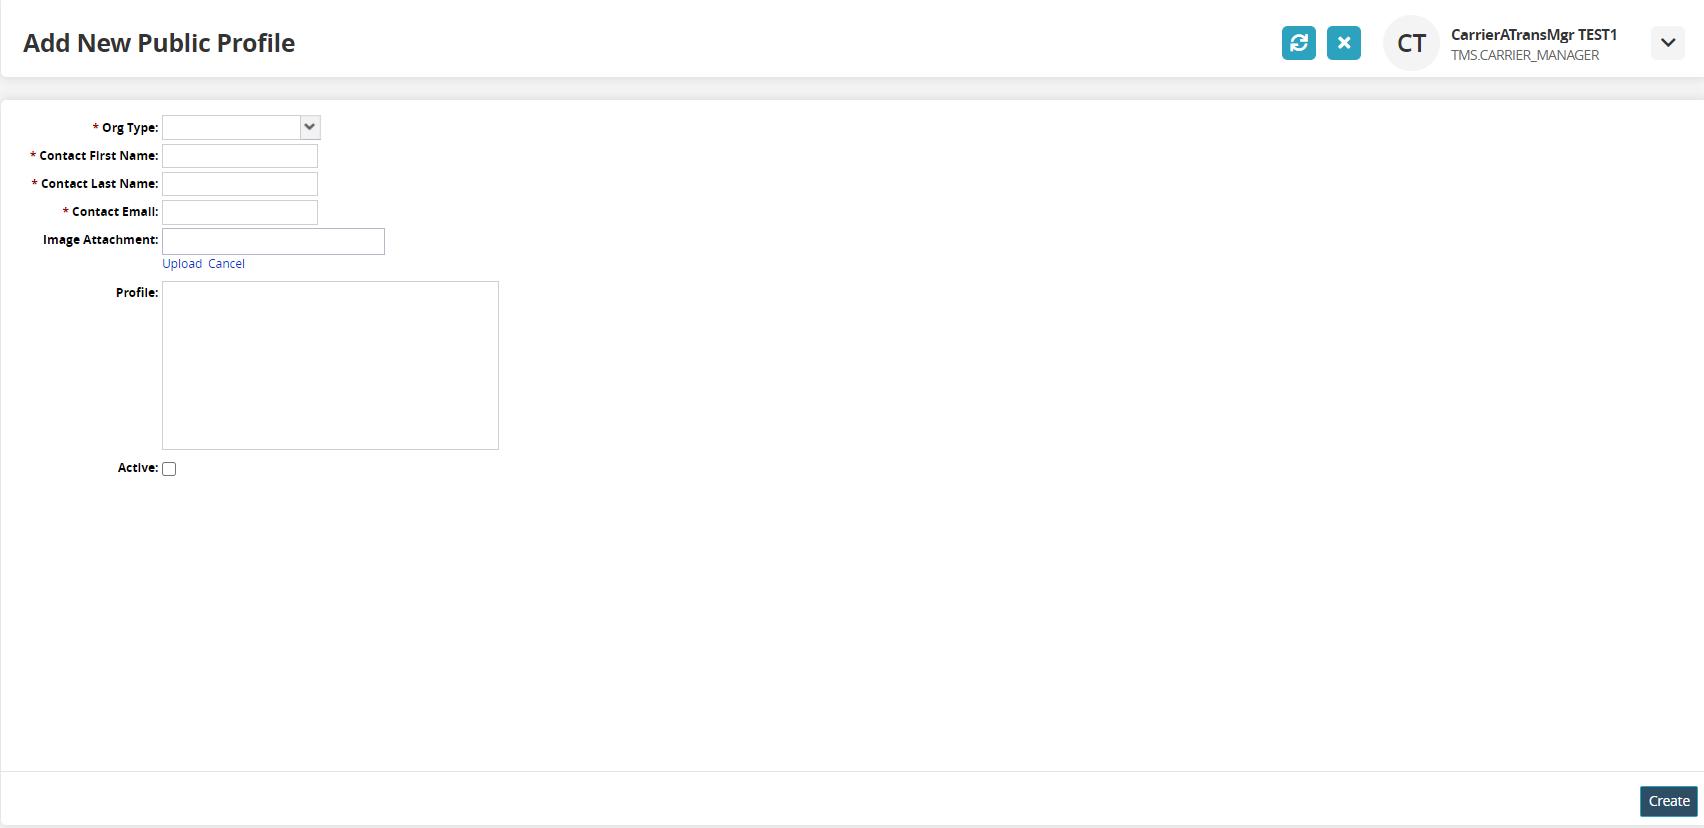
Field
Description
*Org Type
Select the Organization Type from the drop-down menu.
*Contact First Name
Type in the contact's first name.
*Contact Last Name
Type in the contact's last name.
*Contact Email
Type in the contact's email address.
Image Attachment
Click on the Upload link to upload an image attachment.
Profile
Type in profile information about the contact.
Active
Check the box to indicate an active profile.
Creating Regions and Lanes
Complete the following steps to create regions and lanes:
Click Menus/Favs > Administration > Regions and Lanes.
The Regions and Lanes screen displays.
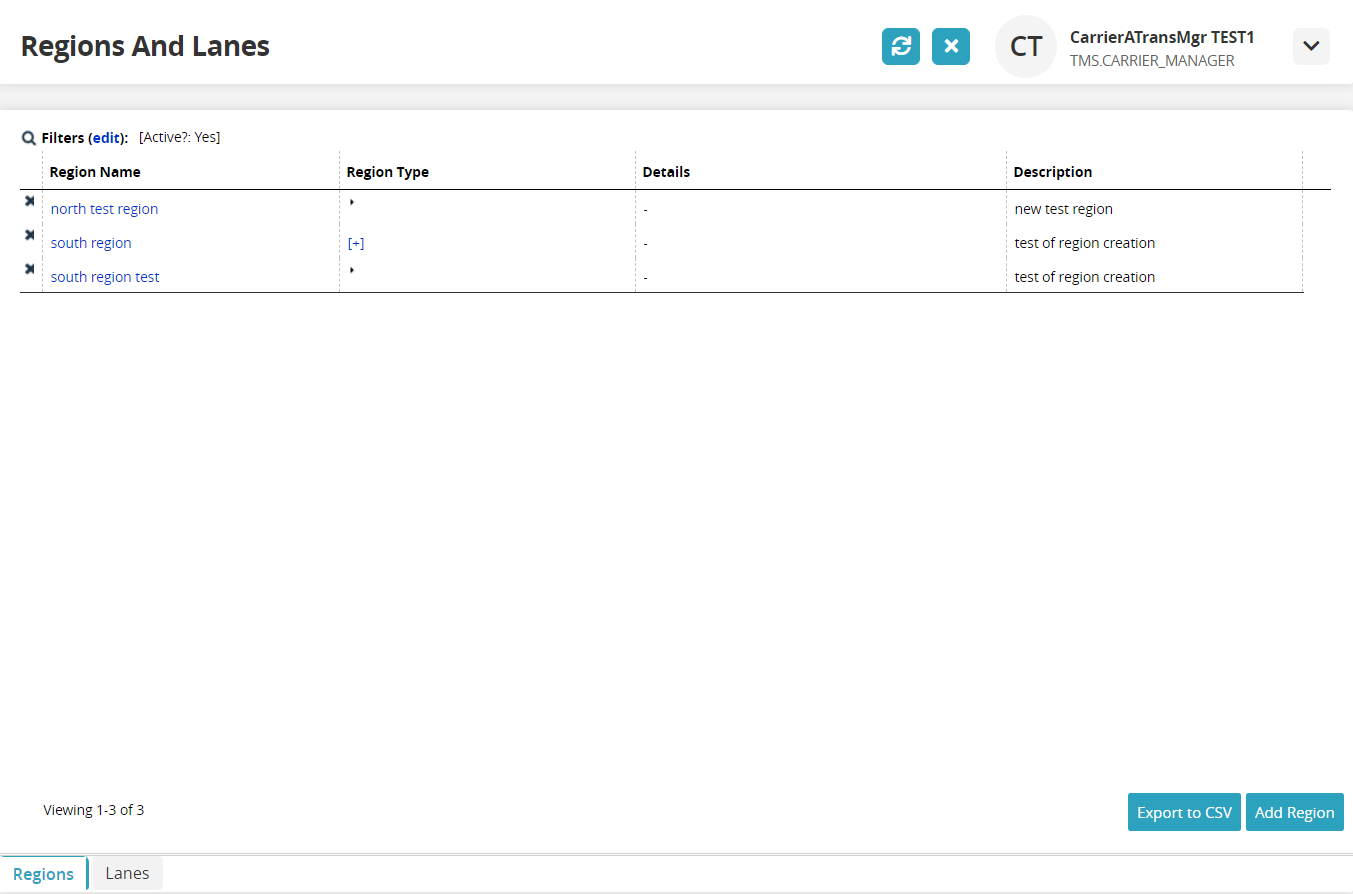
Click the Add Region button.
The New Region screen displays.
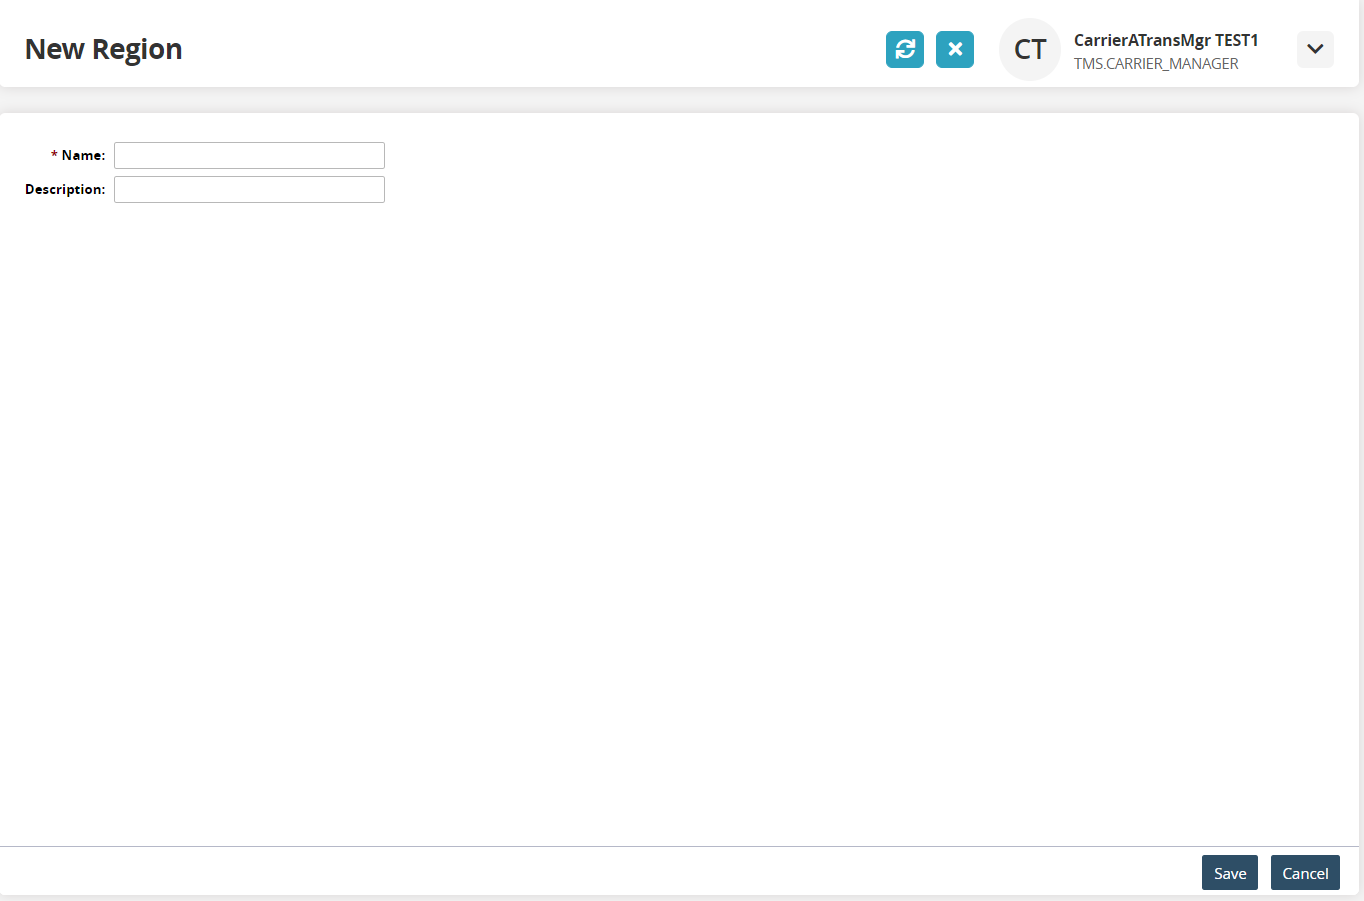
Fill in the *Name and Description fields.
The screen for your new region displays.
Click the Add button.
The lane definition fields display.
In the *Pattern field, select a value from the drop-down list.
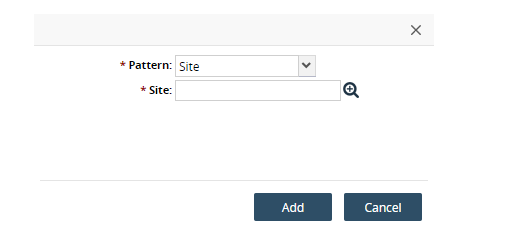
Different values from the drop-down list determine the list of fields below it, as shown below.
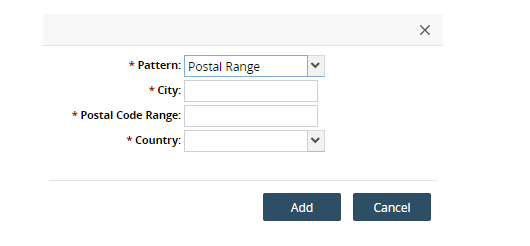
Click the Add button.
The lane information displays.
Deleting Users
Complete the following steps to delete a user:
Click Menus/Favs > Administration > Users.
The Users screen displays a list of users.

Click the X next to the user to be deleted.
A window displays.
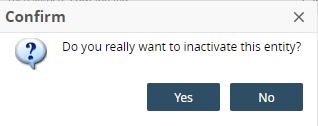
Click the Yes button.
A deactivation window displays.
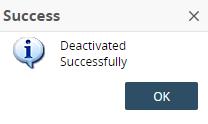
Click the OK button.
Accepting a Partnership Request
Complete the following steps to accept a partner request:
Click Menus/Favs > Administration > Partner Invitations.
The Partner Invitations screen displays.
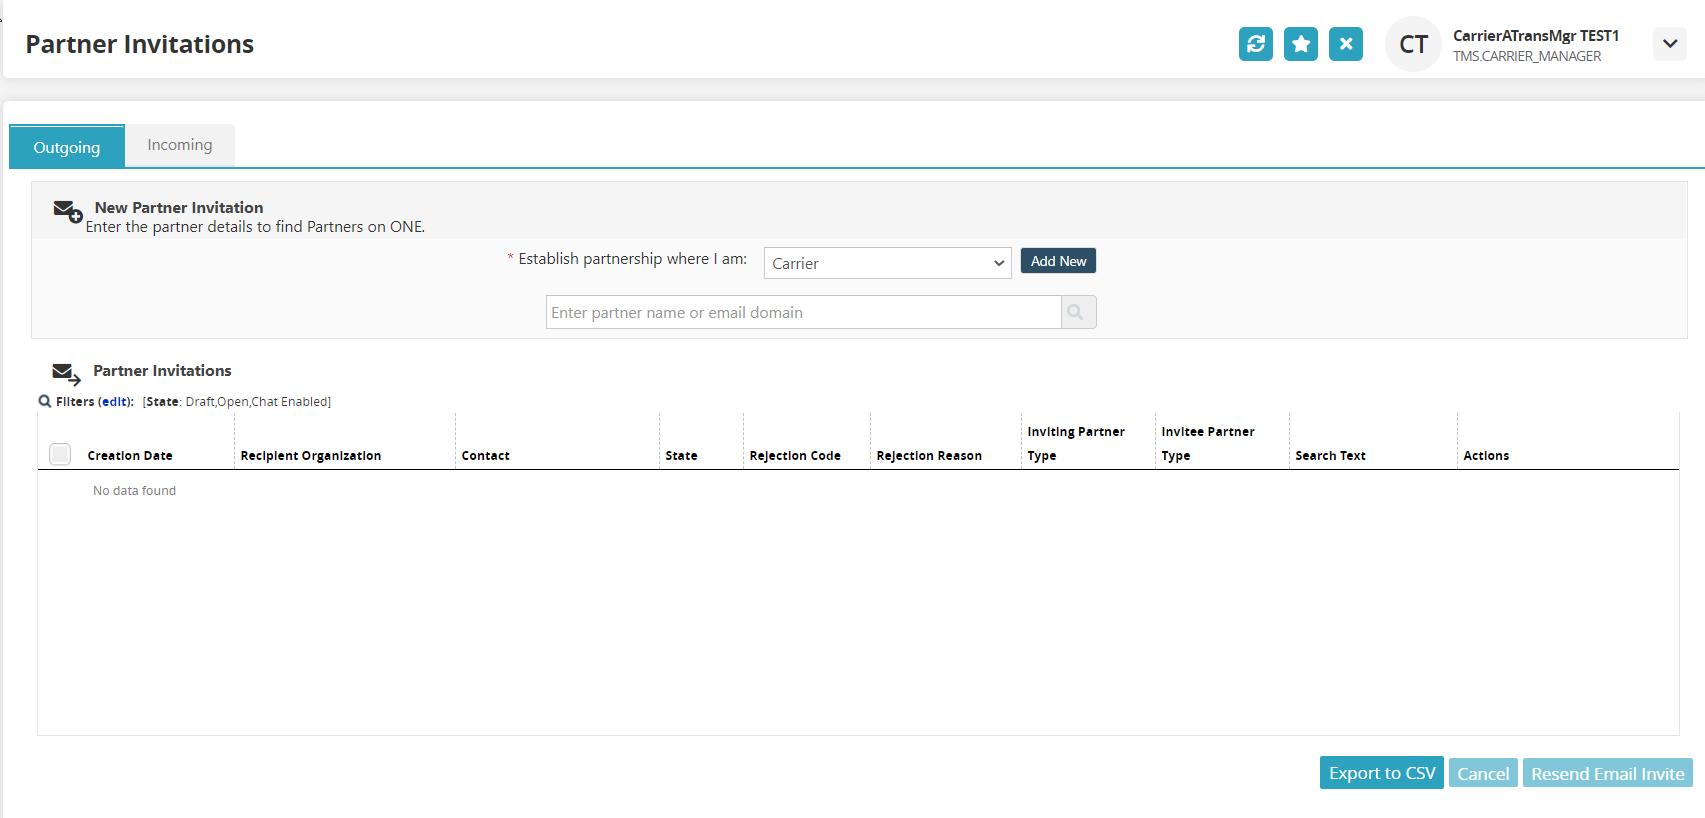
Click the Incoming tab.
A list of invitations displays.
Click the checkbox next to the invitation to be accepted.
The Accept and Reject buttons activate.
Click the Accept button.
Switching Roles
A user role controls the permissions and types of actions users can perform and data they have access to. Users can have multiple role types assigned to them, but they can use only one role at a time, like the Carrier Manager role. Although users are limited to using a single role at a time, they can switch to a different role at any time.
Complete the following steps to switch roles:
The dashboard displays.
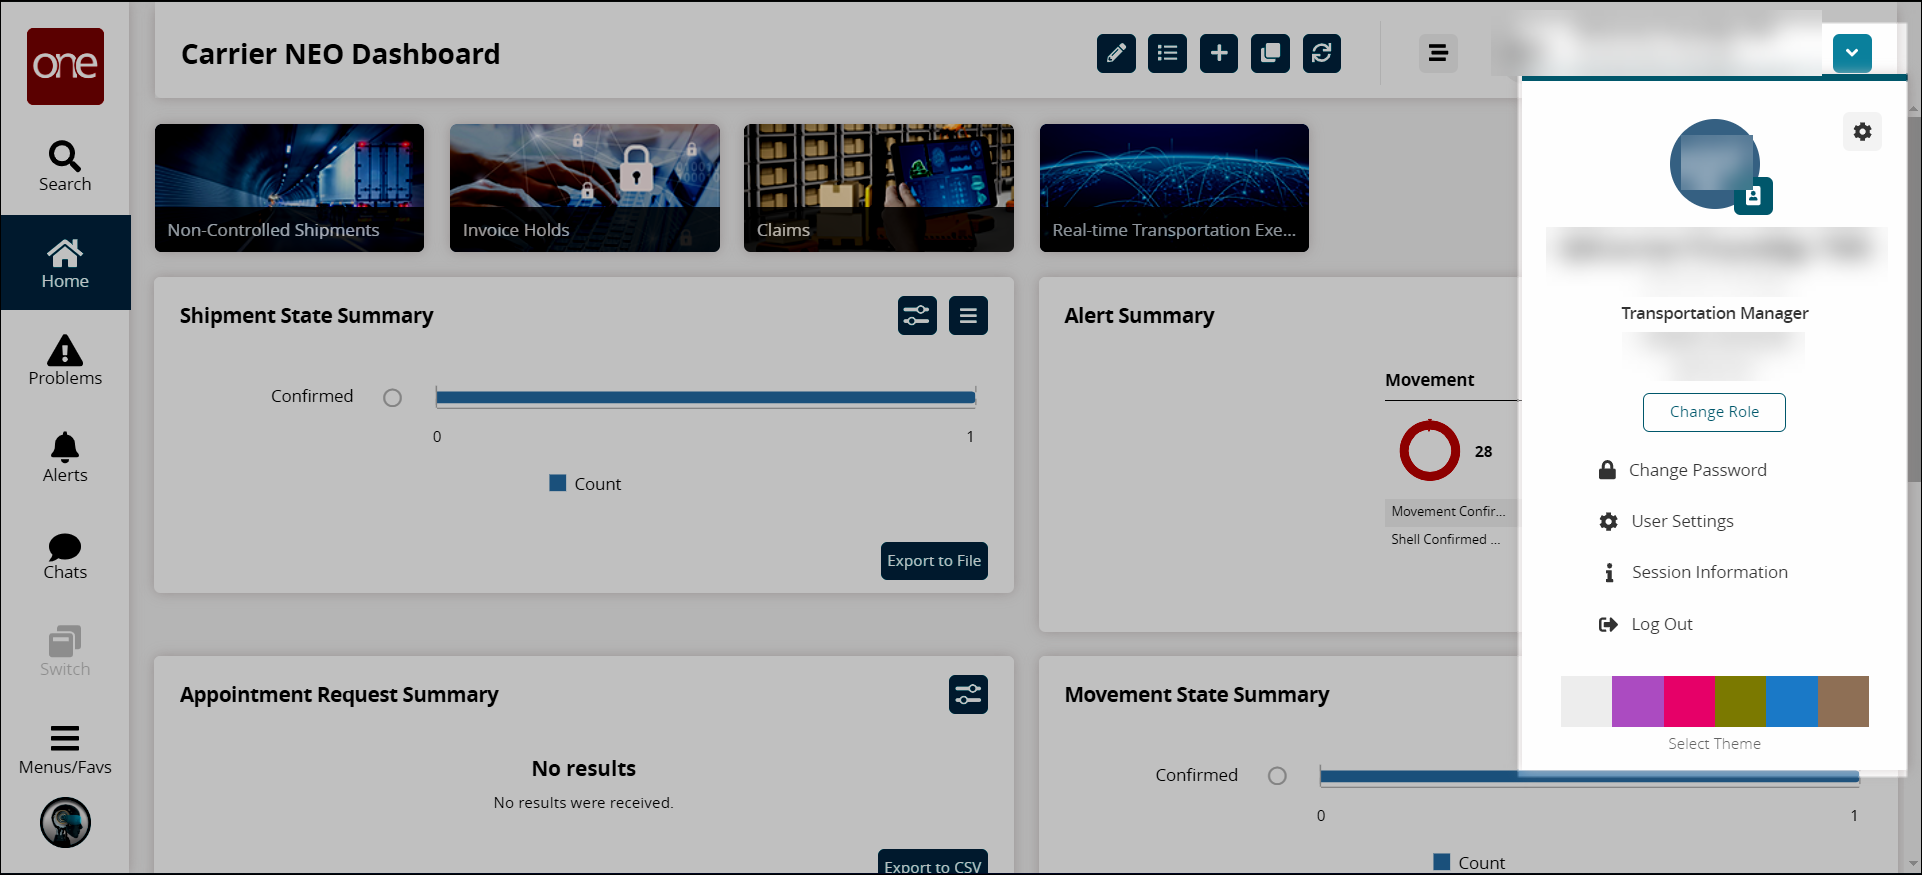
Click the down arrow in the top right-hand corner of the NEO UI.
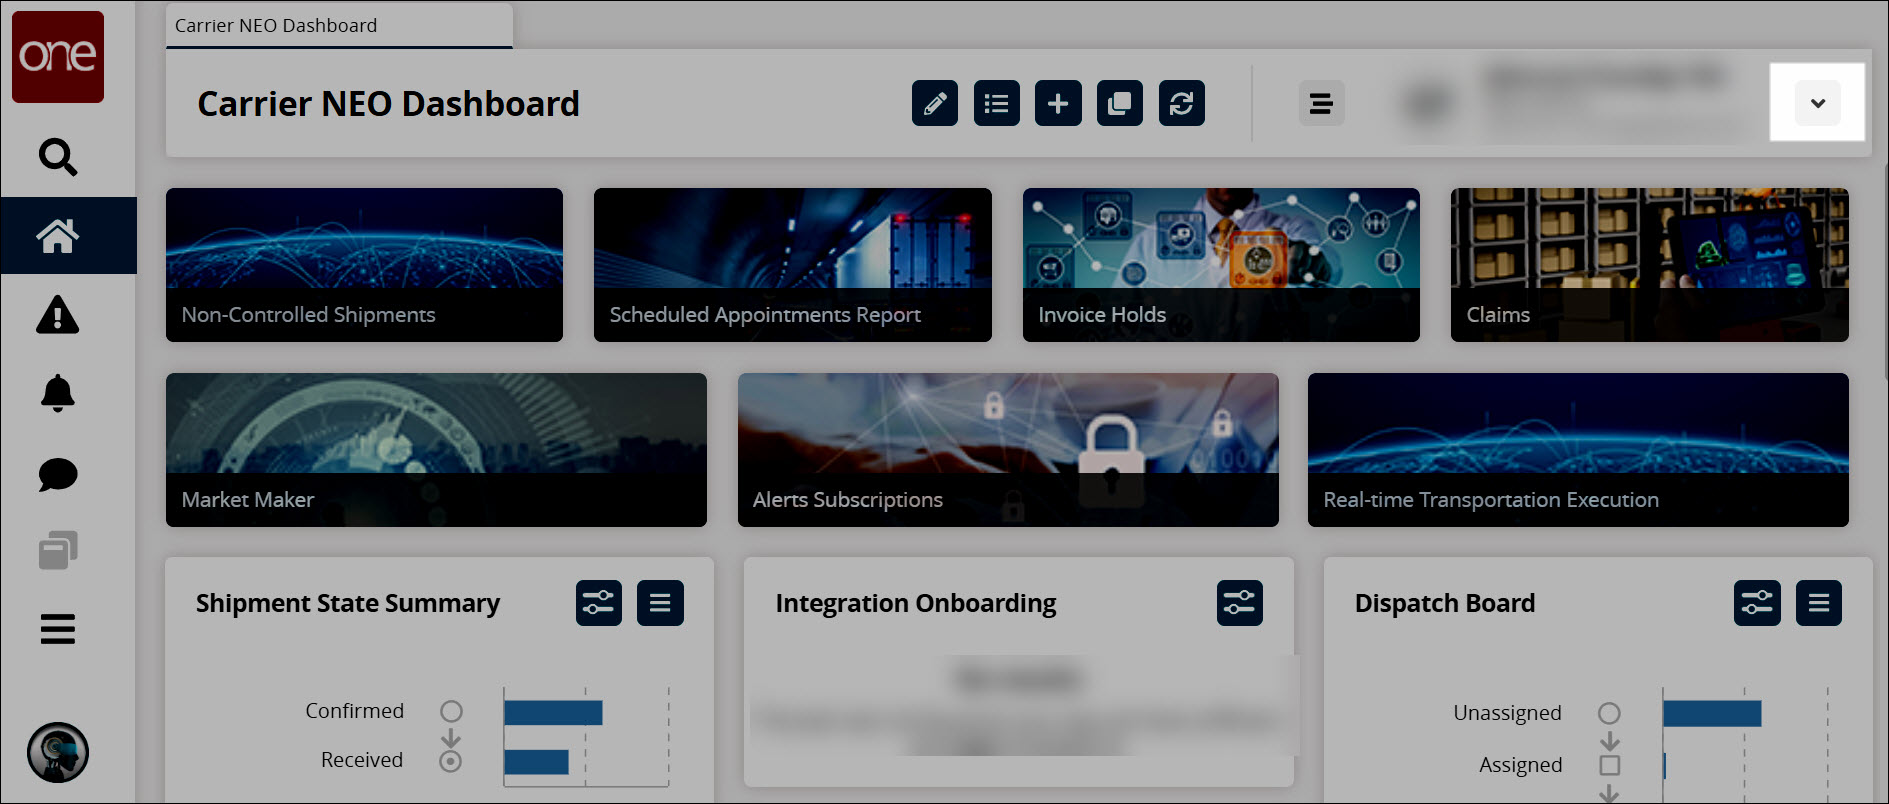
The user profile settings slideout displays.
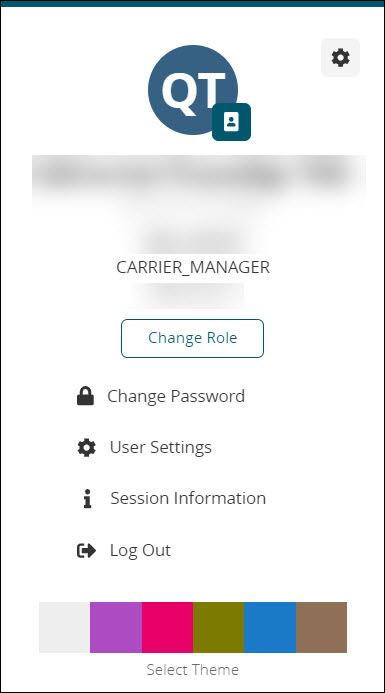
Click the Change Role button.
The Select Another Role window is displayed.

Click the radio button to select a new role, and click the Change Role button.
The screen refreshes with the new role.
Viewing and Updating User Profiles
Complete the following steps to view and update user profiles:
Click Menus/Favs > Administration > Users.
The Users menu displays.
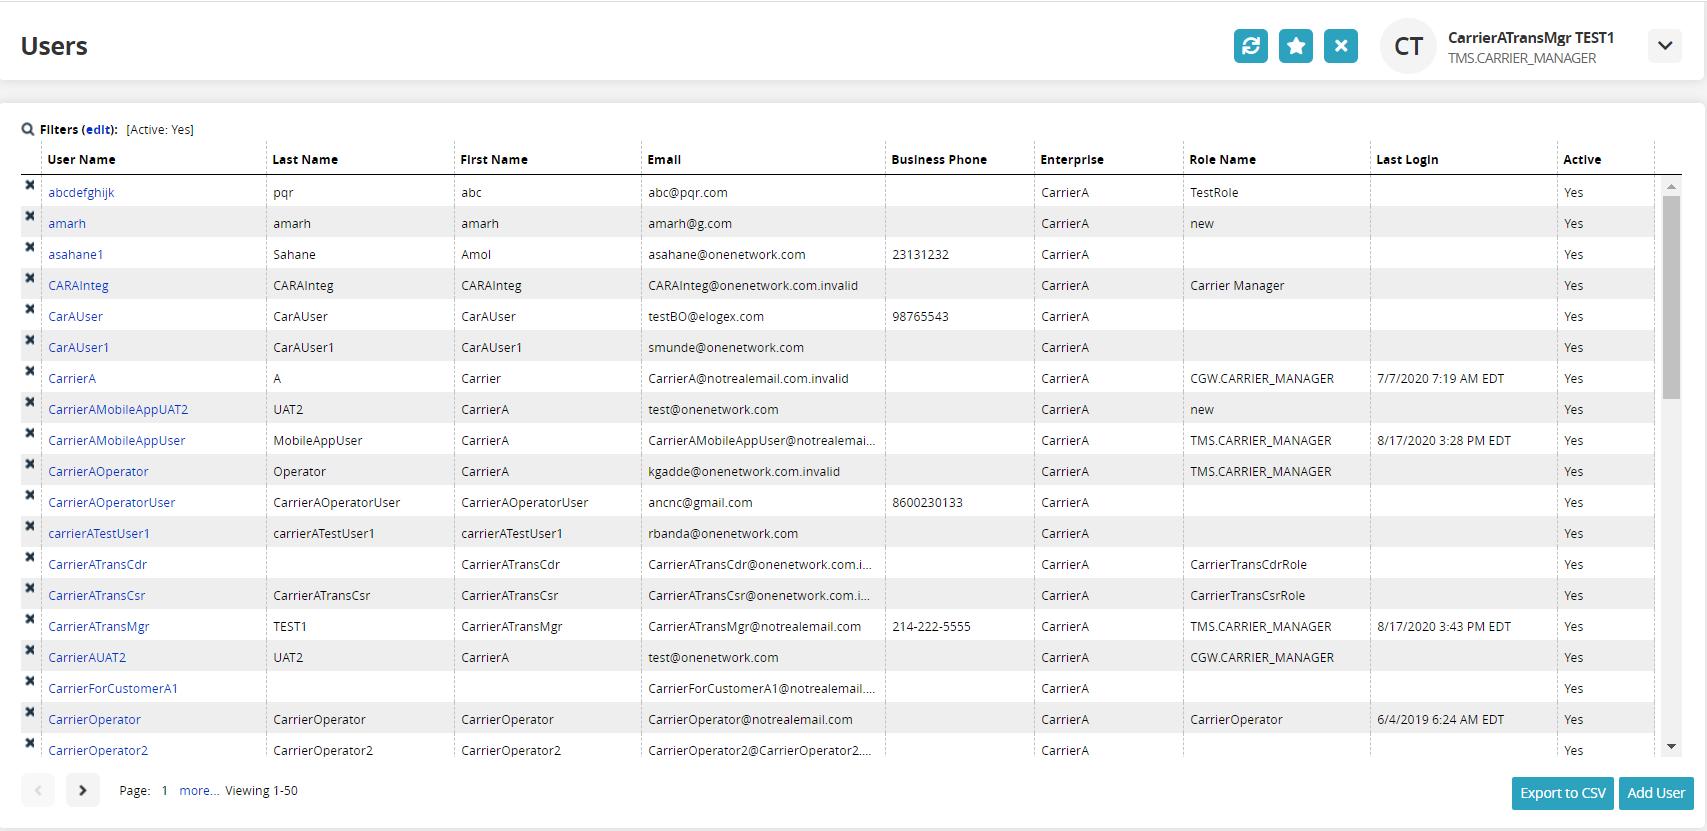
Click the User Name link.
The user profile screen displays.
Update information as necessary and click the Update button.
Carrier Integration Onboarding
Carrier Onboarding Invitations
Complete the following instructions to send an onboarding invitation to carriers:
Click Menus/Favs > Administration > Partners > Partner Onboarding > Partner Invitations as a Transportation Manager role.
The Partner Invitations screen displays with the Outgoing and All Invitations tabs selected by default.
Any of the following criteria can be used to search for partners and users in the ONE system.
Field
Description
*Onboarding Program
Select the onboarding program for the new partner from the drop-down list.
*Establish partnership from where I am
Select the organization or partnership the user is part of: Customer or Carrier.
Enter partner name or email domain
Enter the partner name or the email domain name the partner uses.
EIN Type
Select the Employer Identification Number (EIN) type from the drop-down list.
EIN
Enter the EIN.
Organization SCAC
Enter the organization's Standard Carrier Alpha Code (SCAC).
Click the Search button.
The Potential Matches window is displayed possible matches across the top. If matches are found, there are sections for organizations with active and non-active users.
Click on the radio button to select a carrier user.
Contact details display for that user.
If the partner is not found in the search, the Potential Matches window is displayed as below:
As you enter values, the action buttons become active.
Section
Field
Description
Top section - contains user contact information
*First Name
Enter the user's first name.
*Email
Enter the user's email.
*Suggested Enterprise Name
Enter the enterprise name suggested.
*Last Name
Enter the user's last name.
Phone
Enter the user's phone number.
Bottom section - additional information related to this invitation
Name your partnership
Enter your organization's name.
Priority
Select the priority for the email invitation from the drop-down list.
Additional Notes
Enter any additional information.
Click the Cancel Invite button to cancel the invitation. The window closes and the user is redirected to the Partner Invitations screen.
Click the Save to Draft button to save the invitation as a draft. A record of the draft displays in the Partner Invitations section.
Click the Email Preview button to display another window with a preview of the email.
Click the X to close the preview.
Click the Send Email Invite button to send the invitation.
A record of the invitation displays in the Partner Invitations section.
Click the Resend Email or Cancel links to resend the email invitation or cancel the invitation.
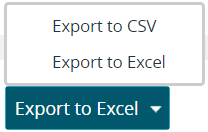
Click Export to Excel to export the report to a file.
Note
Depending on the configuration settings of your instance of the ONE system, an additional drop-down menu may display that includes the option to export the data in a CSV file.
Click the checkbox in front of multiple records.
The Cancel and Resend Email buttons activate.
Click the link under the Invitation No column to view the details screen for an invitation.
Click the Incoming tab to view partner invitations received.
Click the Draft Invitations by Onboarding Program to view all invitations saved as drafts and sorted according to the onboarding program.
Complete the following steps to process an incoming partner invitation:
Click Menus/Favs > Administration > Partners > Partner Invitations as a Carrier Manager role.
The Partner Invitations screen displays.
Click the Incoming Tab.
Select one or more incoming partner invitations by clicking on the checkbox.
Click the Accept button to accept the invitation(s).
An email is sent to the user with a link to log in and set their password.
Click the Reject button to reject the invitation(s).
Click Export to Excel to export the report to a file.
Note
Depending on the configuration settings of your instance of the ONE system, an additional drop-down menu may display that includes the option to export the data in a CSV file.
Complete the following steps to complete integration certification:
Click Menus/Favs > Administration > Partners > Partner Onboarding > Integration Onboarding.
The Integration Onboarding screen displays.
Scheduling
Cancelling In Progress Appointment Requests
Users can cancel in-progress appointment requests.
Complete the following steps to cancel an appointment request:
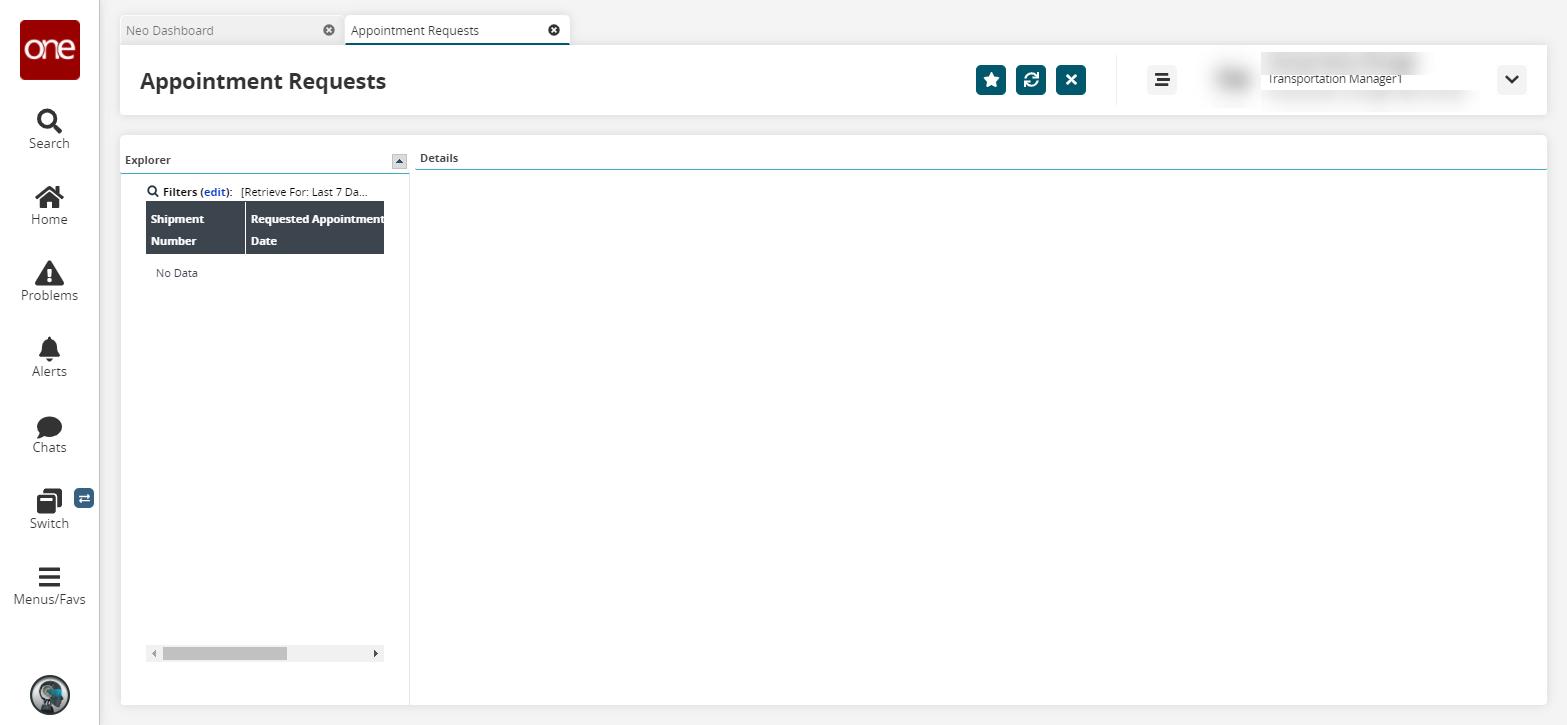
Click Menus/Favs > Scheduling > Appointment Requests.
The Appointment Requests screen displays, showing an Explorer panel and a Details panel.
Select one or more appointments to cancel them, and click Cancel Appointment Request.
The Cancel Appointment Request window is displayed details on the selected appointments.
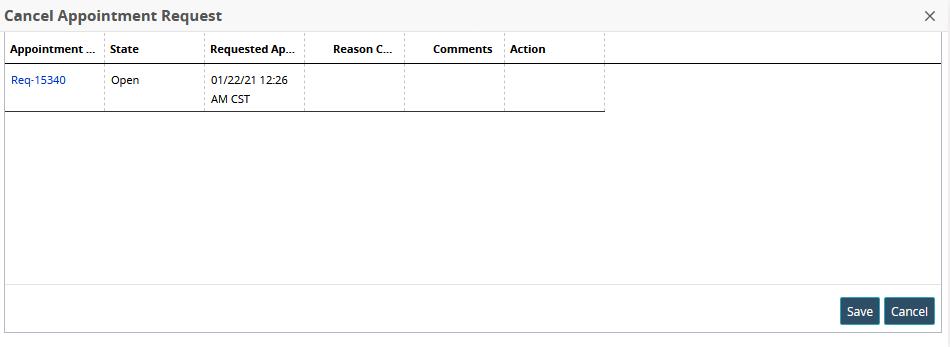
Select a reason for cancellation from the drop-down in the Reason Code column.
Note
If canceling multiple appointment requests, you can specify the reason and comments for one appointment request and click Apply All Reason Codes to apply the same reason code to all other appointment requests selected for cancellation.
If the Hide Reject Reason Code Field for Appointment Request policy is enabled under Scheduling Policies, the Reason Code field is not displayed on the UI when rejecting an appointment request.
Enter any additional information for reference in the Comments column.
Creating Appointment Requests
If no appointments are available in the system when scheduling appointments for controlled and non-controlled shipments or if a different time is required from the appointment times listed, users can create appointment requests. the Create Appointment Request button from any of the following screens: New Live Pickup Appointment, New Live Delivery Appointment, Create Drop Delivery Appointment.The process is the same for live pickup, live delivery, and drop delivery appointments.
Complete the following steps to create an appointment request:
Click Menus/Favs > Transportation > Search Shipments to search for a shipment.
Shipment Search Alternatives
Alternative methods to search for shipments are available. See any of the following sections in the NEO Online Help for more information:
"Searching Shipments"
"Searching for Non-Controlled Shipments"
"Using Filters"
"Performing a Global Search"
Click the link for the shipment number.
The shipment details screen displays.
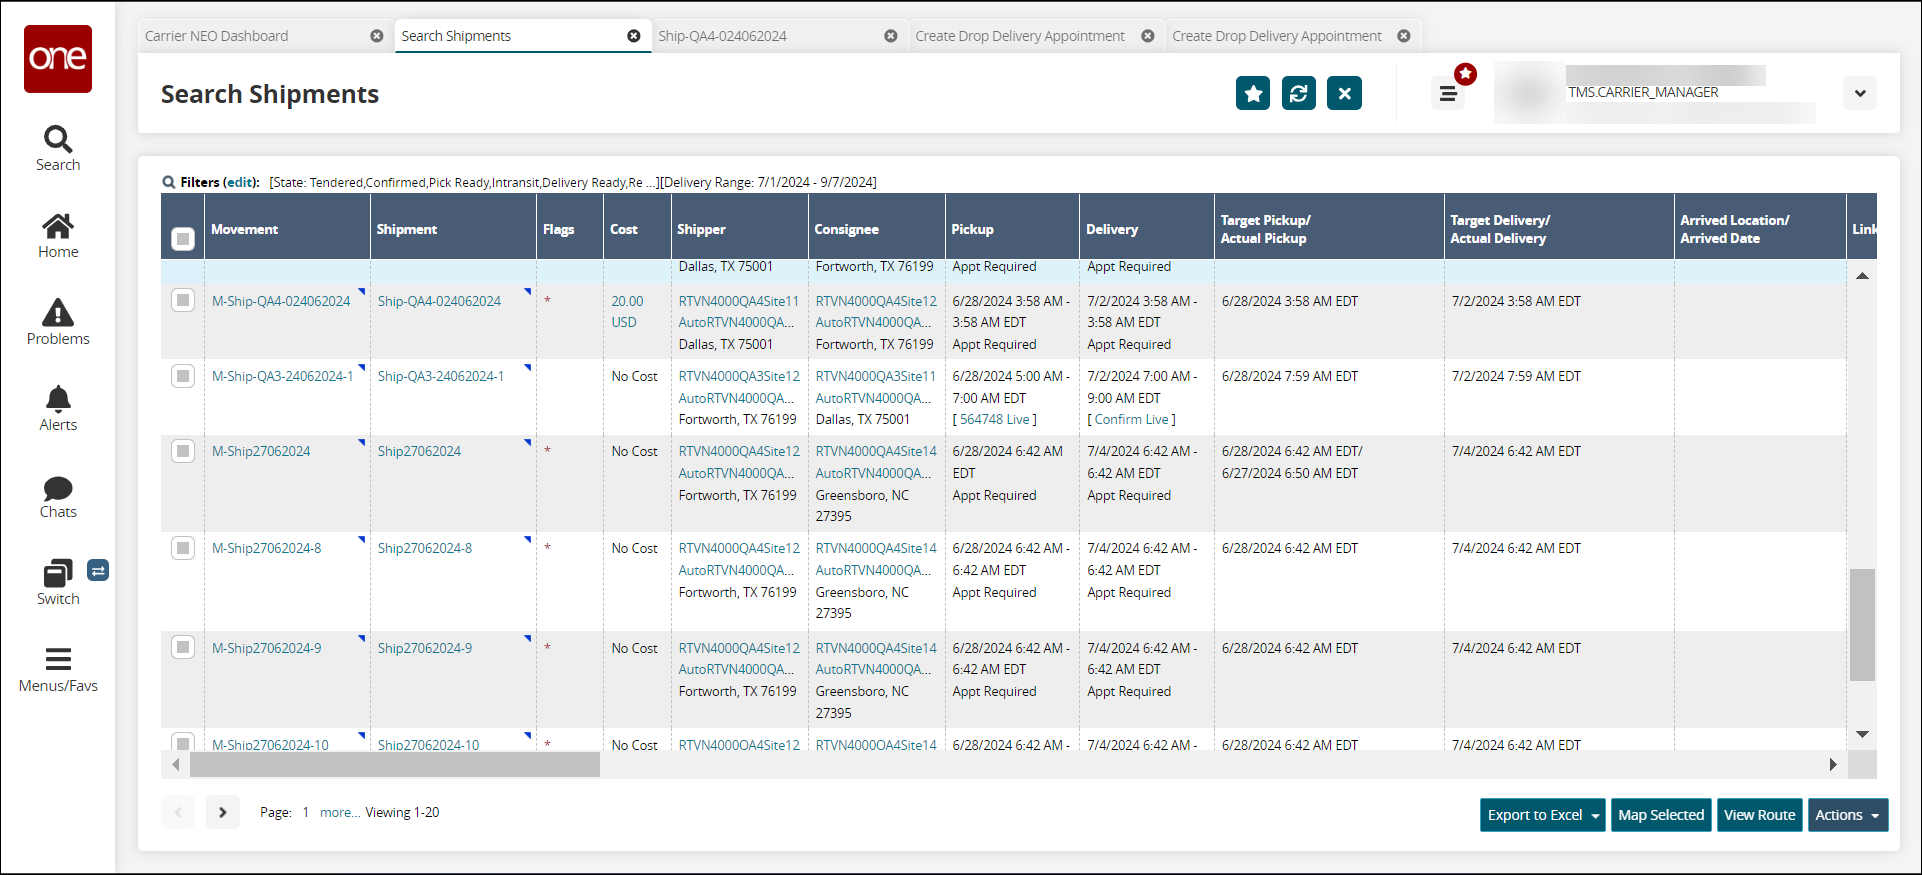
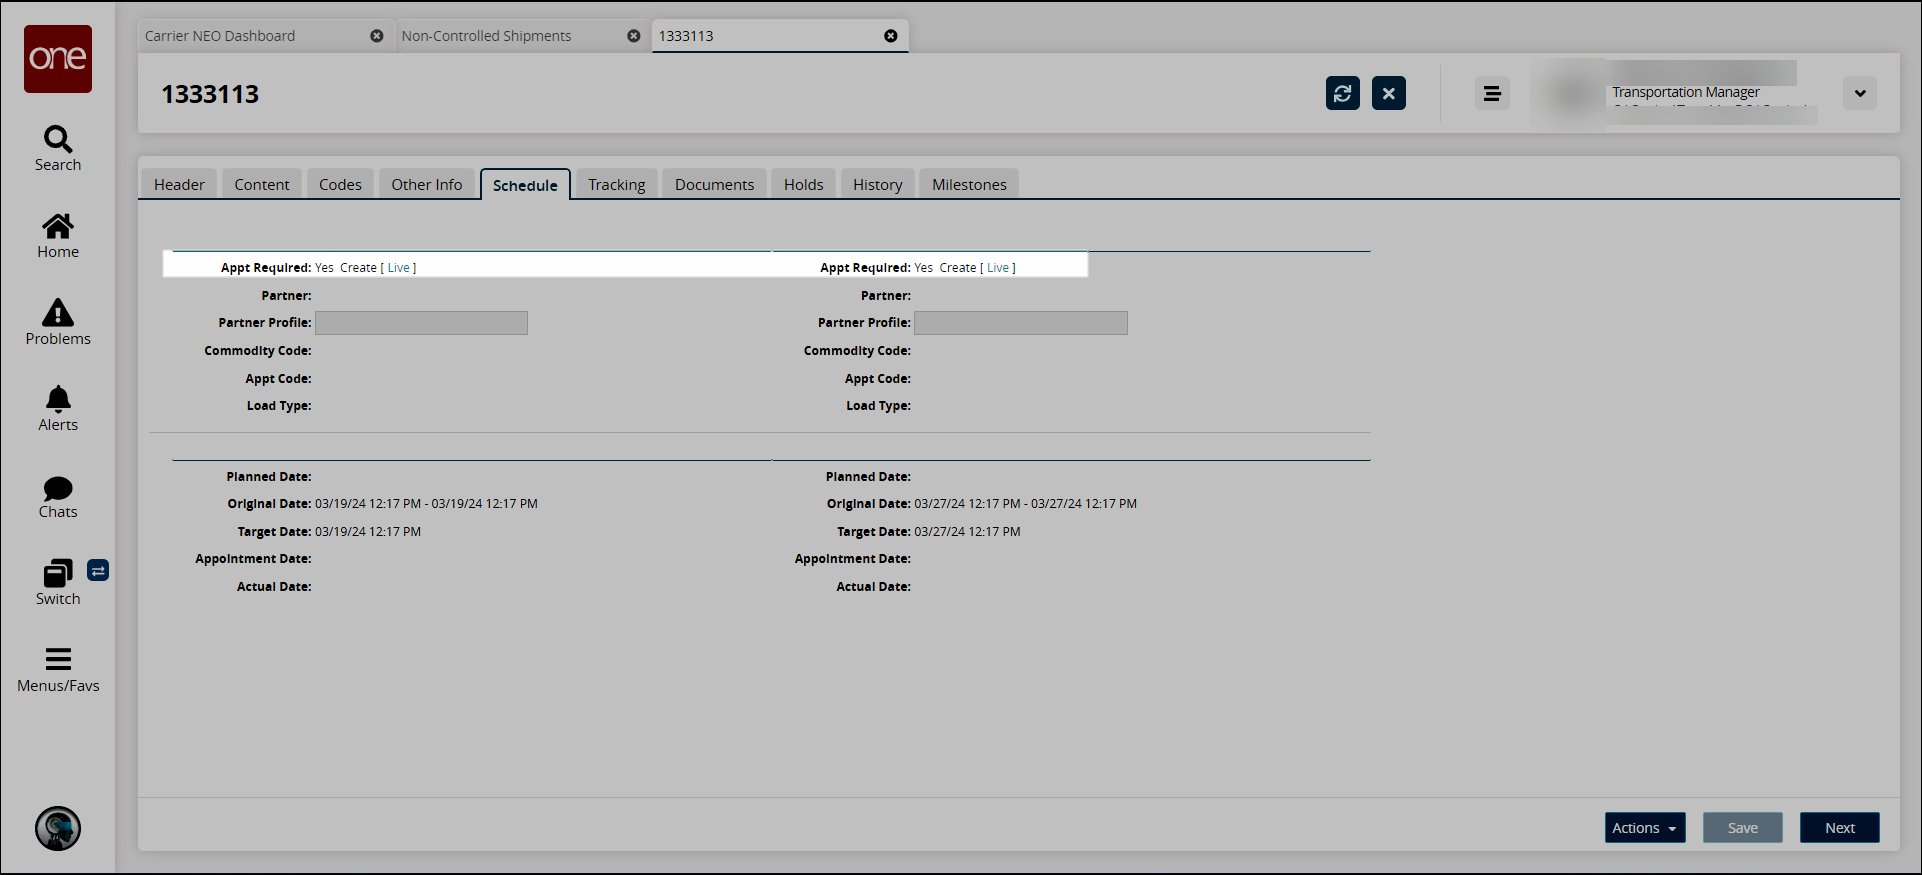
Click the Schedule tab.
Current appoinment information displays.
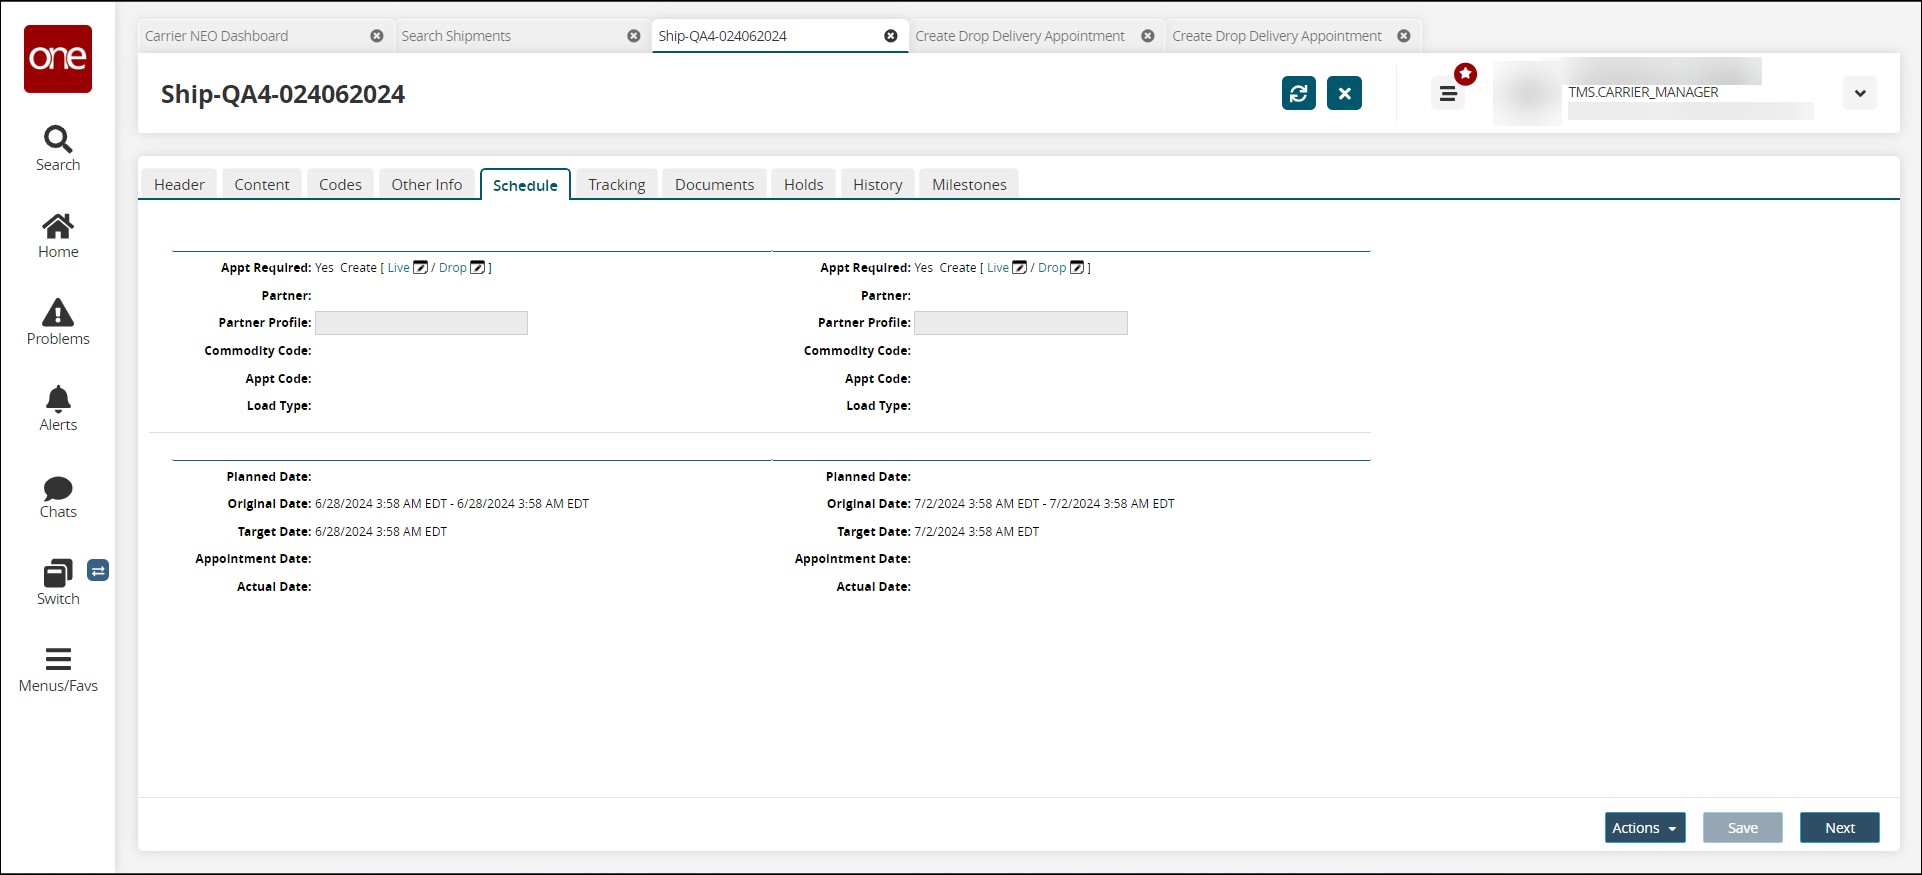
Click the link next to Appointment Required on the left for pickup appointment requests and on the right for delivery requests.
The Create Appointment Request window displays. Some fields may vary based on which link you clicked.
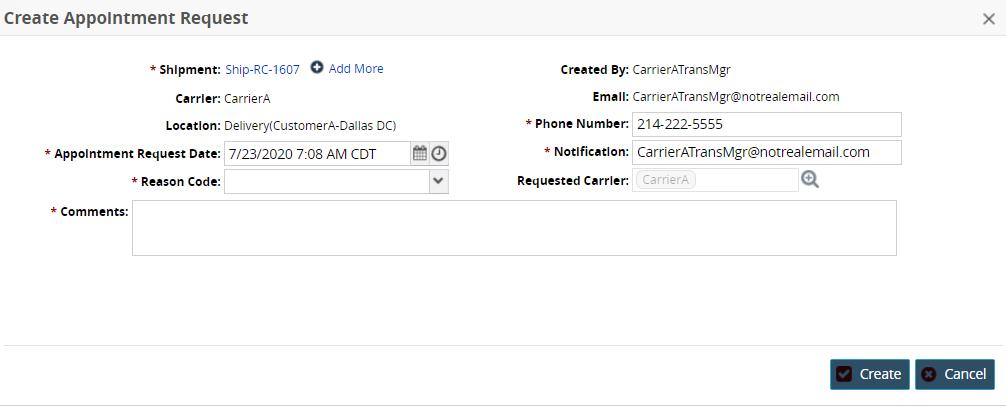
Field
Description
*Shipment
This field auto-populates with a shipment number. Users can add more shipments.
Carrier
This field auto-populates with a carrier name.
Location
This field auto-populates with the location for the pickup/delivery.
*Appointment Request Date
Use the calendar and clock tools to select the requested appointment date.
*Reason Code
Select a reason code from the drop-down list.
*Comments
Enter comments into the text box.
Created by
This field is auto-populated with the user's name who is creating the request.
Email
This field is auto-populated with the user's email.
*Phone Number
Enter a phone number.
*Notification
Enter an email recipient for notifications.
Requested Carrier
Use the picker tool to select the requested carrier. This field may not always be available based on values from other fields.
A success window displays.
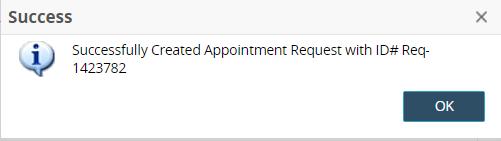
Click the OK button.
Dispatching Movements to an Off-Network Driver
Carrier managers can use a context menu option to dispatch movements to off-network users via their mobile numbers for controlled shipments. Carriers benefit from the added flexibility to add drivers from a larger pool (off-network) when dispatching controlled shipments.
Complete the following instructions to dispatch movements to off-network drivers for controlled shipments:
Search for a controlled movement using the global Search feature on the left navigation panel or by clicking Menus/Favs > Transportation > Search Shipments.
The search results display.
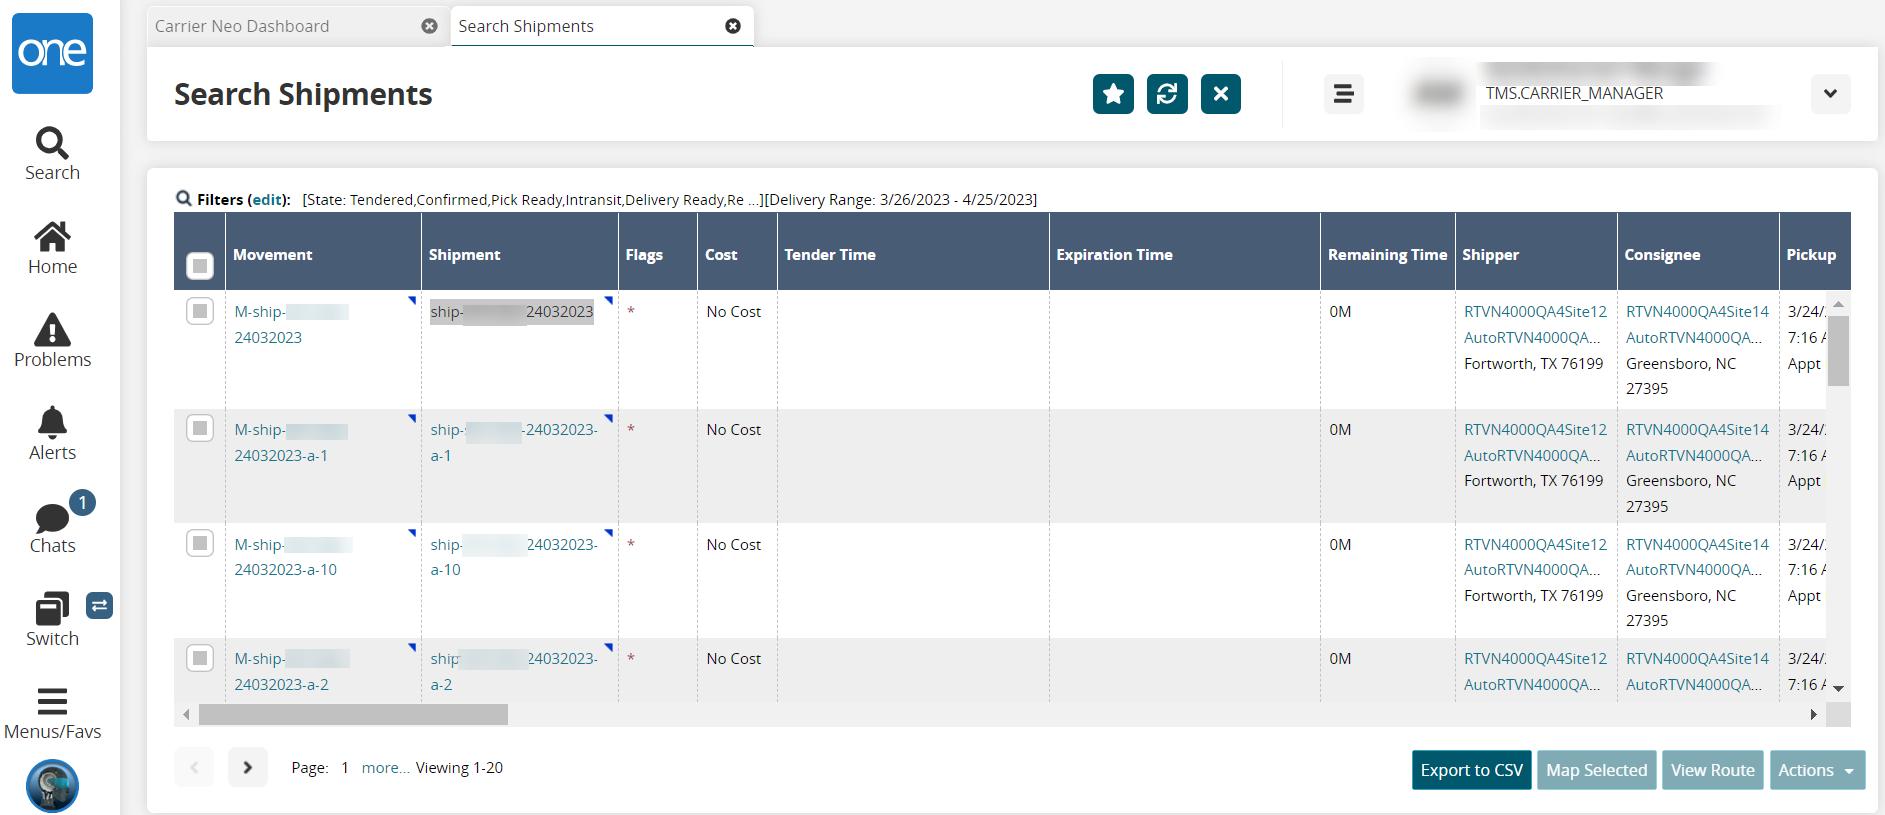
Click the contextual menu icon (blue triangle) for a single movement in the Movement cell and select Dispatch Movement to Offnetwork Driver, or click the checkbox for multiple movements and click Actions > Dispatch Movement to Offnetwork Driver.
The Dispatch Movement to Offnetwork User window is displayed.
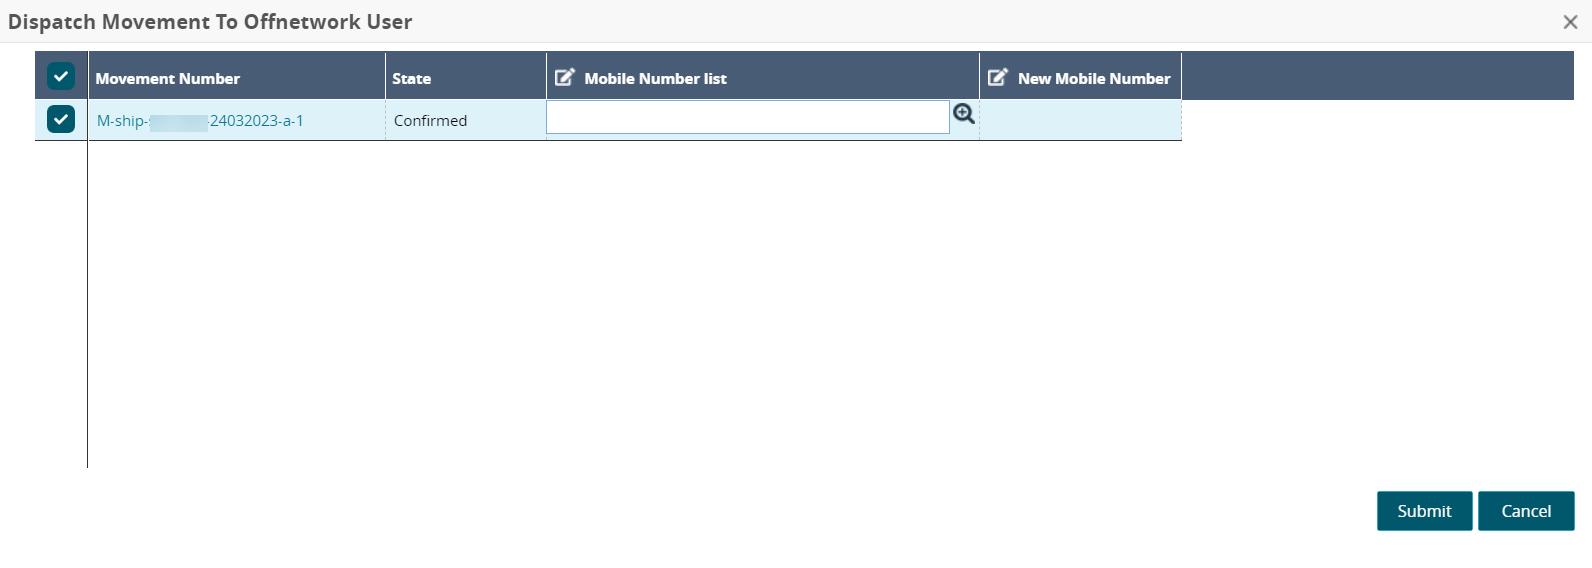
Use the picker tool in the Mobile Number List cell to select the driver's mobile number.
Click the Close and Refresh button.
The movement is dispatched to the off-network driver.
Rescheduling Appointments
Users can reschedule existing appointments for controlled or non-controlled shipments. The steps for pickup and delivery appointments are the same.
Complete the following steps to reschedule an appointment:
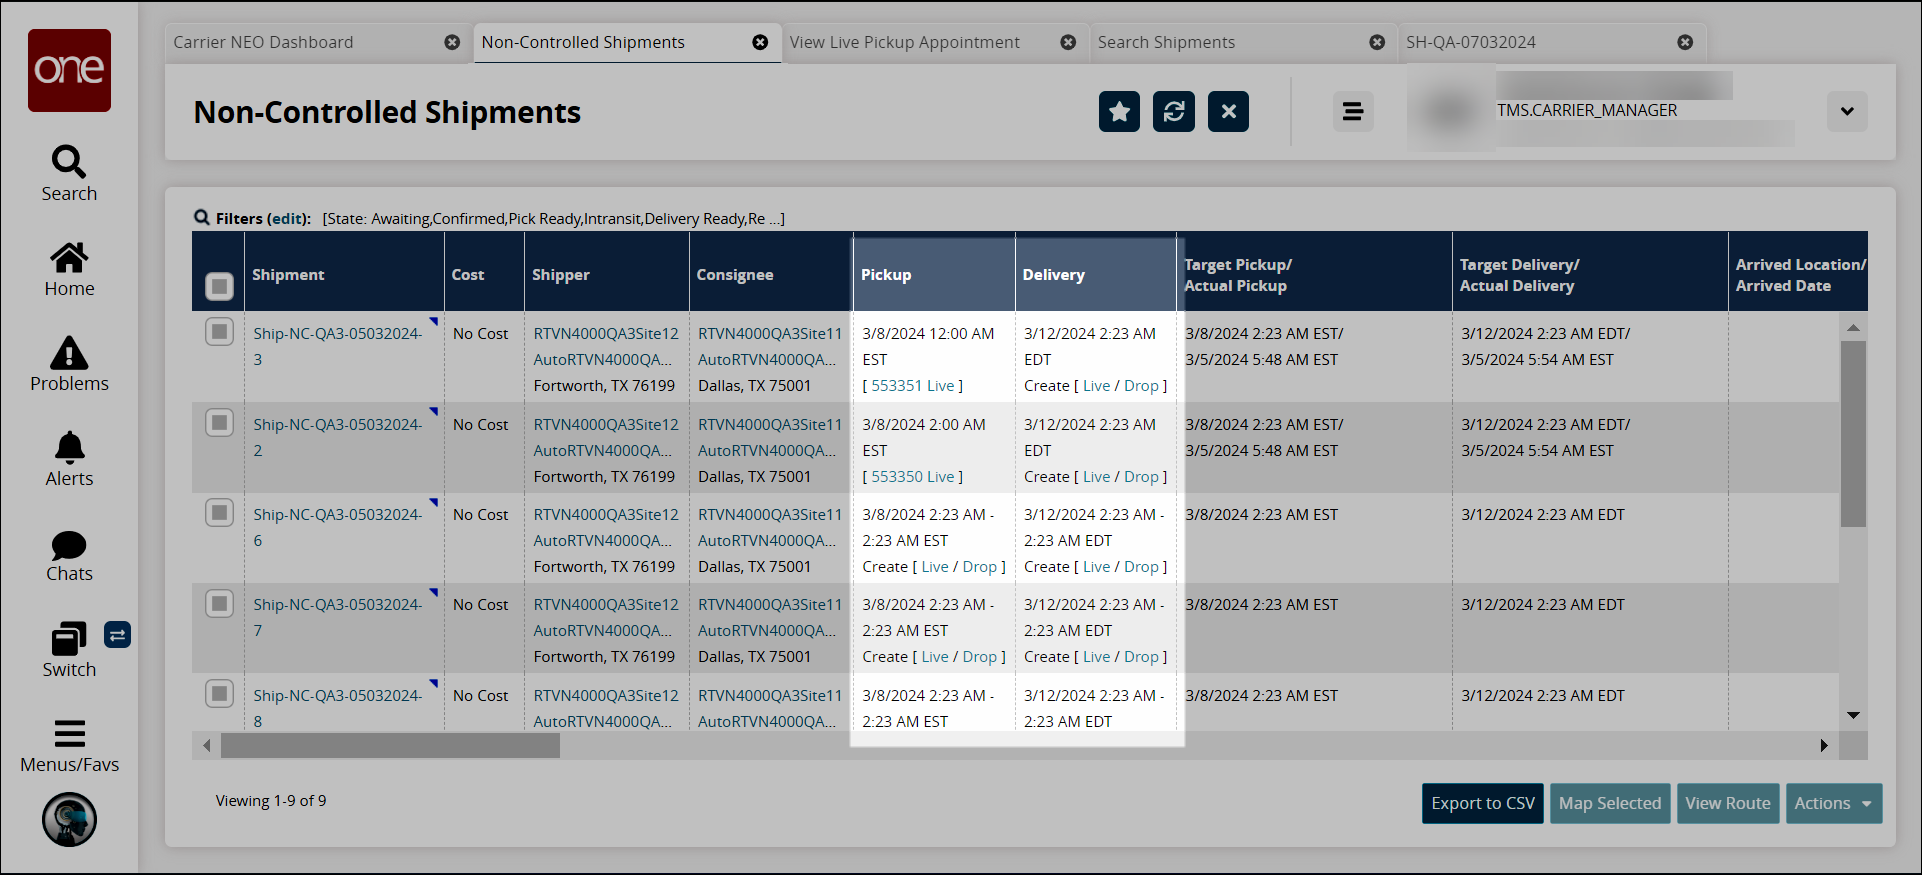
Click Menus/Favs > Transportation > Search Shipments for controlled shipments, and click Menus/Favs > Transportation > Non-Controlled Shipments to search for non-controlled shipments.
Shipment Search Alternatives
Alternative methods to search for shipments are available. See any of the following sections in the NEO Online Help for more information:
"Searching Shipments"
"Searching for Non-Controlled Shipments"
"Using Filters"
"Performing a Global Search"
The report for selected shipments displays.
Click the link for the appointment reservation identification number under the Pickup or Delivery column. (Example: [ 553351 Live ])
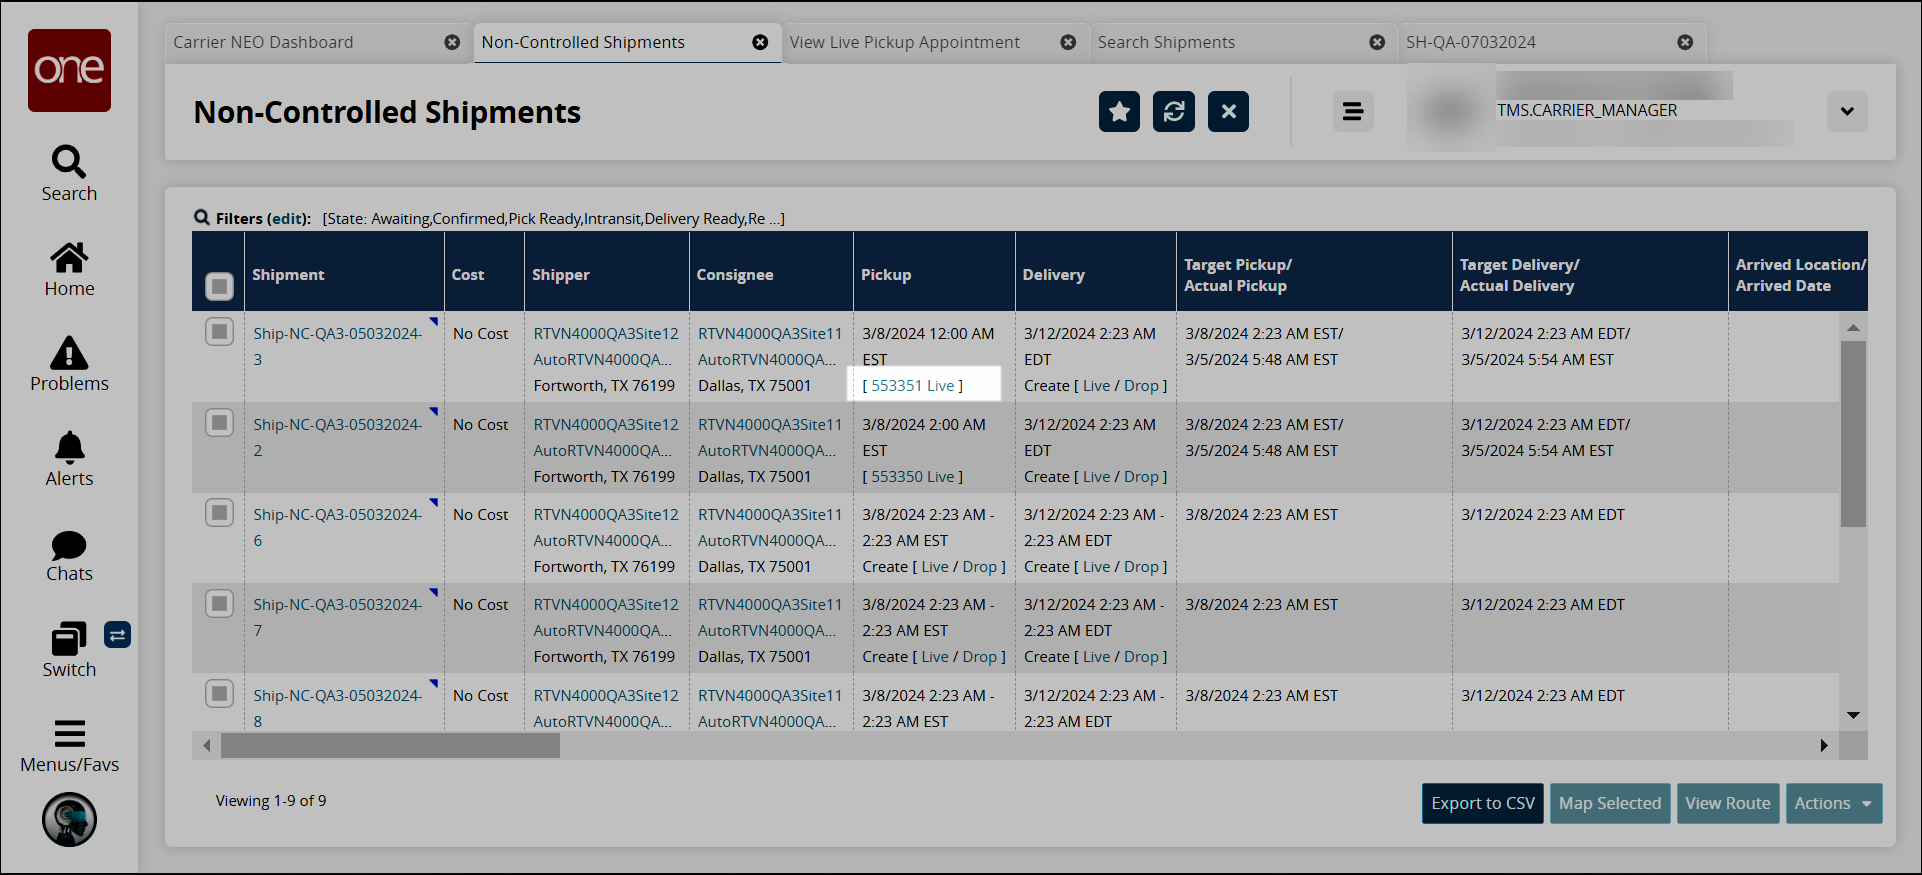
In this case, the View Live Pickup Appointment screen displays when the live appointment reservation ID link is clicked.
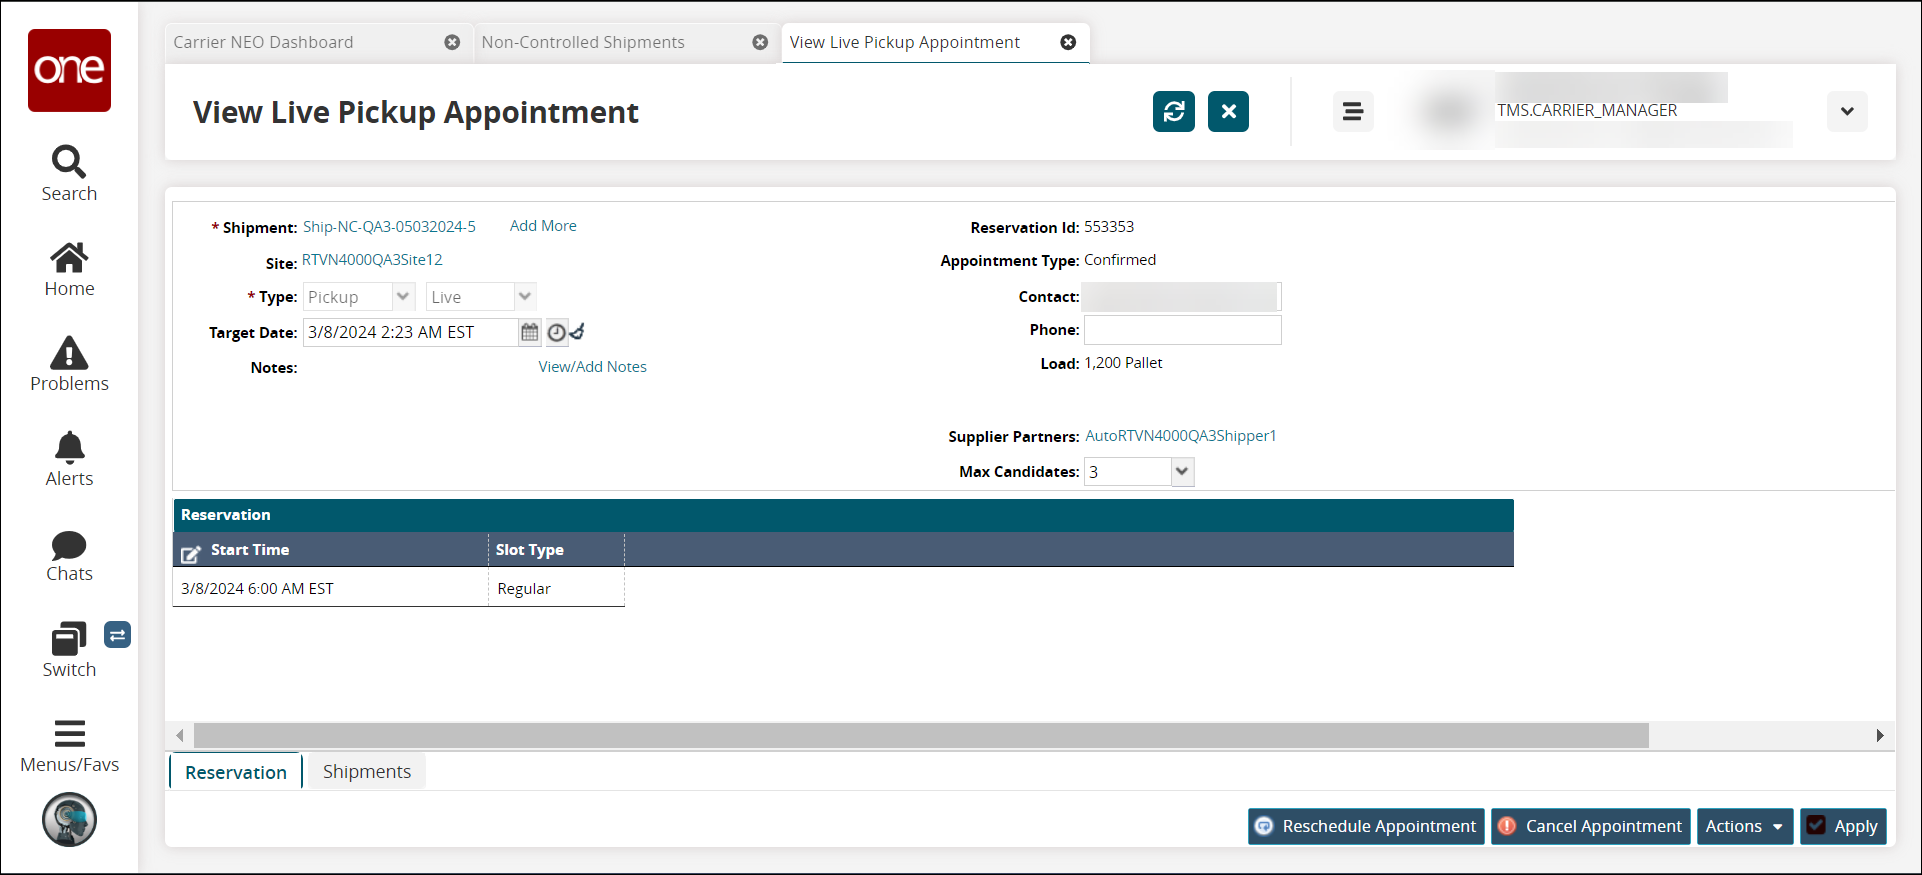
Click the Reschedule Appointment button.
A window displays.
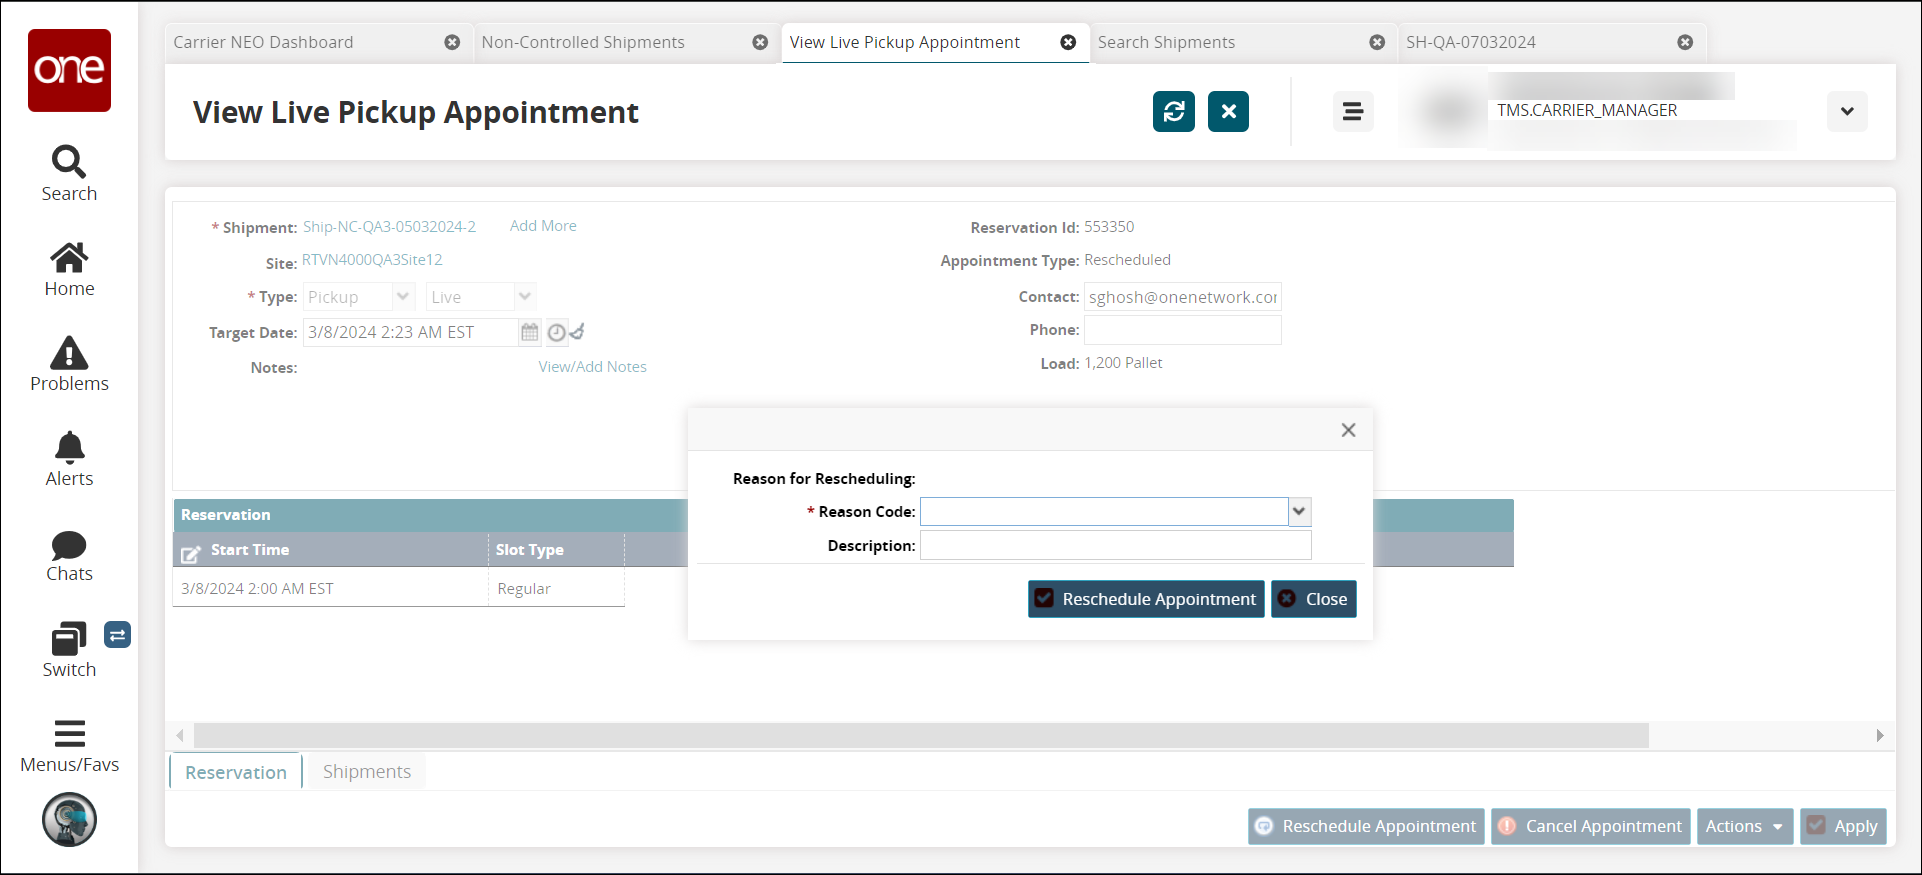
Select a value in the *Reason Code field from the drop-down menu.
Type in the appropriate information in the Description field.
Click the Reschedule Appointment button.
The page refreshes with the original reservation appointment displays under the Reservation section of the screen. Available appointment dates display under Reservation Candidates.
Note
If no reservation candidates exist, a "No Data" message displays. Users can change the target date or click the Create Appointment Request button.
Click the checkbox to select the new appointment time.
A green success bar displays, and the appointment type changes to Rescheduled.
Saving an Appointment as a Pattern for Intelligent Scheduling
While creating an appointment with the preferred time slot, a partner can save it as the preferred candidate for similar future appointments.
Prerequisites
The Activate Intelligent Scheduling flag must be enabled under the Basic Policies tab of Organization-level policies.
The Enable Appointment Request flag must be enabled under the Basic Policies tab of Site-level policies.
Complete the following steps to save an appointment request as a pattern:
Navigate to the Live Pickup Appointment, Live Delivery Appointment, or Drop Delivery Appointment screens.
The appropriate screen displays.
Click the Create Appointment Request button.
The Create Appointment Request screen displays.
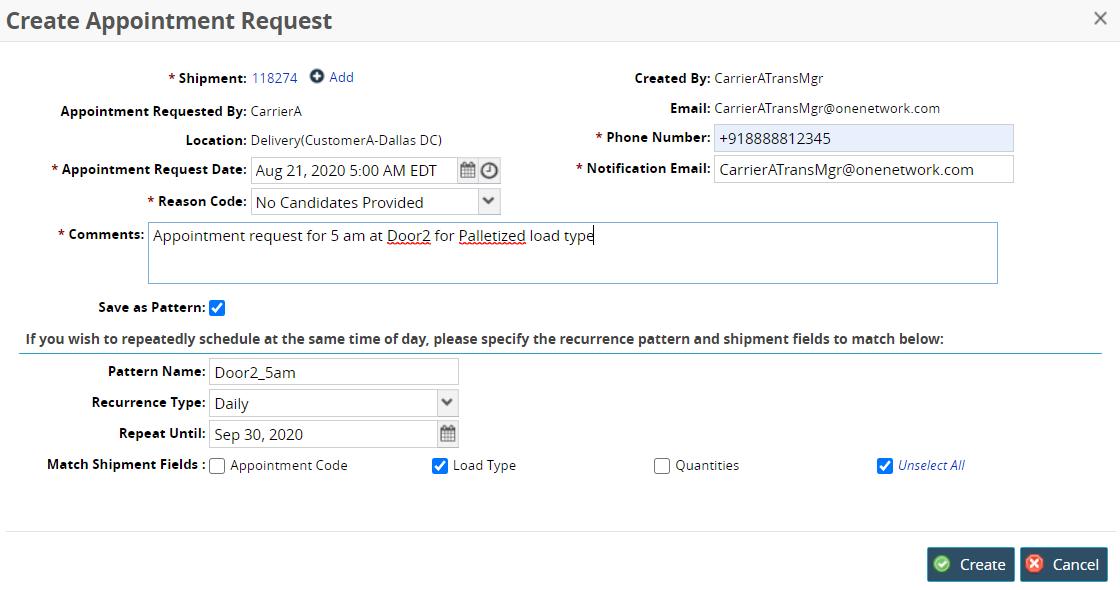
Enter the request details in the top of the screen. For more information, please see the "Create Appointment Requests" section.
Click the checkbox for the Save as Pattern field.
Enter a name in the Pattern Name field
Select the recurrence from the Recurrence Type drop-down menu.
Use the calendar tool to select an end date for the pattern in the Repeat Until field.
Click the checkbox that is appropriate for the Match Shipment field.
Click the Create button.
The appointment will now display at the top of the list of system-suggested reservation candidates for all similar appointments in the future.
Scheduling Appointments
Scheduling Appointments for Controlled Shipments
Users can use the ONE network to schedule pickup and delivery appointments for controlled and non-controlled shipments. Instructions for setting live pickup/delivery and drop pickup/delivery appointments for controlled shipments from different screens in the UI are provided below.
Scheduling Appointments from the Search Shipments Screen
Complete the following steps to schedule a live pickup or delivery appointment:
Click Menus/Favs > Transportation > Search Shipments to locate a controlled shipment.
For more instructions on how to search for a specific shipment, see the "Using Filters," "Searching Shipments," or "Performing a Global Search" sections in the NEO Online Help.
The Search Shipments screen displays.
Click the Live or Drop link located under the Pickup (or Delivery) column for a movement/shipment.
In the example below, we clicked the Live link under Pickup.
Note
Users may see the Live link only, the Drop link only, or both, depending on the shipper's configuration.
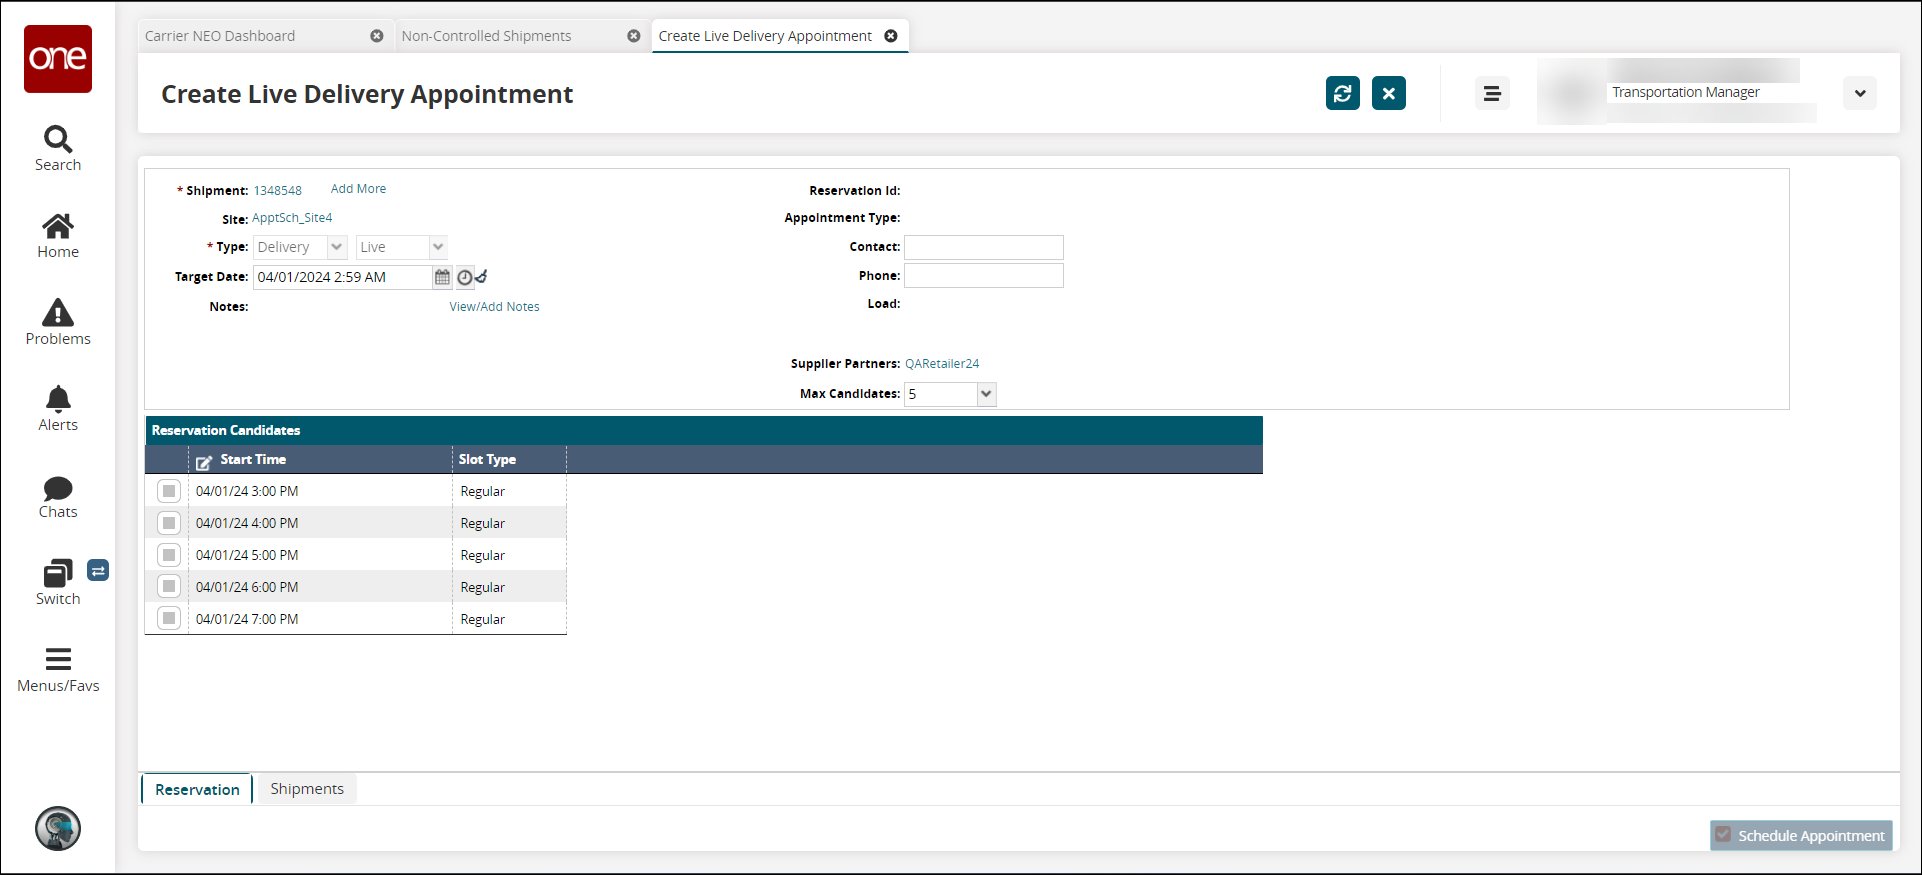
The Create Live Delivery Appointment screen displays.
Field
Description
*Shipment
This field auto-populates with a shipment number.
Click the Add More link to add more shipments, and then click the Select Shipments option.
The Select Shipments window is displayed.
Field
Description
*Search by
Freight Control?
Check the box if the item is freight-controlled. This field is only available for the Order Ref or Shipment No options.
*State
Check the boxes for the shipment states.
Retrieve For
Select the time bucket from the drop-down list.
Click the Search link.
The search results display.
Check the box(es) for the shipment you want to add to the appointment and click the Add button.
The shipments are added to the appointment. The More link may display if there are several shipments.
Site
This field auto-populates with a site name.
*Type
These fields auto-populate based on what link was used to get to this screen (Live/Drop and Pickup/Delivery).
Target Date
This field auto-populates with the target date.
Click the calendar and clock icons to change the date and time for the appointment.
Click the Reset Target Date icon
 to revert back to the original target date.
Note
Some shippers have configured appointment scheduling to require a reason for changing the date. If so, the required *Appointment Date Change Reason Code field displays above the Reservation Candidate table.
Notes
Existing notes display.
Click the View/Add Notes to view more information or add a new note.
The Notes window displays.
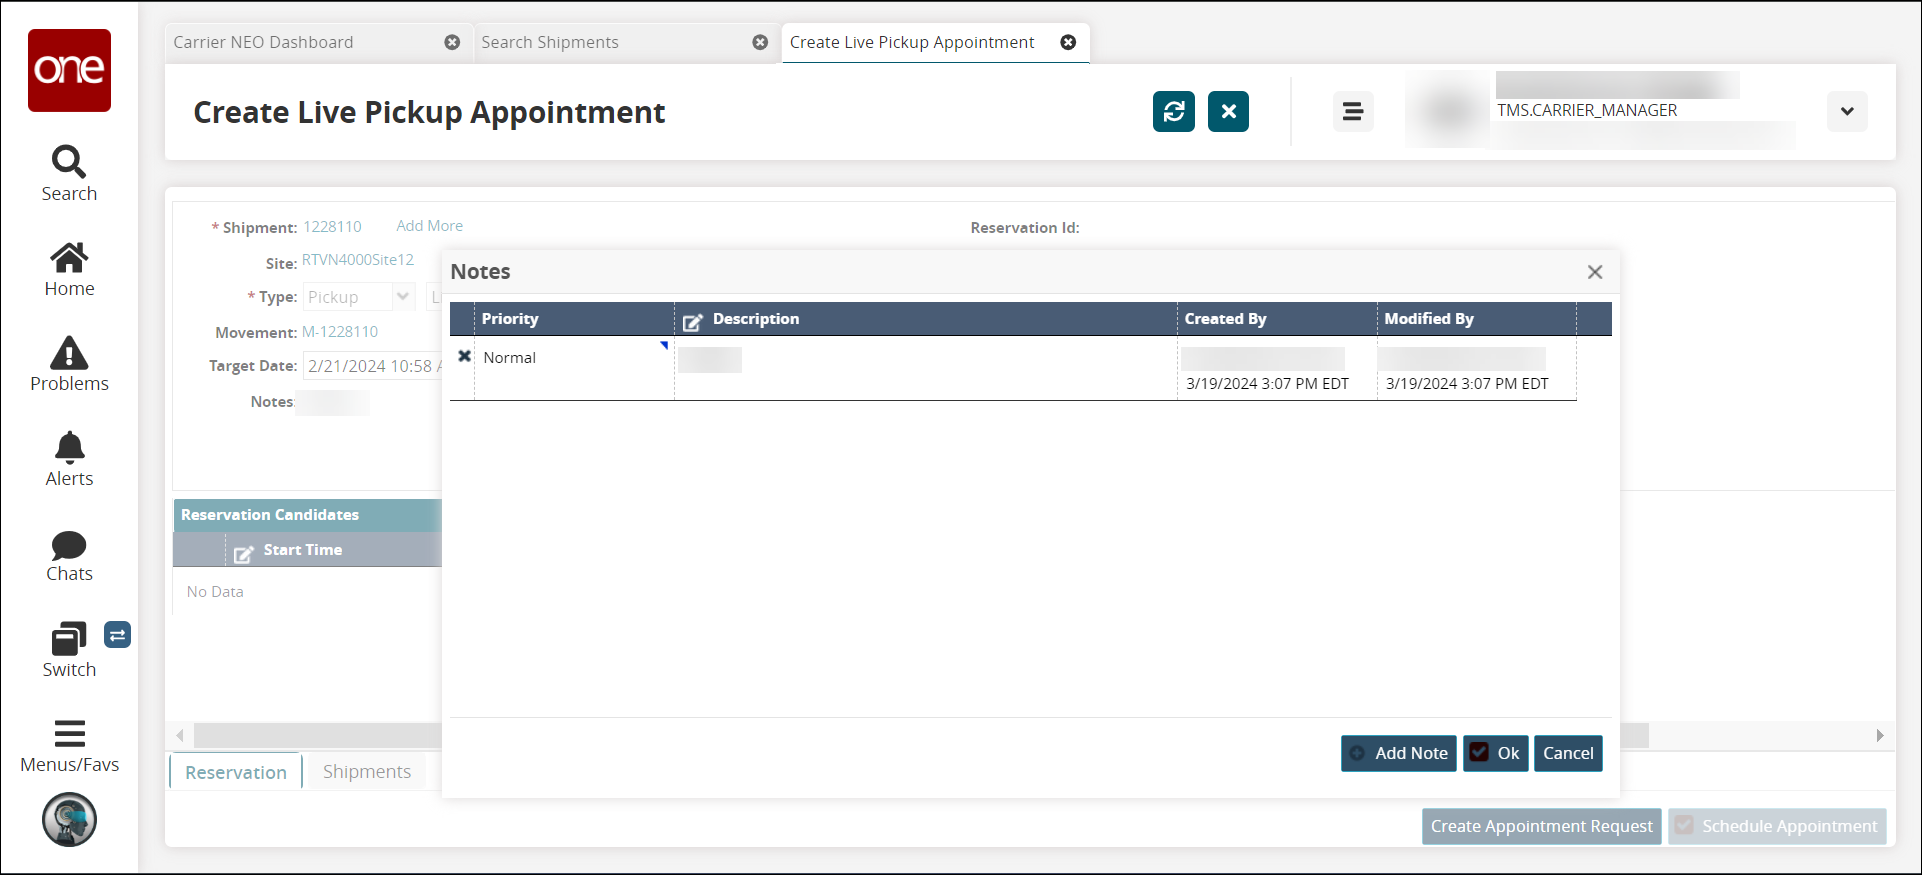
Complete the following instructions to add a new note:
Click the Add Note button to add a new note.
A new row displays.
Enter information in the Description field.
Click the OK button.
The note is saved.
Click the Close button to close the window.
Reservation ID
This field auto-populates after scheduling the appointment.
Appointment Type
This field auto-populates after scheduling the appointment.
*Contact
Enter a contact name.
*Phone Number
Enter a phone number.
Drop Appt Est Time
Use the calendar and clock tools to select the estimated drop appointment time.
Note
This field only displays with Drop appointments.
Load
This field auto-populates.
Supplier Partners
This field auto-populates.
Max Candidates
Select the maximum number of appointment candidates to display in the Reservation Candidates table.
*Appointment Date Change Reason Code
This field displays if the shipper has configured this parameter. Select a reason code from the drop-down list.
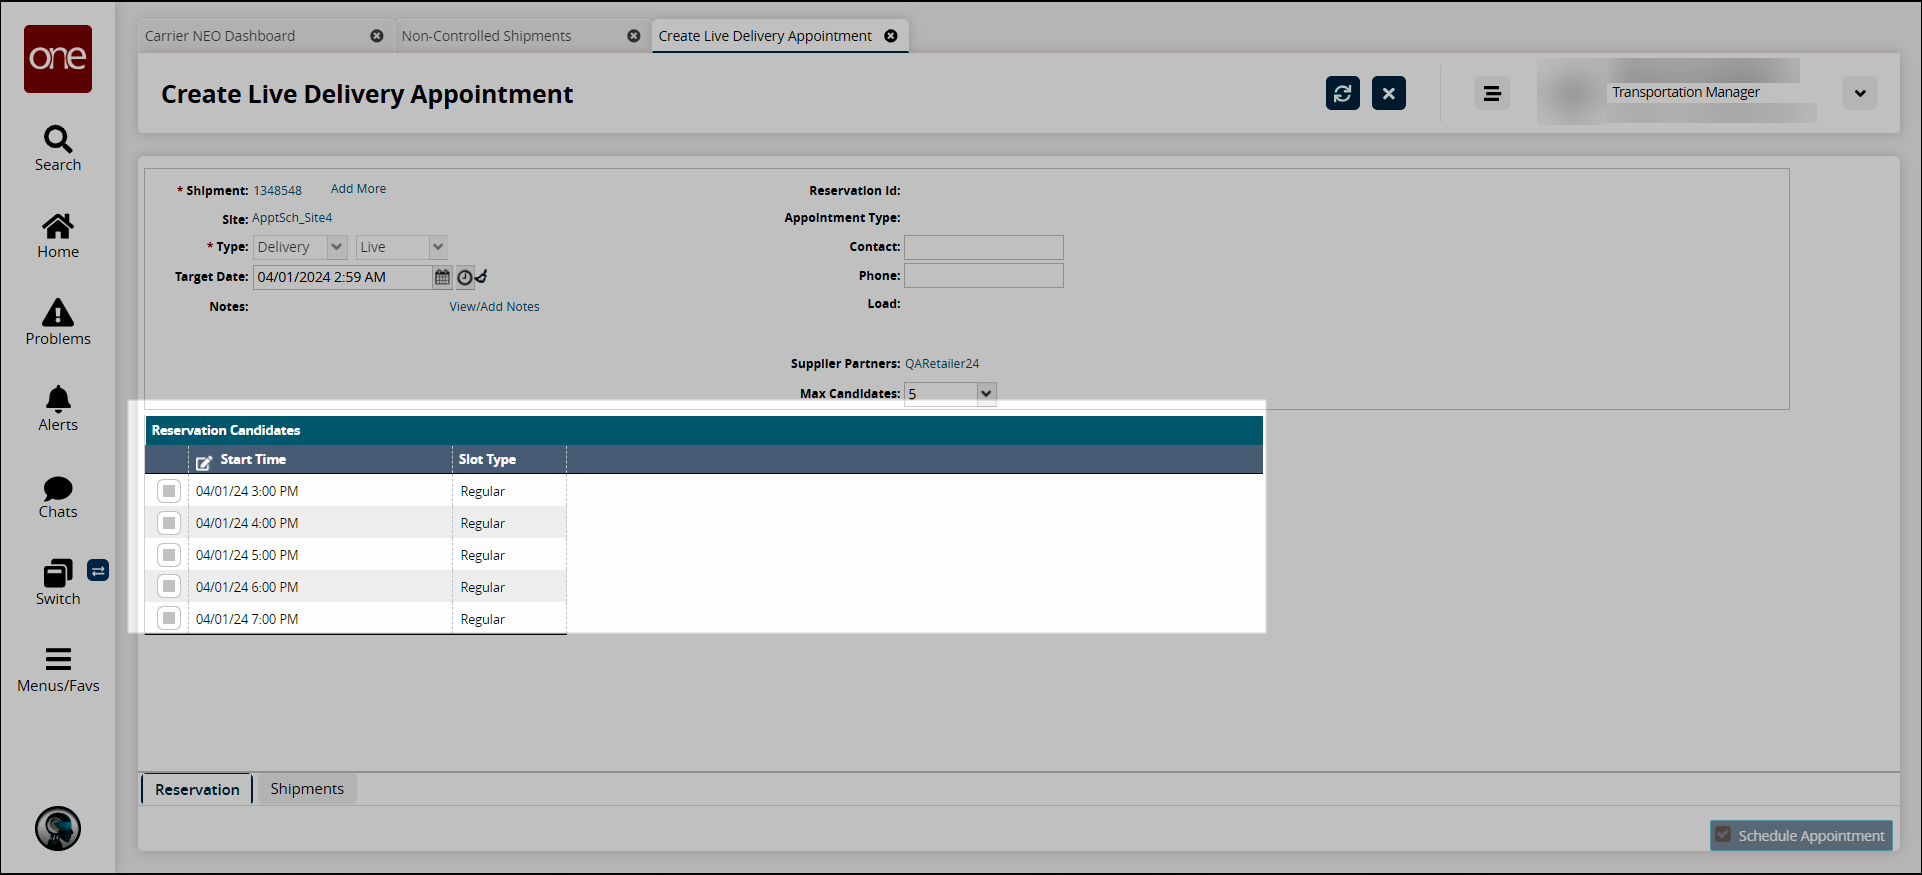
Appointment times display in the Reservation Candidates table, as highlighted below. If there are no appointment times available in the system or if none of the available appointment times work, users can also request a new appointment. See the "Creating Appointment Requests" section in the NEO Online Help for instructions.
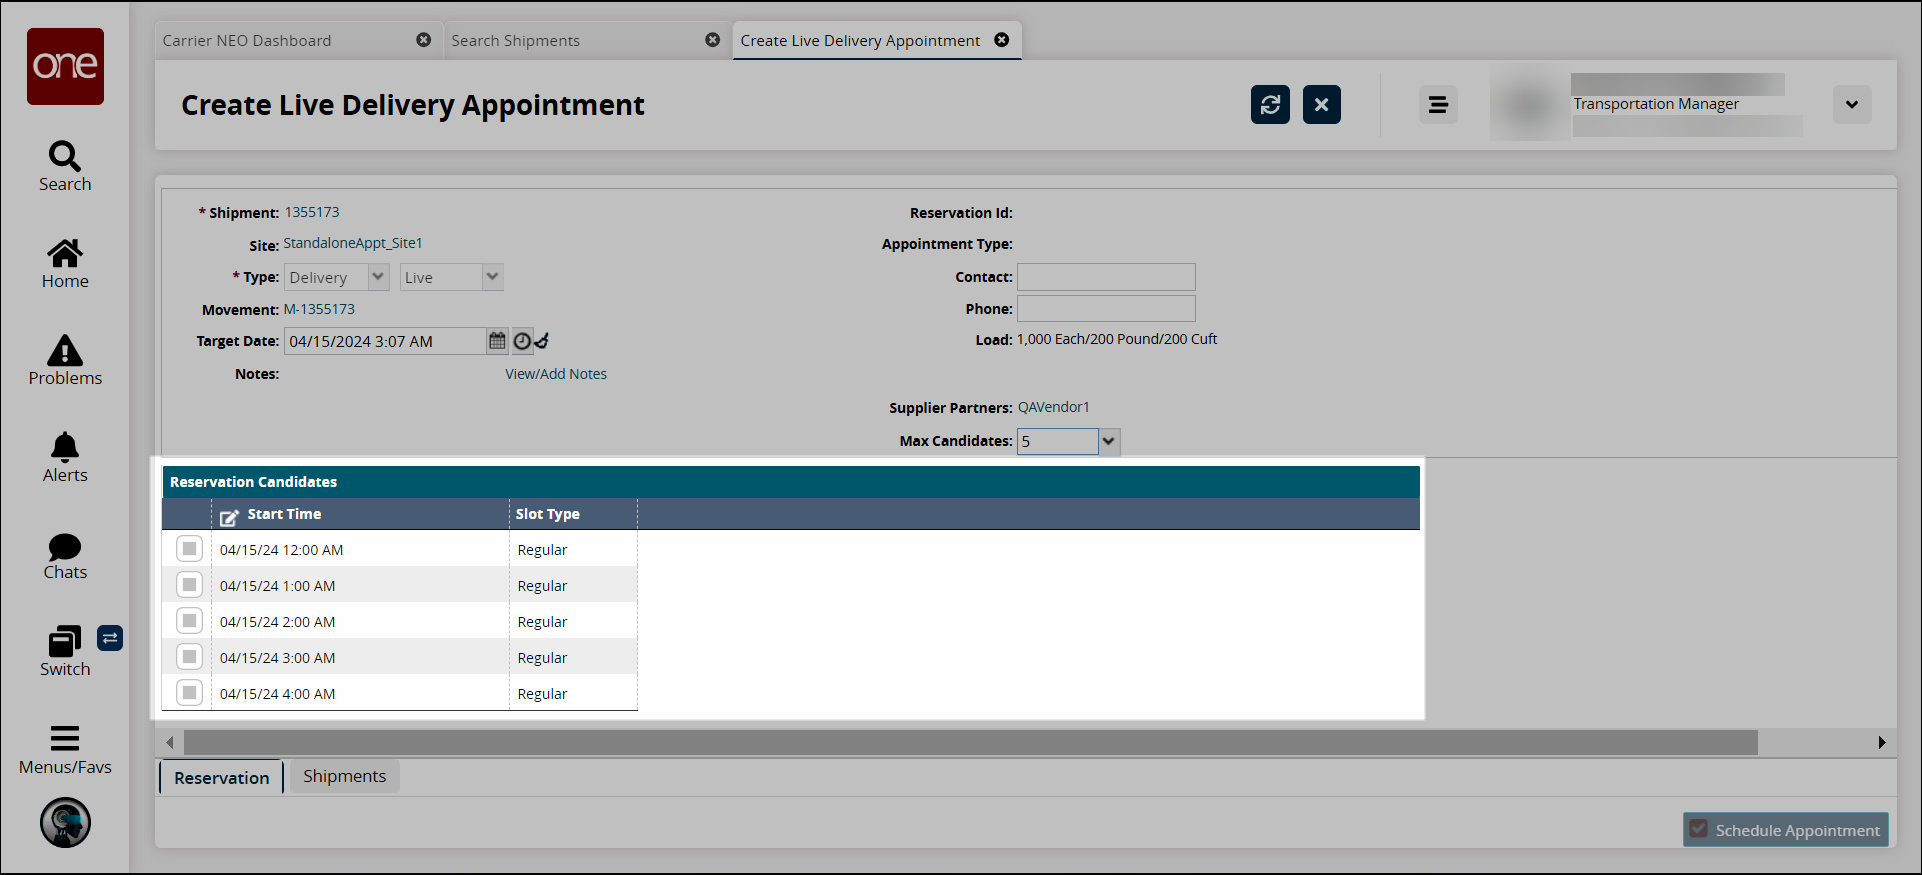
Select an appointment time. If there are more than the maximum number of reservation candidates available, an icon displays on the table header to view more options.

The Schedule Appointment button activates.
Click the Schedule Appointment button to schedule an appointment.
A green success bar displays and new action buttons are available at the bottom of the screen. The appointment is also now assigned a confirmation number in the Reservation ID field and the Appointment Type field displays as Confirmed.

Scheduling Appointments from the Shipment Details Screen
Users can schedule live or drop appointments for pickup or delivery from the shipment's details screen. Once here, users follow the same instructions as above.
Click Menus/Favs > Transportation > Search Shipments to locate a shipment. Users can also perform a global search.
The Search Shipments screen displays.
Click the link in the Shipment column.
The shipment details page displays.
Click the Scheduling tab.
The scheduling information displays.
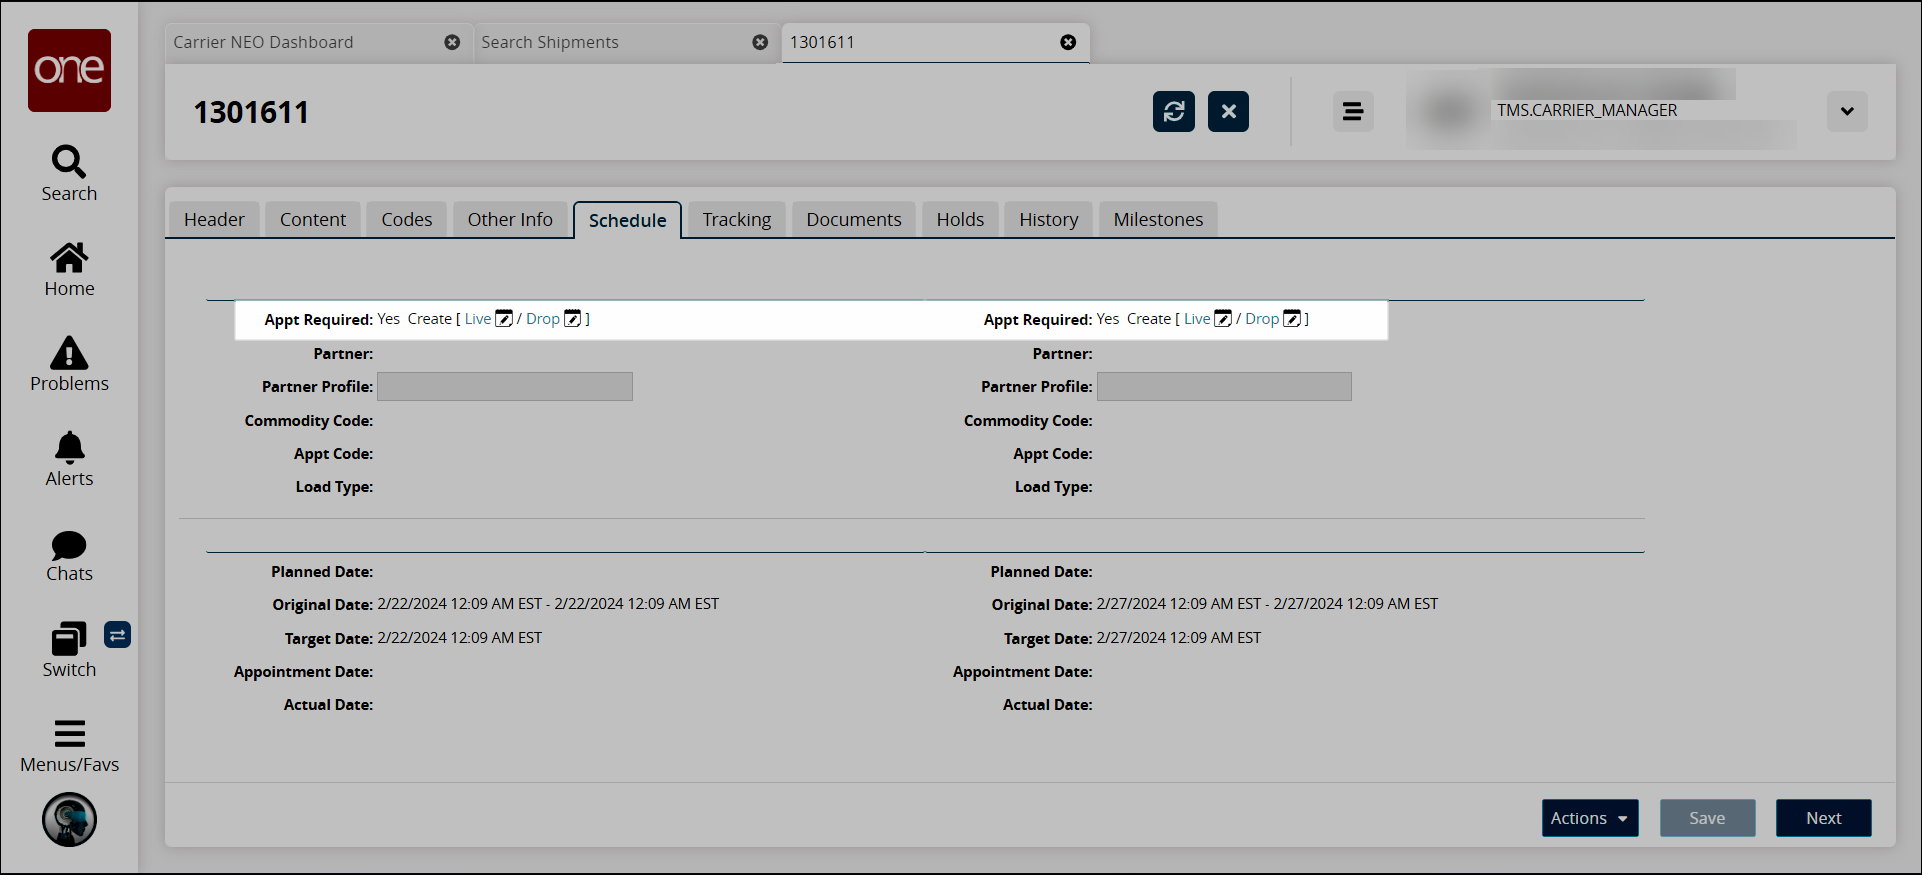
Click the Live or Drop links on the left to set a pickup appointment.
The screens from the instructions above display. Follow the appropriate instructions to schedule the appointment.
Click the Live or Drop links on the right to set a delivery appointment.
The screens from the instructions above display. Follow the appropriate instructions to schedule the appointment.
Scheduling Appointments for Non-Controlled Shipments
Users can use the ONE network to schedule pickup and delivery appointments for controlled and non-controlled shipments. Instructions for live pickups/deliveries and drop pickups/deliveries for non-controlled shipments from different screens in the UI are provided below.
Note
A non-controlled shipment is one in which you typically work directly with your supplier, who provides the information for the load. A non-controlled shipment will not have a movement number associated with it. The supplier or shipper may provide the shipment number.
Schedule a Live Pickup or Delivery Appointment from the Search Shipments Screen
Complete the following steps to schedule a live pickup or delivery appointment from the Non-Controlled Shipments screen:
Click Menus/Favs > Transportation > Non-Controlled Shipments for non-controlled shipments.
Shipment Search Alternatives
Alternative methods to search for shipments are available. See any of the following sections in the NEO Online Help for more information:
"Searching Shipments"
"Searching for Non-Controlled Shipments"
"Using Filters"
"Performing a Global Search"
The Non-Controlled Shipments screen displays.
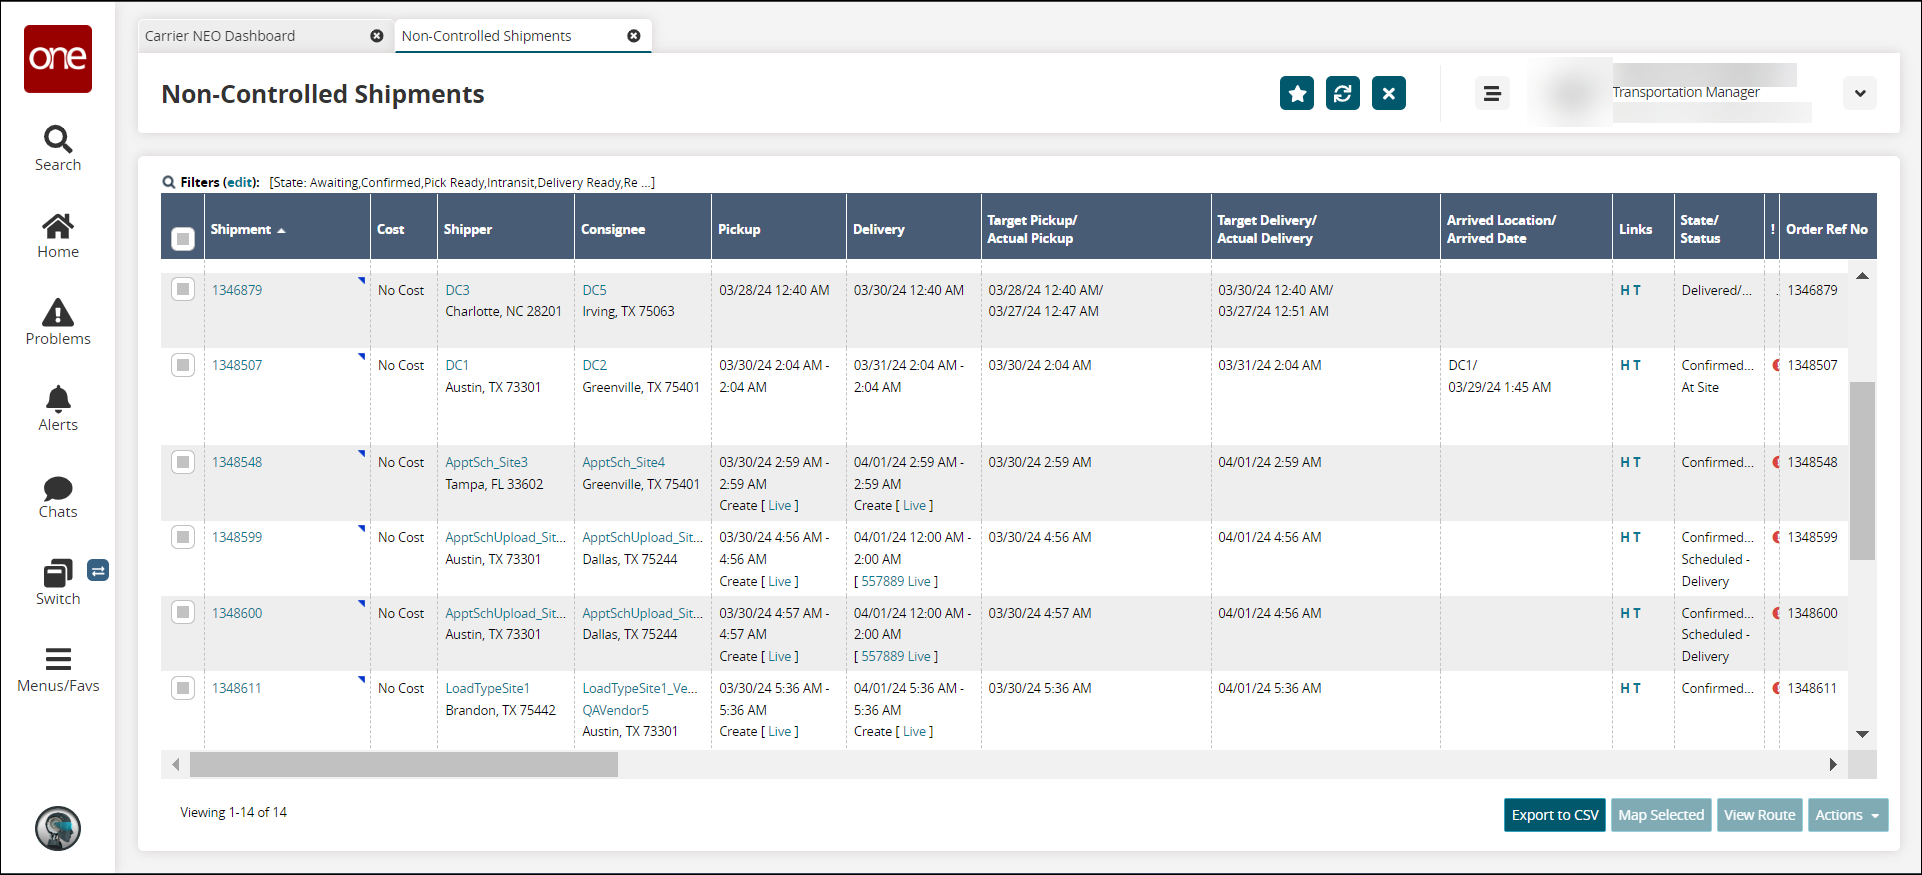
Click the Live or Drop link located under the Pickup (or Delivery) column for a movement/shipment. In the example below, we clicked the Live link under Delivery.
Note
Users may see the Live link or the Drop link only or may see both based on the shipper's configuration.
The Create Live Delivery Appointment screen displays. The Create Live Pickup Appointment looks the same.
Field
Description
*Shipment
This field auto-populates with a shipment number. Click the Add More link to add more shipments. See the "Adding Shipments to Existing Appointments" section of the NEO Online Help for more information.
Site
This field auto-populates with a site name.
*Type
These fields auto-populate based on the link clicked to access this screen (Live/Drop and Pickup/Delivery).
Target Date
This field auto-populates with the target date.
Click the calendar and clock icons to change the date and time for the target delivery date.
Click the Reset Target Date icon
to revert back to the original target date.Note
Some shippers have configured appointment scheduling to require a reason for changing the date. If so, the required *Appointment Date Change Reason Code field displays above the Reservation Candidate table.
Notes
Existing notes display.
Click the View/Add Notes to view more information or add a new note.
The Notes window displays.
Complete the following instructions to add a new note:
Click the Add Note button to add a new note.
A new row displays.
Enter information in the Description field.
Click the OK button.
The note is saved.
Click the Close button to close the window.
Reservation ID
This field auto-populates after scheduling the appointment.
Appointment Type
This field auto-populates after scheduling the appointment.
*Contact
Enter a contact name.
*Phone Number
Enter a phone number.
Drop Appt Est Time
Use the calendar and clock tools to select the estimated drop appointment time.
Note
This field only displays with Drop appointments.
Load
This field auto-populates.
Supplier Partners
This field auto-populates.
Max Candidates
Select the maximum number of appointment candidates to display in the Reservation Candidates table.
*Appointment Date Change Reason Code
This field displays if the shipper has configured this parameter. Select a reason code from the drop-down list.
Appointment times display in the Reservation Candidates table as highlighted below. If there are no appointment times available in the system or if none of the available appointment times work, users can also request a new appointment. See the "Creating Appointment Requests" section in the NEO Online Help for instructions.
Select an appointment time. If there are more than the maximum number of reservation candidates available, an icon displays on the table header to view more options.
The Schedule Appointment button activates.
Click the Schedule Appointment button to schedule the appointment.
A green success bar displays and new action buttons are available at the bottom of the screen. The appointment is also now assigned a confirmation number in the Reservation ID field and the Appointment Type field displays as Confirmed.

Scheduling Appointments from the Shipment Details Screen
Users can schedule appointments for pickup or delivery from the shipment's details screen. Once here, users follow the same instructions as above.
Click Menus/Favs > Transportation > Non-Controlled Shipments to locate a shipment.
The Non-Controlled Shipments screen displays.
Shipment Search Alternatives
Alternative methods to search for shipments are available. See any of the following sections in the NEO Online Help for more information:
"Searching Shipments"
"Searching for Non-Controlled Shipments"
"Using Filters"
"Performing a Global Search"
Click the link in the Shipment column.
The shipment details page displays.
Click the Scheduling tab.
The scheduling information displays.
Click the Live or Drop link on the left to schedule a pickup appointment.
The screens from the instructions above display. Follow the appropriate instructions to schedule the appointment.
Click the Live or Drop link on the right to schedule a delivery appointment.
The screens from the instructions above display. Follow the appropriate instructions to schedule the appointment.
Tenders
Accepting and Rejecting Tenders and Spot Tenders
Carrier users can accept or reject a tender. They can also conditionally accept a spot tender
Complete the following steps to accept or reject tenders:
Click Menus/Favs >Transportation > Tendered as a Carrier role.
The Tendered screen displays.
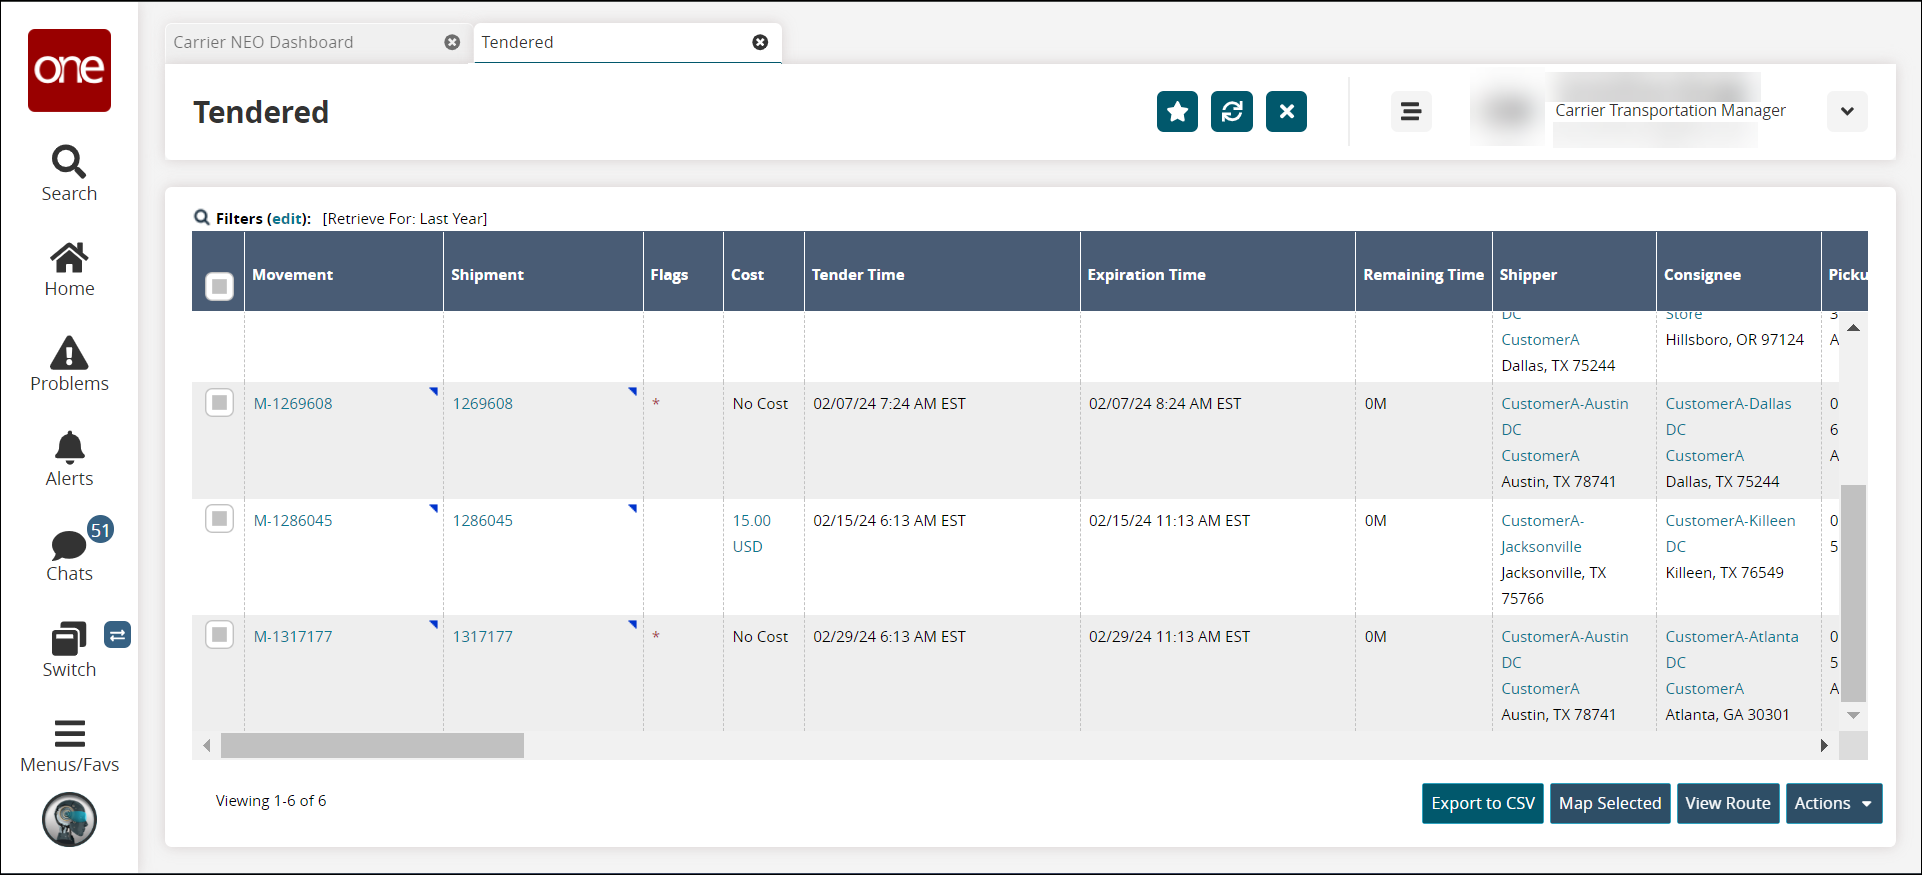
Select the checkbox for a Movement tender you want to accept or reject.
Click Actions > Accept to accept the tender.
The Accept window screen displays to accept the tender. Fields with a pencil icon are editable.
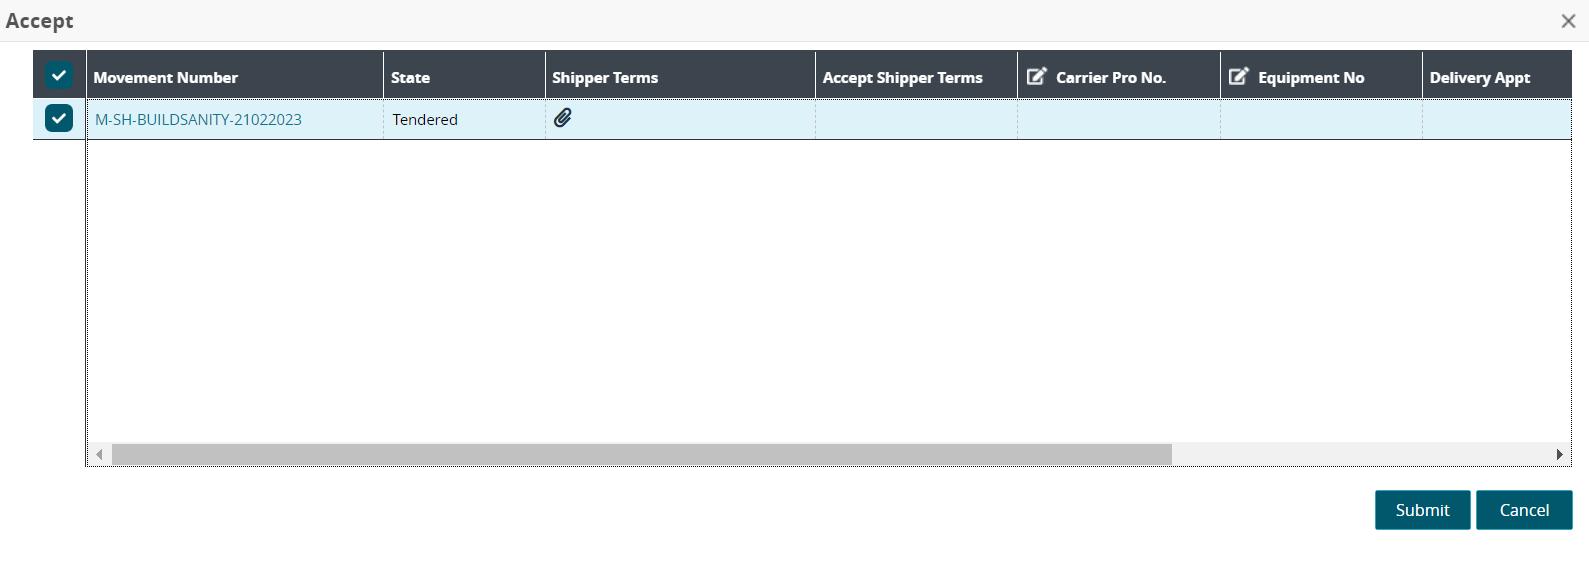
Field
Description
Movement Number
Click the link to open the movement details page.
State
This field auto-populates with the movement state.
Shipper Terms
This field displays links to shipper term documents if they've been added.
Accept Shipper Terms
This field displays accepted shipper terms.
Carrier Pro No
Enter the carrier progressive number (PRO).
Equipment No
Enter the equipment number.
Delivery Appt
This field displays the delivery appointment date and time.
Pickup Appt
This field displays the pickup appointment date and time.
Carrier Arrival ETA
Enter the carrier's estimated time of arrival.
Click the Close and Refresh button.
The tender status changes to Confirmed on the Tenders screen.
As an alternative, click Actions > Conditionally Accept.
If a shipment has been spot tendered, the action is Conditionally Accept.
The Conditionally Accept window is displayed.
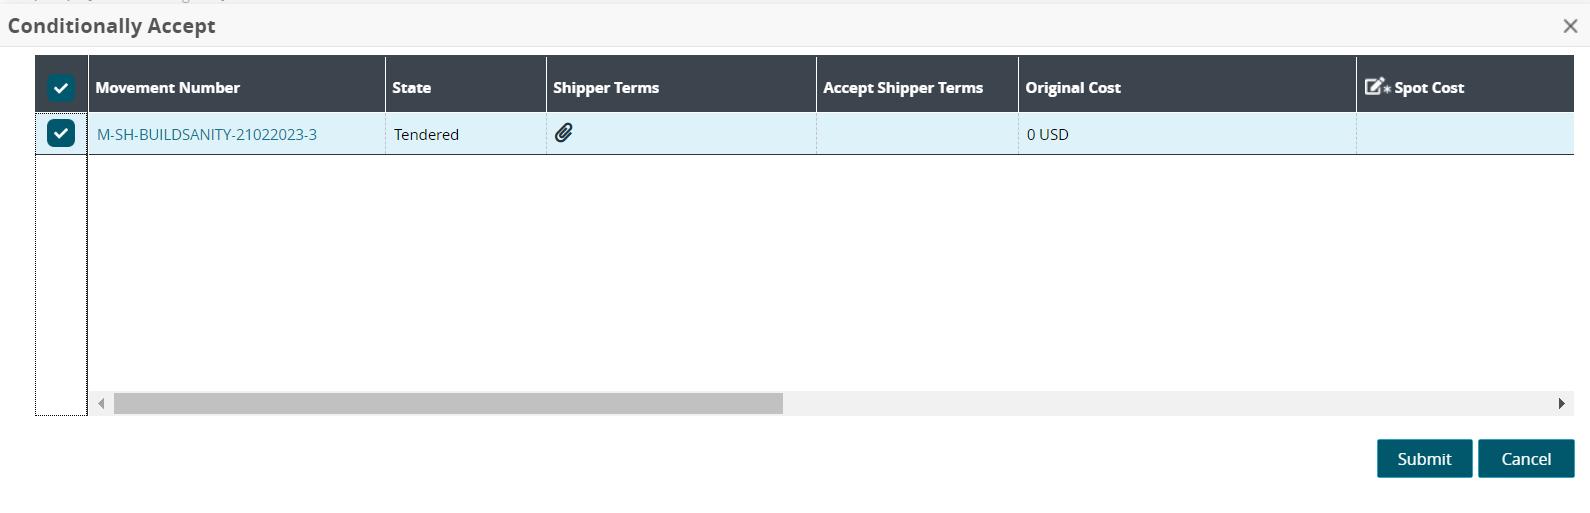
Fields with an edit icon (pencil) are editable, and only fields different than seen in the Accept window are shown in the table below.
Field
Description
Original Cost
This field auto-populates the original cost for the tendered shipment.
*Spot Cost
Enter a cost for spot tendering.
Spot Cost Description
Enter a description for the spot cost.
Tender Plan
The tender plan number auto-populates.
Carrier Terms
Any carrier term documentation displays here. Click on the paper clip icon and the Upload link to upload files.
Bid Expiry Terms
Click in the cell, and use the calendar and clock icons to set the tendered bid term expiration date and time.
Carrier Spot Tender Comments
Enter any comments.
Carrier Arrival ETA
Use the calendar and clock icons to enter the date and time for the carrier's estimated arrival time.
Click the Submit button.
A confirmation window is displayed as a notification that the spot cost is different than the original.
Click the Yes button.
A green success message displays.
Click the Close and Refresh button.
The spot tender conditionally accepted with a spot is in Review Response status. This indicates the spot cost/bid has been sent to the shipper, and the shipper needs to review and accept it if they agree. Spot tenders not yet conditionally accepted is in Awaiting Response status.
As an alternative, click Actions > Reject.
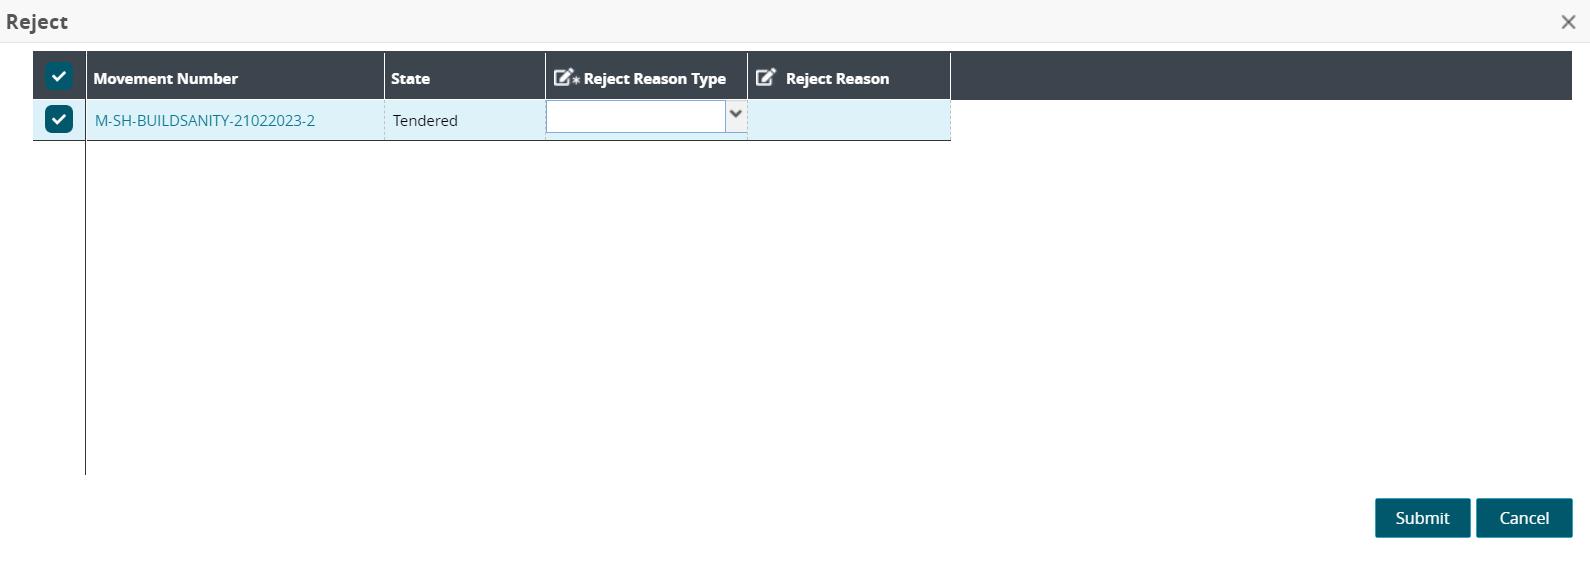
Select the *Rejection Reason Type from the drop-down list.
Enter the Reject Reason.
Click the Close and Refresh button.
The tender is removed from the Tenders screen.
Viewing Tenders and Tender Details
Users can view reports of tendered movements and shipments and tender details. The Tendered report screen also provides multiple functions as described below. Links open screens with more information on the associated data.
Complete the following steps to view tenders and tender details:
Click Menus/Favs > Transportation > Tendered as a Carrier Transportation Manager role.
The Tendered screen displays with a list of tenders.
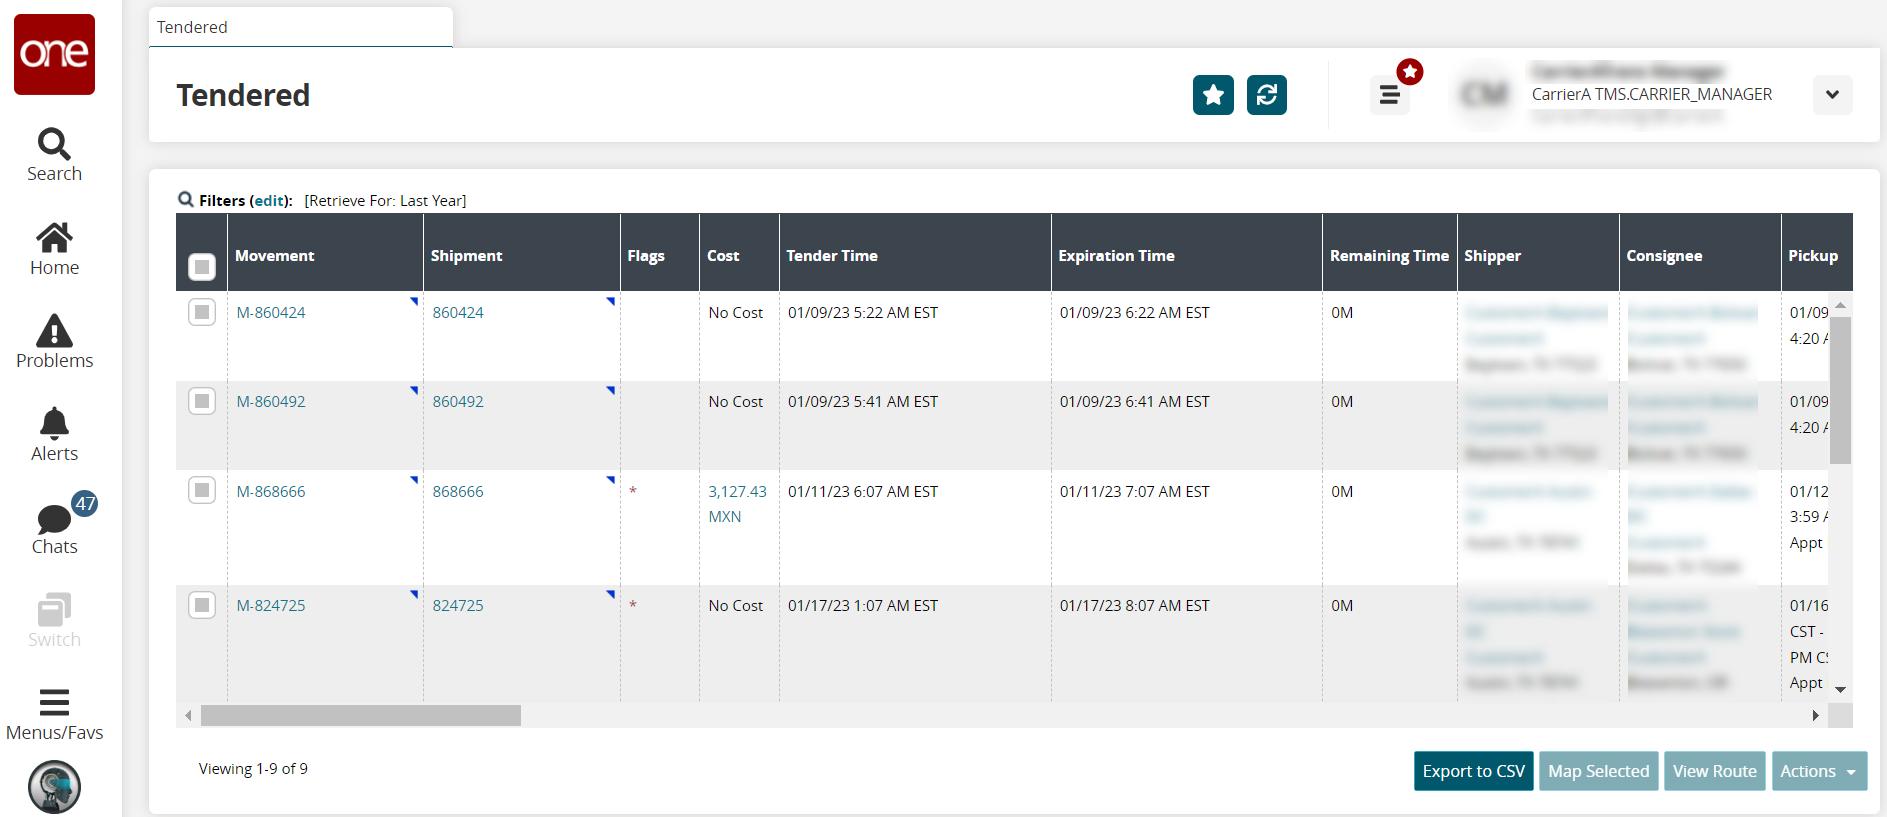
Under the Movement and Shipment columns, click the blue triangle to select from an contextual menu.
To create appointments, click the Live or Drop links under the Pickup or Delivery columns. See the "GLG: Scheduling Appointments for Shipments" section in the NEO Online Help for more information. These options may not alway be available for each tender.
Click Export to Excel to export the report to a file.
Note
Depending on the configuration settings of your instance of the ONE system, an additional drop-down menu may display that includes the option to export the data in a CSV file.
Click a movement checkbox and the Map Selected button.
The Geo View screen displays. The map view can be changed to view By Mode, By Type, and Show Deadheads.
Click the Show Legend button to view the map legend.
A legend displays.
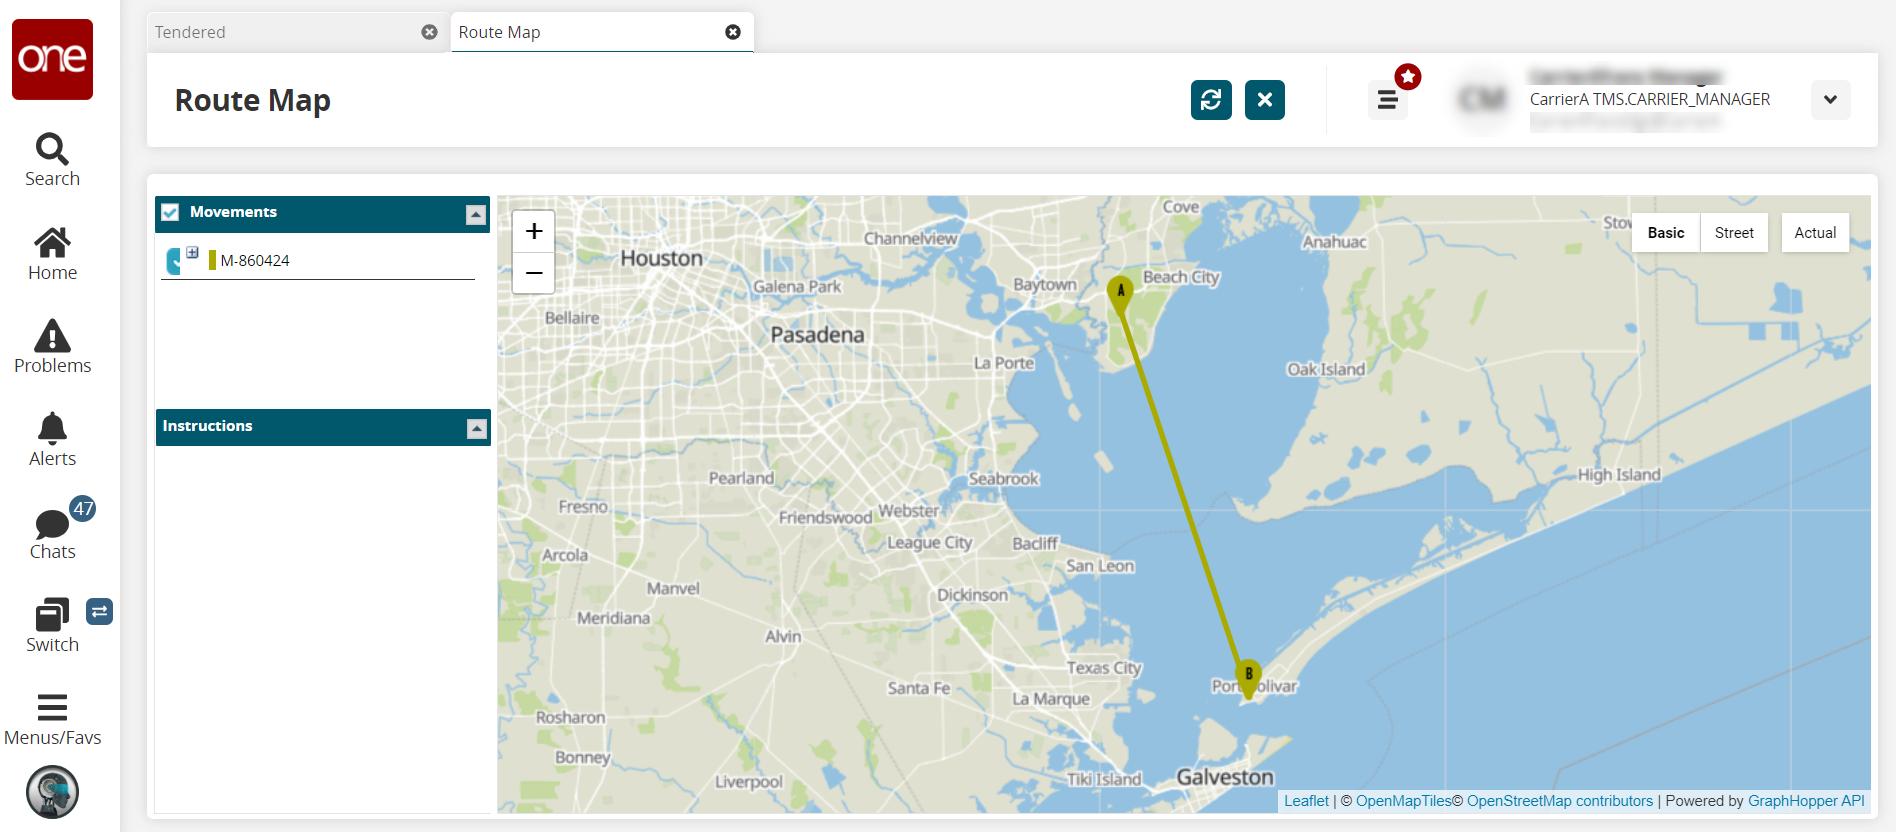
On the Tendered page, select a tendered movement, and click the View Route button.
The Route Map screen displays.
Click the checkbox for a tender(s), and click the Actions button.
Actions available for this tender and/or user are available.
Shipments
Assigning a Vehicle to a Movement
Complete the following steps to assign a vehicle to a movement:
Click Menus/Favs > Transportation > Confirmed.
The Confirmed screen displays.

There are two ways to assign a vehicle to a movement or movements:
For single movements, click the small triangle next to the movement for a window and select Assign Vehicle.
For multiple movements, click the checkboxes in front of the movements and click Actions > Assign Vehicle.
The Assign Vehicle window displays.
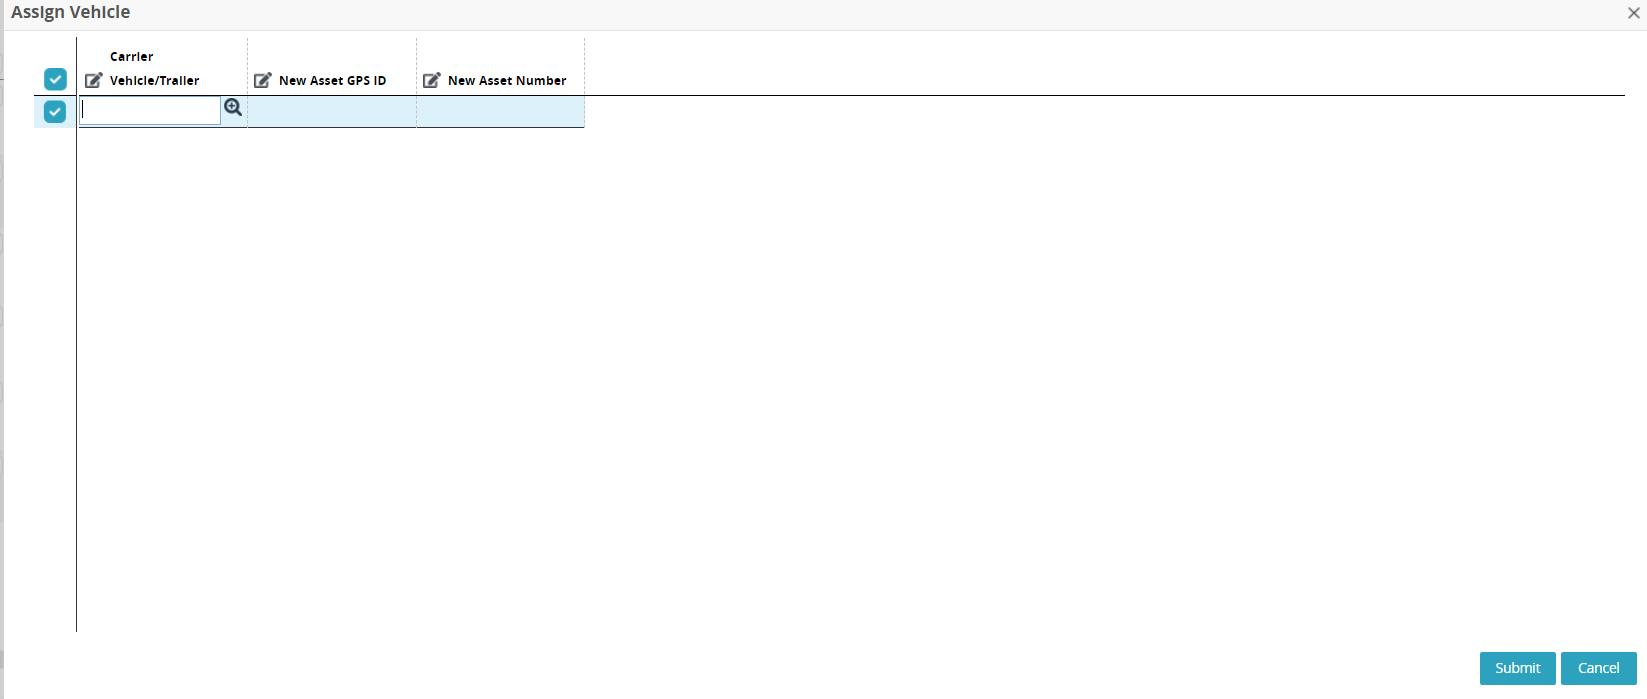
Click the picker tool to select the Carrier Vehicle/Trailer.
The Asset window displays.
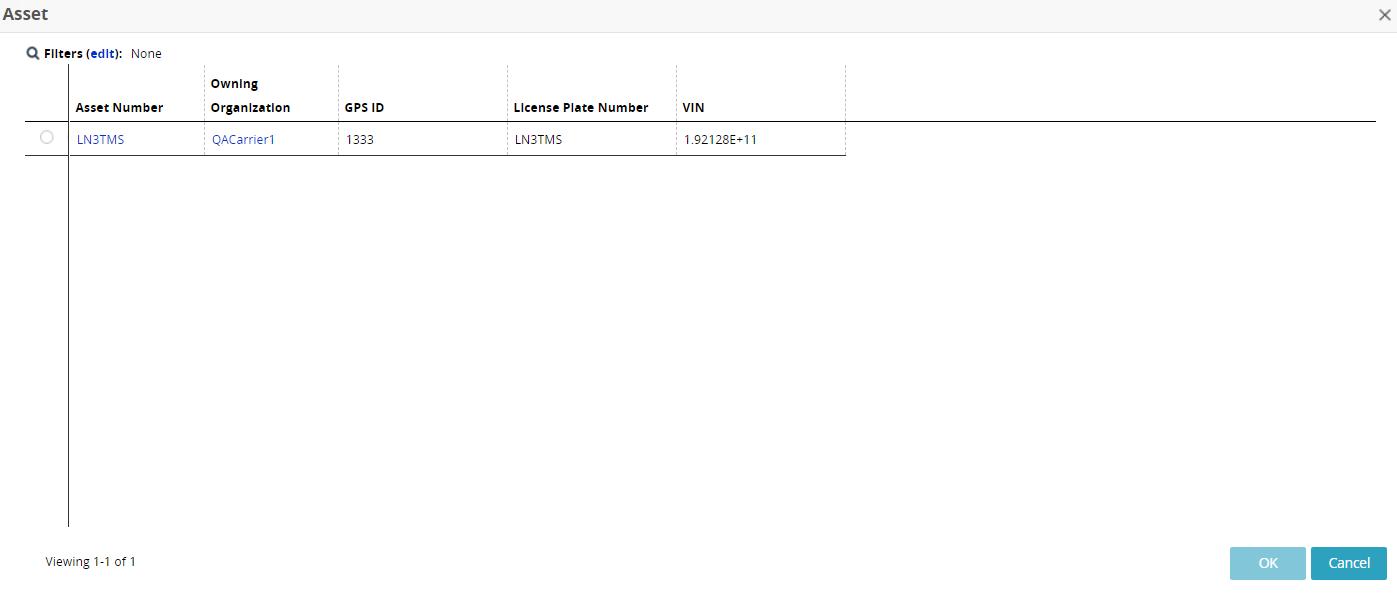
Select a vehicle from the list and click the OK button.
The vehicle information updates in the Assign Vehicle window.
Click the Close and Refresh button.
Assigning a Driver to a Movement
Users can dispatch a movement by assigning a user to the movement.
Complete the following steps to dispatch a movement and assign a dispatch user:
Click Menus/Favs > Transportation > Confirmed.
The Confirmed screen displays.

There are two ways to select the Dispatch Movement menu option.
Click the contextual (triangle) menu next to the movement name (used when you want to perform an action on a single movement) or click the checkbox in front of the movement and then the Actions button menu (used when you want to perform the same action for multiple movements).
Select Dispatch Movement from the menu.
The Dispatch Movement window displays.
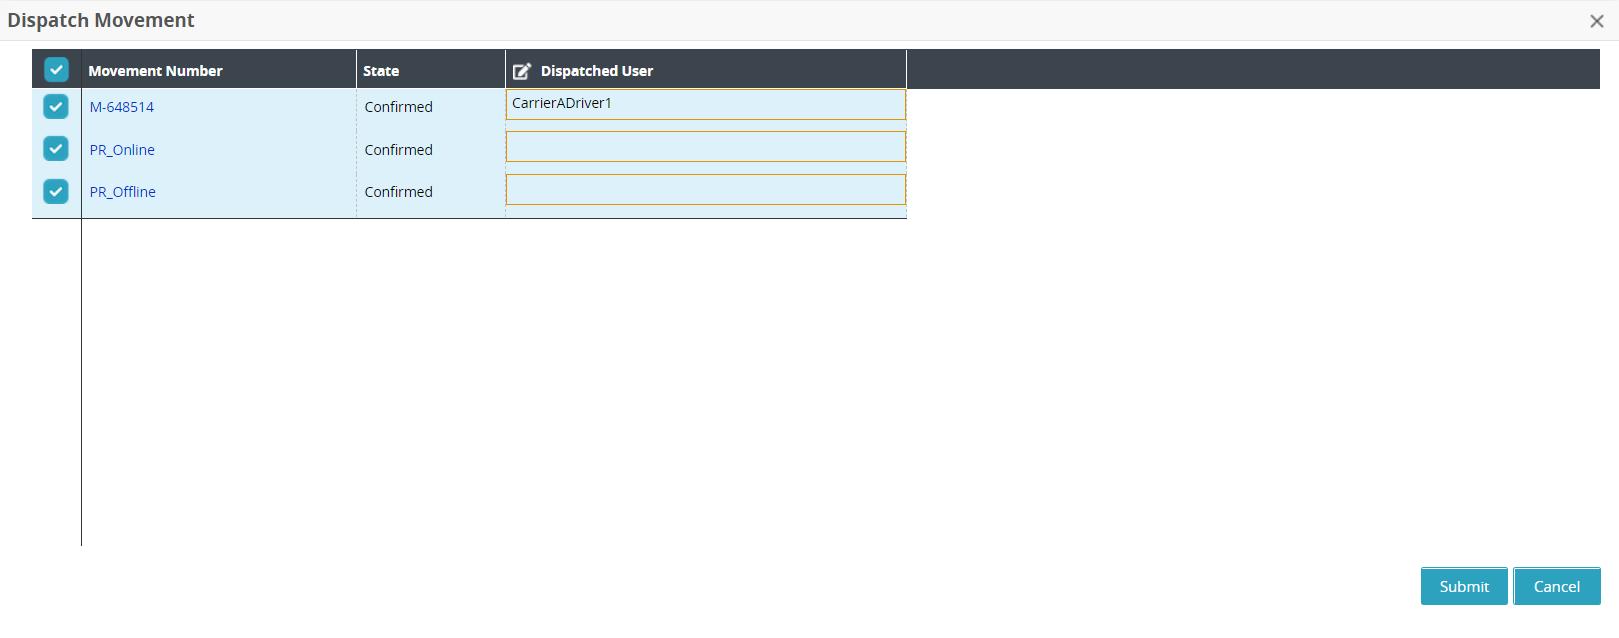
Type in the name in the Dispatched User field or use the picker tool.
In the example, we selected CarrierADriver1.
To make bulk edits that allow you to dispatch multiple movements to the same driver, click the column editing icon and select Enable Bulk Edit.

A new column displays.

Click the copy icon (first icon).
A window displays.
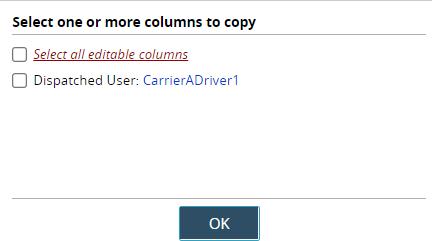
Check the appropriate box to select all columns or just limited columns.
In this case, check the box for Dispatched User: CarrierADriver1.
Click the OK button.
Click the paste icon for each row that you want to dispatch to the same driver.
The driver is copied to the cell.
Click the Close and Refresh button.
The movement updates and sends a notification to the driver.
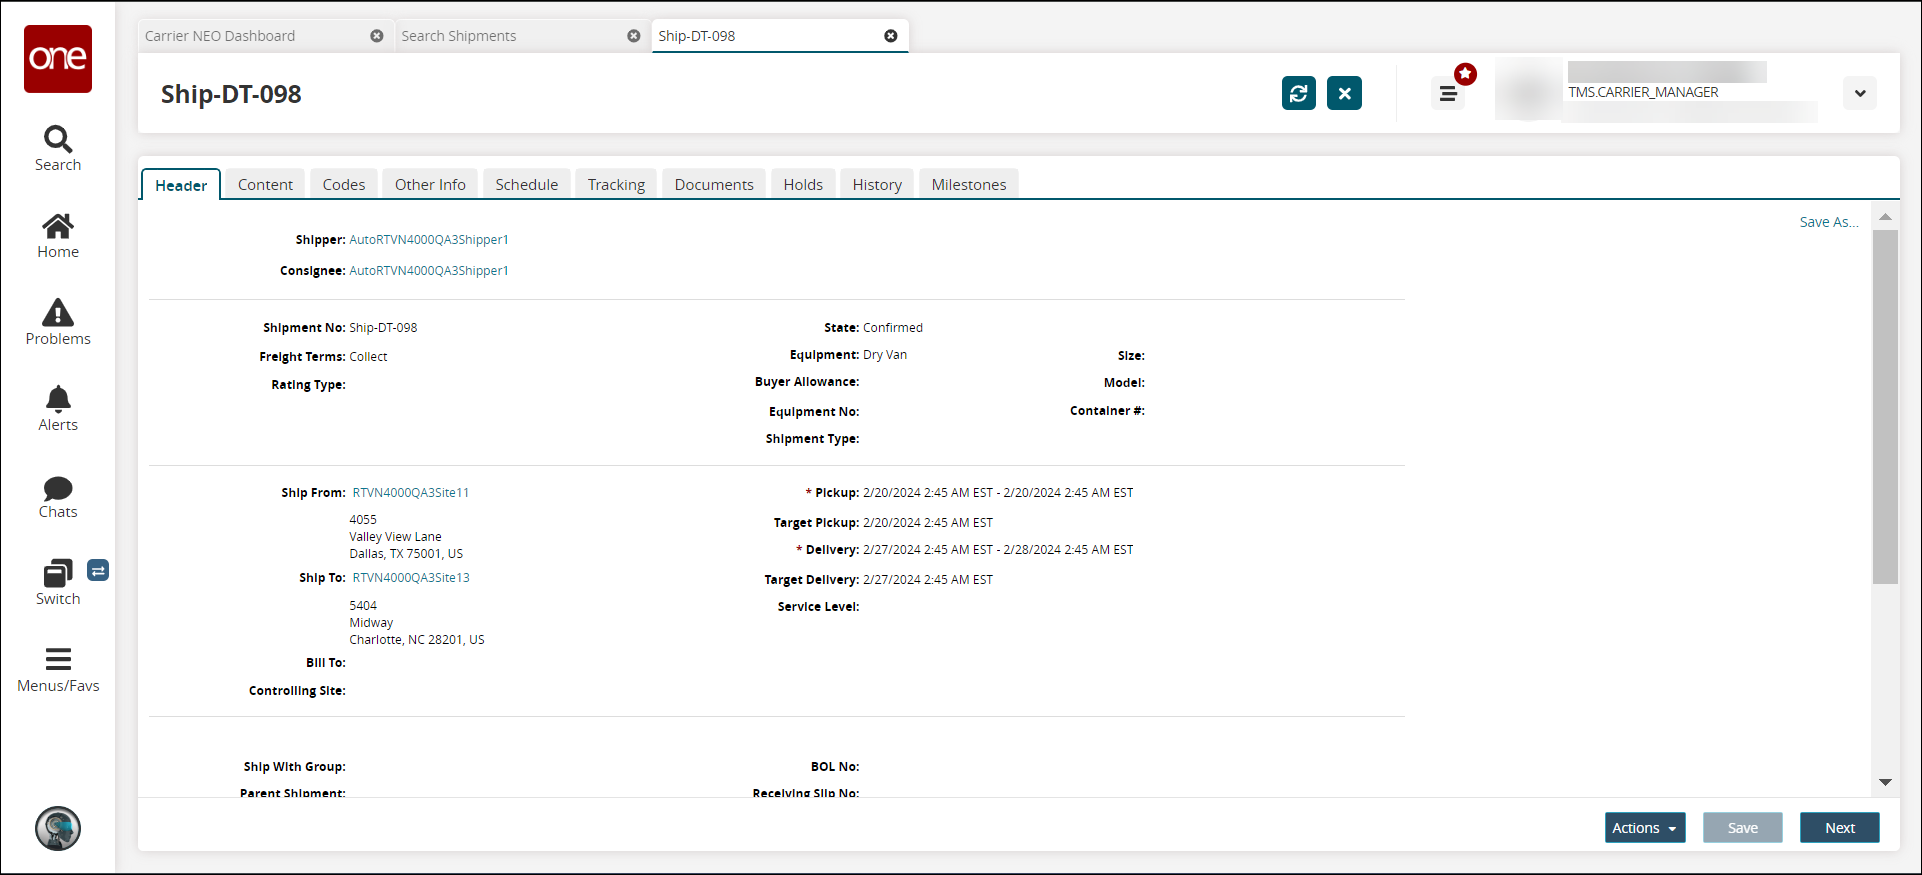
Viewing Milestones on the Shipment Details Screen
The Milestones tab on the shipment details screen displays any milestone updates made in the RTVN system. This screen allows read-only access to all milestone events along with other shipment data on the same page in the UI, increasing efficiency and visibility when and where GLG users commonly need it.
Complete the following steps to view milestone events via the shipment details screen:
Click Menus/Favs > Transportation > Search Shipments and enter any filters to locate a shipment.
Click the shipment link. Users can also use the global search on the left navigation bar to search for a shipment.
The shipment details page displays.
Click the Milestones tab.
Milestone events and related information display.
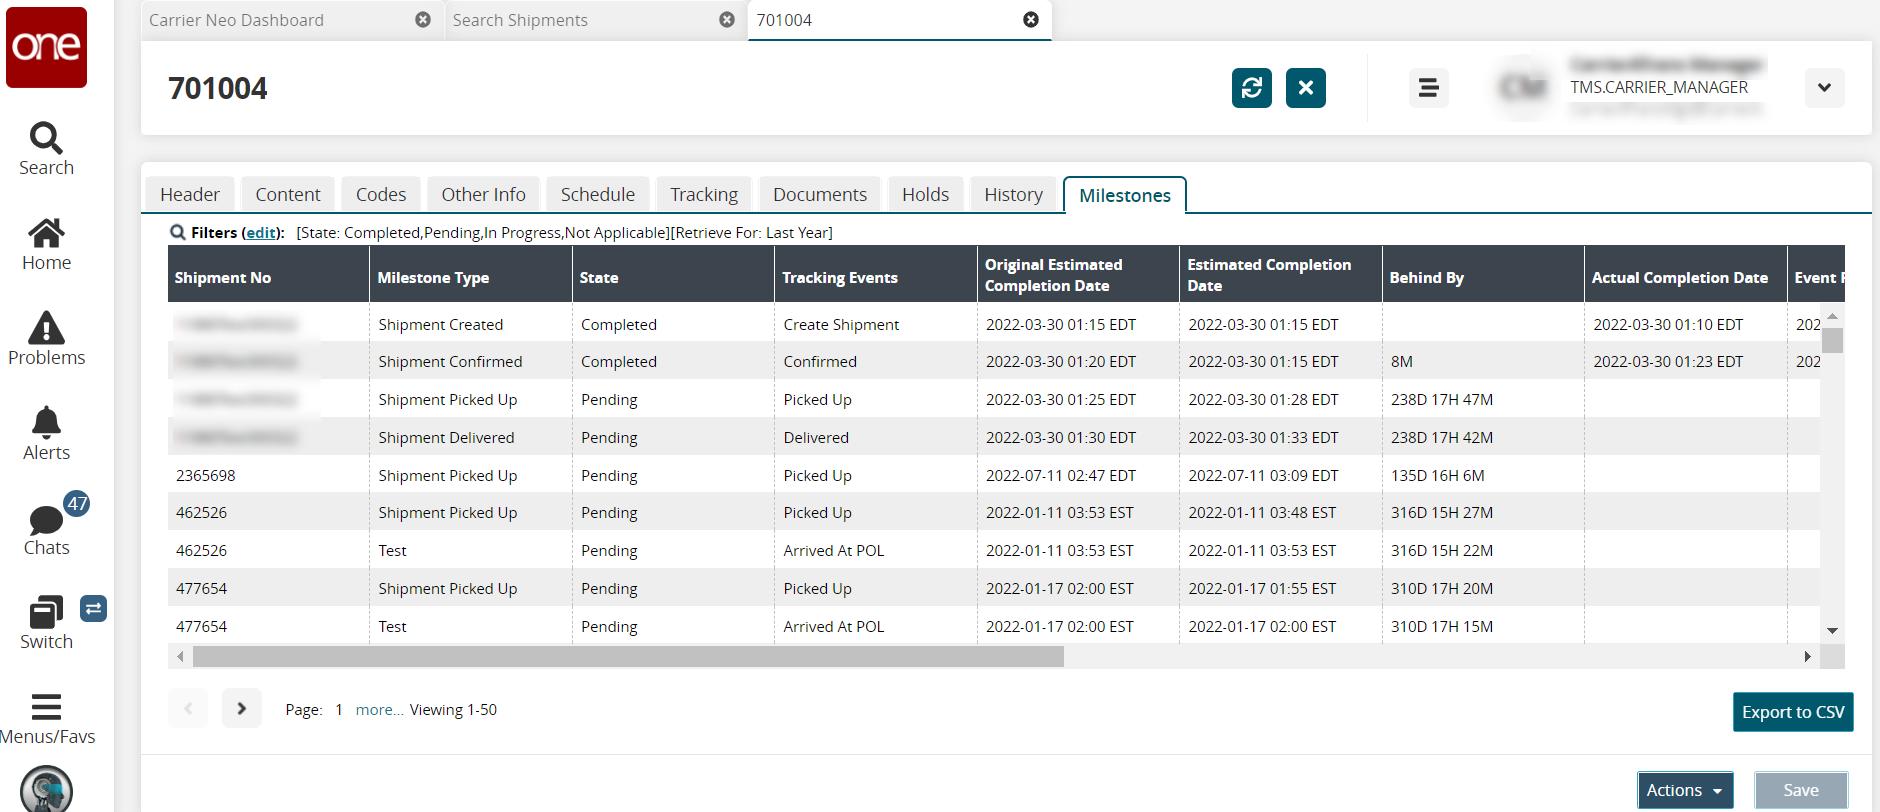
Click Export to Excel to export the report to a file.
Note
Depending on the configuration settings of your instance of the ONE system, an additional drop-down menu may display that includes the option to export the data in a CSV file.
Viewing Reason Codes for Shipments and Movements
Complete the following steps to view the reason code for a movement:
Search for the shipment number using the global search function in the left navigation pane.
The search results display.
Click the History link under the Links column.
The Movement History Page displays a new Reason Code column.
Complete the following steps to view the reason code for a shipment:
Search for the shipment number using the global search function in the left navigation pane.
The search results display.
Click the shipment number link in the Shipment column.
The shipment details screen displays.
Click the History tab.
The shipment's event history displays a new Reason Code column.
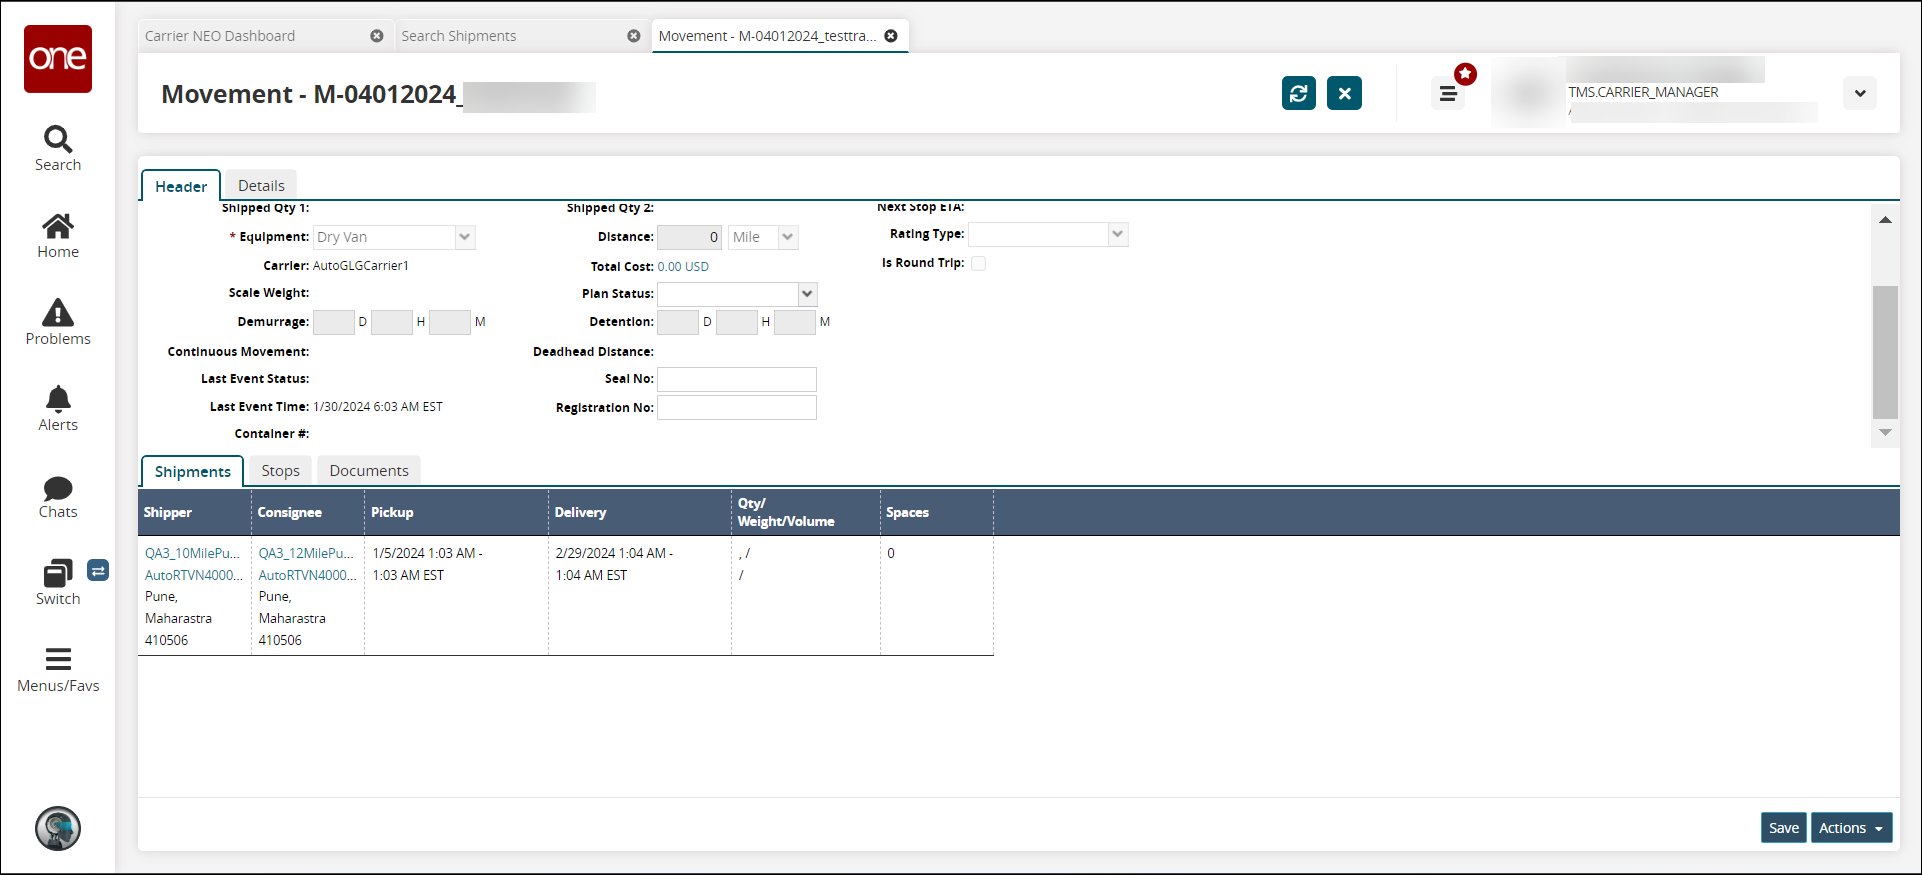
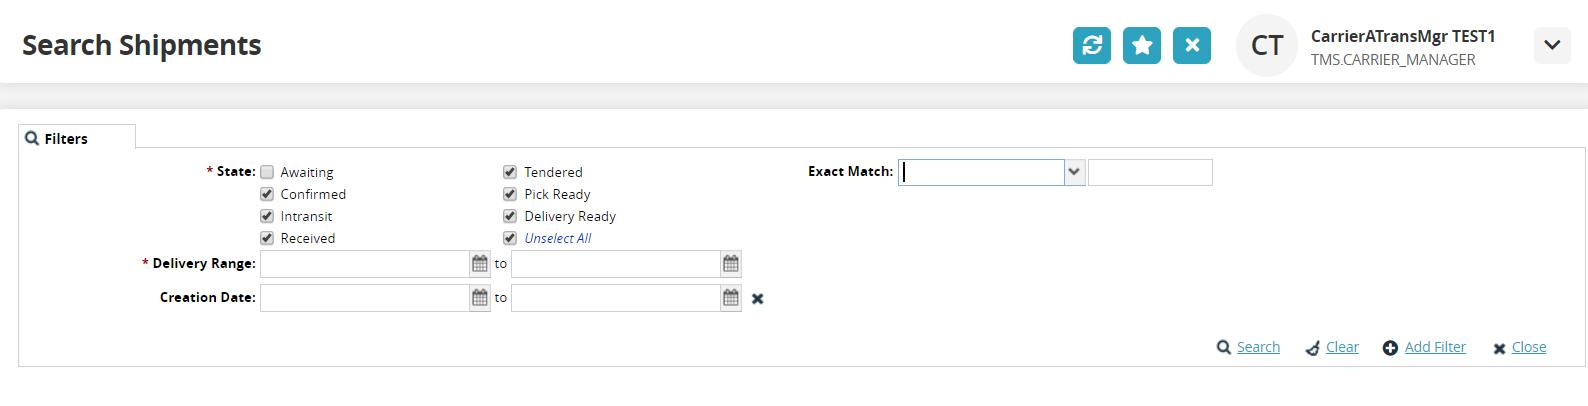
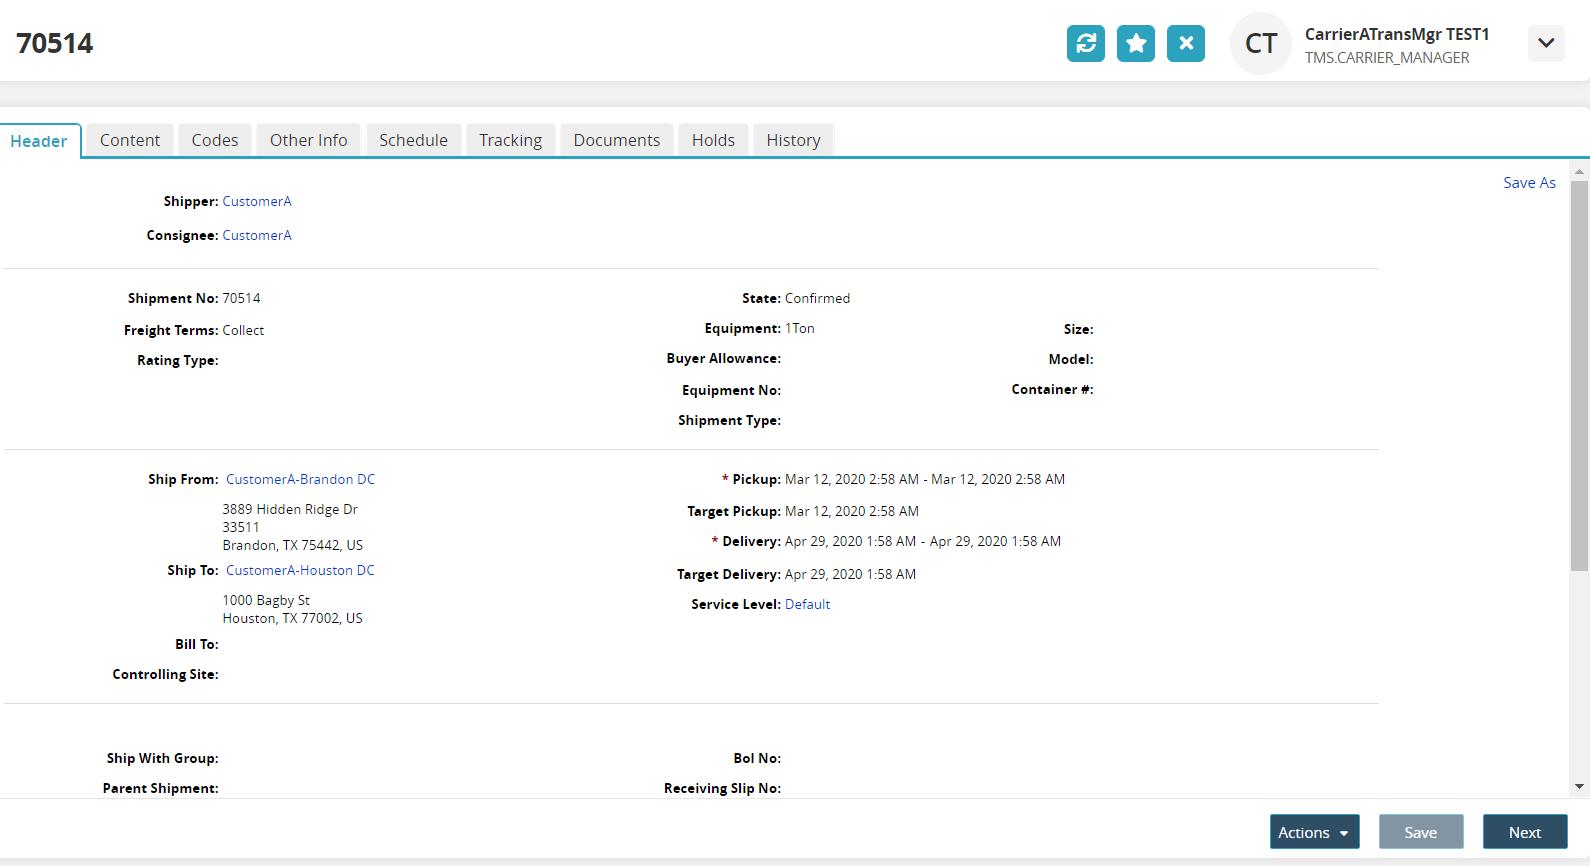
Making Changes to Movements
Complete the following steps to make changes to movements:
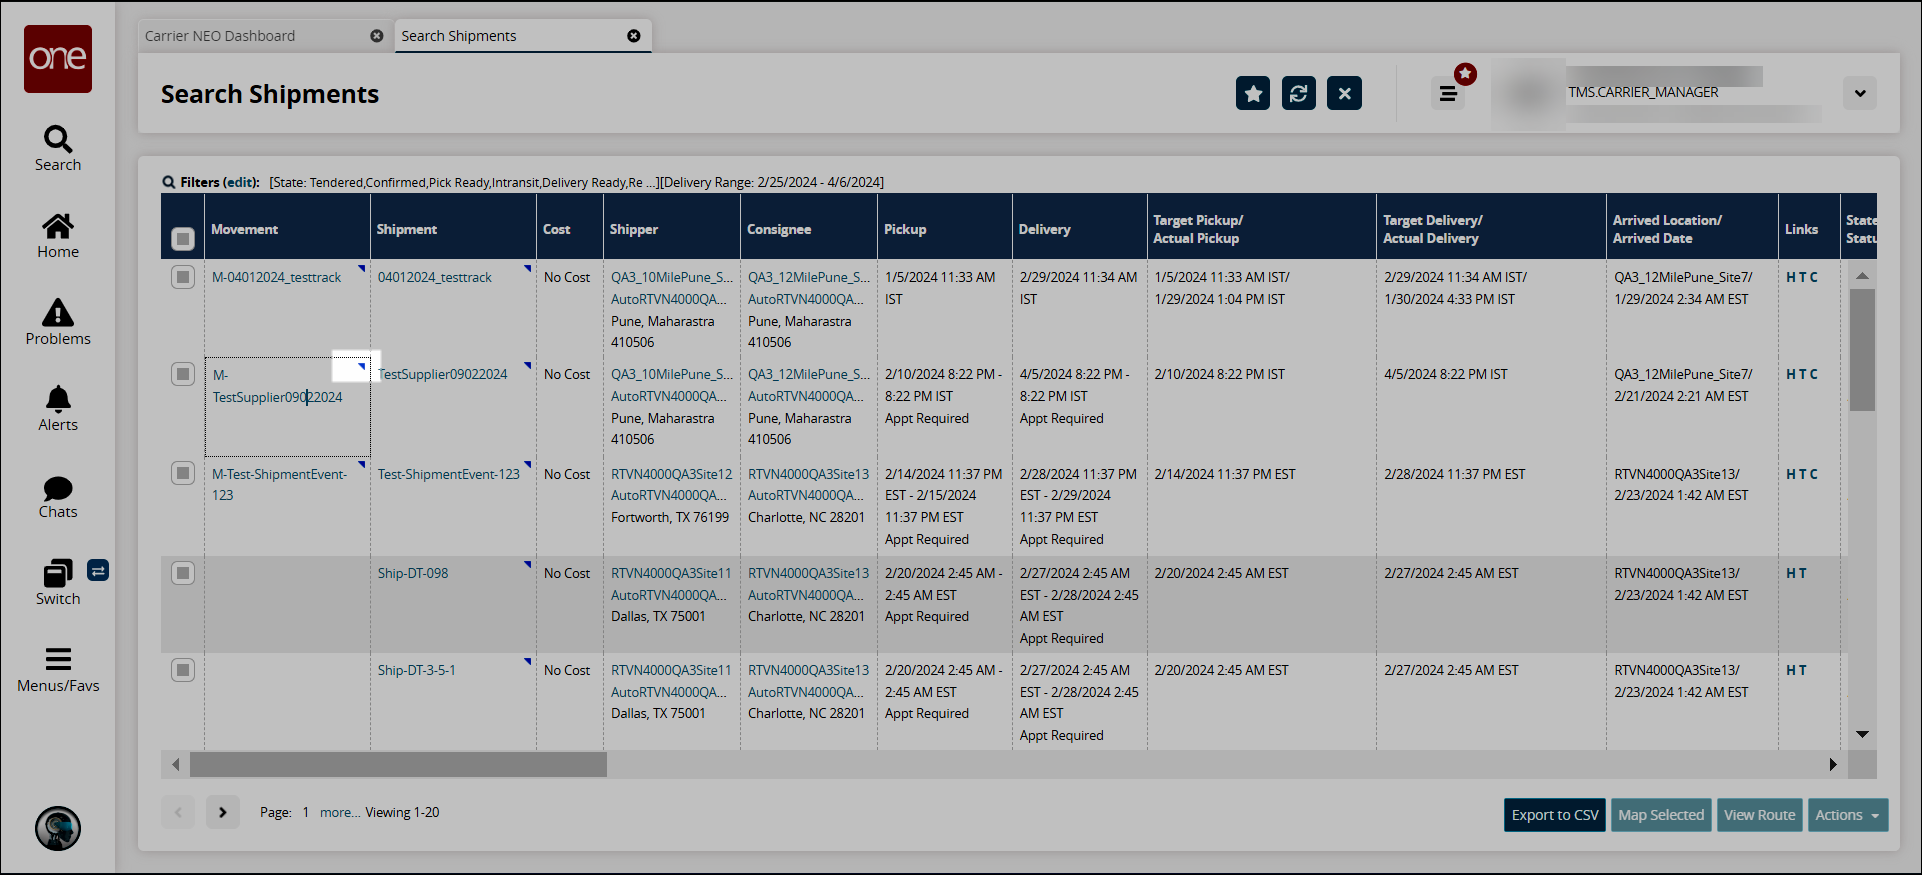
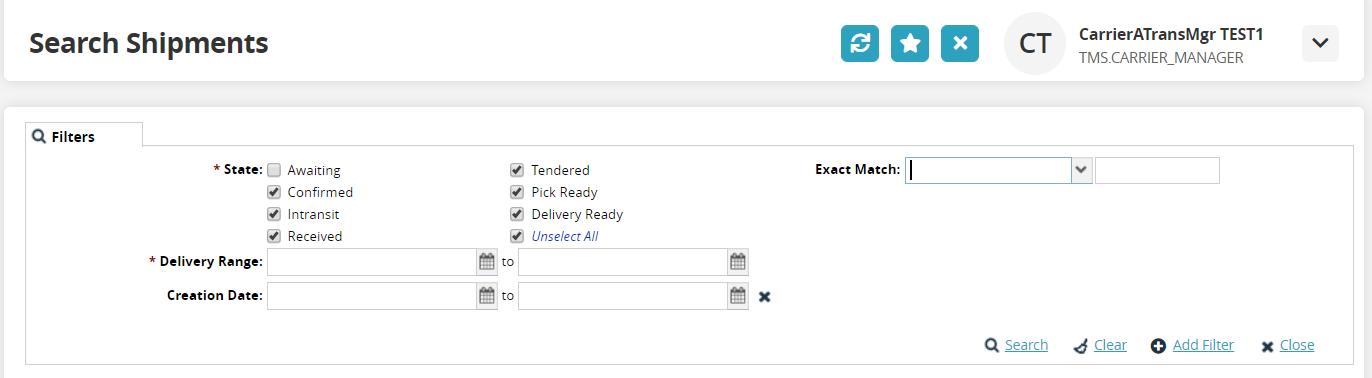
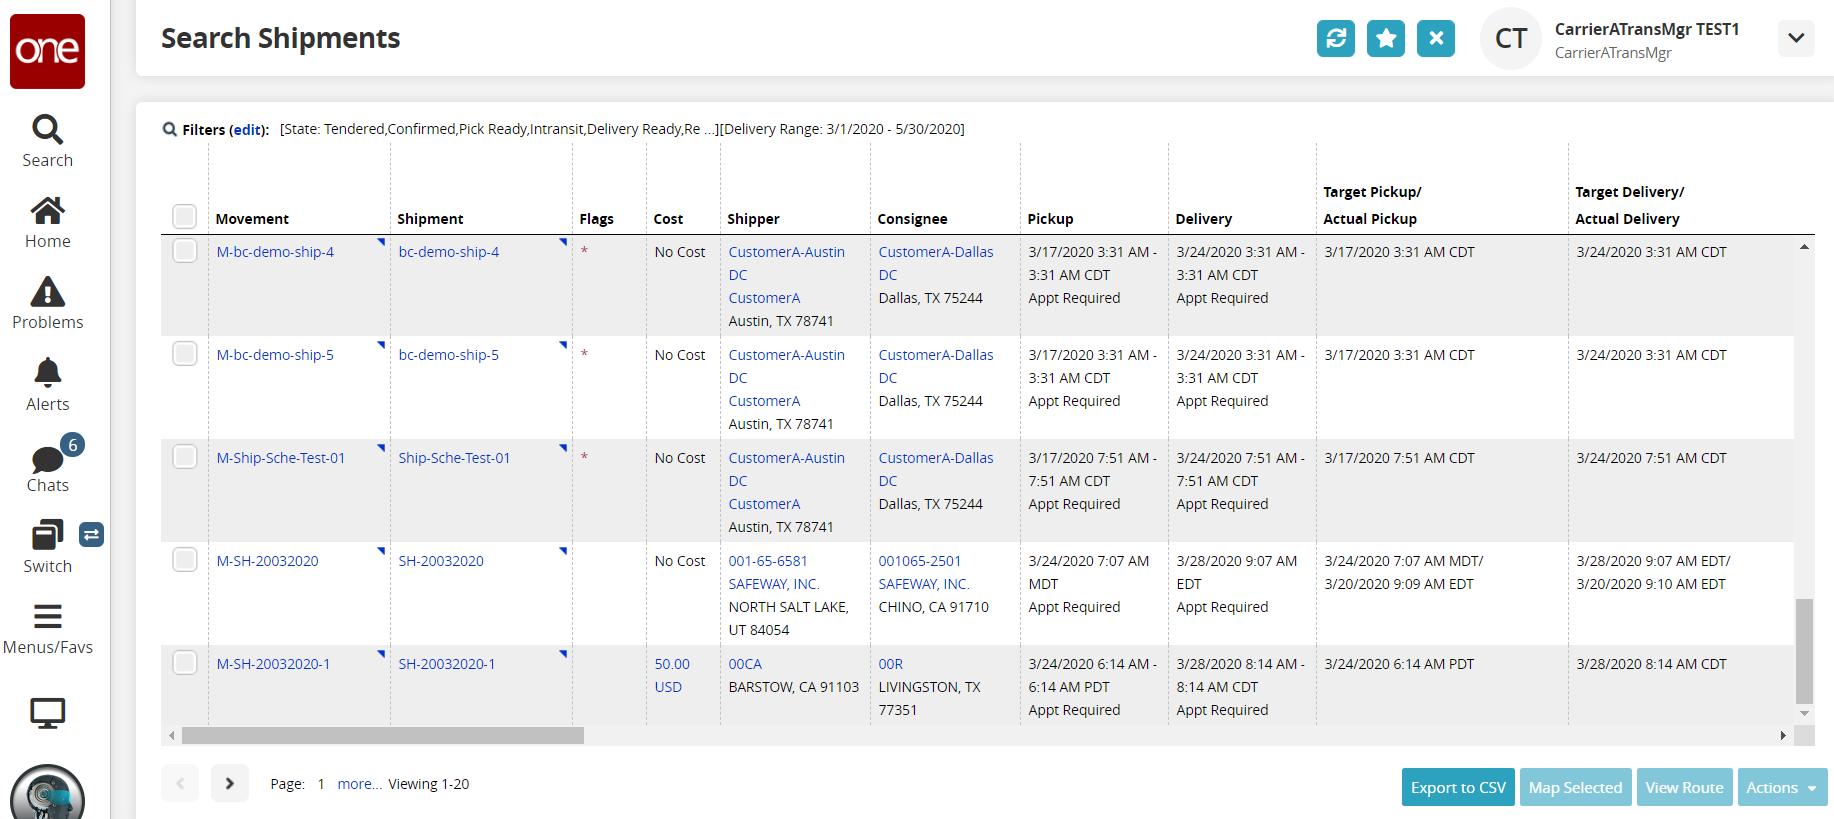
Click Menus/Favs > Transportation > Search Shipments.
The Search Shipments screen displays.
Field
Description
*State
Select a states.
*Delivery Range
Select a delivery date range using the calendar icons.
Creation Date
Select a creation date rate using the calendar icons.
Exact Match
Enter a value and search by.
Click the Search link.
The data results display.
Click the Movement link.
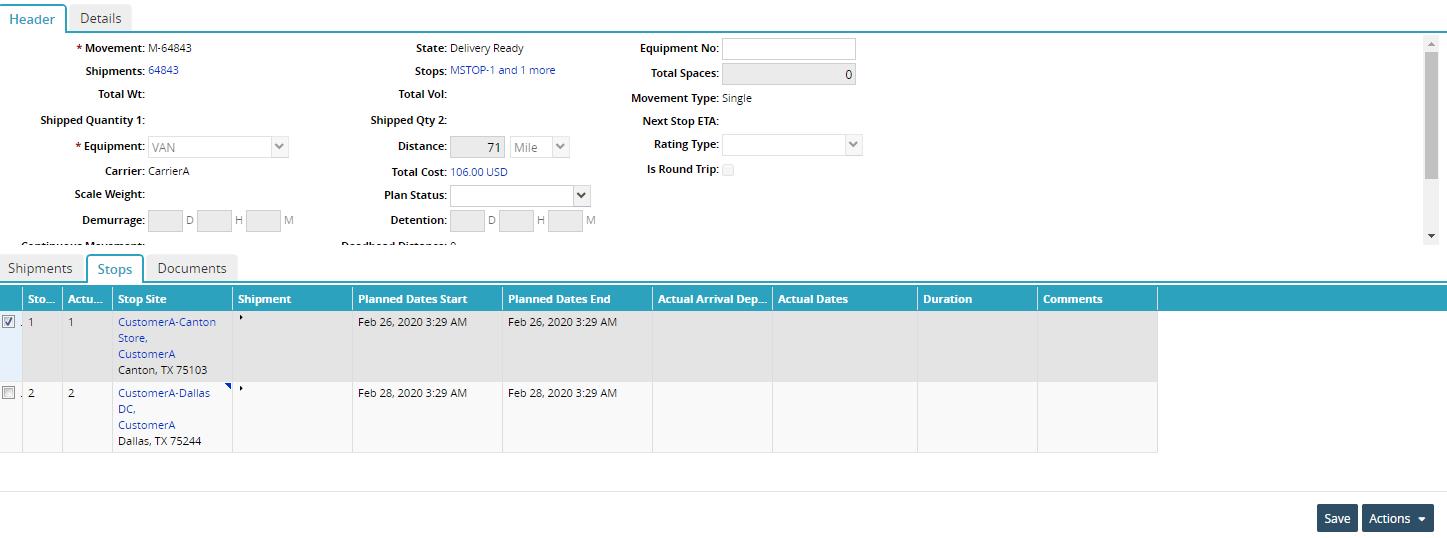
The Movement details screen displays.
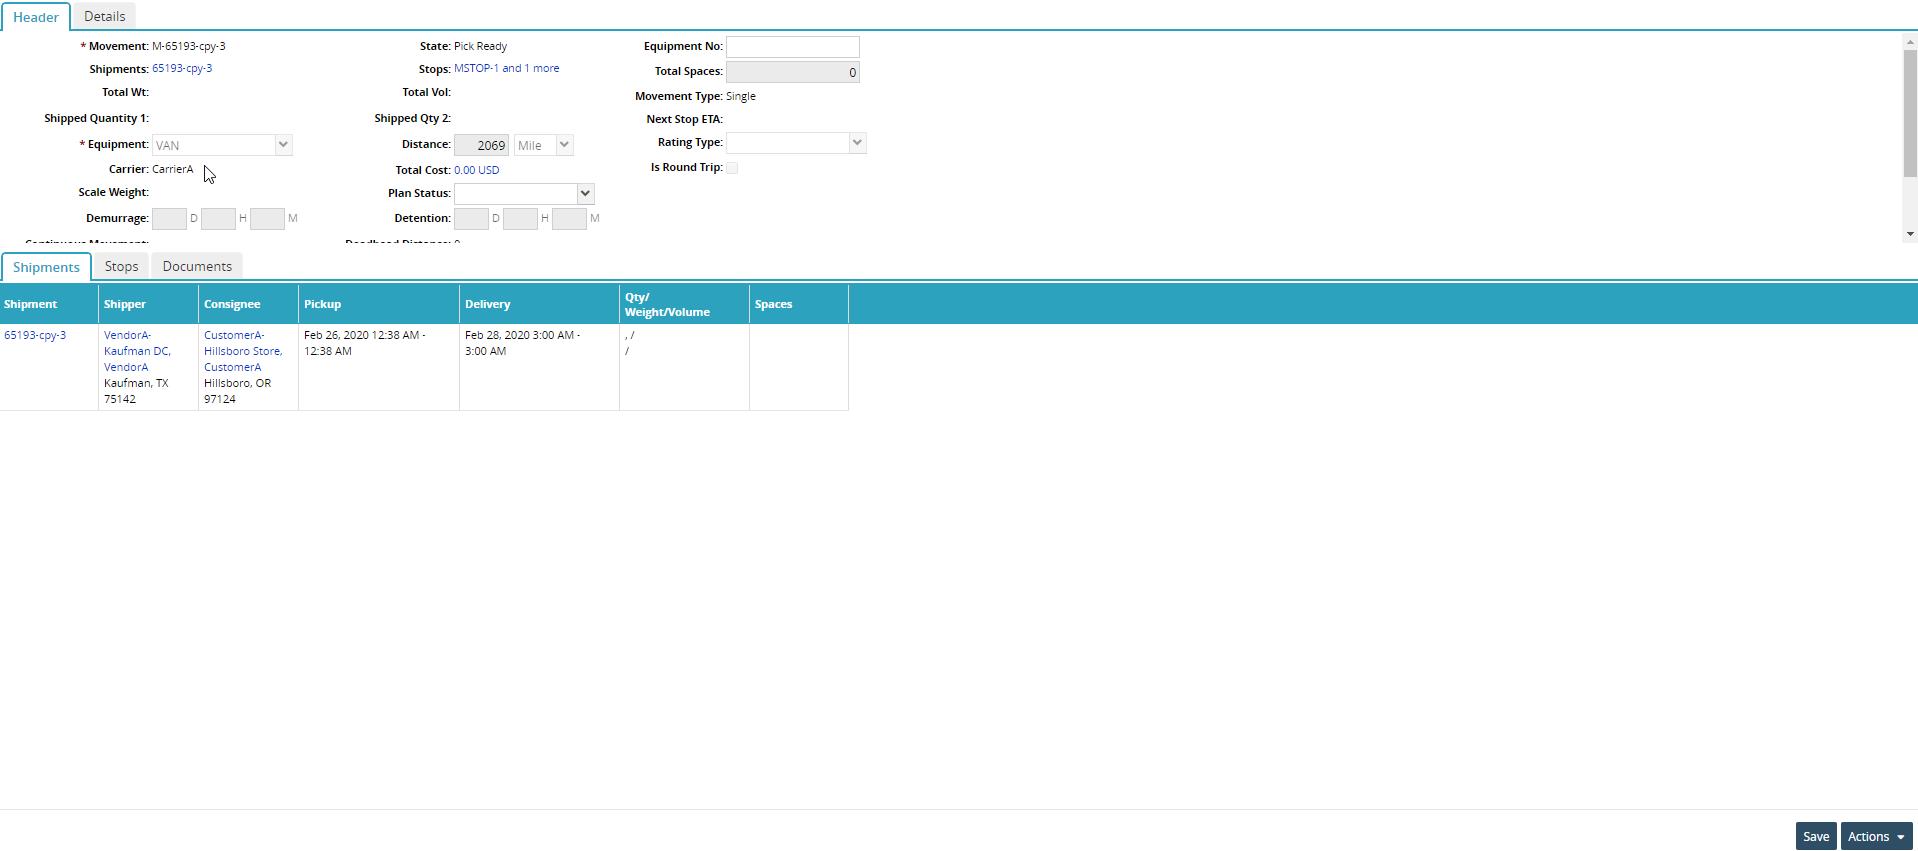
The following fields are editable on the Header: Equipment No, Plan Status, Seal No, and Registration No.
The following fields are editable on the Details tab: PRO No, Booking No, Travel Direction.
There are no editable fields on the Shipments tab.
The following field is editable on the Stops tab: Actual Dates.
The following field is editable on the Documents tab: Attachments.
Searching for Non-Controlled Shipments
Complete the following steps to search for non-controlled shipments:
Click Menus/Favs > Transportation > Non-Controlled Shipments.
The Non-Controlled Shipments screen displays all non-controlled shipments.
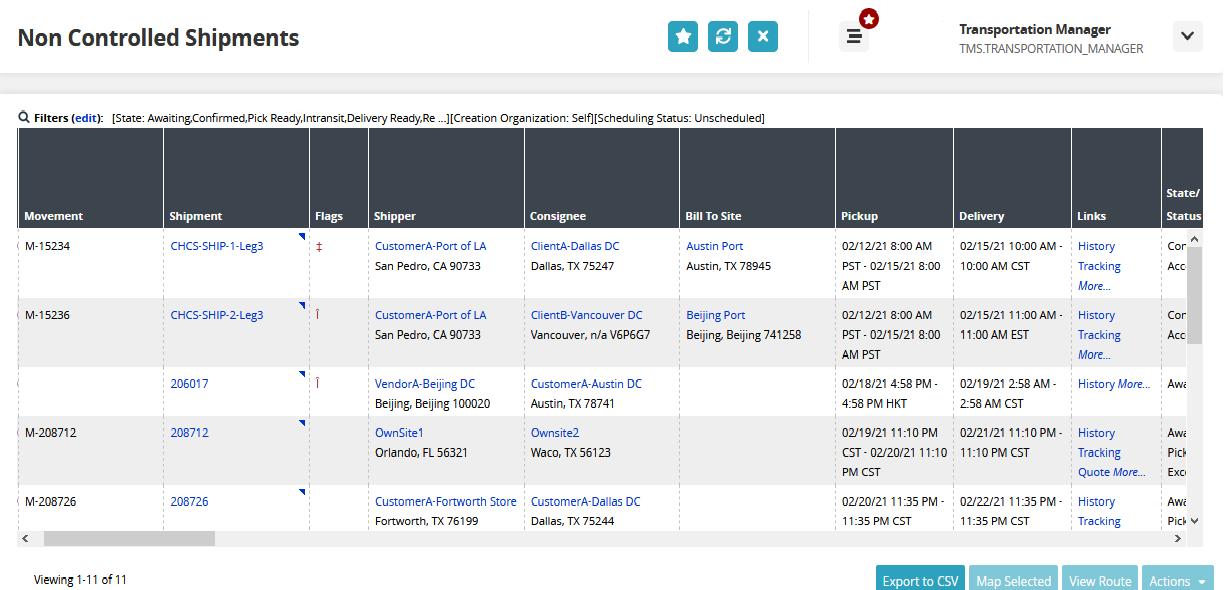
Click the Filters (edit) link.
The search filters display.
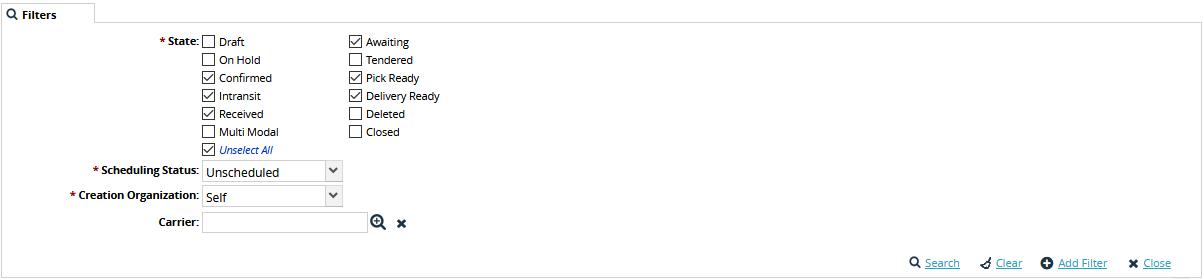
Check the box next to the appropriate shipment state for the *State field.
From the Scheduling Status drop-down menu, select the appropriate status. The available options are: All, Scheduled, and Unscheduled.
From the Creation Organization drop-down menu, select the organization that created the shipment. The available options are Self, Partner, and Both.
In the Carrier field, enter the carrier name by typing the first few letters or by clicking the Search icon and then selecting one.
Click the Search link.
The data results display.
Stop-Level Pickup and Delivery
Complete the following steps to perform stop-level pickups and deliveries:
Click Menus/Favs > Transportation > Confirmed.
The Confirmed Shipments page displays.
Click the Movement link.
The Movement Details page displays.
Click the Stops tab.
The stops for the movement display.
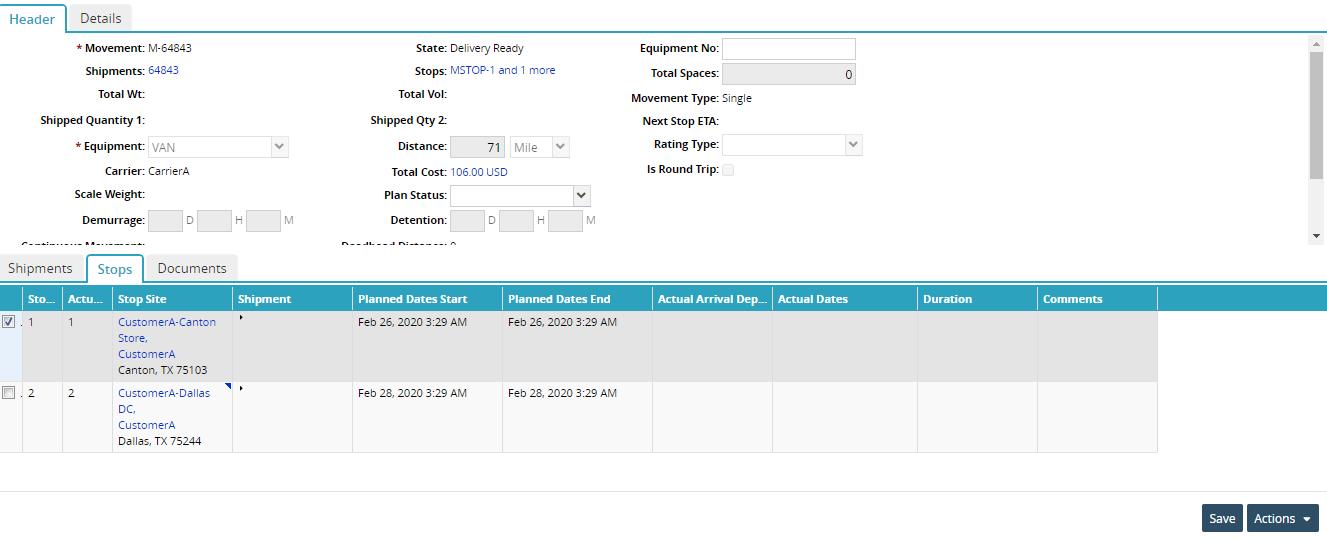
Click the checkbox to the left of a stop.
Click the Actions button.
The Actions menu displays.
Select the appropriate action for the stop.
Select Pickup
The Pickup window displays.
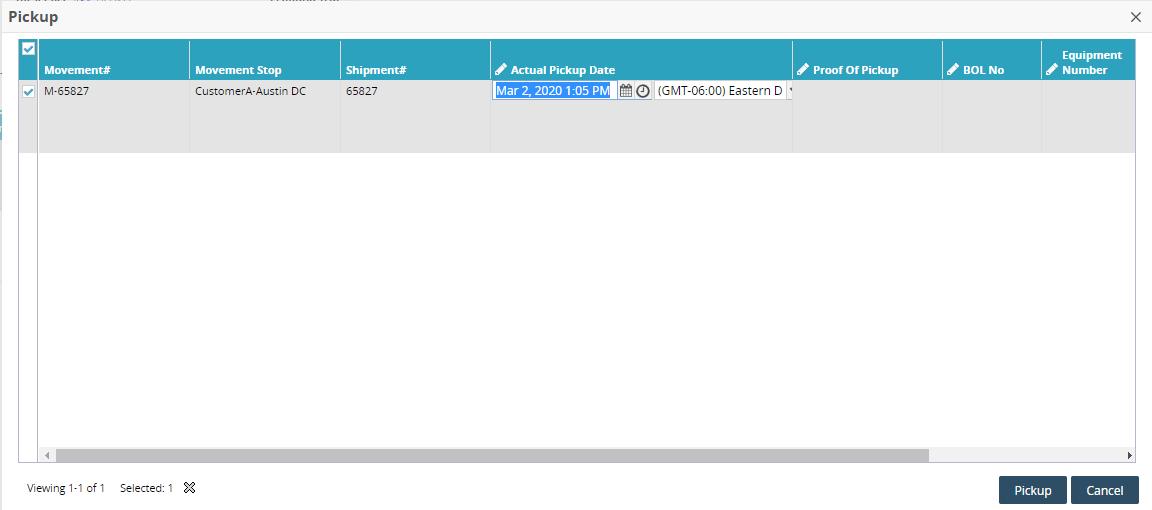
Enter the correct date and time.
Click the Pickup button.
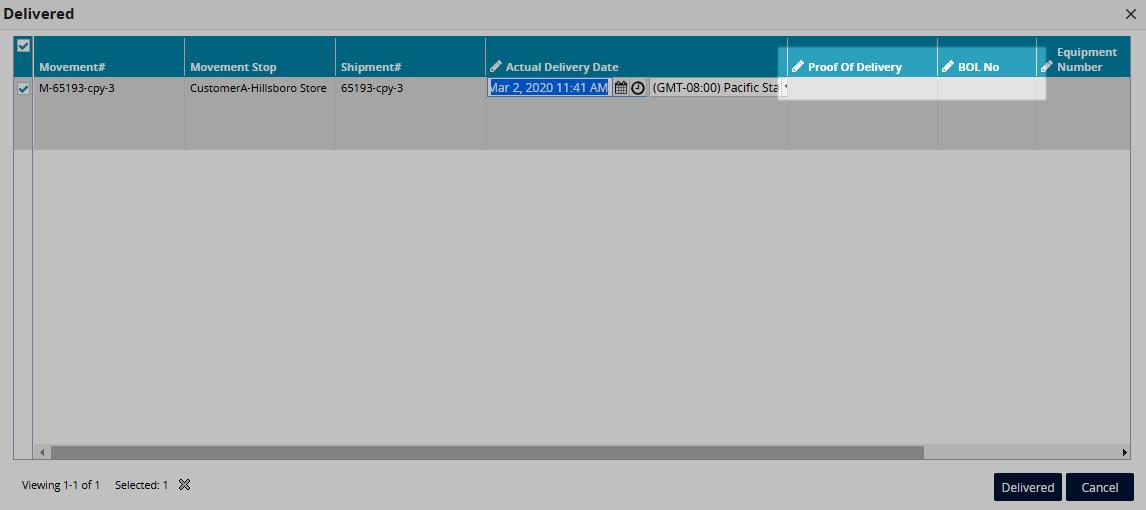
Select Delivered.
The Delivered window displays.
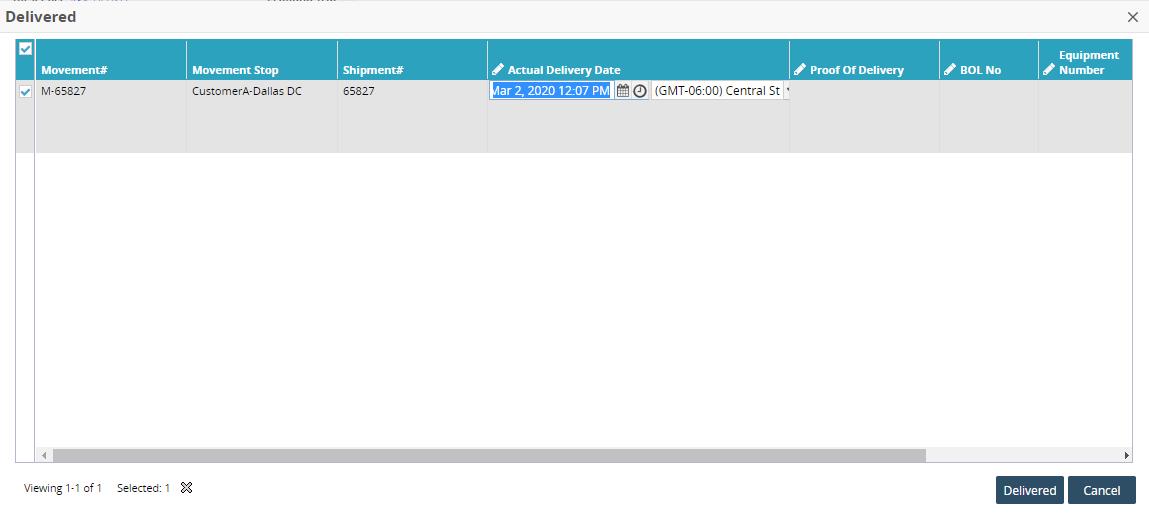
Enter the correct date and time.
Click the Delivered button.
A success message displays.
Click the Close and Refresh button.
A confirmation window displays.
Click on the Yes button.
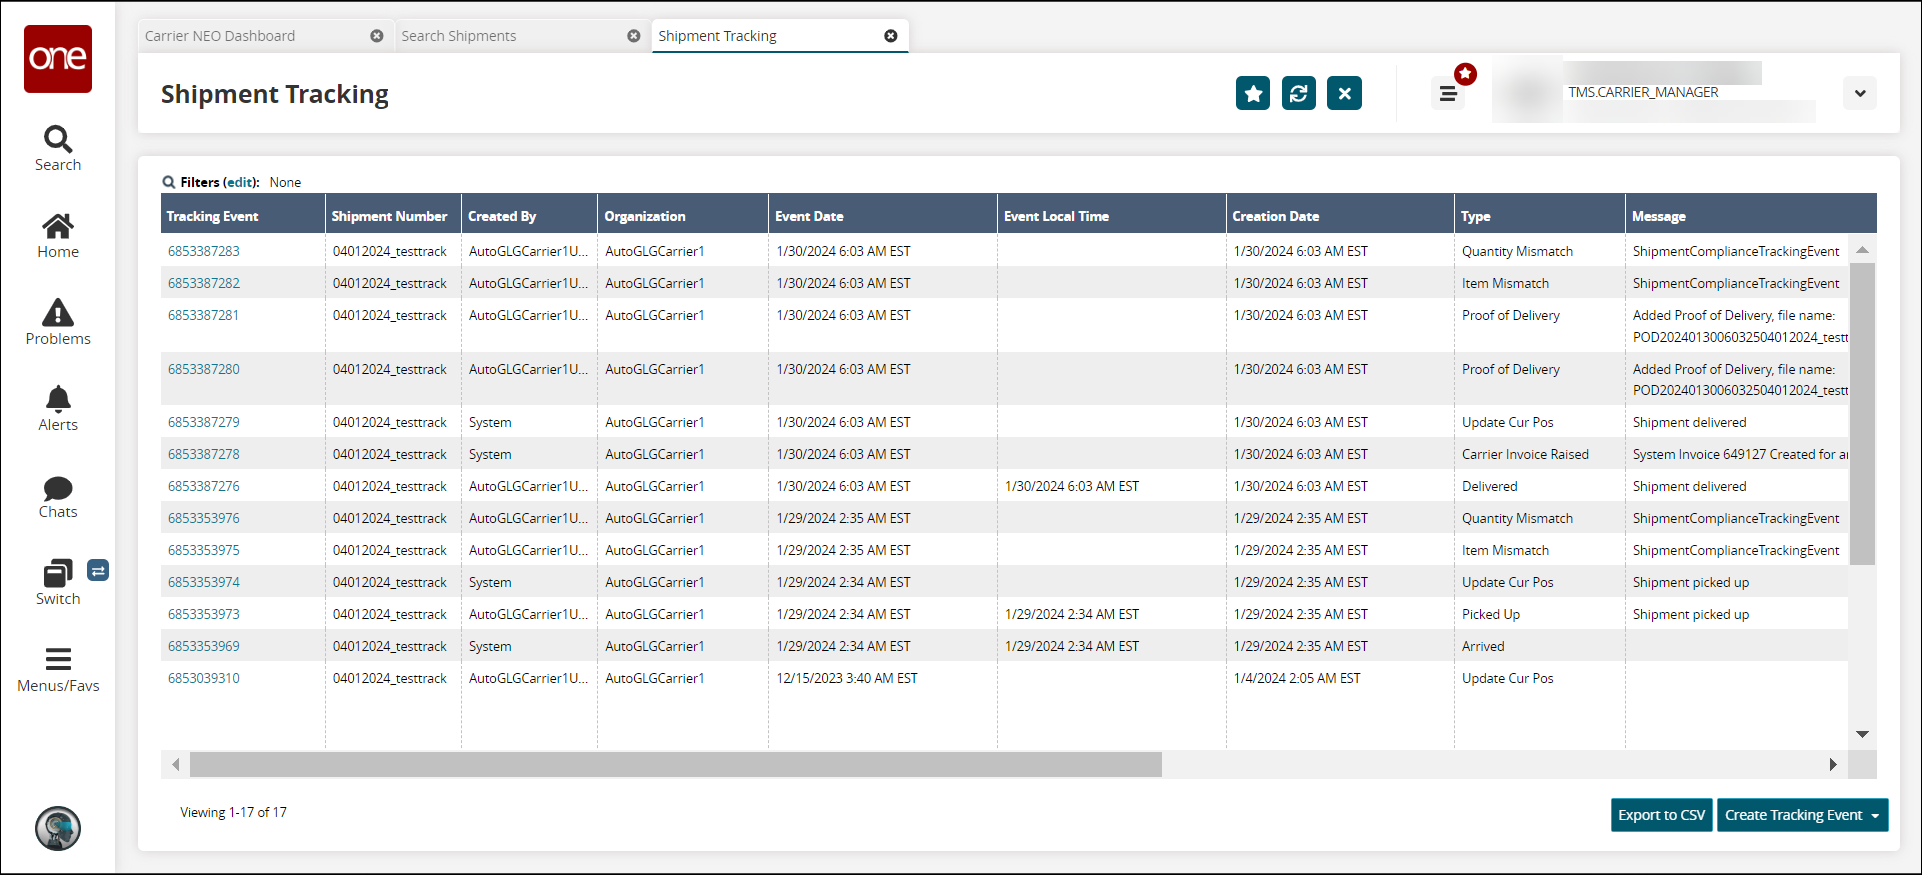
Viewing Tracking Events
Users can view tracking events defined by the enterprise, organization, or user. For more information about user-defined tracking events, see the "Creating Tracking Events" section in the NEO Online Help.
Screens in the UI displaying tracking events for a movement or shipment can be accessed in three different ways. The instructions below describe how to view movement tracking events, but the same process is used to view shipment tracking events. The different methods start the same, so this step is written below, and the three methods follow.
Complete the following steps to view tracking events from the Search Shipments, Non-Controlled Shipments, or shipment status screens using the Actions menu:
Locate the shipment or movement to which you want to add the event.
Shipment Search Alternatives
Alternative methods to search for shipments are available. See any of the following sections in the NEO Online Help for more information:
"Searching Shipments"
"Searching for Non-Controlled Shipments"
"Using Filters"
"Performing a Global Search"
Check the box for one movement/shipment from one of the screens mentioned above.
Note
Users cannot view tracking events for more than one movement/shipment at the same time.
Click Actions > Movement Tracking.
The Movement Tracking screen displays.

Complete the following steps to view movement tracking events from the Search Shipments or Non-Controlled Shipments screens using the contextual menu (blue triangle):
Click Menus/Favs > Transportation > Search Shipments or Menus/Favs > Transportation > Non-Controlled Shipments.
Click the contextual menu arrow (blue triangle) in the cell for a movement.
A menu displays.
Click the Movement Tracking option.
The Movement Tracking screen for that movement displays.
Complete the following steps to view shipment tracking events from the Search Shipments or Non-Controlled Shipments screens using the contextual menu (blue triangle):
Click Menus/Favs > Transportation > Search Shipments or Menus/Favs > Transportation > Non-Controlled Shipments.
Click the contextual menu arrow (blue triangle) in the cell for a shipment.
A menu displays.

Click the Shipment Tracking option.
The Shipment Tracking screen displays.
Complete the following steps to view movement tracking events from the movement details screen:
Click the Movement Number link for a movement based on the search performed above.
The movement details screen displays.
Click Actions > Movement Tracking.
The Movement Tracking screen displays.
Complete the following steps to view shipment tracking events from the shipment details screen:
Click the link for a shipment based on the search performed above.
The shipment details screen displays.
Click the Tracking tab.
The tracking events for that shipment display.

Uploading Proof of Delivery and BOL
Complete the following steps to upload proof of delivery and bill of lading (BOL) files:
Click Menus/Favs > Transportation > Search Shipments.
The Search Shipments screen displays.
Field
Description
*State
Click the checkbox for the state of the shipment.
*Delivery Range
Use the clock and calendar tools to select the beginning and end dates for the delivery range.
Shipment
Enter the shipment number.
Equipment
Select the value parameter from the drop-down list for the first field. Select the equipment type for the second field.
Creation Date
Use the calendar tool to select a date range for the creation date of the shipment.
Exact Match
Select movement or shipment from the drop-down list for the first field. Enter the exact movement/shipment number in the second field.
Click the Search link.
The data results screen displays. (A shipment detail screen displays below. Shipments and movements can be searched.)
Click the Documents tab.
The Documents tab displays.
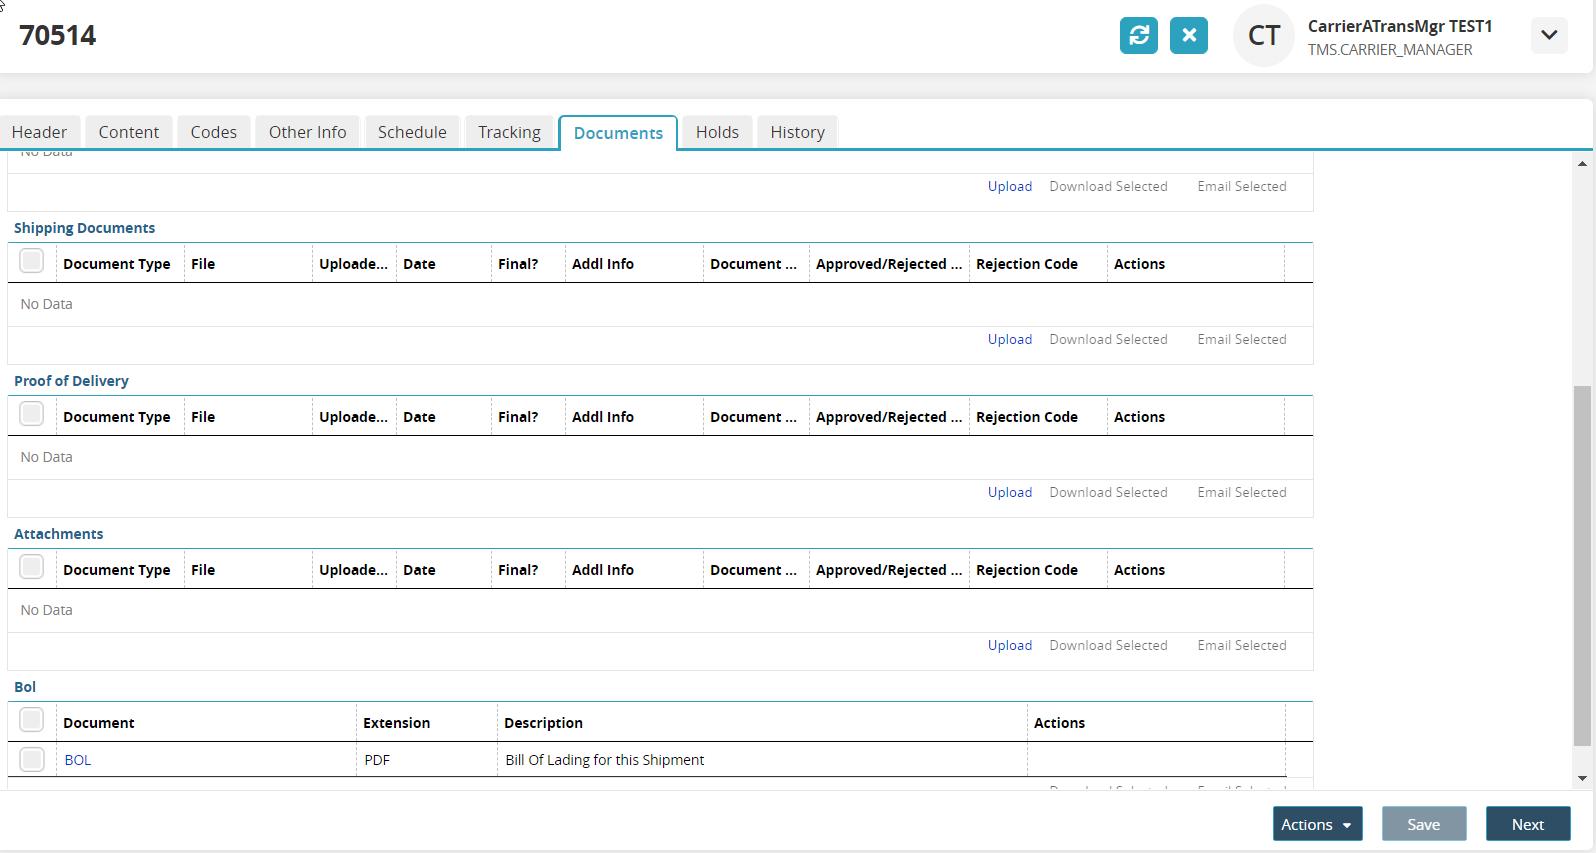
Scroll to the Proof of Delivery section and click the Upload link.
The Upload window displays.
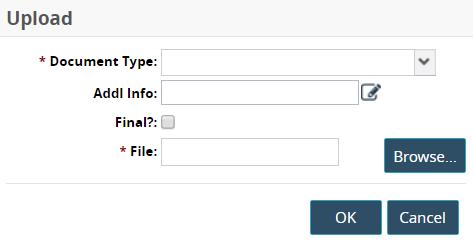
Use the drop-down menu to select the value for the *Document Type field.
Click the edit icon to complete the Addl Info field.
Check the box for the Final? field.
Click the Browse button to select a file from the user's computer.
Click the OK button.
The document type and file name display in the Proof of Delivery section.
The same steps are performed to upload a BOL file.
Updating Proof of Delivery and BOL
Complete the following steps to update proof of delivery (POD) or bill of lading (BOL):
Click Menus/Favs > Transportation > Confirmed.
The Confirmed Shipments page displays.
Click the Movement link.
The Movement Details page displays.
Click the Stops tab.
The stops for the movement display.
Click the checkbox to the left of a stop.
Click the Actions button.
The Actions menu displays.
Select the Pickup or Delivered for the stop.
The Pickup or Delivered window displays.
Edit the Proof of Delivery and BOL No fields.
Click the Pickup or Delivered button.
A green success bar displays on the window.
Click the Close and Refresh button.
A confirmation window displays.
Click the Yes button.
Viewing Changes in Non-Controlled Shipments
This topic describes how to view changes in the shipment lines of non-controlled shipments.
Complete the following steps to view changes in non-controlled shipments:
Click Menus/Favs > Transportation > Non-Controlled Shipments.
The Non-Controlled Shipments screen displays with a list of shipments.
Click the Filters (edit) link to search for a shipment.
The search result screen displays.
Click the shipment number to open the shipment.
The shipment details page displays.
Click the History tab.
The History tab displays with a list of changes made to the shipment.
Under the View Changes column, click the View Changes link.
The Changed Details window displays, displaying old and new values of the fields.
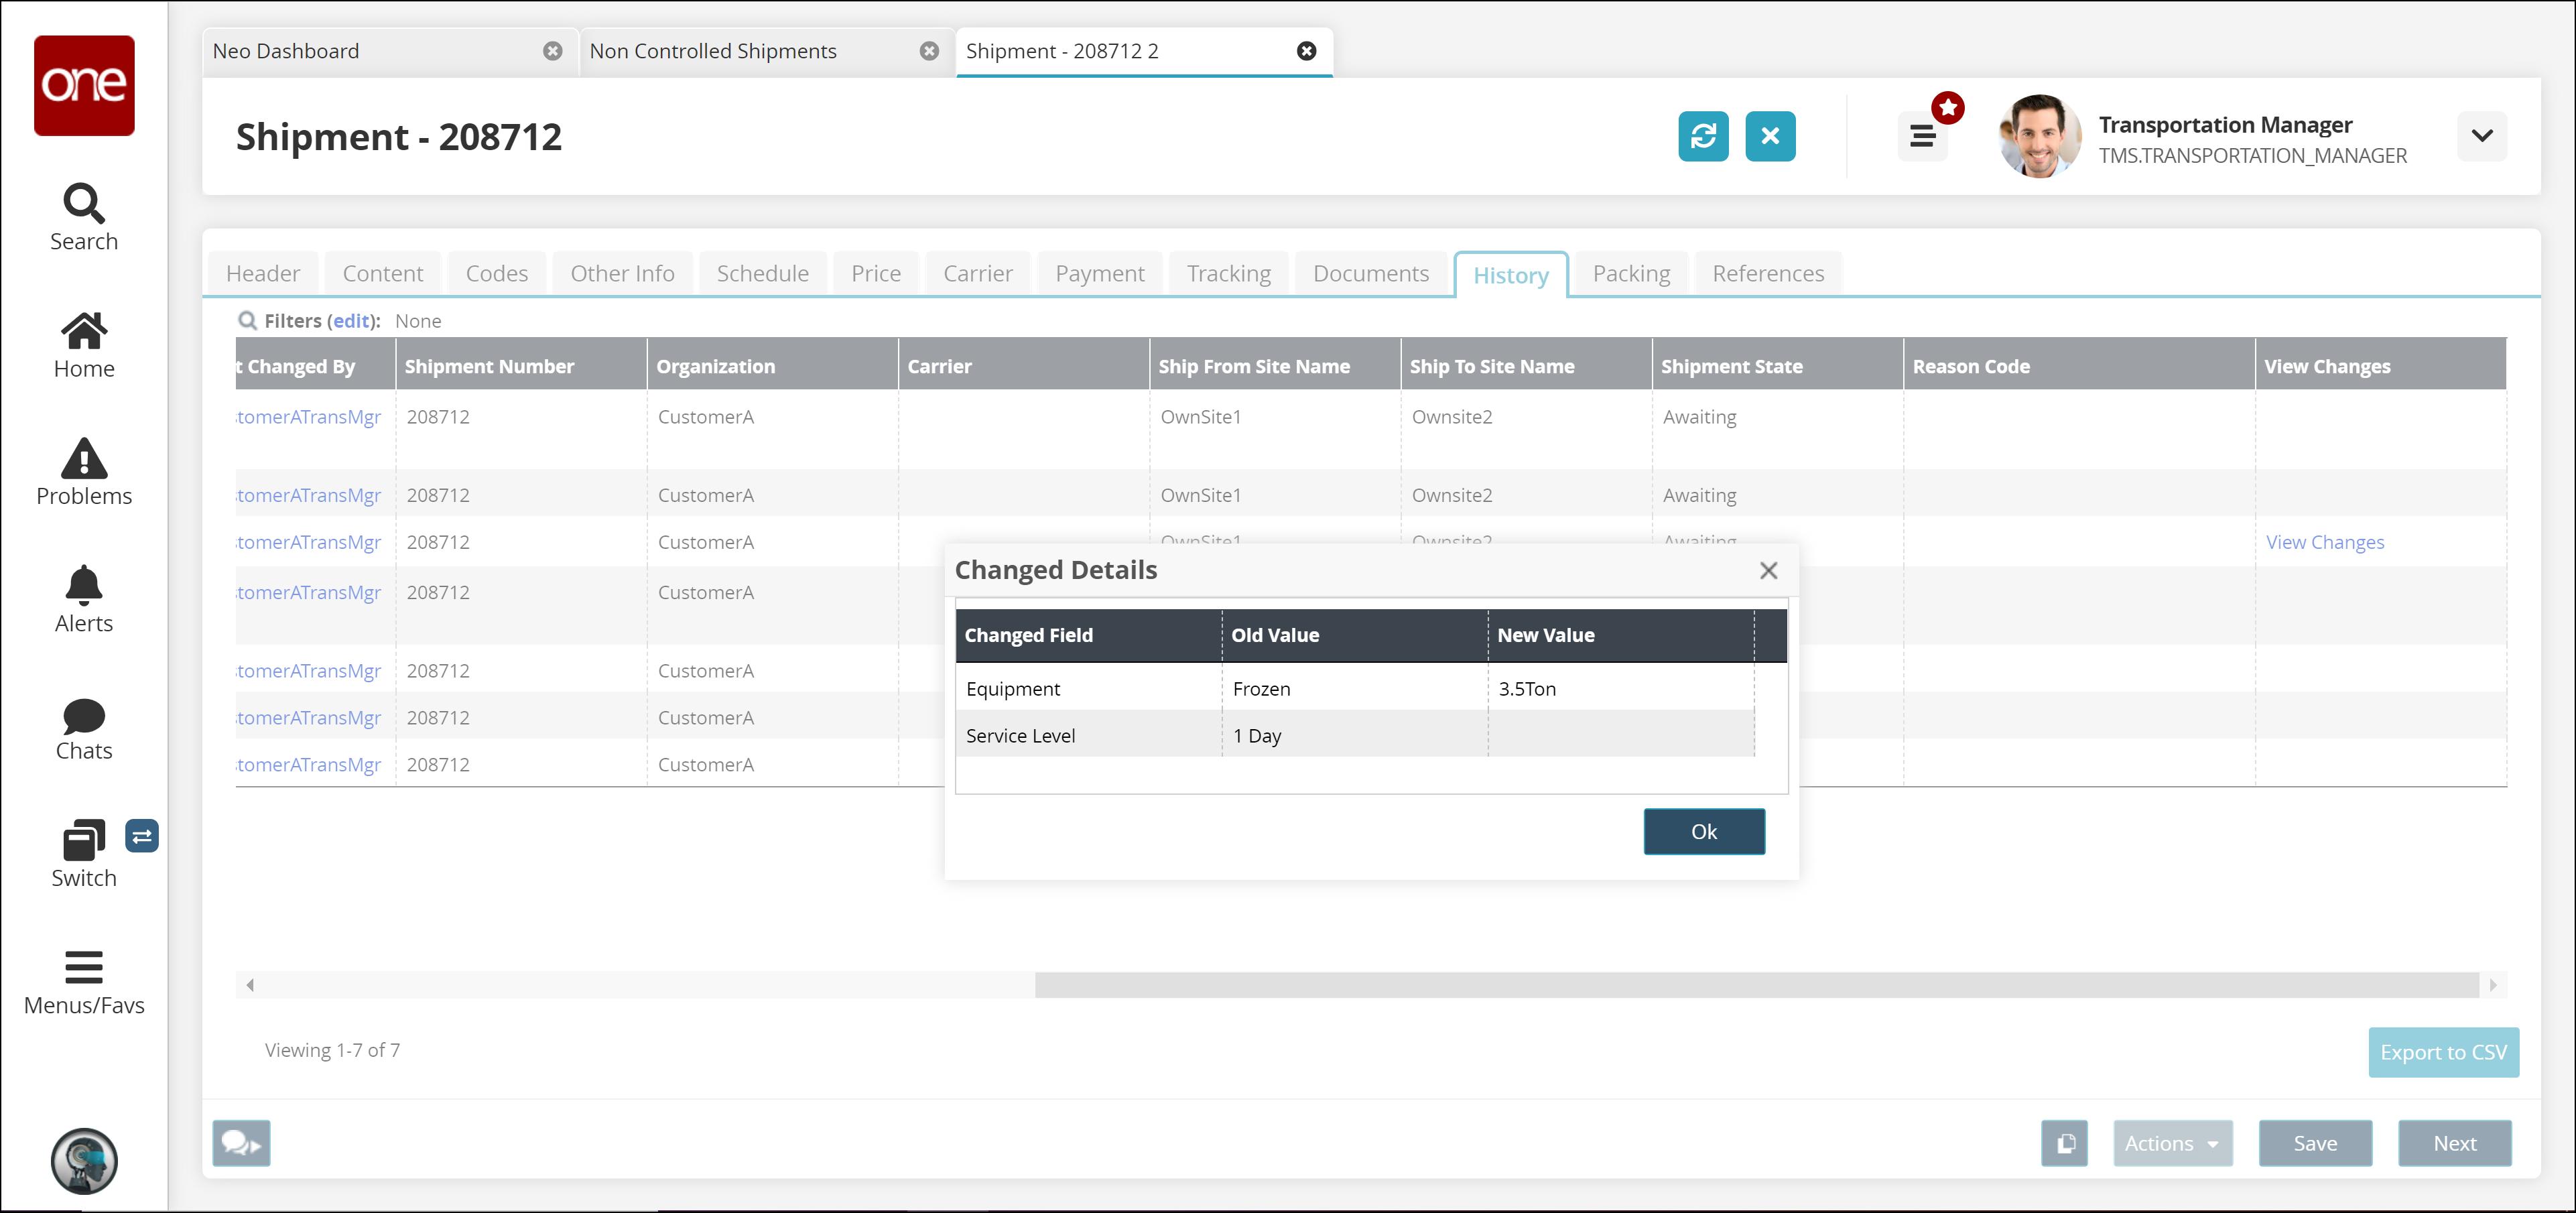
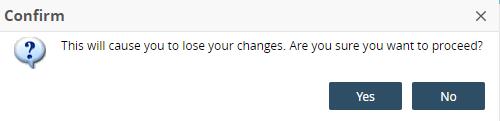
Click the OK button.
The window closes.
Viewing Shipments by State
The Shipment Summary screen provides a summary of shipments in the system categorized by state.
Complete the following steps to view shipments by state:
Click Menus/Favs > Transportation > Shipment Summary.
The Shipment Summary screen displays.
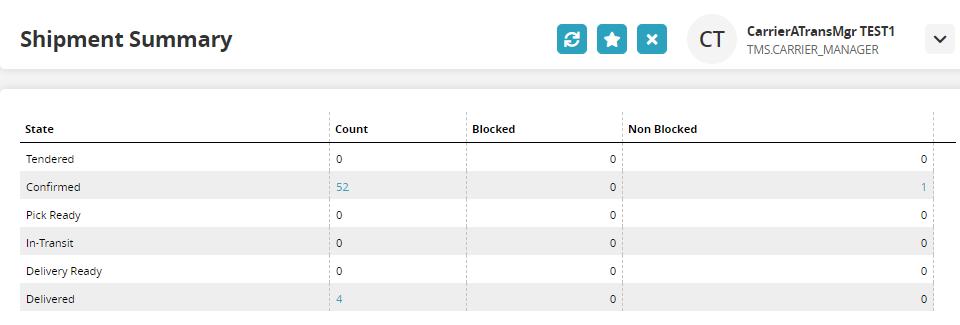
Click the link in the Count column to view a list of shipments in that state.
A list of shipments for that shipment state displays.
Viewing the Movements Rejected by Carrier Report
The Movement Rejected By Carrier report allows carrier users to see the loads rejected by the carrier organization, which helps carrier users identify rejected movements for business analysis.
Complete the following steps to view the Movement Rejected by Carrier report:
Click Menus/Favs > Transportation > Movement Rejected by Carrier.
The Movement Rejected by Carrier screen displays.
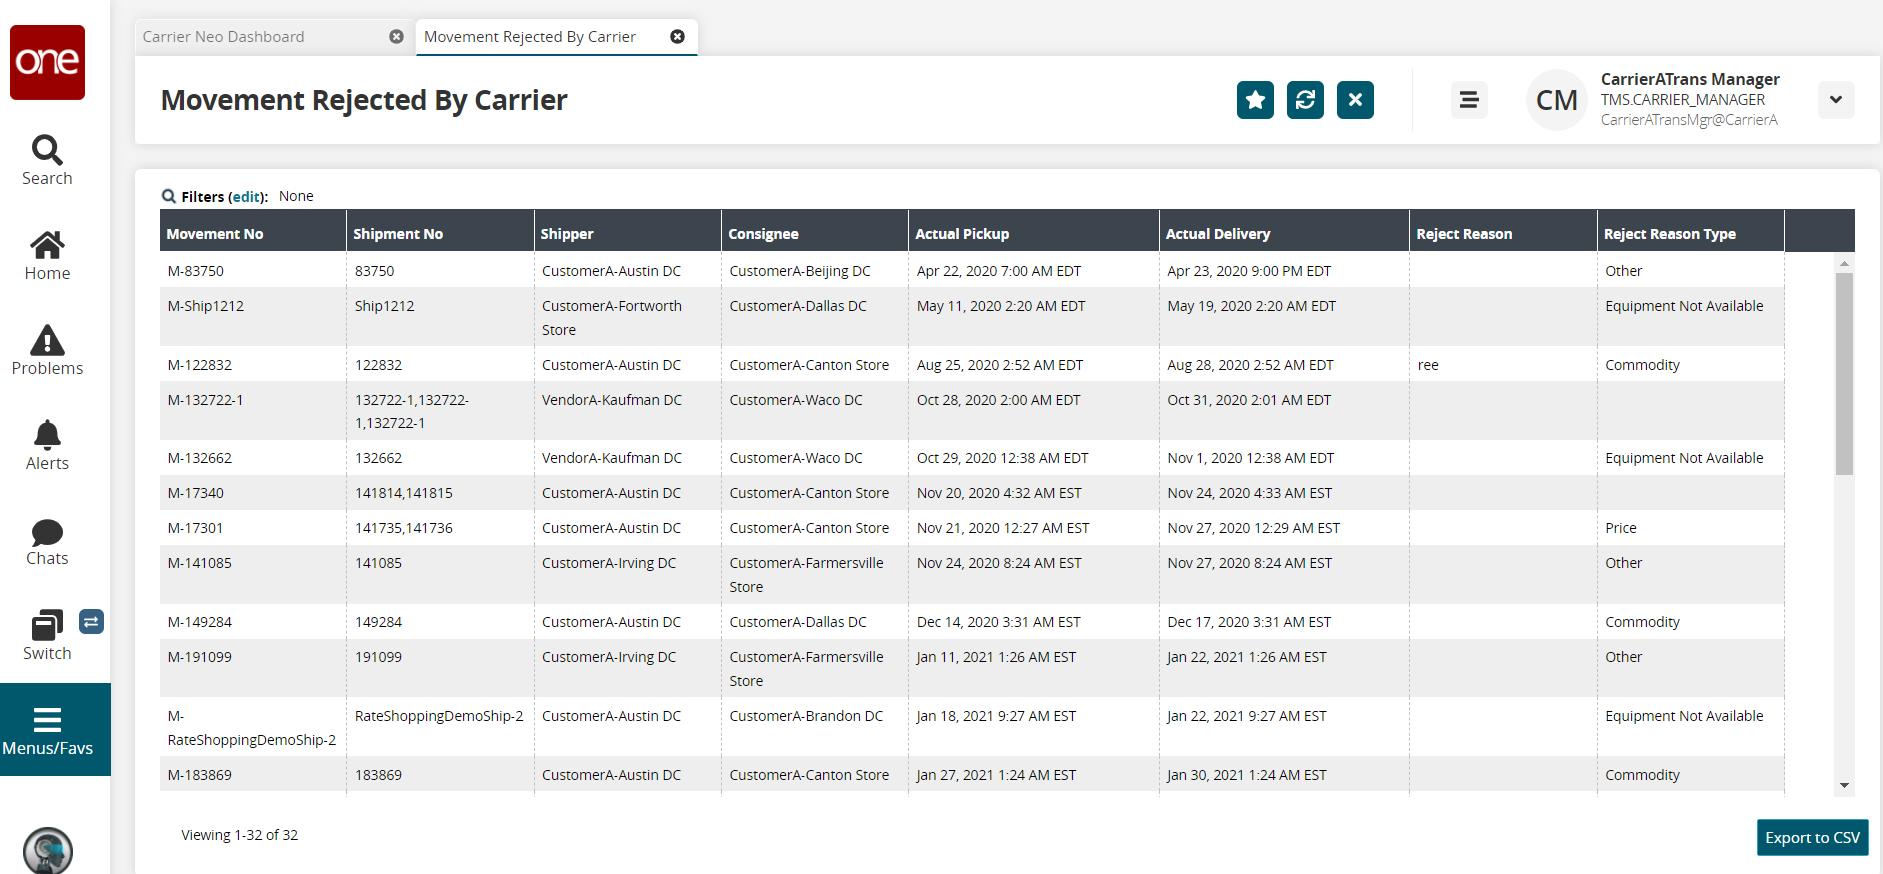
Click the Filters (edit) link to utilize filters to view movements.
Click Export to Excel to export the report to a file.
Note
Depending on the configuration settings of your instance of the ONE system, an additional drop-down menu may display that includes the option to export the data in a CSV file.
Working with Shipment-Related Documents
Complete the following steps to view, attach, and print shipment-related documents:
To locate a shipment, click Menus/Favs > Transportation > Search Shipments.
The Search Shipments screen displays the Filters header.
Field
Description
*State
Click the checkbox for the state of the shipment.
*Delivery Range
Use the clock and calendar tools to select the beginning and end dates for the delivery range.
Shipment
Enter the shipment number.
Equipment
Select the value parameter from the drop-down list for the first field. Select the equipment type for the second field.
Creation Date
Use the calendar tool to select a date range for the creation date of the shipment.
Exact Match
Select movement or shipment from the drop-down list for the first field. Enter the exact movement/shipment number in the second field.
Click the Search link.
The data results display.
To access the shipment information, click the shipment number located in the Shipment column.
The Shipment Details page is displayed for the selected shipment.
On the Shipment Details page, select the Documents tab.
The Documents tab displays different sections for shipment-related documents.
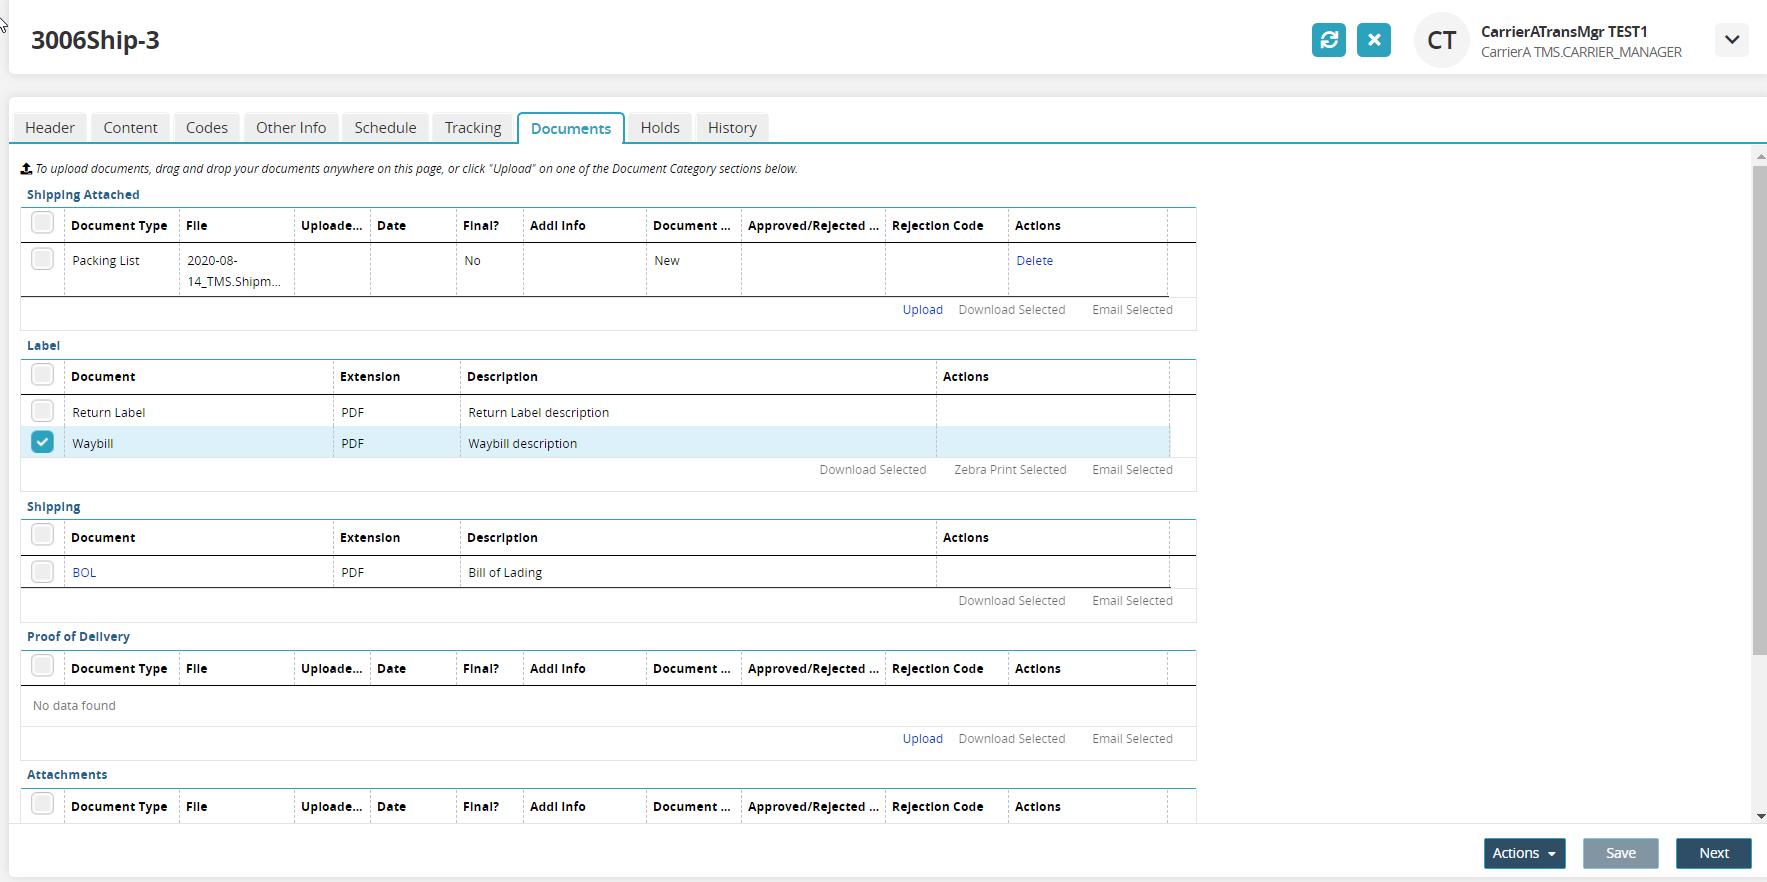
Click the Upload link under any section to upload that type of document.
The Upload window display.
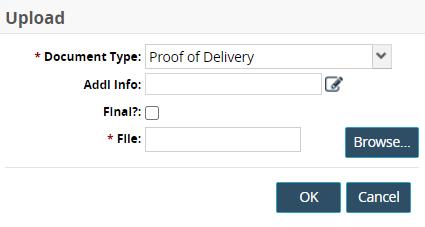
Field
Description
*Document Type
Select a document type from the drop-down menu.
Addl Info
Click the pencil icon to add additional information.
Final?
Select this checkbox if this document is a final.
*File
Click the Browse button to locate a file from the user's computer.
Click the OK button.
The file displays under the section.
Download a Document
Click the checkbox next to the document.
Click the Download Selected link.
The document downloads to the user's computer.
Print a Document
Click the checkbox next to the document.
Click the Zebra Print Selected link.
The document prints.
Email a Document
Click the checkbox next to the document.
Click the Email Selected link.
The Email Documents window displays.

In the *Email Address field, type the email address.
Type a message in the Message field.
Click the Send Email button.
Financials
Creating Receivables Invoices
Carriers can create a new Invoice against a movement, plus additional invoices against a movement to request credit/debit payments.
Complete the following steps to create an invoice:
Click Menus/Favs > Financials > Receivables > New Invoice.
The New Invoice screen displays.
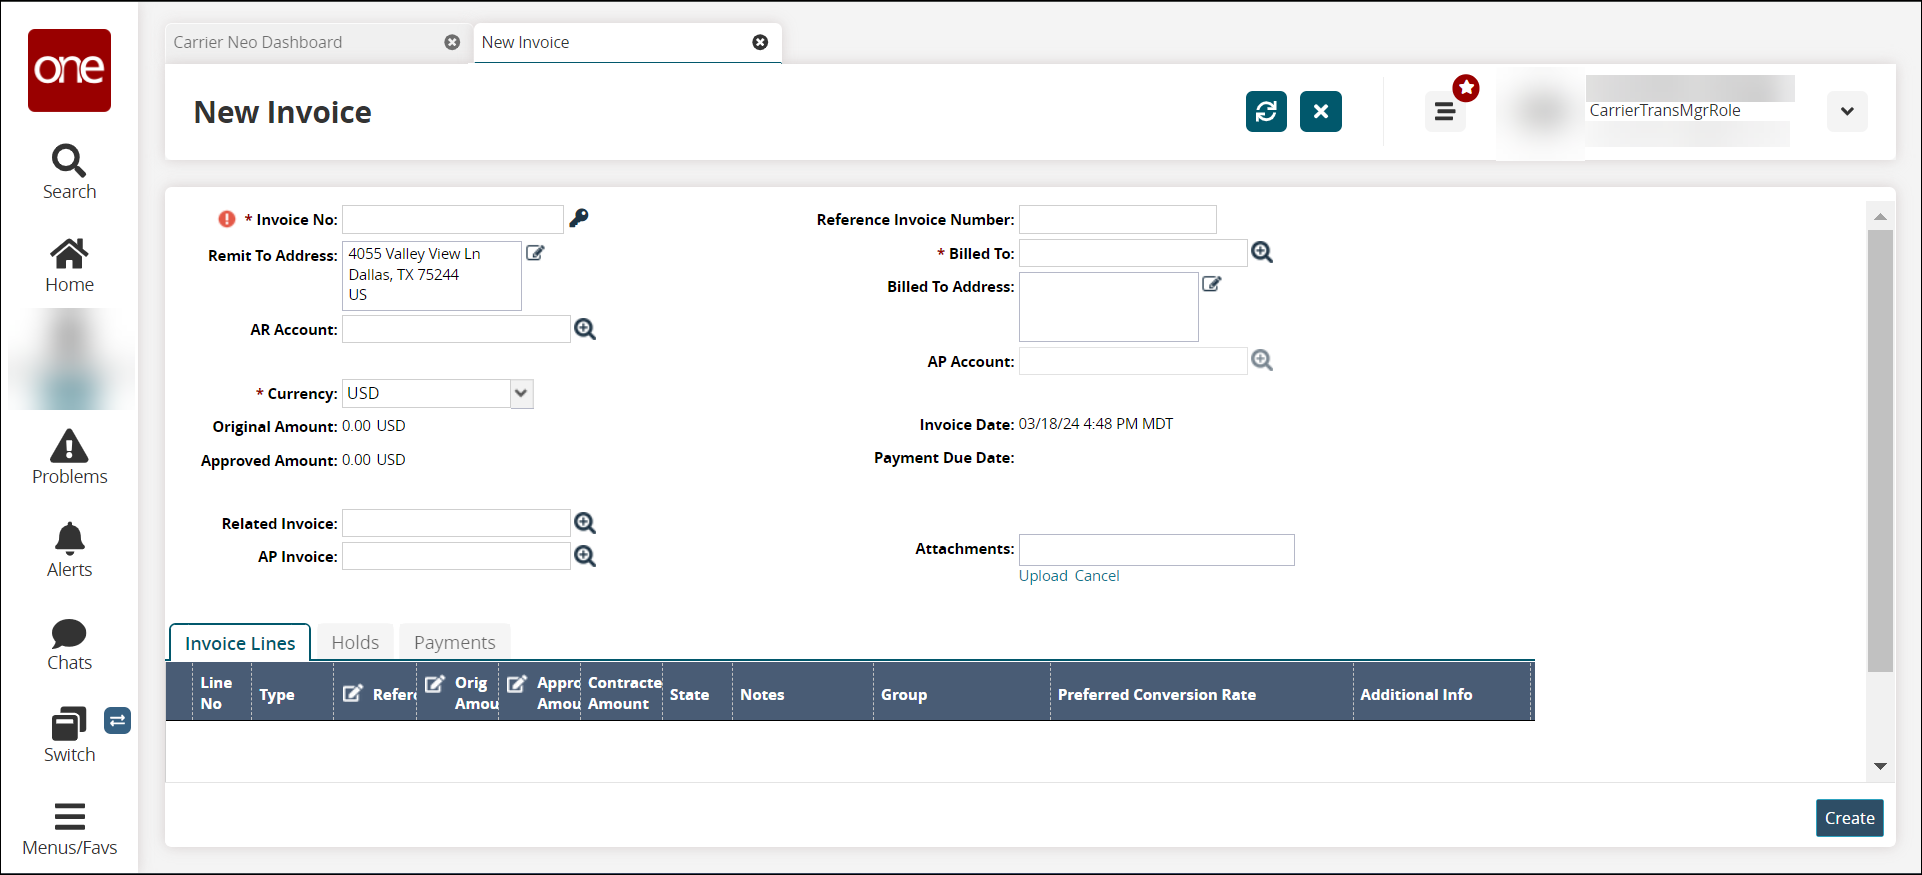
Field
Description
*Invoice No
Enter an invoice number, or click the key icon to generate an invoice number automatically.
Remit To Address
Click the pencil icon.
A window with address fields displays.
Enter address information, and click outside the window.
The window closes, and the address information populates the field.
AR Account
Use the pencil icon to fill in address fields for the Bill To address.
*Currency
Choose the country currency code from the drop-down menu.
Original Amount
The original amount value is populated from the Invoice Lines.
Approved Amount
The approved amount value is populated from the Invoice Lines.
Related Invoice
Use the picker tool to select a related invoice.
AP Invoice
Use the picker tools to select an accounts payable invoice related to this invoice.
*Billed To
Click the picker tool to choose the Bill To organization.
Note
The Bill To Address field will populate based on the Bill To organization selected. However, the information is still editable.
*Bill To Address
Click the pencil icon.
A window with address fields displays.
Enter address information, and click outside the window.
The window closes, and the address information populates the field.
AP Account
Use the picker tool to choose an accounts payable account.
Invoice Date
The creation date and time is auto-generated when the invoice is created.
Payment Due Date
The payment due date is populated automatically.
Attachments
Click the Upload link to upload attachments from your computer for the invoice. For more information, see the "Uploading Files" section of the NEO Online Help.
Click the Add link for Invoice Lines.
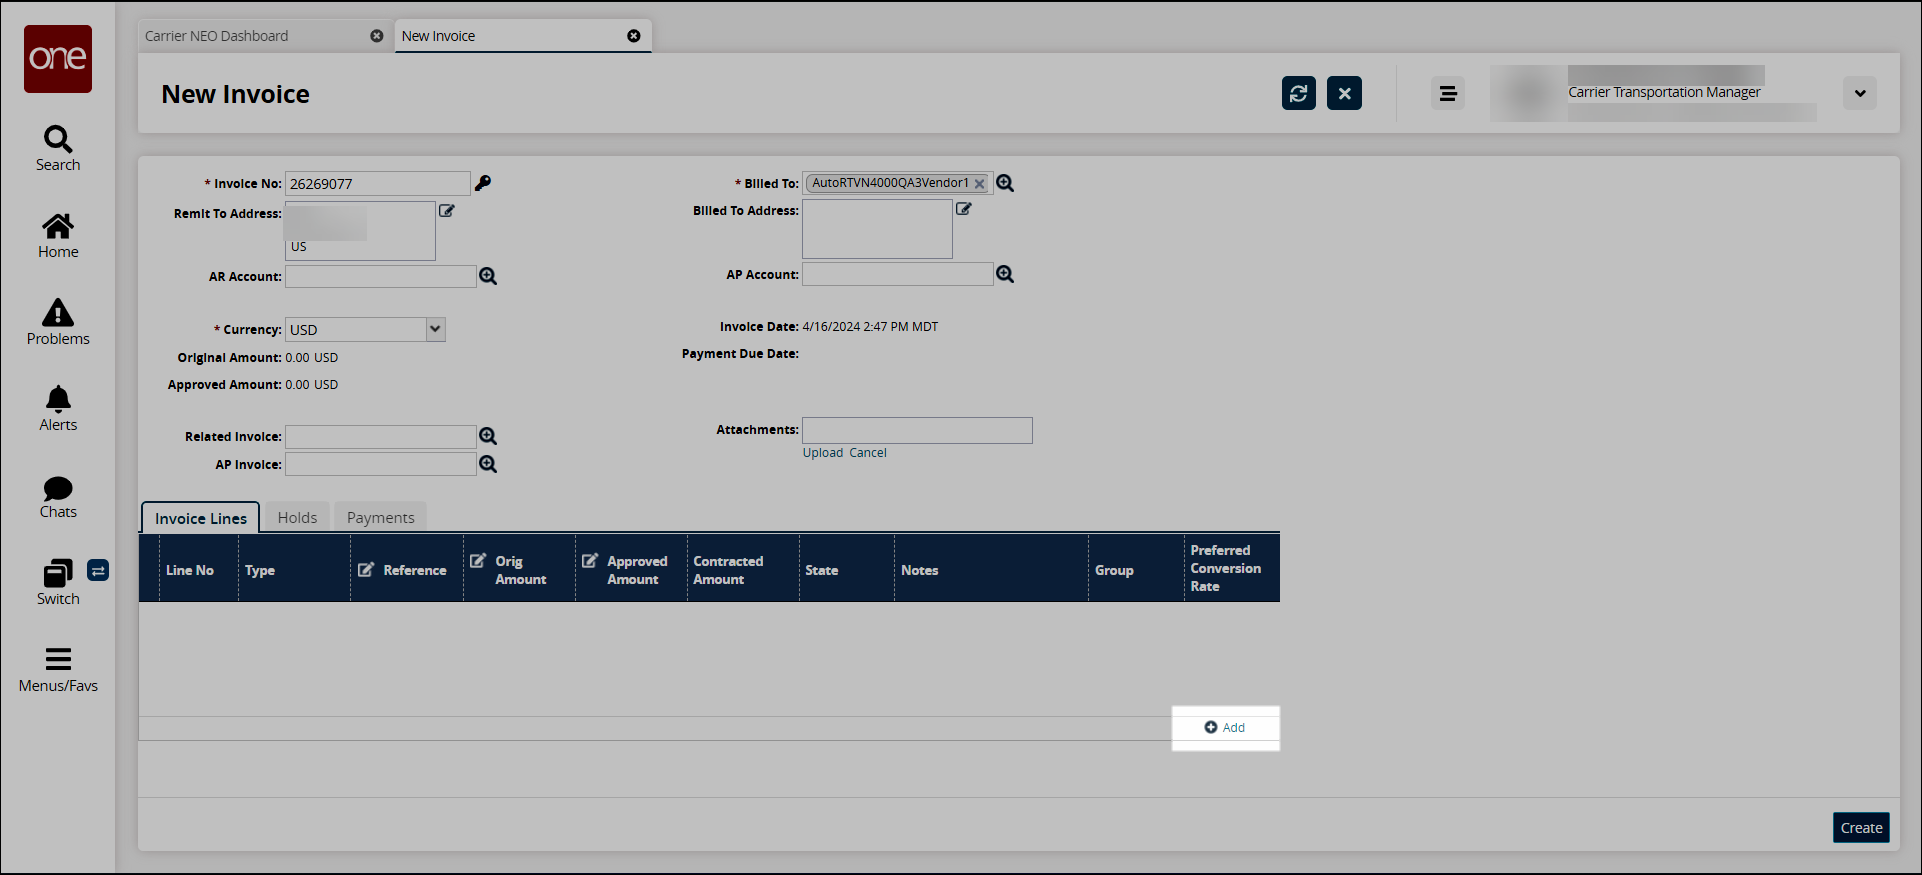
The New Invoice Line window displays.
Note
An invoice must have at least one invoice line.
Enter an invoice line number, or click the key icon to generate an invoice number automatically in the *Invoice Line No field.
Select a type of invoice line from the drop-down menu in the * Type field.
Fields specific to the invoice line-related cost display.
Enter values for the fields in the box under the Type field. Fields with an asterisk (*) are required.
Note
The fields in the box below the Type field are dependent upon the type of invoice-related cost. Many invoice types require a reference, which is most often a shipment number.
Commonly used invoice line types include:
Freight Base Cost (captures the cost for the line haul/base amount)
Freight Accessorial Cost (captures the cost for a specific accessorial)
Freight Tax (captures the cost for tax)
In addition, every invoice line type requires the following two fields:
Field
Description
*Reference
Enter the shipment number (the system will display shipment numbers with an auto-complete function), and click the correct option.
As an alternative, click the picker tool.
The Shipment window displays.
Enter a value in the *Shipment Number field, and click the Search link.
The search results display.
Select the shipment.
Click the OK button.
The shipment number displays in the Reference field.
*Original Invoice Line Amount
Enter a numerical value for the the amount for the cost (example: 125.75). To indicate a debit amount, enter a hyphen/dash before the number (example: -100.50).
Continue to follow the above steps to add as many invoice lines as required.
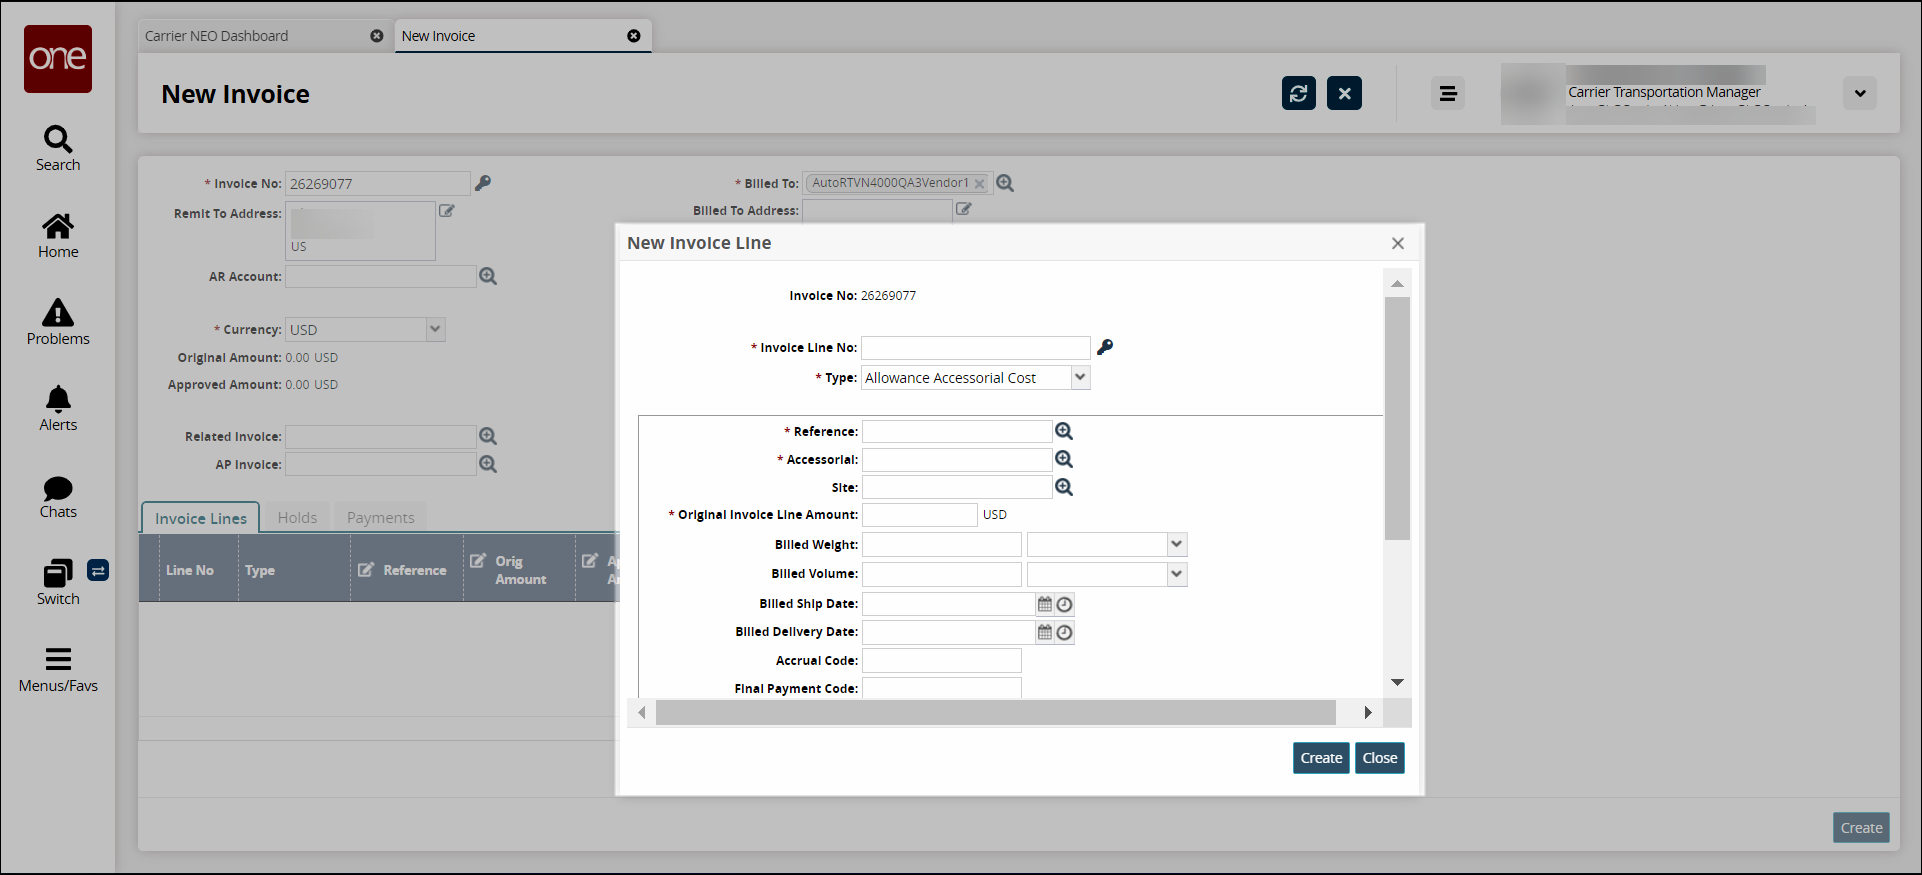
Click the Create button on the window.
The New Invoice Line window closes, and the Invoice Line tab populates. Any fields with a pencil icon are editable.
Enter a numerical value in the Orig Amount field if necessary.
Enter a numerical value in the Approved Amount field if necessary.
Click the View/Add Notes link to add notes to the invoice line.
The Line Notes window displays.
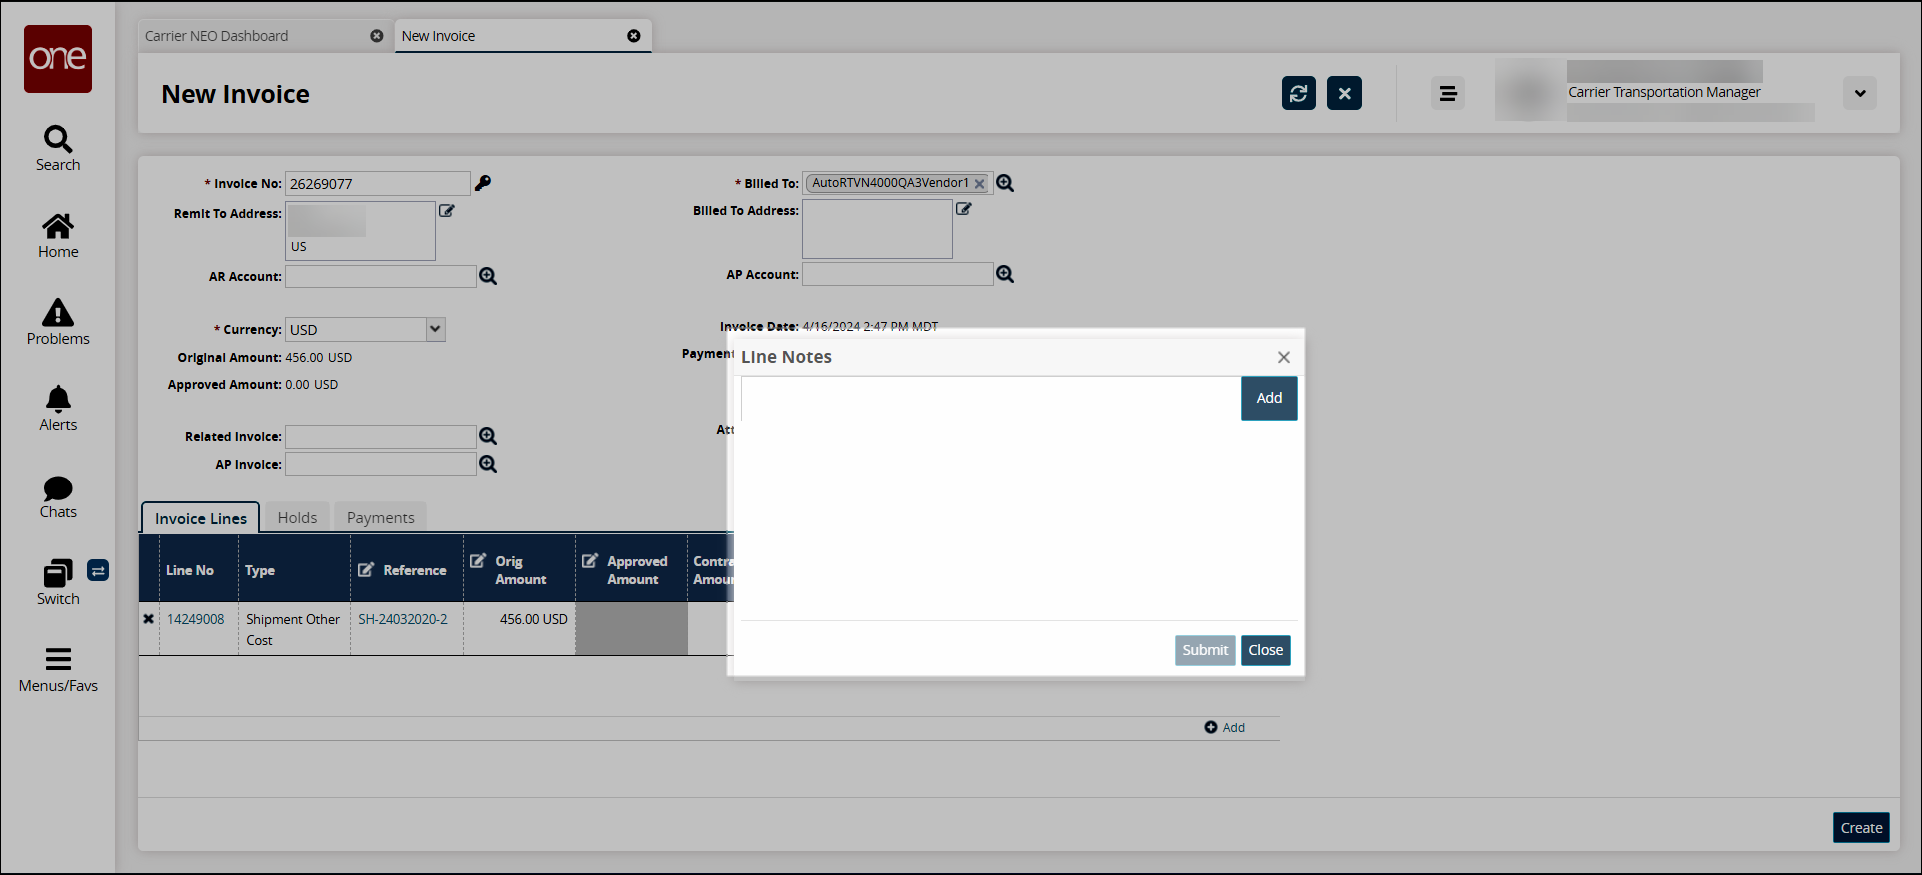
Enter notes into the window, and click the Add button.
The notes, along with the username and a date/time stamp, display.
Click the Close button.
A shortened view of the notes displays in the Notes field.
Click the Create button for the new invoice.
A green success bar displays on the new invoice's details page, and the Status field shows New for the invoice status.
Click Actions > Submit to submit the invoice.
A confirmation window displays.
Click the Yes button.
A green success message displays, and the status is now For Review.
Note
The company you bill must review the invoice and either accept it or reject it. However, if the billing company sets a policy to auto-approve the invoice and its associated amount, the invoice status displays as Approved.
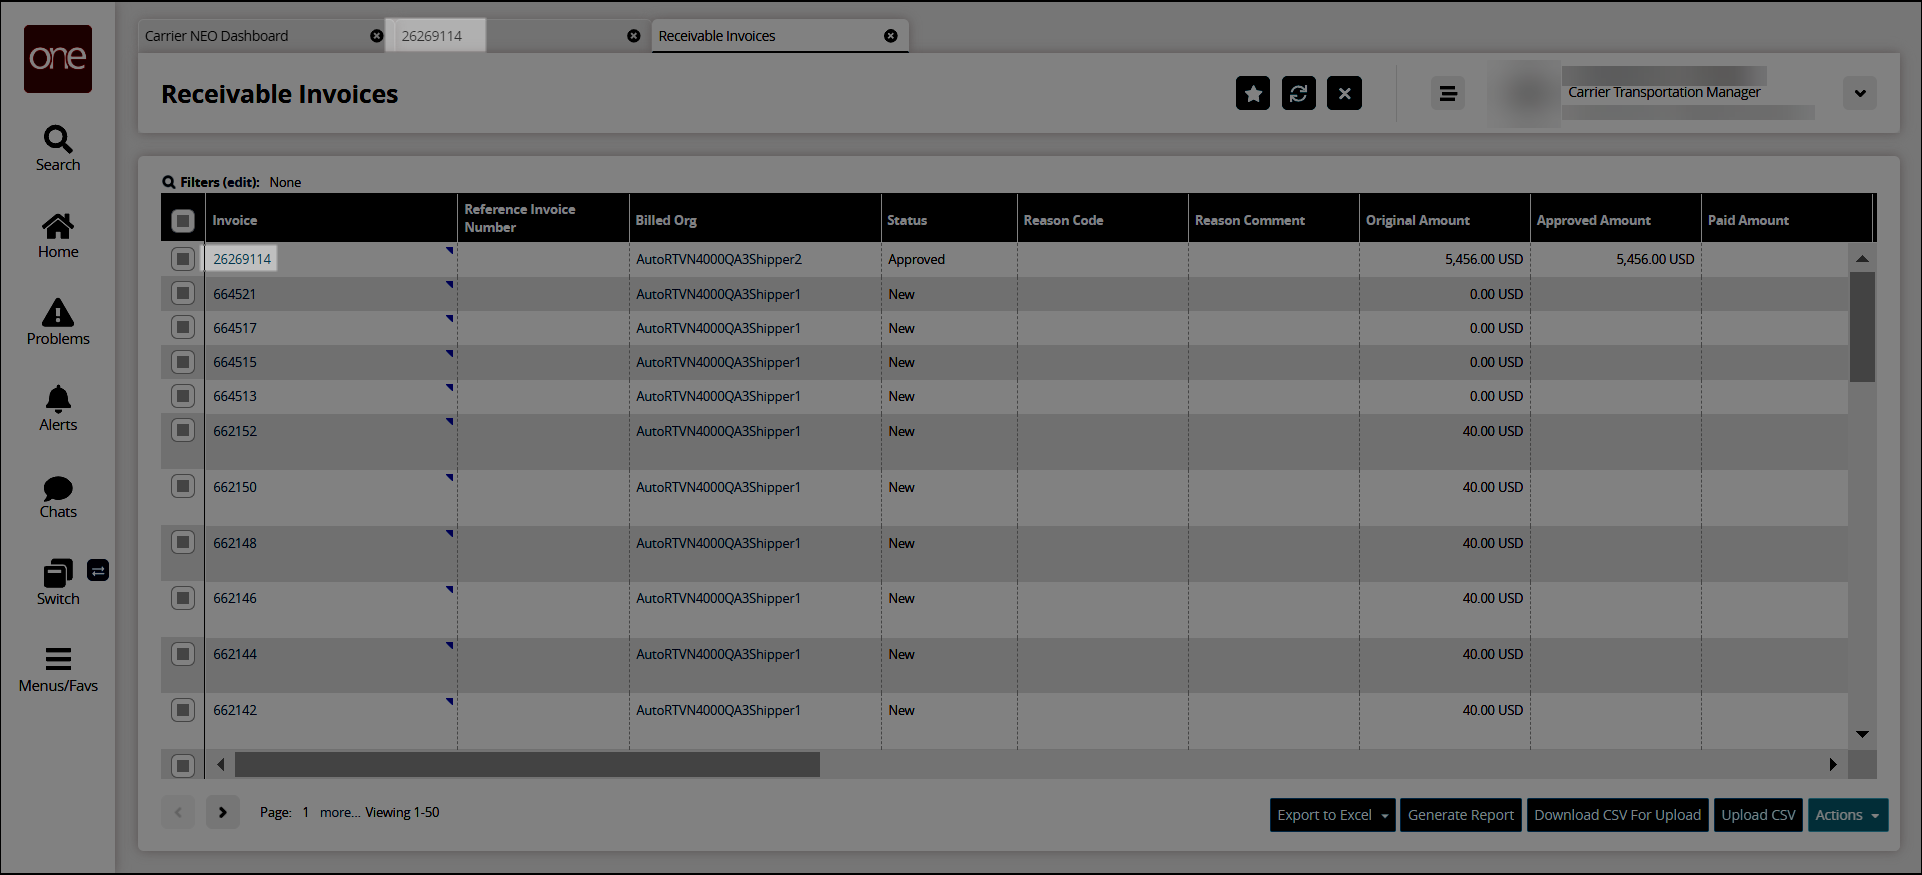
Click Menus/Favs > Financials > Receivables > Invoices to view the submitted invoices.
The Receivable Invoices screen opens.
Viewing and Working with Claims
Users can view and perform actions on all types of financial claims from the Claims screen.
Complete the following steps to view a claim:
Click Menus/Favs > Financials > Claims.
The Claims screen displays.
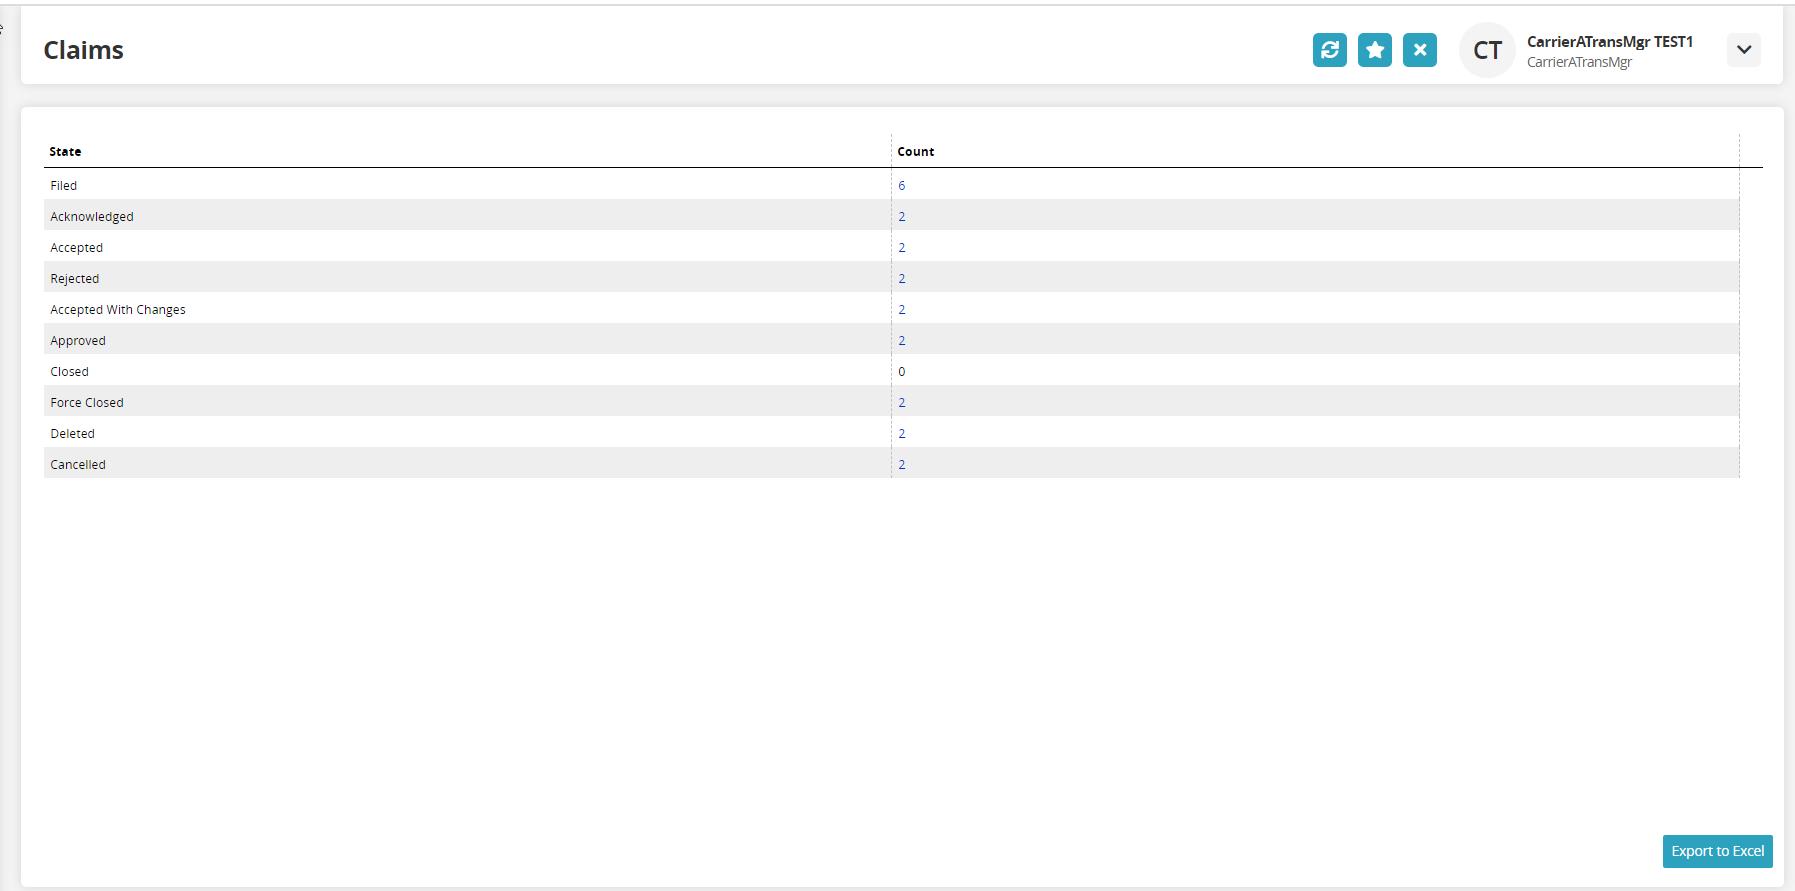
Under the Count column, click a number link.
A list of claims in that particular state displays. The image below shows claims in a Filed state.
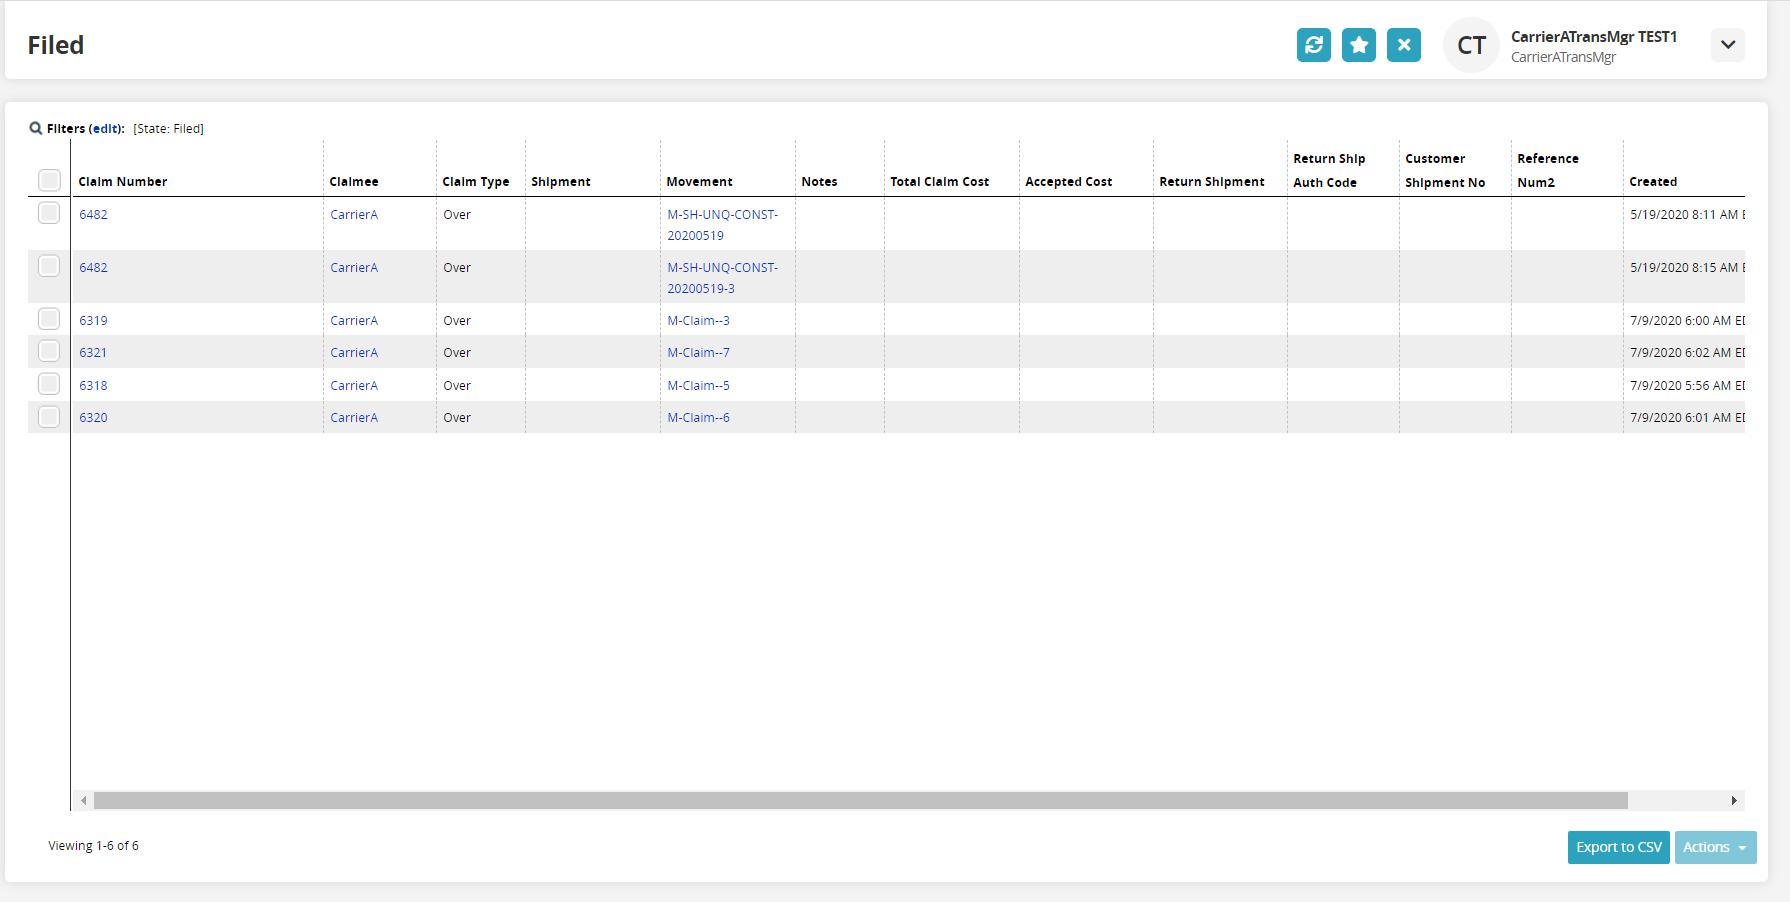
Click the Claim Number link to view a claim.
The detail screen for the claim displays.
To perform an action from the Claims screen, click the checkbox in front of the claim.
The Actions button is now available.
Select an action from the Actions button menu.
The menu will change based on the state of the claims selected. Possible actions can be found in the table below.
Action
Description
Accept
Click Accept.
The Accept window displays.
Accept With Changes
Click Accept With Changes.
The Accept With Changes window displays.
Edit the fields that have an edit icon.

Acknowledge
Click Acknowledge.
The Acknowledge window displays.
Add Response
Click Add Response.
The Add Response window displays.
Edit the fields that have an edit icon.
Reject
Click Reject.
The Reject window displays.
Edit the fields that have an edit icon.
Review
Click Review.
The Review window displays.
Submit after review
Click Submit after Review.
The Submit after review window displays.
Edit the fields that have an edit icon.
Update Claim
Click Update Claim.
The Update Claim window displays.
Edit the fields that have an edit icon.
Viewing Receivables Invoices
Complete the following steps to view invoices:
Click Menus/Favs > Financials > Receivables > Invoices.
The Receivable Invoices screen displays.
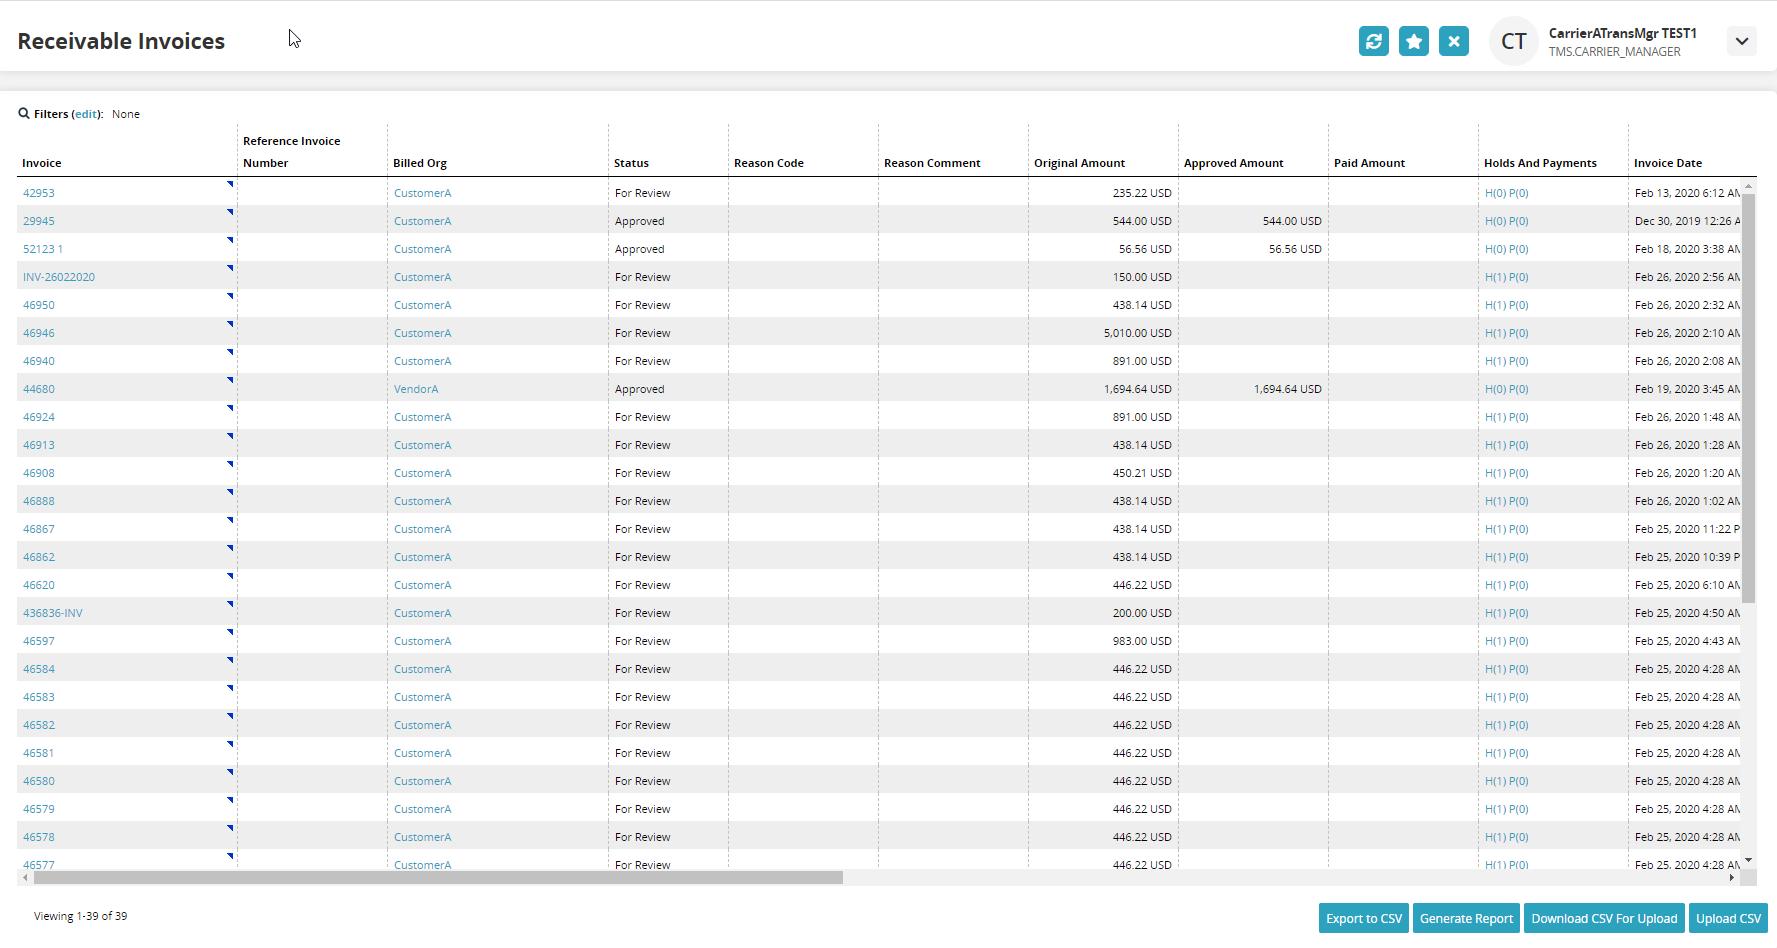
In the Invoice column, click the invoice number link.
The invoice details screen displays the number of the invoice at the top.
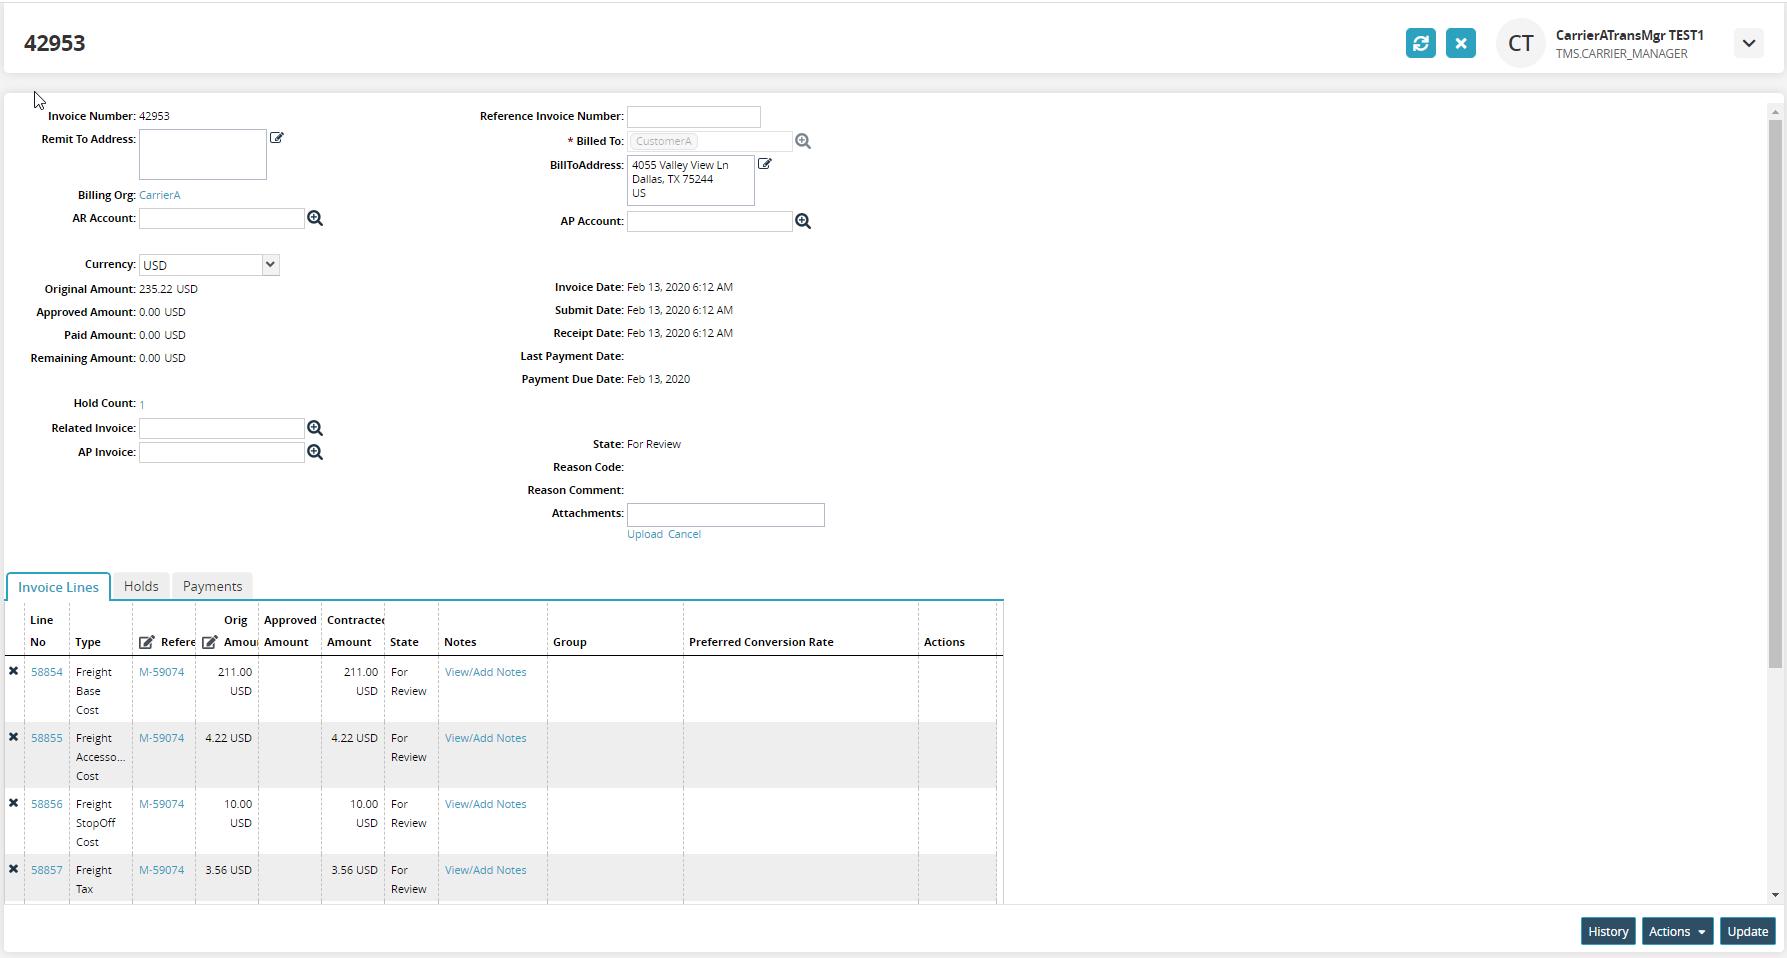
To view holds, click the Holds tab.
To view payments, click the Payments tab.
To view the history, click on the History button.
Click Actions > Cancel to cancel the invoice.
Click the Update button.
A success message displays.
Bid Won Loss By Carrier Report
The Bid Won Loss by Carrier report helps carrier users gather data to improve the rates provided to clients or see trends in their wins/losses.
Complete the following steps to access the new Bid Won Loss By Carrier report:
Click Menus/Favs > Transportation > Bid Won Loss By Carrier.
The Bids Won Loss By Carrier report displays.
Click Export to Excel to export the report to a file.
Note
Depending on the configuration settings of your instance of the ONE system, an additional drop-down menu may display that includes the option to export the data in a CSV file.
The data is downloaded to your computer as a CSV file.
Policies
Adding Custom Fields to the POD Screen
GLG carriers can add custom fields to the Proof of Delivery (POD) screen in the driver app.
Complete the following steps to add custom fields to the POD screen:
Click Menus/Favs > Transportation > Policies > Carrier Profiling.
The Carrier Profiling screen displays.
In the Custom Fields on POD Required row, check the box under the Apply to Delivery column to include custom fields on the POD.
Error is the only available option in the Failure Type column.
Check the Custom Fields link under the Check Value column.
The Add Custom fields window is displayed.
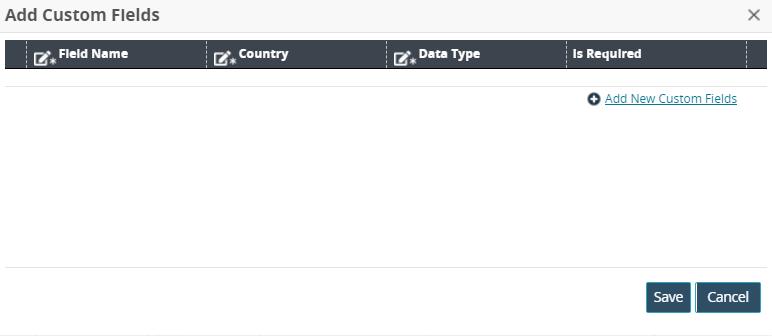
To add a new custom field, click the Add New Custom Fields link.
A new row displays.
Field
Description
*Field Name
Enter a field name.
*Country
Enter a country code to which the field will apply.
*Data Type
Select a data type from the drop-down menu.
Is Required
Select this checkbox if the field is required.
Click the Create From UI button.
A success message displays.
Delivery Restrictions
Carriers can set a policy to enforce a location capture for deliveries. Deliveries are validated via a geofence verification configuration set on the carrier's profile. If a driver has not enabled the location service on their device and attempts a delivery, an error message displays on their device. This provides shippers with the means to capture the exact location of the delivery.
In addition, the Driver Mobile app can restrict users from completing a POD if the user delivers a shipment out of a shipment's delivery location radius. These features are enabled as policies on carrier profiles with the ability to set the radius restriction based on the location.
Complete the following steps to set shipment restrictions at the location level:
Click Menus/Favs > Transportation > Policies > Carrier Profiling.
The Carrier Profiling screen displays.
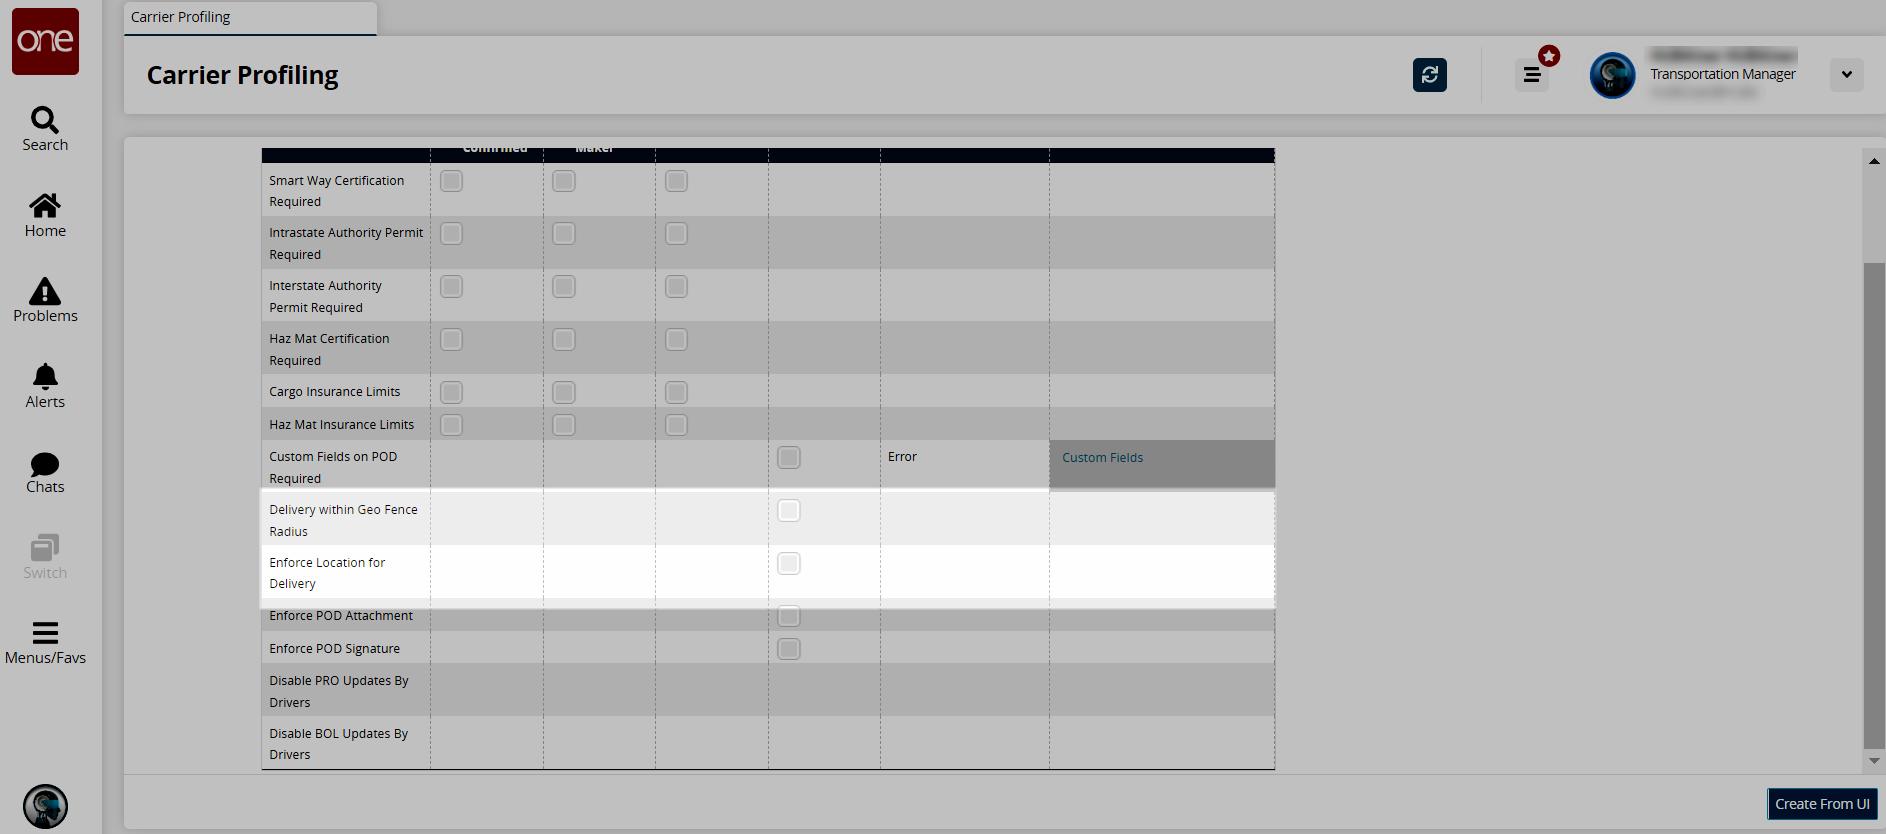
To set the delivery restriction within a geo-fence radius, in the Delivery within Geofence Radius row:
Check the box under the Apply to Delivery column.
Select the Failure Type (Error or Warning) using the drop-down menu.
Enter a numerical value (in miles) for the radius in the Check Value column.
To set the delivery restriction for the location, in the Enforce Location for Delivery row:
Check the box under the Apply to Delivery column.
Select the Failure Type (Error or Warning) using the drop-down menu.
Enter a value in the Check Value column.
Click the Create From UI button.
A success message displays.
Restricting Drivers from Updating PRO and or BOL Numbers
The Carrier Profile screen in the UI now has fields that disable PRO and/or BOL updates by drivers as a means of ensuring data consistency and security. Users check boxes for either the BOL or PRO to disable driver access.
Complete the following steps to disable the BOL and/or PRO number updates by drivers:
Click Menus/Favs > Transportation > Policies > Carrier Profiling.
The Carrier Profiling screen displays.
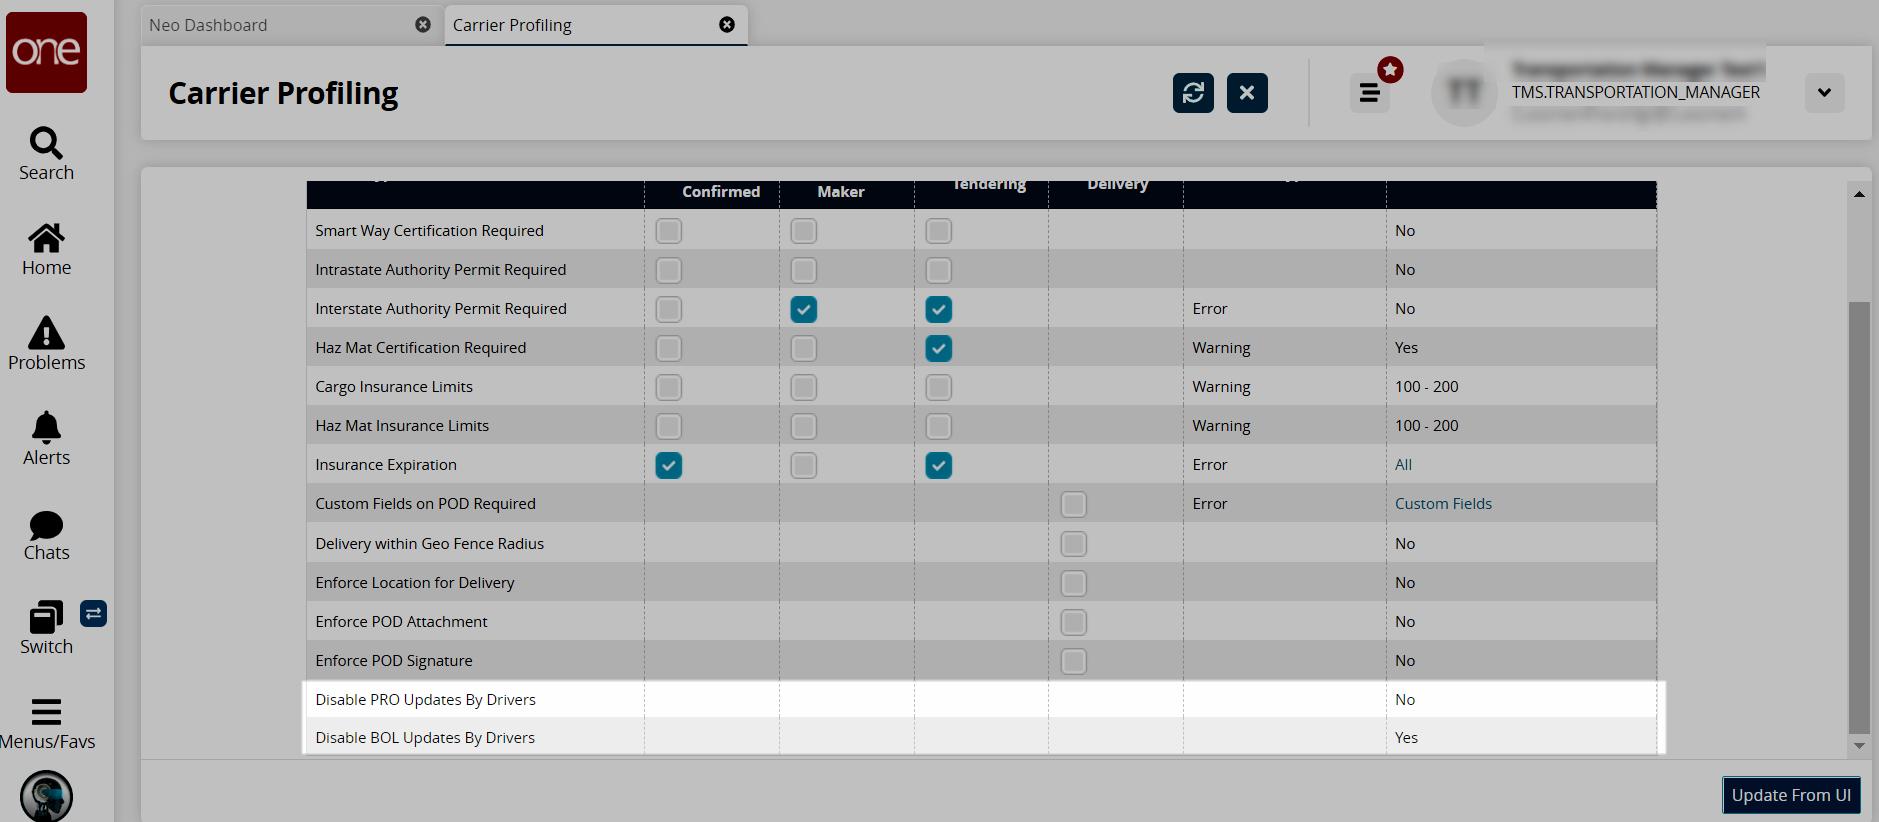
Check the boxes in the *Check Value column for Disable PRO Updates By Drivers and/or Disable BOL Updates By Drivers to enable or disable editing rights that drivers have in the Driver Mobile App.
The values will display as Yes or No.
Click the Update From UI button to save the profile settings.
A success message displays.
Setting Data Type Validation for Custom Fields
Custom fields can require data type validation to eliminate data errors. Customers can add validations such as field type and valid characters to their custom fields in carrier profiles. After customers set up the data type validations, drivers are restricted to input data following the data type parameters. With this enhancement, customers have more control in ensuring data from carriers is correct.
Complete the following steps to set data type validations for custom fields that are displayed in the driver mobile app:
Click Menus/Favs > Transportation > Policies > Carrier Profiling.
The Carrier Profiling screen displays.

In the Custom Fields on POD Required row, check the box under the Apply to Delivery column to include custom fields on the POD.
Error is the only available option in the Failure Type column.
Check the Custom Fields link under the Check Value column.
The Add Custom fields window is displayed. The following screenshot shows an existing custom field. To add custom fields, see the "GLG: Adding Custom Fields to the POD Screen" section in the NEO Online Help for more information.
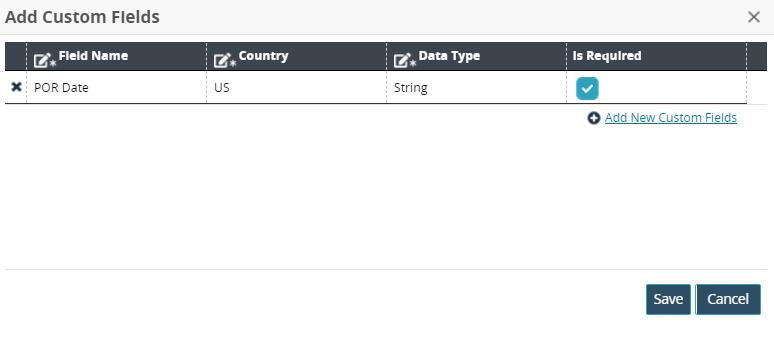
Select a *Data Type from the drop-down list: Boolean, Double, Integer, String.
Check the box for Is Required.
Click the Create From UI button.
A success message displays.
Setting the OTP on POD Policy
This feature includes a process to add a one-time password (OTP) that includes a new field on the POD screen on the Driver Mobile App. Users add the custom field, OTP, and set the policy via transportation policies and carrier profiles to generate an alert containing the password that is sent to a HUB's receiving contact. The receiving contact subscribes to the alert with the OTP password and enters the password on the POD screen in the driver app when shipments are delivered (at the shipment or stop level). This information is then delivered via API back to the carrier in a new OTP column on the shipment details page.
The workflow process in the GLG NEO UI requires two steps:
Set the OPT transportation policy, Generate OTP On Pickup, and the Generate Delivery OTP flag in the Shipment Event Alert subscription in the RTVN system
Create a custom field for the driver app called (OTP or similar)
Prerequisite
Ensure that the Contact Type email and phone number for the HUB's receiving contact have been entered on the Contacts tab for the shipment.
Setting the OTP Transportation Policy
Complete the following steps to set the OTP as a transportation policy in RTVN:
Click Menus/Favs > Transporation > Transportation Policies.
The Transportation Policies screen displays.
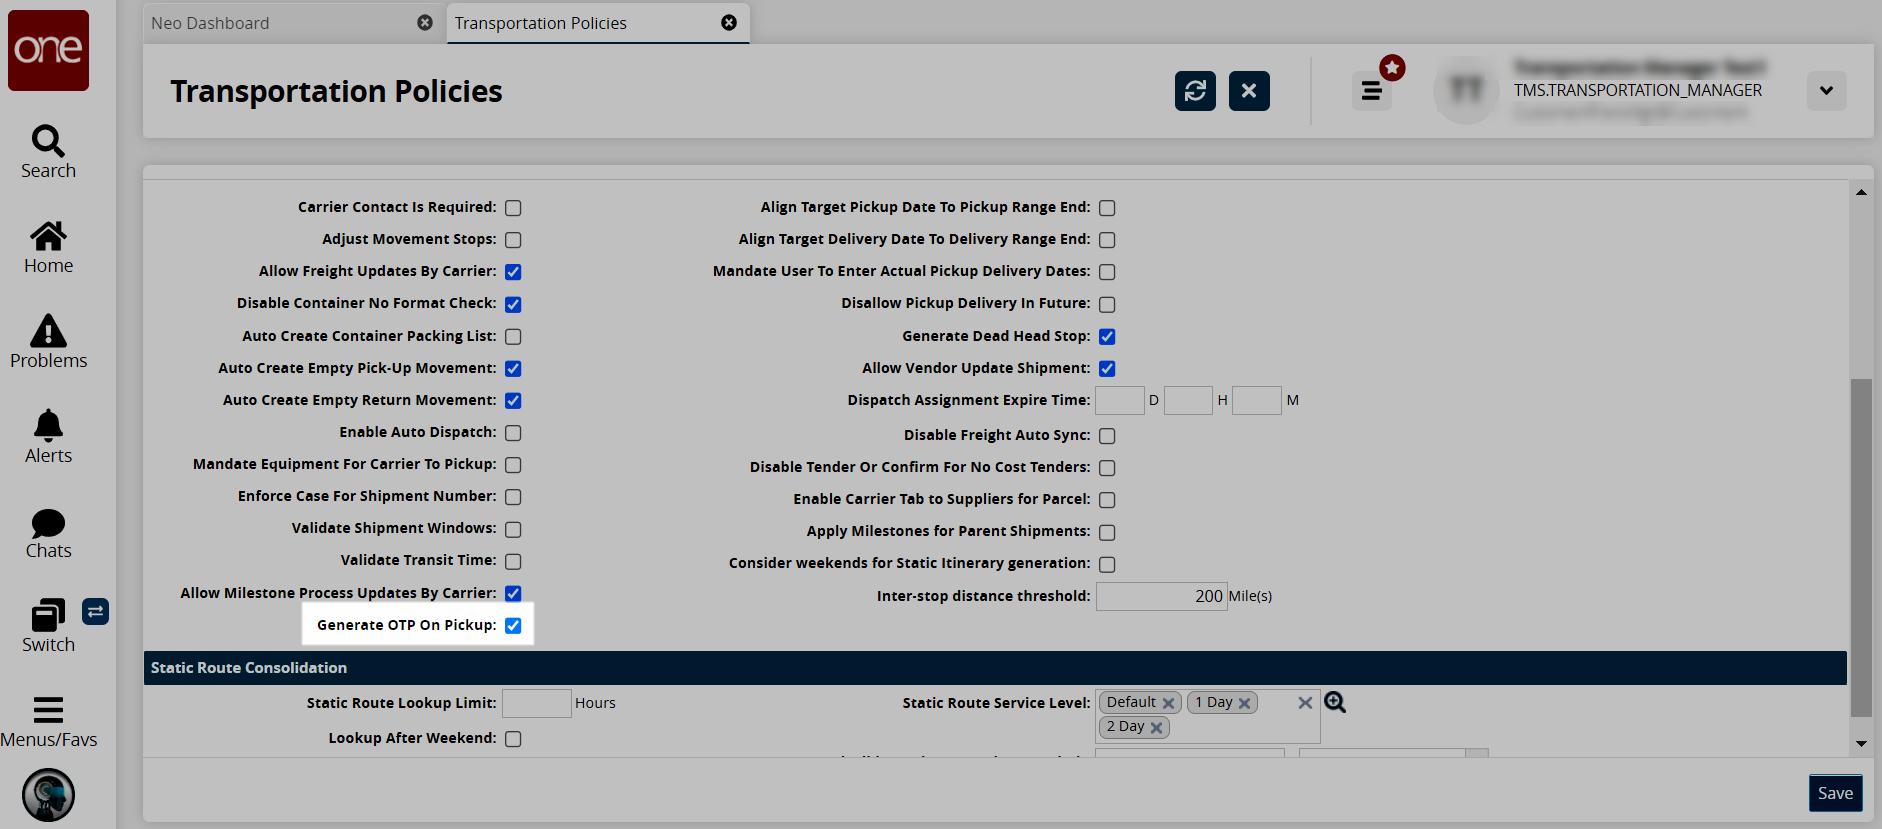
Click the checkbox for the Generate OTP On Pickup policy.
Adding OTP as a Custom Field
Complete the following steps to add OTP as a custom field to the POD screen. See the "GLG: Adding Custom Fields to the POD Screen" in the NEO Online Help for instructions to add an OTP custom field for the Custom Fields for POD Required field on the Carrier Profiling page.
ClickMenus/Favs > Transportation > Policies > Carrier Profiling.
The Carrier Profiling screen displays.
In the Custom Fields on POD Required row, check the box under the Apply to Delivery column to include custom fields on the POD.
Error is the only available option in the Failure Type column.
Click the Custom Fields link under the Check Value column.
The Add Custom fields window is displayed.
To add a new custom field, click the Add New Custom Fields link.
A new row displays.
Enter a value for *Field Name.
For this enhancement, enter OTP or a similar name.
Enter a country code in the *Country field to apply this field only within certain countries.
Select a *Data Type from the drop-down list.
Check the box for Is Required.
Click the Create From UI button.
A success message displays.
Setting the POD Attachment Policy
The Driver Mobile App can require attachments for proof of delivery (POD). However, setting the policy is necessary to enforce the requirement. The Attachments field can be set in a carrier's profile to require actual proof as an attached file to complete the shipment or movement delivery. This creates added security with physical proof submission.
Complete the following steps to require POD signatures in the driver app:
Click Menus/Favs > Transportation > Policies > Carrier Profiling.
The Carrier Profiling screen displays.
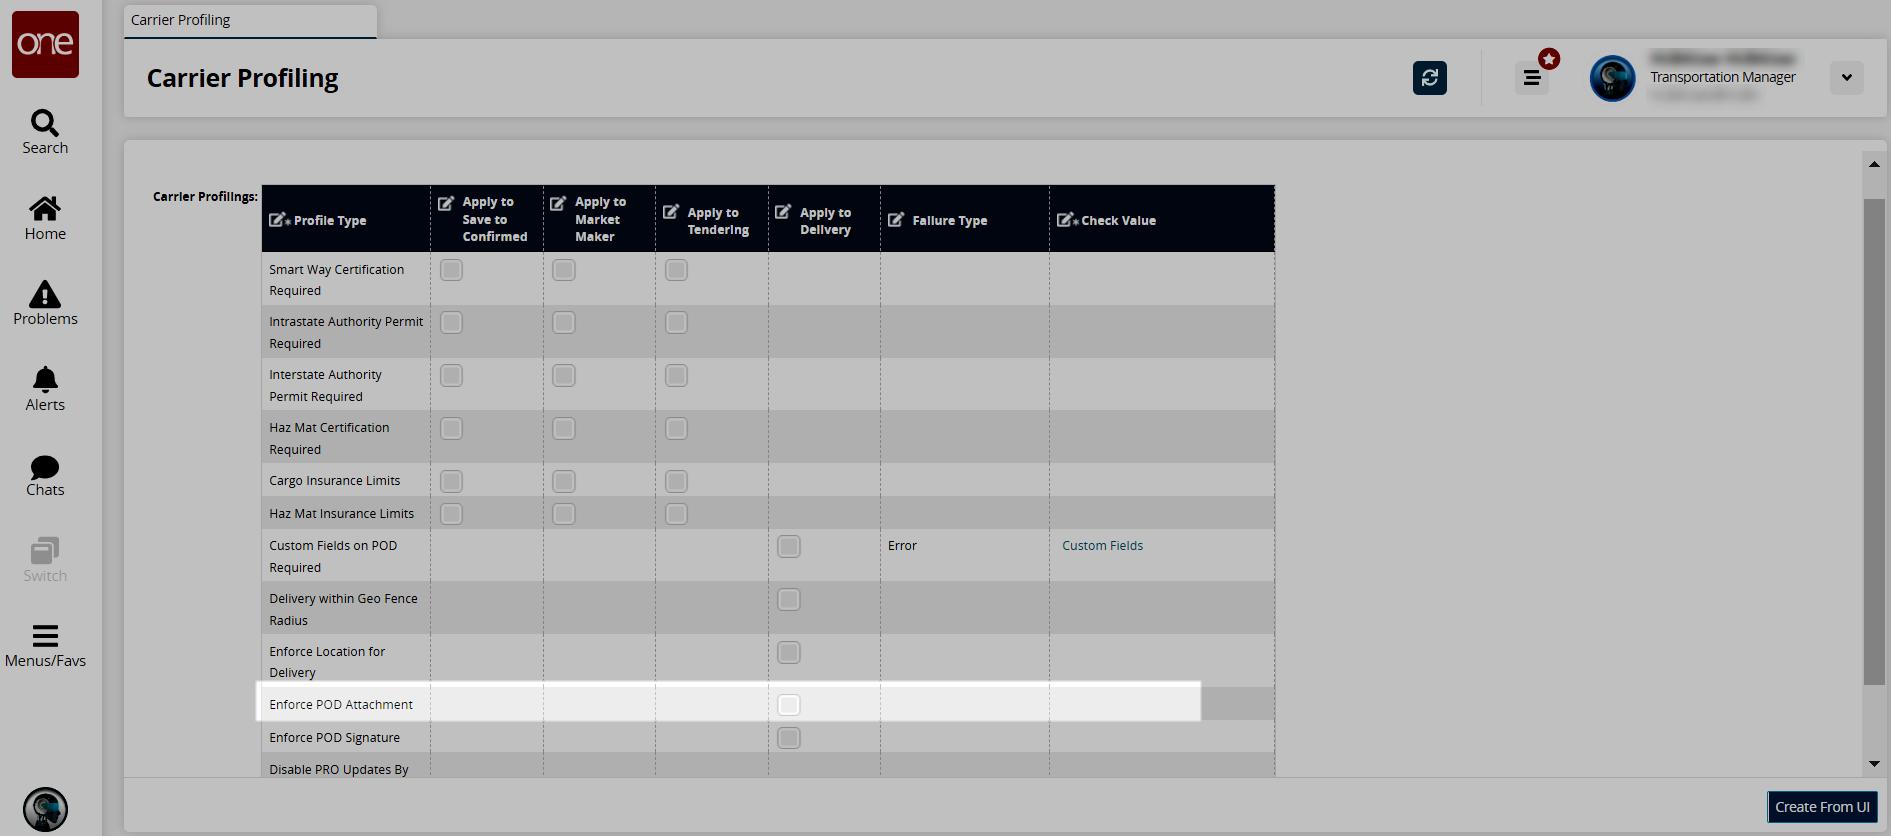
To set the delivery restriction to enforce a POD attachment, check the box under the Apply to Delivery column.
Select the Failure Type (Error or Warning) using the drop-down menu.
Check the box under the Check Value column.
The checkbox displays Yes for the value.
Click the Create from UI button.
A success message displays.
Setting the POD Signature Policy
The Driver Mobile App requires the recipient's signature for proof of delivery (POD). However, setting the policy is necessary to enforce the required signature.
Complete the following steps to require POD signatures in the driver app:
Click Menus/Favs > Transportation > Policies > Carrier Profiling.
The Carrier Profiling screen displays.
To set the delivery restriction to enforce a POD signature, check the box under the Apply to Delivery column.
Select the Failure Type (Error or Warning) using the drop-down menu.
Check the box under the Check Value column.
The checkbox displays Yes for the value.
Click the Create from UI button.
A success message displays.
Telematics
Adding ELD Providers
[Adding ELD Providers]
GLG provides integration fleet management software and hardware providers via an electronic logging device (ELD) provider using Telematics. Telematics processes location feeds from ELDs and creates location events periodically when movements are assigned vehicles. Customers have choices in ELD providers that allow automatic event tracking for vehicles, which increases flexibility and adaptability for carrier solutions.
A Carrier Gateway Value Chain Admin adds ELDs on the ELD Provider screen.
A Carrier Manager uploads or reloads vehicles at the ELD Authorization screen.
Carrier Gateway Value Chain Admin users must have the URL for the ELD.
Carrier Manager users need to have a valid username, password, client ID, and client Secret from the ELD.
Shipper partners must set up a telemetry policy.
Complete the following steps to add ELD providers:
Click Menus/Favs > Administration > ELD Providers.
The ELD Providers screen displays existing providers.
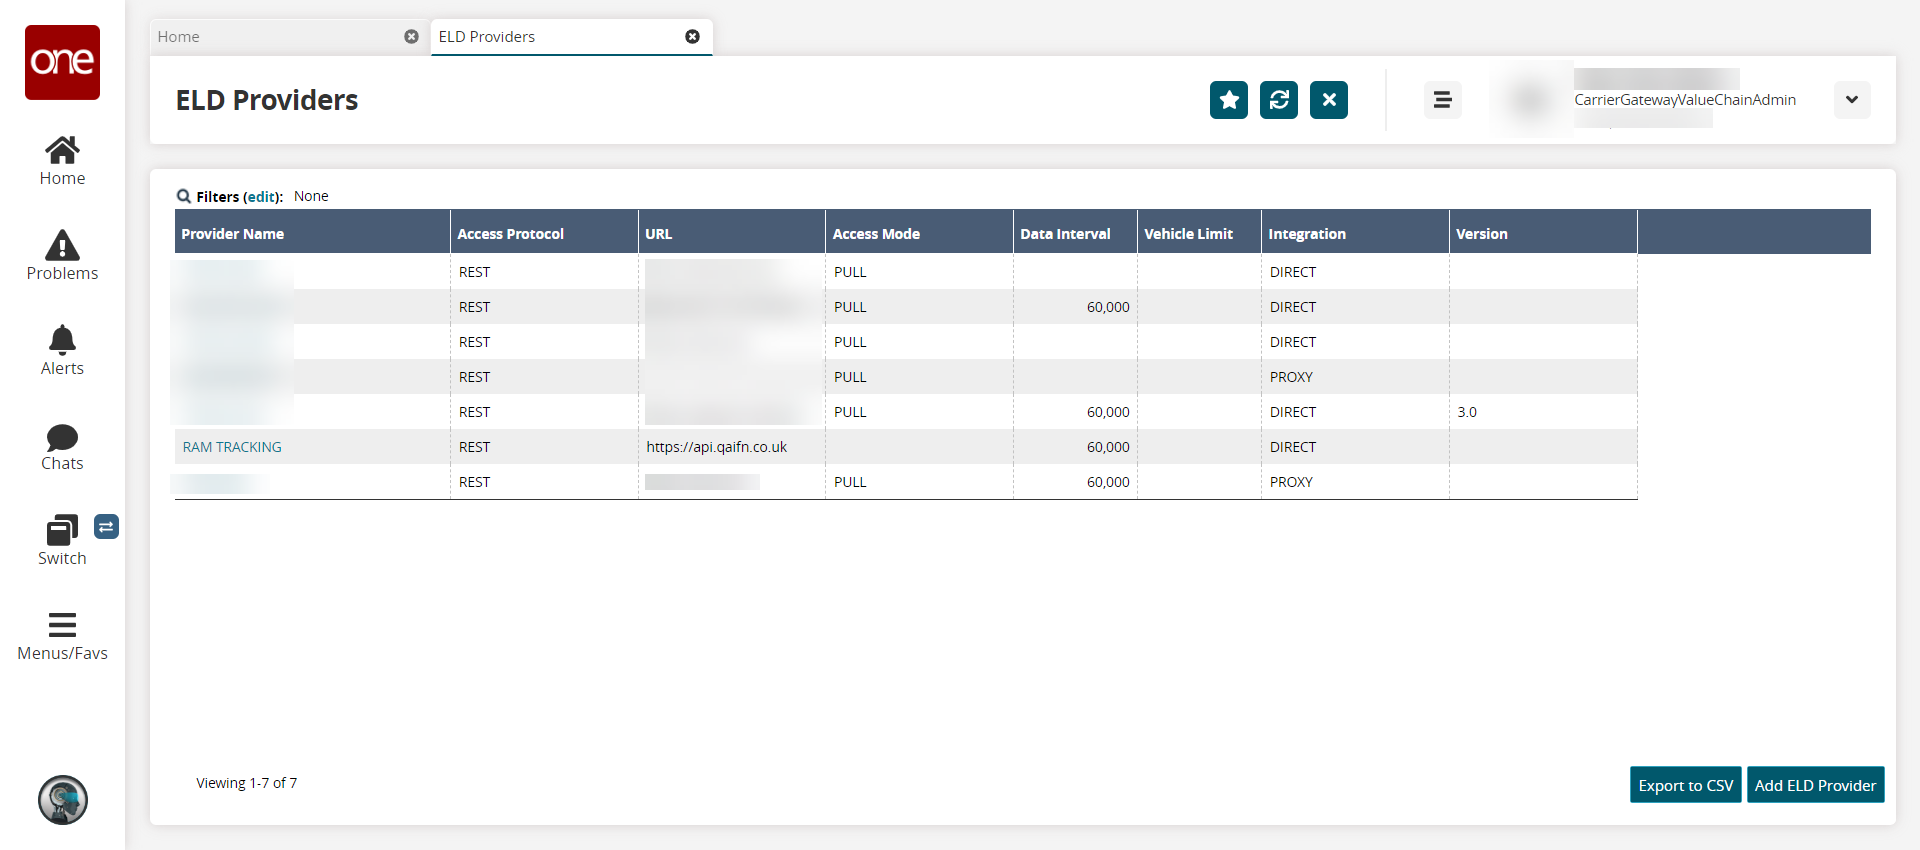
Click the Add ELD Provider button.
The Configure ELD Provider page displays.
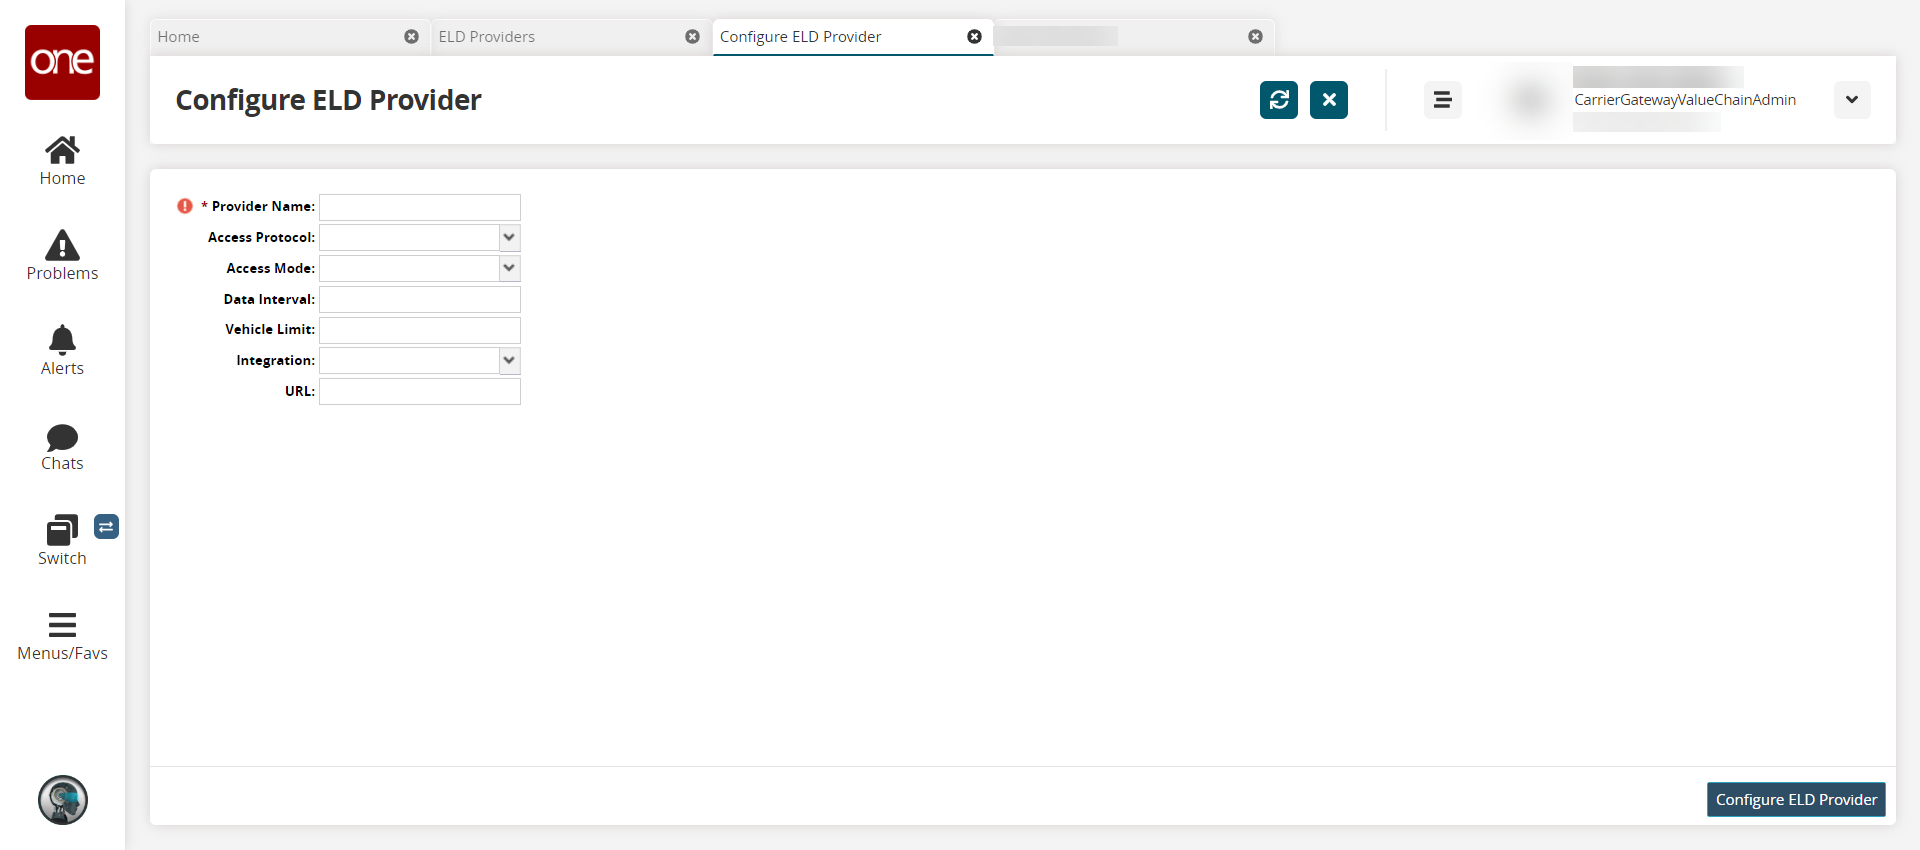
Field
Description
*Provider Name
Enter the name for the ELD provider.
Access Protocol
Select the access protocol type from the drop-down menu.
Access Mode
Select the access mode type from the drop-down menu.
Data Interval
Enter a numerical value for the data interval.
Vehicle Limit
Enter a numerical value for the weight limit of the vehicle.
Integration
Select the integration type from the drop-down list.
URL
Copy and paste in a URL (internet address) for the provider.
Click the Configure ELD Provider button.
Configuring ELD Provider Credentials
Assigning Vehicles to ELD Providers
Complete the following steps to assign a vehicle to an ELD provider:
Click Menus/Favs > Contract Management > ELD Authorization as a Carrier Transportation Manager role.
The ELD Authorization page displays.
Select the ELD provider.
The ELD provider information displays in the right pane.
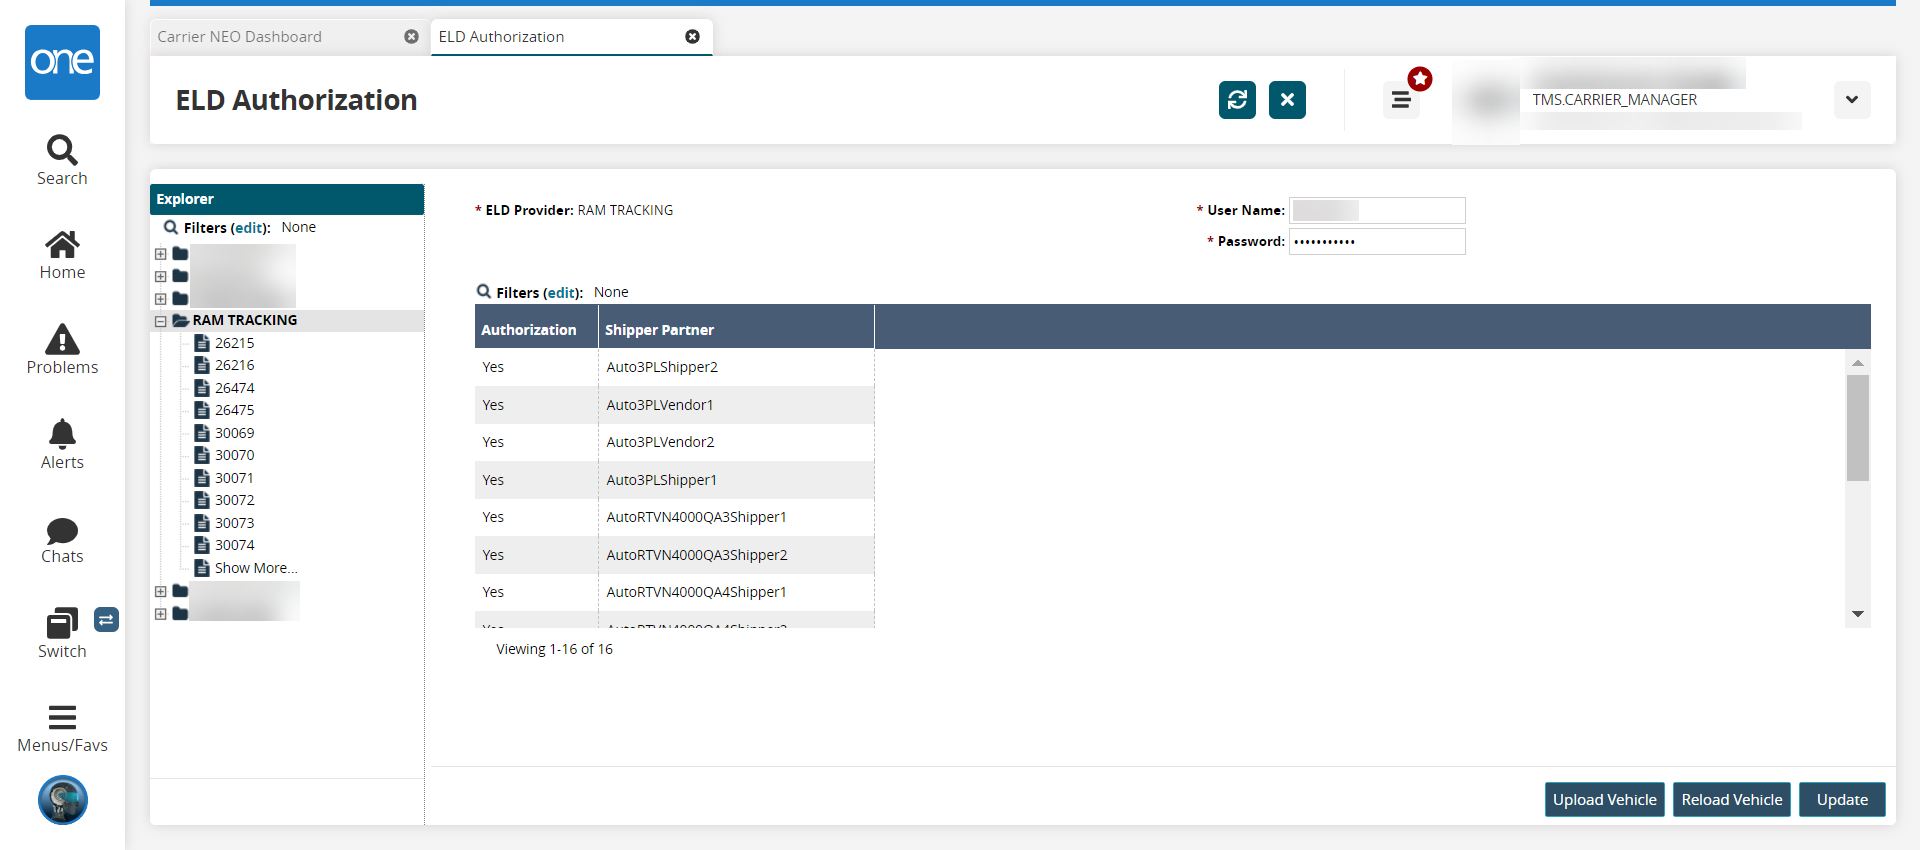
Input the *User Name, and *Password.
Log-in credentials are always encrypted and not stored in plain text.
Click Upload Vehicle.
The Select File to Upload window displays.
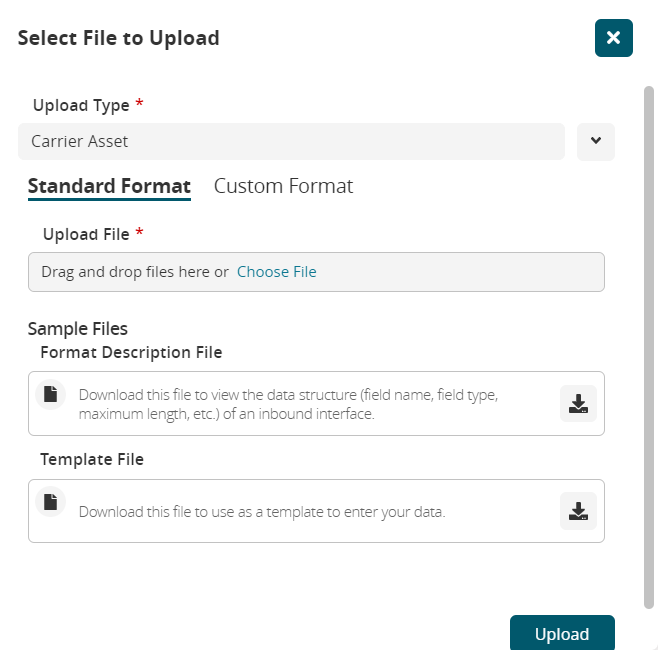
Ensure that the correct document type is selected in the *Upload Type field; Carrier Asset in this case. See the "Uploading Files" section in the NEO Online Help for more information.
Click the Choose File link and select a file from the user's computer.
Click the Upload button.
The vehicle displays under the ELD provider in the left Explorer pane.
Click the + sign to expand the ELD provider in the Explorer pane to see assets/vehicles running on that ELD network.
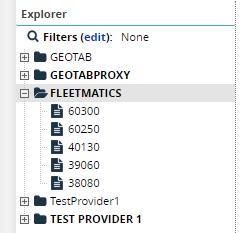
Click the vehicle name or identifying number in the left pane.
The vehicle/asset information displays in the right pane.
Modify GPS ID if necessary.
Click the Update Vehicle button.
A green success bar displays.
Under Vehicle Auth, select Yes or No for each shipping partner to allow access to data from this vehicle.
Click the Authorize Shipper button.
A green success bar displays.
Creating or Modifying Telemetry Policies
Complete the following steps to modify the Telemetry policies at the site level:
Click Menus/Favs > Transportation > Policies > Telemetry Policies.
The Telemetry Policies page displays. If no policies exist, the Create new event policy link displays at the bottom. If policies exist, and the user modifies them, the Save button displays.
Click the customer in the left column.
The policy details display.
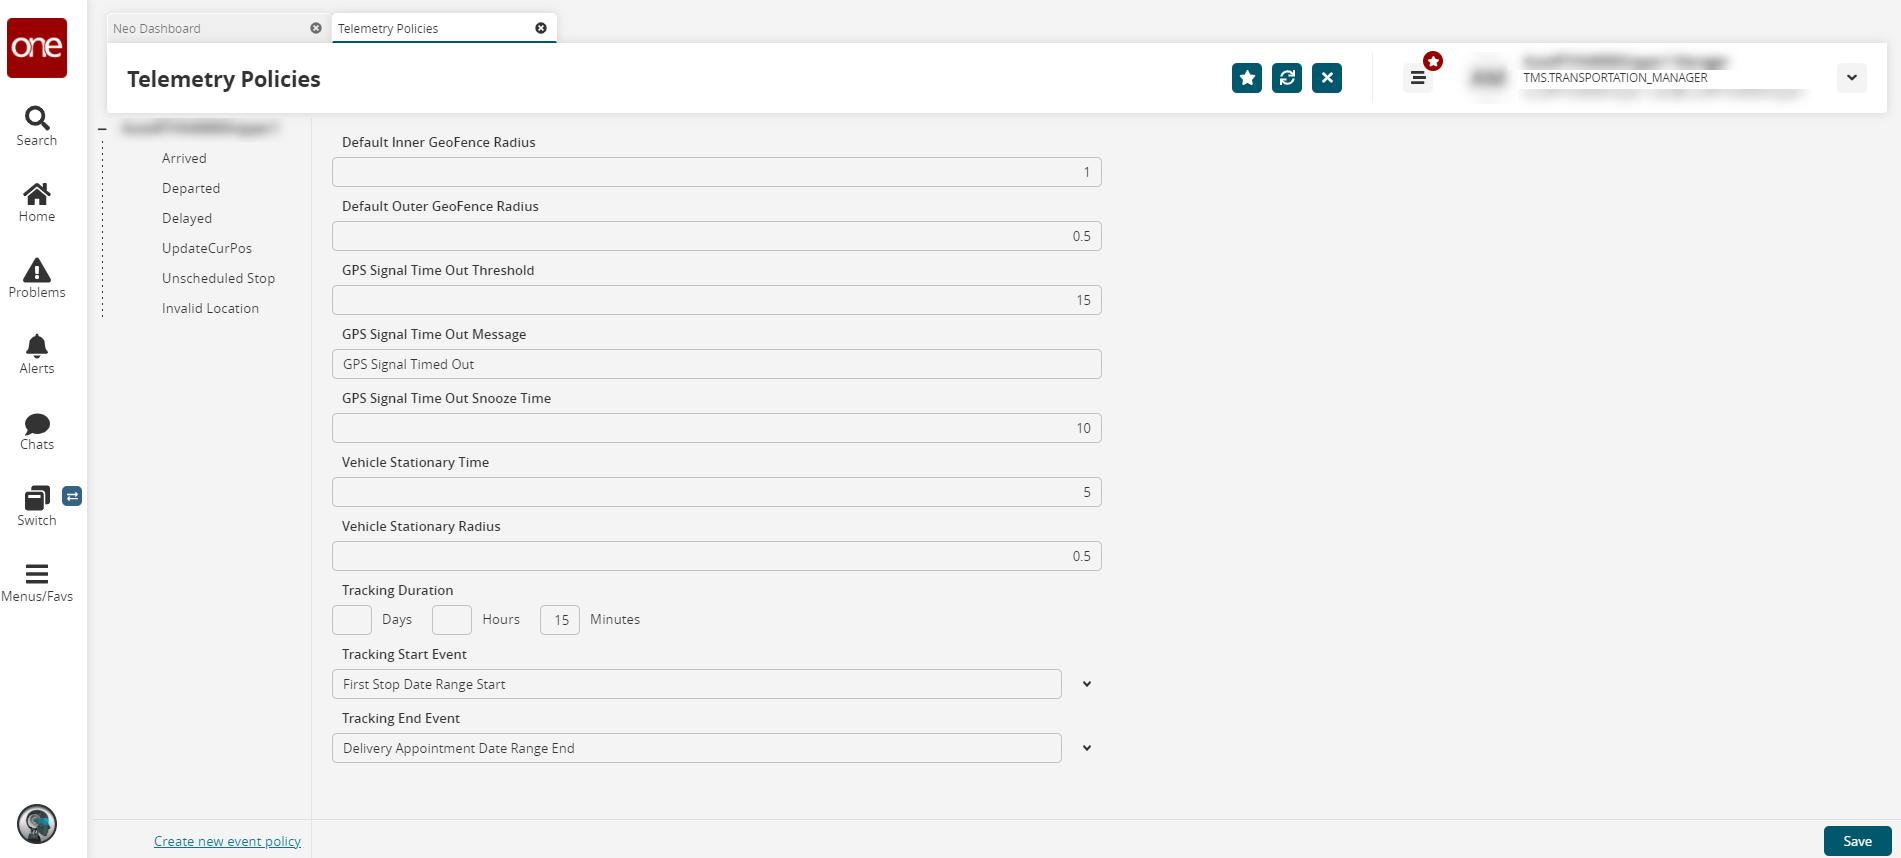
Attribute
Description
Default Inner GeoFence Radius
Enter a value for the default inner geo-fence radius used to compute Arrival and Departure events.
Default Outer GeoFence Radius
Enter a value for the default outer geo-fence radius used to compute approaching events.
GPS Signal Time Out Threshold
Enter a value for the GPS time-out threshold.
GPS Signal Time Out Message
Enter the message to send when the GPS Signal Time Out value is reached.
GPS Signal Time Out Snooze Time
Enter a value for the timeout, in minutes, to set how long to silence the GPS Signal Time Out message once it has been sent.
Vehicle Stationary Time
Enter a value for time, in minutes, to wait before a vehicle is considered stationary (Default is 15 minutes).
Vehicle Stationary Radius
Enter a value for the distance from the last stationary point to indicate a vehicle has left (Default is 1 mile).
Tracking Duration
Enter a value for the duration an asset will be GPS tracked. Users can use the date field from the movement or a date field from a tracking event like Confirmed, Picked Up, and Received, among others.
Example:
From: 5 Hours from PickupDateRangeStart
To: DeliveryAppointmentDate
Tracking Start Event
Select an event from the drop-down menu that will start the system tracking.
Tracking End Event
Select an event from the drop-down menu that will end the system tracking.
Click the Create or Save button (depending on if you are creating a new policy or you are modifying an existing policy).
A green success bar displays.
Complete the following steps to create policies based on tracking events:
From the Telemetry Policies page, select a customer.
Click an event under the customer name.
In the screenshot below, we have selected Arrived as the event.
Click the Create new event policy link at the bottom left of the screen. The policy fields display.
If policies already exist, they will display under the customer's name. A Create new event policy link displays if there are no tracking event policies. A Save button displays if there are existing policies.
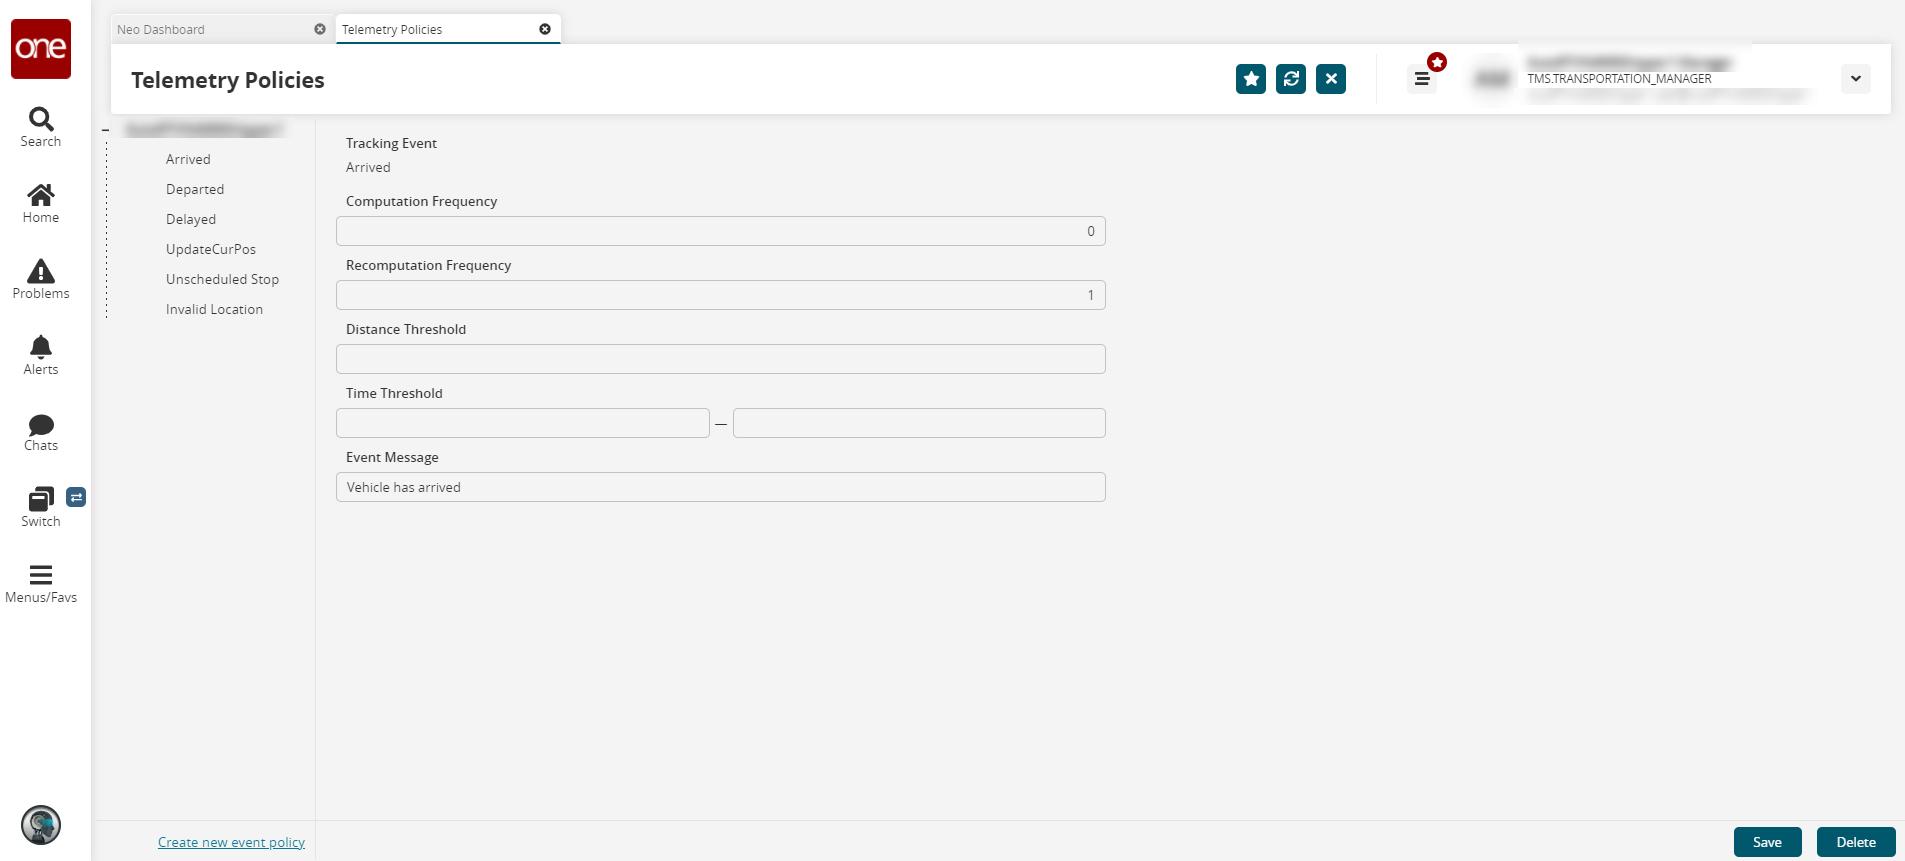
Attribute
Description
Tracking Event
This field displays the event type selected from the left panel.
Computation Frequency
Enter a value in minutes for the frequency at which the event is computed.
Recomputation Frequency
Enter a value in minutes for the frequency used to recompute delay once an event like Delayed is triggered.
Distance Threshold
Enter a value in miles for the distance threshold used for event computation. For example:
For a Departed event, this is the distance the truck would have to travel from a site�s geo-fence to trigger the geo-fence.
For an Out of Route event, this is the distance the truck can deviate from the planned route
Time Threshold
Enter a value in minutes for the time threshold used in the context of event computation; this could be a range depending on the event. For example:
For an Arrived event, this will be used as a threshold for triggering the event.
For a Delayed at Stop event, this is the threshold beyond which a truck can stay at a planned stopover for the stop duration.
Event Message
Create a custom message when the event is triggered.
Click the Create or Save button.
A success message displays.
(Optional) Click the Delete button to delete a policy.
Telematic Asset Assignment via a Digest Email
GLG enables scheduling one-time and/or periodic emails to request dispatching drivers or vehicles for unassigned movements. Through the link provided by the email, off-network dispatchers can assign a driver or vehicle without logging into the system. It provides a means to remind and allow off-network users, who are not currently in the system, to dispatch movements. Carrier managers can schedule dispatch request emails to off-network dispatchers that include current unassigned movements. When the dispatcher receives the email, they use the URL provided in the email to open a new form to assign a driver or vehicle to any unassigned movements and submit the assignment to the system. Carrier users click the new Schedule Report button in the Unassigned detail report, which is accessed from the Dispatch Board and Vehicle Dispatch Board widgets.
Instructions
Complete the following steps to schedule dispatch request emails:
The NEO dashboard displays the Dispatch Board and Vehicle Dispatch Board widgets.
Click the Unassigned label, count link, or chart bar.
The Unassigned screen displays. In the example below, we have used the unassigned driver dispatch link.
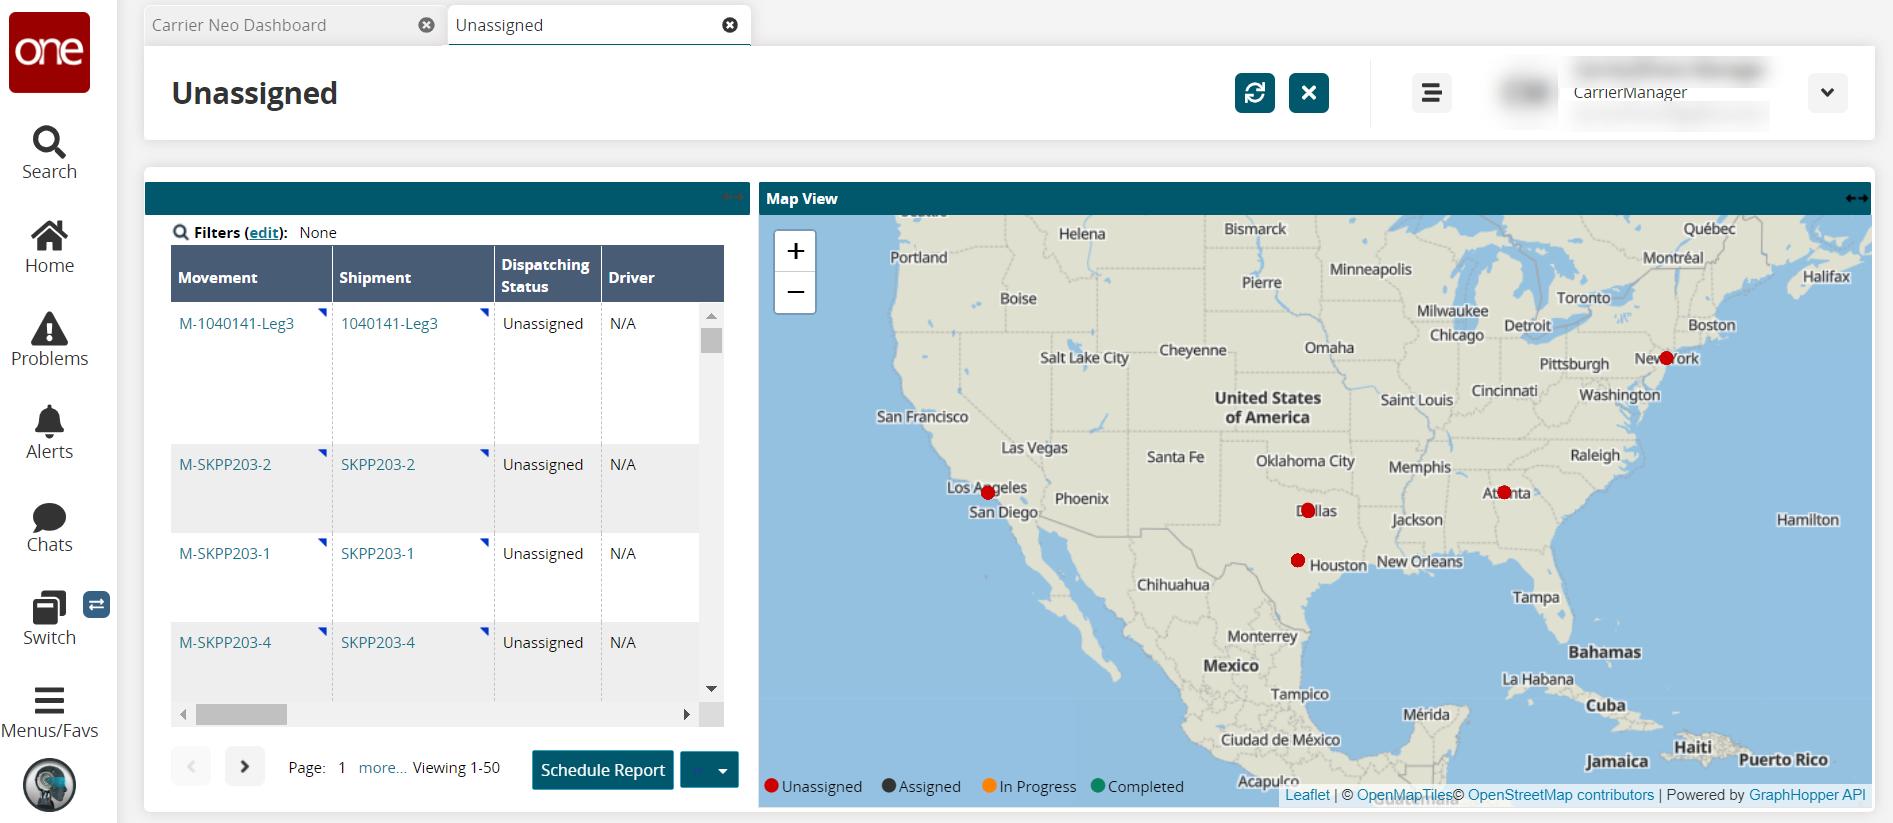
Click the Schedule Report button.
A confirmation window is displayed.
Click the Yes button.
The Create Integration Subscription screen displays.
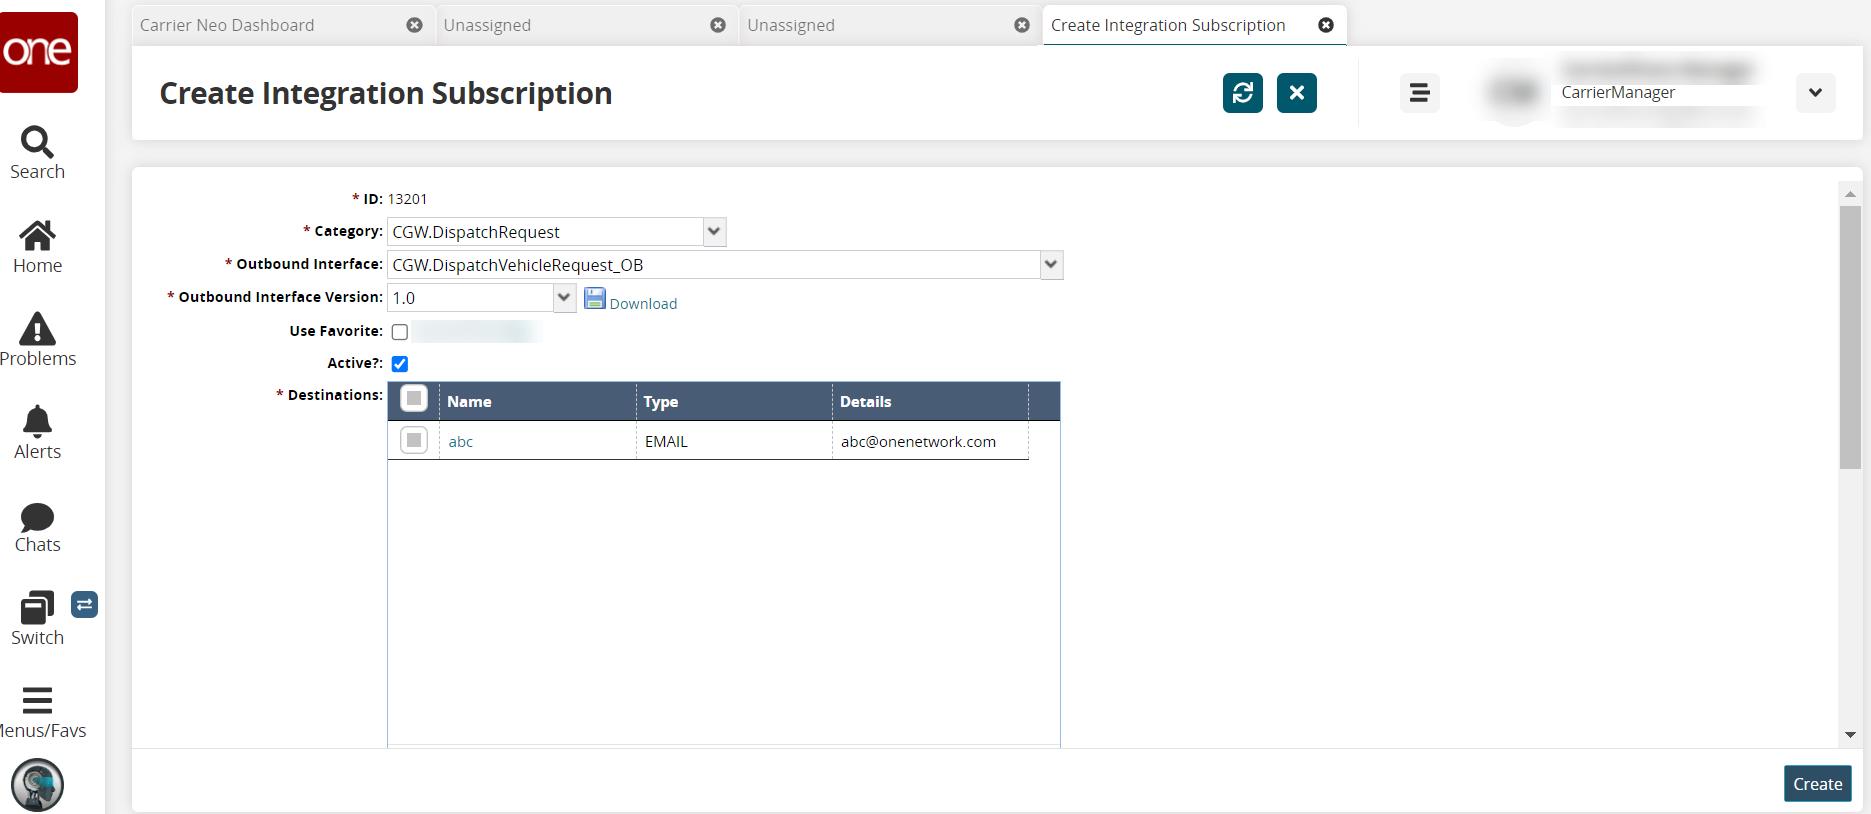
Field
Description
*ID
The ID field is auto-populated.
*Category
Select the category from the drop-down list.
*Outbound Interface
Select the outbound interface from the drop-down list. The default is auto-populated based on the widget and schedule report screen you clicked on in the previous steps.
*Outbound Interface Version
Select the version for the outbound interface from the drop-down list.
Download
Click the Download link to download a copy of the outbound interface version to your computer.
Use Favorite
Check the box to use a favorite.
Active?
Check the box to ensure that this integration subscription is active.
*Destinations
Click the checkbox for any existing destinations (recipients).
Click the Add new destination link to add a new destination (recipient) to the list.
The New Destination window is displayed.
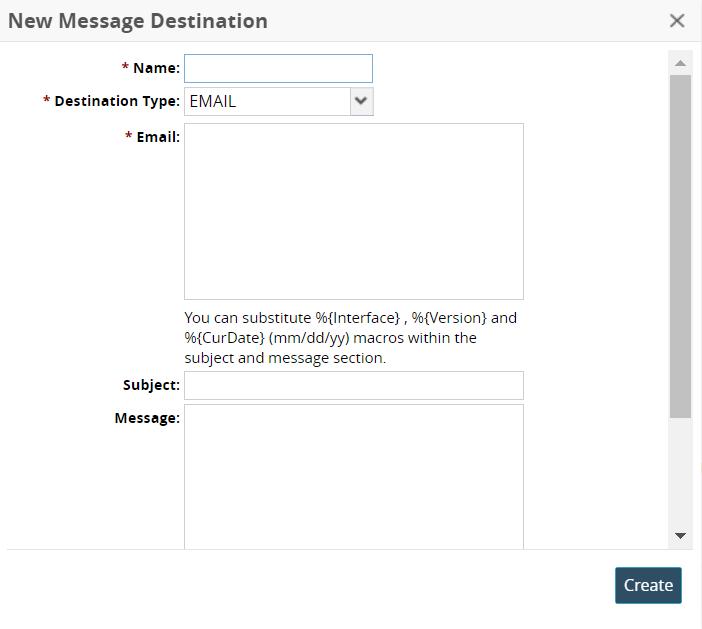
Field
Description
*Name
Enter the name of the recipient.
*Destination Type
Select the type of destination method from the drop-down list. Please note that the following fields are based on selecting Email from the list. The fields will change based on the destination type.
*Email
Enter emails for this destination recipient.
Subject
Enter the subject text for the email notification.
Message
Enter the message for the email notification.
*Attached File Name
Enter the file name attached to the email.
The new destination is added to the Destinations table.
*Execute As
This field is auto-populated.
Ignore Changes Made By
Use the picker tool to select users to ignore who have made changes.
Preferred Timezone
Select a time zone from the drop-down list.
Schedule
Click the Add link to add a schedule.
A new row displays. Fields with the edit icon (pencil) are editable.
Select the month or Every Month from the drop-down list for the Month field.
Select the day or Every Day from the drop-down list for the Day field.
Select the time from the drop-down list for the Time field.
Select a time zone from the drop-down list for the Timezone list.
Active Date Range
Use the calendar and clock tools to select the beginning and end dates and times for which this subscription notification is active.
The page for the newly created subscription (shown with a new ID number) displays with a green success message.
Tools
Alerts
Alert Warning Popup to Whitelist ONE Emails During Alert Subscription
Some alert types that support click-through links have a Warning window notification that appears during alert creation. The window suggests users whitelist One Network email addresses to prevent automated email systems from clicking links within alert emails. The window is displayed for both movement alerts and cost limit alerts of the Approval Requested type relating to tendered events. This enhancement was added because some external email systems apply filters to check links for malicious intent; sometimes, these filters click "reject" links, giving the appearance that a tender has been instantaneously rejected. If users whitelist the appropriate ONE email addresses, there should be fewer false clicks, saving time.
Users see a Warning window when they create an alert email subscription for Tendered movement events. All steps to create the alert subscription are the same as before.
Complete the following steps to create a Tendered movement alert and view the Warning window:
Click Menus/Favs > Tools > Alert Subscriptions.
The Alert Subscription screen displays.
Click the New Subscription button.
The Subscription screen displays.
The list of fields below is truncated to only show the Warning window.
Field
Description
*Category
Select Movement from the drop-down list.
*Alert Type
Select Movemet Event Alert from the drop-down list.
*Event
Select Tendered from the drop-down list.
The Warning window is displayed.
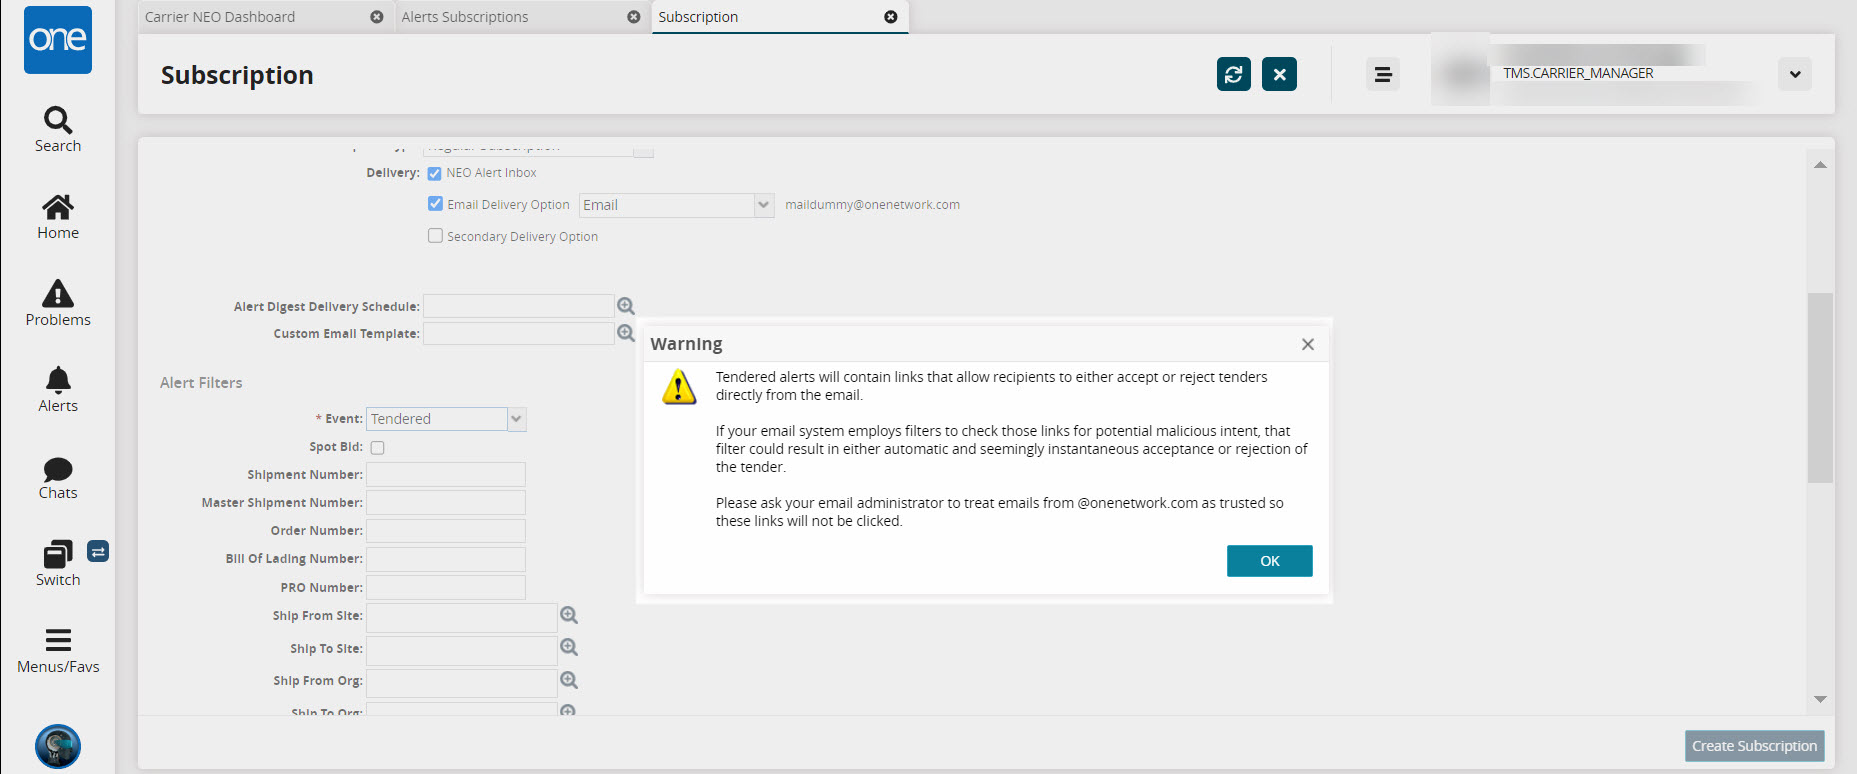
Click the OK button.
The window closes, and you can continue to create the alert subscription. Please see the "Creating a New Alert Subscription in the NEO Online Help for more informtion.
Creating an Alert Subscription
Users have the ability to create alert subscriptions using a rich array of alert types. See "Alert Subscription Types" for a full list of categories, types, and filter details.
Complete the following steps to create an alert subscription:
Click Menus/Favs > Tools > Alert Inbox or Menus/Favs > Tools > Alert Subscription as a Carrier Transportation Manager role.
The page displays.
Click the New Subscription button.
The Subscription page displays.
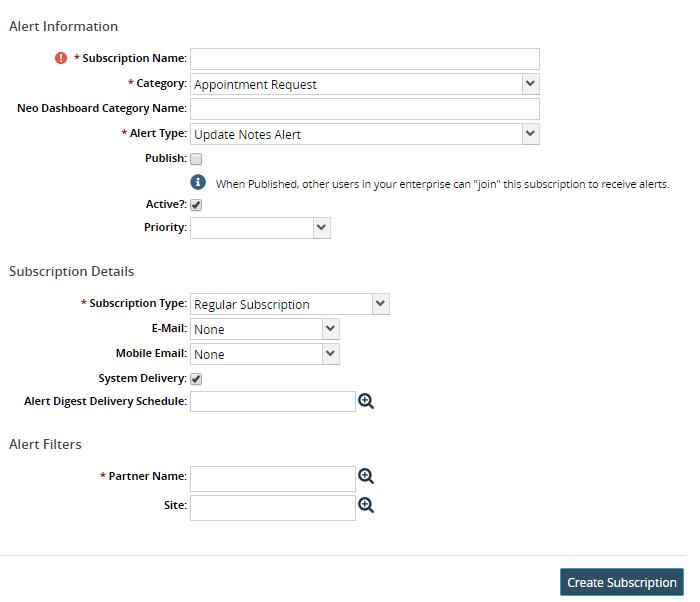
Complete the Alert Information and Subscription Details fields. These fields are generic for every new alert subscription.
Field
Description
*Subscription Name
Type in the subscription name.
*Category
Select the category from the drop-down list. More fields display for the Alert Filters.
NEO Dashboard Category Name
Type in the category name.
*Alert Type
Select the alert type from the drop-down list.
Publish
Check the box to publish this alert so that others in your enterprise network can subscribe to it.
Active
Check the box to remove the active status.
Priority
Select the priority from the drop-down list.
*Subscription Type
Select the subscription type from the drop-down list.
E-Mail
Select the email option from the drop-down list.
Mobile Email
Select the mobile option from the drop-down list.
System Delivery
Check the box to remove system delivery in the user's Alert Inbox.
Alert Digest Delivery Schedule
Use the picker tool to select the delivery schedule.
Complete the Alert Filter fields. The Alert Filter fields are specific to the Category and Alert Type.
Click the Create Subscription button.
A green success bar displays. The new alert subscription shows in the Alert Subscription page.
Creating an Alert Subscription for Spot Bids and Tenders
Users have the ability to create alert subscriptions using a rich array of alert types. See "Alert Subscription Types" in the NEO Online Help for a full list of categories, types, and filter details. This set of instructions includes steps to create any kind of alert in addition to the specific parameters for spot bids and tenders.
Complete the following steps to create an alert subscription:
Click Menus/Favs > Tools > Alert Inbox or Menus/Favs > Tools > Alert Subscription.
The page you selected displays. Both will have the button in the next step.
Click the New Subscription button.
The New Subscription page displays. For some users, the screen is titled Subscription.
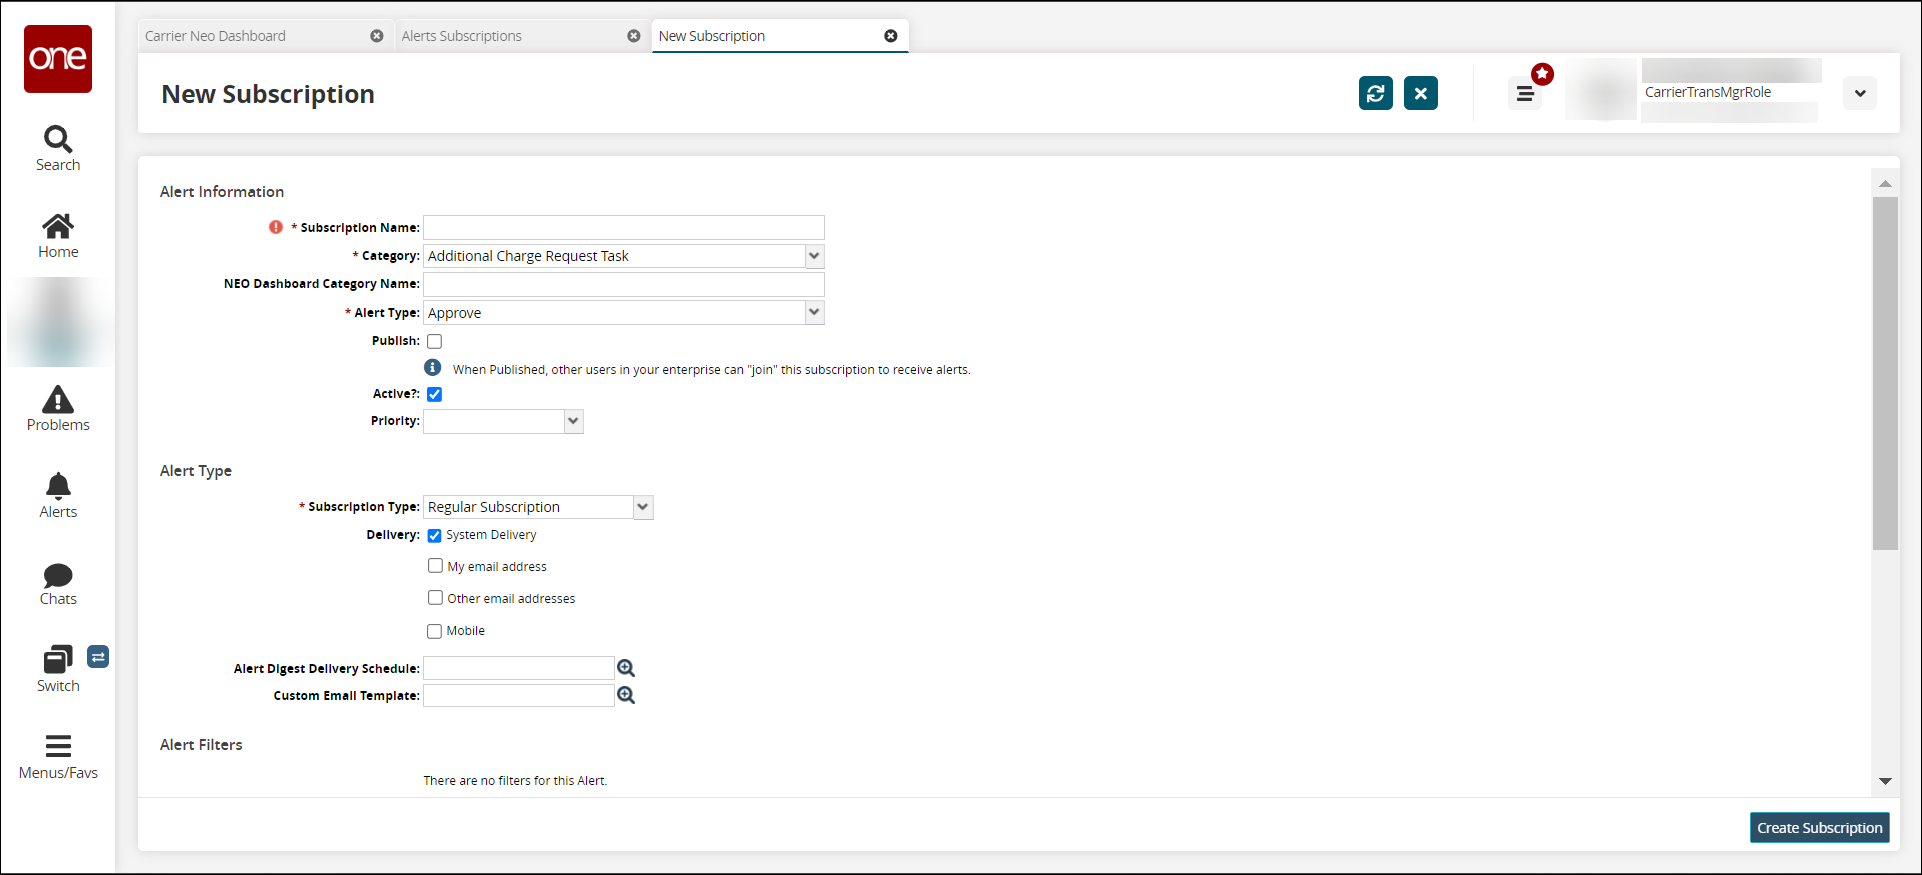
Complete the Alert Information and Subscription Details fields. These fields are generic for every new alert subscription.
Field
Description
Alert Information
*Subscription Name
Type in the subscription name.
*Category
Select the category from the drop-down list.
This field determines what alert types, alert filters, display fields, and additional contact types are available.
NEO Dashboard Category Name
Type in the category name.
*Alert Type
Select the alert type from the drop-down list.
The alert types are dependent upon the alert category selected above.
Publish
Check the box to publish this alert so that others in your enterprise network can subscribe to it.
Active?
Check the box to remove the active status.
Priority
Select the priority from the drop-down list.
Subscription Details
*Subscription Type
Select the subscription type from the drop-down list.
Delivery
Check the box for one or more of the following options:
Click the checkbox for NEO Alert Inbox.
Alerts will post to the user's alert inbox found by clicking Menus/Favs > Tools > Alert Inbox. This option is selected by default.
Click the checkbox for the Email Delivery option.
Another field and the users email display. Email is the default option. Select Alternate Email and enter a different email.
Click the checkbox for the Secondary Delivery Option.
Enter multiple email addresses separated by commas.
Click the checkbox for Mobile.
New fields display with SMS, My Mobile Number, and the user's mobile number. Users can select SMS or WhatsApp with their own mobile number that is in their profile or another phone number using the added fields.
Alert Digest Delivery Schedule
Use the picker tool to select the delivery schedule.
Custom Email Template
Use the picker tool to select a customized email template for the alert.
Complete the Alert Filter fields.
The fields under Alert Filters are specific to the category and alert types selected above.
Click the checkboxes under Display Fields to select the fields displayed in the alert.
The fields under Display Fields are specific to the category and alert types selected above.
Complete the fields under Additional Contact Types.
The fields under Additional Contact Types are specific to the category and alert types selected above.
Click the Create Subscription button.
A green success bar displays. The new alert subscription shows in the Alert Subscription page.
The table below outlines the specific parameters for creating alerts for spot bids that are tendered, accepted, and/or rejected. The field name is provided with the appropriate selection.
Tendered | Accepted | Rejected |
|---|---|---|
Category = Movement Alert Type = Movement Event Alert Subscription Type = Regular Subscription Event = Tendered Spot Bid = Yes | Category = Movement Alert Type = Movement Event Alert Subscription Type = Regular Subscription Event = Accept Spot Bid = Yes | Category = Movement Alert Type = Movement Event Alert Subscription Type = Regular Subscription Event = Reject Spot Bid = Yes |
Working with Alerts Subscriptions
Complete the following steps to work with alert subscriptions:
Click Menus/Favs > Tools > Alerts Subscriptions as a Carrier Transportation Manager role.
The Alerts Subscription page displays all current alert subscriptions.

Scroll to the end of the row for links in the Action column: Publish, Delete, Deactivate.
Publish will publish the alert subscription to all users in the enterprise system.
Delete will delete that subscription.
Deactivate will keep it in the system but deactivate it from generating alerts and problems.
Users may also perform other actions by checking the box next to an alert.
The Actions button activates.
Click Actions > Delete Alert Subscription.
The Delete Alert Subscription page displays the selected alert subscription.
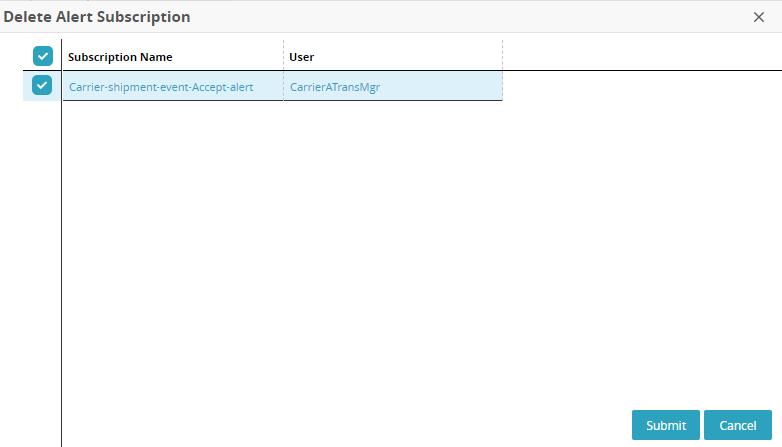
Creating an Integration Subscription
Complete the following steps to create an integration subscription:
Click Menus/Favs > Tools > Integration Subscription as a Carrier Transportation Manager role.
The Integration Subscription screen displays.
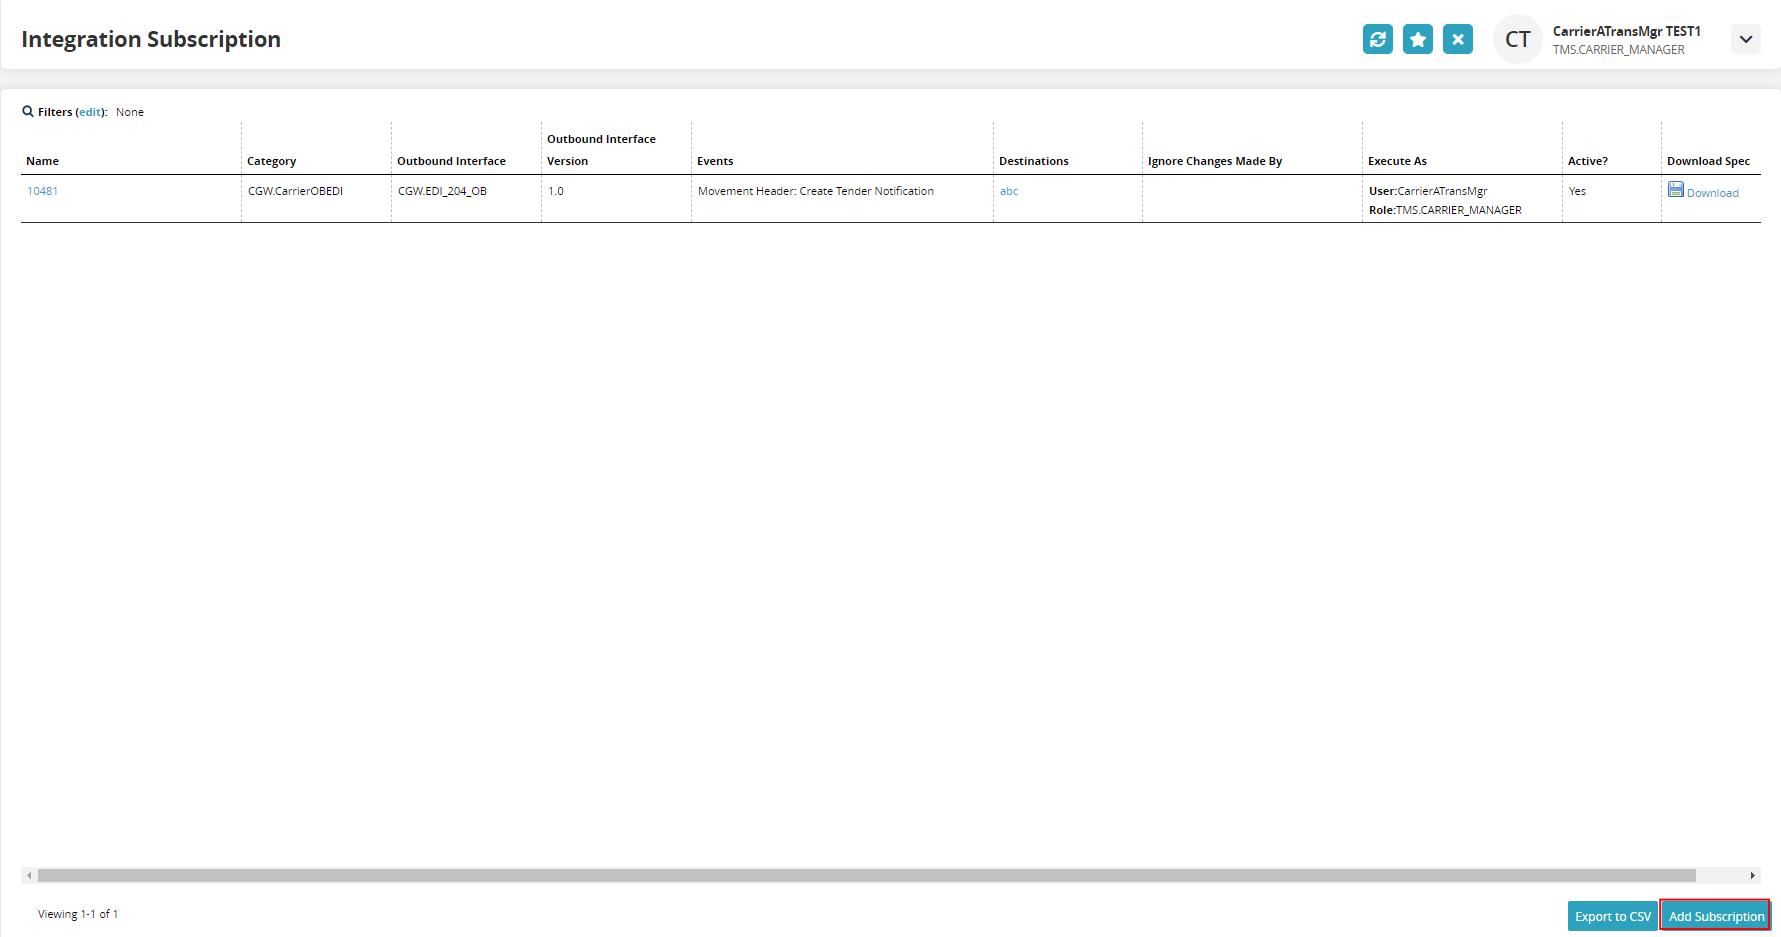
Click the Add Subscription button.
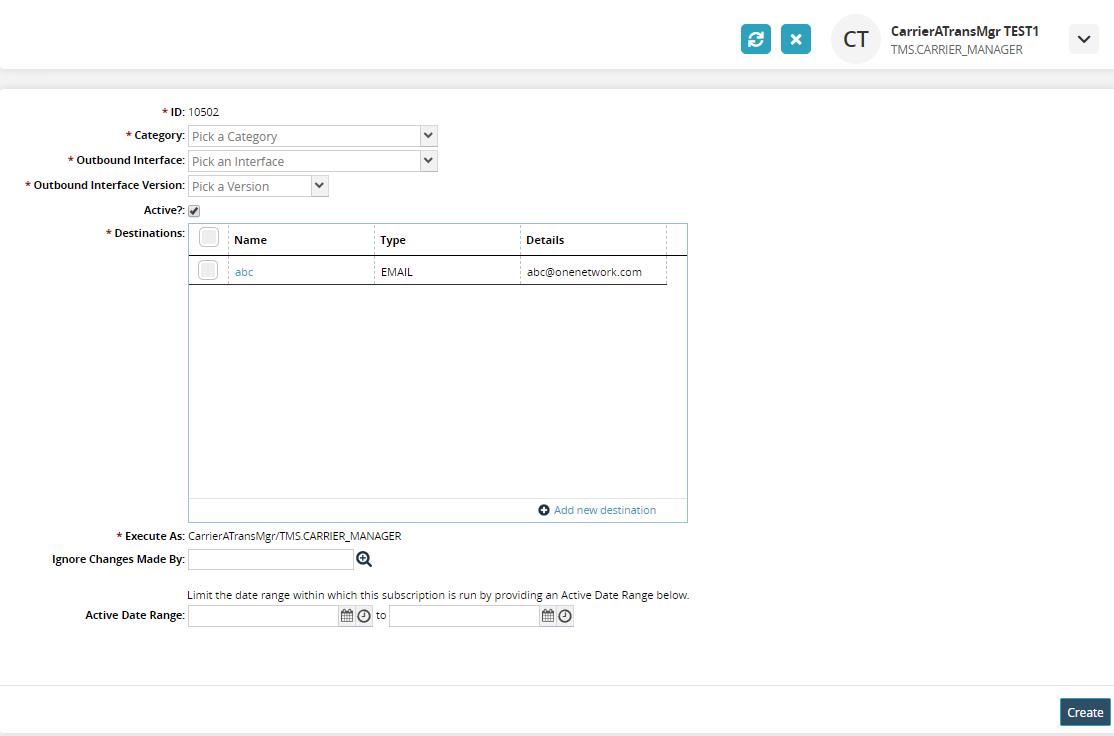
Field
Description
*ID
This number is auto-generated when the subscription is created.
*Category
Select the category from the drop-down menu.
*Outbound Interface
Select the outbound interface from the drop-down menu.
*Outbound Interface Version
Select the outbound interface version from the drop-down menu.
Active
Check the box to deselect this subscription as active.
*Destinations
Check the box for the email destination where the notification will go. New email addresses can be added by clicking on the Add new destination link.
*Execute As
This information is auto-generated based on the user/role.
Ignore Change Made By
Use the picker tool to select users whose changes should be ignored.
Active Date Range
Use the calendar tools to select the to and from date range.
EDI Message Queue
Searching EDI Queues
Complete the following steps to search the EDI queue:
Click Menus/Favs > Tools > Manage EDI Queue as a Transportation Manager role.
The Manage EDI Queue screen displays.
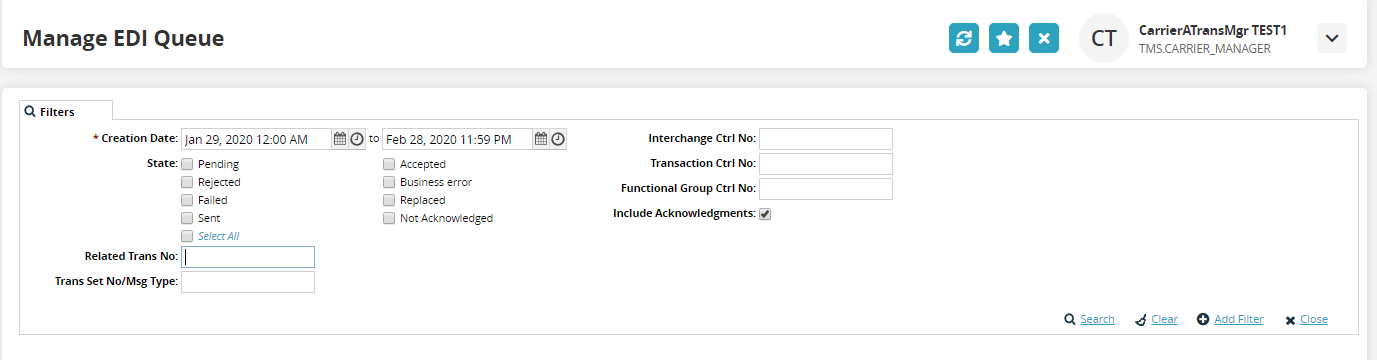
Field
Description
*Creation Date
Select a date range using the calendar tools. The creation date is when the EDI message was received by ONE Network (inbound) or when it was created by ONE Network (outbound). The system auto-populates several weeks.
Interchange Ctrl No
Type the interchange number provided in the ISA13 segment of the EDI message.
State
Check the box next to the state of the EDI message.
Pending - indicates the inbound message has been received by not yet processed
Rejected - indicates the inbound message was rejected as it did not adhere to the EDI specifications or indicates outbound message received a negative acknowledgment from the receiver indicating they were not able to process the message
Sent - indicates the outbound message was submitted to the receiver but no acknowledgment has been received yet
Accepted - indicates the inbound message has processed successfully without errors or indicates an outbound message received a positive acknowledgment from the receiver
Business error - indicates the inbound message adhered to the EDI specifications but contained some business validation issue
Replaced - indicates that the shipment has been updated to a replaced status
Not Acknowledged - indicates the outbound message after a defined amount of time where no acknowledgment was received
Select all - check to select all of the states
Transaction Ctrl No
Type the transaction number provided on the ST02 segment of the EDI message.
Functional Group Ctrl No
Type in the transaction number provided on the GS06 segment of the EDI message.
Include Acknowledgements
Check the box to include the 997 acknowledgment for the EDI message.
Related Trans No
Type in the reference number value contained in the EDI message.
Trans Set No/Msg Type
Type in the type of EDI message (204, 990, 214, etc.).
Click the Search link.
EDI messages that match the selection criteria display.
Creating EDI Message Queue Alert Subscriptions
Users can create an EDI Message Queue Alert Subscription that sends an alert if any of the following EDI processing issues occur:
An inbound EDI message is rejected due to format validation errors.
An inbound EDI message processing fails due to business validation errors.
An inbound EDI message gets "stuck" in a Pending state.
An outbound EDI message is not acknowledged by a partner in a specified amount of time.
Complete the following steps to create an EDI message queue alert subscription:
Click Menus/Favs > Tools > Alerts Subscriptions as a Transportation Manager role.
The Alert Subscription screen displays.
Click the New Subscription button.
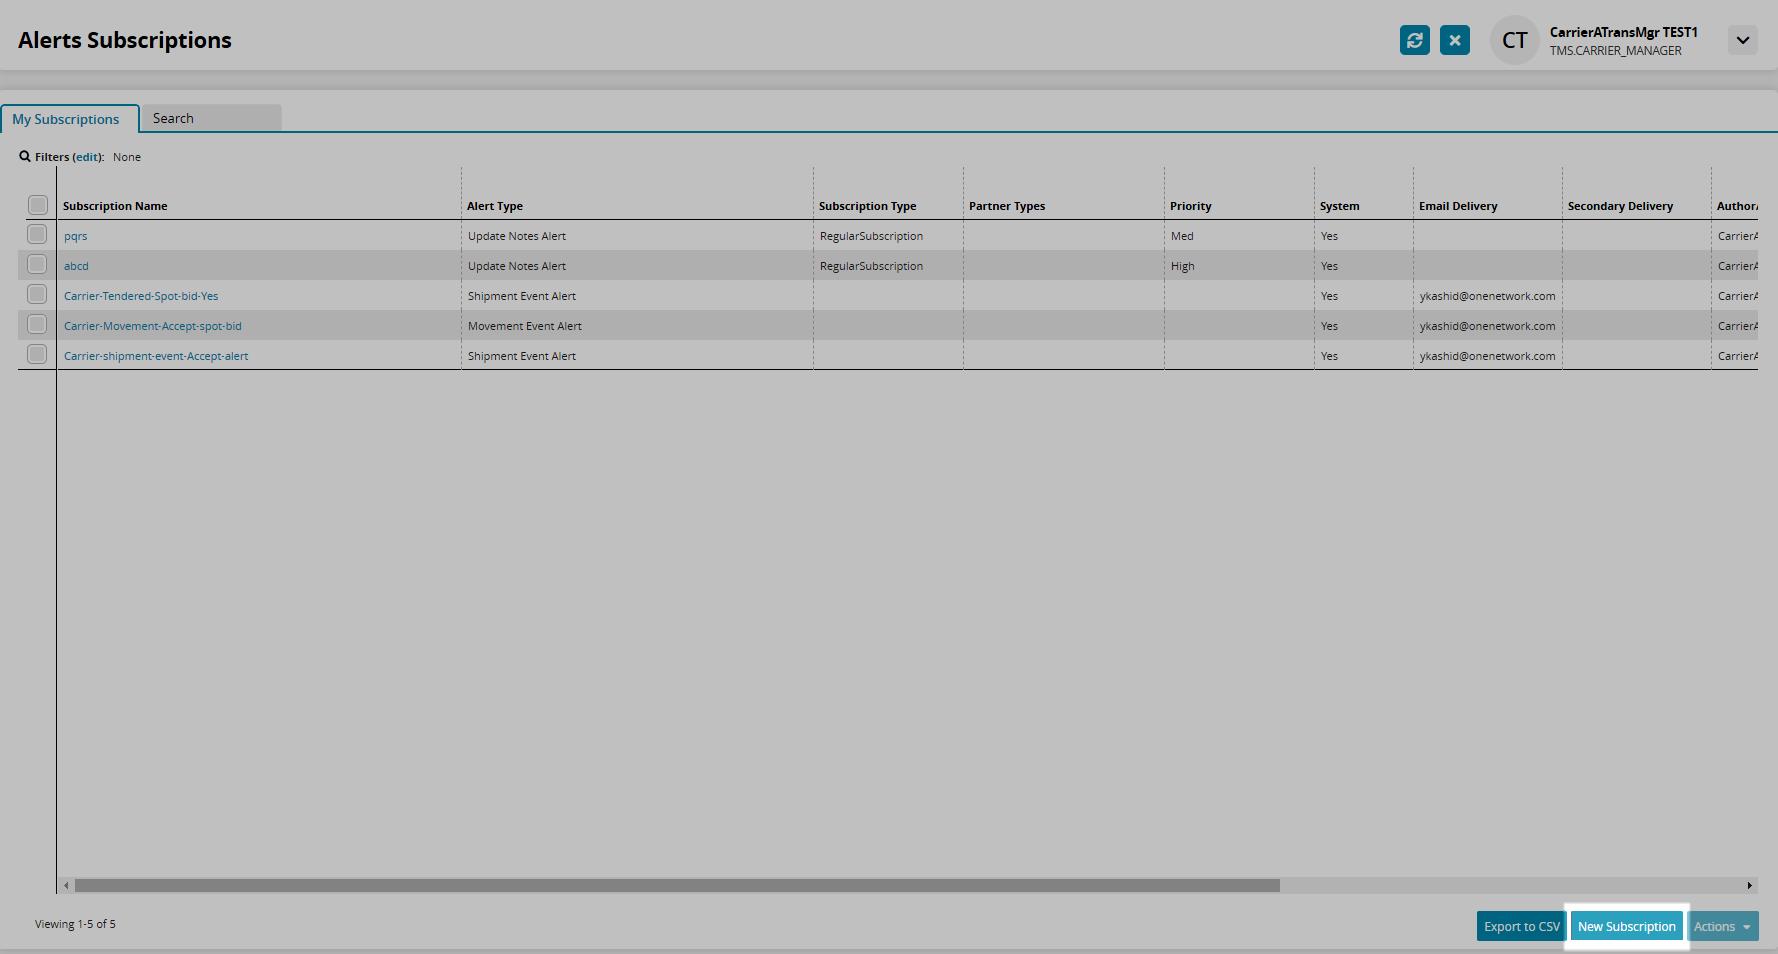
The Subscription screen displays.
In the Alert Information and Subscription Details sections, complete the fields described in the table below the following screenshot.
These fields are generic for every new alert subscription.
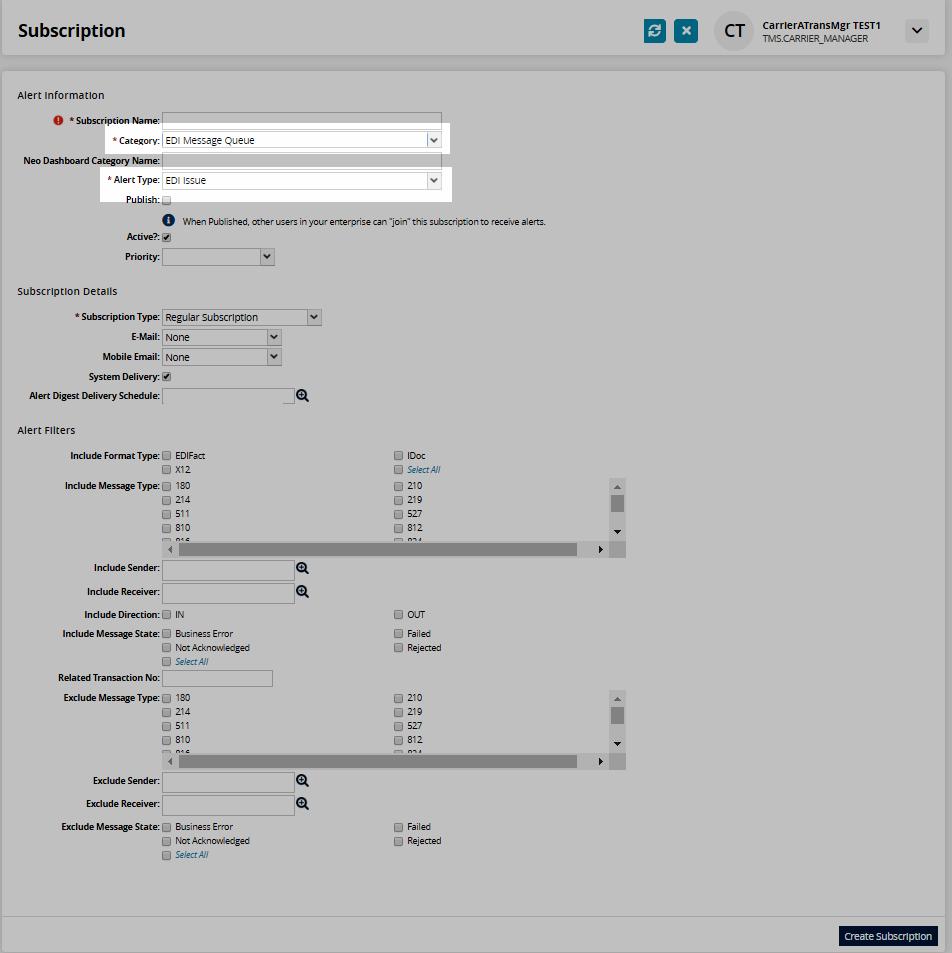
Field
Description
*Subscription Name
Type in the subscription name.
*Category
Select EDI Message Queue from the drop-down list. More fields will display for the Alert Filters
NEO Dashboard Category Name
Type in the category name.
*Alert Type
Select EDI Issue as the alert type from the drop-down list.
Publish
Check the box to publish this alert so that others in your enterprise network can subscribe to it.
Active
Check the box to determine the active status.
Priority
Select the priority from the drop-down list.
*Subscription Type
Select the subscription type from the drop-down list.
E-Mail
Select the email option from the drop-down list.
Mobile Email
Select the mobile option from the drop-down list.
System Delivery
Check the box to determine the system delivery in the user's Alert Inbox.
Alert Digest Delivery Schedule
Use the picker tool to select the delivery schedule.
Complete the following Alert Filter fields. These fields are specific to EDI Message Queue alerts.
Field
Description
Include Format Type
Check the box for the format type.
Include Message Type
Check the box for the EDI message type.
Include Sender
User the picker tool to select the sender to include.
Include Receiver
User the picker tool to select the receiver to include.
Include Direction
Check the box for the inbound or outbound direction of the EDI message.
Include Message State
Check the box for the EDI message state to include.
Related Transaction No
Type in the related transaction number.
Exclude Message Type
Check the box to exclude certain EDI message types.
Exclude Sender
Use the picker tool to select the sender to exclude.
Exclude Receiver
Use the picker tool to select the receiver to exclude.
Exclude Message State
Check the box for the EDI message state to exclude.
Click the Create Subscription button.
The page is renamed to the subscription name and a green success bar displays. The alert subscription will now display on the Alert Subscription page.
Reprocessing a Failed EDI Message
Complete the following steps to reprocess a failed EDI message:
Click Menus/Favs > Tools > Manage EDI Queue as a Transportation Manager role.
The Manage EDI Queue screen displays.
Enter the search criteria for the failed EDI message.
Click Search.
The EDI messages with the search criteria display.
Click View under the Payload column for the EDI message to resend.
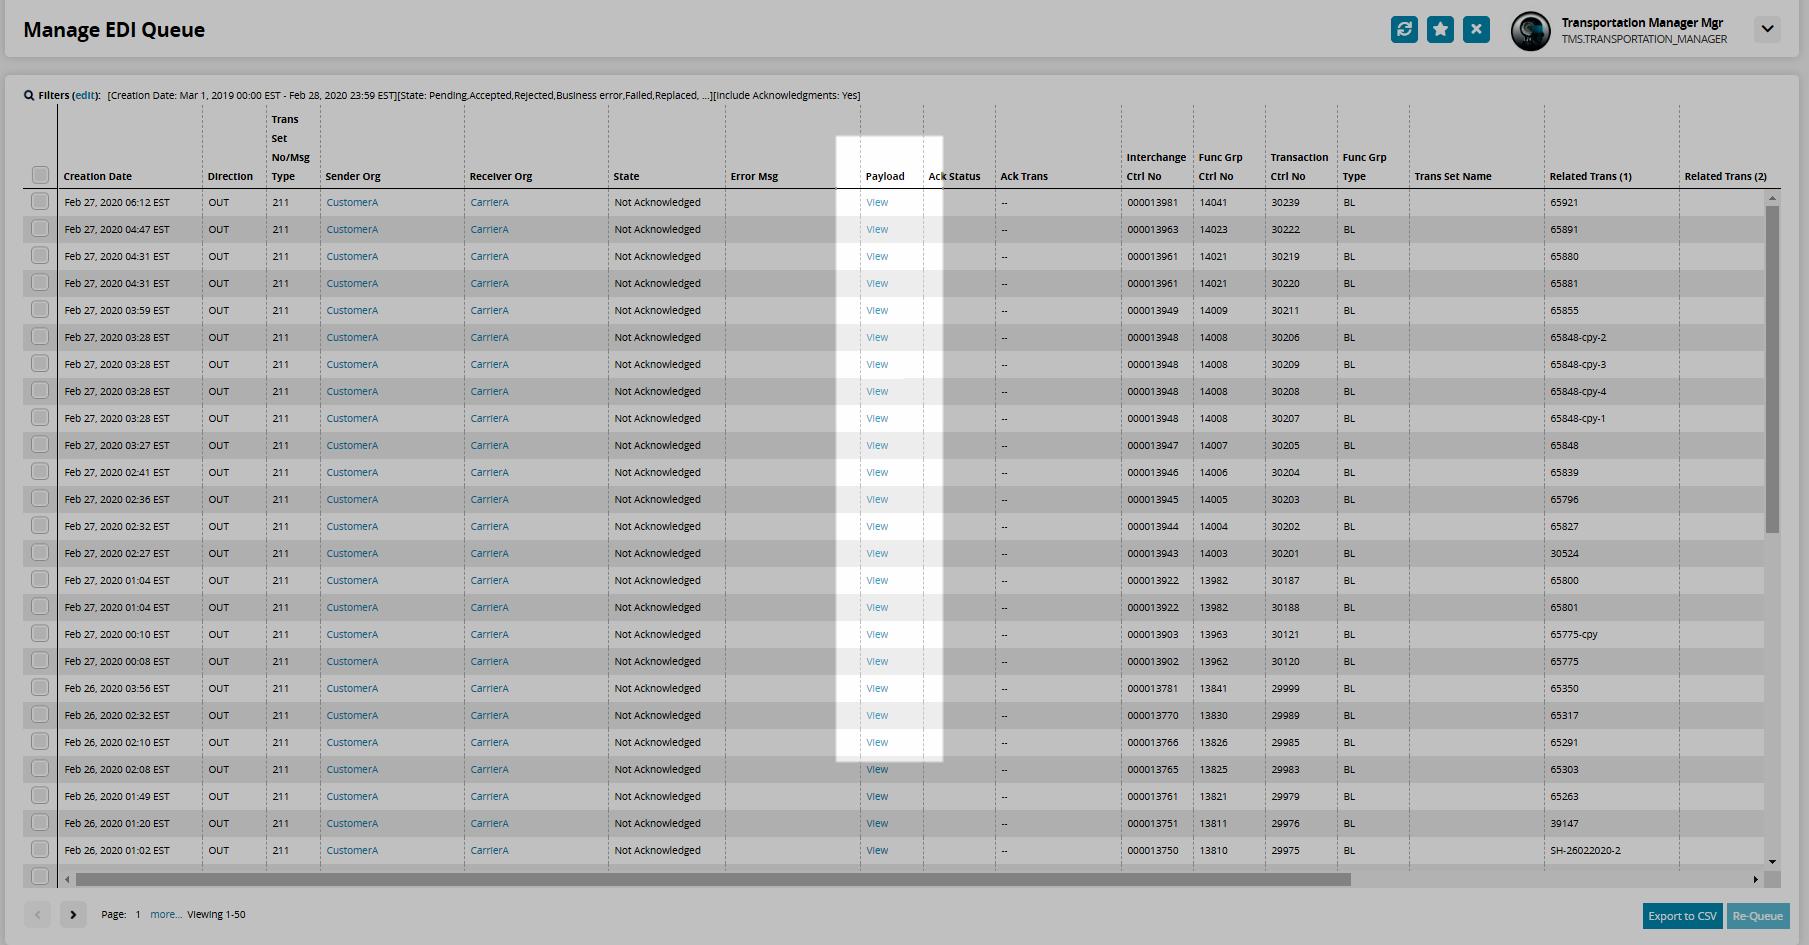
The Payload dialog box displays.
Follow-up or corrections may be required before the EDI message can be resent.
Click the Enqueue Text as New Message button to resend the EDI message.
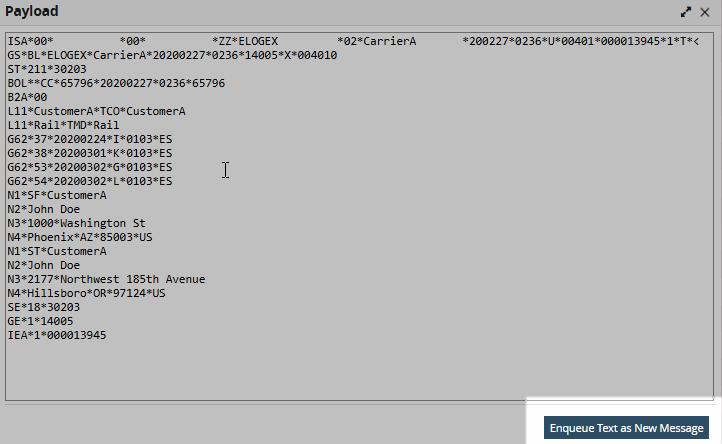
A window displays.
Click OK.
Real-Time Execution Page (RTTEP)
GLG supports a widget that can be added to NEO dashboards and the Real-time Transportation Execution Page (RTTEP) in the UI. The enhancement provides a summary layer with movement counts based on their mode of transportation and state. Users can also click on icons in the map to see movement details, which show breadcrumbs based on real-time event positions currently in our system, providing basic information like driver contact information, stops pickup dates, next stop, and the remaining distance to the final stop. The RTTEP map shows controlled and non-controlled shipments. The widget and the UI page helps carrier users view movement information in a single UI for a more efficient user experience.
To add the new widget, please see the "Adding Widgets" section of the NEO Online Help for more information. When users click on this widget, the Real-time Transportation Execution page displays.
Complete the following steps to view the Real-time Transportation Execution page in the UI:
Click the RTTEP widget, or click Menus/Favs > Transportation > Real-time Transportation Execution.
The Real-time Transportation Execution screen displays. Movement counts and states are displayed in a read-only view across the top.
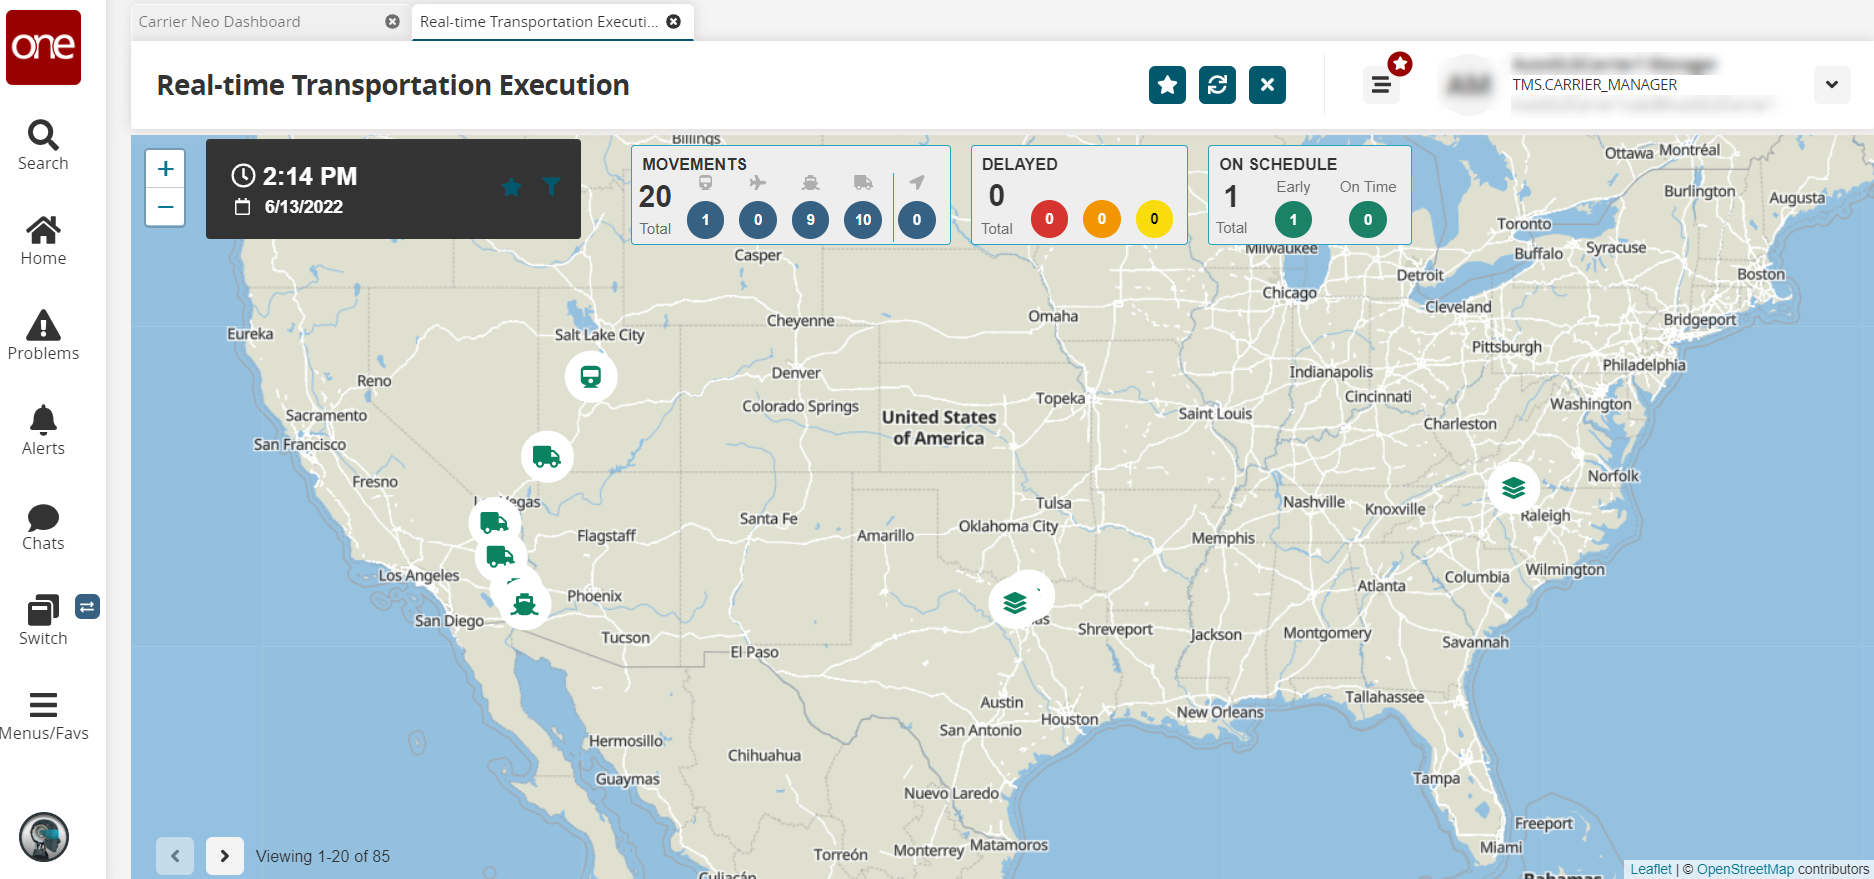
Click the plus (+) or minus (-) signs to zoom in and out on the map.
Click the star icon next to the date and time to set this page as a favorite.
Click the funnel icon to apply filters.
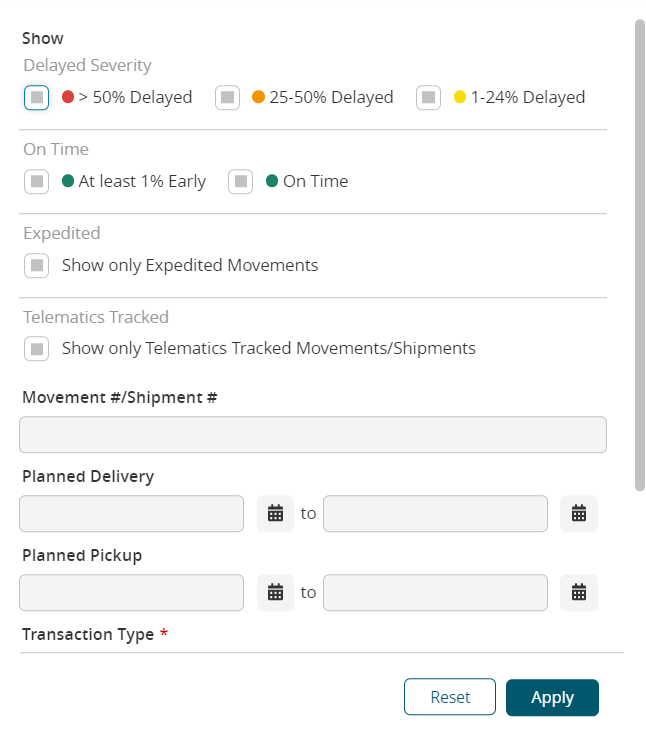
Field
Description
Delayed Severity
Check the box(es) to display the number of movements in a particular severity state.
On Time
Check the box(es) to display the number of movements that are early and/or on time.
Expedited
Check the box to only show movements that are expedited.
Telematics Tracked
Check the box to only show movements/shipments that are tracked with telematics.
Movement #/Shipment #
Enter a movement or shipment number.
Planned Delivery
Use the calendar tools to add a beginning and ending delivery date range.
Click on the icon with three dots on the calendar window to display more date variables such as times and a plus or minus time increments.
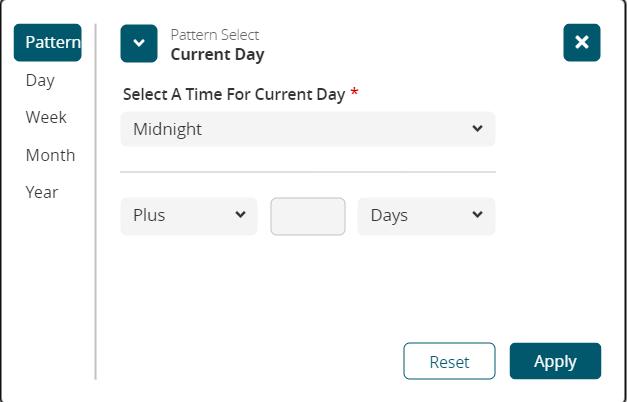
Click the Apply button to apply the date parameters.
These variables are available for the beginning and end dates.
Planned Pickup
Use the calendar tools to add a beginning and ending pickup date range. The same variables described above are available for the beginning and end dates.
Transaction Type *
Select the transaction type from the drop-down list.
Origin Site
Use the picker tool to select the origin site.
Destination Site
Use the picker tool to select the destination site.
Click the Apply button to apply the filters.
The movements on the map refresh and display according to the filters.
Click an icon on the map to display movement numbers and their modal types.
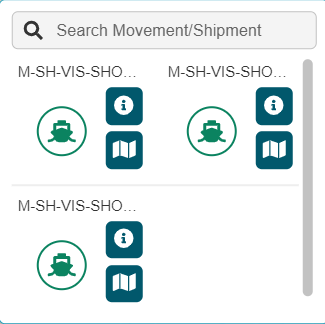
Click on the i (information) icon to display more details about the movement.
A movement details slideout displays, and the movement number is a live link to the movement details screen.
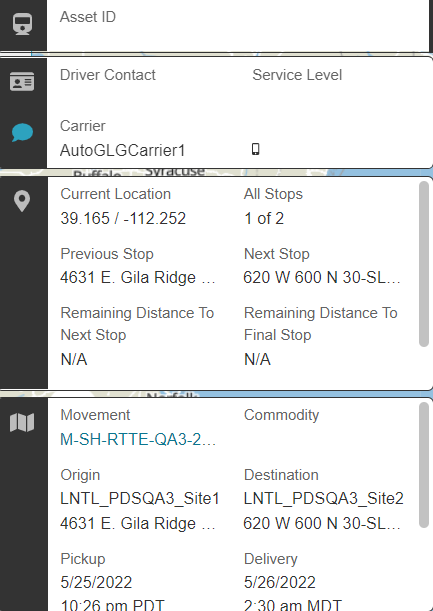
Click the map icon.
The screen refreshes to show that movements route with icons for events, origin site, destination site, and current position. Across the top are sections showing the movement number as a live link to the movement details page, the number of stops, the distance, and the ETA to the final stop.
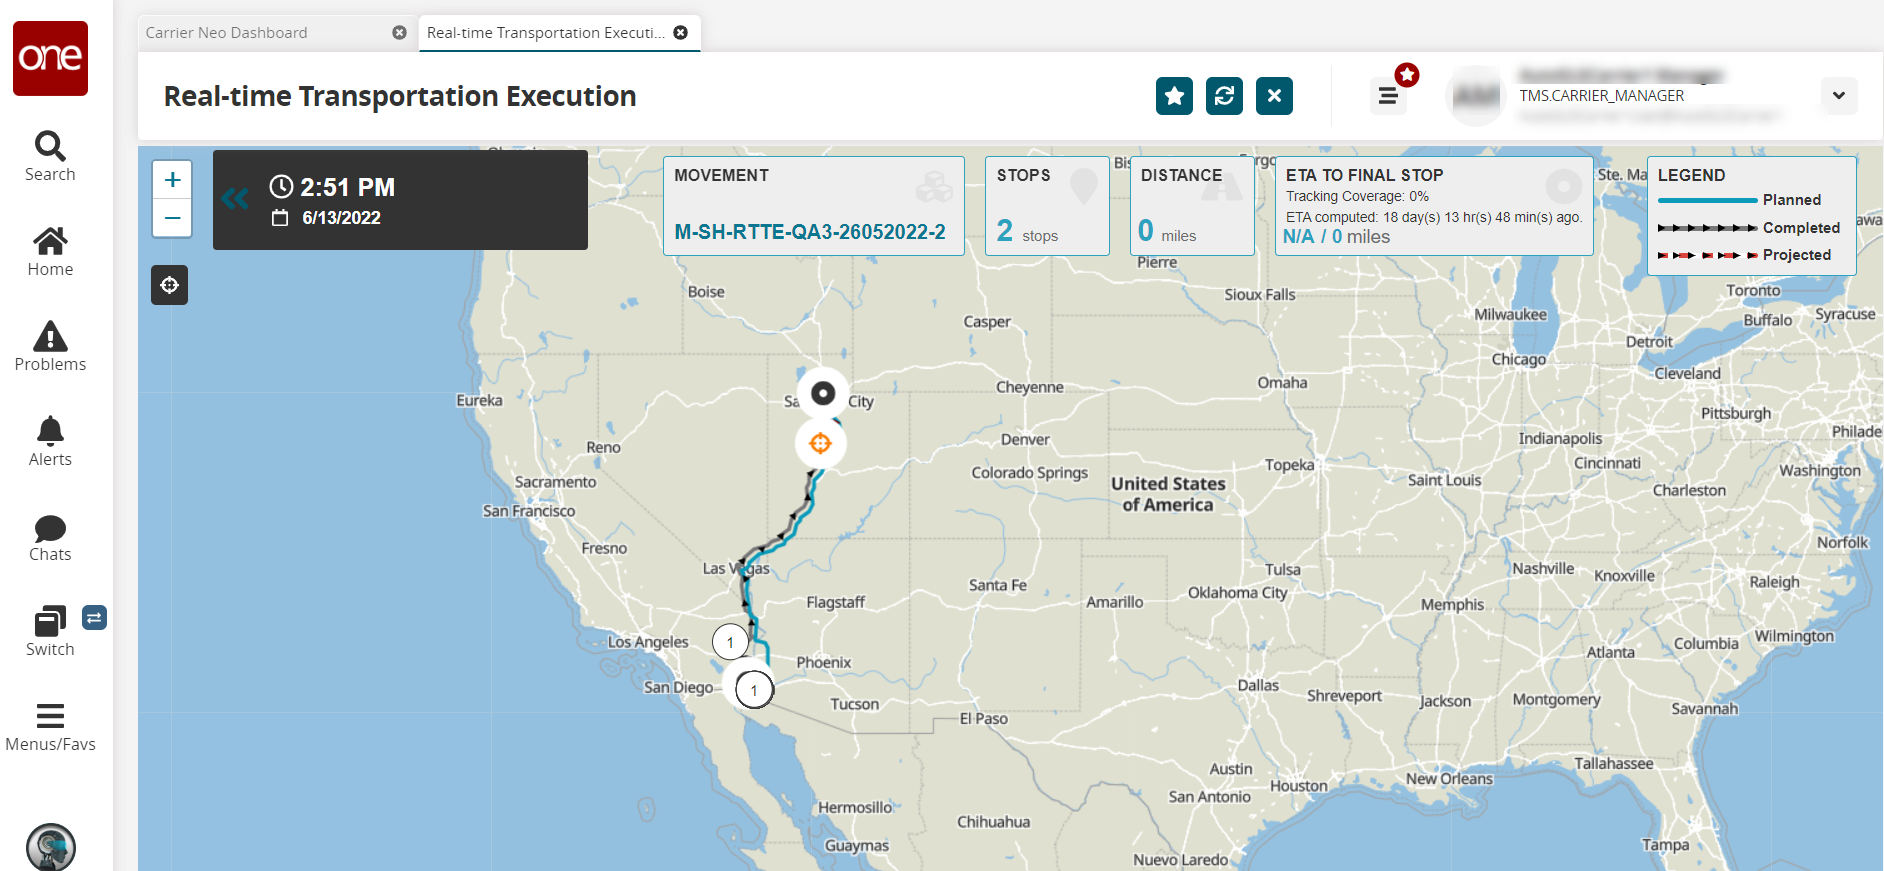
Click the Actual icon (below the zoom icons) to toggle showing planned, completed, or projected routes.
Click the double arrows next to the date and time to return to the summary RTTEP map.
Accessing the RTTEP Map from Multiple Reports in the UI for Carriers
Access to the Real-time Transportation Execution Page (RTTEP) maps can be found in the Movement Tracking, Intransit, and Delivery Ready reports for tracking individual events for carrier manager users. Specifically, users click a menu option in the movement context menu (blue triangle) and Actions buttons for Intransit and Delivery Ready movement reports. This enhancement helps Carrier Manager users view driver locations for movement events on a map for better visibility and event reviews. Please note that the map option displays on tracking events where coordinates are provided.
Instructions
Complete the following instructions to access the map option found on the Search Shipments screen:
Click Menus/Favs > Transportation > Search Shipments.
The Search Shipments screen displays.
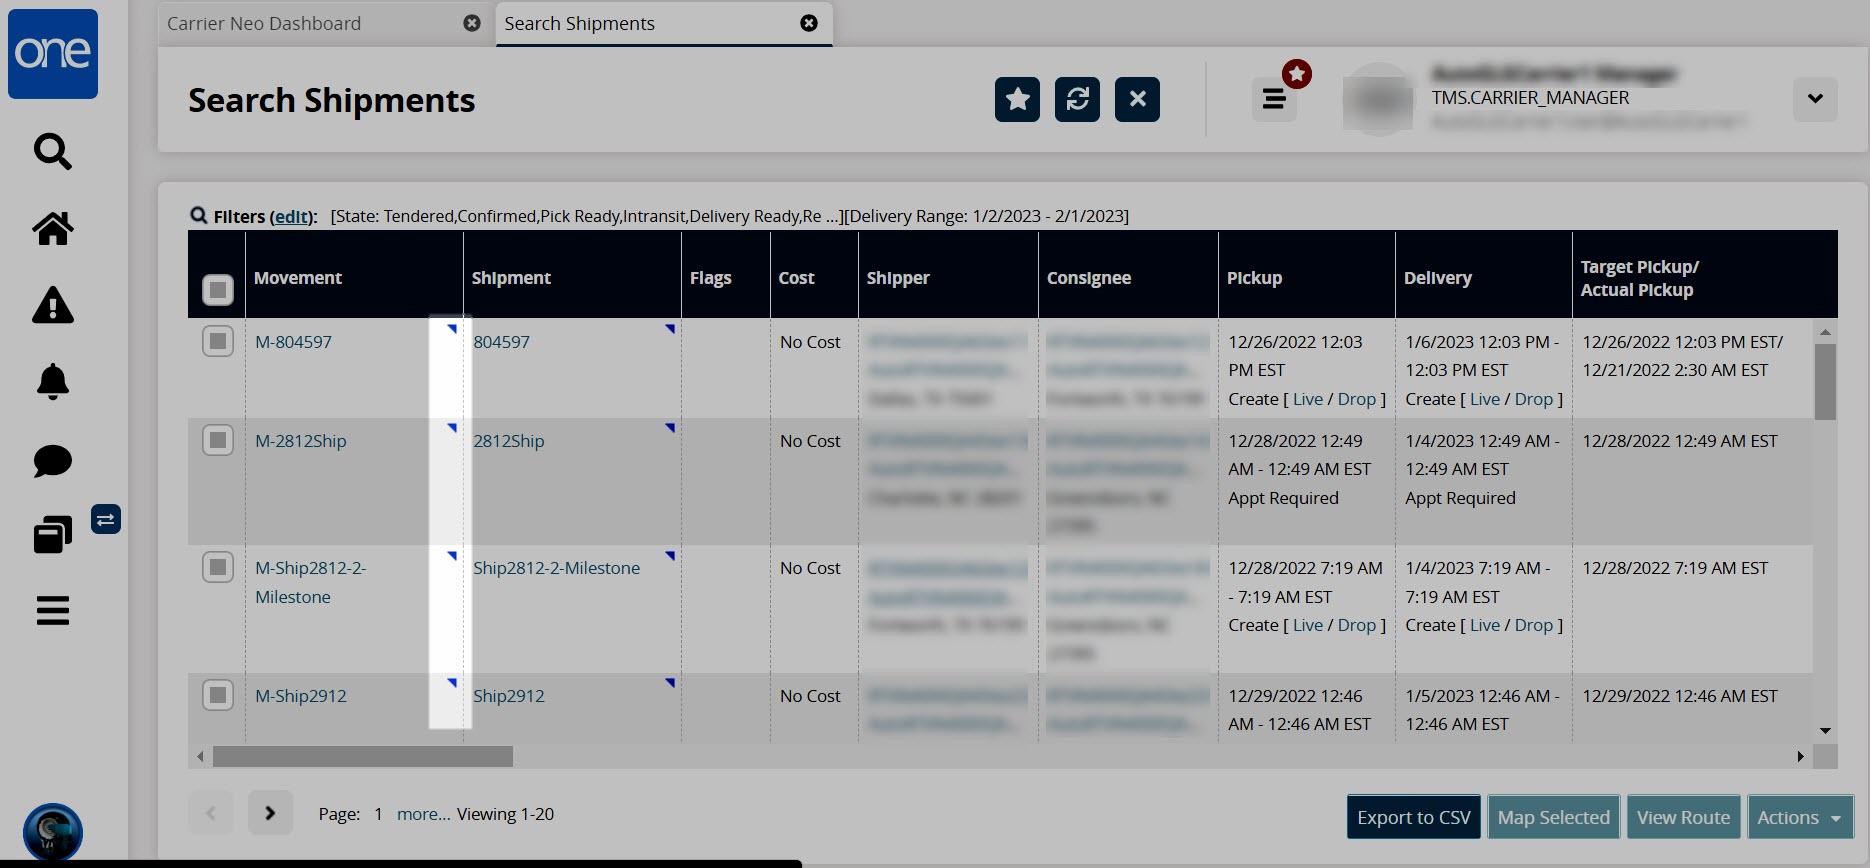
Click the blue context icon (blue triangle) for the movement.
A menu displays.
Click the Real-time View option.
The Real-time Transportation Execution map screen displays the movements on the map.
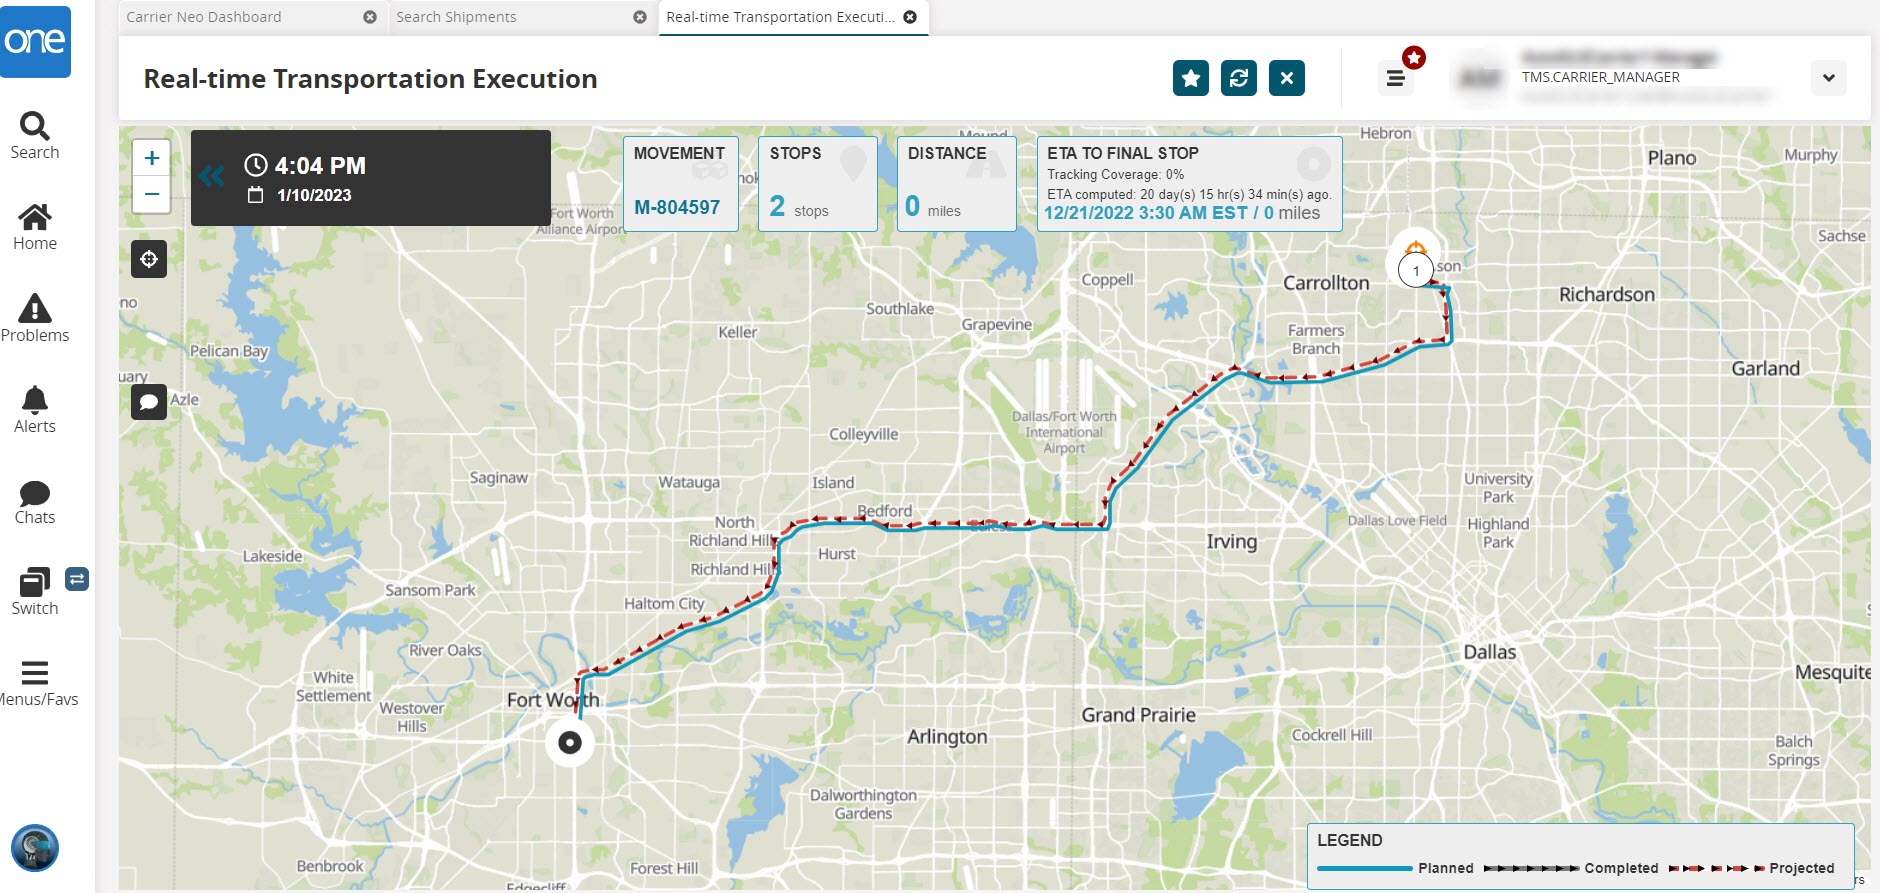
Complete the following instructions to access the map option from the In-Transit and Delivery Ready reports:
Click the link for the report on the Movement State Summary widget displayed on the Neo Dashboard for movements in the In-Transit or Delivery Ready state.
The report displays.
Click the blue contextual menu (blue triangle) for a movement, or click the checkbox for one or more movements and click the View On RTTEP button.
The Real-time Transportation Execution map screen displays the movements on the map.
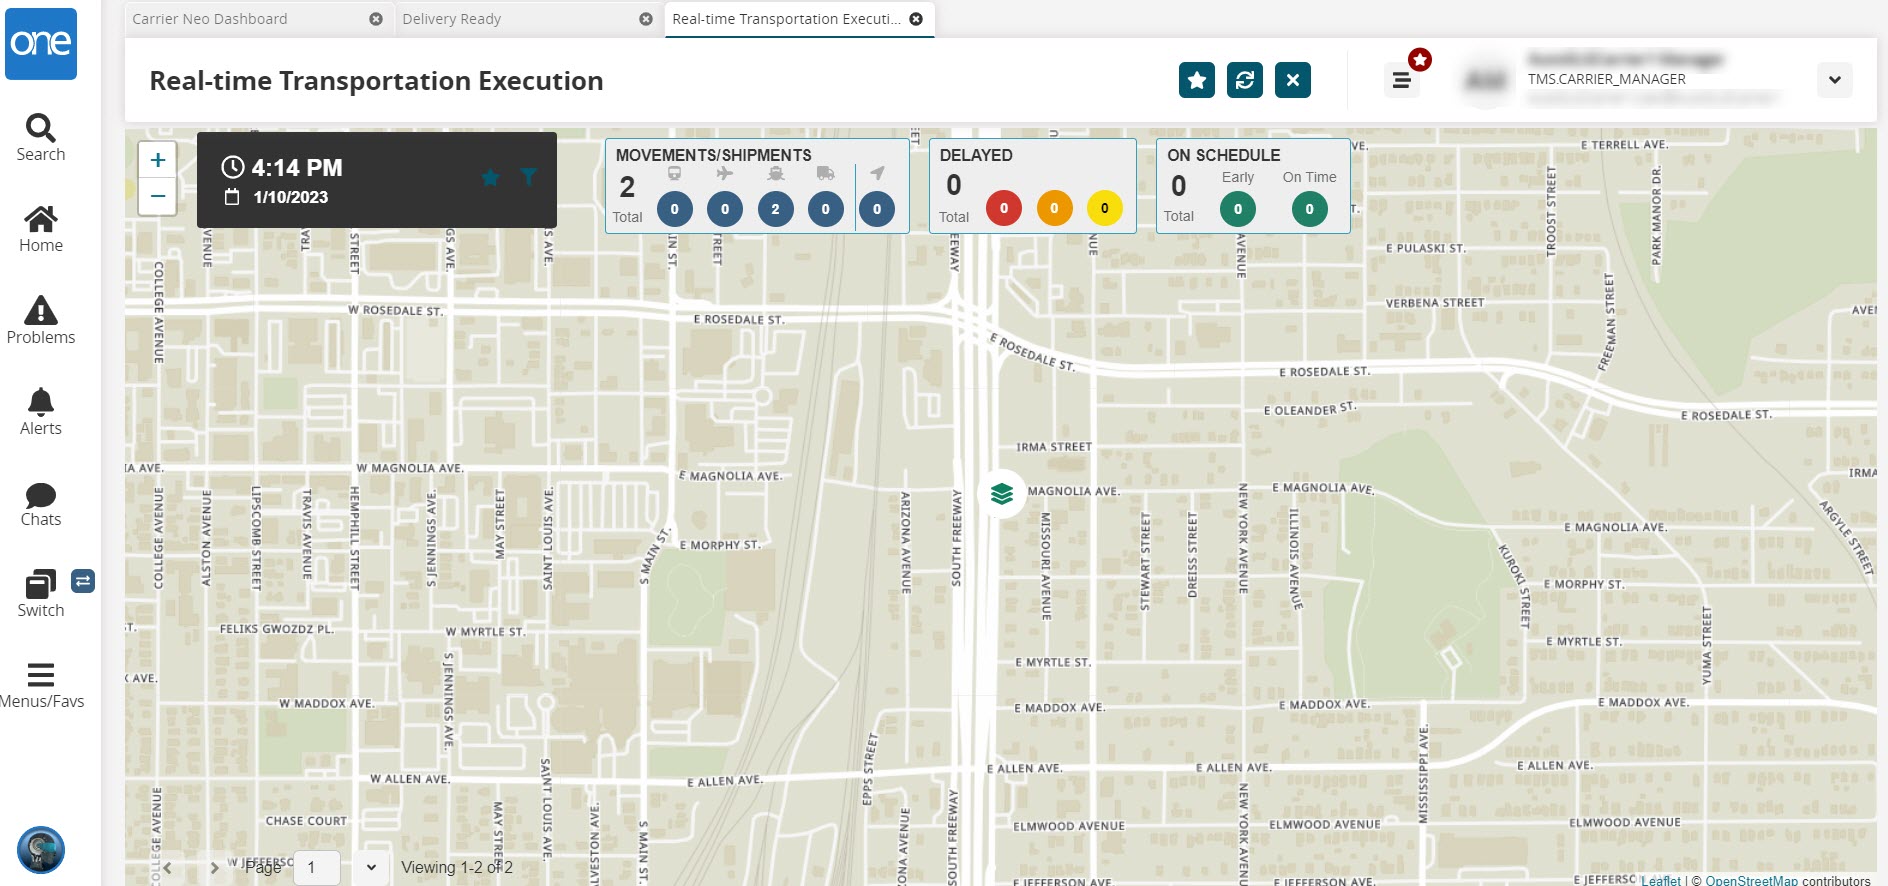
Complete the following steps to view the RTTEP map from the Movement Tracking screen:
Click the link for the report on the Movement State Summary widget displayed on the Neo Dashboard for movements in the In-Transit or Delivery Ready state.
The report displays.
Click the blue contextual menu (blue triangle) for a movement, and select the Movement Tracking option.
The Movement Tracking screen displays map icons for movements mapped in RTTEP.
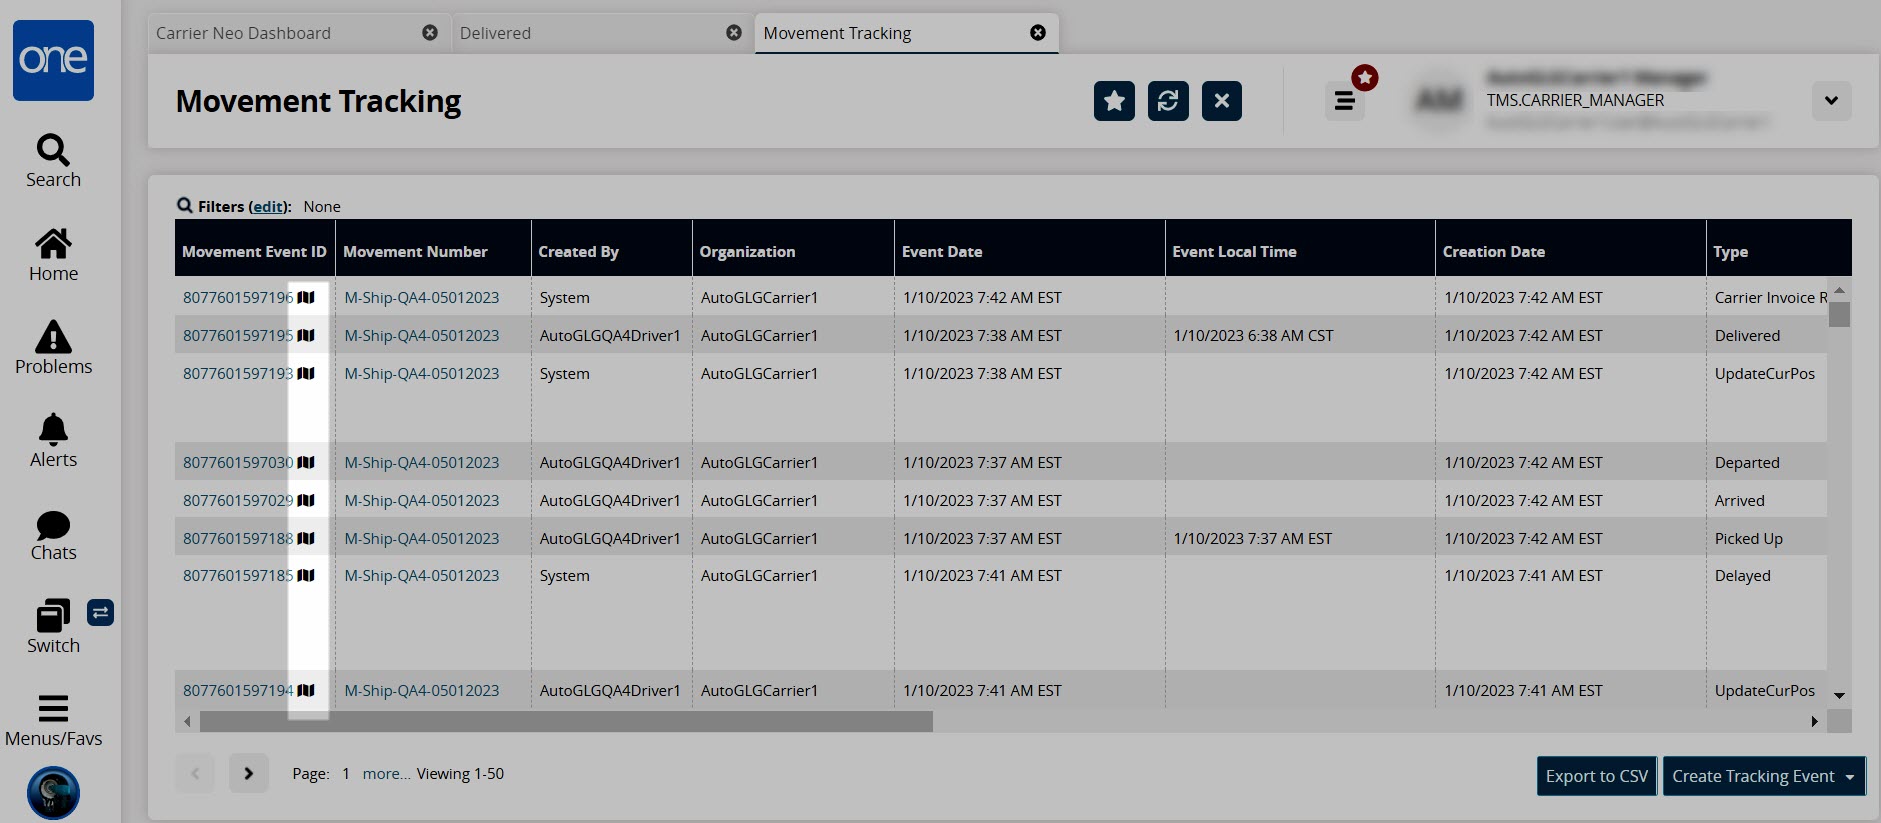
Click the map icon next to a movement event ID number.
The Real-time Transportation Execution map screen displays the movements on the map.
Driver Mobile App
Appointment Scheduling in the Driver Mobile App
Appointments in the Driver App
GLG offers drivers and carrier managers the ability to work with appointments in the Driver App. Users can work with scheduled, unscheduled, and live appointments, performing actions including viewing, searching, creating, rescheduling, and canceling. This enhancement gives users more permissions and flexibility within the app, so carriers can provide quicker response times to customers.
Creating Appointments
Users can work with scheduled, unscheduled, and live appointments, performing actions including viewing, searching, creating, rescheduling, and canceling. This feature gives users flexibility within the app to provide quicker response times to customers.
Complete the following steps to create appointments for stops on the Scheduled or Unscheduled tabs using the Live or Live/Drop links or the Calendar icon:
Open the ONE Driver App.
The application displays the user's dashboard.

Tap the main menu icon (three horizontal lines at the top right of the screen).
The main menu displays.
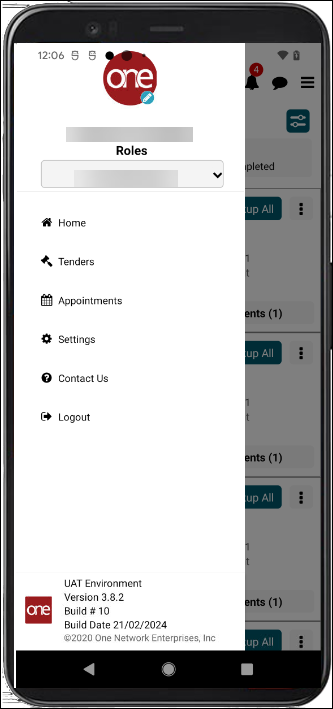
Tap Appointments.
The Appointments screen displays.
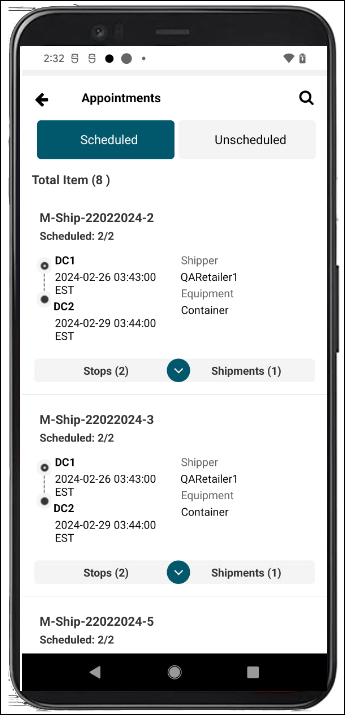
Tap the Stops tab to display stops for a movement and the stop's expansion arrow to display stop details.
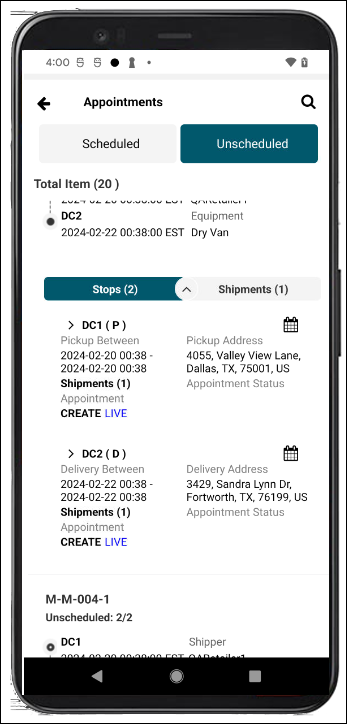
Tap the Live link or the calendar icon for a stop.
The Create Appointment screen displays.
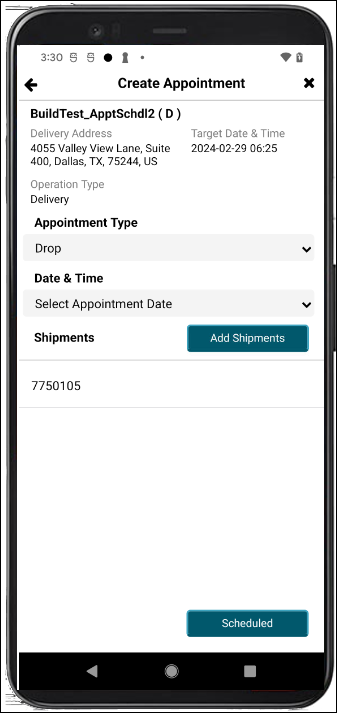
Select an option from the Appointment Type drop-down list.
Select an available appointment slot from the Date & Time drop-down list.
Tap the Add Shipments button.
The Add Shipments screen displays.
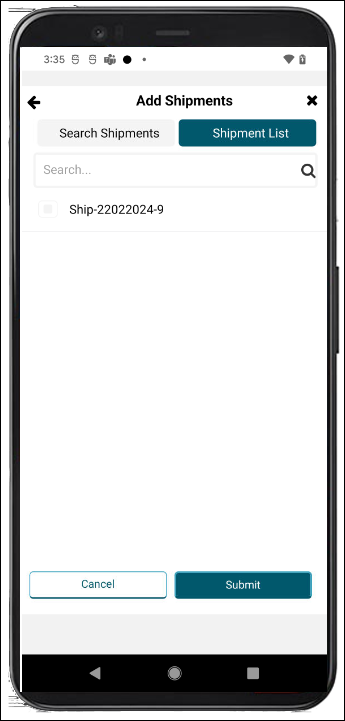
Enter shipment information in the Search field, and tap the Search icon.
The search results display.
Tap shipments to add them to the appointment.
Check marks display next to the selected shipments.
Tap the Submit button.
The shipments are added to the appointment, and the Create Appointment screen displays.
Tap the Scheduled button.
A green success window is displayed.
Tap the OK button.
The View Appointment screen displays the appointment details.
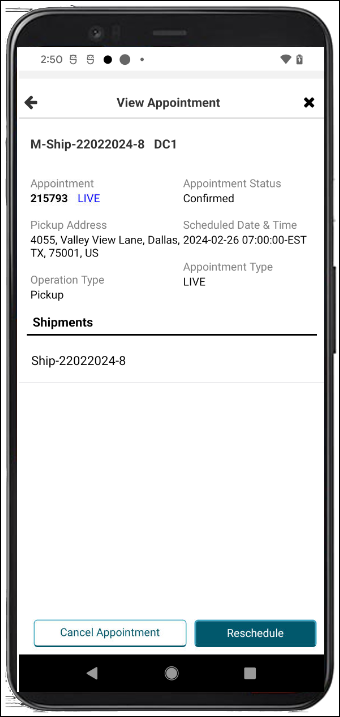
Viewing and Searching Appointments
Users can view and search scheduled, unscheduled, and live appointments. This feature gives Users flexibility within the app to provide quicker response times to customers.
Complete the following steps to view and search for appointments:
Open the ONE Driver App.
The application displays the user's dashboard.
Tap the main menu icon (three horizontal lines at the top right of the screen).
The main menu displays.
Tap Appointments.
The Appointments screen displays Scheduled and Unscheduled tabs.
Tap the Unscheduled tab.
Unscheduled appointments display.
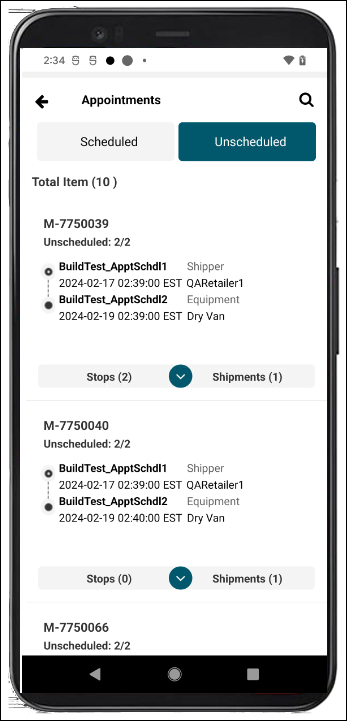
Tap the search icon.
A search field displays.
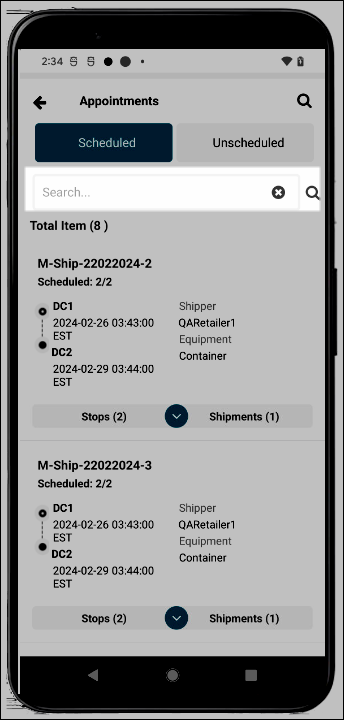
Enter movement/shipment information, and tap the search icon next to the field.
The search results display.
Tap the expand arrow to view stops and shipments, and tap the Stops or Shipments tab to view details.
All the same functionality is available on the Unscheduled tab.
Rescheduling Appointments
Users can work with scheduled, unscheduled, and live appointments, performing actions including viewing, searching, creating, rescheduling, and canceling. This feature gives users flexibility within the app to provide quicker response times to customers.
Complete the following steps to reschedule appointments or add a shipment to an existing appointment:
Open the ONE Driver App.
The application displays the user's dashboard.
Tap the main menu icon (three horizontal lines at the top right of the screen).
The main menu displays.
Tap Appointments.
The Appointments screen displays.
Tap the Stops tab to display stops for a movement and the stop's expansion arrow to display appointment details for the stop.
The appointment details display.
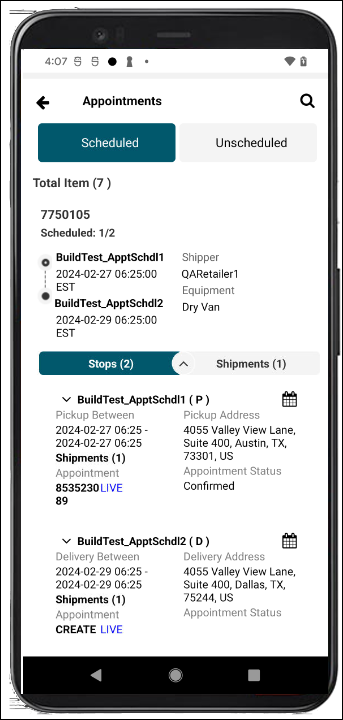
Tap the Live link or the calendar icon for a stop with an existing appointment.
The View Appointment screen displays.
Tap the Reschedule button.
The Reschedule Appointment screen displays.
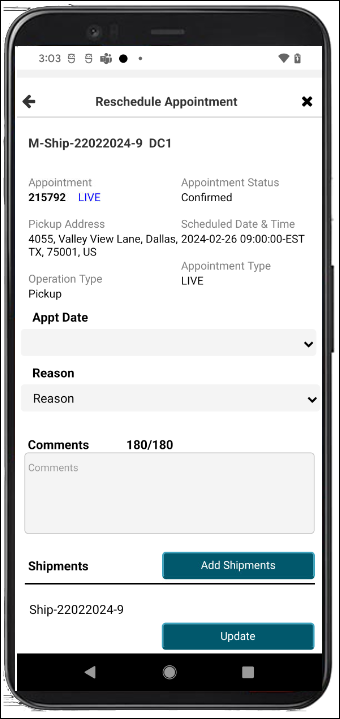
Select a date from the Appt Date drop-down list.
Select a reason from the Reason drop-down list.
Enter remarks or instructions in the Comments text box.
Tap the Add Shipments button to add shipments to the appointment.
Fields for adding a shipment display. See the instructions for creating appointments above for more information.
Tap the Update button.
A success window is displayed.
Tap the OK button.
The appointment is updated with the new information.
Canceling Appointments
Users can work with scheduled, unscheduled, and live appointments, performing actions including viewing, searching, creating, rescheduling, and canceling. This feature gives users flexibility within the app to provide quicker response times to customers.
Complete the following steps to cancel appointments:
Open the ONE Driver App.
The application displays the user's dashboard.
Tap the main menu icon (three horizontal lines at the top right of the screen).
The main menu displays.
Tap Appointments.
The Appointments screen displays.
Tap the Stops tab to display stops for a movement and the stop's expansion arrow to display appointment details for the stop.
The stop details display with the Appointment Status (Confirmed).

Tap the Live link or the calendar icon for a stop with an existing appointment.
The View Appointment screen displays.
Tap the Cancel Appointment button.
The Cancellation Reason window is displayed.
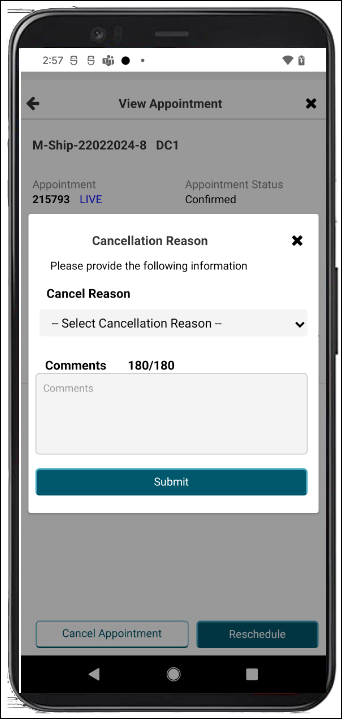
Select a reason from the Cancel Reason drop-down list.
Enter any remarks or instructions in the Comments text box.
A success window is displayed.
Tap the OK button.
The appointment is cancelled.
Basic User Functions in the Driver Mobile App
Download the ONE Driver Application
The following sections describe how to download the ONE Network Driver Application for iOS and Android.
Download Instructions for Android
Complete the following steps to download the ONE Network Driver Application for Android:
Open the Google Play Store application.
The Google Play Store home screen appears.
Enter "ONE Driver Application" in the search bar.
Find and tap the ONE Driver Application in the list of results.
Tap the Install icon.
The installation process initiates, and the app's icon displays on the phone's screen.
Download Instructions for iOS
Complete the following steps to download the ONE Network Driver Application for iOS:
Open the App Store application.
The App Store home screen appears.
Tap the Search bar, and enter "ONE Driver Application."
A list of results appears.
Find the ONE Driver Application in the list of results, and tap the Get button.
Depending on your personal iOS security settings, a download verification message may appear. The download initiates, and the app's icon displays on the phone's screen.
Request Username
Existing driver users can request to have their login username sent to them via email. This feature helps driver users retrieve their login information quickly and efficiently without waiting for assistance from production support. Driver users must have a user profile in the ONE system and be associated with this device.
Complete the following steps to request a forgotten username:
Open the driver app.
The ONE Network Driver App screen opens.

Tap the Username link at the bottom of the screen.
The Username Help screen displays.
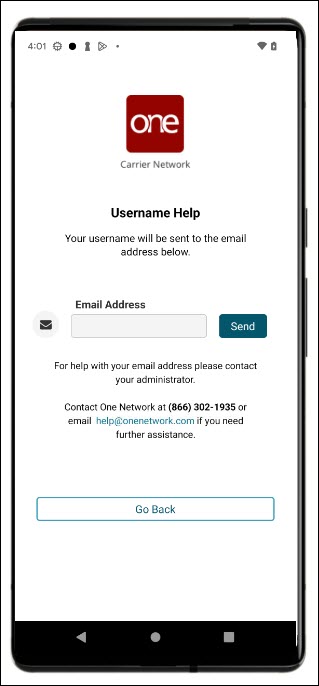
Enter your email.
Tap the Send button.
A success message displays, and the driver's username is sent via email.
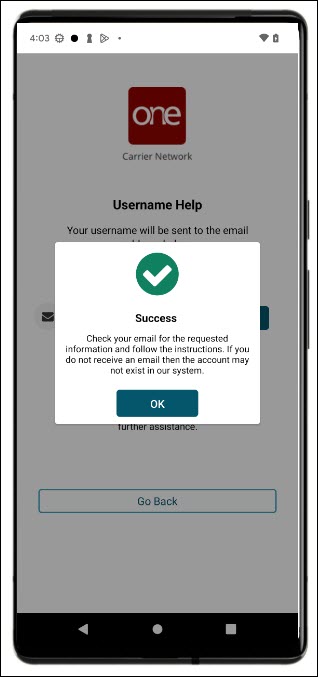
Tap the OK button, and fetch the username from the email.
Tap the Back To Login button to return to the login screen.
Enter the username and password to log in to the app.
If you did not receive an email, call One Network at (866) 302-1935 or email [email protected] for assistance.
Request Password
Driver users can request their password; they must have an existing profile with an email.
Complete the following steps to request a password reset:
Open the driver app.
The ONE Network Driver App screen opens.

Tap the Password link.
The Password Reset screen displays.
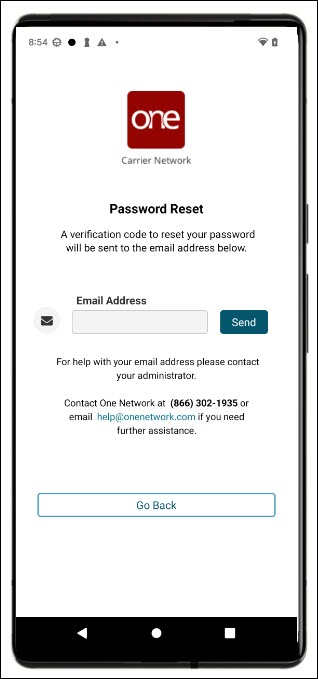
Enter your email address.
The email you enter must be on file with the system, or you will get an error message.
Tap the Send icon.
A message is sent with a link to the Password Reset screen via a text message or email. A success window is displayed.
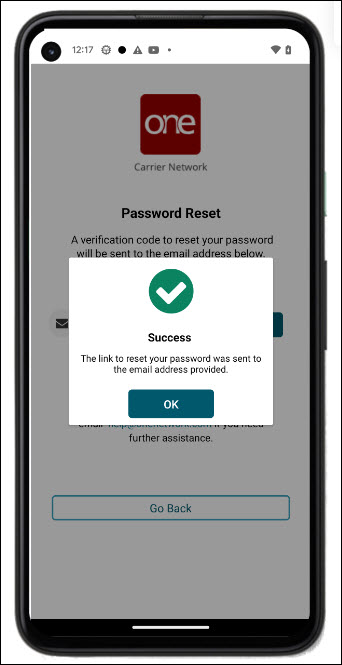
Tap the OK icon.
Open your email app, and tap the link in your email on your device sent from the ONE system.
The Change Password screen displays.
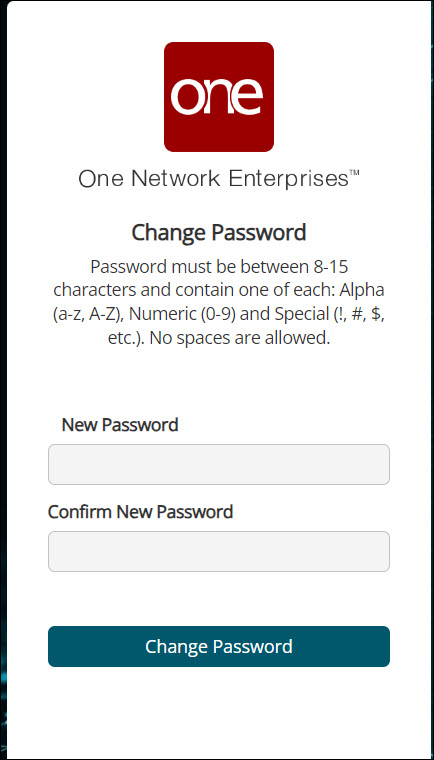
Type in your New Password.
Type in the new password in the Confirm New Password field.
Tap the Change Password icon.
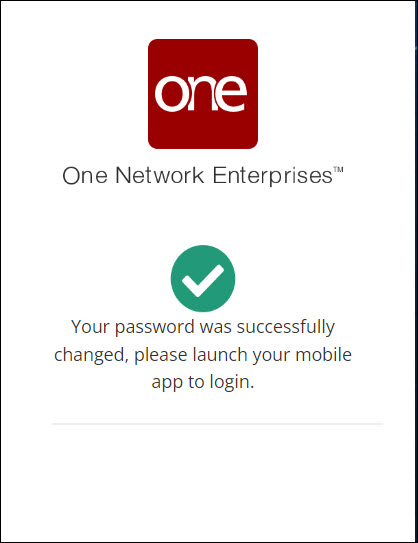
Return to the mobile app and log in using the new password.
Off-Network User Access
ONE provides access to off-network drivers who are users not affiliated with ONE and do not have an existing profile/email address) to provide more flexibility with carriers who are not onboarded with ONE. Off-network users can work with movements and non-controlled shipments.
Complete the following steps to log in to the driver app as an off-network user:
Open the driver app.
The ONE Carrier Network driver app opens at the login screen.
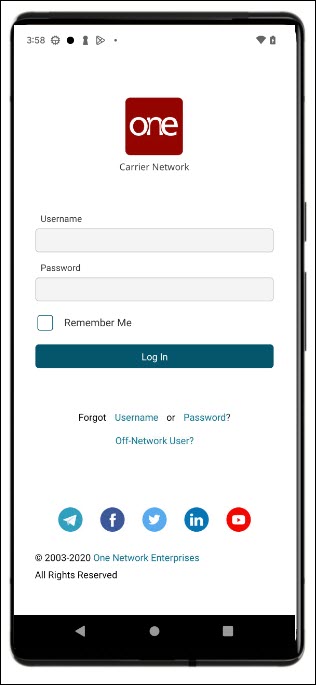
Tap the Off-Network User link.
A screen prompt for off-network users displays.
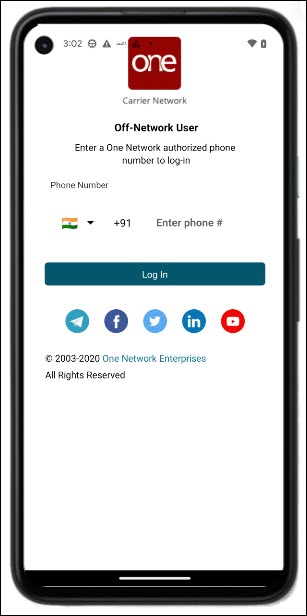
Select the country code from the drop-down list.
Enter the Phone Number.
Tap the Log In button.
The ONE system sends a text message with a verification code to the phone number that was entered. A screen prompts the user to enter the code.
Enter the code into the screen.
Note
The verification code has a time limit, and the screen displays a countdown.
Tap the Verify Verification Code icon.
The app displays the main dashboard. If the incorrect code is entered, the user sees an error message.
Tap the Resend Verification Code icon if you need a new code.
Driver Log In
Driver users log in to the ONE Network Driver App after it has been installed on their Android or iPhone.
Complete the following steps to log into the driver app:
Open the app.
The ONE Network Driver App screen opens.

Fill in the Username.
Fill in the Password.
Check the box for Remember me if this device is assigned to a dedicated driver.
Tap the Log In icon.
The driver is logged into the app.
User Settings
Users have a number of settings, including language selection, providing feedback, and more.
Complete the following steps use to explore options in the Settings menu:
Log in to the ONE driver app.
The dashboard displays.

Tap the main menu icon.
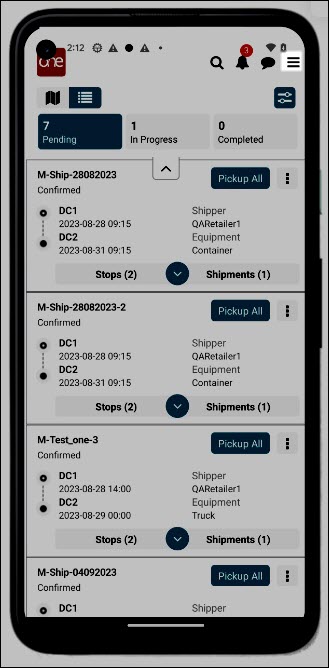
The main menu screen displays.

Tap the Settings option.
The Settings screen displays. (Tap the back arrow to return to the previous screen.)

Tap the Feedback option.
The Feedback screen displays.
Enter your *Email.
Enter Comments.
Tap a star for the Rating.
Tap the Send icon.
A success window is displayed.
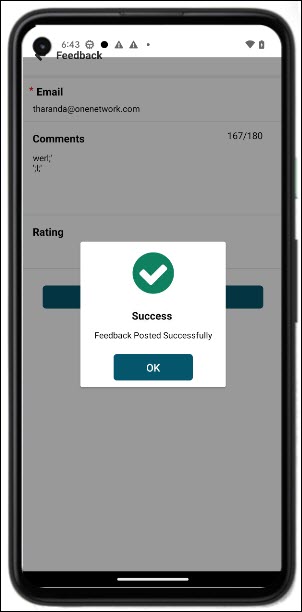
Tap the OK icon.
The Settings screen displays.
Tap the About us option.
The About us screen displays a short description of the ONE Network company.
Tap the back arrow (<) to return to the Settings screen.
Instructions for the remaining Settings options can be found in this guide in the following sections:
"Change Your Password"
"Set Preferred Language"
"Viewing Offline Records"
"Enabling Error Log Capture"
Change Your Password
Driver users can change their passwords from their user profile within the app when their password has expired or whenever they need to create a new password. Driver users must have an existing profile.
Complete the following instructions to change your password from the profile settings:
Log in to the driver app with your username and password.
TheONE Network Driver App main dashboard screen opens.

Tap the Menu icon (three horizontal lines/"hamburger" icon) at the top of the screen.
The main menu displays.
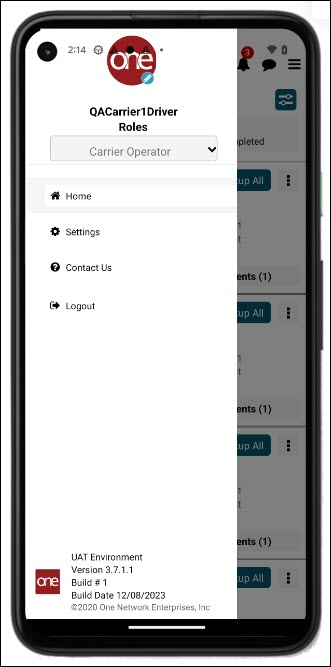
Tap the Settings option.
The settings menu displays.
Tap the Change Password option.
The Password Change screen displays.
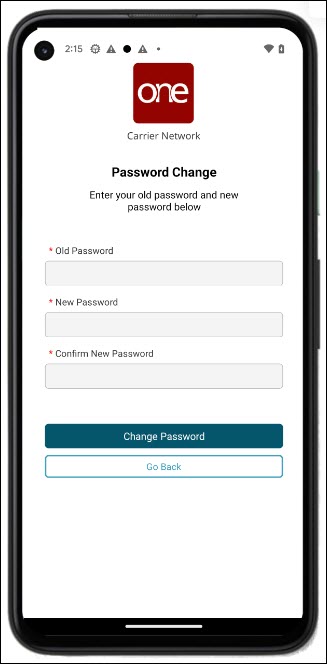
Field
Description
*Old Password
Enter your old password.
*New Password
Enter your new password.
*Confirm New Password
Enter your new password again.
Tap the Change Password icon.
The Password Change success window is displayed.
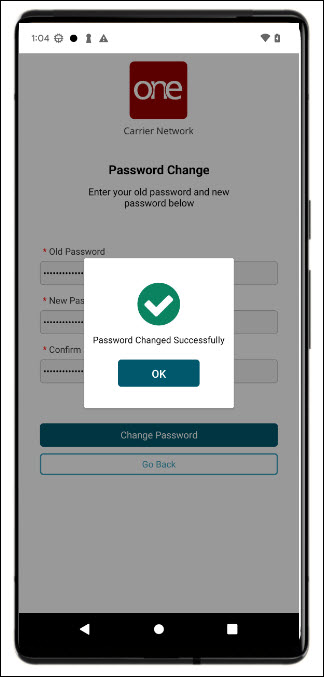
Tap the OK icon.
Tap the Go Back icon.
The login screen displays.
Type in your username and new password to log in to the app.
Set Preferred Language
Users can set their preferred language in the ONE Driver Mobile App.
Complete the following instructions to set your preferred language:
Log in to the driver app.
The dashboard displays.

Tap the Main Menu icon (three horizontal lines/"hamburger" icon).

The Settings menu displays.

Tap Language.
The Language screen displays.
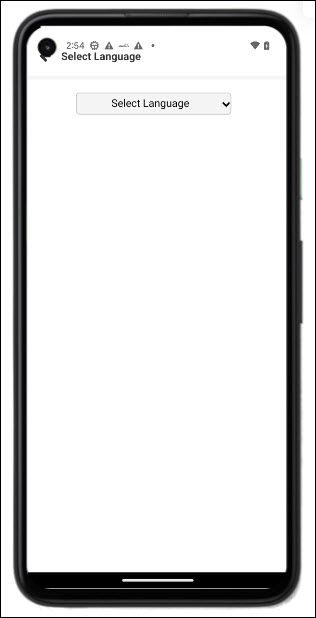
Select the preferred language from the drop-down list.
A success window is displayed.
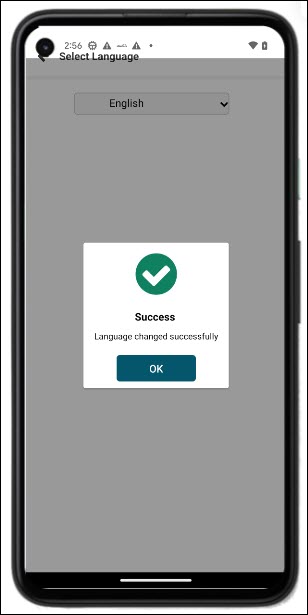
Tap the OK icon.
The selected language displays in the field.
Tap the back arrow (<) at the top of the Select Language screen.
The dashboard displays in the preferred language.
Enabling Error Log Capture
Users can enable an error capture from the driver app that expires in an hour. When the Error Capture function is enabled, an alert notifies the driver that the error log capture will be disabled after an hour. This enhancement provides the error log capture for enough time to capture any errors in a data log without overburdening the system with longer periods of data capture.
Complete the following steps to enable the error log capture in the driver mobile app:
Login to the Driver Mobile App.
Tap the main menu icon.

The main menu screen displays.

Tap the Settings option.
The Settings screen displays.

Tap the on/off switch to enable Error Log Capture.
A window is displayed.
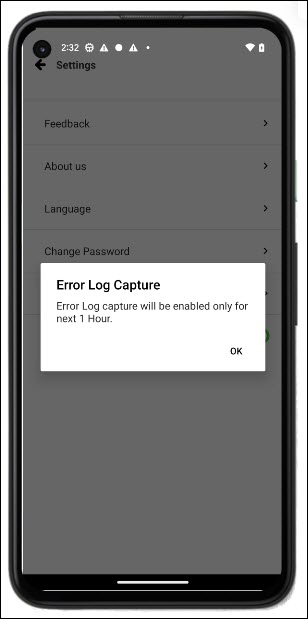
Tap the OK icon.
The error log capture turns off automatically in one hour.
Viewing Offline Records
In some circumstances, drivers may need to use the driver app while offline. In those cases, the records are stored in the app on the driver's device. When the driver has an internet connection again, they can sync the data.
Complete the following steps to sync data stored while offline:
Log in to the ONE driver app.
The dashboard displays.

Tap the main menu icon.

The main menu screen displays.

Tap the Settings option.
The Settings screen displays.

Tap Offline Records.
The Offline Transactions Report displays any records that have not been synced with the system.
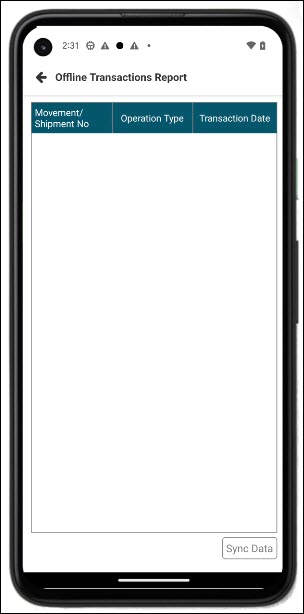
Tap the Sync Data icon to sync the records with the system.
A success message displays.
Tap the OK icon.
User Interface Basics
Views in the Driver App
Users have several views in the ONE Network Driver App to manage pickup and delivery of movements and shipments. The views include a list view with details for stops and shipments expanded or collapsed, as well as a map view. When users open the GLG driver app, the map view and list view are available options to view movements and shipments.
Please see specific sections in the ONE Network Driver App User Guide for instructions on how to use each of the views within the driver's workflow for pickup and delivery of movements and shipments.
List View
The list view is the default of the app dashboard. Users can view movements, shipments, and stops in any of the three movement statuses.
 |
Icon/Information | Description | ||
| Tap the icons for Map View and List View to toggle back and forth between the views. The Map View is shown below. | ||
 | Tap the movement status tabs to view movements within each status: Pending, In Progress, and Completed. The number on each tab indicates how many movements assigned to the driver are in that status. | ||
| Tap the scroll icon to scroll through the list of movements on any status tab. Drivers can also swipe up or down on the screen to move through the lists. | ||
| Tap the Stops and Shipments tabs to view stops and shipments assigned to the movement. The number indicates how many for each. | ||
| Tap the expand and collapse icons to show and view stops or shipments. | ||
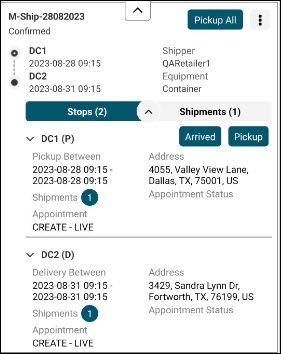 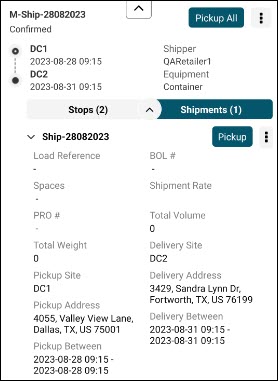 | Expanded stops and shipment details. |


For drivers that have been dispatched to a movement with multiple drivers, the driver app will display a green icon if they are the active driver and a red icon if they are an inactive driver for the movement.
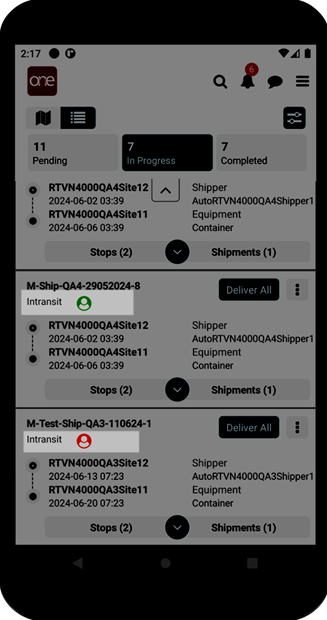
Map View
The map view is accessible from the main app dashboard, as shown below. As with other device apps, drivers can use one finger to move the map and two fingers (pinching inward or expanding) to zoom in and out of the map.
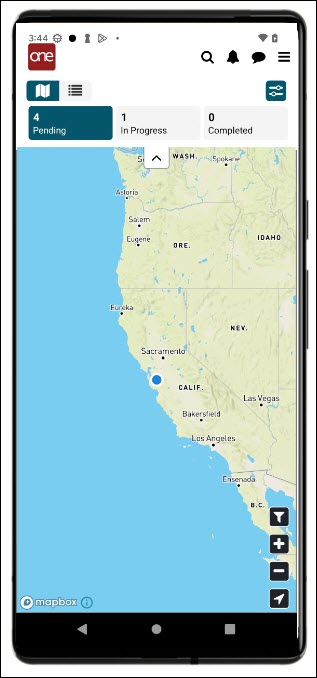 |
Icon/Information | Description | |
| Tap the funnel icon to filter and sort. Tap the plus (+) icon to zoom in. Tap the minus (-) icon to zoom out. Tap the arrow icon to recenter the map to the current position (of the driver/device). | |
| Tap a pin icon to view the movement number. |
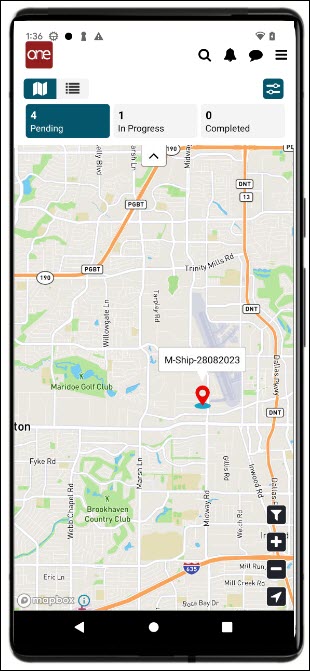
Main Menu
Users have a number of options available from the main menu.
Complete the following steps to access the settings menu:
Open the ONE drive app.
The dashboard displays.

Tap the main menu icon.

The main menu displays.

Tap the Home option to close the menu.
The dashboard displays.
Tap the Settings option to view the settings menu.
Please see "User Settings" section in this guide for specific instructions on options available under Settings.
Tap the back arrow (<) to return to the dashboard.
Tap the Contact Us option to contact ONE Network.
Email addresses and phone numbers for general information and technical support are provided.
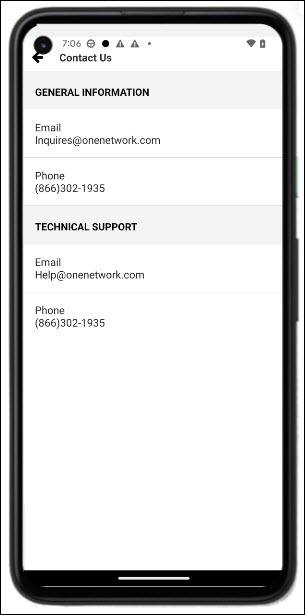
Tap the back arrow (<) to return to the dashboard.
Tap the Logout option to log out of the application.
The user login screen displays.
Applying Filters and Sorting
Drivers have the ability to filter in the map view and sort movements in the list view. Filter options for delivery times and distances from the next stop are presented on the map in red, orange, and black. In-progress and pending movements can be sorted by delivery times and distances from the next stop or pickup location. This feature allows drivers to visually access the status of movements quickly.
Complete the following steps to apply filters and sort movements:
Open the driver app.
The dashboard displays.
Tap the Filter Options icon.
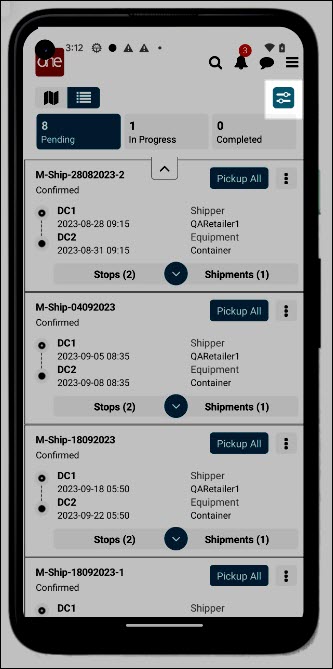
The Filter and Sort Options screen displays the Filters tab by default.
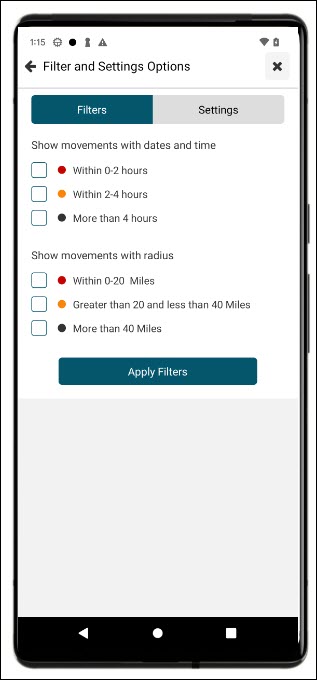
Tap the boxes for the different time windows and/or distances to display on the app screen.
Tap the Apply Filters icon.
The filters are applied.
Tap the Sorting tab.
The sorting options display.
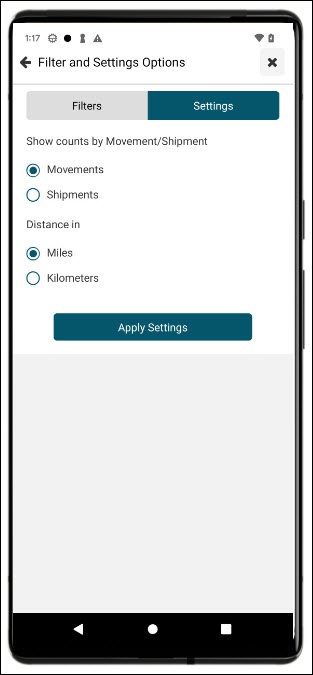
Tap the radio button to show counts for movements or shipments. This feature will change the display on both the map view and the list view to show movement or shipment counts.
Tap the radio button to sort by miles or kilometers.
Tap the Apply Settings icon.
The data displays based on the sorting options selected.
Global Search for Movements and Shipments
Users can perform a global search in the app for movements and shipments.
Complete the following steps to use the global search:
Log in to the driver app.
The dashboard displays.
Tap the search icon at the top of the screen.
The Global Search screen displays.
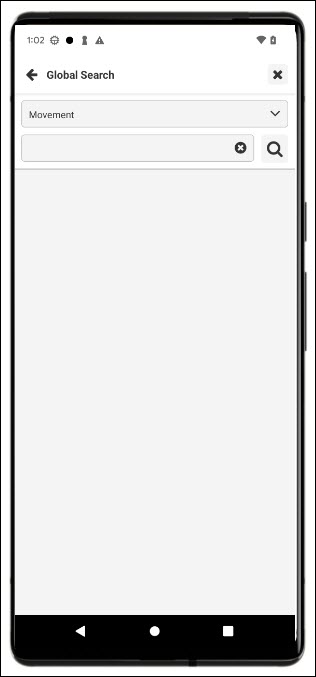
Select movement or shipment from the drop-down list.
Type in a value in the following field. Wild card characters (* for example) are allowed.
Tap the search icon.
Data results display.
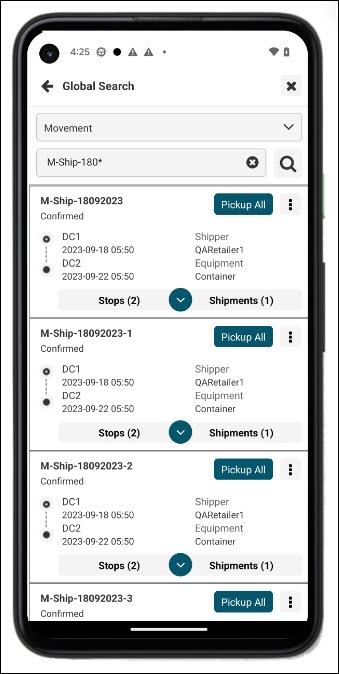
On-Screen Messages
The ONE Network Driver App includes several on-screen messages to assist users as they use the app to manage pickups and deliveries. These messages display without any actions from the user.
Please see below for examples of the messages.
In-app messages let the driver know when data is refreshed on their device.
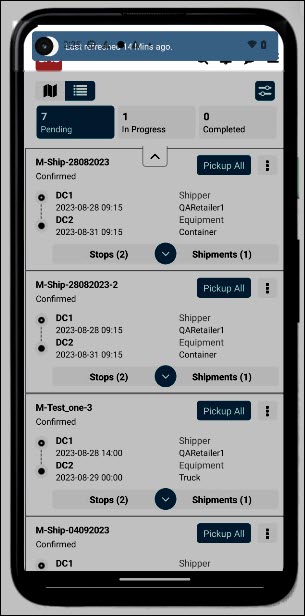 |
The following message indicates that the device has no internet connection. Updates to and from the device will occur when the internet is available again.
See "Viewing Offline Records" for more information on syncing records after the internet connection is restored.
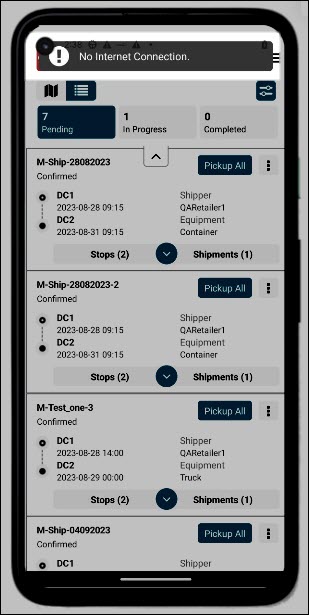 |
The GLG Mobile App provides an arrived/departed event notification based on geo fence parameters. If the driver enters or leaves the geo fence perimeter for a site, then the system sends a notification to the driver to confirm they have arrived or departed.
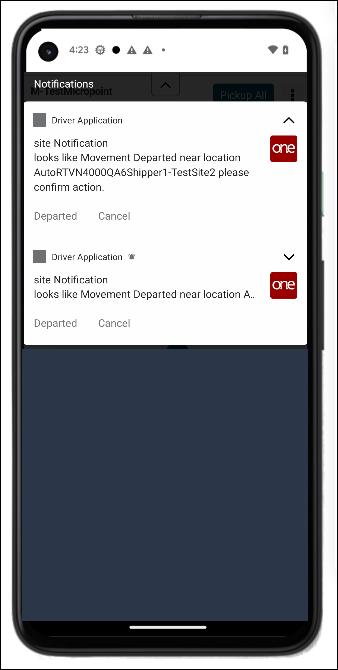 |
Creating Driver App Widgets on Your Device
Users can add widgets on their device home screen providing access to critical information without opening the app. Widget customization on the home screen is standard for iOS and Android operating systems. This feature helps drivers access specific information without navigating through the app, thus saving time and improving the user experience.
Users have the following widget options:
Small - Three available options show a single state count (Ex: pending count only).
Medium - One available option shows all states' counts.
Large - One available option shows all states as a snapshot of movement numbers and actions based on the tab selection.
The instructions below are based on steps from Apple and Android support pages at a the time of this release. Please see the following pages for specific phone support:
https://support.apple.com/
https://support.google.com/android
Complete the following instruction to add the new widgets to an iOS home screen:
Touch and hold a widget or an empty area from the home screen.
The app icons wiggle with a minus sign, and buttons display at the top of the screen.
Tap the Add button in the upper left corner.
The Search Widgets slideout displays.
Tap the ONE driver app widget, or type it into the Search bar.
The One slideout displays.
Swipe left or right to find a widget size, then tap Add Widget.
The home screen displays the new widget with the icons still wiggling.
Tap Done.
The widget displays on your home screen.
Complete the following instructions to add the new widgets to an Android OS home screen:
Touch and hold a widget or an empty area from the home screen.
The app icons wiggle.
Tap Widgets.
Find the ONE Driver Mobile App and tap the icon.
A list of widgets for the app displays.
Touch and hold a widget.
Images of your Home screen(s) display.
Slide the widget to where you want it located, and lift your finger.
Dispatching Drivers from the Mobile App
for Carrier Managers
Dispatching Movements to Drivers
Carrier managers can dispatch movements to drivers from the GLG Driver Mobile App.
Complete the following steps to dispatch movements to drivers:
Open the ONE Driver App.
The application displays the user's dashboard.
Tap the Actions icon for a movement.
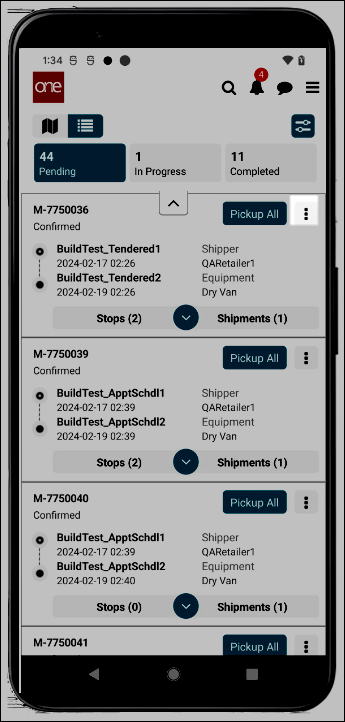
The Actions screen displays the actions available to the user for this movement based on their permissions.
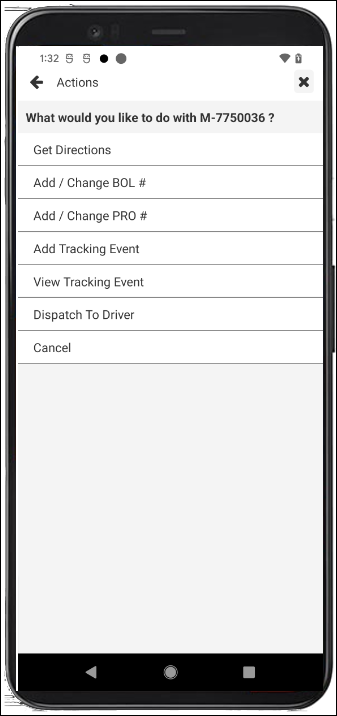
Tap Dispatch To Driver.
The Dispatch To Driver screen for the movement displays.
Tap the driver user names to select them.

Tap the arrow button.
A Success window is displayed.
Tap the OK button.
The movement is dispatched to the driver. Carrier mangers see the name of the active driver when movements are dispatched.
Tendering in the Driver Driver App
Tendering
Carrier managers can work with tenders within the Driver Mobile App, offering more flexibility to carrier tendering. The Tender screen is accessed from the main menu, where they carrier managers reject or accept tenders. They also have the ability to conditionally accept tenders that are enabled for spot bidding.
The Tendering screen includes three tabs (Available, Pending, and Accepted) that display tenders in those particular states. Carrier managers can track tenders as they move from state to state after accepting or conditionally accepting them. They can accept, conditionally accept, or reject tenders from the Available tab shown below.
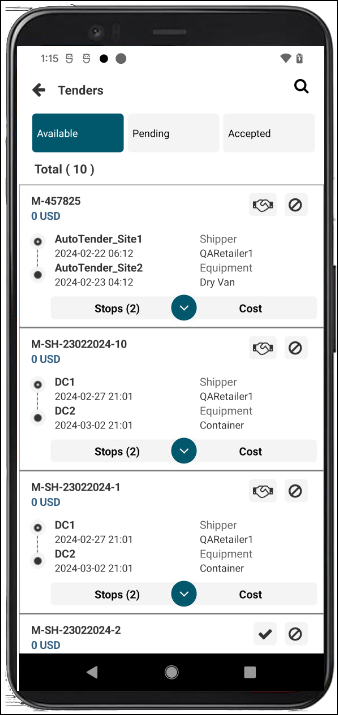
Accepting Tenders
The GLG Driver Mobile App offers carriers flexibility with the ability to view and perform actions on tenders in the field. Carrier managers access the Tender screen from the main menu, where they can accept tenders as outlined below.
Roles
Users with a Carrier Manager role can tender shipments in the mobile app.
Instructions
Complete the following steps to accept tenders:
Open the ONE Driver App.
The application displays the user's dashboard.
Tap the main menu icon (three horizontal lines at the top right of the screen).
The main menu displays.
Tap Tenders.
The Tenders screen displays. The Available tab displays tenders that can be accepted (check icon) or conditionally accept (handshake icon).
Tap the check icon next to a tender to accept it.

A warning window is displayed.
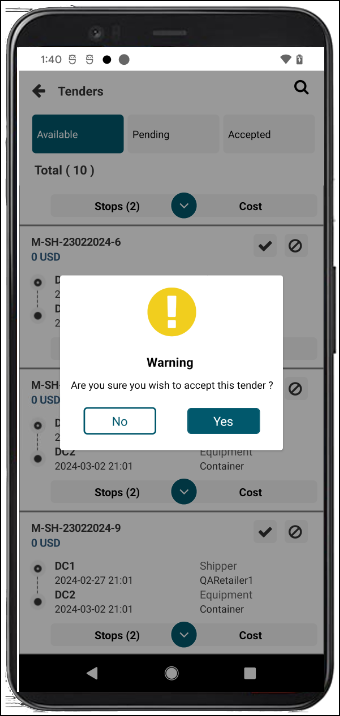
Tap the Yes button.
The screen refreshes, and a success window is displayed.
Tap the OK button.
The tender is now accepted and moves to the Accepted tab for reference.
Conditionally Accepting Tenders
The GLG Driver Mobile App offers carriers flexibility with the ability to view and perform actions on tenders in the field. Conditionally accepting a tender requires the carrier manager to provide parameters or conditions for accepting the tender. Carrier managers access the Tender screen from the main menu, where they can conditionally accept tenders enabled for spot bidding as outlined below.
Roles
Users with a Carrier Manager role can tender shipments in the mobile app.
Instructions
Complete the following steps to conditionally accept a tender in the mobile app:
Open the ONE Driver App.
The application displays the user's dashboard.
Tap the main menu icon (three horizontal lines at the top right of the screen).
The main menu displays.
Tap Tenders.
The Tenders screen displays. (Tap the Available tab if it does not display automatically by default.)
Tap the handshake icon next to a tender to enter parameters for conditionally accepting tenders.

The Conditionally Accept screen for the shipment/movement displays.
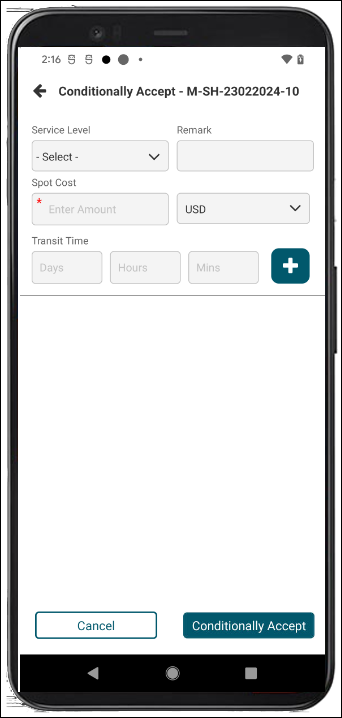
Field
Description
Service Level
Select the service level for the acceptance from the drop-down list.
Spot Cost *
Enter a numerical value for a spot cost in the first field, and select a country currency code from the drop-down list in the second field.
Transit Time
Enter Days, Hours, and Minutes as numerical values in the appropriate fields.
Remark
Add any comments, remarks, or instructions.
Tap the Add button (plus sign) to add additional condition sets of fields.
A new set of fields (as described above) displays.
Tap the trash can icon to delete any unwanted condition sets.
Tap the Conditionally Accept button.
A success window is displayed.
Tap the OK button.
The tender is conditionally accepted and moves to the Pending tenders tab where it stays until the customer of the movement/shipment accepts the new parameters.
Rejecting Tenders
The GLG Driver Mobile App offers carriers more flexibility with the ability to view and perform actions on tenders in the field. Carrier managers access the Tender screen from the main menu, where they can reject tenders as outlined below.
Roles
Users with a Carrier Manager role can tender shipments in the mobile app.
Instructions
Complete the following steps to reject a tender in the mobile app:
Open the ONE Driver App.
The application displays the user's dashboard.
Tap the main menu icon (three horizontal lines at the top right of the screen).
The main menu displays.
Tap Tenders.
The Tenders screen displays.
Tap the Reject icon (circle with a line) next to a tender.
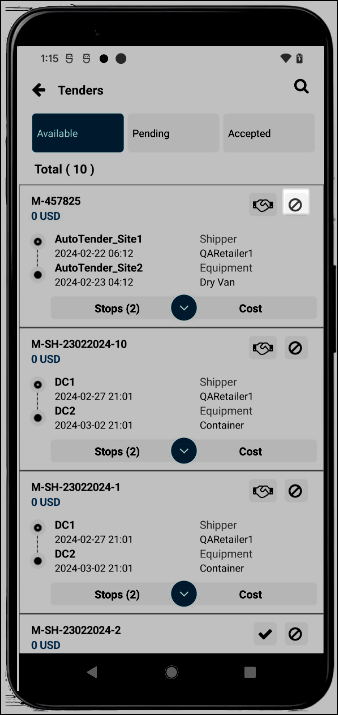
The Rejection Reason window is displayed.
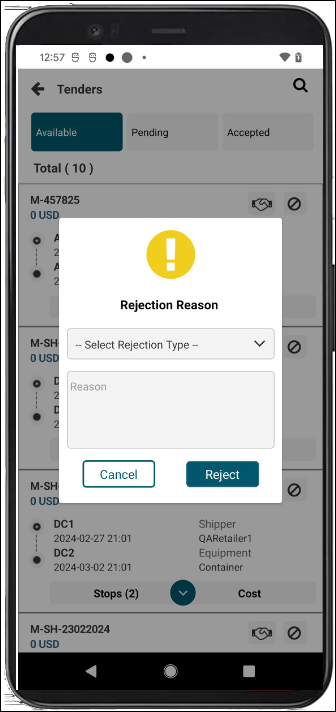
Select a rejection type from the drop-down list.
Enter comments in the Reason text box.
Tap the Reject button.
A success window is displayed.
Tap the OK button.
Viewing and Searching Tenders
The GLG Driver Mobile App offers carriers more flexibility with the ability to view and perform actions on tenders in the field. Carrier managers access the Tender screen from the main menu, where they can view and search tenders as outlined below.
Roles
Users with a Carrier Manager role can tender shipments in the mobile app.
Instructions
Complete the following steps to view and search tenders:
Open the ONE Driver App.
The application displays the user's dashboard.
Tap the main menu icon (three horizontal lines at the top right of the screen).
The main menu displays.
Tap Tenders.
The Tenders screen displays tabs with tenders.

Tap the tab (Available, Pending, and Accepted) to view the tenders in that state.
Tap the search icon at the top of the screen
A new search field displays.
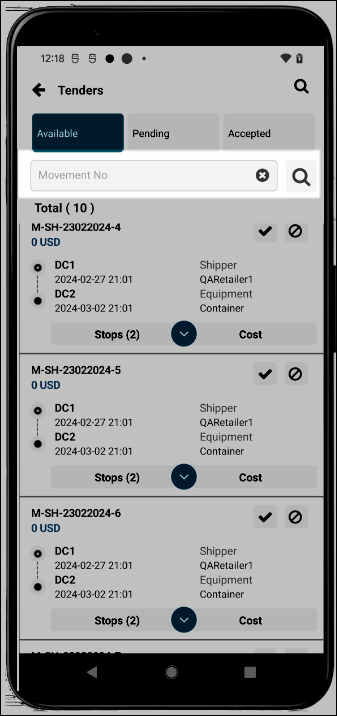
Enter a movement/shipment number, and click the search icon next to the field.
The search results display.
Supplier Services
Copyright © 2024 One Network Enterprises - A Blue Yonder Company
All rights reserved. Printed in the United States of America, 2024. No part of this document may be reproduced, stored in a retrieval system, or transmitted in any form or by any means, electronic, mechanical, photocopying, recording, or otherwise, without prior written permission of One Network Enterprises, Inc.
Published November 8, 2024
Supplier Services – Finished Goods Overview
The Supplier Services – Finished Goods product offers tools that significantly reduce the time spent on manual scheduling, decision-making, and collaboration with all of their buyers.
The services shown in this document are indicative of all the functionality and features available in the system. What features are available to you depends on the Services purchased by your Partner. Some of these features may require you to purchase additional services.
Logging in and Passwords
Changing a User's Authentication Method
The Change Authentication Method button is added to the user details screen for users in the Enterprise Admin role.
Complete the following steps to change your authentication method:
Log in as an Enterprise Admin.
Click Menus/Favs > Administration > Users or Menus/Favs > Administration > User > Search User
Note
For more information, see the "Searching Users" section in the current version of the NEO Online Help.
Click the username link under the User Name column.
The username details screen displays.
Click the Change Authentication Method button.
The Change Authentication Method window displays.
Select Use My Enterprise's Authentication Method or Use Authentication Method from.
For the Use Authentication Method from option, enter the enterprise name in the text field below.
Click OK.
A database transaction occurs, and the authentication method changes for the desired user.
Changing Your Password
Follow this process to change your password. See the "Resetting a Forgotten Password" section of this guide if you have forgotten your password.
Complete the following steps to change your password from the User Profile slide-out:
Click the User Profile button in the top right of the NEO UI dashboard.
The User Profile menu displays.
Click the Change Password link.
The Change Password dialog box displays.
Enter your current password in the Current Password field. (Click the Show link to display the password.)
Type a new password that follows the password rules in the New Password field. (Click the Show link to display the password.)
Re-enter the new password in the Confirm Password field. (Click the Show link to display the password.)
The Change Password button activates if all criteria have been met with check marks in the boxes.
Click the Change Password button.
The new password will be required upon the next login.
Logging in to NEO and Configuring the Sign-On Screen
Users have a single sign-on screen to log in to the ONE system, and the sign-on screen has configuration features. This sign-on screen is also known as the login screen.
Complete the following steps to log in to the One Network system and the NEO interface:
Type in the correct URL in a browser search bar. Typically, this is https://logon.onenetwork.com.
The ONE Network sign-on screen displays with audio and video features. Displays might vary.
Enter your username in the Username field.
Enter your password in the Password field.
Note
The Username and Password fields are case-sensitive. Enter uppercase and lowercase letters precisely.
Click the Log In button.
Some users are logged in to the ONE system. Some users see a selection of subnetworks, as shown below.
Click the Select button for your network.
Tip
For more information about each subnetwork, click the expansion arrow to the left of each subnet name.
The NEO dashboard assigned to your user role displays.
Complete the following steps to configure the sign-in screen:
Type in the correct URL in a browser search bar.
The ONE sign-on screen displays with audio and video features that play in a continuous loop.
Click the audio (speaker) icon.
The icon changes to show that the audio is turned off for the sign-on screen.
Click the video (camera) icon.
The video loop changes to a static picture of NEO. The audio and video selections remain the same until changed.
Logging out of NEO
Users can log out of ONE's NEO system through the User Profile panel.
Complete the following steps to log out:
Click the arrow button for the User Profile slideout, as shown in the screenshot below.
The slideout displays the user profile and settings options.
Click the Log Out option.
The Log Out confirmation window displays.
Click the Yes button.
The Logged Out screen displays.
Click the Return to Login button to log back in to the ONE system.
Log in to the ONE NEO System with a Temporary Password
When new users are created and when existing users need to have a forgotten password reset for them, a temporary password is sent to them.
Complete the following steps to log in as a user with a temporary password:
Go to https://logon.onenetwork.com/, and log in using the temporary password.
The system will prompt the user to set a new password.
Enter the temporary password in the Current Password field.
Enter a new password in the New Password and Confirm New Password fields.
The user can log in using the new password.
Resetting a Forgotten Password
If a user forgets their password, it can be reset from the login screen using the following procedure.
Users can also change their password after logging in to the One Network system. See the "Changing Your Password" section in the NEO Online Help for more information.
Complete the following steps to reset a password:
Type in the correct URL in a browser search bar. This is typically https://logon.onenetwork.com.
The ONE sign-on screen displays. Displays might vary based on the URL provided to customers or partners.
Click the Forgot Password link.
The Password Reset screen displays.
Enter your email address in the Email Address field.
Click the Send Email button.
The screen shows a Request Submitted message, and an email is sent to the address you provided.
Note
If you receive an error message stating, “No account exists for the provided email address,” please confirm you entered your email address correctly. Contact an administrator user for your company if you are having issues with your email address or if you do not remember your email address. They can check for it in the system.
If the email address you entered is associated with multiple user accounts, a Username field displays to enter your username.
Click the link provided in the email.
The Change Password screen displays.
Note
The link in the email expires after 24 hours and can only be used once. Once expired or used, the user must request a new password again.
Enter a new password that complies with the password security requirements in both the New Password and Confirm New Password fields.
Click the Change Password button.
The NEO dashboard established for the user displays. Each user is assigned a ready-made dashboard with the most common elements for their job requirements.
Some users may see a subnetwork screen similar to the screen shown below.
Click the Select button next to your subnetwork name.
The NEO dashboard established for the user displays
Setting a Password for New Users
First-time users receive an email inviting them to log in to the ONE Network system. This email provides links, computer requirements, and support information.
Complete the following steps to set a password as a new user:
Open the email sent by ONE Network.
Click the link to activate your account.
The Change Password screen displays.
Enter a password that meets the requirements provided on the screen in both the New Password and Confirm New Password fields.
Click the Change Password button.
The NEO dashboard established for the user displays. Each user is assigned a ready-made dashboard with the most common elements for their job requirements.
Some users may see a subnetwork screen similar to the screen shown below.
Click the Select button next to your subnetwork name.
The NEO dashboard established for the user displays.
Working with Menus
Click Menus/Favs on the left sidebar to display the menus.
Sub-menus will slide out to the right.
Click one of the submenu options.
The screen displays.
Using the Menu Search Bar
Users who are familiar with menus in their daily work may find it easier to use the menu search bar to get to a specific screen.
Complete the following steps to use the menu search bar:
Click Menus/Favs in the left sidebar of the NEO UI.
Click inside the Search Bar at the top of the slideout menu.
Type in a screen or report name.
The UI displays a list of menu items matching your entry in the search bar. The search is predictive, so partial matches yield results.
Click the name of the screen or report from the list.
The screen displays.
Switching Screens in the NEO UI
In the NEO UI, users may switch between open perspectives (screens) by clicking on the tabs at the top of the screen if they have turned on that setting. (See the "Edit User Settings" section of the NEO Online Help for more information.) If the tab setting is not in use or there are more screens open, users can use the Switch feature to view, move between, or close open screens. The instructions below assume that the user has current screens already open.
Complete the following steps to use and configure the screen Switch feature:
Click the Switch icon on the left sidebar of NEO.
The UI displays the slideout menu of active or open perspectives or screens. The list of screens is based on the current login session as screens do not save from session to session.
Note
If the user has just logged in, the icon is grayed out and inactive.
Click the name of the desired screen to switch to it.
The screen displays.
Click the Display Options button.
The Display Options dialog box displays.
Options for how the list of screens is displayed include
Order by last viewed - The last viewed screen/perspective remains on the top of the list and the rest are in order of last viewed.
Retain position - The order of the screens/perspectives is sorted based on when each was opened.
Click the radio button in front of the display option to select it.
Click the Apply button.
The list of screens reorders based on the selection.
Click the Reset button to return the sort order to the previous setting.
Click the X icon next to a screen/perspective name to close it.
Click the Close all previous perspectives button to close all screens/perspectives.
All the perspectives close.
Note
The number of active screens displayed on the Switch menu is limited to 12. User preferences for the number of screens listed (up to 12) can be adjusted. See the "Edit User Settings" in the NEO Online Help for more information.
Using the Frequently Visited Menu
Frequently visited reports and views (screens) are compiled in the NEO UI in the Frequently Visited menu.
Complete the following steps to find a frequently visited screens:
Click Menus/Favs > Frequently Visited.
A list of the user's most frequently visited screens display.
Click the name of the report or view.
The screen displays.
Accessing NEO Online Help Documentation
Complete the following steps to access NEO documentation and the NEO Online Help:
Click Menus/Favs > Quick Links > Documentation.
The NEO Online Help displays.
Click the magnifying glass icon in the top right to display the search field to locate information.
Alternatively, click the arrows to expand the left navigation topics, and click the topic desired.
Note
The version of the NEO Online Help and any other documentation provided from this screen is custom to each organization.
Screen Switching
Complete the following steps to configure the Screen Switcher:
Click the Switch icon on the left sidebar of NEO.
The UI displays the slide-out menu of Active Screens (perspectives). The list of screens is based on the current login session; screens do not save from session to session. If the user has just logged in, then theSwitchmenu is cleared, and the icon is grayed out and inactive.
Click the Filter Options button.
The UI displays the Switcher Display Options dialog box.
Options for displays of the screens include:
Order by time opened - The longest opened screen/perspective remains on the top of the list.
Retain position when opened - The order is based on what screen/perspective the user viewed last.
Click the radio button in front of the option to select it.
Click the Apply button.
The list of screens reorders based on the selection.
Click the Close all perspectives link to close all screens/perspectives.
All the perspectives close.
The number of active screens displayed on the Switch menu is limited to 12. User preferences for the number of screens listed (up to 12) can be adjusted in User Settings.
Viewing Keyboard Shortcuts
The NEO UI comes with keyboard shortcuts to help users work more efficiently.
Complete the following steps to display commonly used keyboard shortcuts:
Click Menus/Favs > Quick Links > Keyboard Shortcuts.
The Keyboard Shortcuts Help dialog box displays.
Click the X or press the Escape (Esc) key to close the window.
User Management
Creating and Editing a Role
GLG Carrier Manager users can create roles (role types) for other users in the system. The following instructions define permissions and views for the roles, and then users are added to the role.
Complete the following steps to create a role:
Click Menus/Favs > Administration > Roles.
The Roles screen displays.
Click the Name link to edit it.
The role's details page displays where users can edit the existing role's information. See the following steps and the pages for each tab for more information.
Click the Add Role button to add a new role.
The Add Role screen displays.
Enter the *Name for the new role. Fields marked with an asterisk (*) are required. This will be the role's name that users can be assigned to.
Select a role type from the *Type Name drop-down menu.
Click the Add button.
The Select Users window displays.
Check the box to select users who can perform this role.
Click the OK button.
The users are added to the Add Role screen in the Users table.
A green success bar displays, and tabs with defining properties display.
Different client users/roles may have different permissions and may or may not be able to perform all functions.
Click a tab to continue to define the role's definitions and properties.
Each tab after the General tab is described in its own section in the NEO Online Help.
Adding a User
ONE Network users with the proper credentials have the ability to add users to the system. Part of this process includes assigning a role to the user profile; a role is a predetermined set of rights and privileges.
Complete the following steps to add a user:
Click Menus/Favs > Administration > Users as a Transportation Manager role.
The Users screen displays.
Click the Add User button.
The New User screen displays.
Field
Description
*Enterprise Carrier
This field is auto-populated based on the enterprise of the user.
Address
Type in the address.
*Name
Type in the user name.
*First Name
Type in the first name.
Business Phone
Type in the business phone number.
Middle Initial
Type in the middle initial.
Business Fax
Type in the business fax number.
*Last Name
Type in the last name.
Mobile Phone
Type in the mobile number.
*Email
Type in the email.
External Identity
Type in the external identity.
Active
Check the box to make the user active or inactive.
Person
Use the picker tool to select the person associated with this user.
Add Roles
Use the picker tool to select a role associated with this user. The table will populate upon selection. A user may have multiple roles. Roles can be deleted after they've been added by selecting the role and clicking the Delete Role button.
Admin users have several roles to choose from when assigning roles to a new user depending on the actionable rights and privileges appropriate for the new user.
Carrier Transportation Manager - The Manager role is designed to perform administrative functions for the carrier company. This user can manage users (view/add/delete), view/create roles, view/create regions and lanes, manage Geo permissions, set up auto-accept for tendering, view/accept/reject tenders, view shipments, view/add tracking events, view/schedule/reschedule/cancel appointments, view claims, create/view invoices, and view all available carrier reports.
Carrier Transportation Coordinator - The Coordinator role can view/accept/reject tenders, view/add tracking events, view shipments, view selected reports, and schedule/reschedule/cancel appointments.
Carrier Transportation CSR (Customer Service Representative) - The CSR role supports customers as a view-only user with rights to view selected reports and view shipments in selected states.
Carrier Transportation Operator - The Operator role is designed to equip operators or drivers who are required to provide shipment status updates via the ONE Network mobile app. A user with the Operator role may only access shipments that are dispatched to that user within that carrier company. This user can provide status updates on dispatched loads, enable GPS tracking, and provide Proof of Delivery (POD).
Adding Geo Permissions to a Role
Complete the following steps to add geo permissions to a role:
Click Menus/Favs > Administration > Role.
The Roles screen displays.
Under the Name column, click a Role link.
The role's screen displays.
Click the Geo Permissions tab.
The Geo Permissions tab displays.
Click the Add button.
The Select Geo Lane window dialog box displays.
Click the checkbox in front of the lane to be added.
Click the OK button.
The lane is added to the role.
Creating a Public Profile
Carriers who operate in ONE Network have the ability to work with multiple ONE Network Customers (Shippers). Carriers can leverage a single ONE Network Carrier enterprise account to collaborate with multiple customers and, therefore, enable global visibility of transportation operations in ONE Network.
To receive partnership requests from Shippers in One Network, you must first have a Public Profile. Companies can have multiple Public Profiles to represent various operating groups within their company. ONE Network Carriers should all have default public profiles that are published when they join the Network. The default Public Profile can be edited to suit your company's needs.
Complete the following steps to create a public profile:
Click Menus/Favs > Administration > Public Profile.
The Public Profile screen displays.
Click the Add New Public Profile button.
The Add New Public Profile screen displays.
Field
Description
*Org Type
Select the Organization Type from the drop-down menu.
*Contact First Name
Type in the contact's first name.
*Contact Last Name
Type in the contact's last name.
*Contact Email
Type in the contact's email address.
Image Attachment
Click on the Upload link to upload an image attachment.
Profile
Type in profile information about the contact.
Active
Check the box to indicate an active profile.
Creating Regions and Lanes
Complete the following steps to create regions and lanes:
Click Menus/Favs > Administration > Regions and Lanes.
The Regions and Lanes screen displays.
Click the Add Region button.
The New Region screen displays.
Fill in the *Name and Description fields.
The screen for your new region displays.
Click the Add button.
The lane definition fields display.
In the *Pattern field, select a value from the drop-down list.
Different values from the drop-down list determine the list of fields below it, as shown below.
Click the Add button.
The lane information displays.
Deleting Users
Complete the following steps to delete a user:
Click Menus/Favs > Administration > Users.
The Users screen displays a list of users.
Click the X next to the user to be deleted.
A window displays.
Click the Yes button.
A deactivation window displays.
Click the OK button.
Accepting a Partnership Request
Complete the following steps to accept a partner request:
Click Menus/Favs > Administration > Partner Invitations.
The Partner Invitations screen displays.
Click the Incoming tab.
A list of invitations displays.
Click the checkbox next to the invitation to be accepted.
The Accept and Reject buttons activate.
Click the Accept button.
Switching Roles
A user role controls the permissions and types of actions users can perform and data they have access to. Users can have multiple role types assigned to them, but they can use only one role at a time, like the Carrier Manager role. Although users are limited to using a single role at a time, they can switch to a different role at any time.
Complete the following steps to switch roles:
The dashboard displays.
Click the down arrow in the top right-hand corner of the NEO UI.
The user profile settings slideout displays.
Click the Change Role button.
The Select Another Role window is displayed.
Click the radio button to select a new role, and click the Change Role button.
The screen refreshes with the new role.
Viewing and Updating User Profiles
Complete the following steps to view and update user profiles:
Click Menus/Favs > Administration > Users.
The Users menu displays.
Click the User Name link.
The user profile screen displays.
Update information as necessary and click the Update button.
Working with Dashboards
Users can use dashboards to visualize and monitor data in real-time. Each user can define and configure multiple dashboards suited to meet the needs of the different aspects of their daily tasks and workflows.
Creating Additional Dashboards
Users can create up to five additional dashboards.
Complete the following steps to create an additional dashboard:
Click the New Dashboard button.

The New Dashboard window displays.
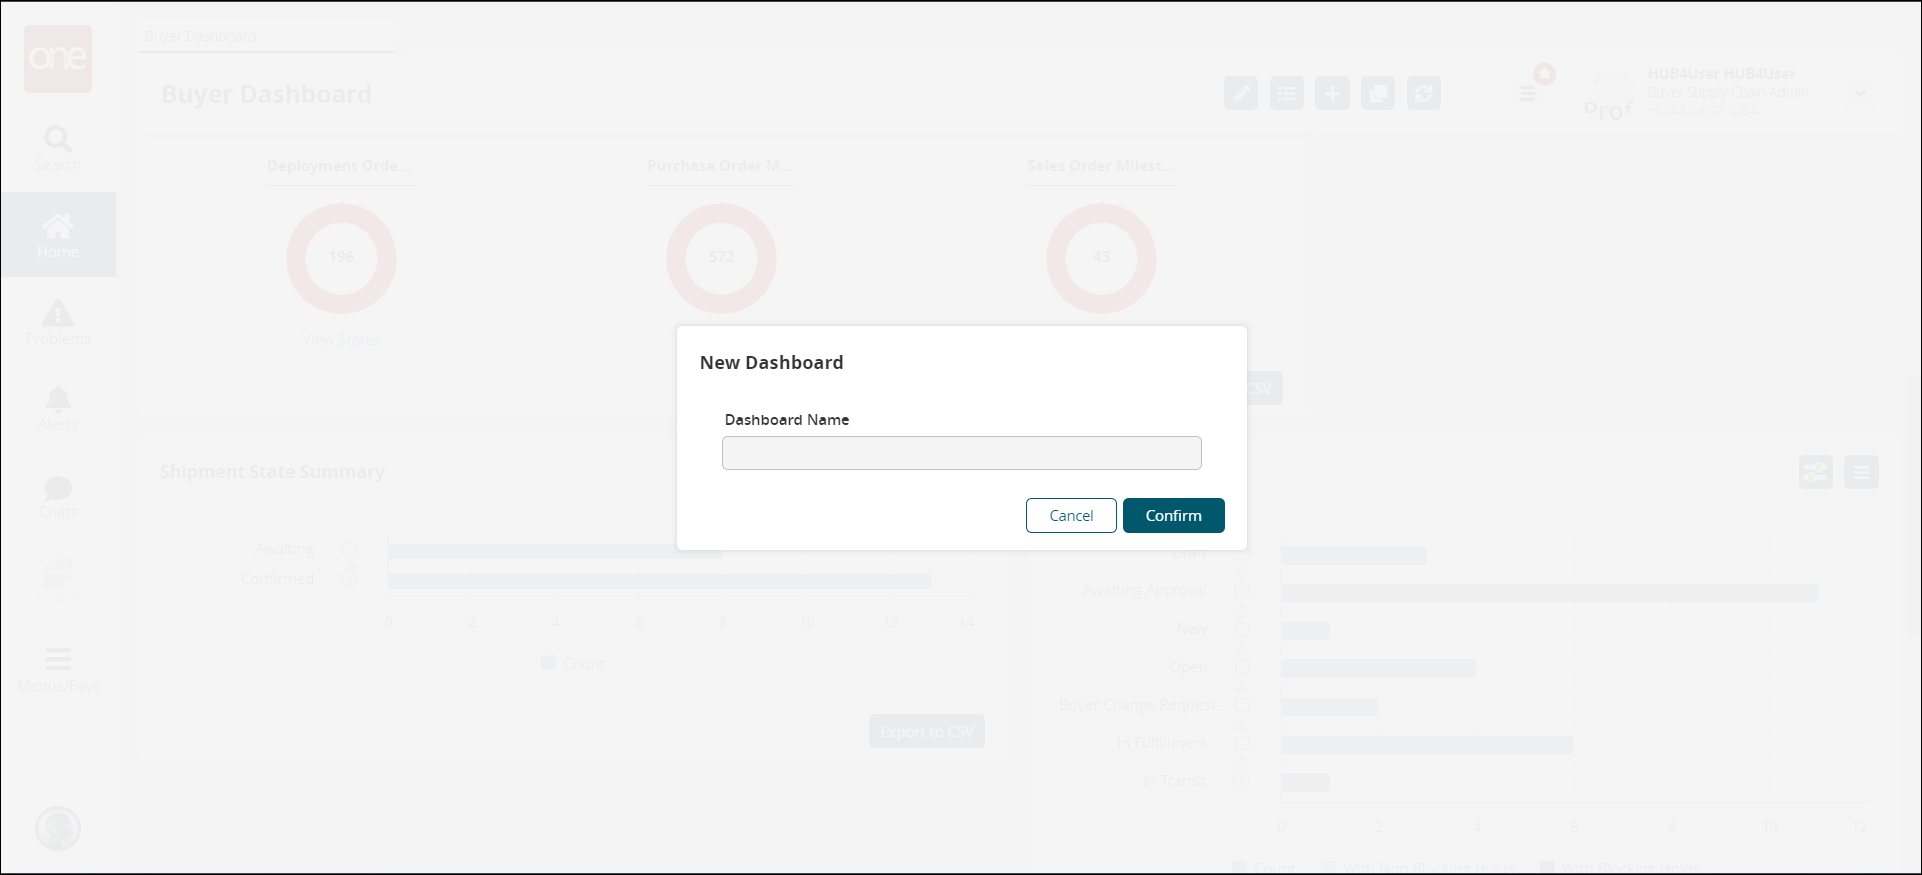
Type in a name for the new dashboard.
Click the Confirm button.
The new dashboard displays and can be configured with widgets.
See the "Customizing NEO Dashboard Layouts" and "Adding Widgets" sections for more information.
As an alternative, click the My Dashboards button.
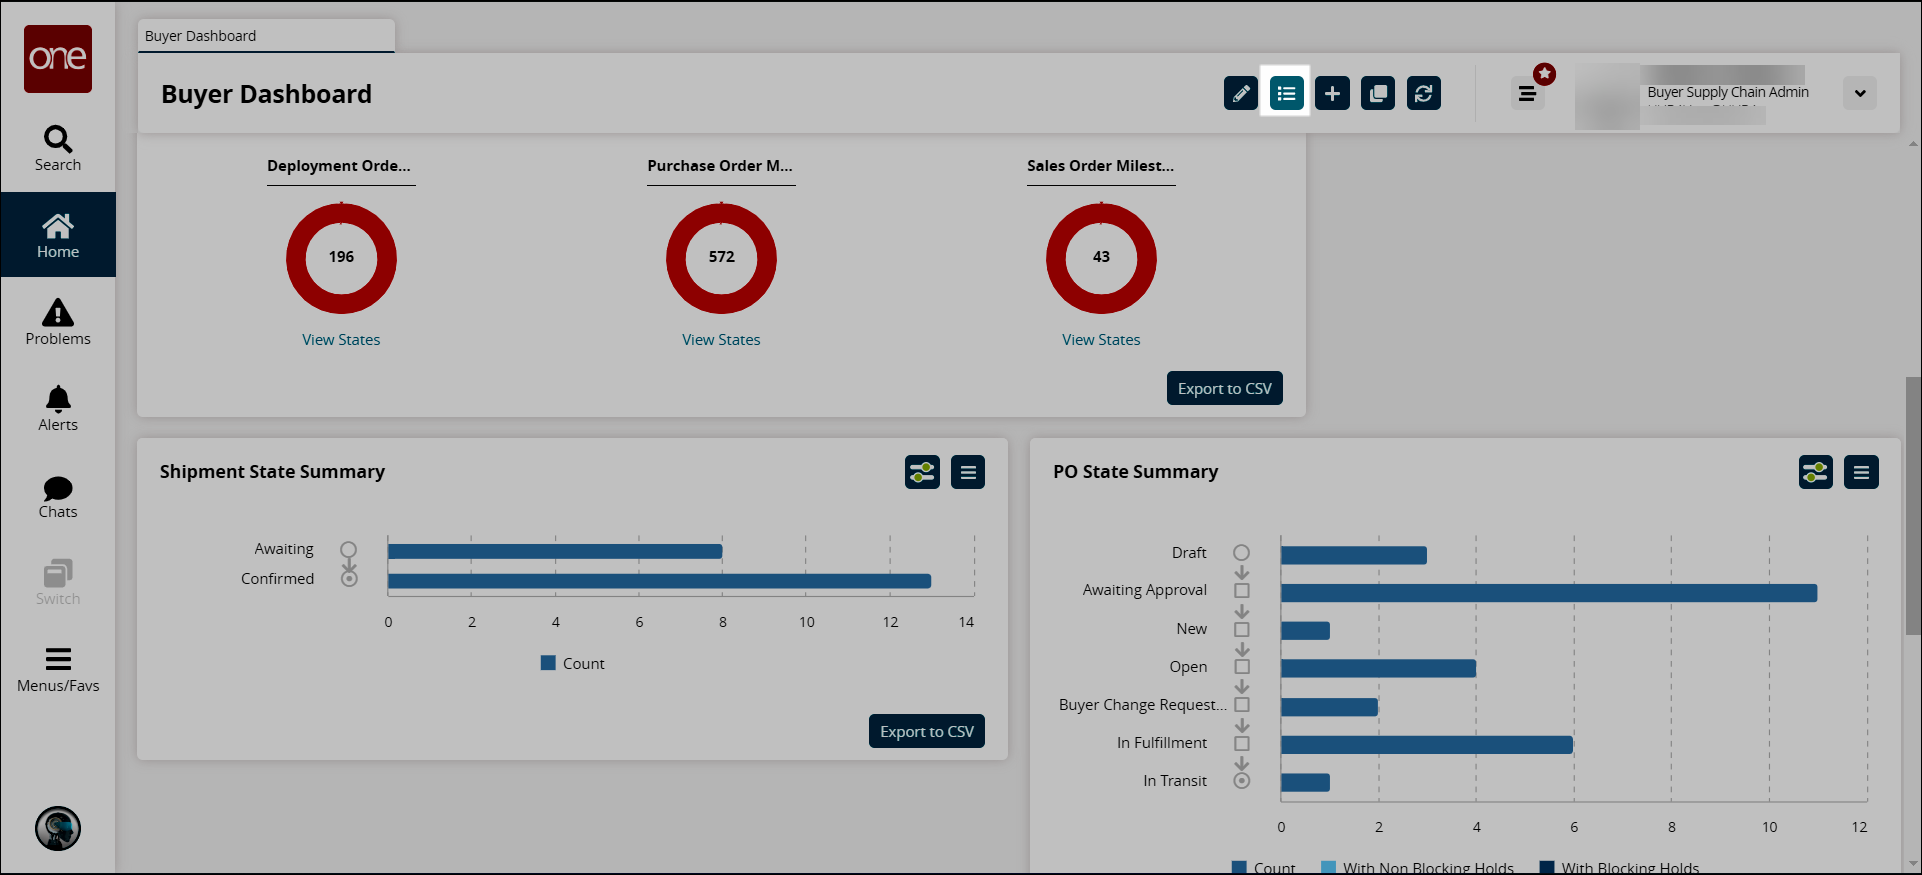
The My Dashboards window displays.
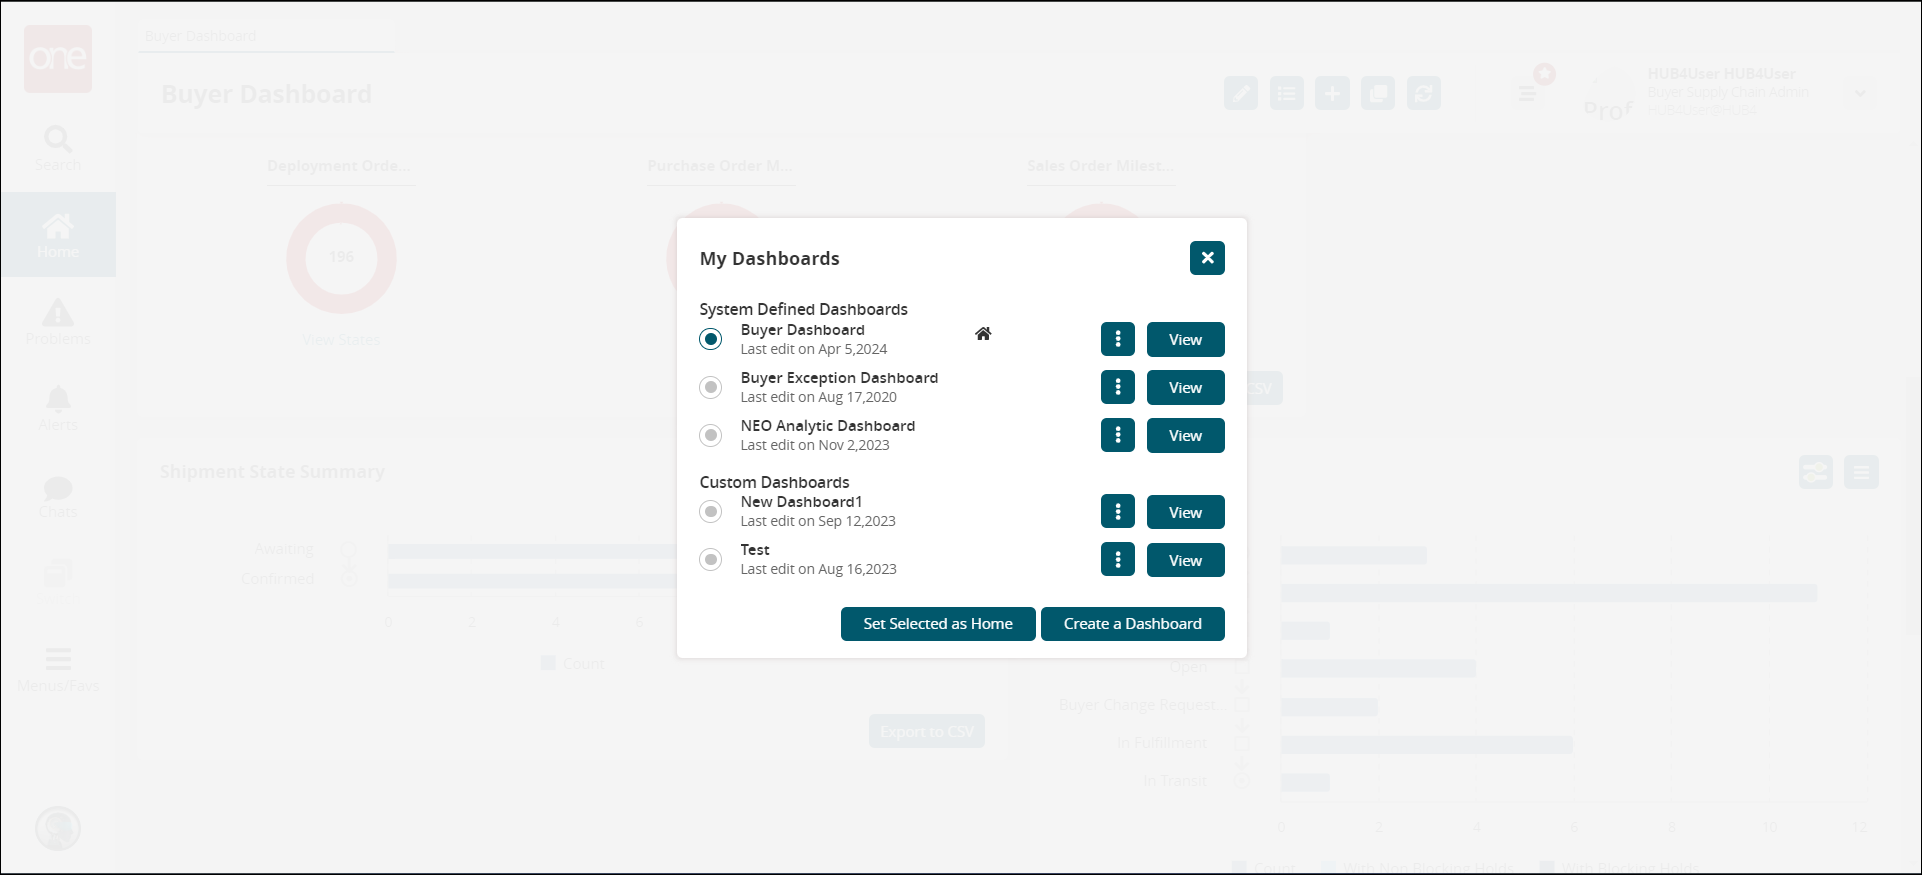
Click the Create a Dashboard button on the My Dashboards window.
The New Dashboard window displays, and the same steps as above apply.
As a third alternative, click the Clone Dashboard button.

The Copy Current Dashboard window displays and the same steps as above apply. Copying an existing dashboard allows users to keep many of the same elements and make adjustments rather than creating a completely new dashboard.
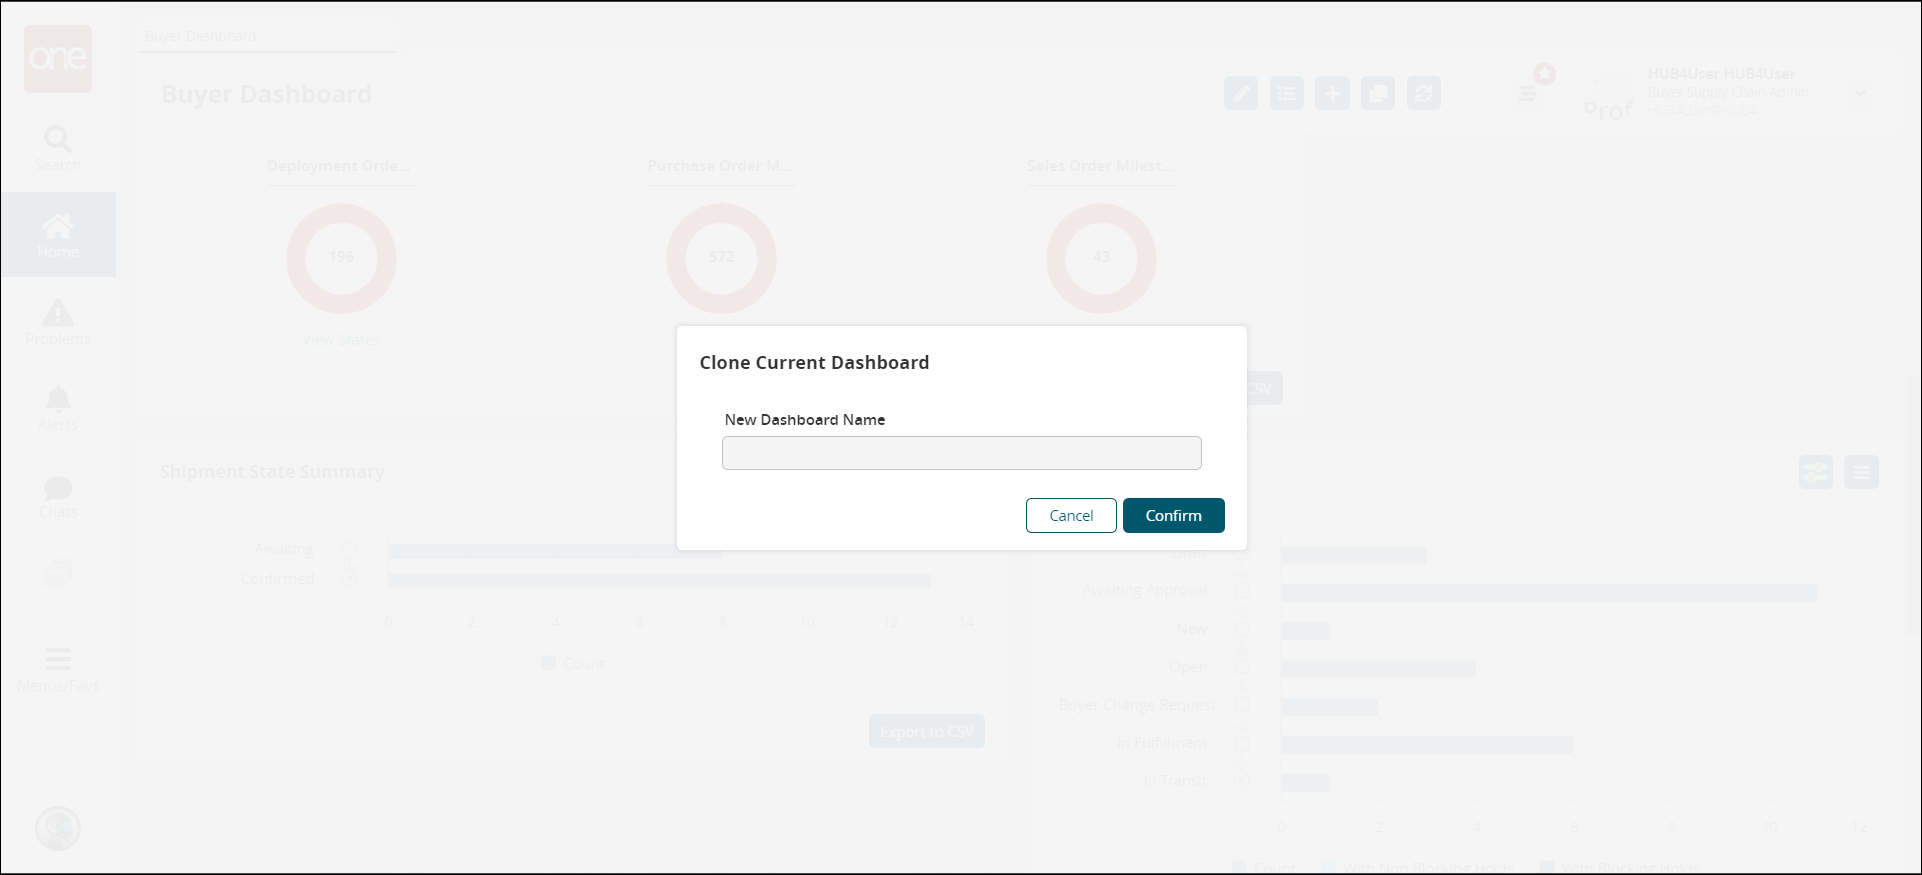
Customizing NEO Dashboard Layouts
Users can customize the layout of dashboards using a Columnar Layout or a Fixed Layout. Many widgets only display in one layout or the other; only a few widgets display in both layouts.
Complete the following steps to customize the NEO dashboard layout:
To customize the NEO UI dashboard layout, click the Edit the Dashboard button.

The dashboard changes to edit mode. The Add Columnar Layout and Add Fixed Layout buttons display.
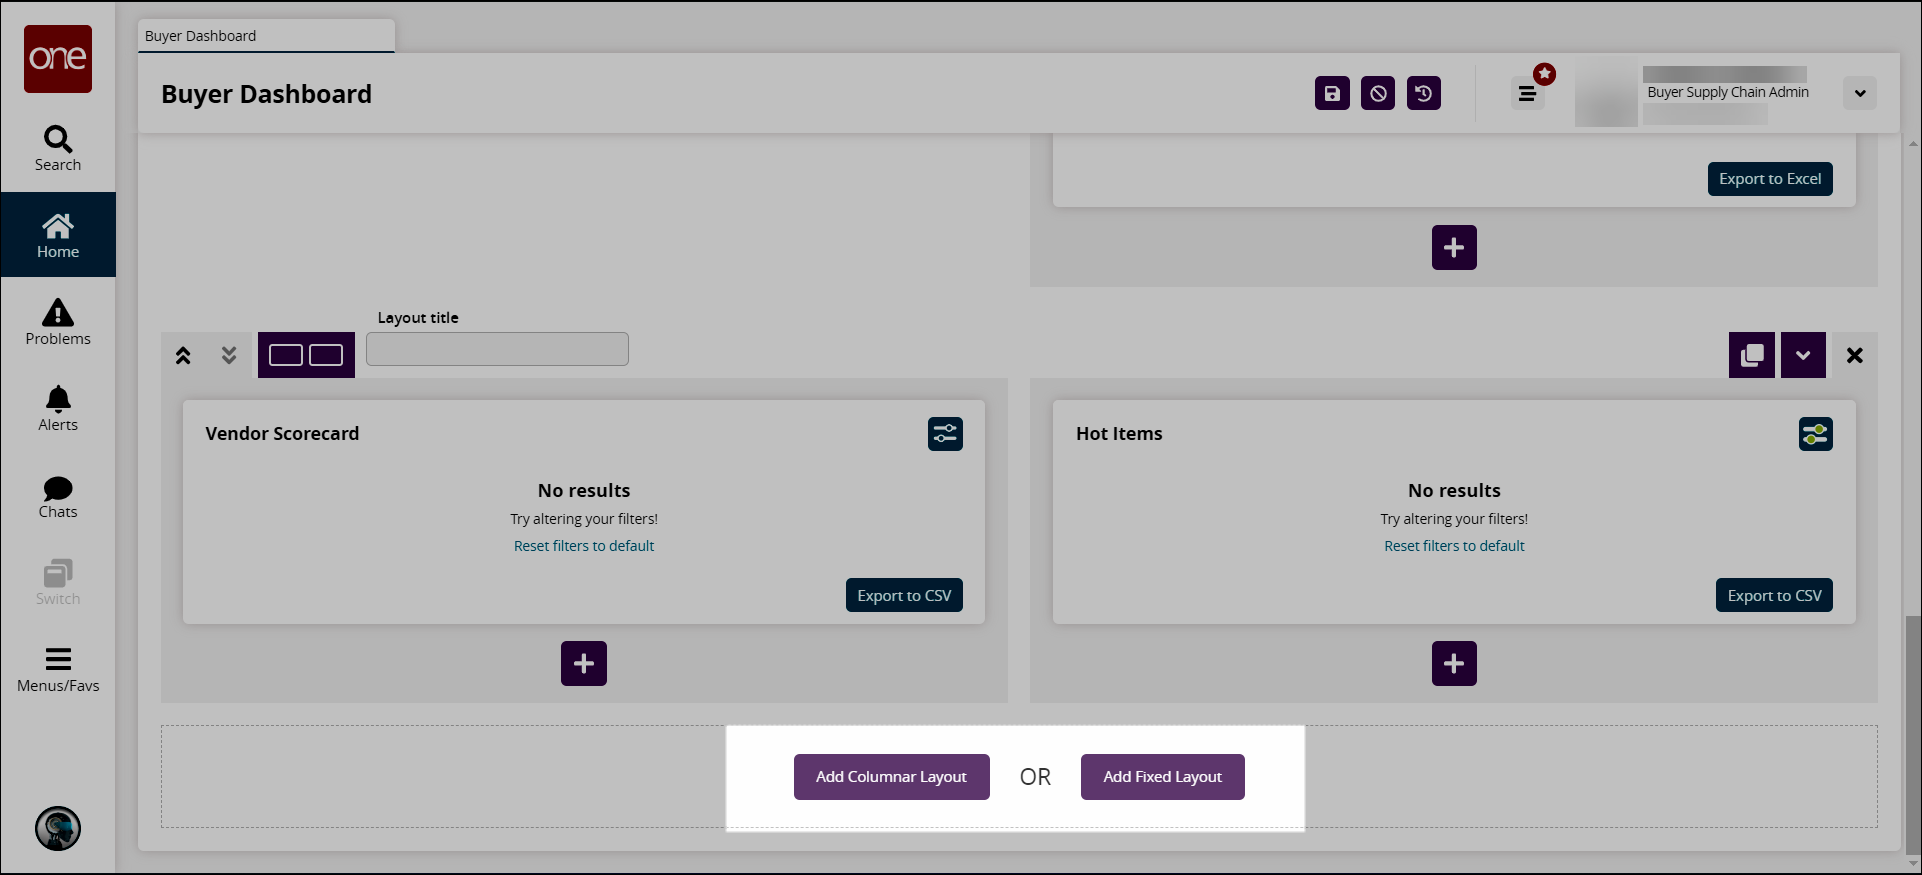
Click the Add Columnar Layout button to add a new widget area in a columnar layout.
A new layout section displays. In the example below, this layout has three columns. Each column has an add button to add a widget.
See "Adding Widgets" for more instructions.
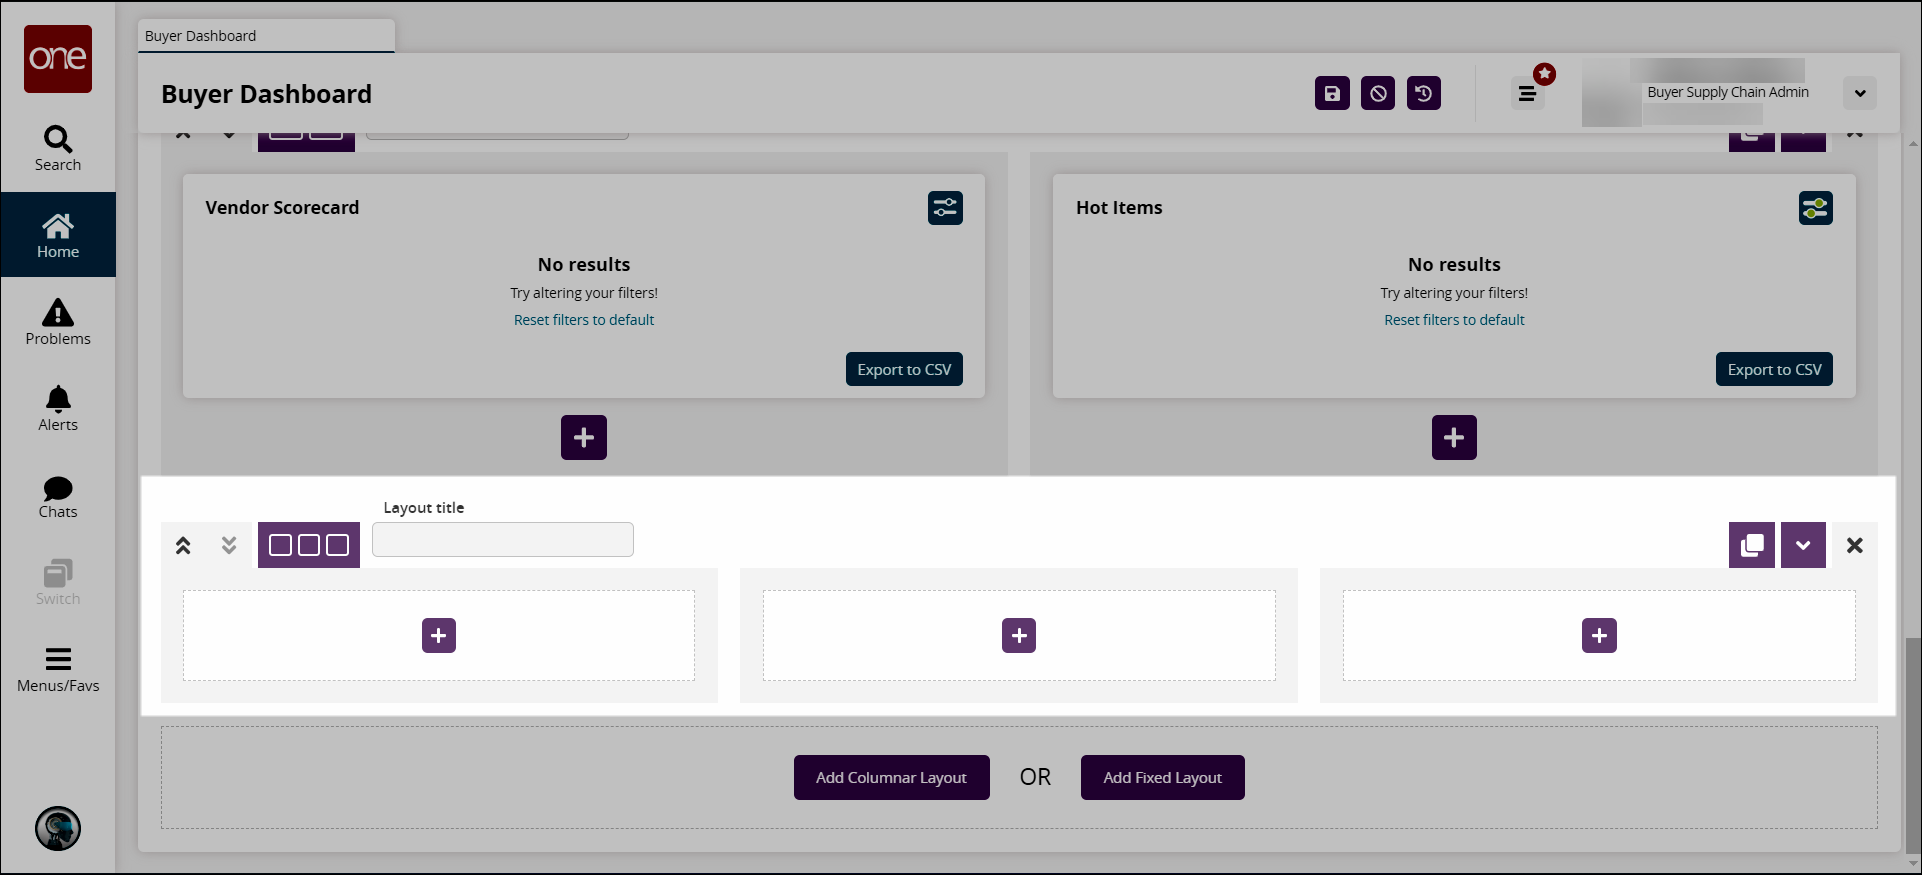
Click the double arrows up or down to move the layout section up or down on the dashboard.

The arrows are grayed out and inactive if there are no other layout sections.
Click the column layout button to choose a different column layout.

The button expands to show all possible columnar layouts.
Click the desired column layout.
The section changes to the new column layout.
Enter a title for the layout section in the Layout title field.
Click the copy layout button to duplicate this layout again on the dashboard.

A new layout section displays below with the same layout and widgets.
Click the collapse button to collapse the layout section.

The section collapses and widgets in that section are hidden.
Click the X to remove the layout section from the dashboard.
A window displays to confirm that you want to delete the section.
Click the Yes button to delete the section.
Click the Add Fixed Layout button to add a fixed layout section to the dashboard.
A new layout section displays.
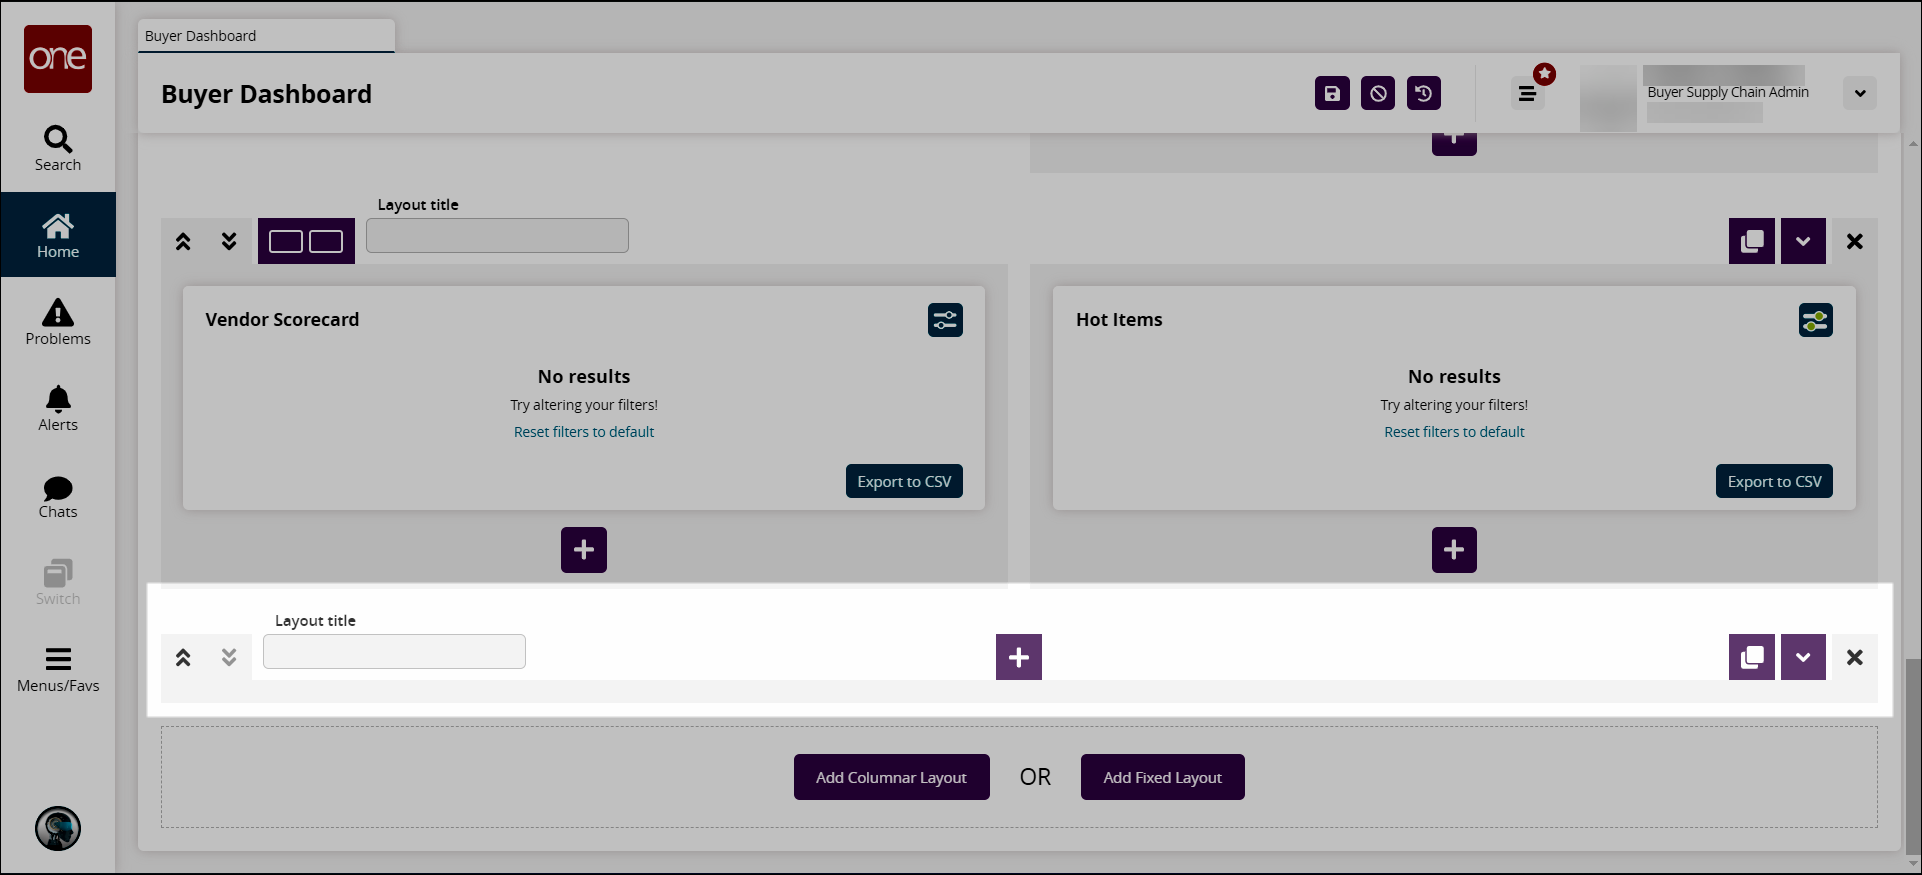
Once a widget is added, a grid displays, and the widget can be moved into place on the grid.
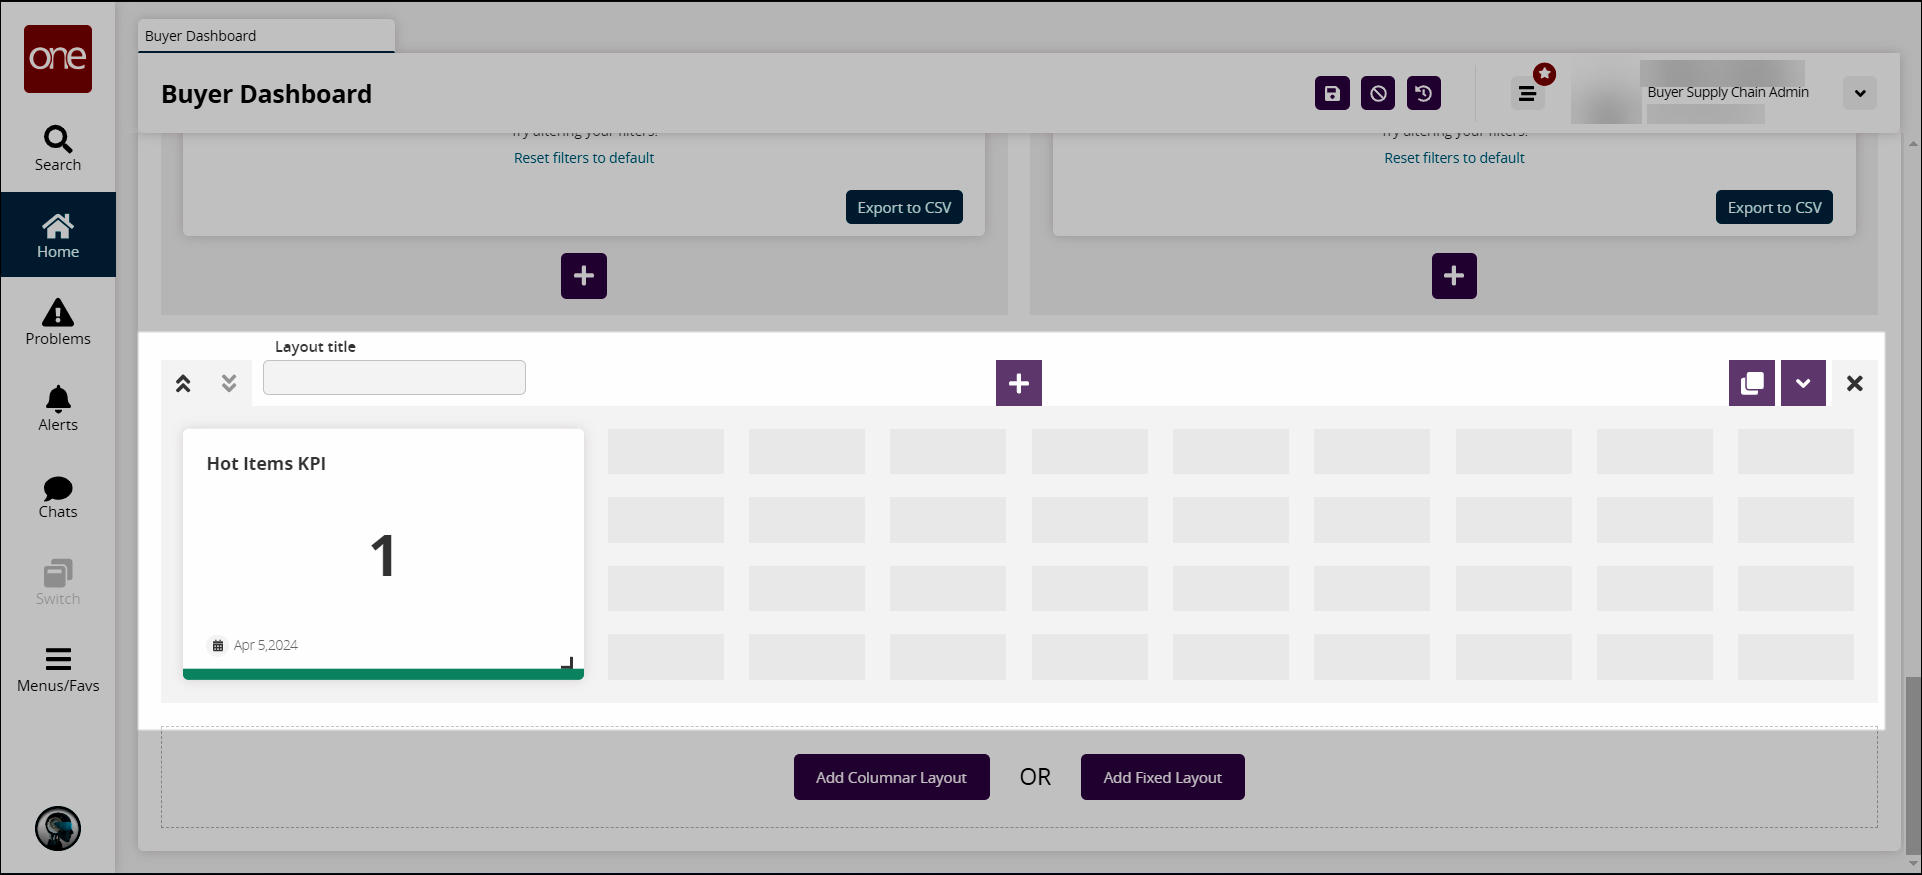
Click the Save the Dashboard button to save the layout changes.
Setting a Default Dashboard
The following example walks through setting a default dashboard. In this example, we select the Global Trade Dashboard as our default dashboard.
Complete the following steps to access the global trade dashboard:
Click the My Dashboards icon.
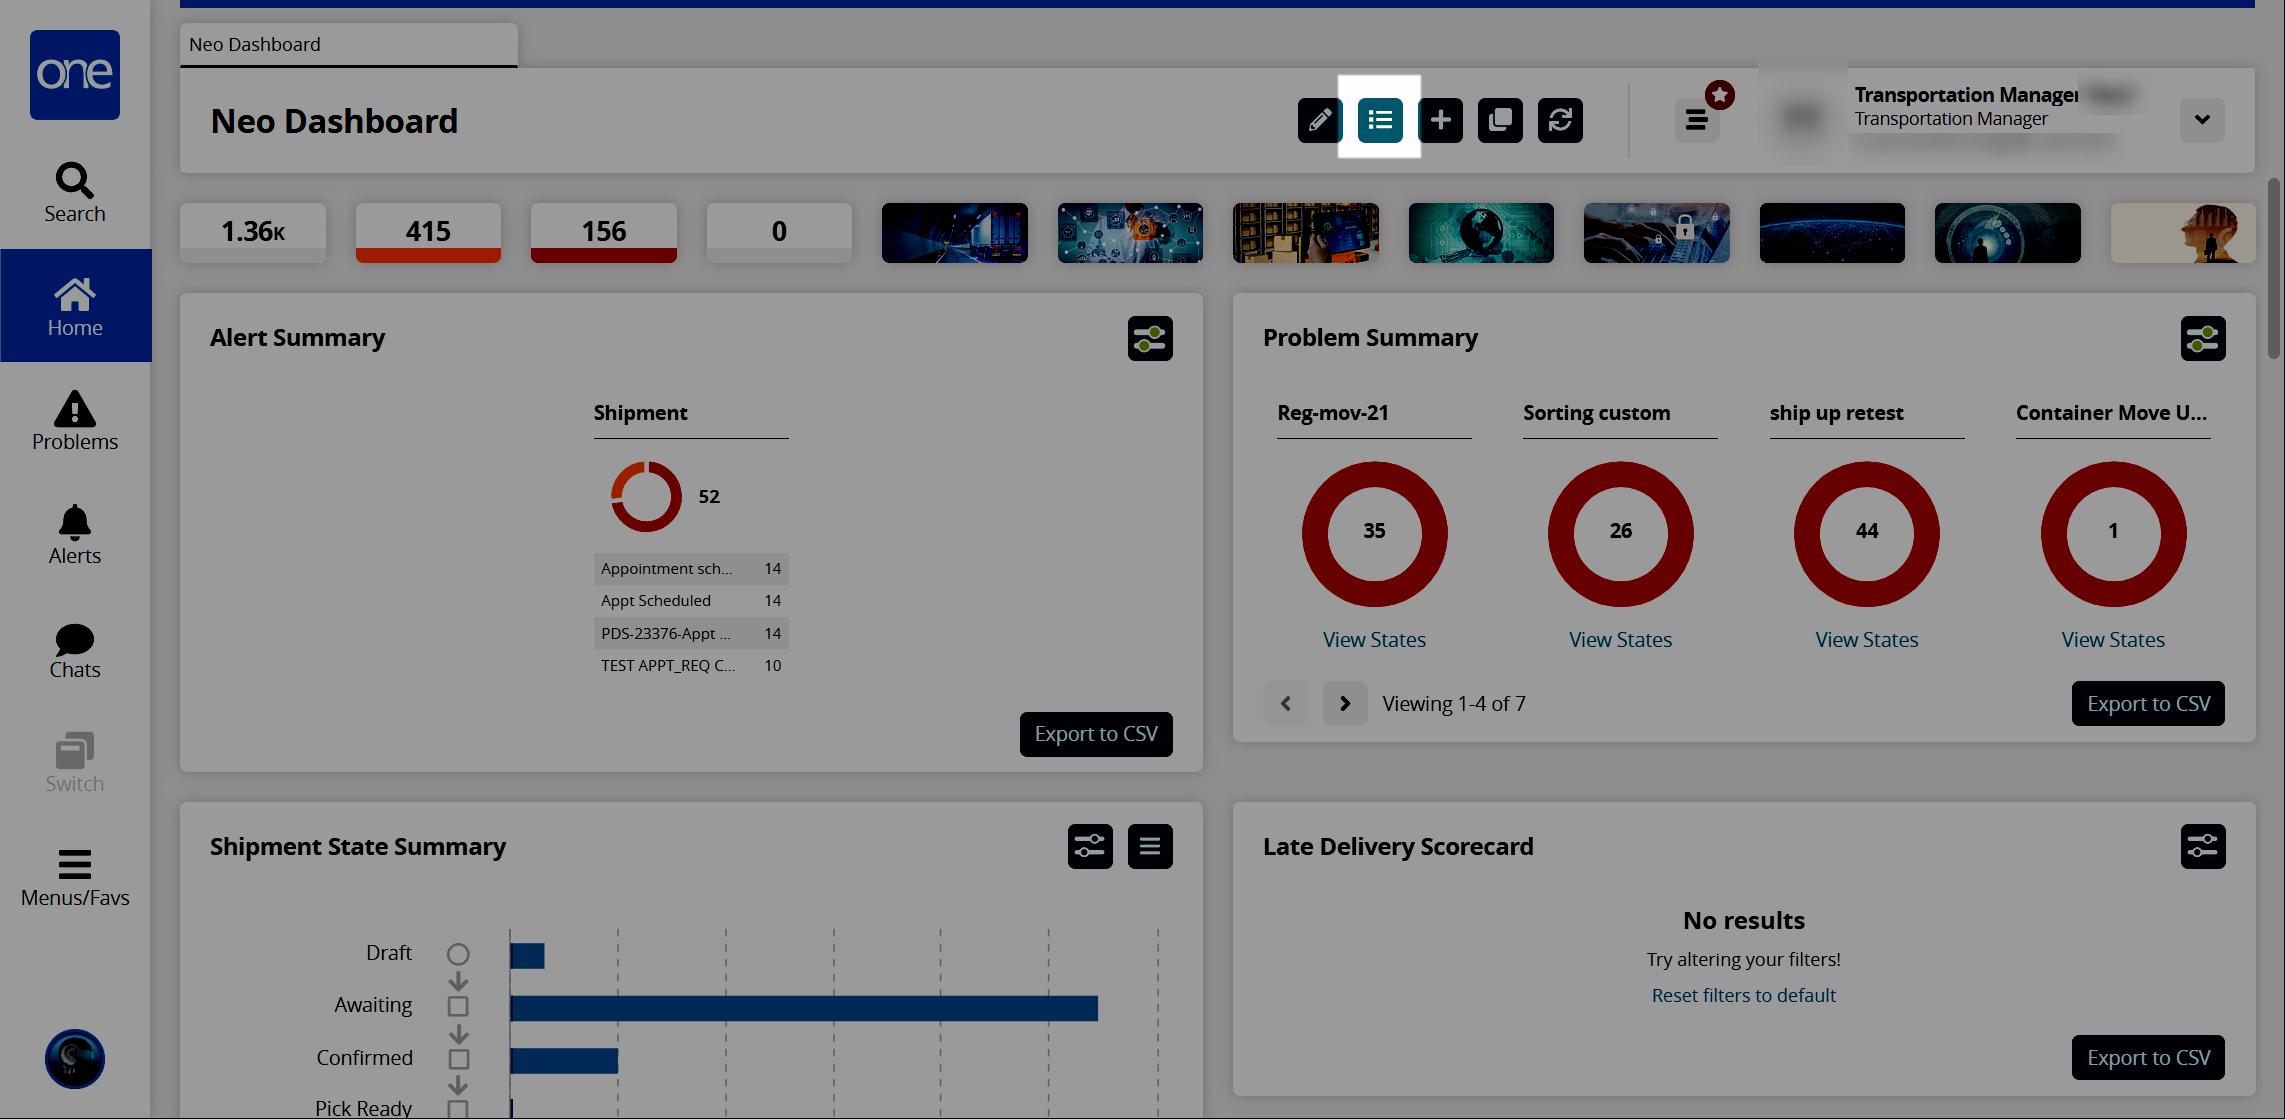
The My Dashboards window displays.
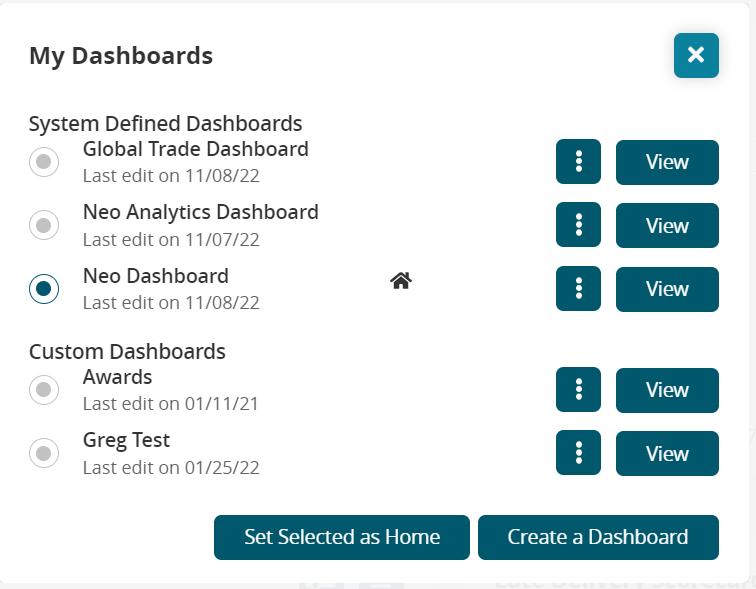
In the System Defined Dashboards section, click the bullet to select Global Trade Dashboard.
If you want to make the Global Trade Dashboard your home (default), click the Set Selected as Home button.
A home icon displays next to Global Trade Dashboard on the window.
Click the View button to open the Global Trade Dashboard.The default Global Trade Dashboard opens in a new tab with a default layout that includes widgets related to bookings and containers.
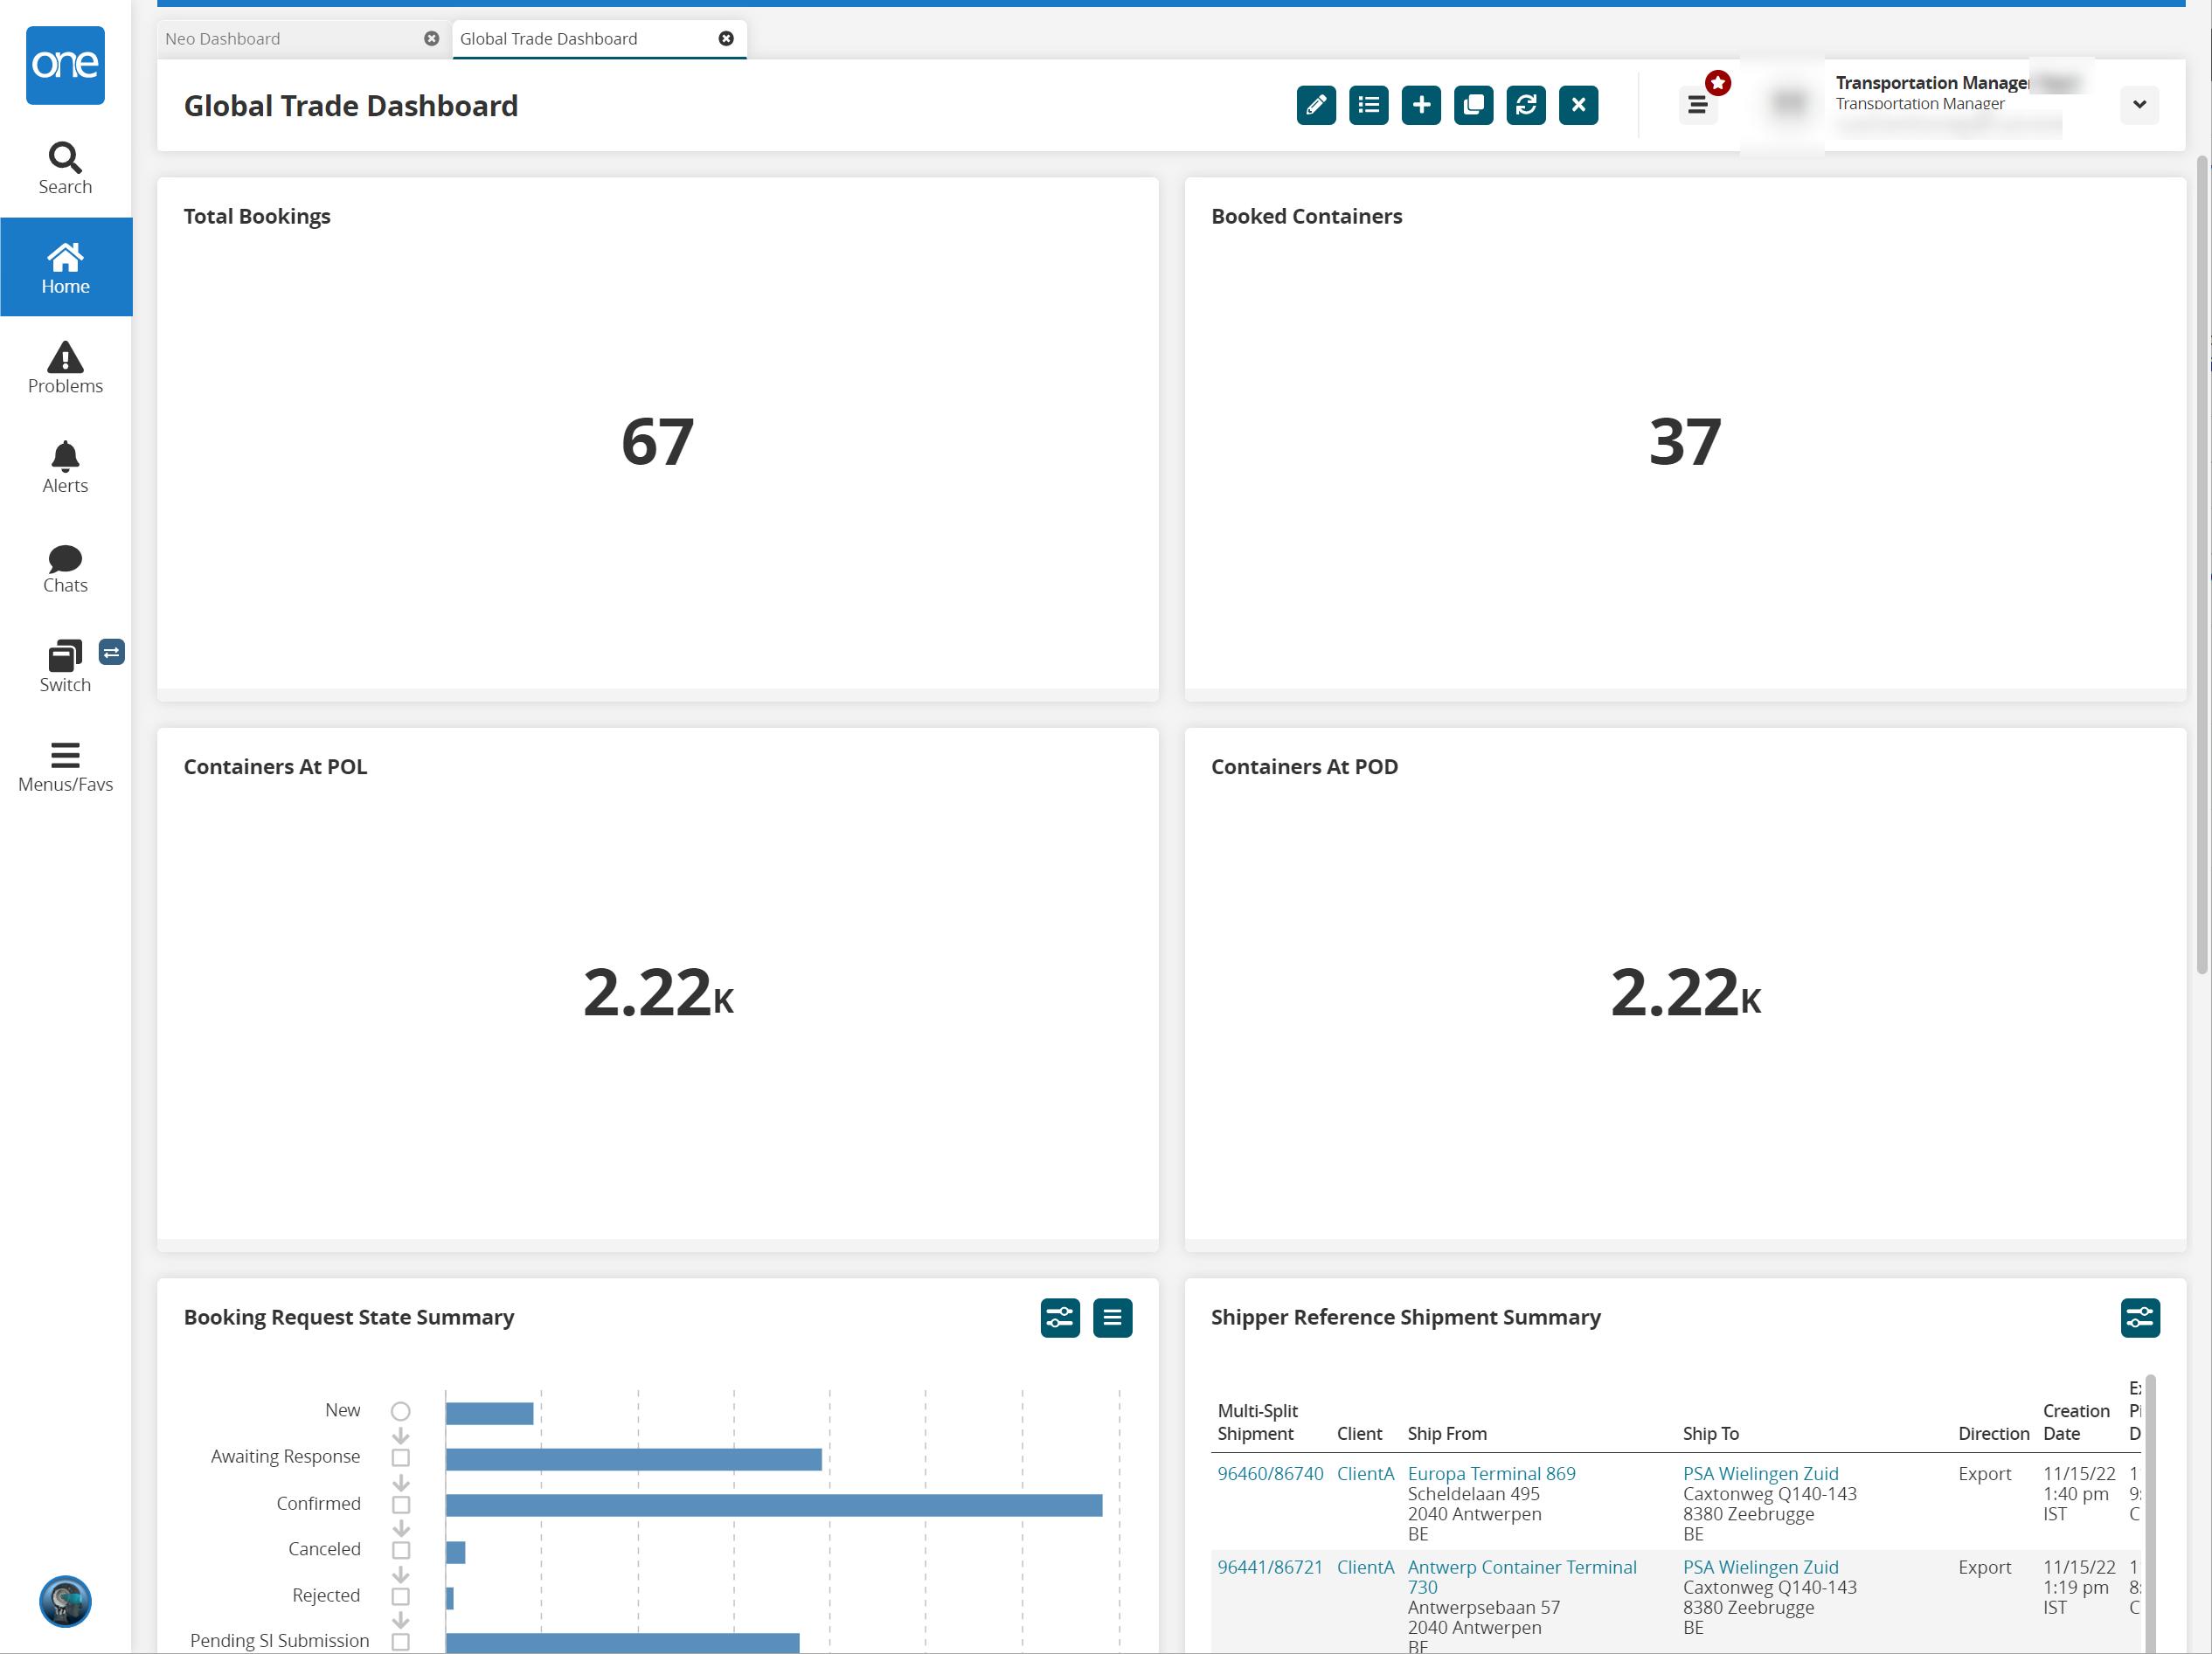
To edit this dashboard layout, click the My Dashboards icon again.
The My Dashboards window displays.
Click the three vertical dots icon to edit the dashboard or revert to the original Global Trade Dashboard if has already been edited.
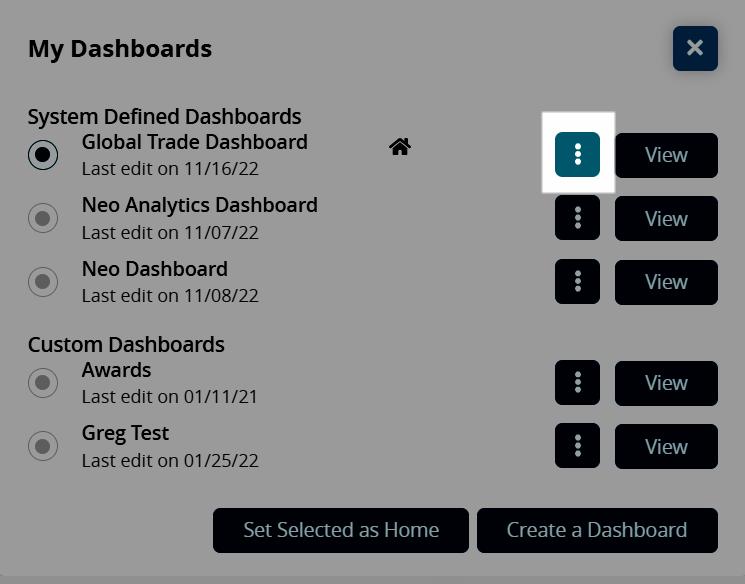
The Edit or Revert to Default menu options display.
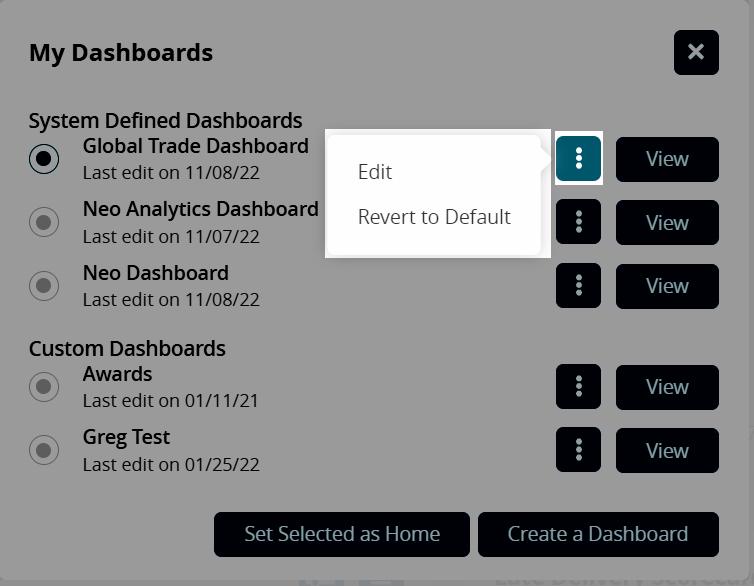
Click Edit to open the dashboard in edit mode.
The dashboard opens in edit mode. See the "Dashboards and Widgets" section in the NEO Online Help for instructions on editing the layout and adding widgets.
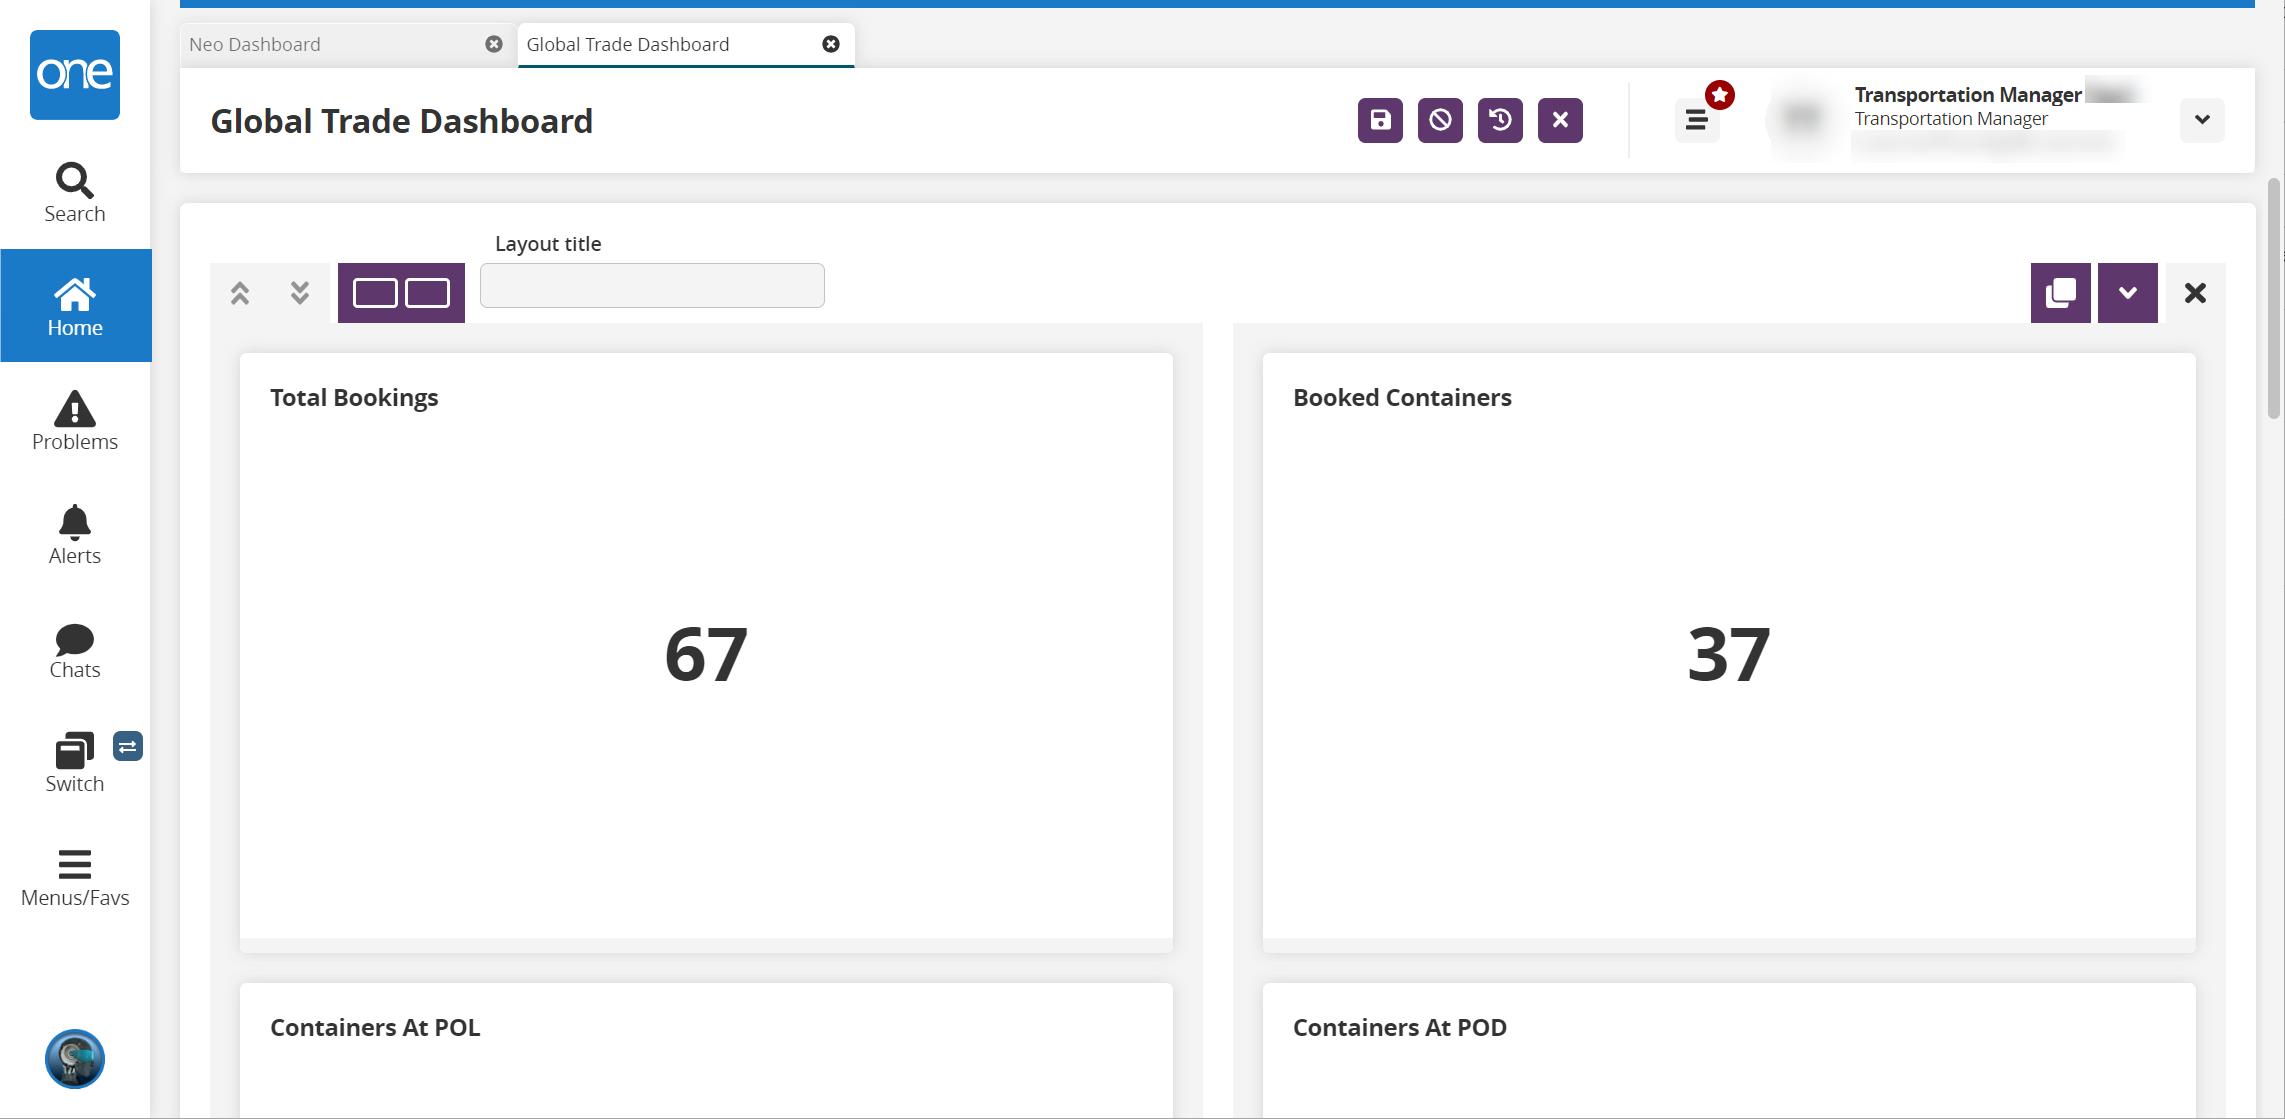
If the dashboard has been edited previously, click Revert to Default to return the Global Trade Dashboard to the default layout.
Switching Between NEO Dashboards
Complete the following steps to switch between dashboards:
From the NEO UI dashboard, click the My Dashboards icon at the top of the screen.

The My Dashboard dialog box displays.
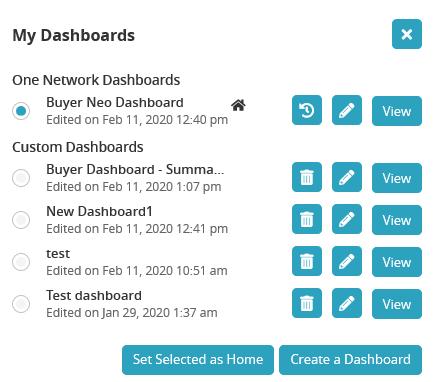
Click the View button for the dashboard you wish to view.
The dashboard displays.
Complete the following steps to switch between dashboards if you have viewed a dashboard and then moved to another screen:
Click Switch in the left sidebar of the NEO UI.
A slide-out menu of Active Screens (perspectives) displays.
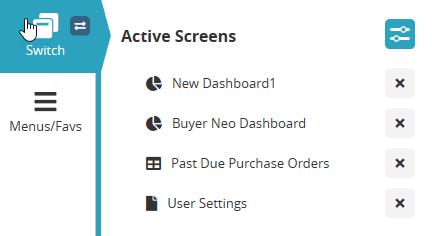
Click the dashboard name from the list.
The dashboard displays.
Complete the following steps to switch to different dashboards from the Menus/Favs menu in the left sidebar:
Click Menus/Favs > Quick Links > My Dashboards in the left sidebar of the NEO UI.
A list of the user's dashboards displays.
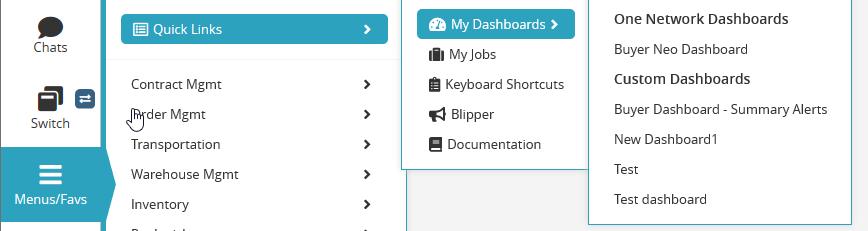
Click a dashboard.
The dashboard displays.
Administration
Items
Lots
Creating Lots
Complete the following steps to create lots:
Click Menus/Favs > Administration > Items > Lots.
The Lots screen displays.
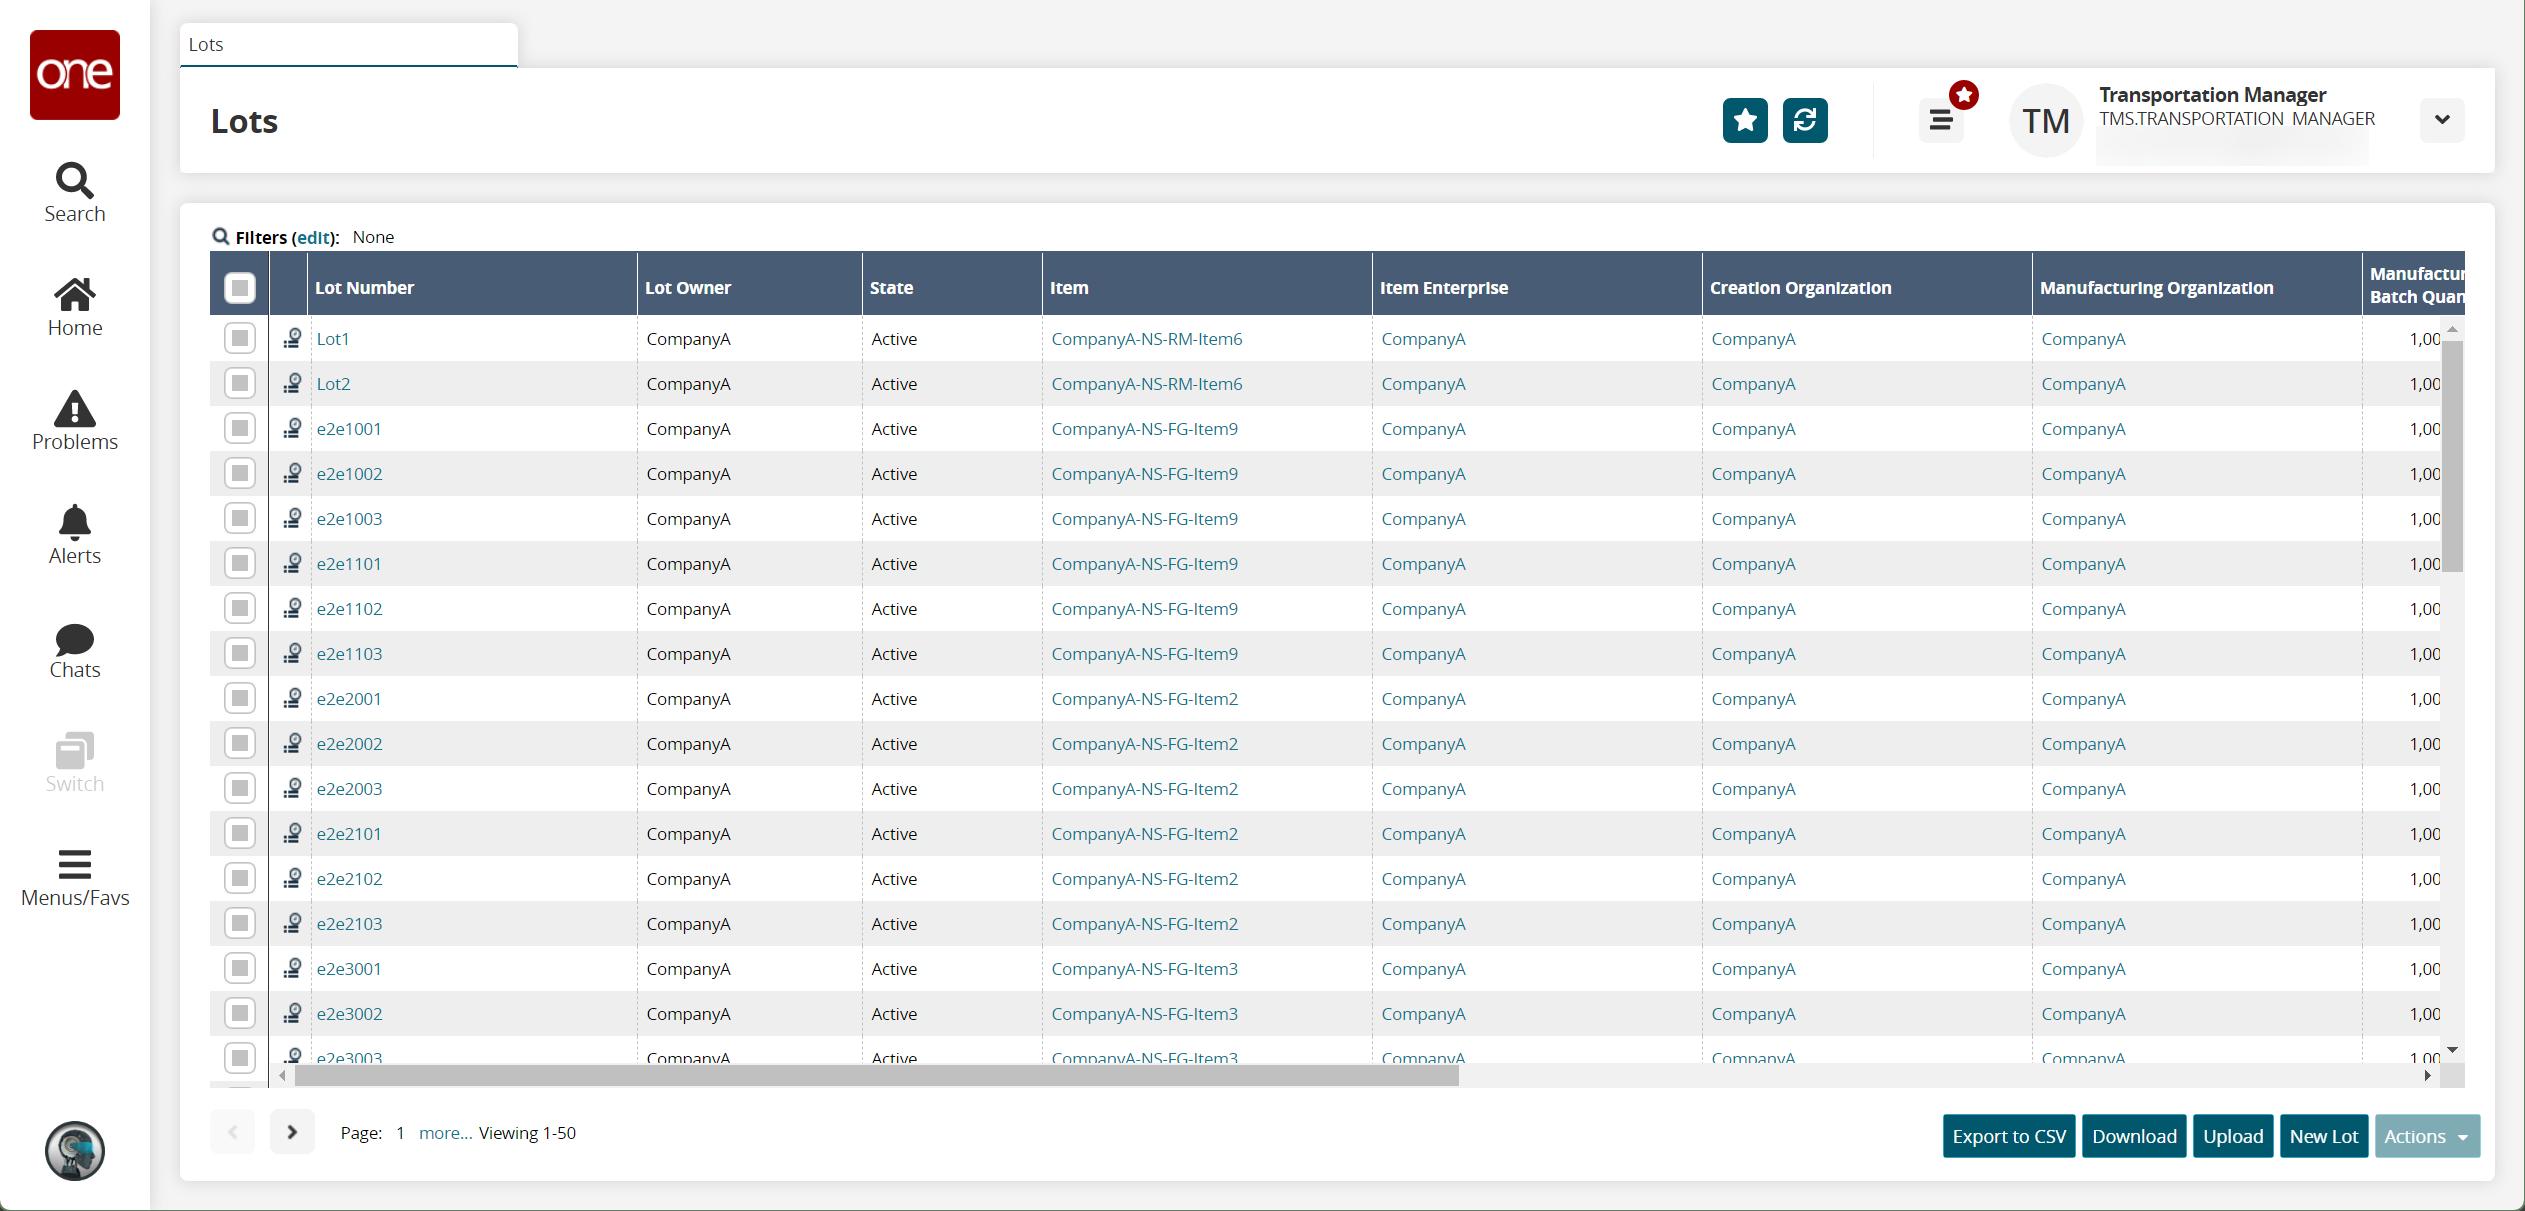
Click the New Lot button.
The New Lot screen displays.
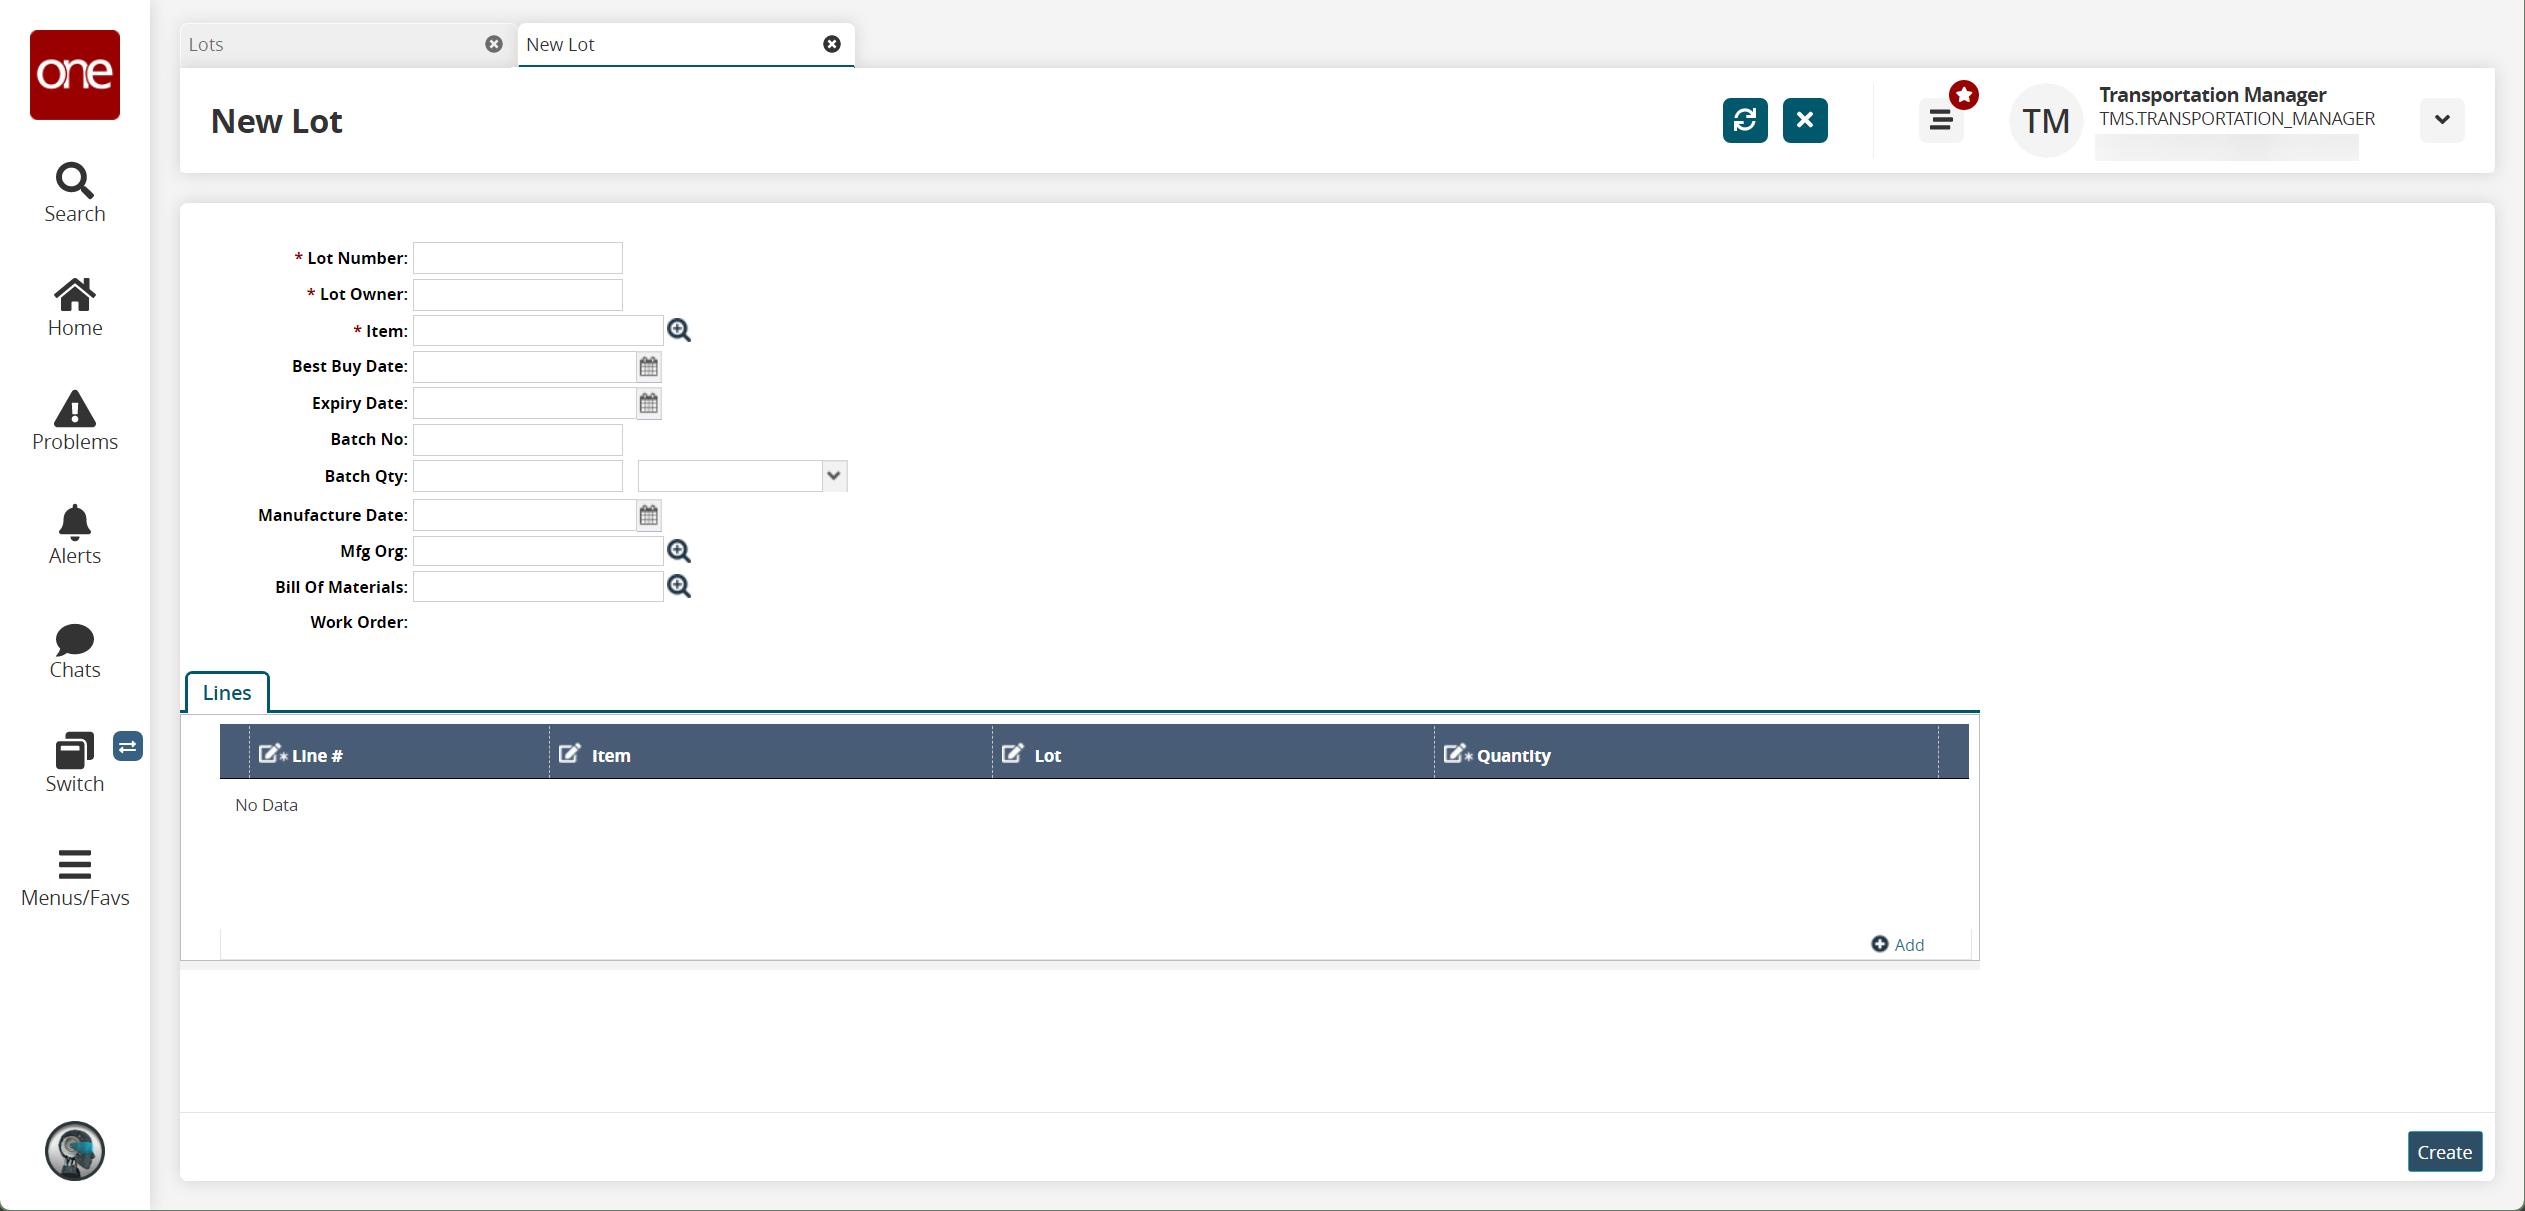
Field
Description
*Lot Number
Enter a lot number.
*Lot Owner
Enter a lot owner.
*Item
Select an item using the picker tool.
Best Buy Date
Enter a best buy date using the calendar icon.
Expiry Date
Enter an expiry date using the calendar icon.
Batch No
Enter a batch number.
Batch Qty
Enter a batch quantity and unit of measure.
Manufacture Date
Enter a manufacture date using the calendar icon.
Mfg Org
Select a manufacturing organization using the picker tool.
Bill of Materials
Select a bill of materials using the picker tool.
Click the Add link to add a line.
Enter or select values for the Items, Lot, and Quantity fields.
Click Create to create the lot.
A success message displays.
Searching Lots
Complete the following steps to search lots:
Click Menus/Favs > Administration > Items > Lots.
The Lots screen displays.
Click Export to Excel to export the report to a file.
Note
Depending on the configuration settings of your instance of the ONE system, an additional drop-down menu may display that includes the option to export the data in a CSV file.
Select one or more rows and click Actions > Update to update information.
The Update window is displayed.
Modify the fields.
Singletons
Creating Singletons
Complete the following steps to create singletons:
Click Menus/Favs > Administration > Singleton > Search Singletons.
The Search Singletons screen opens.
Click the New Singleton button.
The New Singleton screen opens.
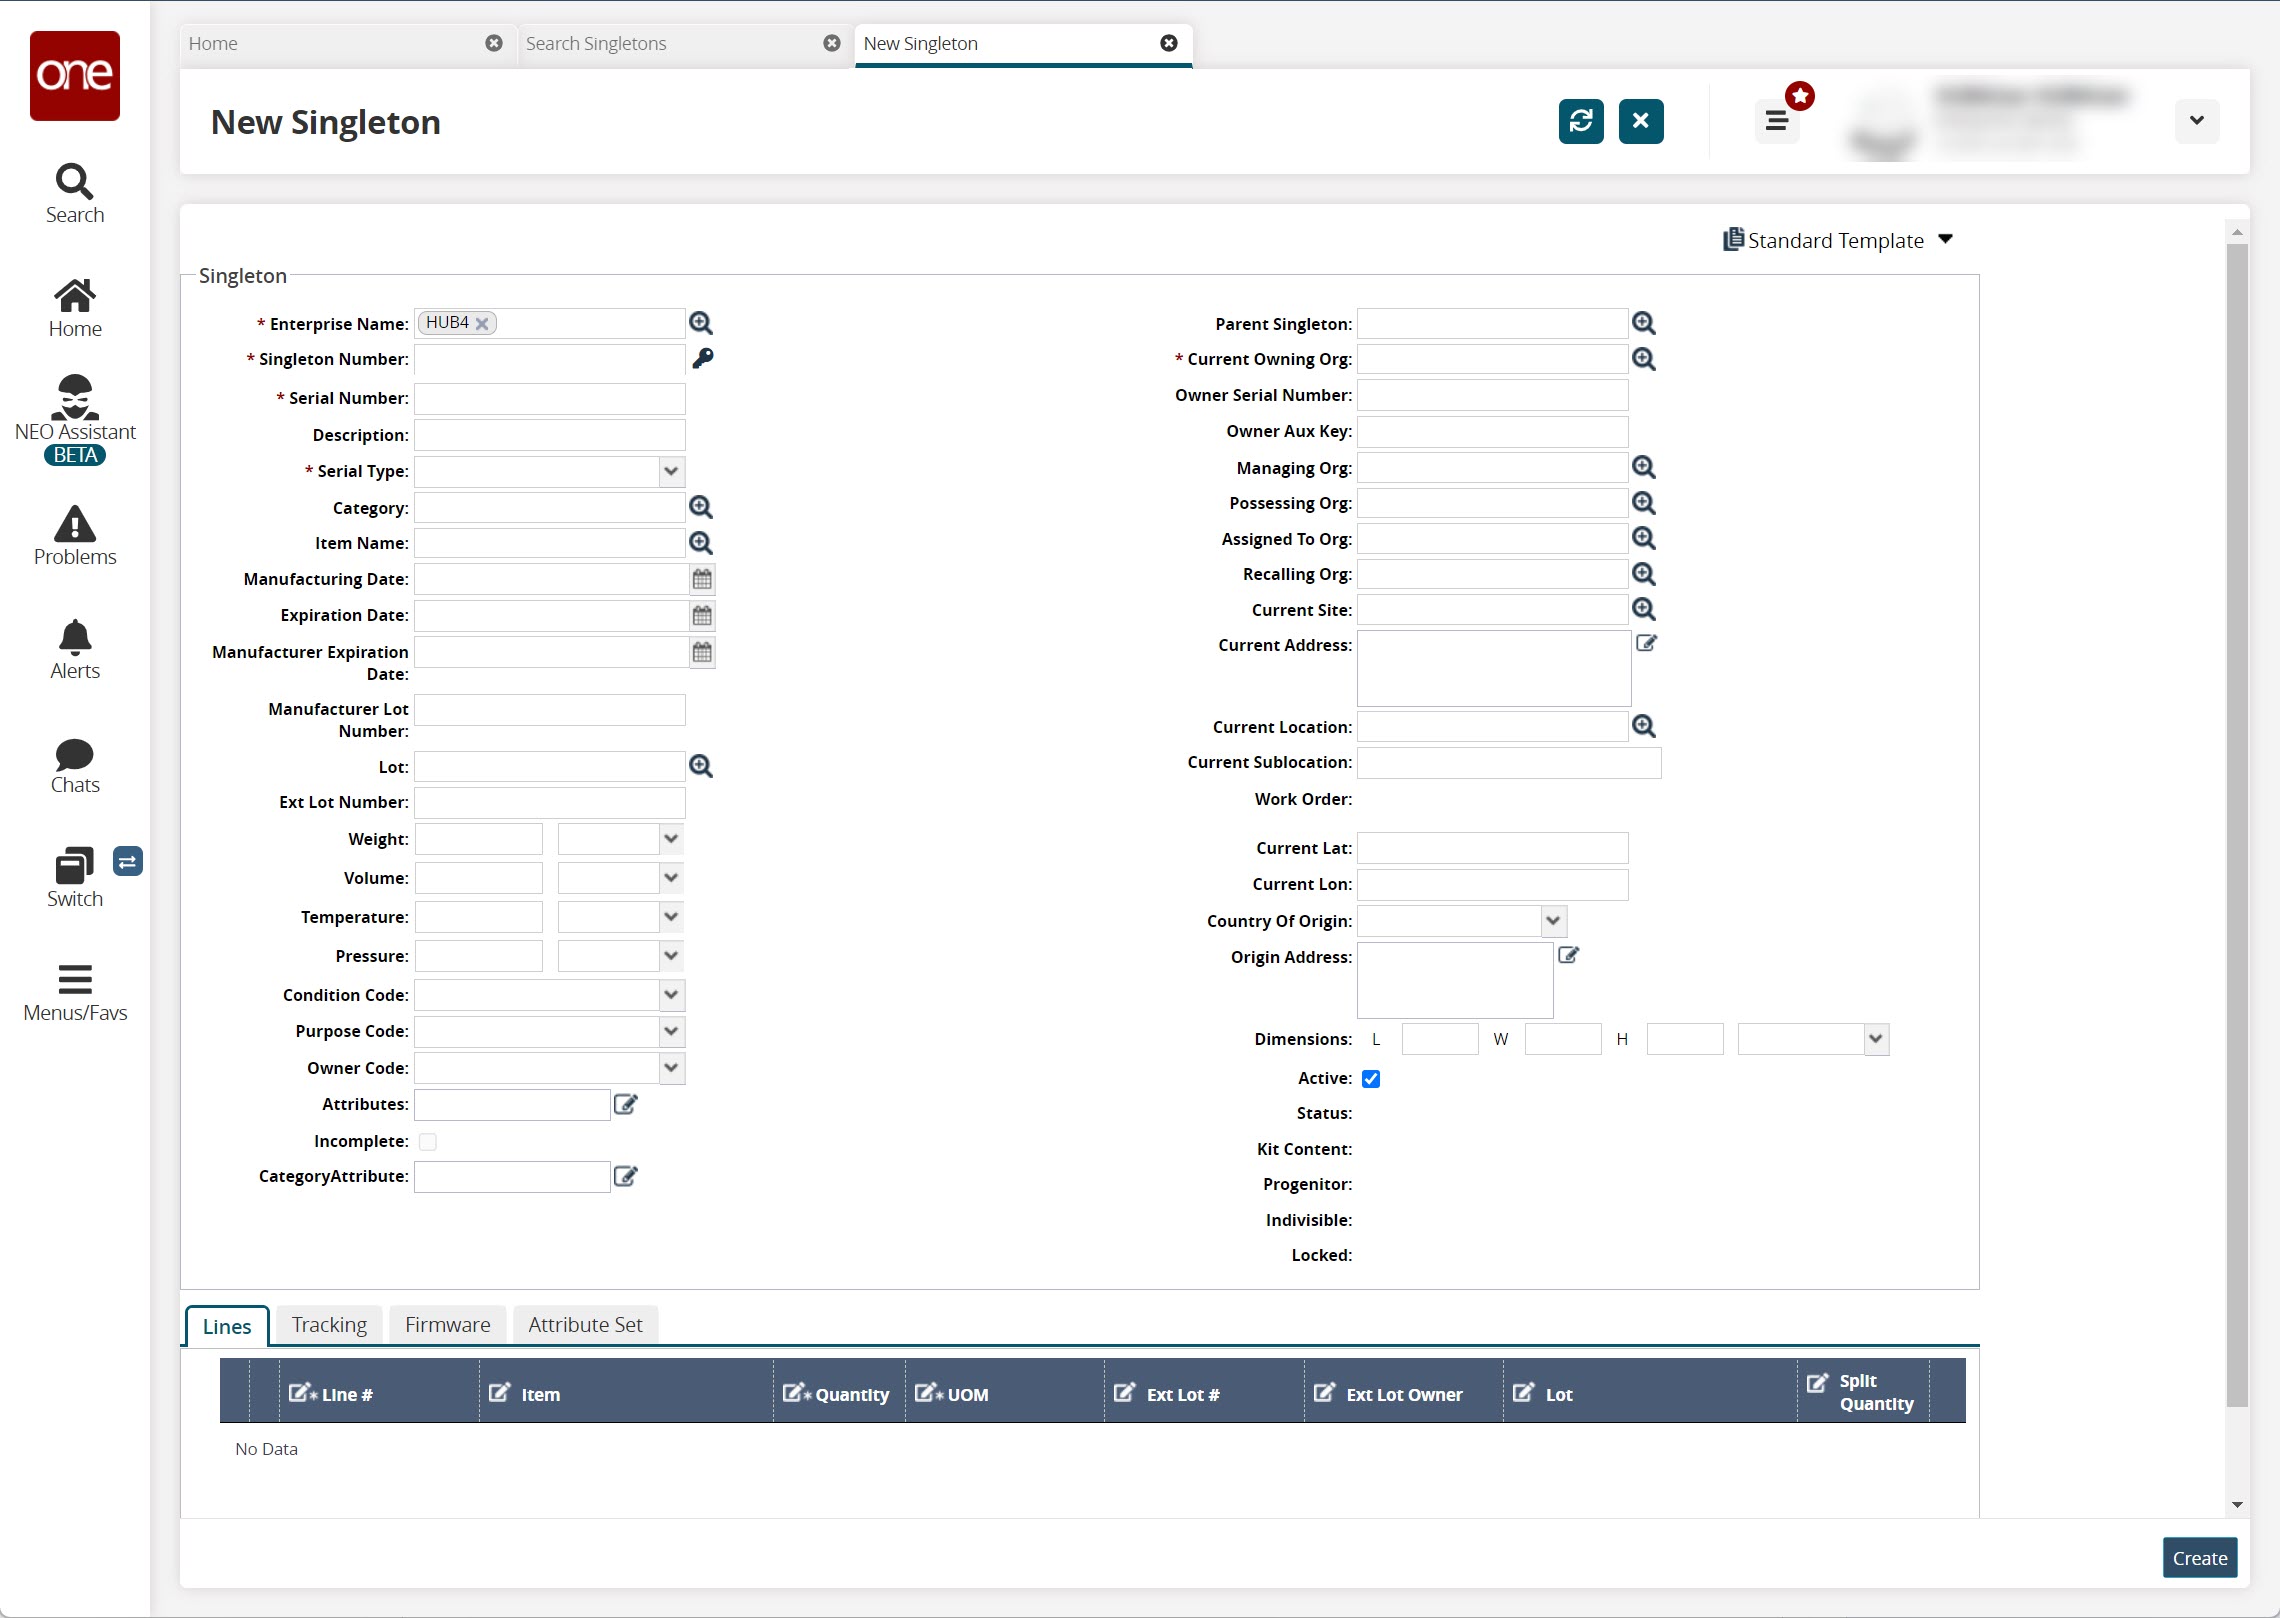
Field
Description
*Enterprise Name
Begin typing the enterprise name and select an option from the auto-complete suggestions. Or, use the picker tool to select one.
*Singleton Number
Click the key icon to enter a singleton number or type in a singleton number (alphabetic, numeric values, decimal values, and special characters are accepted here).
*Serial Number
Click the key icon to auto-populate the serial number or type in a serial number (alphabetic, numeric values, decimal values, and special characters are accepted here).
Description
Enter a description here.
*Serial Type
Select the serial type from the drop-down list.
Category
Use the picker tool to select from a list of categories or type in a known category name.
Item Name
Use the picker tool to select from a list of item names or type in a known item name.
Manufacturing Date
Use the calendar icon to select a manufacturing date or type in a known date.
Expiration Date
Use the calendar icon to select an expiration date, or type in a known date.
Manufacturer Expiration Date
Use the calendar icon to select a manufacturer expiration date or type in a known date.
Manufacturer Lot Number
Enter a manufacturer lot number.
Weight
Enter a numeric value for weight and select a dimension for the value from the drop-down list.
Vol
Enter a numeric value for volume and select a dimension for the value from the drop-down list.
Temperature
Enter a numeric value and select a dimension as Celsius or Fahrenheit from the drop-down list.
Pressure
Enter a numeric value and select a dimension from the drop-down list.
Condition Code
Select a value from the drop-down list.
Purpose Code
Select a value from the drop-down list.
Owner Code
Select a value from the drop-down list.
Attributes
Use the pencil tool to select from a list of attributes or type in a known attribute name.
Parent Singleton
Use the picker tool to select from a list of parent singletons or type in a known parent singleton name.
*Current Owning Org
Use the picker tool to select from a list of current owing organizations or type in a known current owing organization name.
Owner Serial Number
Enter an owner serial number.
Owner Aux Key
Enter an owner auxiliary key.
Managing Org
Use the picker tool to select from a list of current owing organizations or type in a known current owing organization name.
Possessing Org
Use the picker tool to select from a list of processing organizations or type in a known processing organization name.
Assigned To Org
Use the picker tool to select from a list of assigned organizations or type in a known assigned to the organization name.
Recalling Org
Use the picker tool to select from a list of recalling organizations or type in a known recalling organization name.
Current Site
Use the picker tool to select from a current site or type in a known current site name.
Current Address
Use the pencil tool to select a current address or type in a known current address.
Current Location
Use the picker tool to select from a current location or type in a known current location name.
Current Sublocation
Enter a current sublocation.
Current Lat
Enter the current latitude.
Current Lon
Enter the current longitude.
Dimensions
Enter the values of length (L), width (W), and height (H) values and select the dimension from the drop-down list.
Active
Select the checkbox to activate the singleton.
Lines tab
Click the Add link to add a line to the Lines tab. The fields like Line, Item, Quantity, UOM, Ext Lot Owner, Lot, and Split Quantity are editable.
Tracking tab
The Tracking Events are available after the singleton is created. This tab lists the Tracking Events available for the Singleton.
Click Export to Excel to export the report to a file.
Note
Depending on the configuration settings of your instance of the ONE system, an additional drop-down menu may display that includes the option to export the data in a CSV file.
Permitted Orgs
This tab lists the Permitted Orgs available for the Singleton. It is only visible once the singleton is created.
Click Export to Excel to export the report to a file.
Note
Depending on the configuration settings of your instance of the ONE system, an additional drop-down menu may display that includes the option to export the data in a CSV file.
Firmware
This tab displays the firmware information for the singleton.
Attribute Set
This tab displays the attribute information for the singleton and the actions available for the attributes.
Working with Singletons
Users can search for singletons and take various actions, including updating, assigning for inspection, taking ownership, recalling, and so on.
Complete the following steps to search for and take action on singletons:
Click Menus/Favs > Administration > Singleton > Search Singletons.
The Search Singletons screen opens.
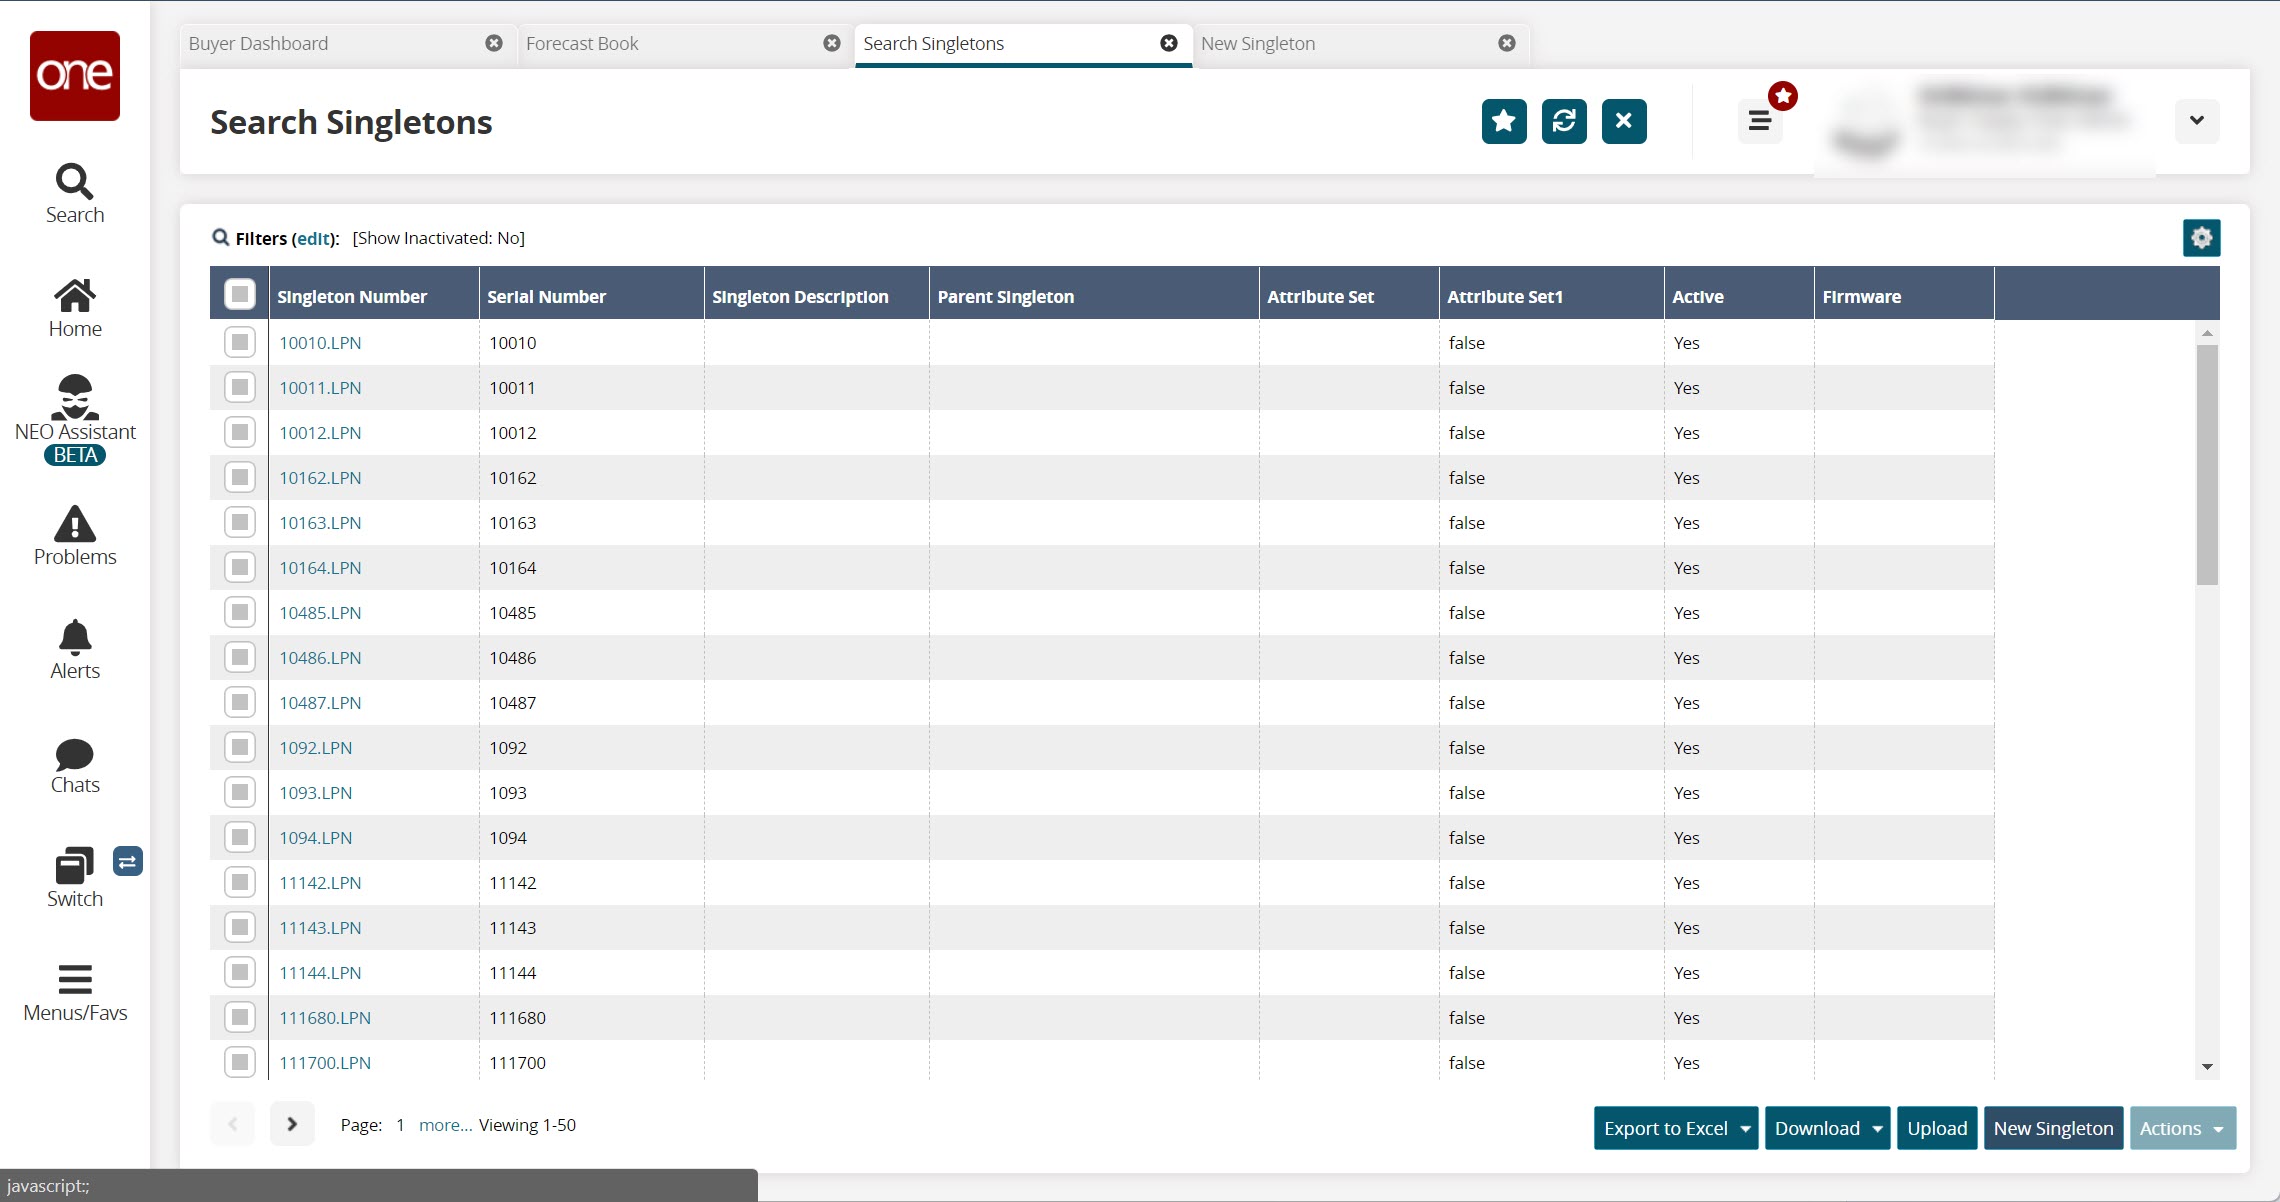
Click the (Filters) edit link to display the search fields.
The filter fields display.
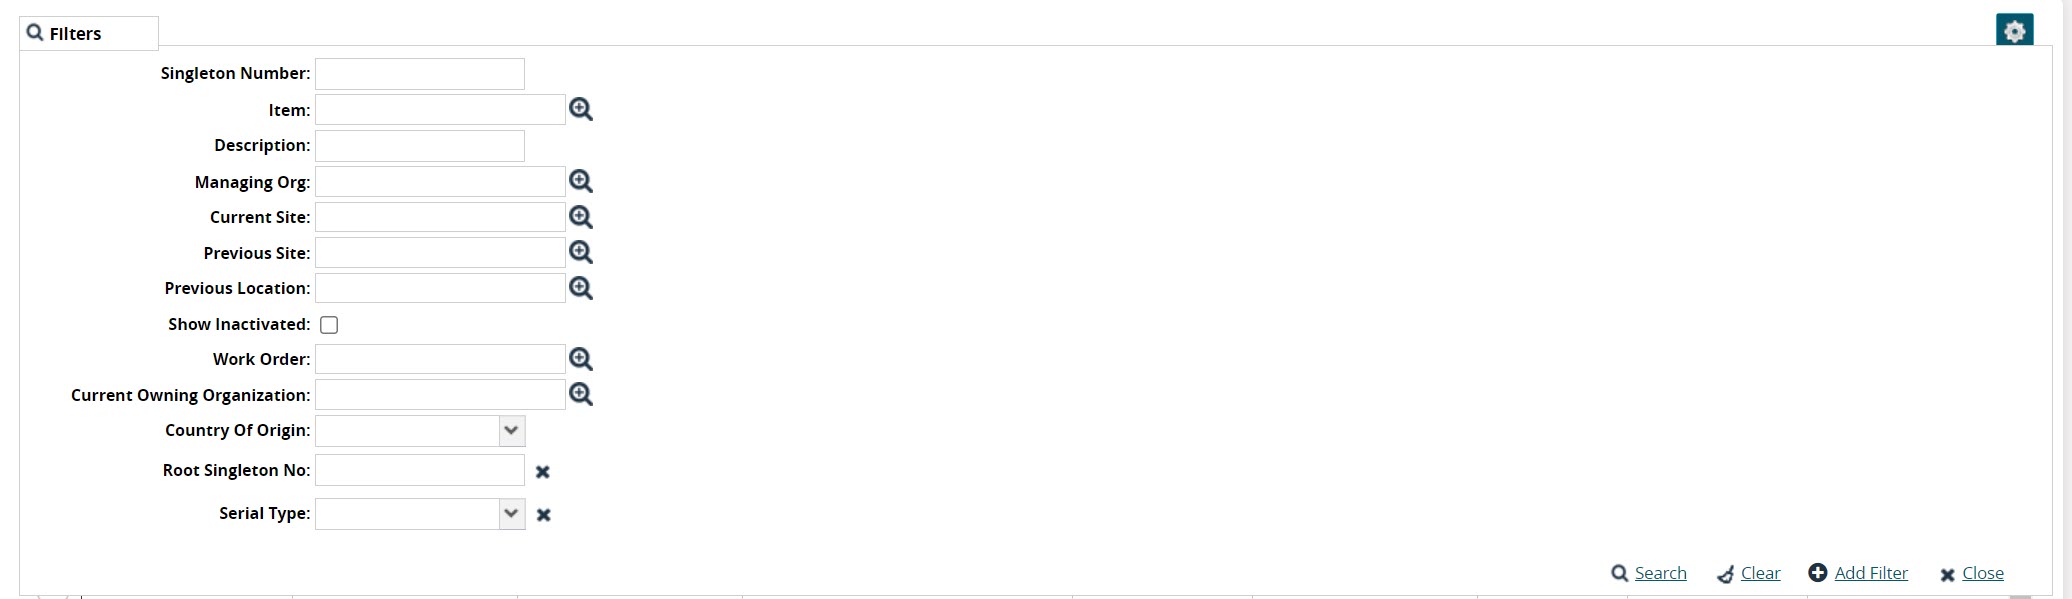
Fill out the fields as necessary to locate the desired singletons and click the Search link.
The screen updates according to the search criteria.
Select the checkbox for the desired Singleton row(s) and click the Actions button to display available actions. Refer to the table below for the Action button options:
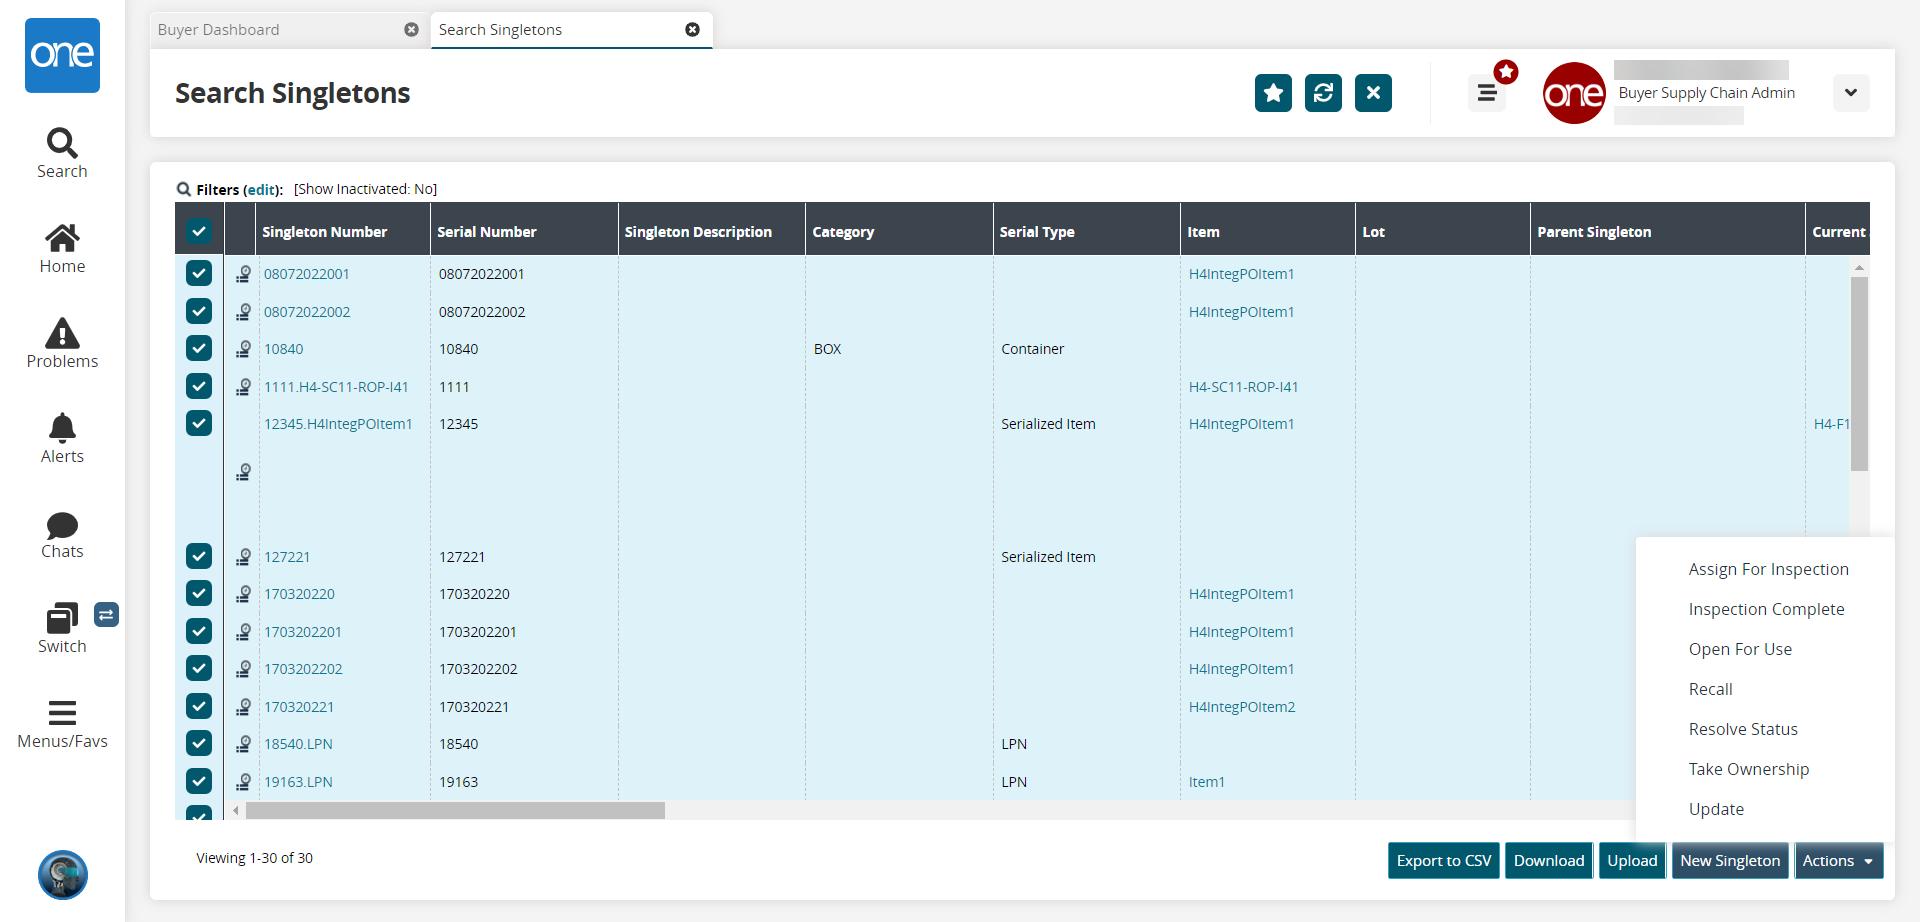
Refer to the table below to select the desired action:
Action
Effect
Assign For Inspection
An Assign For Inspection window opens, and fields like Event Date, Inspection Type, Event Description, and Inspector are editable. The Singleton is assigned for inspection.
Inspection Complete
An Inspection Complete window opens, and fields like Event Date, Inspection Type, and Event Description are editable. The inspection for the Singleton is completed till the event date.
Open For Use
An Open For Use window opens, and fields like Open For Use are editable. The Singleton line is open for use for the assigned item/lot.
Recall
A Recall window opens, and fields like Serial Number, Description, Item, Current Site, Current Address, Current Lat, Current Lon, Current Location, Current Sublocation, Weight, Weight Unit Of Measure, Volume, Volume UOM, Lot, Condition Code, Owner Code, Purpose Code, Category, Serial Type, Dimensions, and Ext Lot Number are editable. The singleton is recalled for the field edited.
Resolve Status
A Resolve Status window opens. The fields are not editable. The singleton is submitted to resolve status.
Take Ownership
A Take Ownership window opens, and fields like Serial Number, Description, Item, Current Site, Current Address, Current Lat, Current Lon, Current Location, Current Sublocation, Weight, Weight Unit Of Measure, Volume, Volume UOM, Active, Lot, Condition Code, Owner Code, Purpose Code, Category, Serial Type, Dimensions, and Ext Lot Number are editable. The singleton is submitted to take ownership of the field(s) edited.
Update
An Update window opens, and fields like Serial Number, Description, Item, Current Site, Current Address, Current Lat, Current Lon, Current Location, Current Sublocation, Weight, Weight Unit Of Measure, Volume, Volume UOM, Active, Lot, Condition Code, Owner Code, Purpose Code, Category, Serial Type, Dimensions, and Ext Lot Number are editable. The singleton is updated for the field(s) edited.
Under the Singleton Number column, click a link to view details about the singleton.
Details about the singleton display.
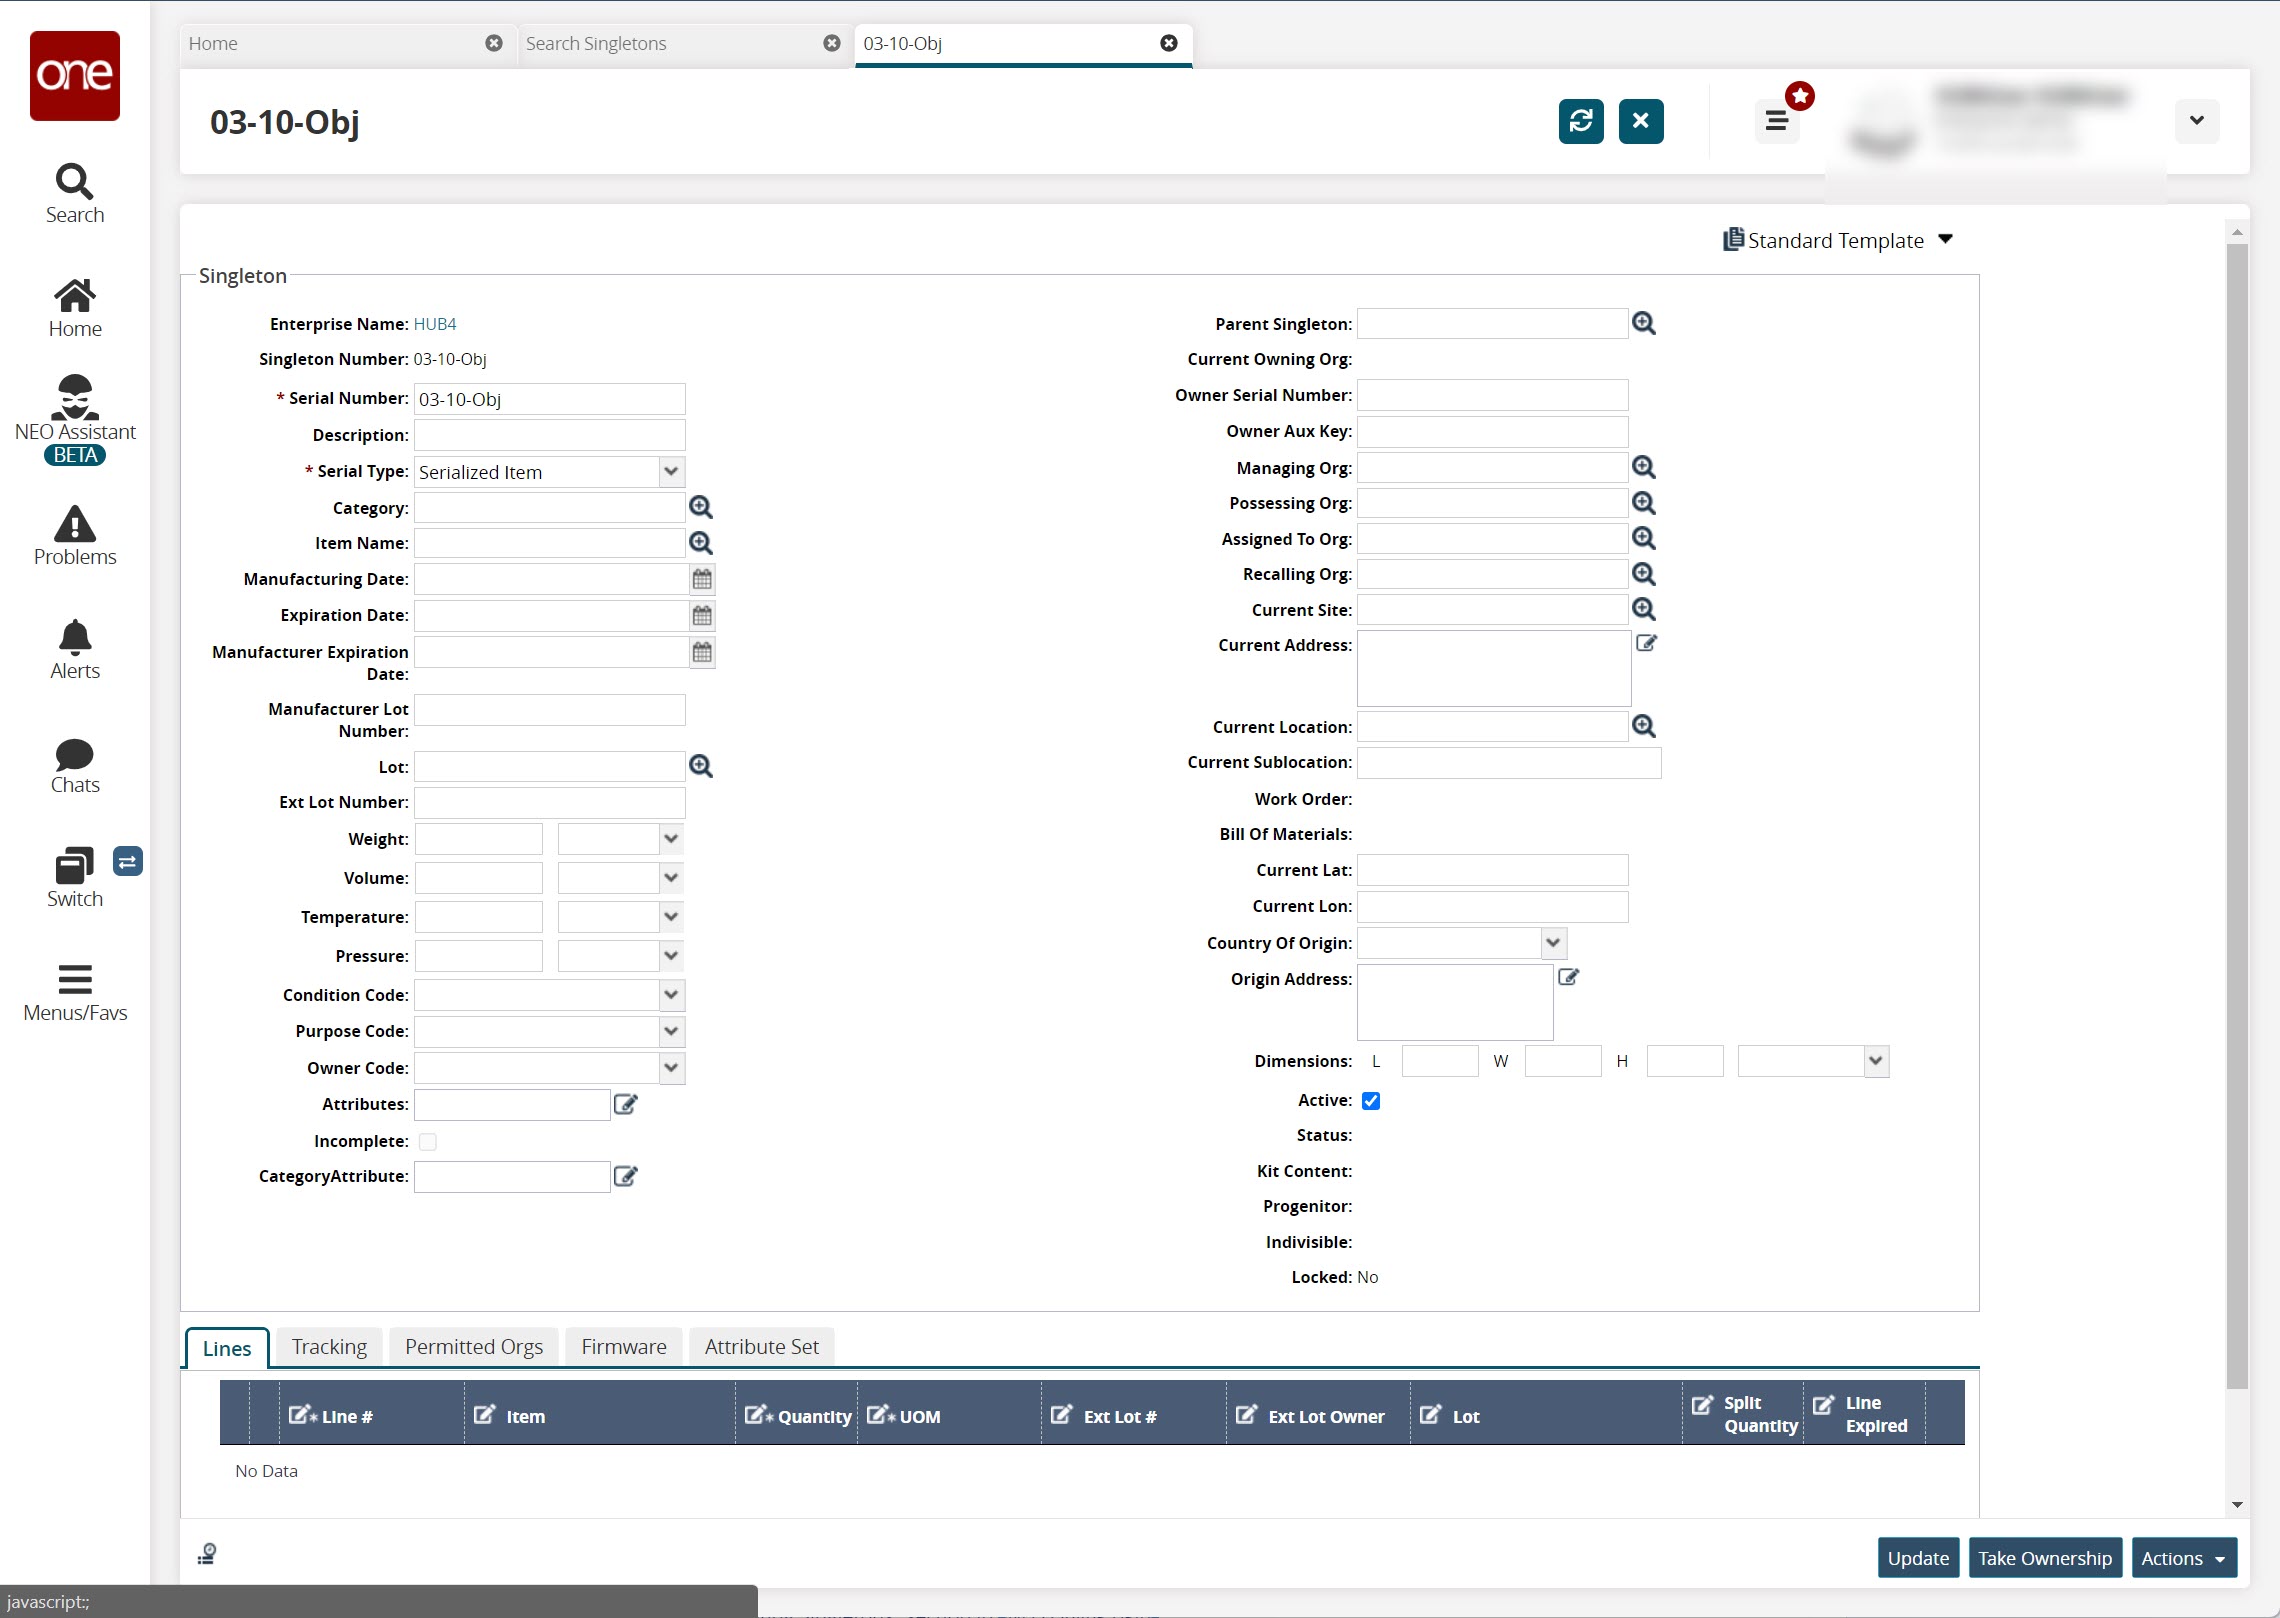
(Optional) Update any fields and click the Update button. For information on each field, see the "Creating Singletons" section in NEO Online Help.
The singleton is updated.
Item Master
The conversion factor to support Quantity Unit Of Measure (UOM) conversion is set at an item level. You can update the conversion factor in the Item Master records. The following tabs can be edited while updating the Item Master:
Dimension
Price
Ordering Info
Life-Cycle
Hazardous
Additional Info
Holds
HS Codes
Searching Items in the Item Master
Complete the following steps to search for item master data:
Click Menus/Favs > Administration > Items > Search Item.
The Search Item screen opens.
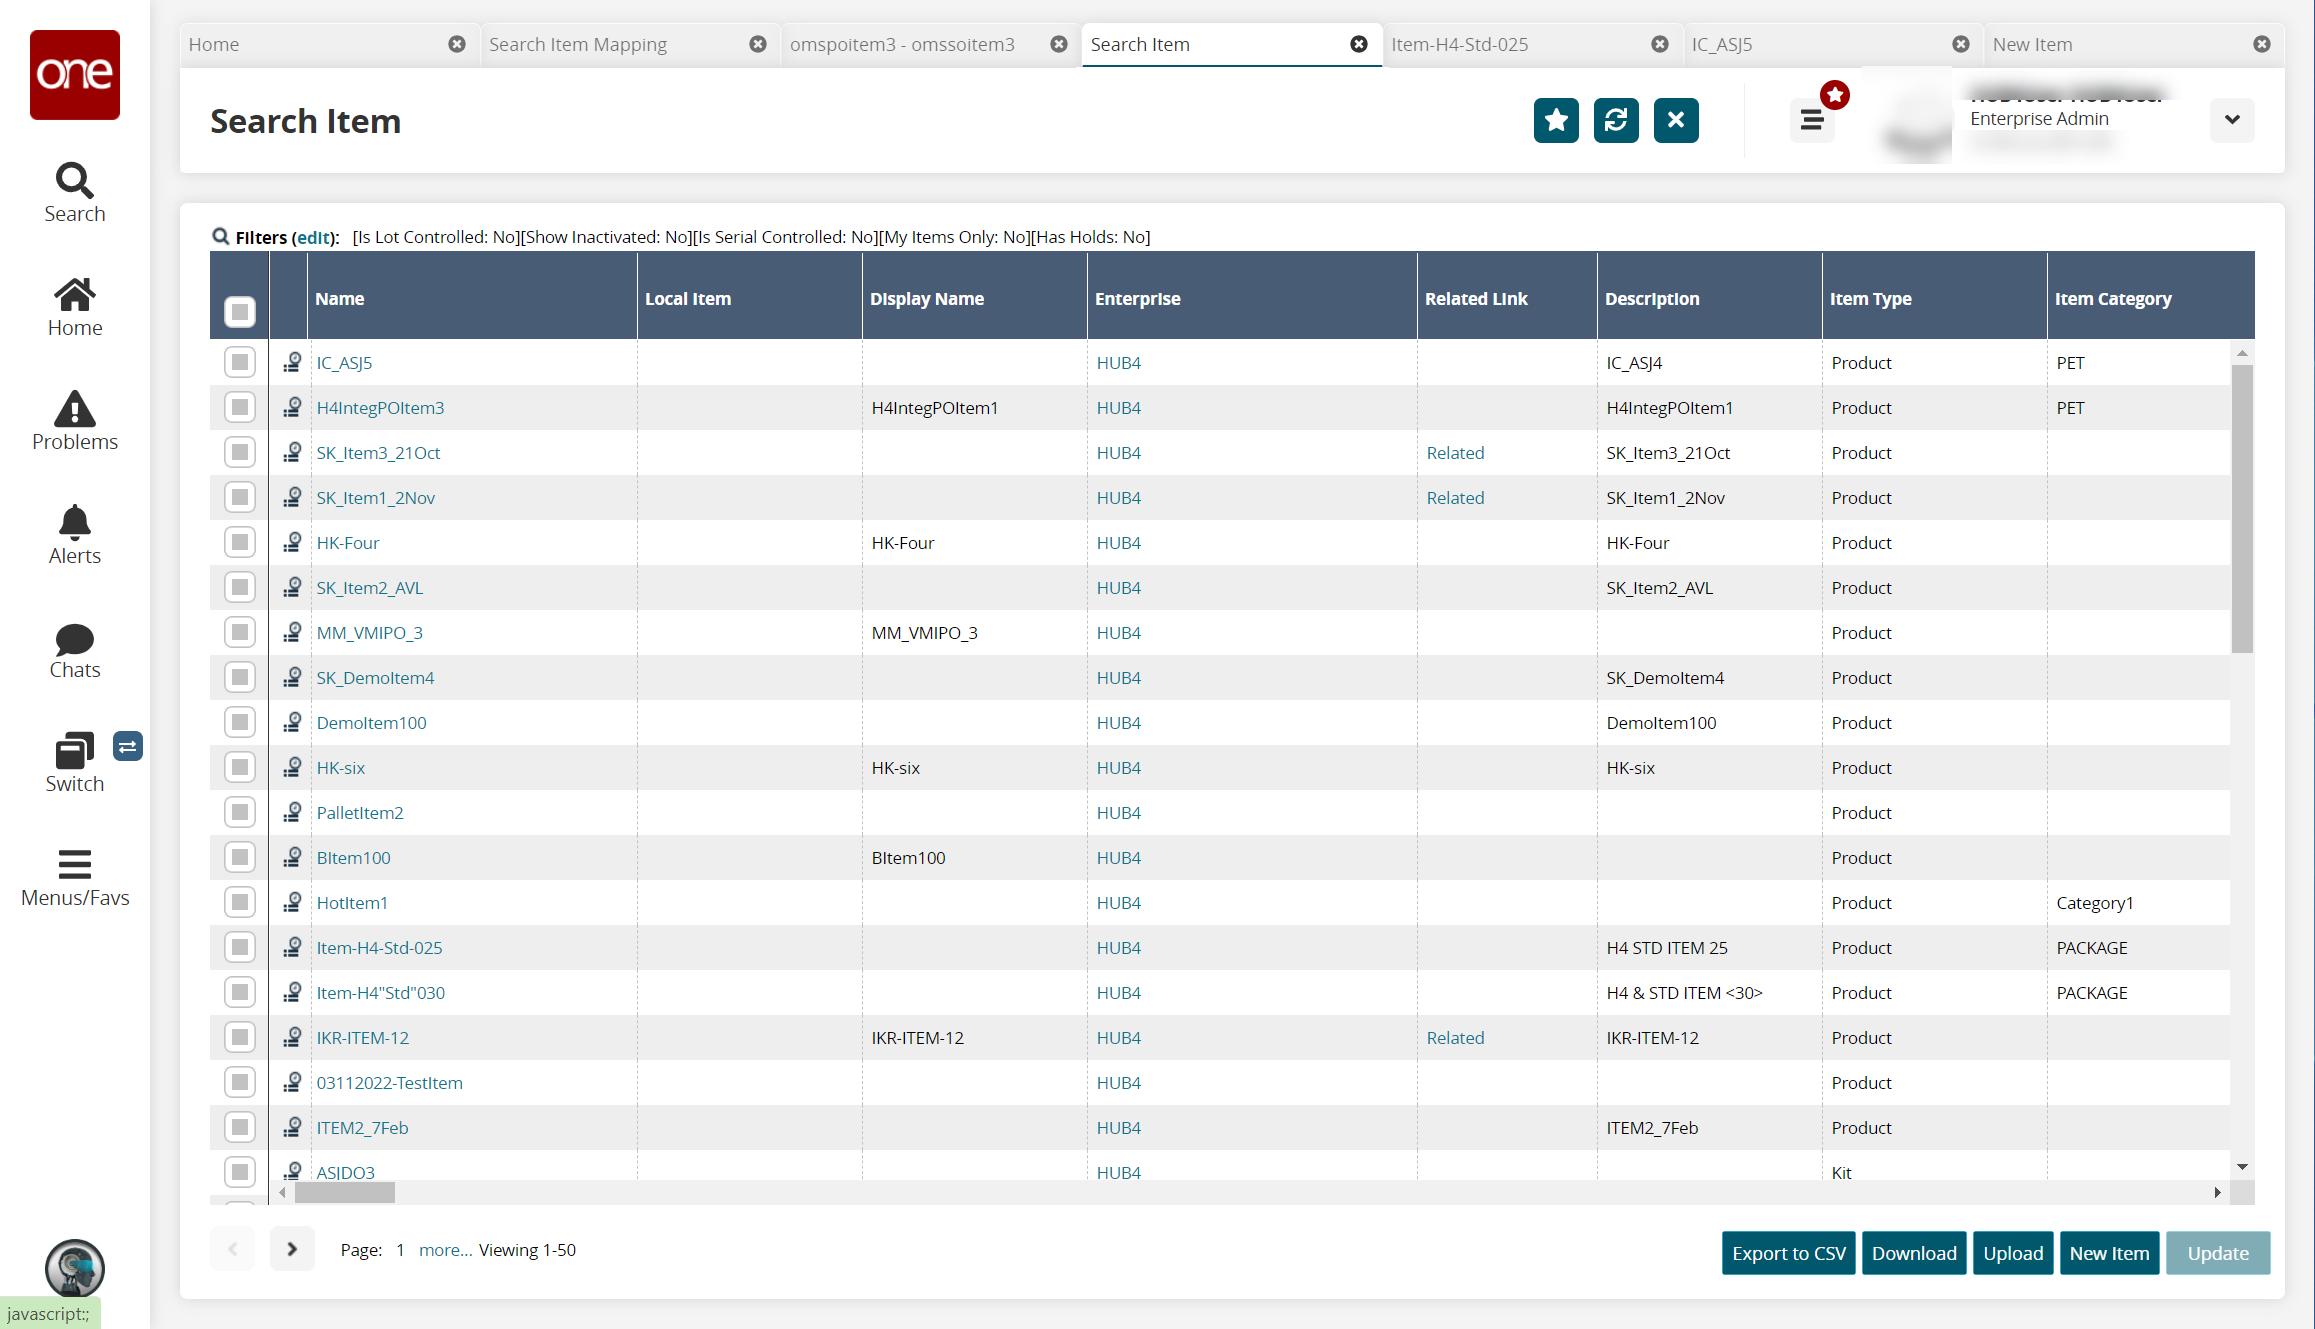
Click the Filters (edit) link.
The filter box displays.
(Optional) Type or select values for the search fields, and then click the Search link.
All items that match the search criteria display in the list of items.
In the Name column, click a link for a item.
The item details screen displays, showing details about the selected item.
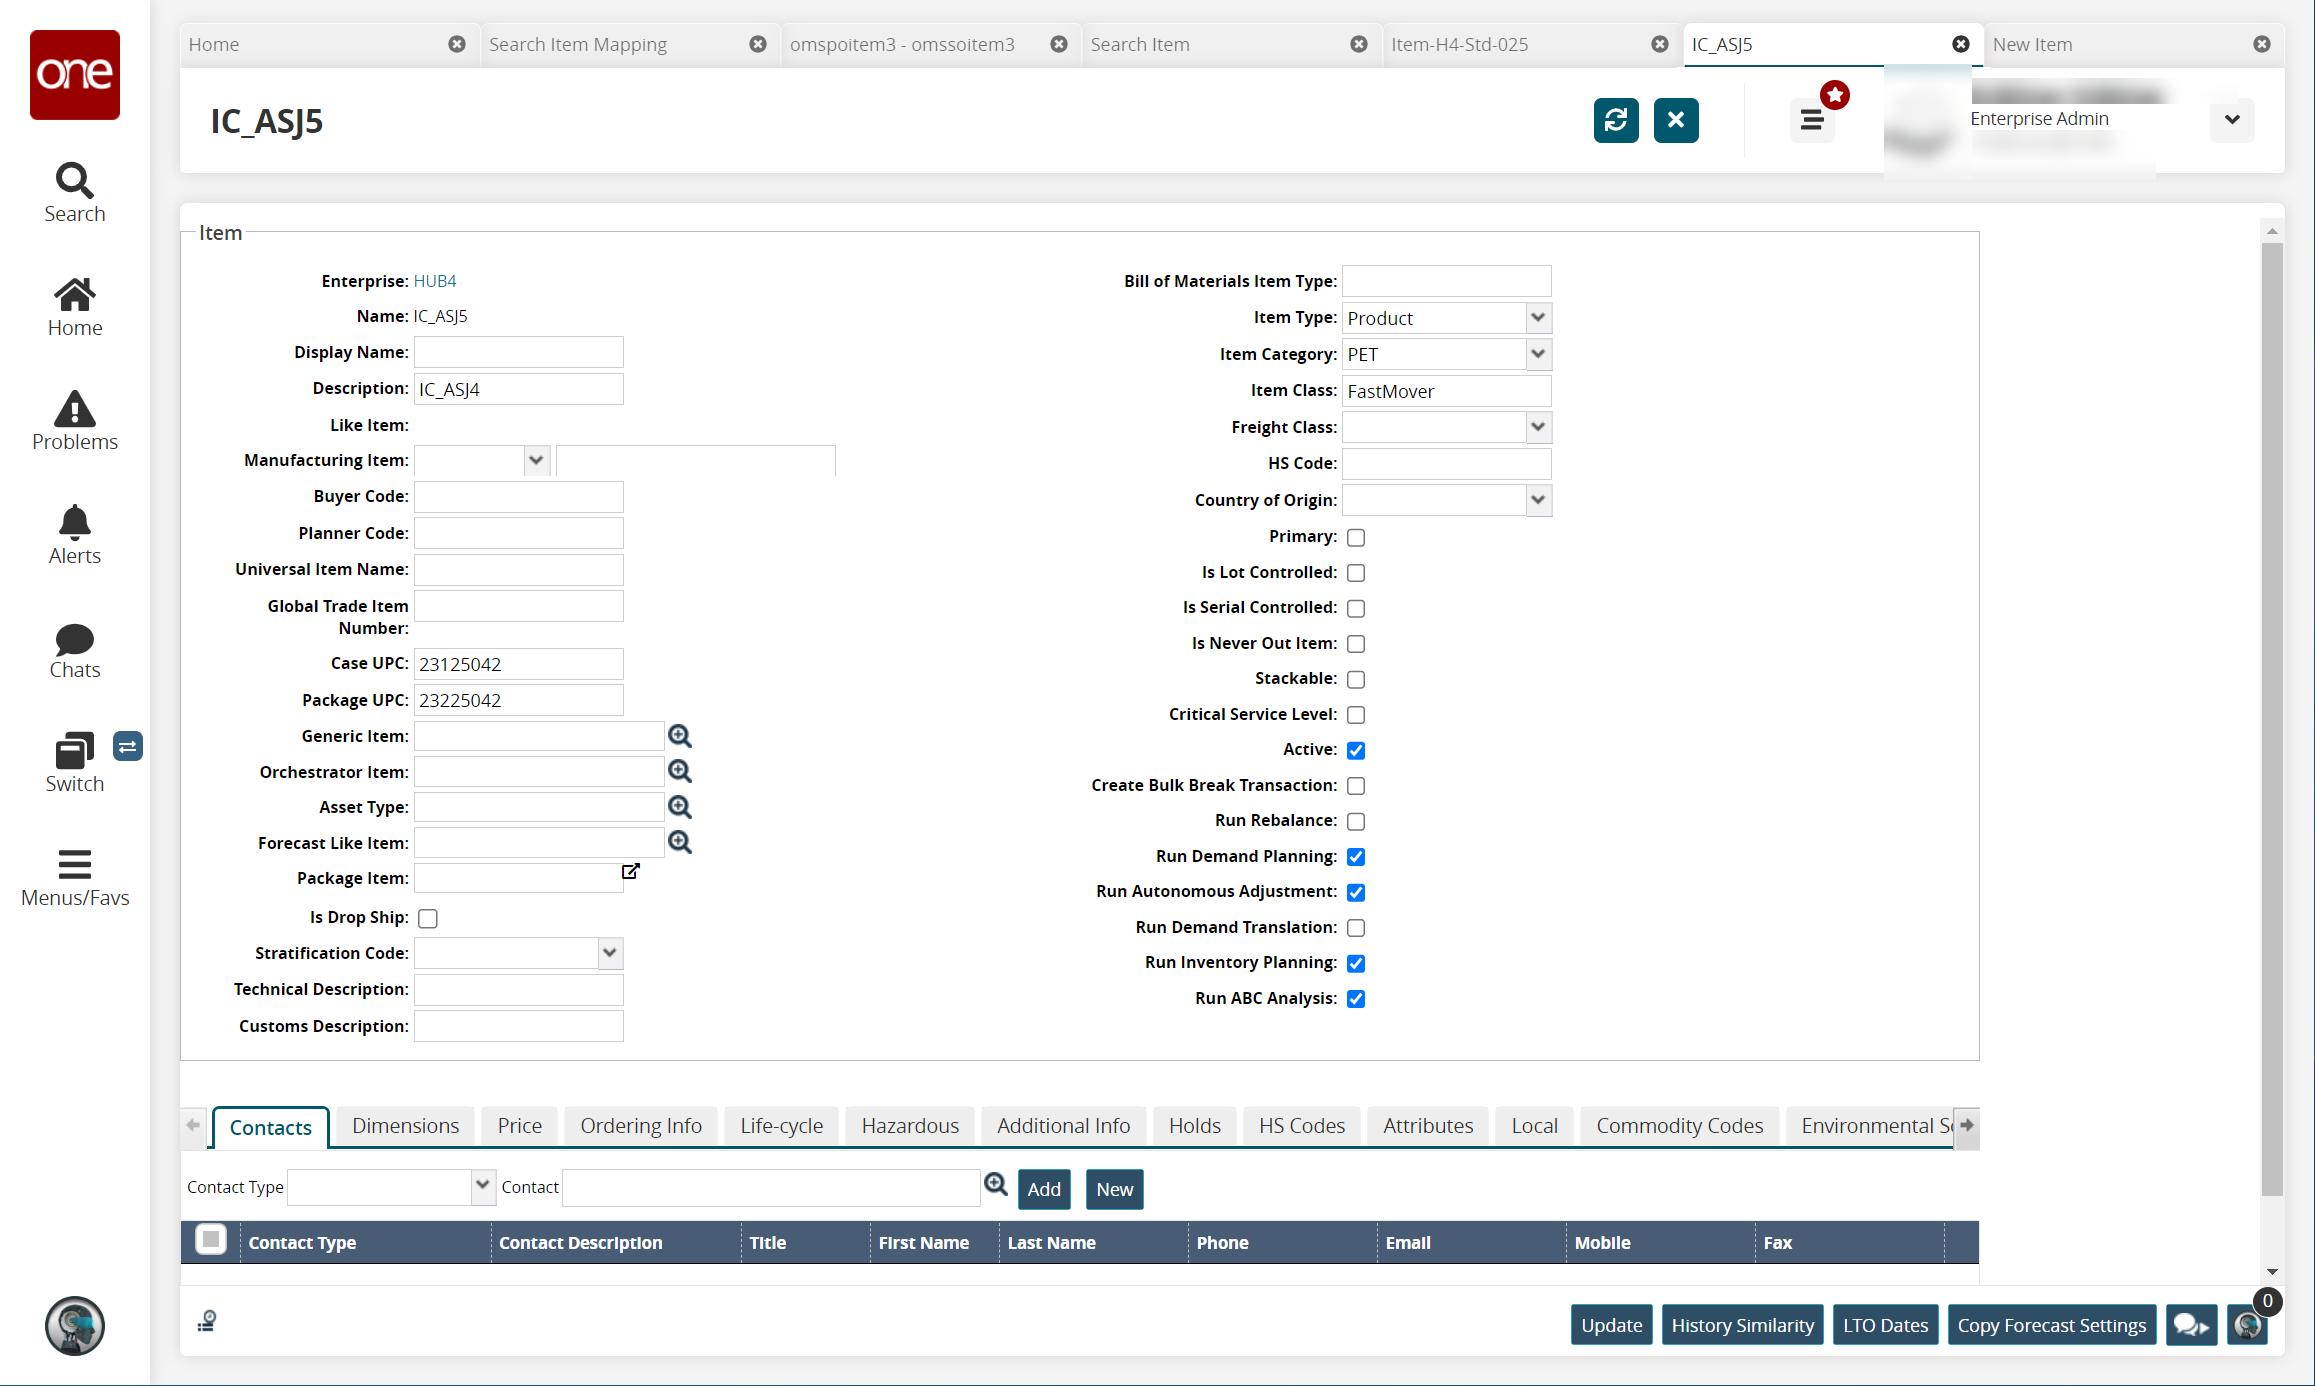
Type or select values for the fields. See the "Adding Items in the Item Master" section in NEO Online Help for information about the fields on this screen.
Click Update to update the record.
The item updates.
Updating the Item Master
Users with Buyer Supply Chain Admin roles and Vendor Supply Chain Admin roles can update the Item Master. Users with Vendor Supply Chain Admin roles can update the Items in Item Master data for creating and updating Purchase Orders, Sales Orders, and Deployment Orders.
Complete the following steps to update the item master:
Click Menus/Favs > Administration > Search Item.
The Search Item screen displays.
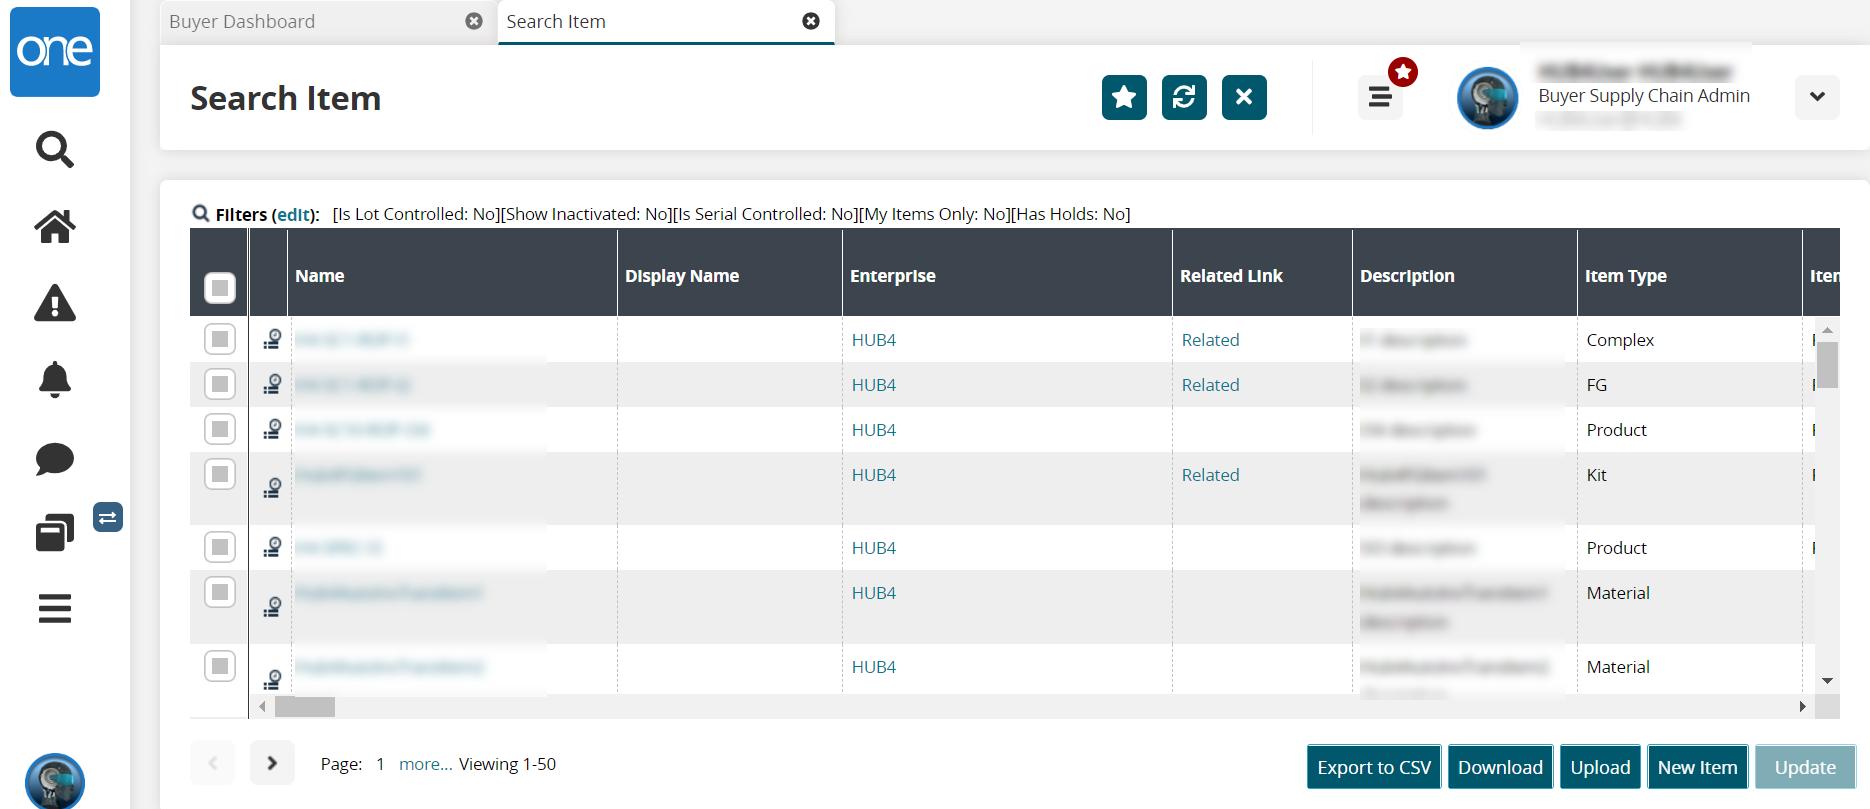
Under the Name column, click the name link.
The item's details page displays.
For descriptions of specific fields on this screen and the tabs, please see the following sections:
Partners
You can create, search, and edit partners for your enterprise as necessary.
Customer Partners
Adding Customer Partners
Complete the following step to add customer partners:
Click Menus/Favs > Administration > Partners > Customer Partners.
The Customer Partners screen displays.
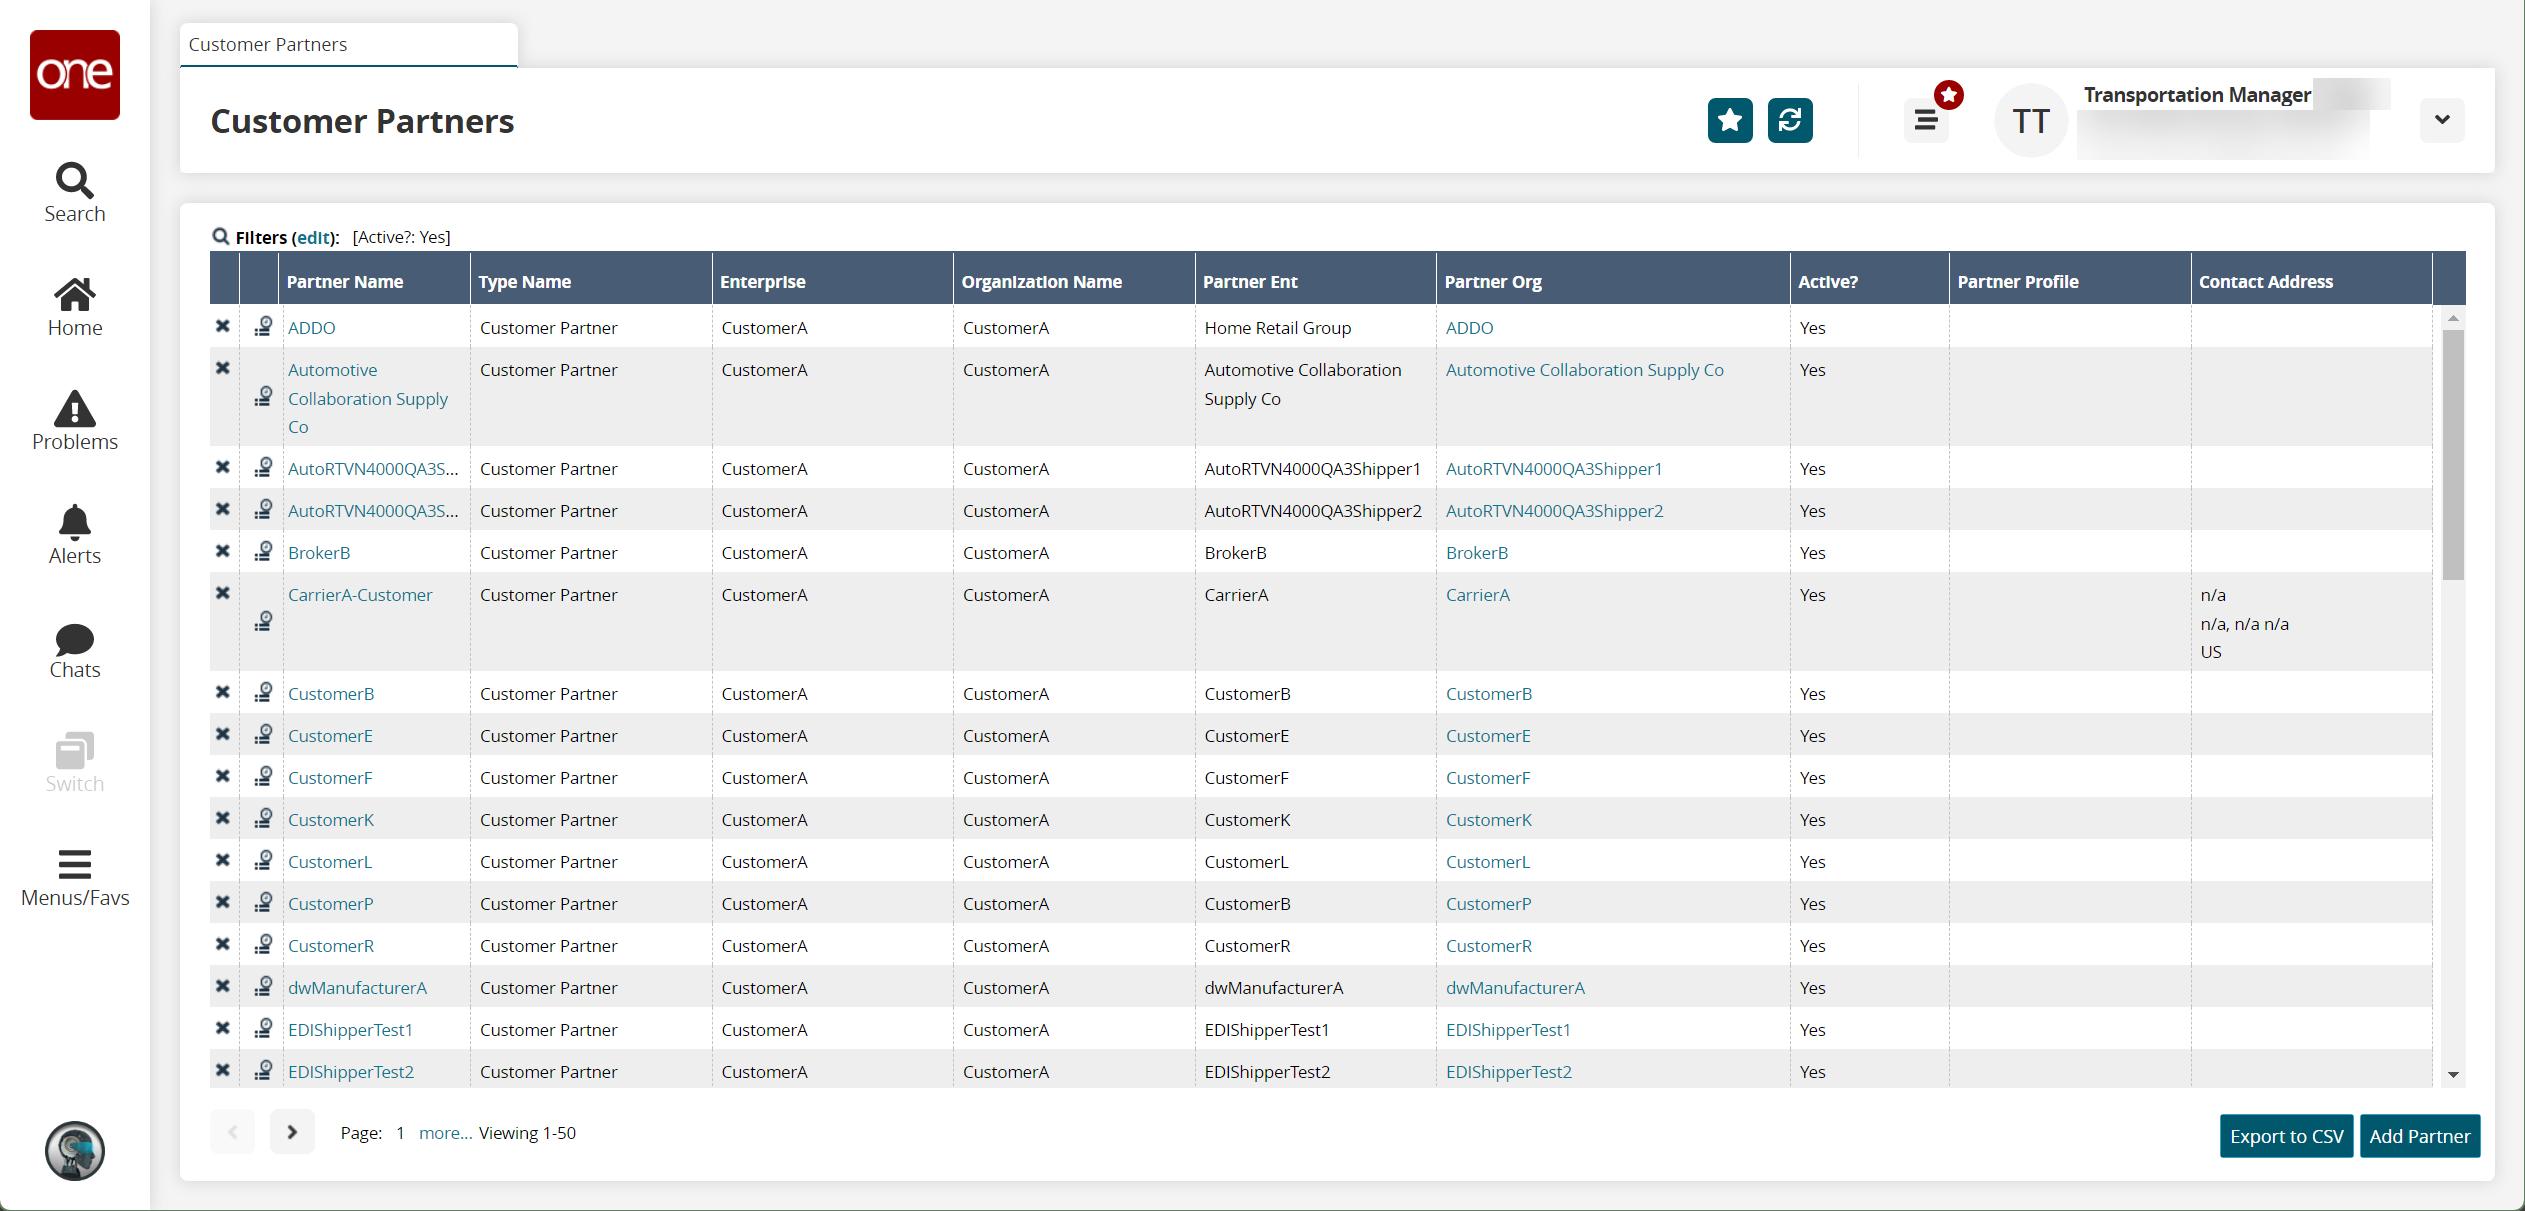
Click the Add Partner button.
The New Customer Partner screen displays.
Enter a Partner Name.
Select a Partner Organization using the picker tool.
Select the Auto Convert Freight Terms checkbox if .
Click Save.
A success message displays.
Complete the following steps to add partner profiles to partners:
From the Customer Partners screen, click a Partner Name link.
The partner details screen displays.
Click the Partner Profile tab.
Click the Add Partner Profile button to add a new partner profile.
The New Partner Profile screen displays.

Field
Description
*Name
Enter a partner profile name,
Delivery Load Type
Select a delivery load type from the drop-down menu.
Pickup Load Type
Select a pickup load type from the drop-down menu.
Delivery Appointment Code
Select a delivery appointment code using the picker tool.
Pickup Appointment Code
Select a pickup appointment code using the picker tool.
Delivery Commodity Code
Select a delivery commodity code using the picker tool.
Pickup Commodity Code
Select a pickup commodity code using the picker tool.
Transportation Instructions
Enter any transportation instructions.
Note
Enter any additional notes.
Click Save.
The new partner profile displays in the list.
Searching Customer Partners
Complete the following steps to search for customer partners:
Click Menus/Favs > Administration > Partners > Customer Partners.
The CustomerPartners screen displays.
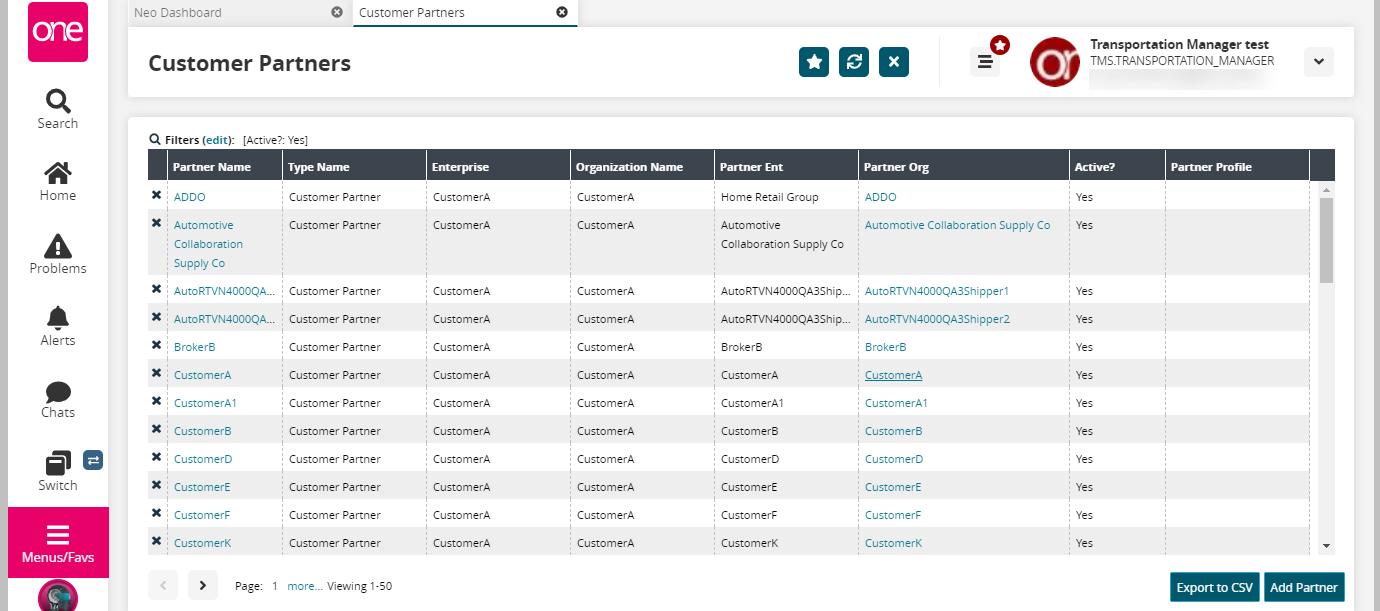
Click Export to Excel to export the report to a file.
Note
Depending on the configuration settings of your instance of the ONE system, an additional drop-down menu may display that includes the option to export the data in a CSV file.
In the Partner Name column, click the customer name link to view the details of the customer partner.
The customer partner details screen displays with the General tab details.

Click the Deactivate button to deactivate the customer partner.
Click the Partner Profile tab to view the partner profile details.
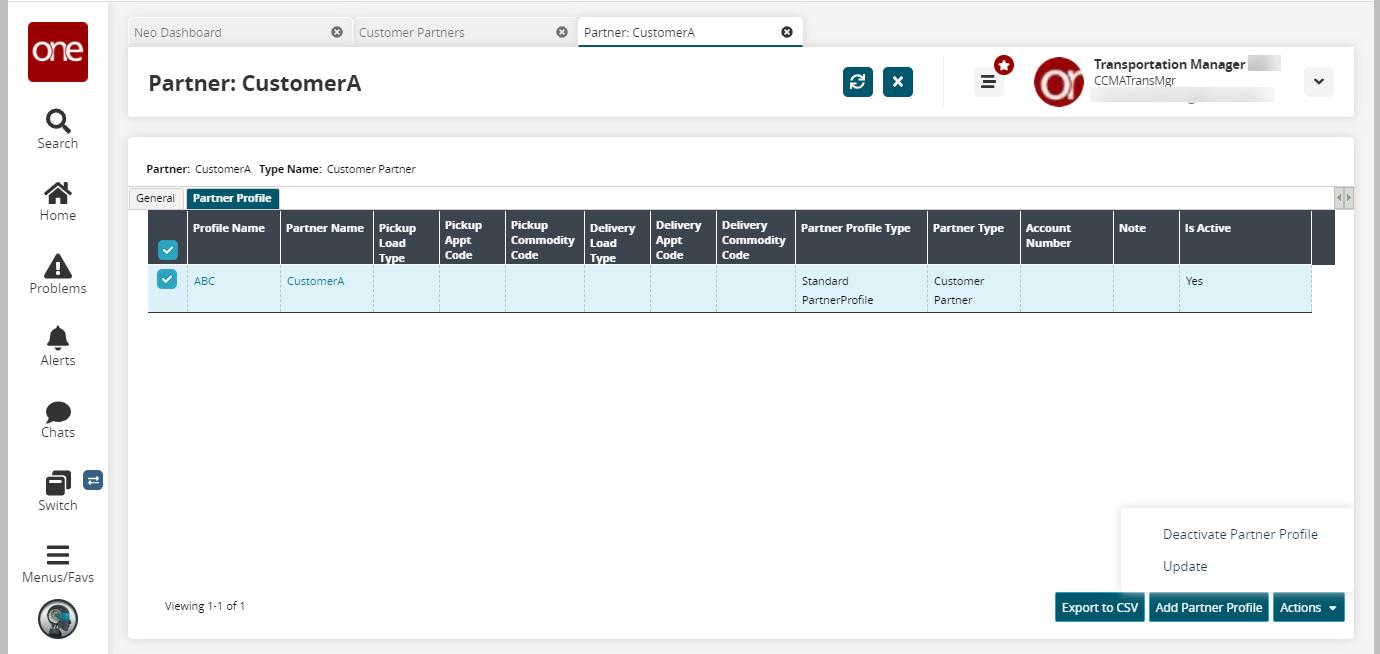
Click the checkbox of the Profile Name to select the partner.
Click the Actions button to perform an action.
Click Export to Excel to export the report to a file.
Note
Depending on the configuration settings of your instance of the ONE system, an additional drop-down menu may display that includes the option to export the data in a CSV file.
Click the Add Partner Profile button to add a partner profile.
The New Partner Profile screen displays.
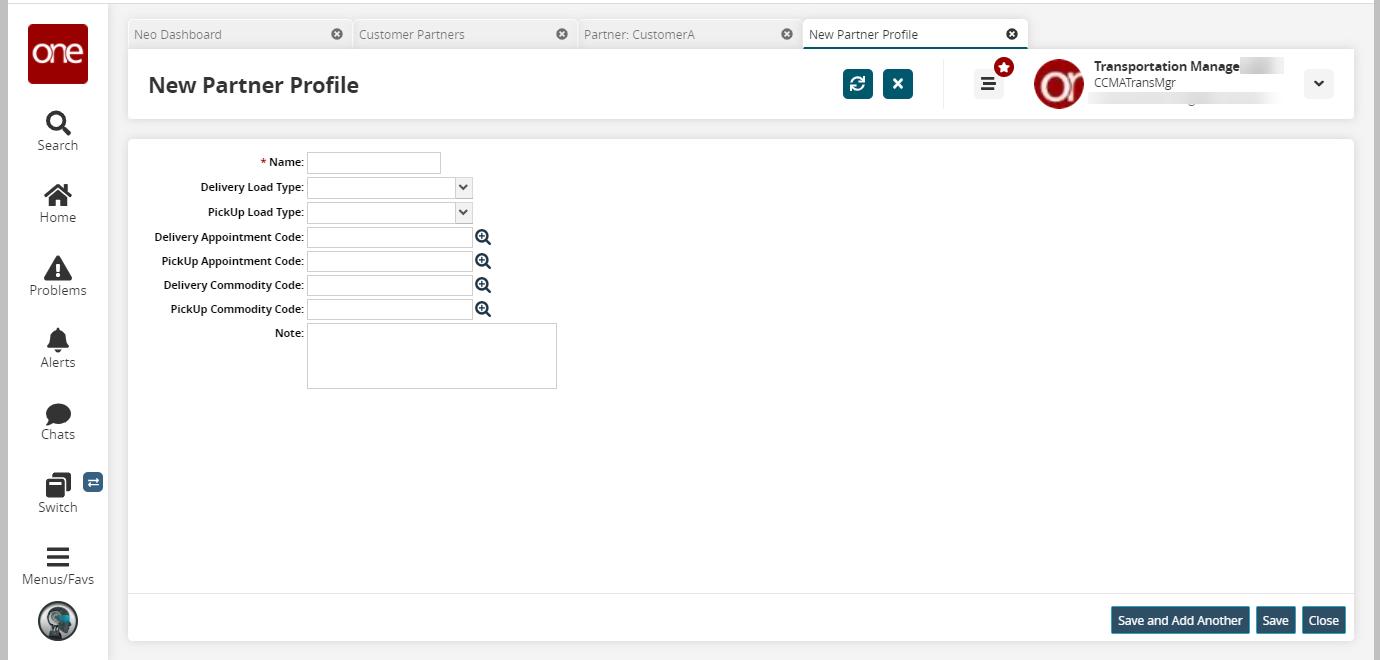
Field
Description
*Name
Enter the name of the partner profile in the Name field.
Delivery Load Type
Select the delivery load type from the drop-down lists
Pickup Load Type
Select the pickup load type from the drop-down lists
Delivery Appointment Code
Select the delivery appointment code with the picker tool.
Pickup Appointment Code
Select the pickup appointment code with the picker tool.
Delivery Commodity Code
Select the delivery commodity code with the picker tool.
Pickup Commodity Code
Select the pickup commodity code with the picker tool.
Note
Enter a note in the Note field.
Click the Save and Add Another button to save the partner profile and add another.
Click the Close button to close the partner profile.
Partner Profiles
Adding a Partner Profile from the Search Partner Profile Screen
Complete the following steps to add partner profiles:
Click Menus/Favs > Partners > Search Partner Profile.
The Search Partner Profile screen displays.
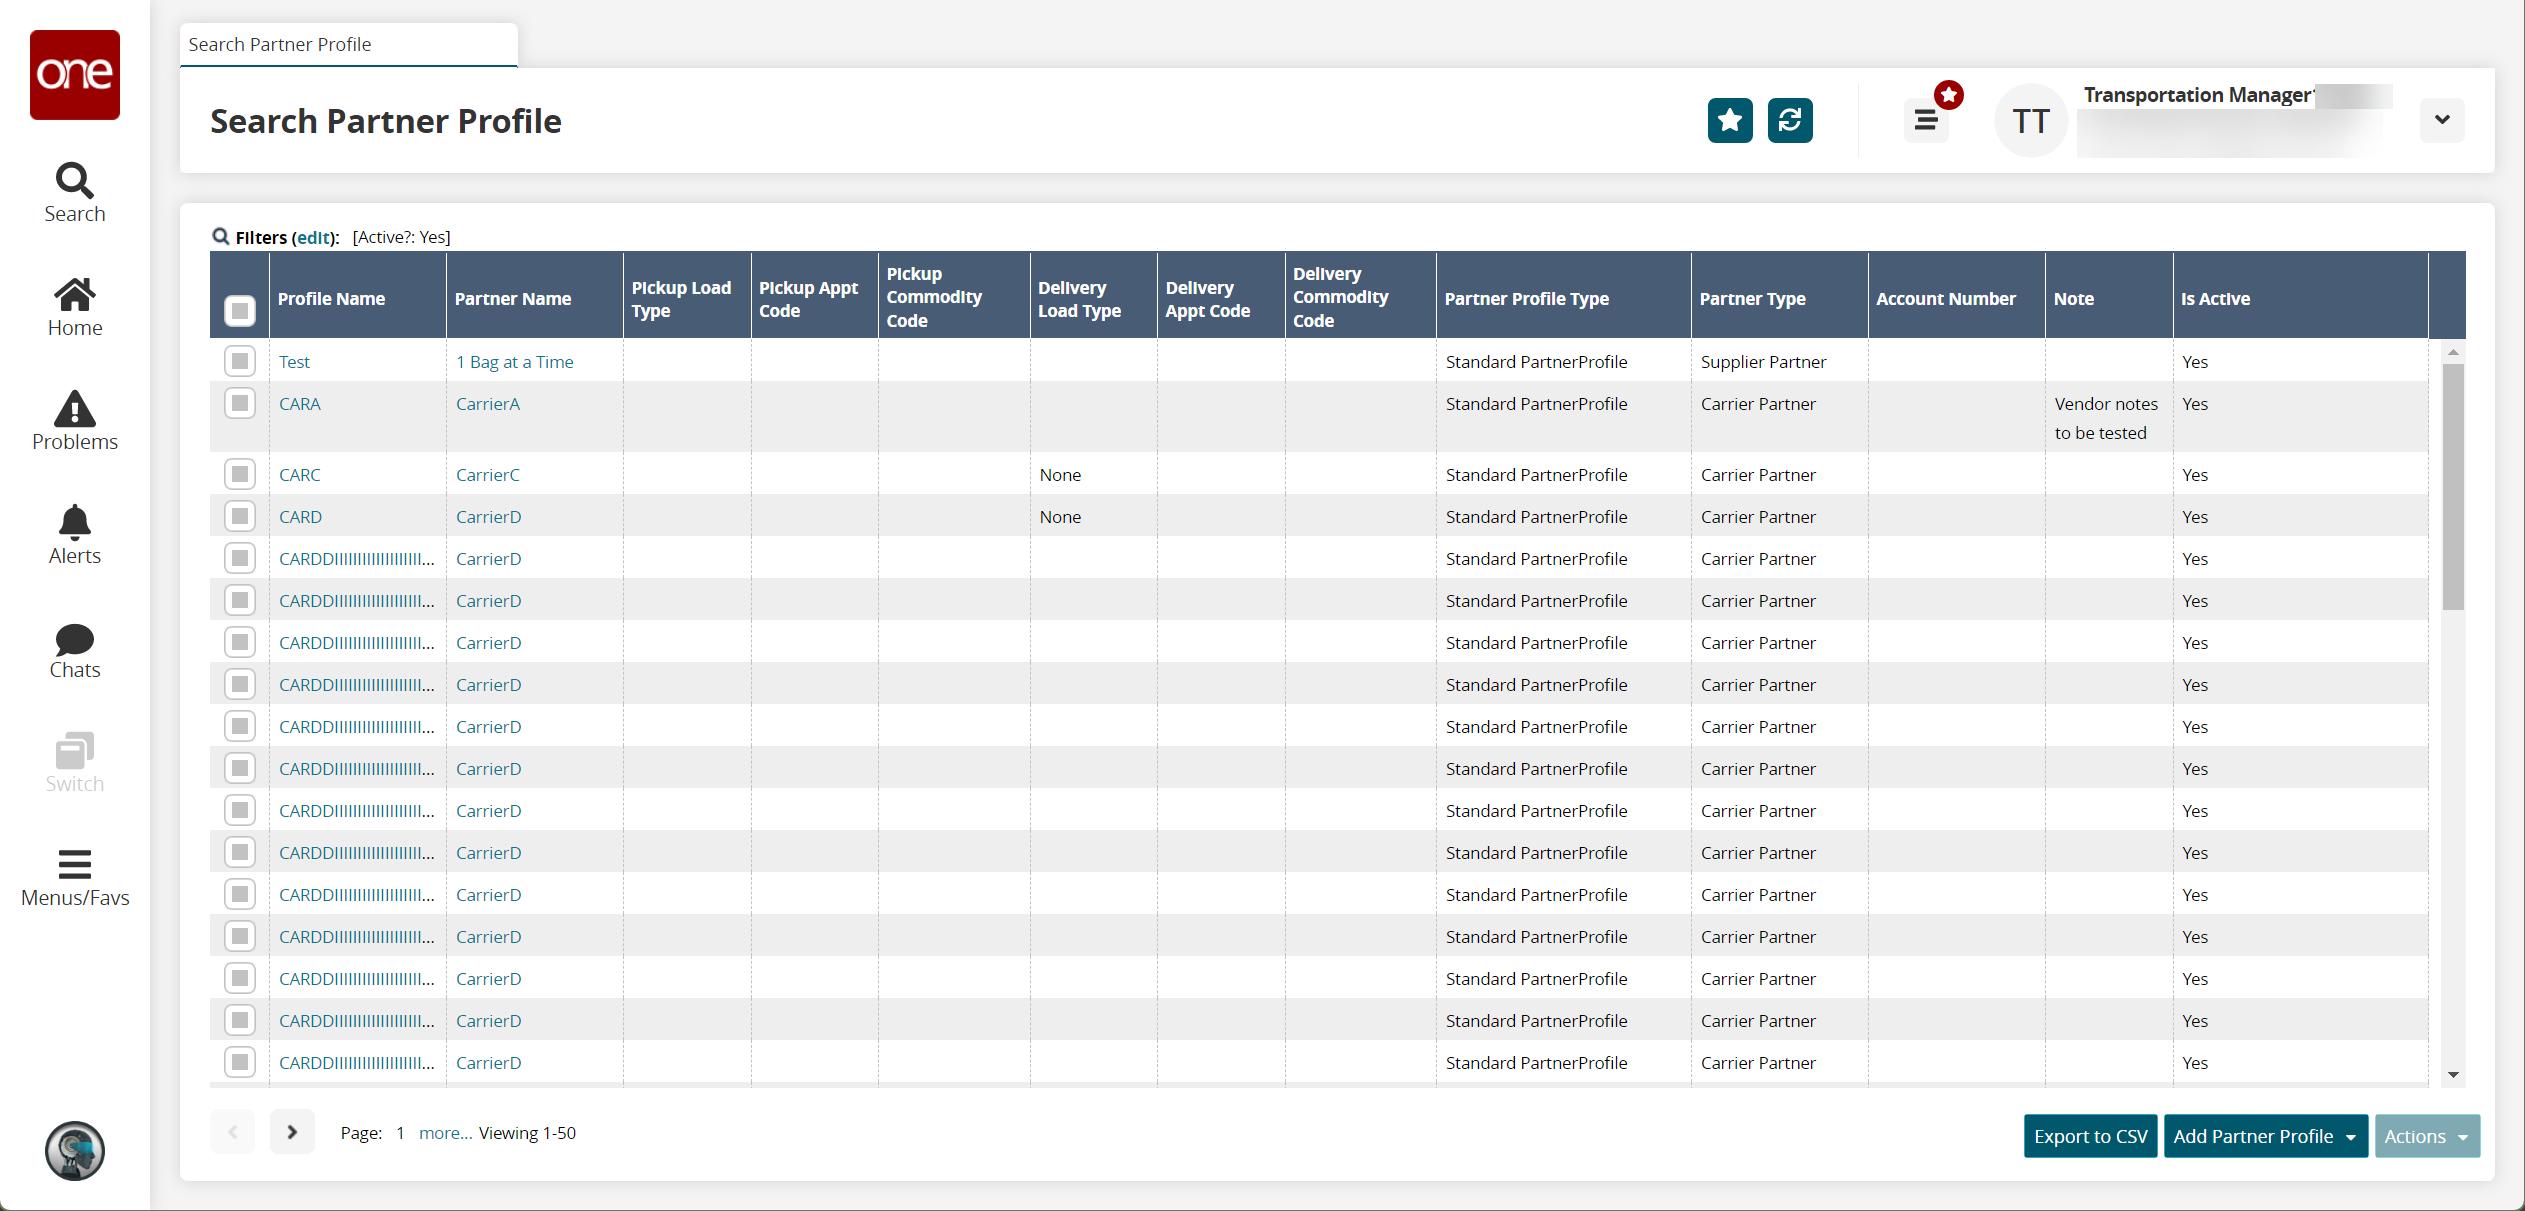
Click the Add Partner Profile button, and select a partner profile type. Profile types include client, carrier, customer, and supplier. All types are described below.
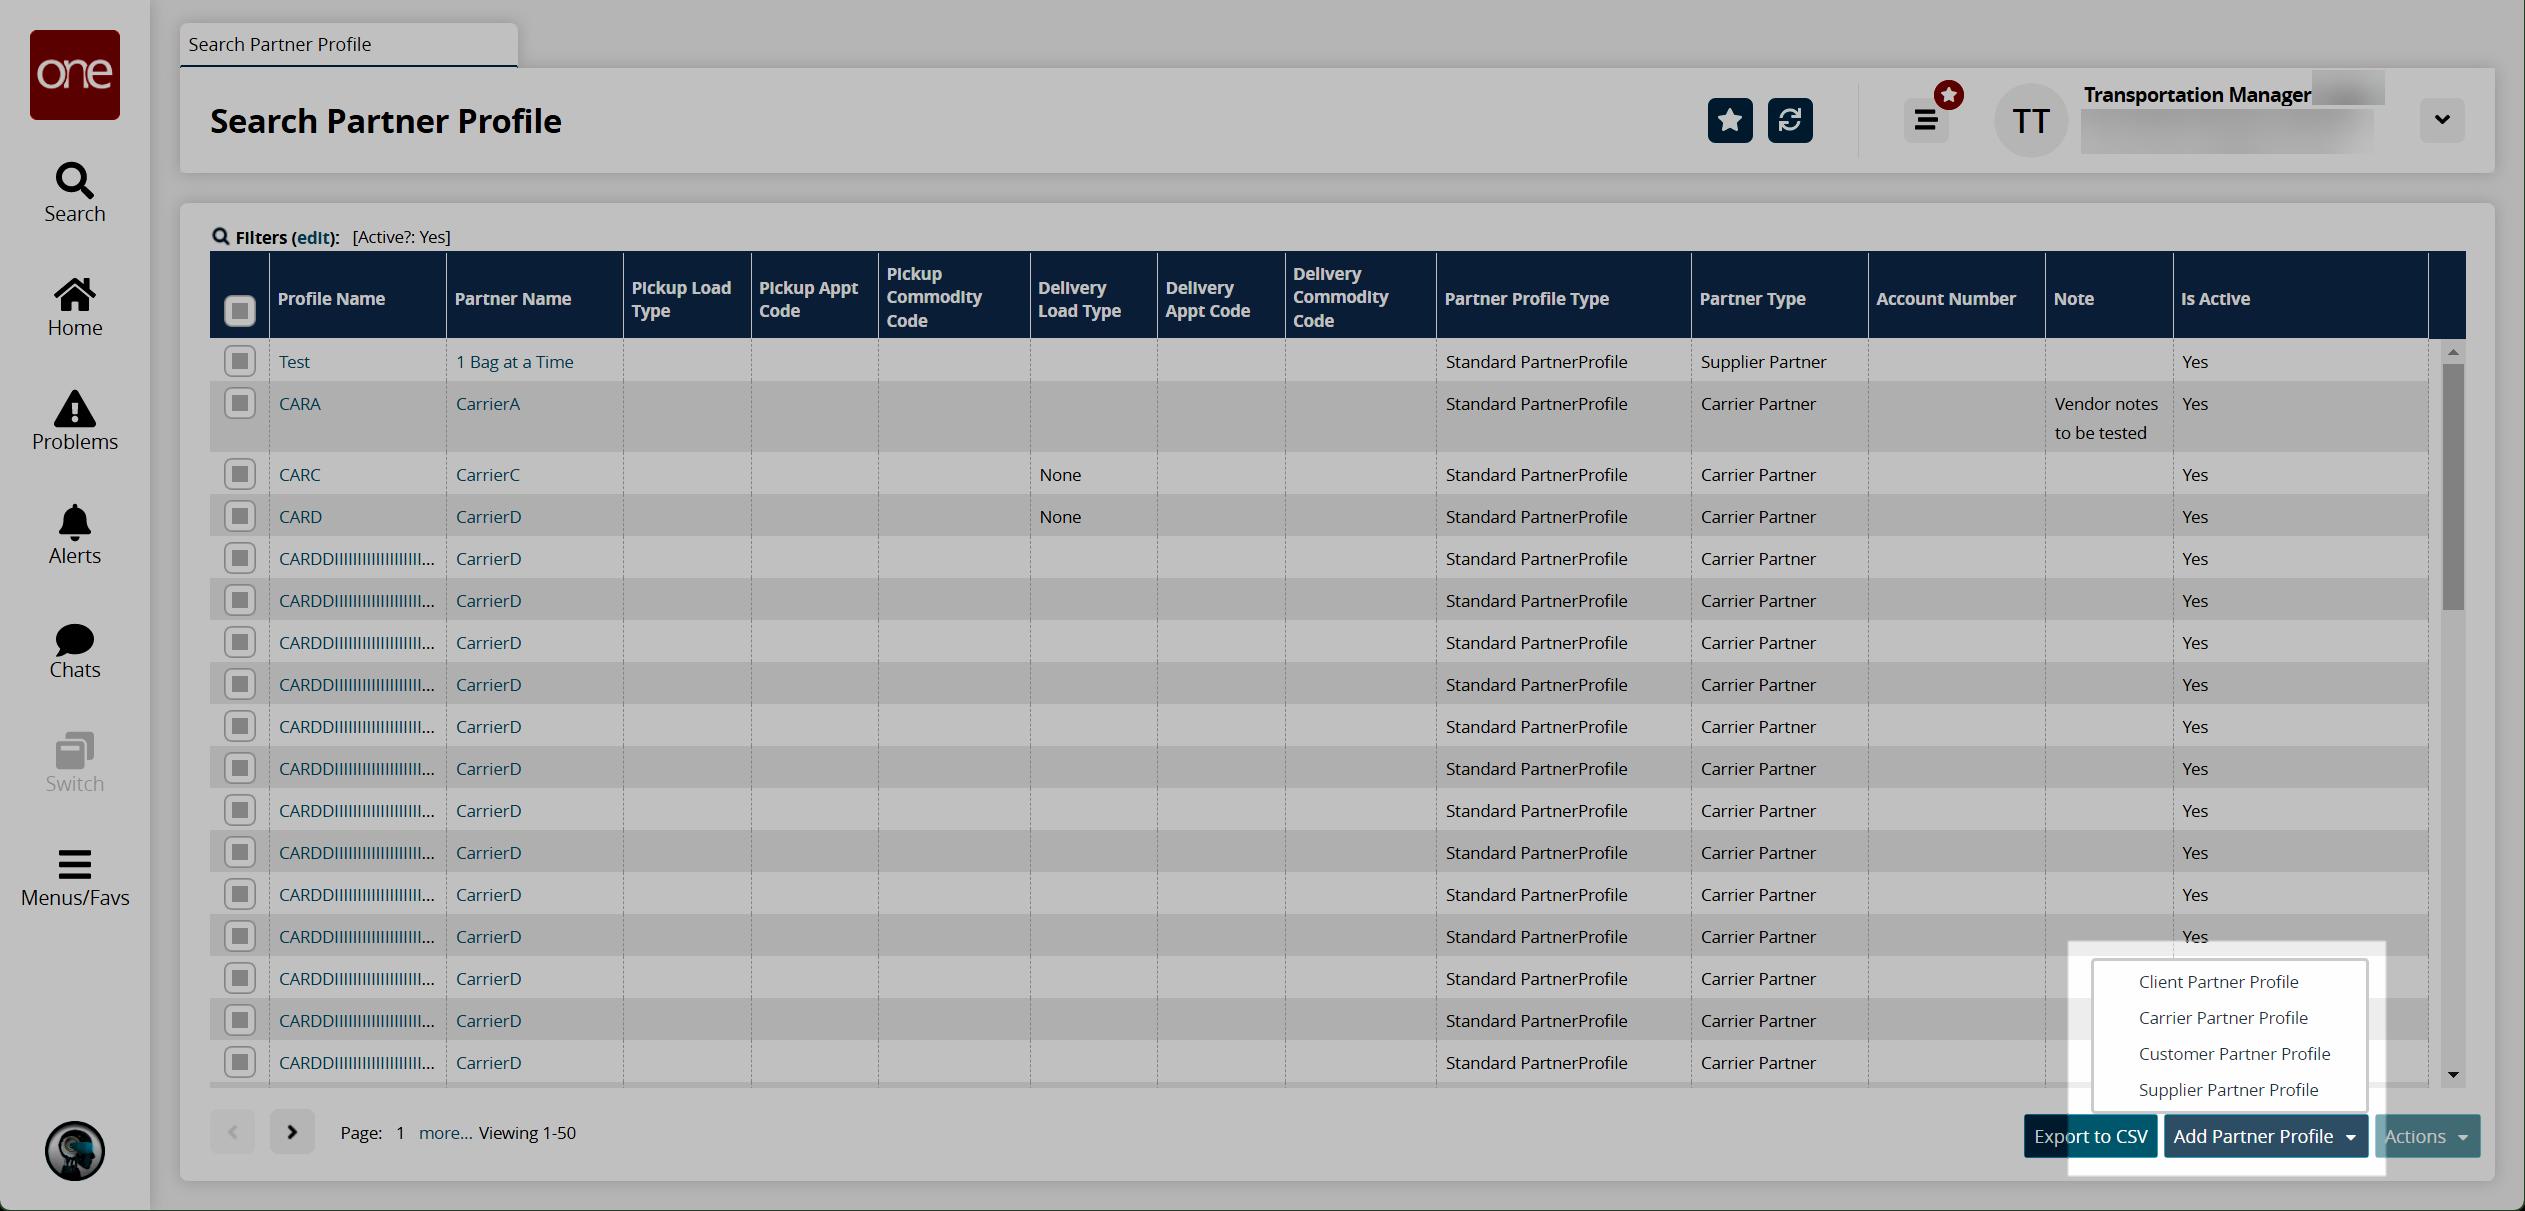
The New Partner Profile screen displays.
Click the Client Partner Profile option.
The New Partner Profile (for a client) screen displays.

Field
Description
*Partner
Select a partner using the picker tool.
*Name
Enter a name.
Account Number
Select an account number using the picker tool.
Transportation Instructions
Enter any transportation instructions.
Note
Enter any additional notes.
Click the Carrier Partner Profile option.
The New Partner Profile (for a carrier) screen displays.
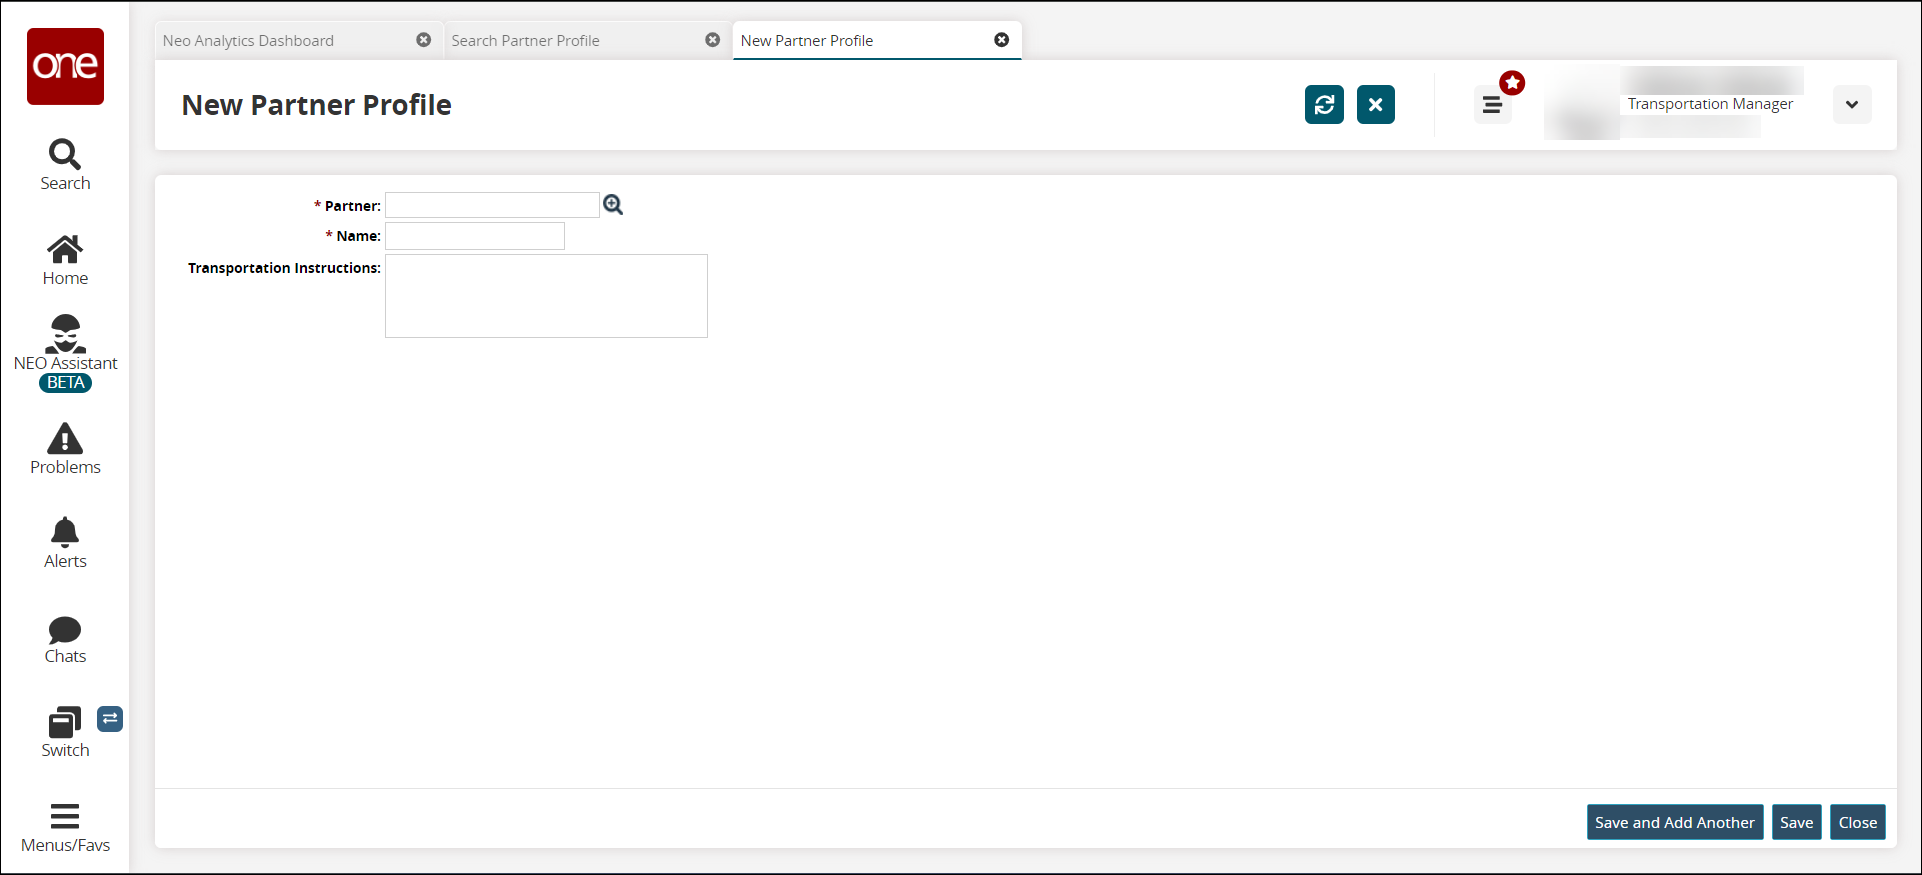
Field
Description
*Partner
Select a partner using the picker tool.
*Name
Enter a name.
Transportation Instructions
Enter any transportation instructions.
Click the Customer Partner Profile option.
The New Partner Profile (for customers) screen displays. The Supplier Partner Profile option displays the same screen and fields.
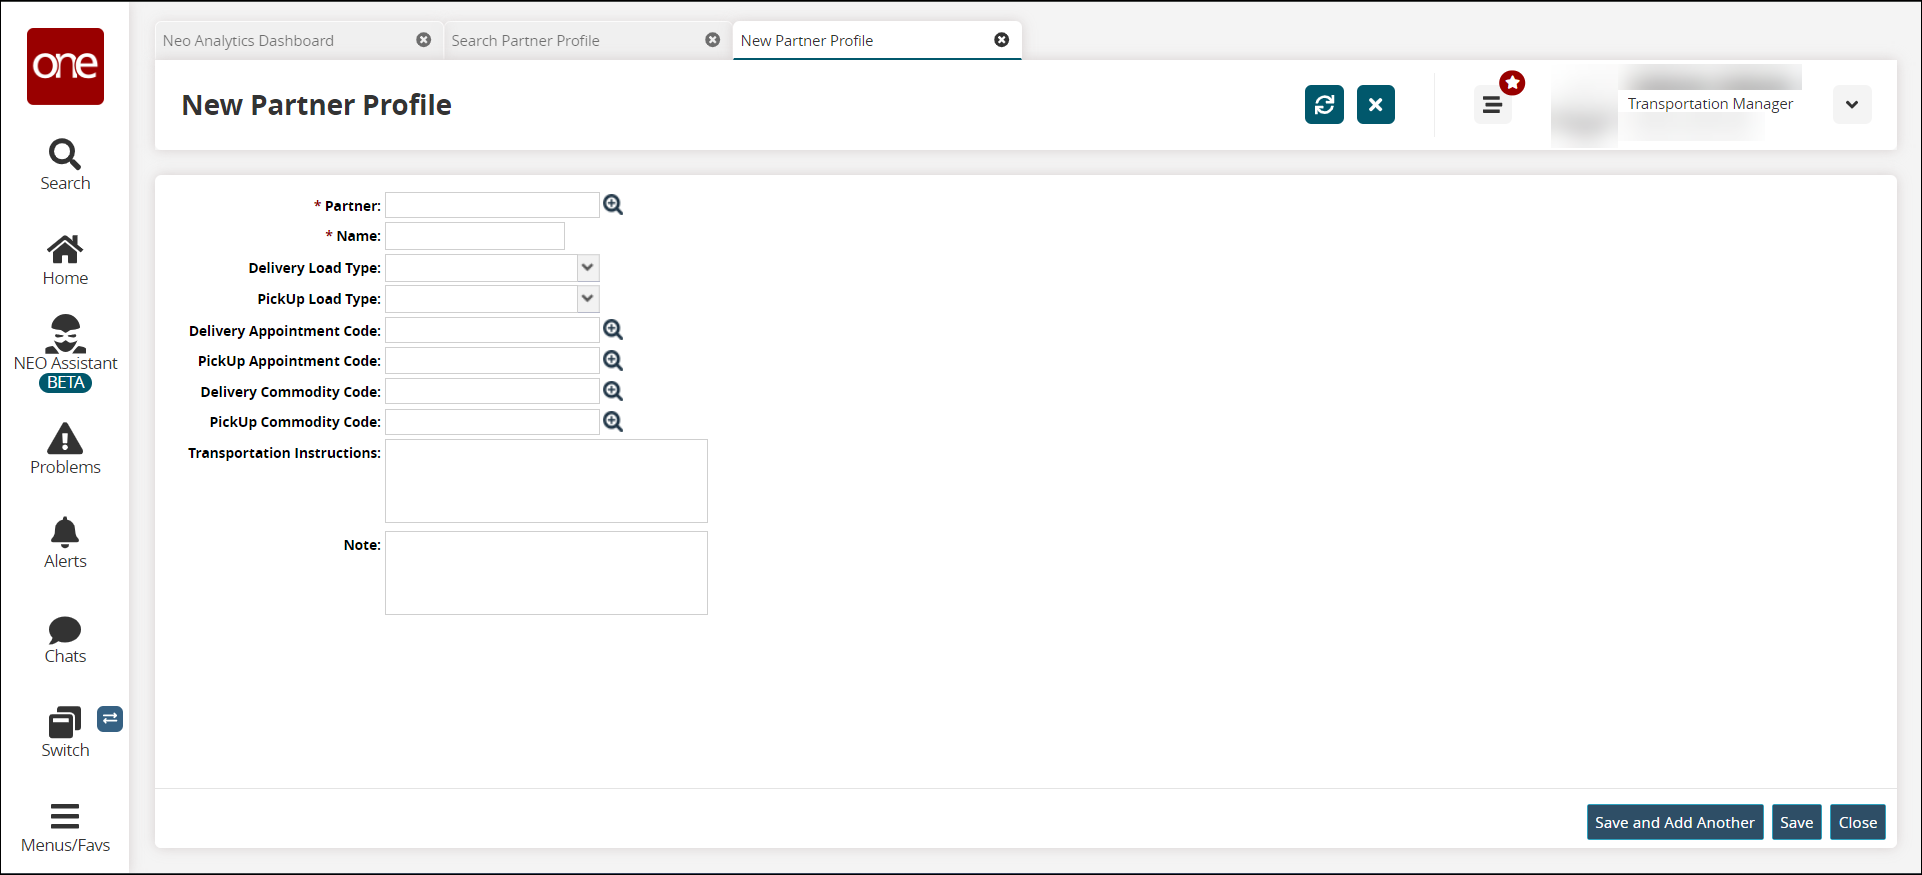
Field
Description
Name
Delivery Load Type
Select the load type for deliveries from the drop-down list.
PickUp Load Type
Select the load type for pickups from the drop-down list.
Delivery Appointment Code
Select the appointment code for deliveries using the picker tool.
PickUp Appointment Code
Select the appointment code for pickups using the picker tool.
Delivery Commodity Code
Select the commodity code for deliveries using the picker tool.
PickUp Commodity Code
Select the commodity code for pickups using the picker tool.
Transportation Instructions
Enter any transportation instructions.
Note
Enter any additional notes.
Save the new partner profile using one of the following options:
Click Save to save the new partner profile.
A success message displays.
Click Save and Add Another to save the new partner profile.
A new, blank partner profile screen displays.
Searching and Updating Partner Profiles from the Search Partner Profiles Screen
Complete the following steps to search for and update partner profiles:
Click Menus/Favs > Administration > Partners > Search Partner Profile.
The Search Partner Profile screen opens.
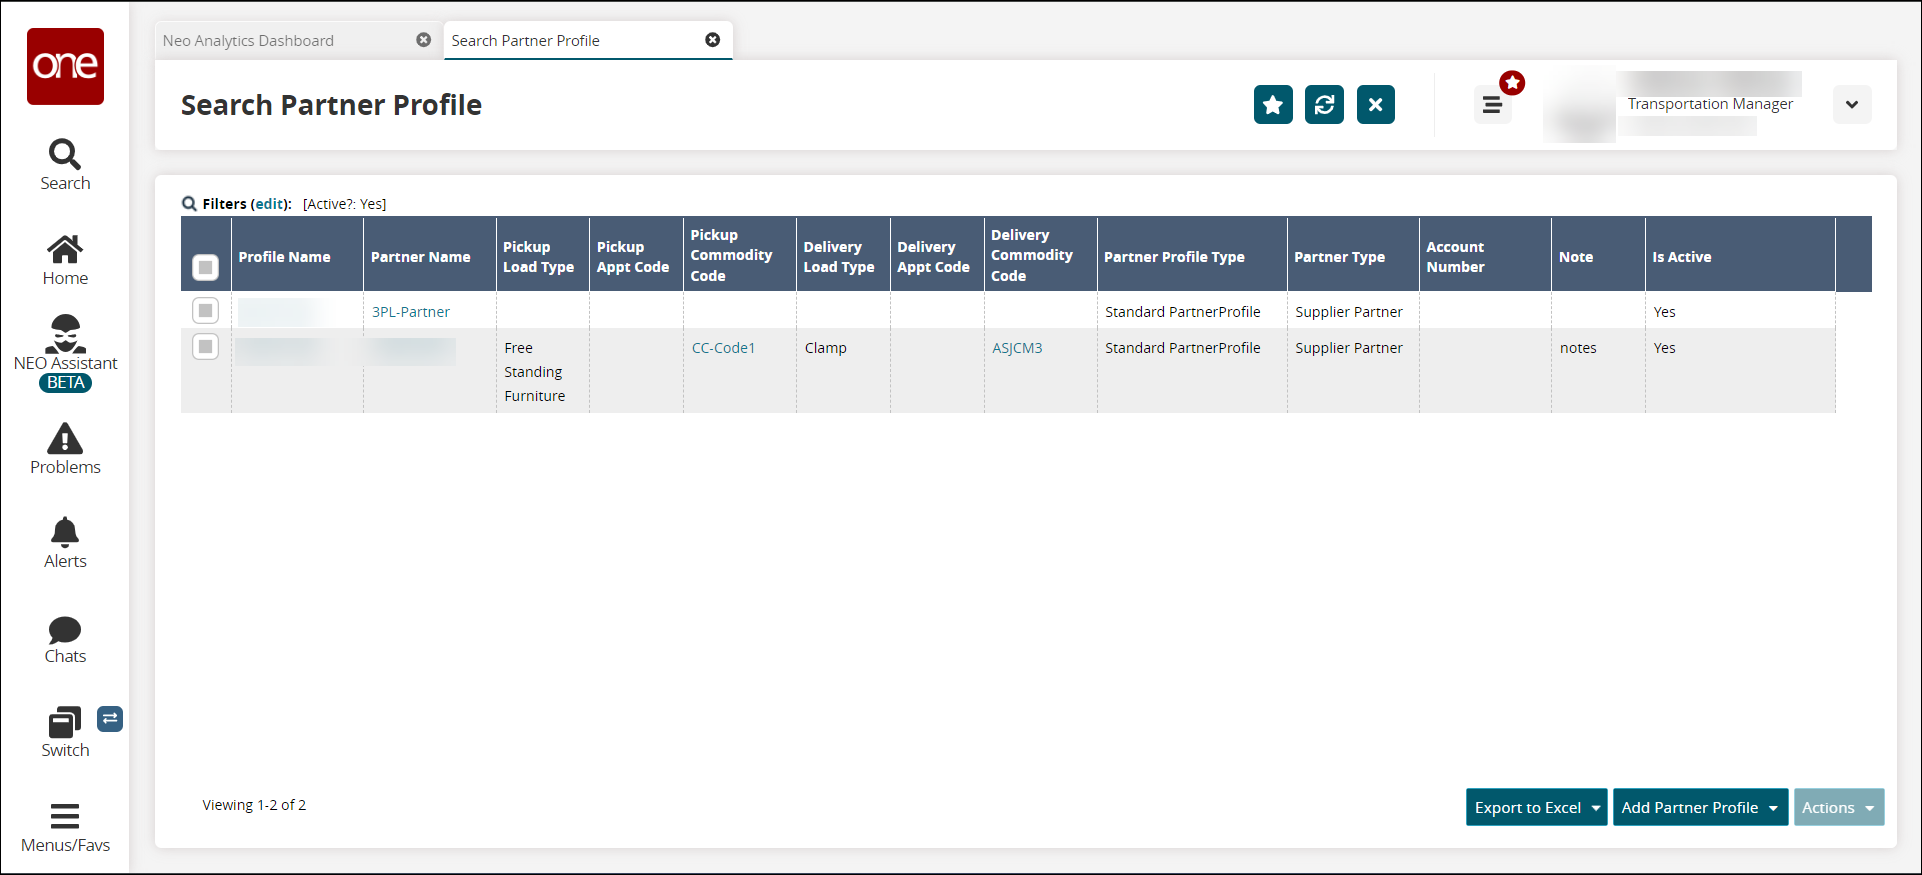
Click the Filters (edit) link to apply search criteria to reduce the number of entries shown.
The Filters menu displays.
Field
Descriptions
Partner
Select a partner associated with the profile using the picker tool
Profile Name
Enter the partner profile name.
Active?
Select an option if the profile is active from the drop-down list.
Partner Profile Type
Enter the partner profile type.
Partner Type
Enter the partner type.
Click the Search link.
The search results display.
In the Profile Name column, click the link for a partner.
The detail screen for the selected partner profile opens.
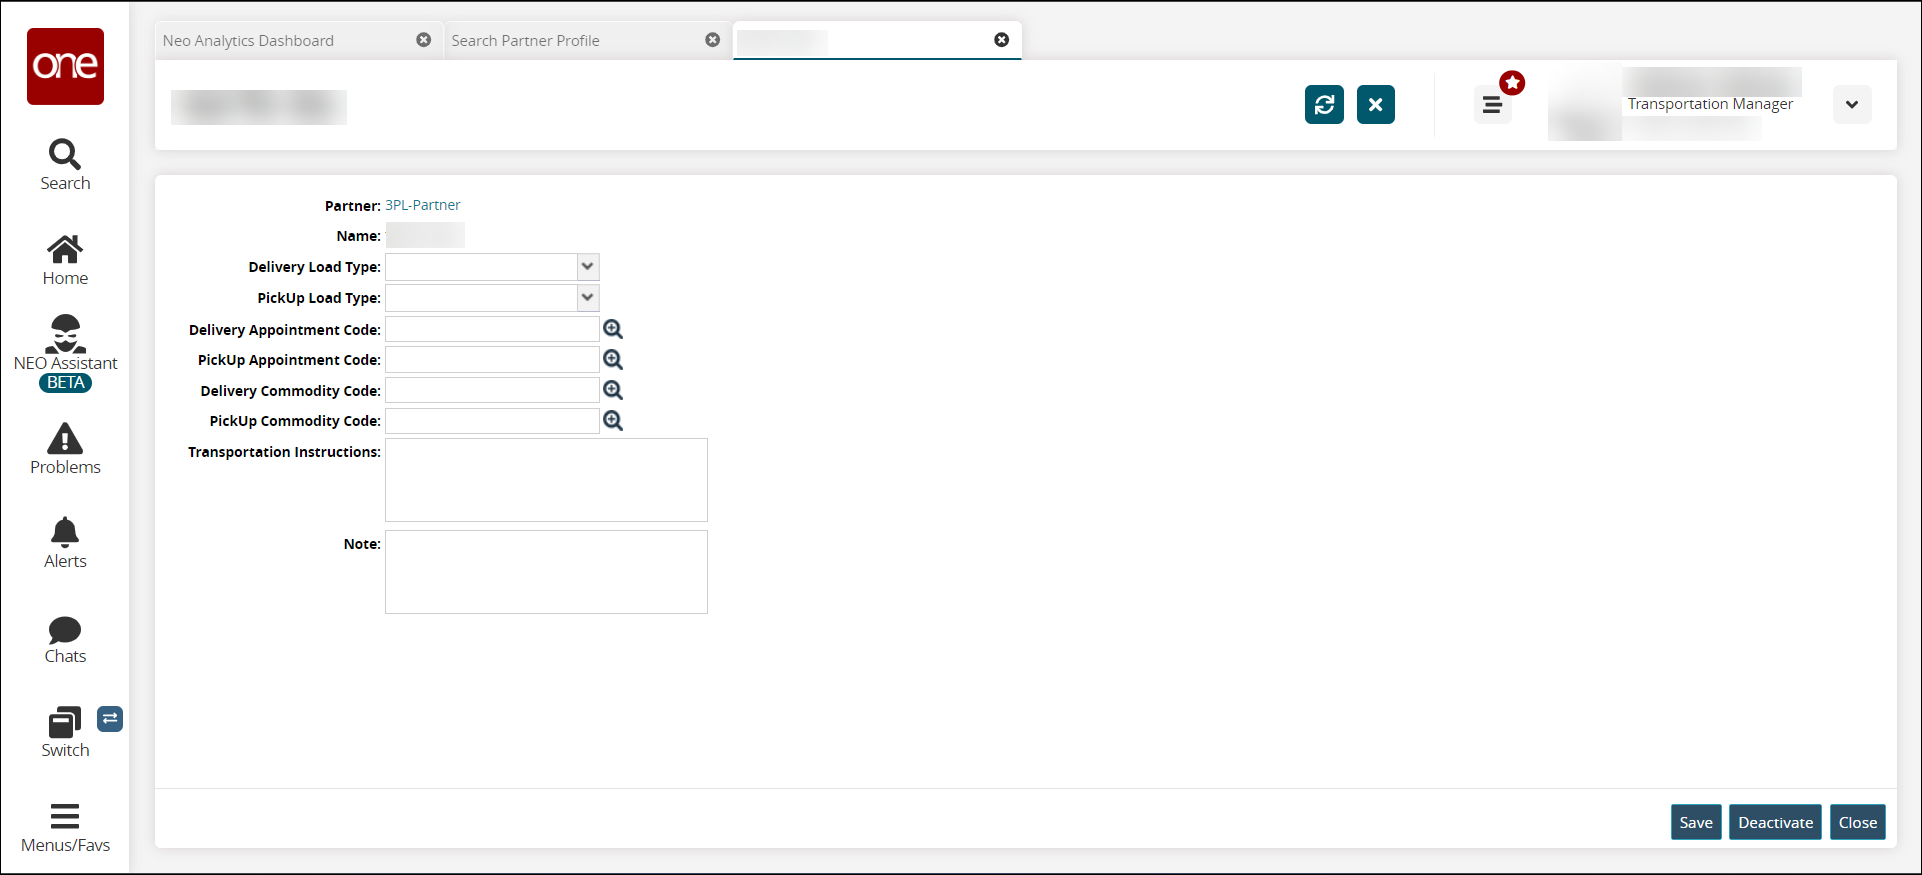
Update information as required. See the "Adding a Partner Profile from the Search Partner Profile Screen" section of the NEO Online Help for more information.
Click the Deactivate button to deactivate the partner profile
Codes
If your role permits it, you can create, edit, or deactivate commodity, compliancy, and appointment codes and define incompatible rules for commodity codes. You can also manage accessorial codes and exception codes.
Accessorial Codes
Creating Accessorial Codes
Accessorial codes are a condition attached to a shipment that requires special handling and could incur additional costs, such as demurral and detention. You can manage accessorial codes and define types. Afterward, you can deactivate and re-activate accessorial codes.
Complete the following steps to add an accessorial code:
Click Menus/Favs > Administration > Codes > Accessorial Codes.
The Accessorial Codes screen displays.
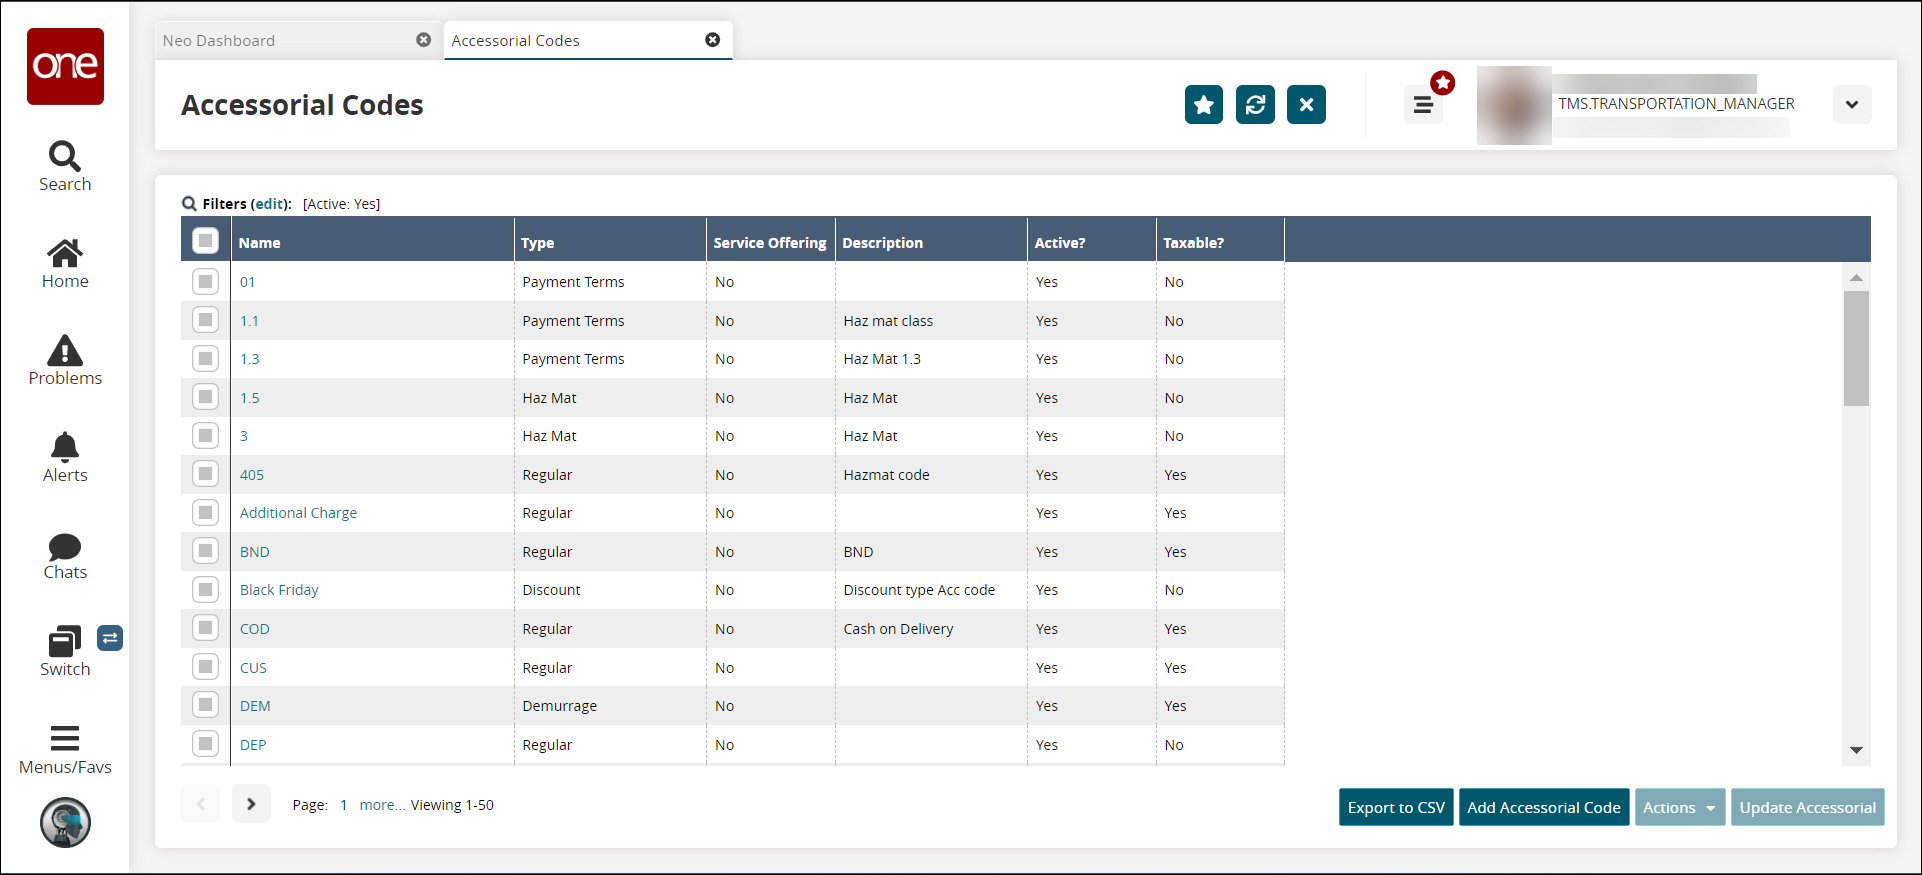
Click the Add Accessorial Code button.
The New Accessorial Code screen displays.
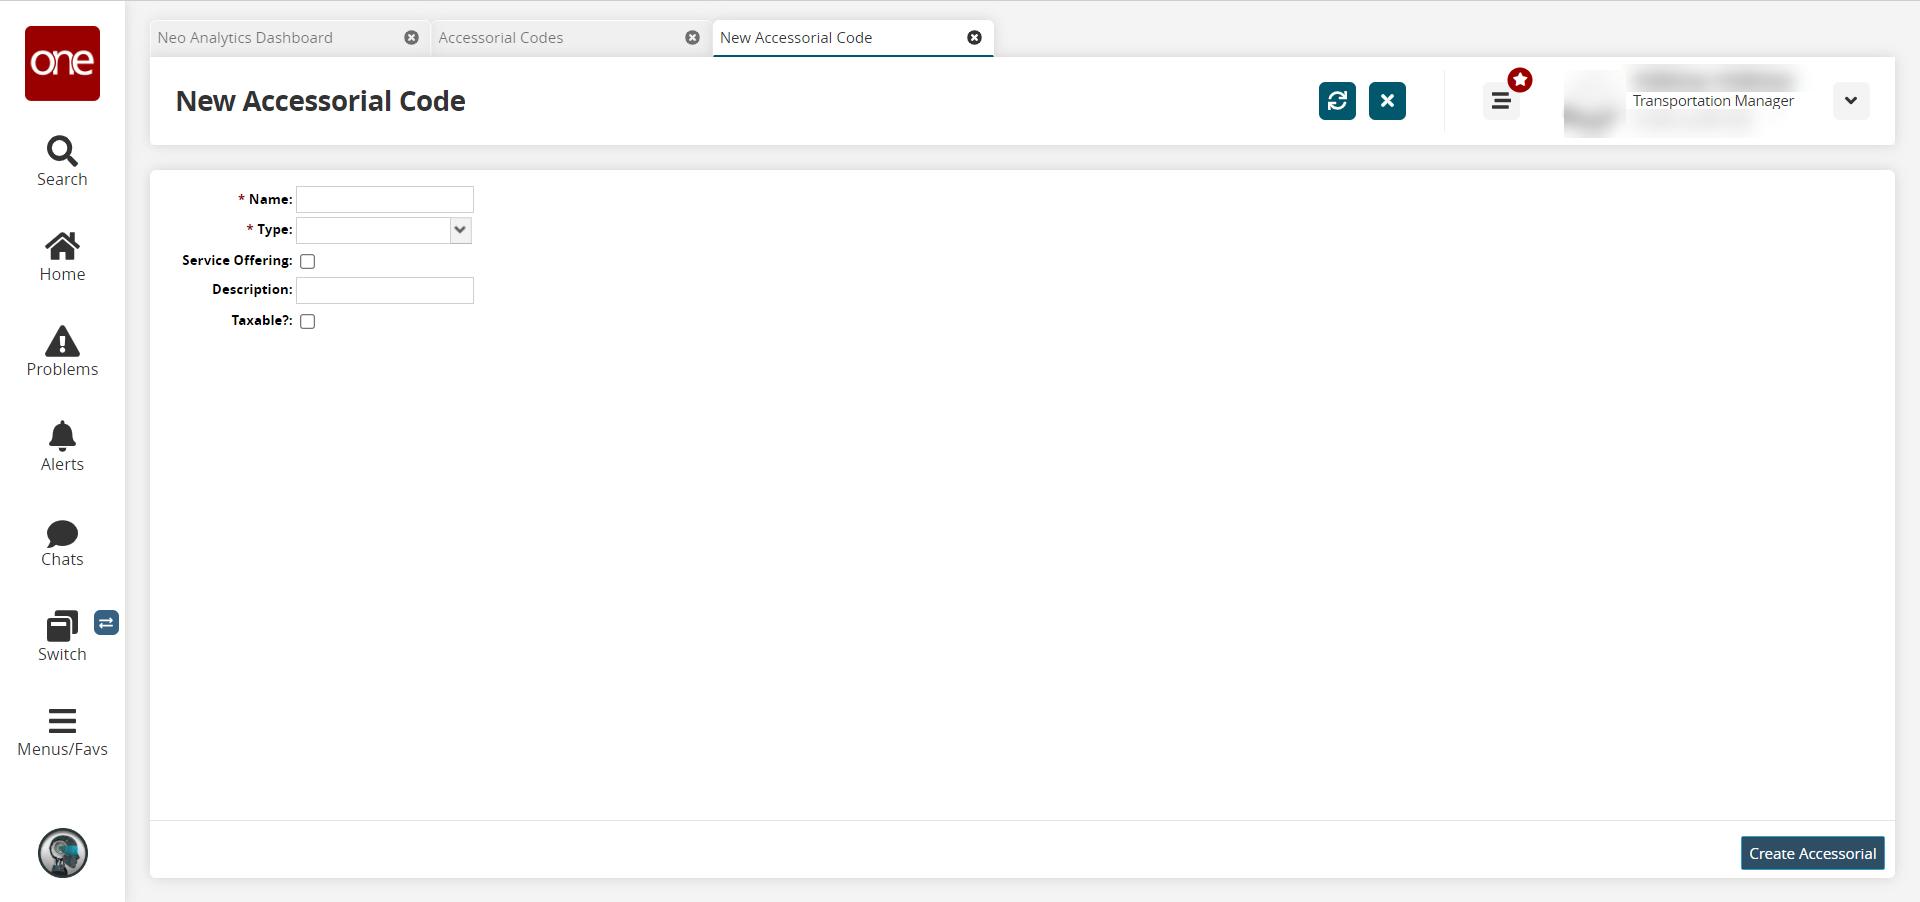
Field
Description
*Name
Enter a name for the accessorial code.
*Type
Select an accessorial code type from the drop-down menu.
Service Offering
Check the box if this accessorial code provides a service offering.
Description
Enter a description.
Taxable?
Select this checkbox if the amount is taxable.
Click the Create Accessorial button.
A green success message displays.
Searching and Updating Accessorial Codes
Accessorial codes are a condition attached to a shipment that requires special handling and could incur additional costs, such as demurral and detention. You can manage accessorial codes and define types. Afterward, you can deactivate and re-activate accessorial codes.
Complete the following steps to manage accessorial codes:
Click Menus/Favs > Administration > Codes > Accessorial Codes.
The Accessorial Codes screen displays.
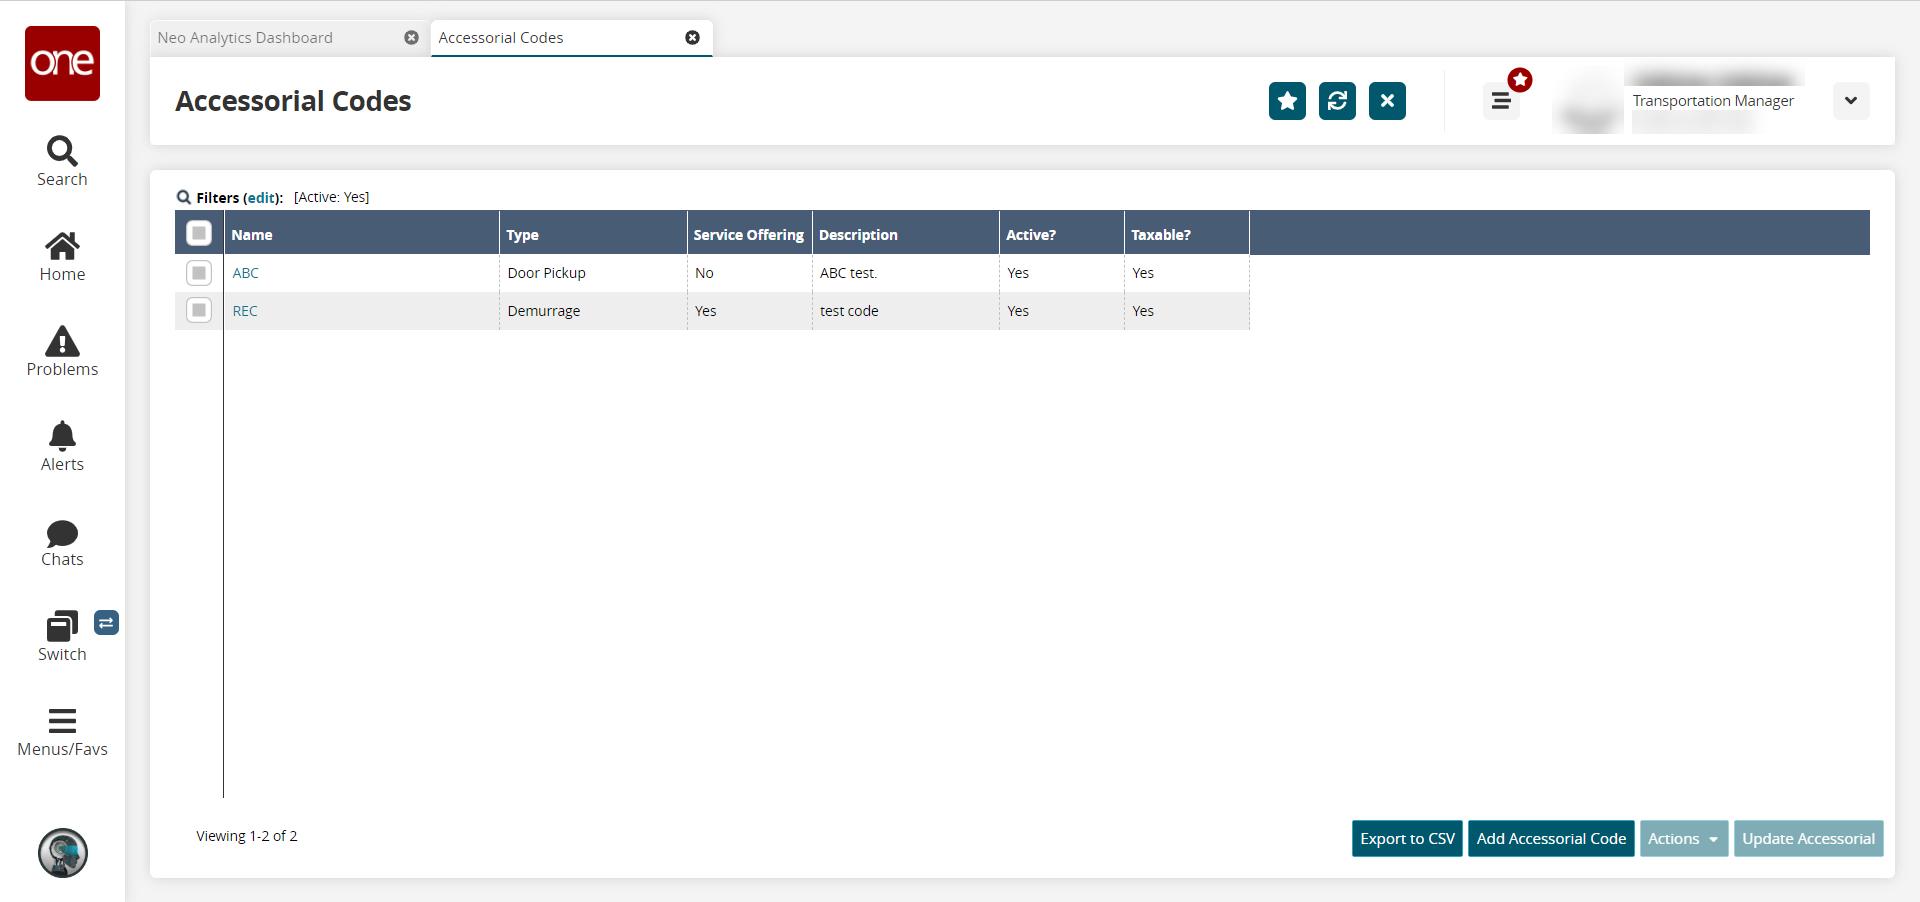
Click the Filters (edit) link to apply search criteria to reduce the number of entries shown.
The Filters menu displays.
Enter the name in the Accessorial Name field.
Select the type of accessorial from the Type drop-down list.
Select an option from the Active? drop-down list.
Click the Search link.
The search results display.
Click Export to Excel to export the report to a file.
Note
Depending on the configuration settings of your instance of the ONE system, an additional drop-down menu may display that includes the option to export the data in a CSV file.
Click the Add Accessorial Code button to add a new accessorial. See the "Creating Accessorial Codes" section in the NEO Online Help for more information.
Click the box(es) for one or more accessorials to select them, and click Actions > Delete Accessorial to delete.
The Deactivate Accessorial window is displayed.
Warning
There is no warning window or confirmation when you click the Submit button. Once you click on Submit, the accessorial codes are deleted.
Click the box(es) for one or more accessorials to select them, and click the Update Accessorial button.
The screen changes to a table with the selected accessorial(s) for updates. Fields with a pencil icon are editable, and fields with an asterisk (*) are required.
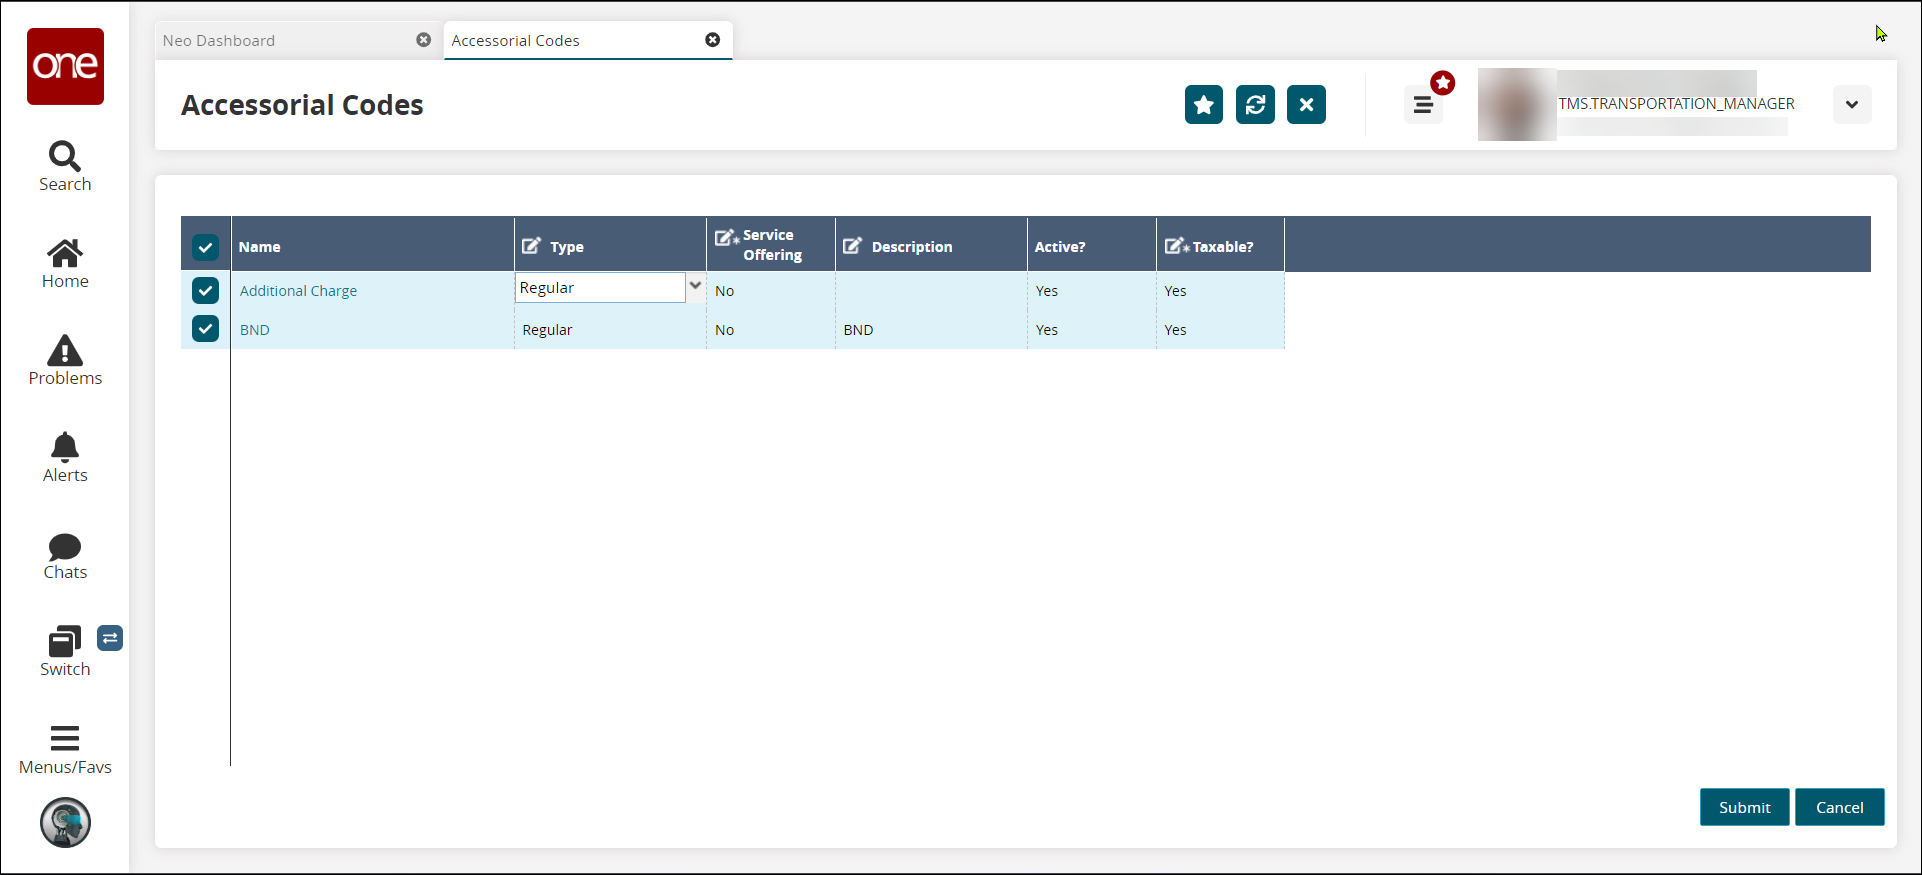
Field
Description
Name
Click on the link to view the details page.
Type
Select the accessorial type from the drop-down list.
*Service Offering
Click in the field, and check/uncheck the box to identify the accessorial as a service offering.
A check indicates Yes, and no check indicates No.
*Description
Enter or update the description of the accessorial.
Active?
This field is not editable.
*Taxable?
Click in the field, and check/uncheck the box to identify the accessorial as taxable..
A check indicates Yes, and no check indicates No.
Contacts
Searching Contacts
This topic describes how to search for and update contacts belonging to the current user's own enterprise or public contacts from partner entities.
Complete the following steps to update contacts from the Search Contacts screen:
Click Menus/Favs > Administration > Search Contact.
The Search Contact screen displays.
Click the Filters (edit) link.

Field
Description
Contact Description
Type the contact description entered while creating a contact.
First Name
Type the first name of a contact.
Last Name
Type the last name of a contact.
Owning Ent
Type the name of the enterprise a contact belongs to.
Public
Select one of the following options to include or exclude public and private contacts from the current user's own enterprise and from partner entities:
Yes: the Search Contact report displays all public contacts from the current user's enterprise and partner entities. The report does not display any private contacts.
No: the Search Contact report displays only private contacts (contacts not marked public) that belong to the current user's enterprise. The report does not display any public contacts.
Blank (default): the Search Contact report displays all public and private contacts from the current user's enterprise and public contacts from partner entities.
Click Search.
The updated search results display.
To update multiple contacts at a time, select contacts and click Update.
The selected contacts can be updated inline.
To view and update a single contact, click the Contact Description link for the contact.
The Contact Details screen displays.
Update contact details and click Update.
Click Export to Excel to export the report to a file.
Note
Depending on the configuration settings of your instance of the ONE system, an additional drop-down menu may display that includes the option to export the data in a CSV file.
Click Export to Excel to export the report to a file.
Note
Depending on the configuration settings of your instance of the ONE system, an additional drop-down menu may display that includes the option to export the data in a CSV file.
Searching Contact Maps
Complete the following steps to search contact maps:
Click Menus/Favs > Administration > Contact > Search Contact Mapping.
The Search Contact Mapping screen displays.
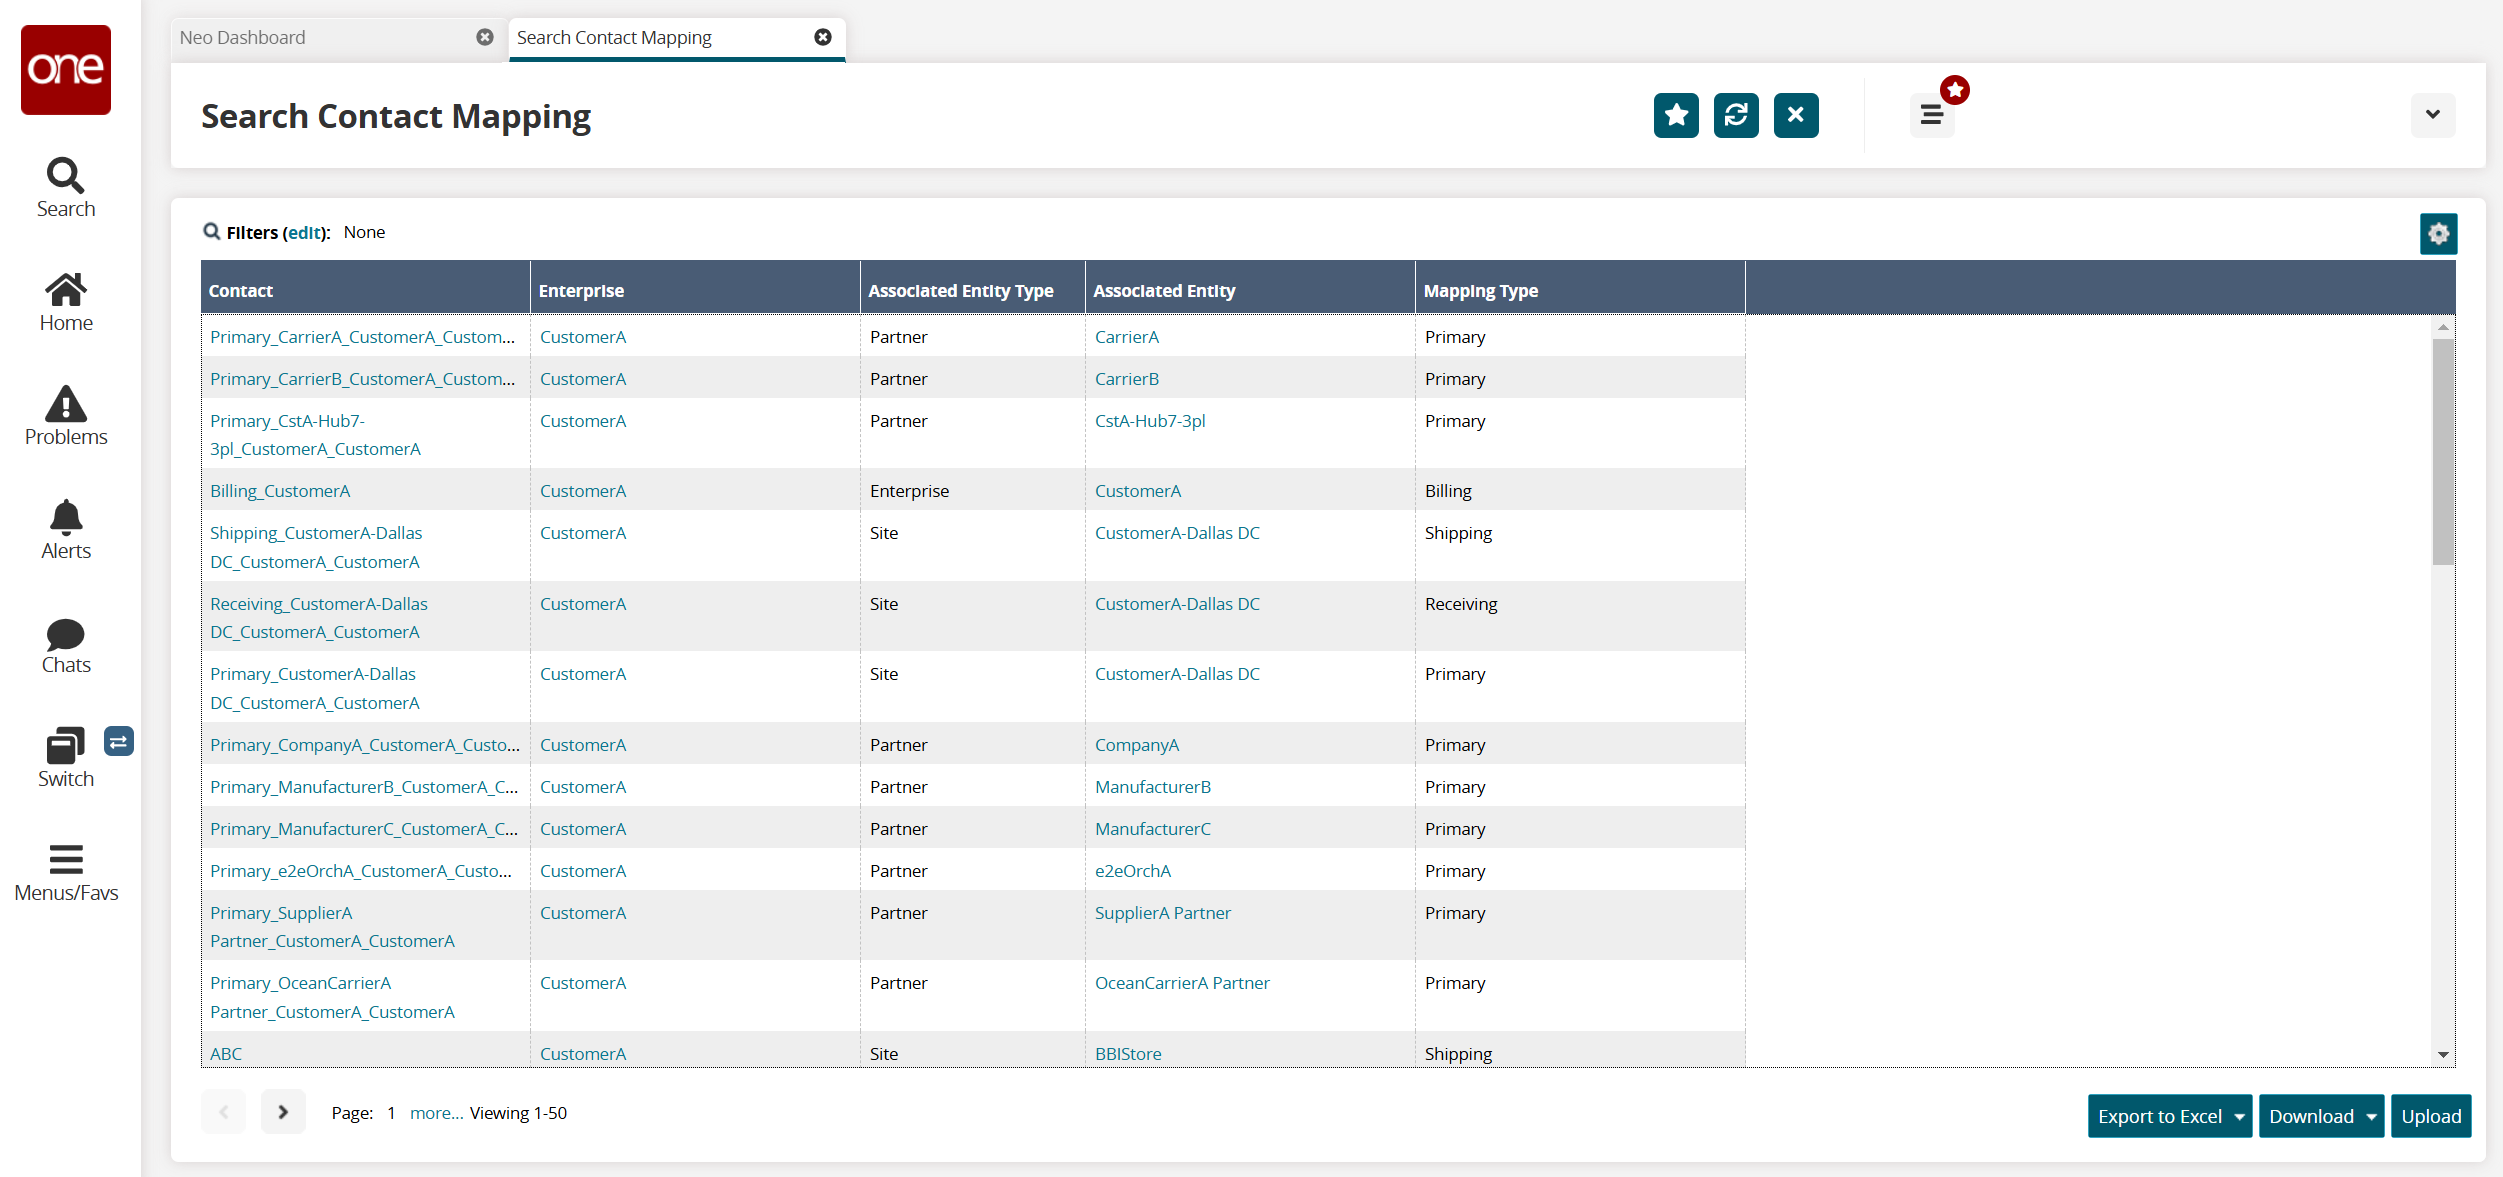
Click a Contact, Enterprise, or Associated Entity link for more information.
Click Export to Excel to export the report to a file.
Note
Depending on the configuration settings of your instance of the ONE system, an additional drop-down menu may display that includes the option to export the data in a CSV file.
Transportation
Working with Shipment State Reports
A Shipment State report provides details on all the shipments in a specified state, including Draft, Tendered, Confirmed Pick Ready, Intransit, Delivered, and Delivery Ready. From a Shipment State report, you can perform many actions related to a shipment or movement. The reports can be accessed via the Shipment State Summary screen or in the Transportation menu.
Complete the following steps to view a Shipment State report for all shipments in a specified state:
Click Menus/Favs > Transportation, then select one of the following shipment states from the menu: Draft, Tendered, Confirmed Pick Ready, Intransit, Delivered, or Delivery Ready.
The shipment state report displays a list of all shipments in that state. In the example below, the user selected Confirmed.
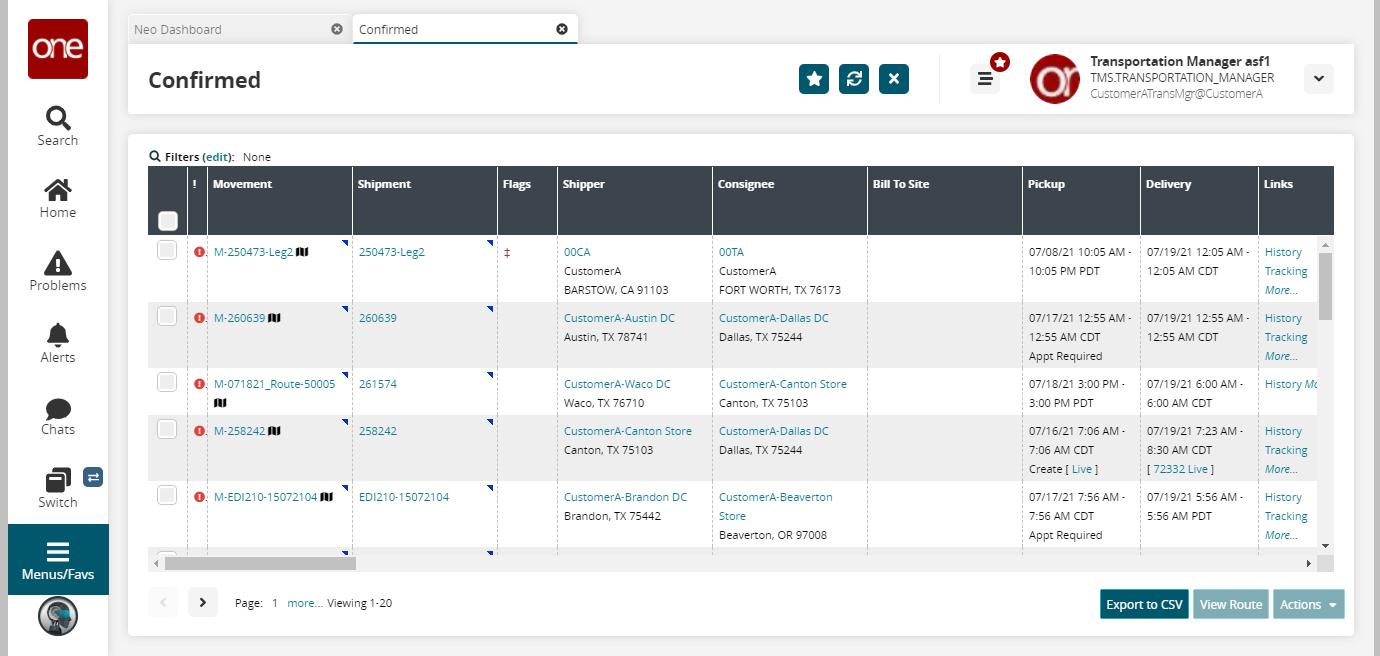
You can also select Menus/Favs > Transportation > Shipment Summary.
From the Shipment Summary screen, click the link for the Shipment State report you want to view. The Shipment State report for the selected state opens in a new tab.
Click the Filters (edit) link to apply search criteria to reduce the number of entries shown.
The Filters menu displays.
Fill out the filters, and click the Search link.
The search results display.
Click Export to Excel to export the report to a file.
Note
Depending on the configuration settings of your instance of the ONE system, an additional drop-down menu may display that includes the option to export the data in a CSV file.
Click a link in any column to view the details for that link in a new tab. Columns with links include:
Movement
Shipment
Shipper
Consignee
Links (Options available in this column vary depending on the Shipment State report being viewed.)
Click the small triangle icon (highlighted below) to expand the options for the selected movement.
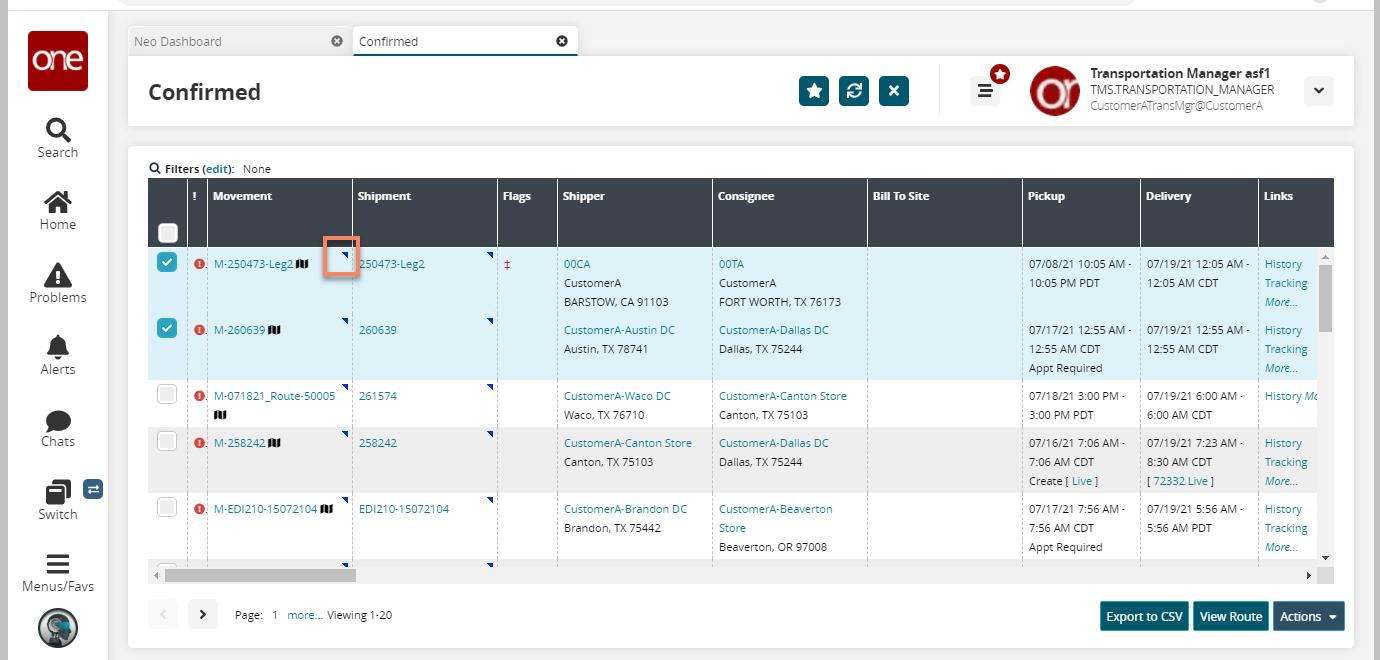
An options menu displays.
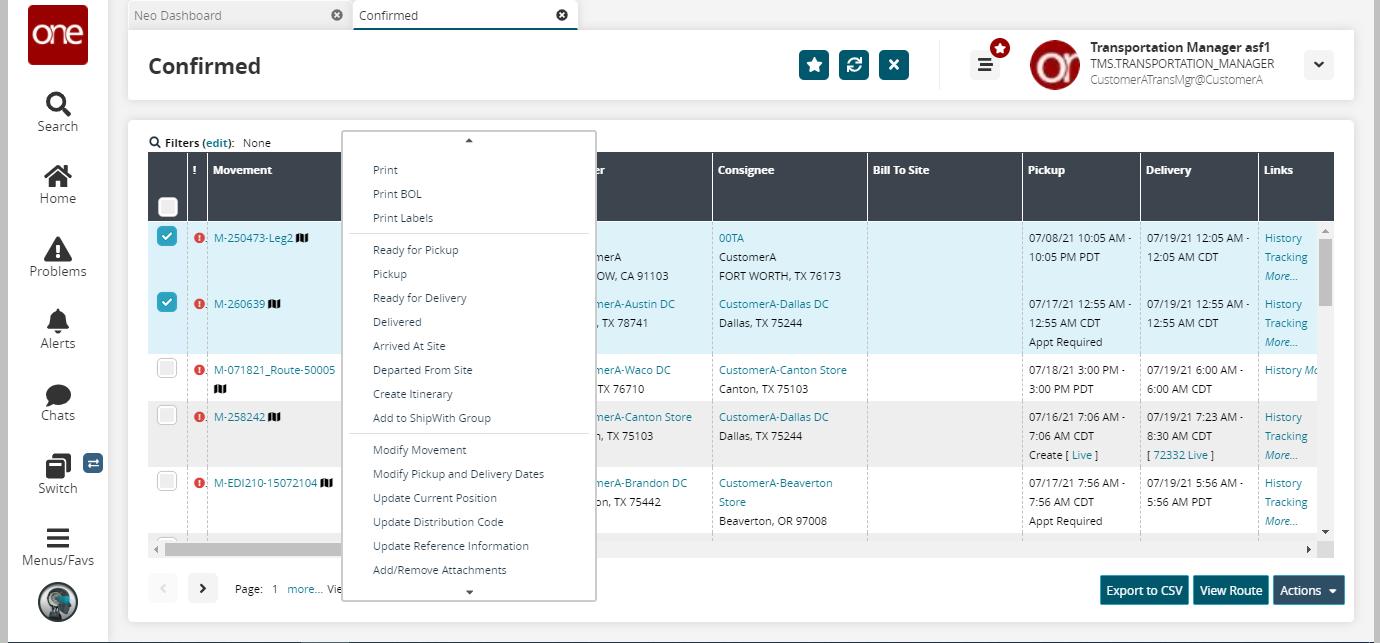
Click the small triangle icon (highlighted below) to expand the options for the selected shipment.
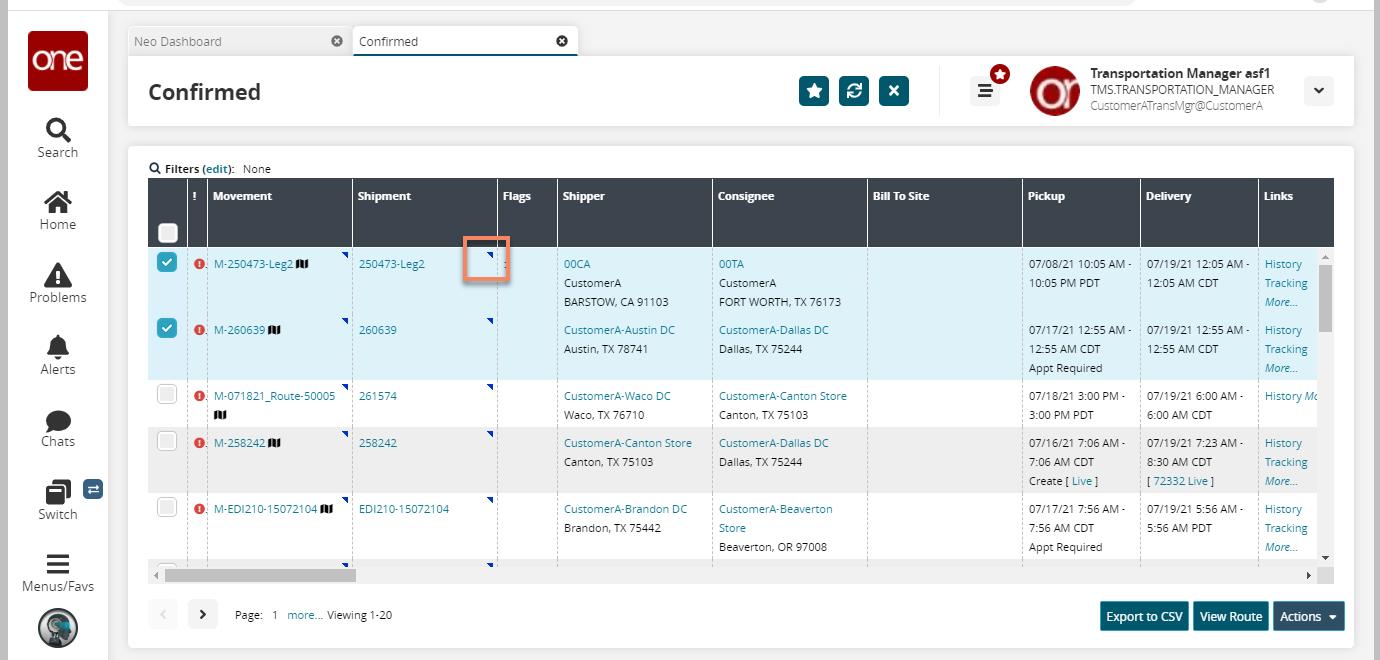
An options menu displays.
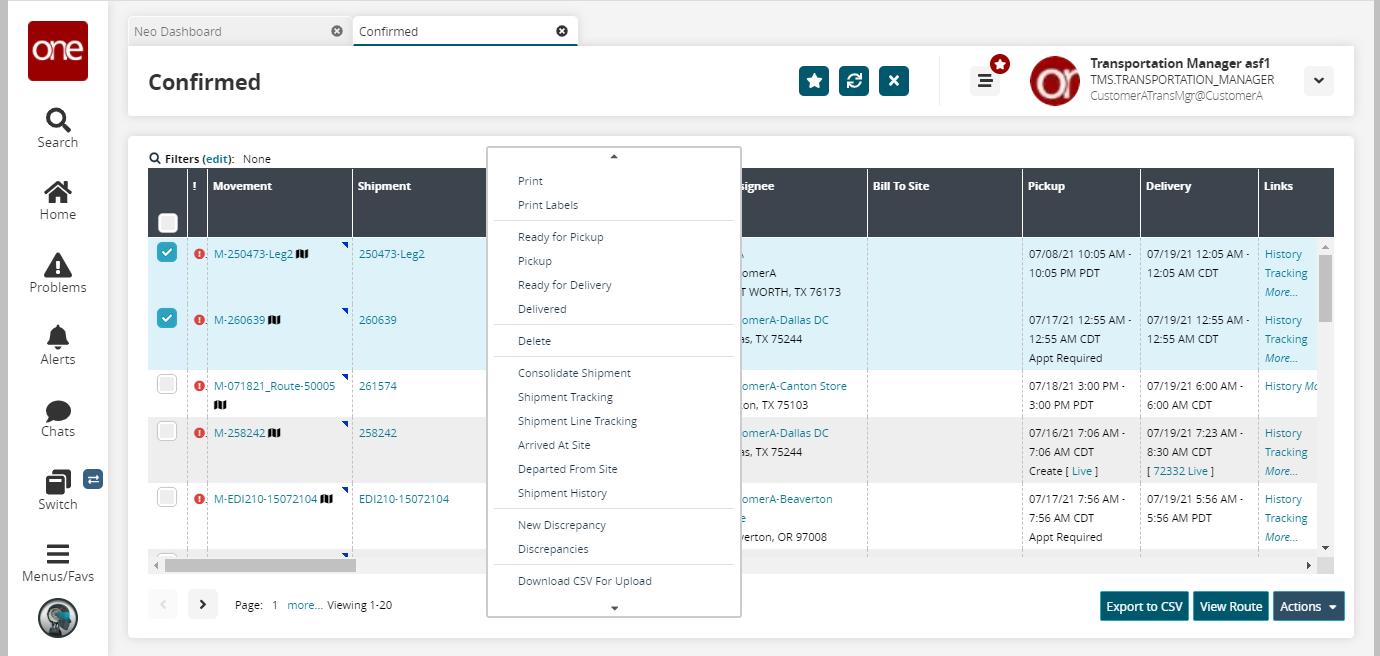
Click Export to Excel to export the report to a file.
Note
Depending on the configuration settings of your instance of the ONE system, an additional drop-down menu may display that includes the option to export the data in a CSV file.
Click the checkbox beside any shipment(s) and click the View Route button.
A route map displays in a new tab.
Click the checkbox beside any shipment(s) and click the Actions button.
An options menu displays above the Actions button.
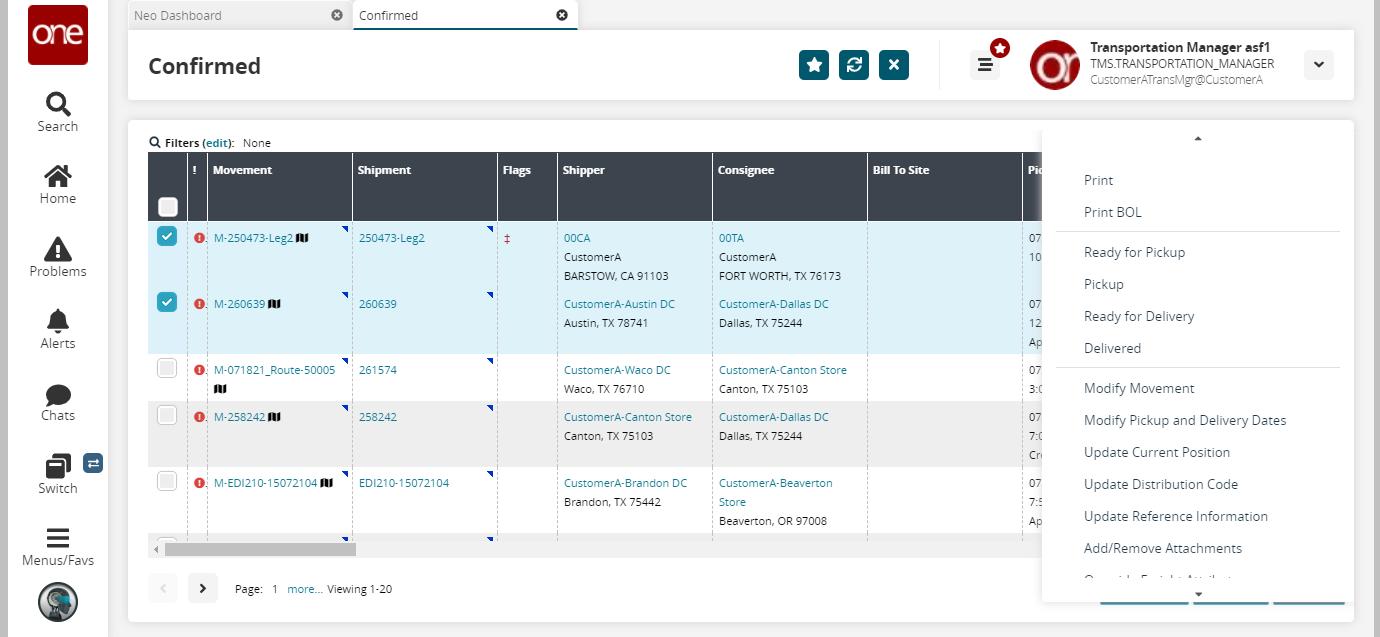
Click an option from the menu to perform the action for the selected movements/shipments.
Working with the Shipment Summary
The Shipment Summary screen allows you to view shipments by state. Not all users and roles have access to this particular feature. From this screen, you can view a Shipment State report for all shipments in a state, view details of shipments and movements, attach documents, apply actions, or export the search results to a spreadsheet.
Complete the following steps to view the shipment summary:
Click Menus/Favs > Transportation > Shipment Summary.
The Shipment Summary screen displays.
To view details of a shipment by state, click a link in the Count column for that state.
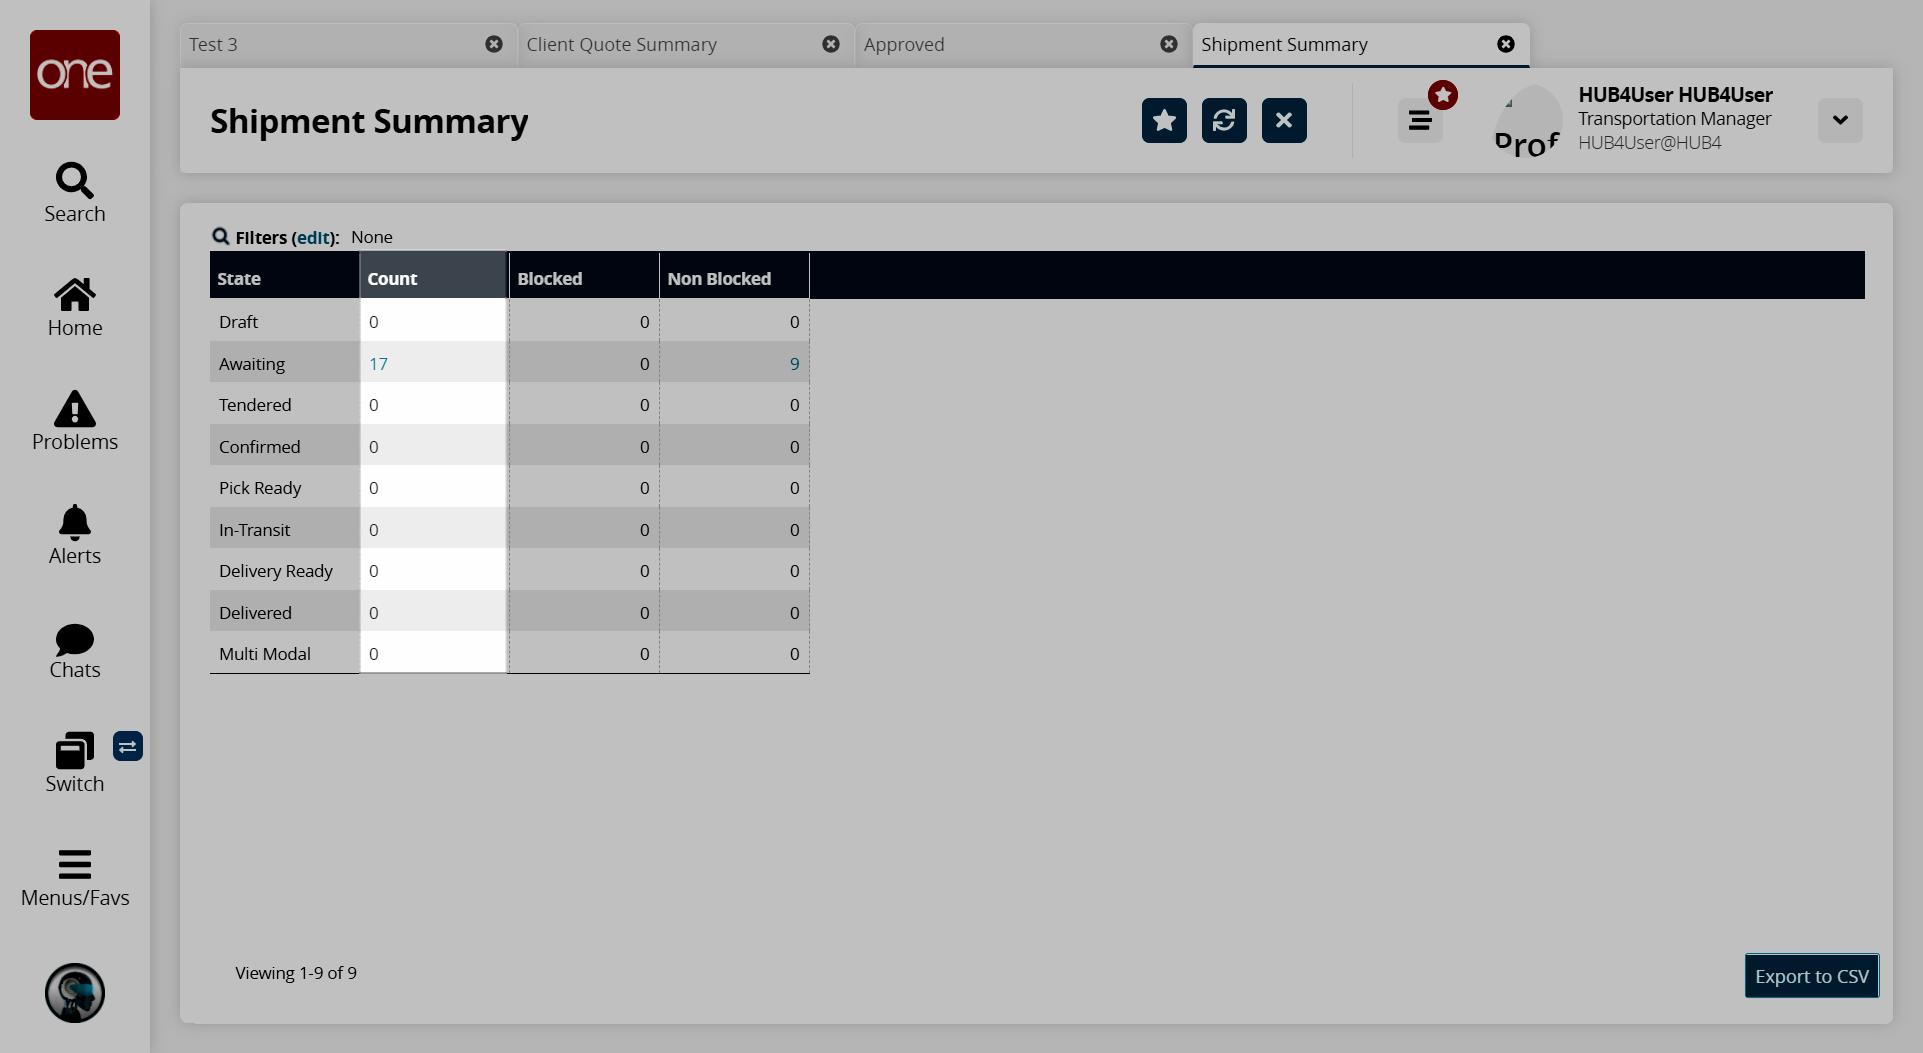
A new tab opens a Shipment State report showing all shipments in the selected state.
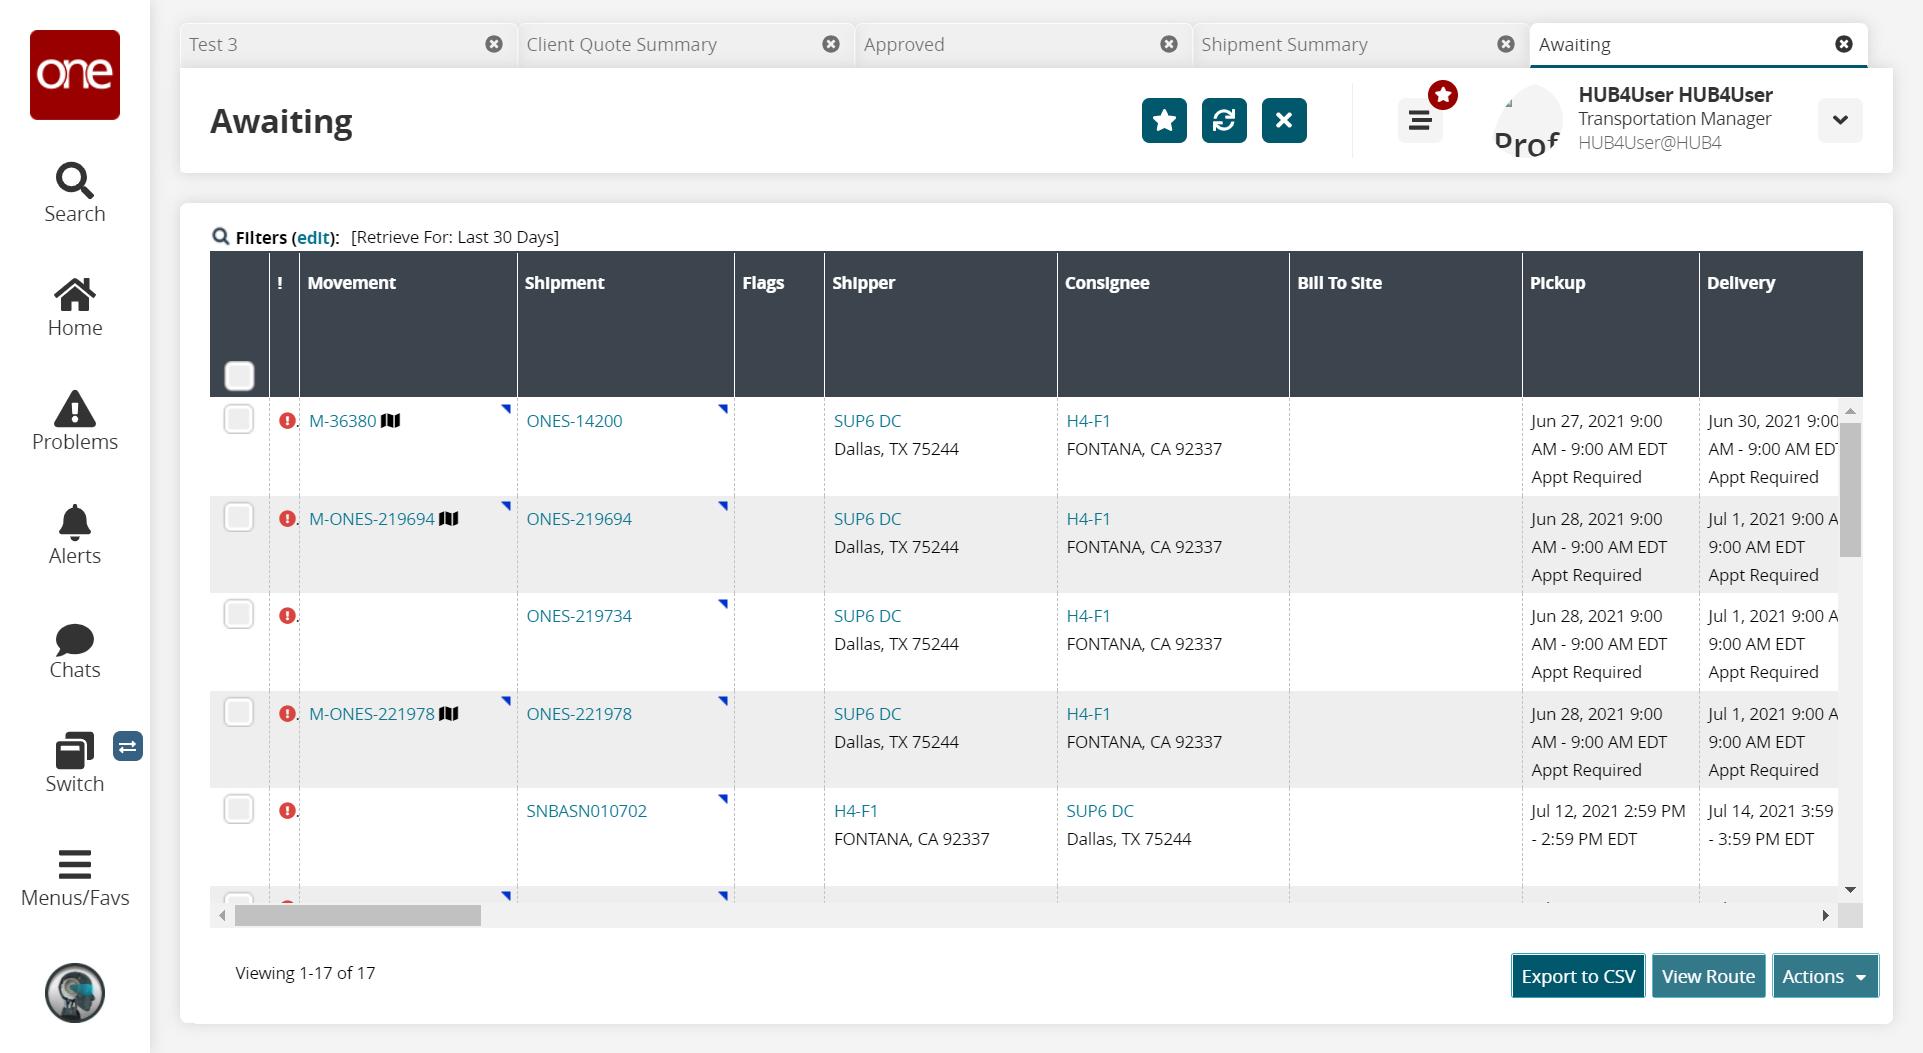
For more information, see the "Working with Shipment State Reports" section in NEO Online Help.
Chain of Custody
In transportation, chain of custody ensures that products are shipped with documentation validating end-to-end security.
Chain of Custody Report
The Chain of Custody UI offers intricate views for tracking global transactions. Not all tabs are available for all lots, and not all user roles have permission to view all elements.
Complete the following steps to use the Chain of Custody feature:
Click Menus/Favs > Transportation > Chain of Custody.
The Chain of Custody screen displays.
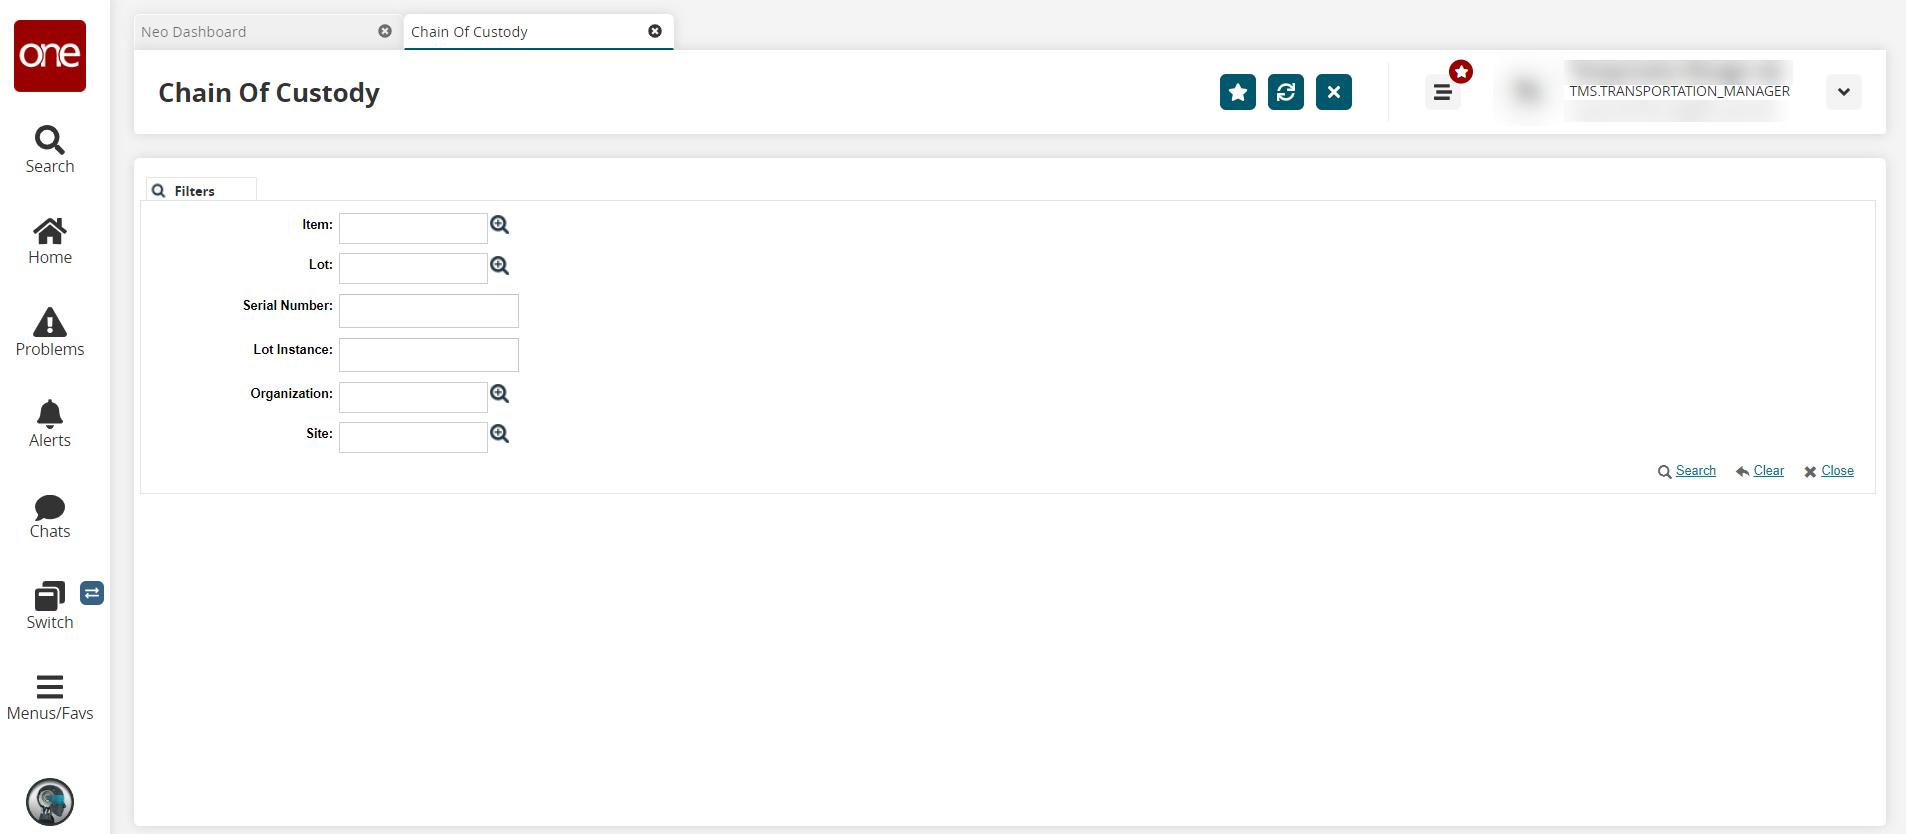
Field
Description
Item
Use the picker tool to select an item.
Lot
Use the picker tool to select a lot.
Serial Number
Enter a serial number.
Lot Instance
Enter a lot instance number.
Organization
Use the picker tool to select an organization.
Site
Use the site tool to select a site.
Optionally, fill out the filters to narrow down results, and click the Search link.
The Chain of Custody screen displays.
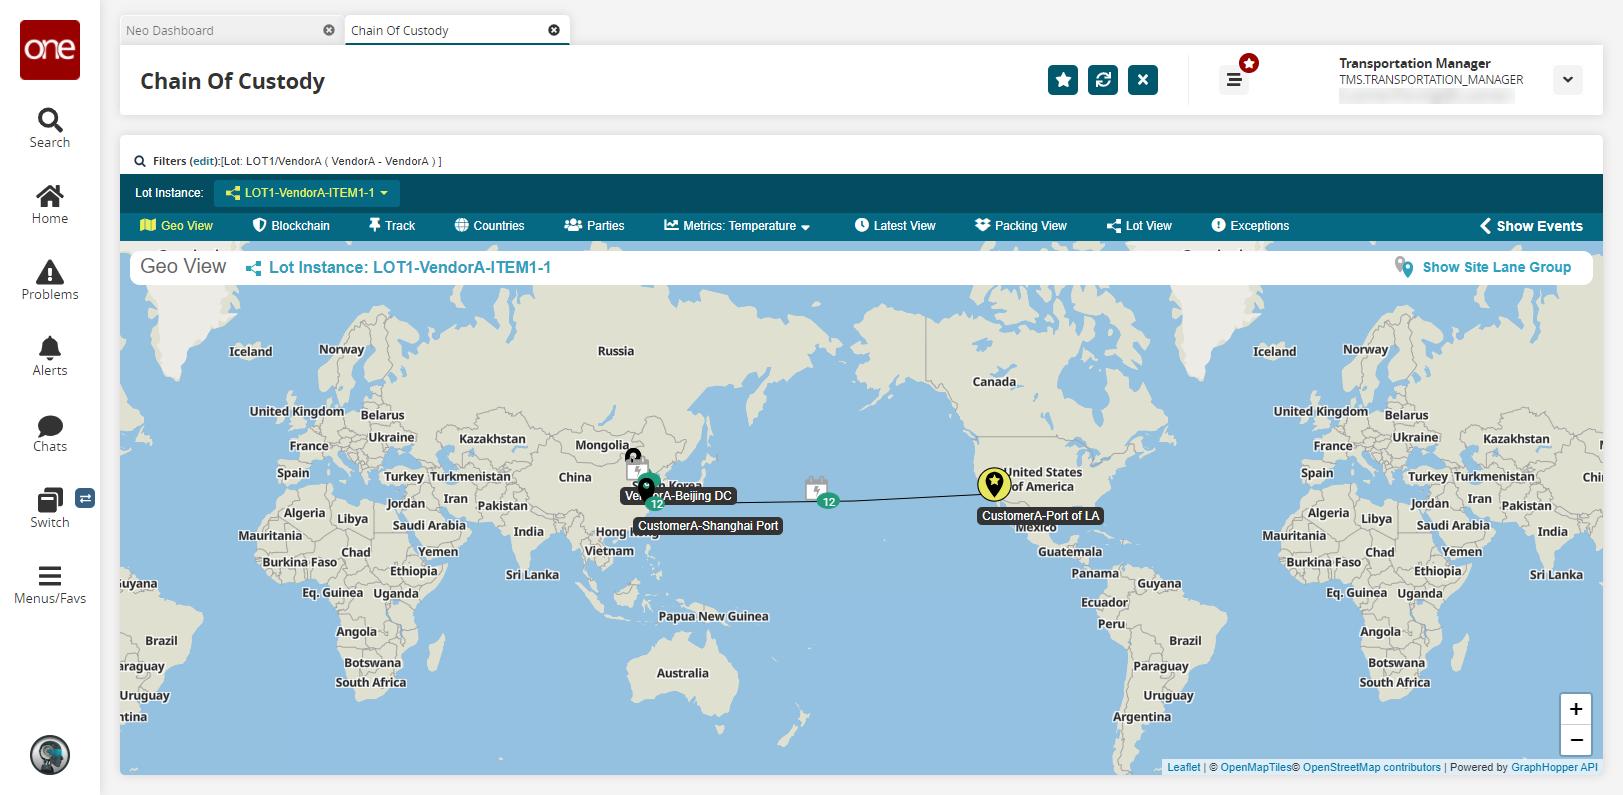
To view a list of lot instances, click the Lot instance drop-down menu.
A list of instances displays.
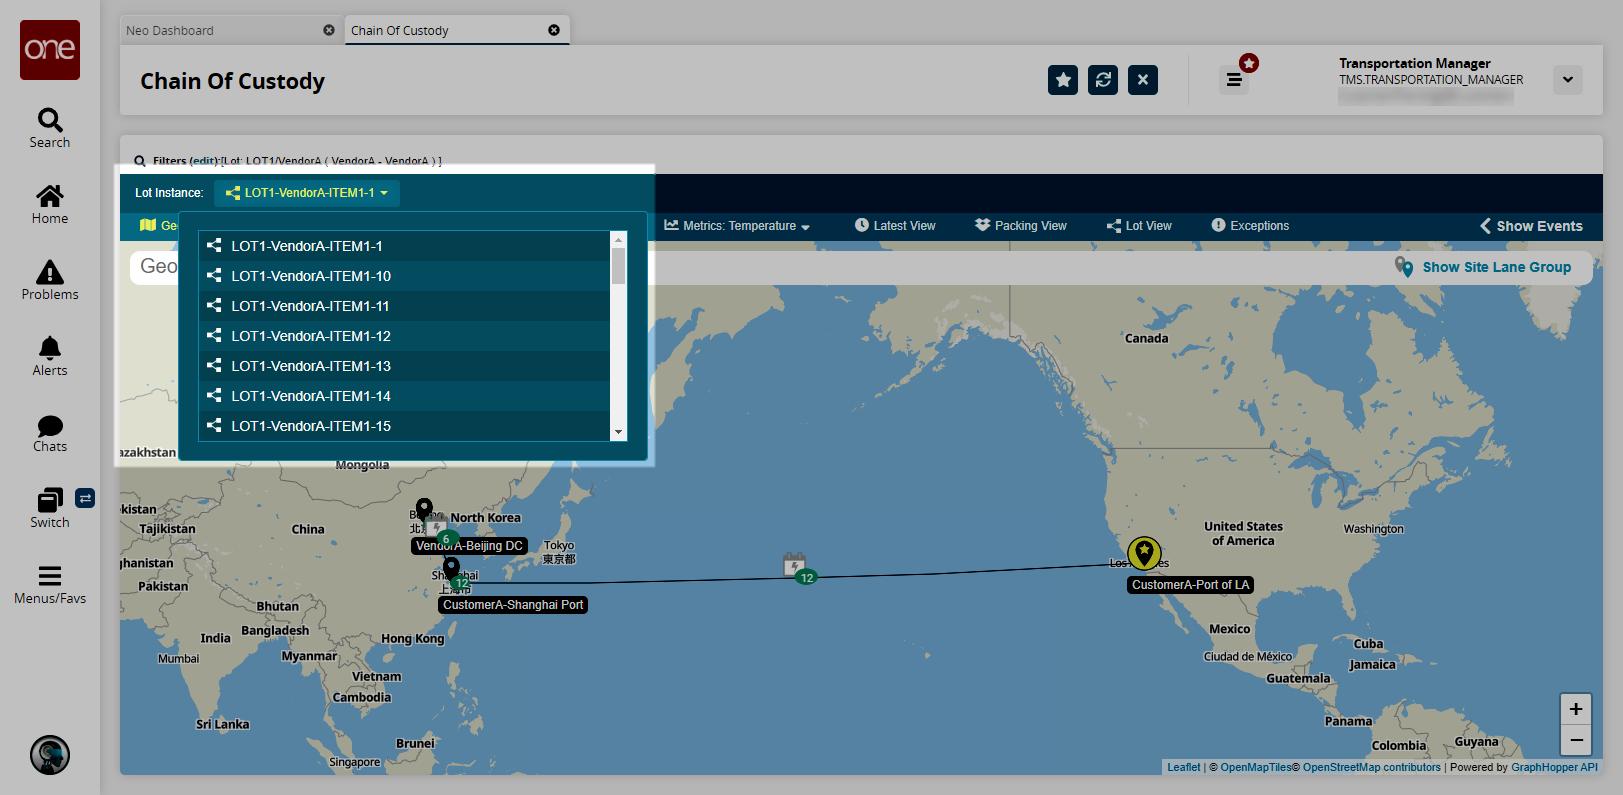
Select an instance to view more information about it.
Chain of Custody - Geo View Tab
The Geo View tab displays a visual representation of the shipment process.
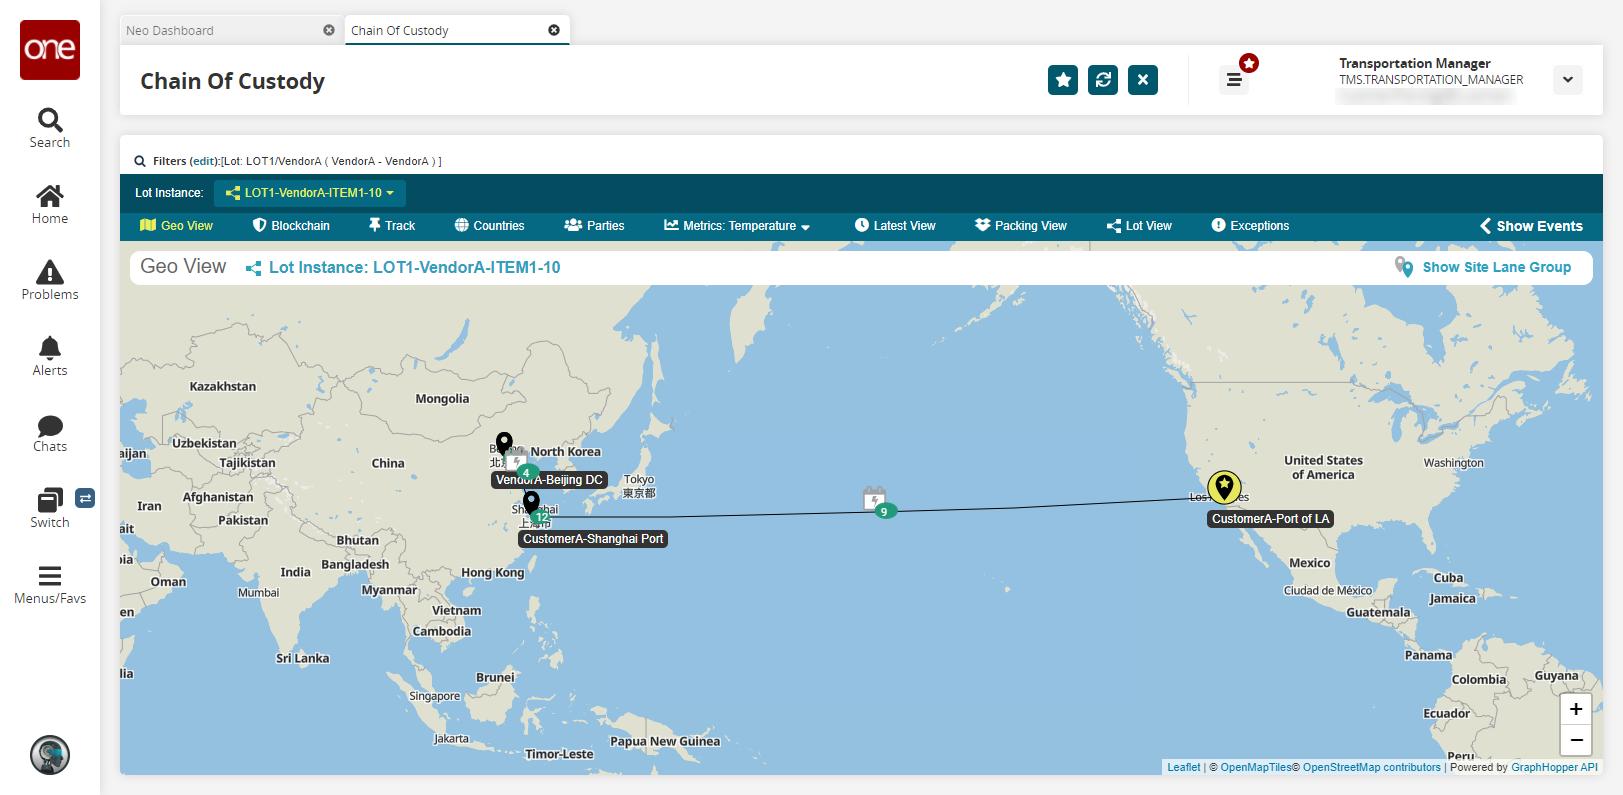
Chain of Custody - Blockchain Tab
The Blockchain tab displays transaction details on the blockchain, such as date and time, the executing user, and multiple views.

Chain of Custody - Track Tab
The Track tab displays a list of transaction events.
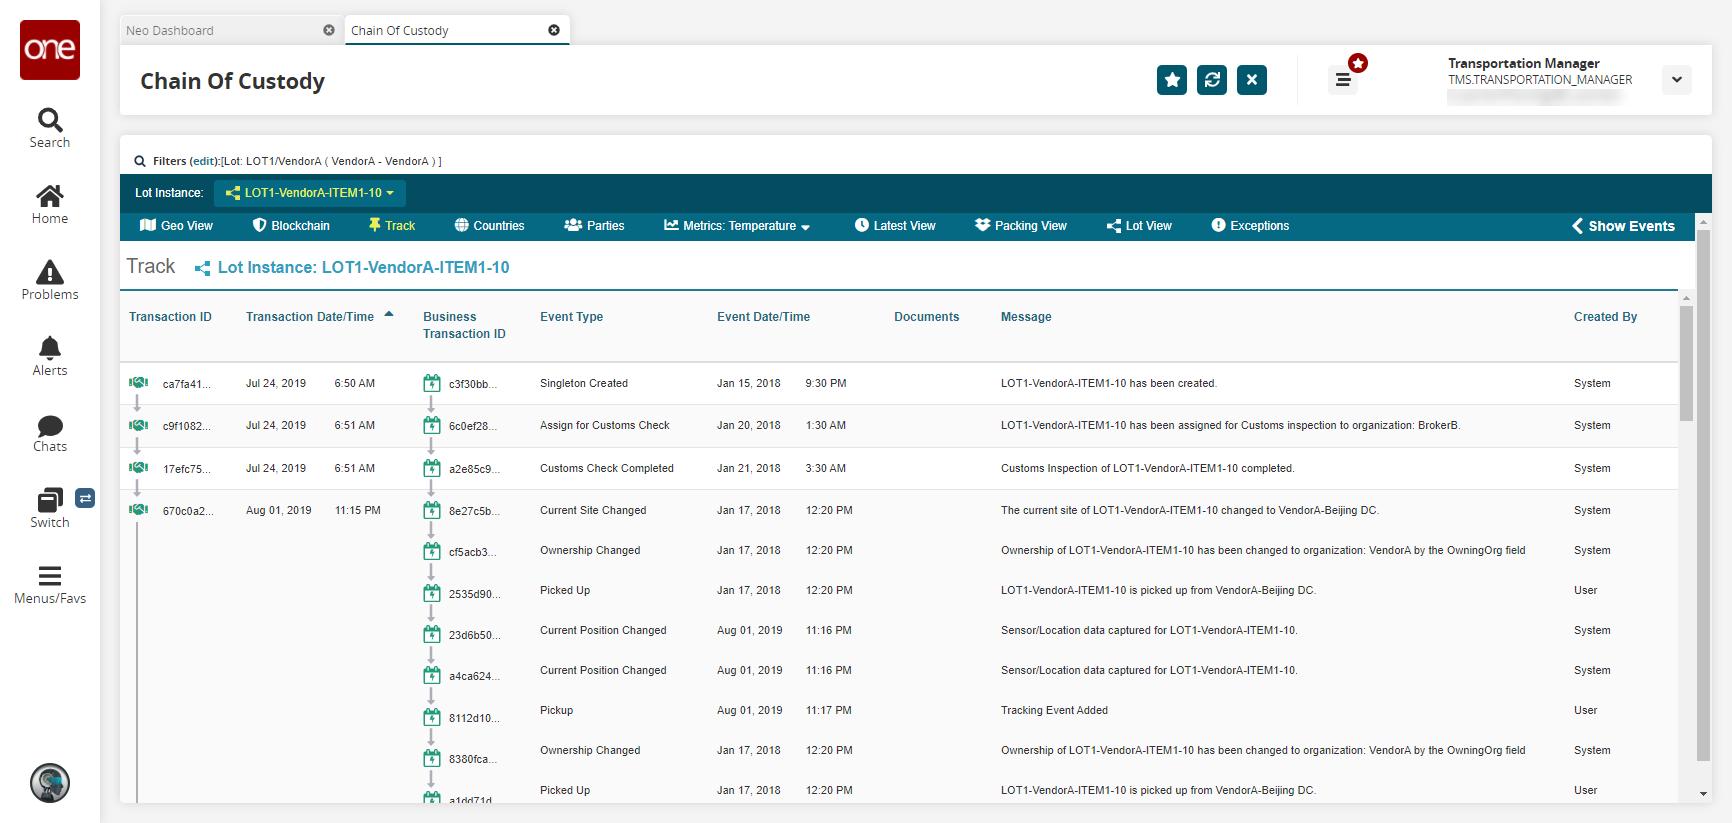
Chain of Custody - Countries Tab
The Countries tab displays the countries involved in the process, along with dates and times of departure and entry.
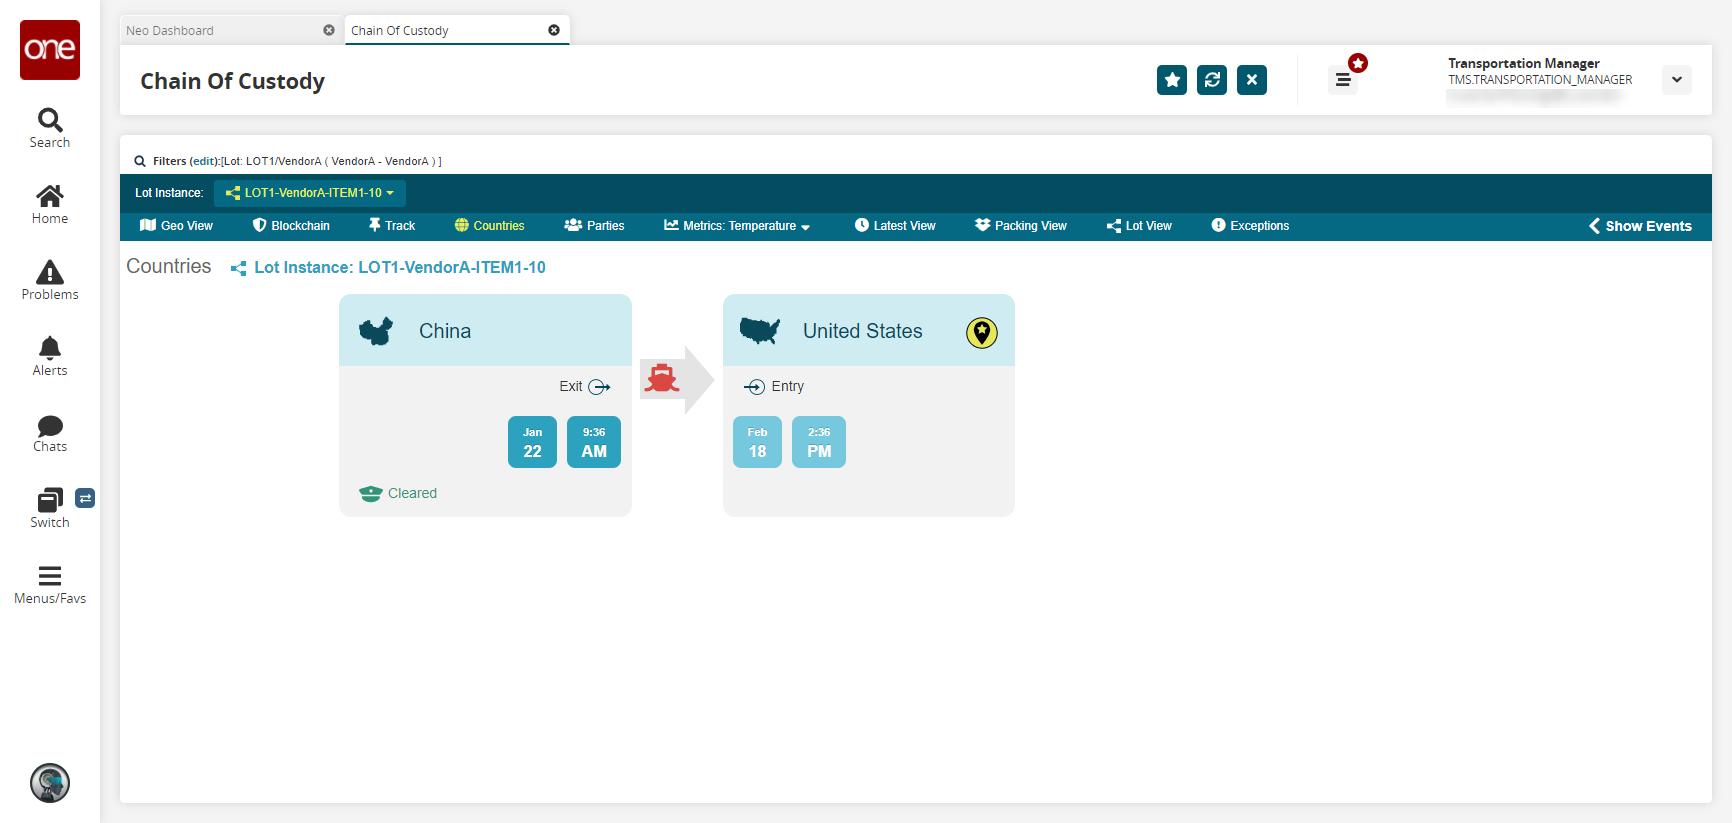
Chain of Custody - Parties Tab
The Parties tab displays all parties involved in the process. Parties include
Owner
Possessor
Recaller
Inspector
Orchestrator
Prospective Buyer
QA
Customs
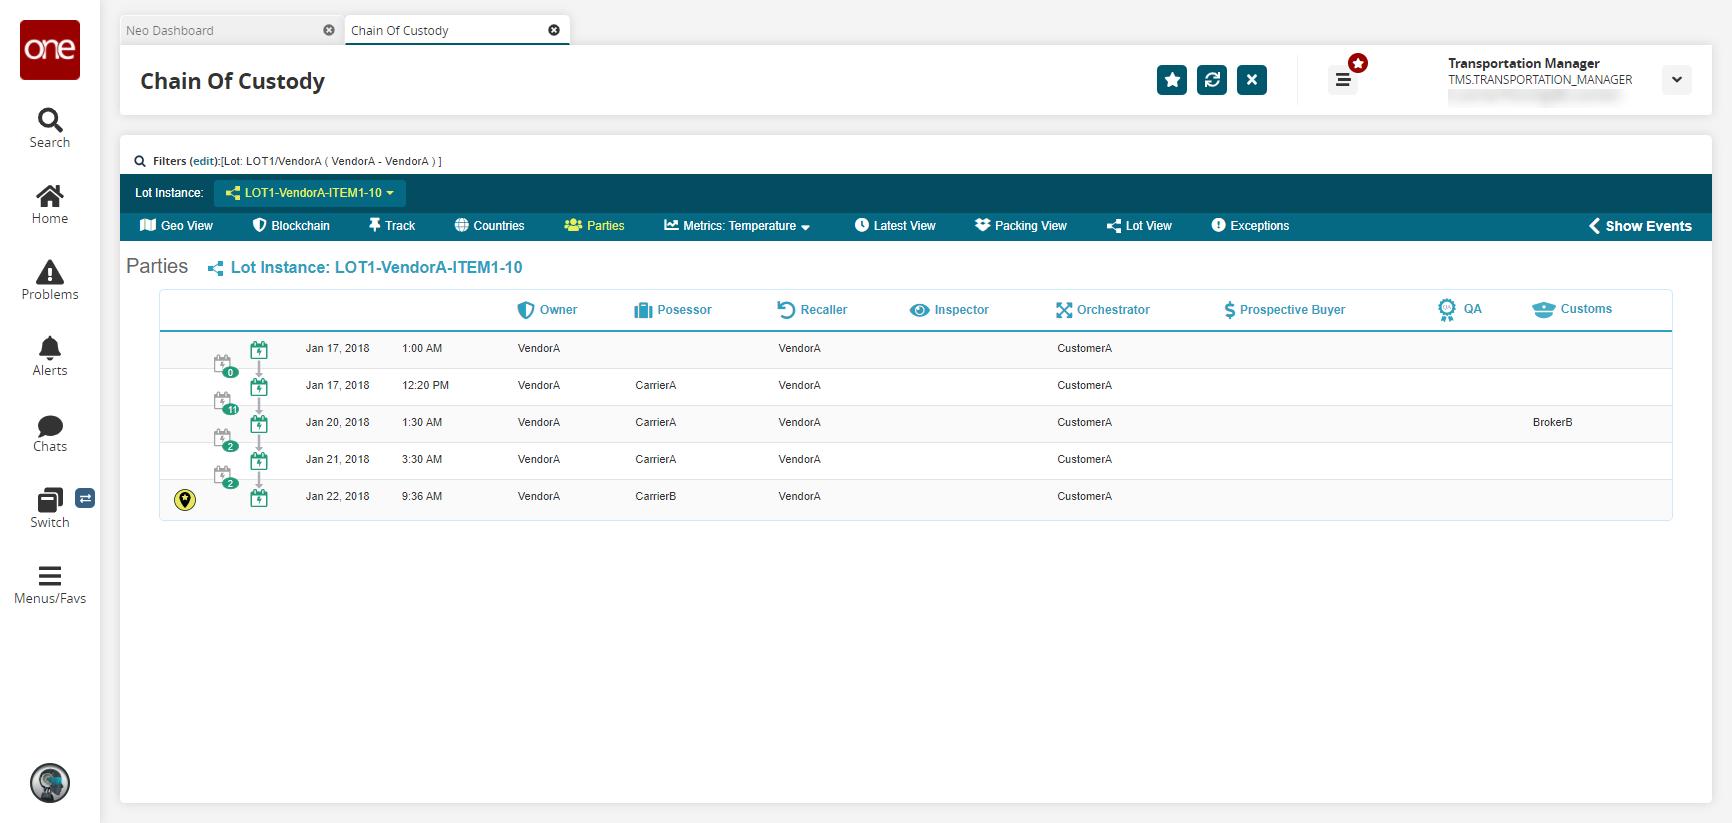
Chain of Custody - Metrics Tab
The Metrics tab displays temperature, humidity, and spectrophotometry data for the instance in a timeline view.
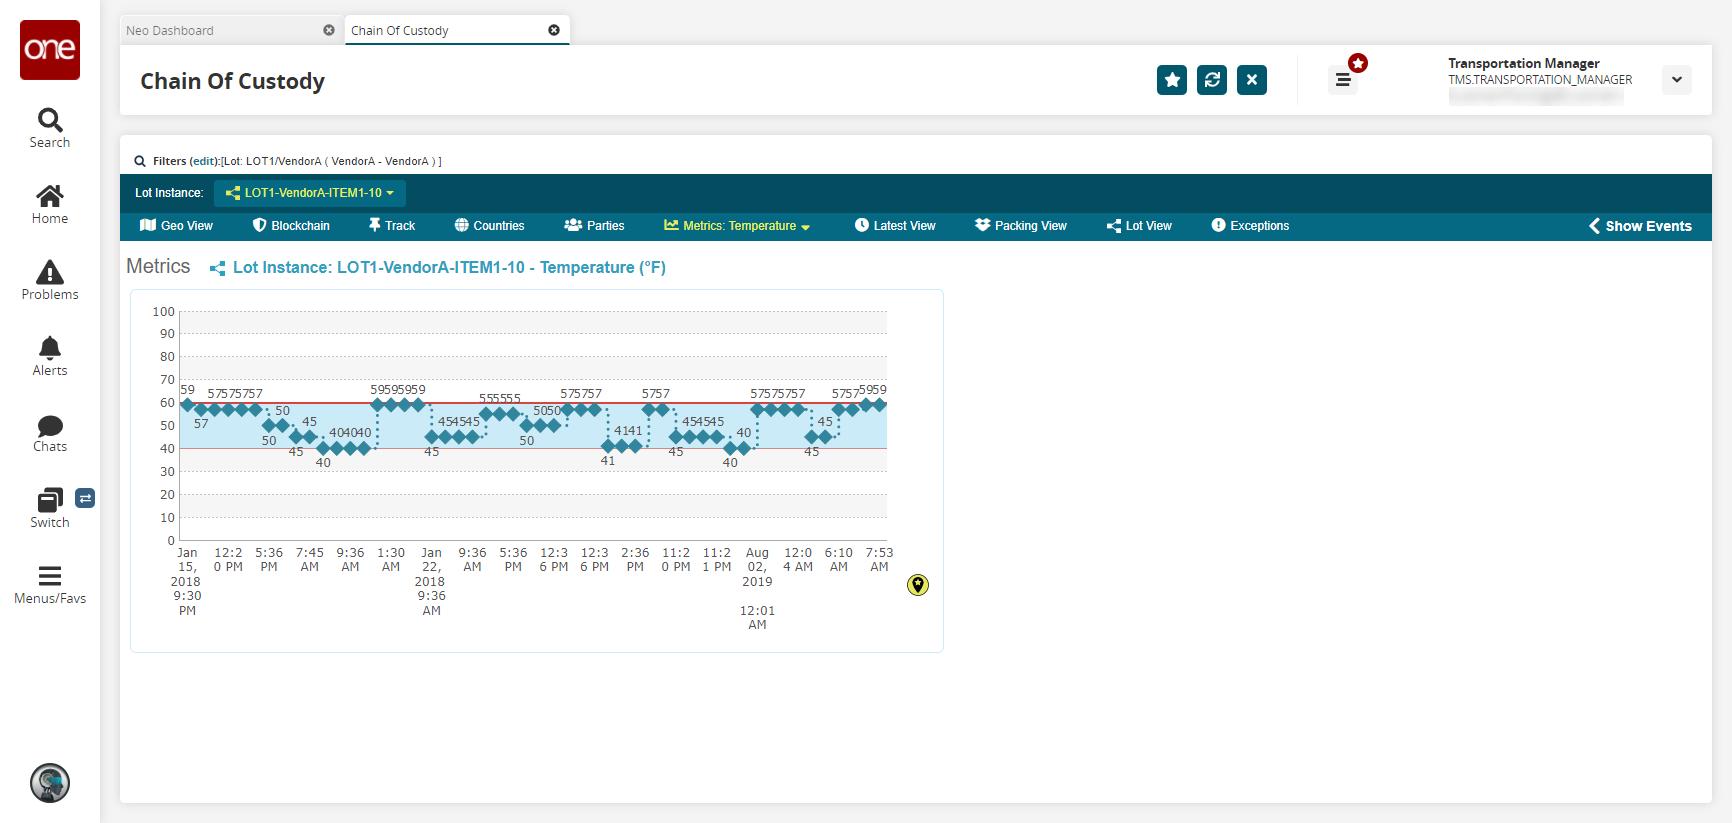
Click the drop-down menu on the tab to view other metrics.
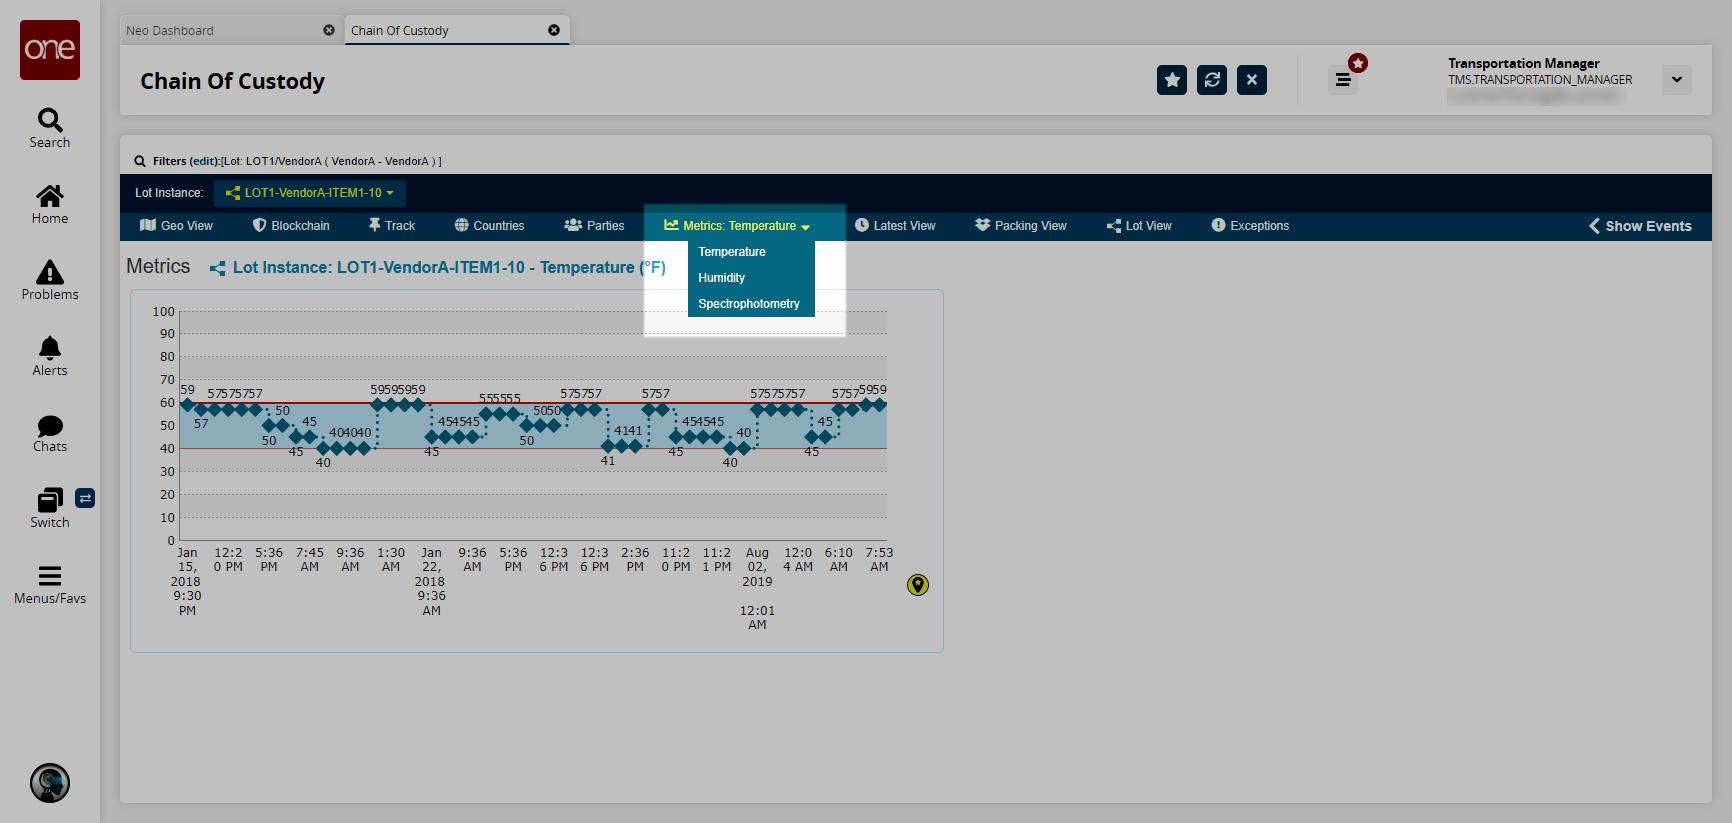
The corresponding data displays.
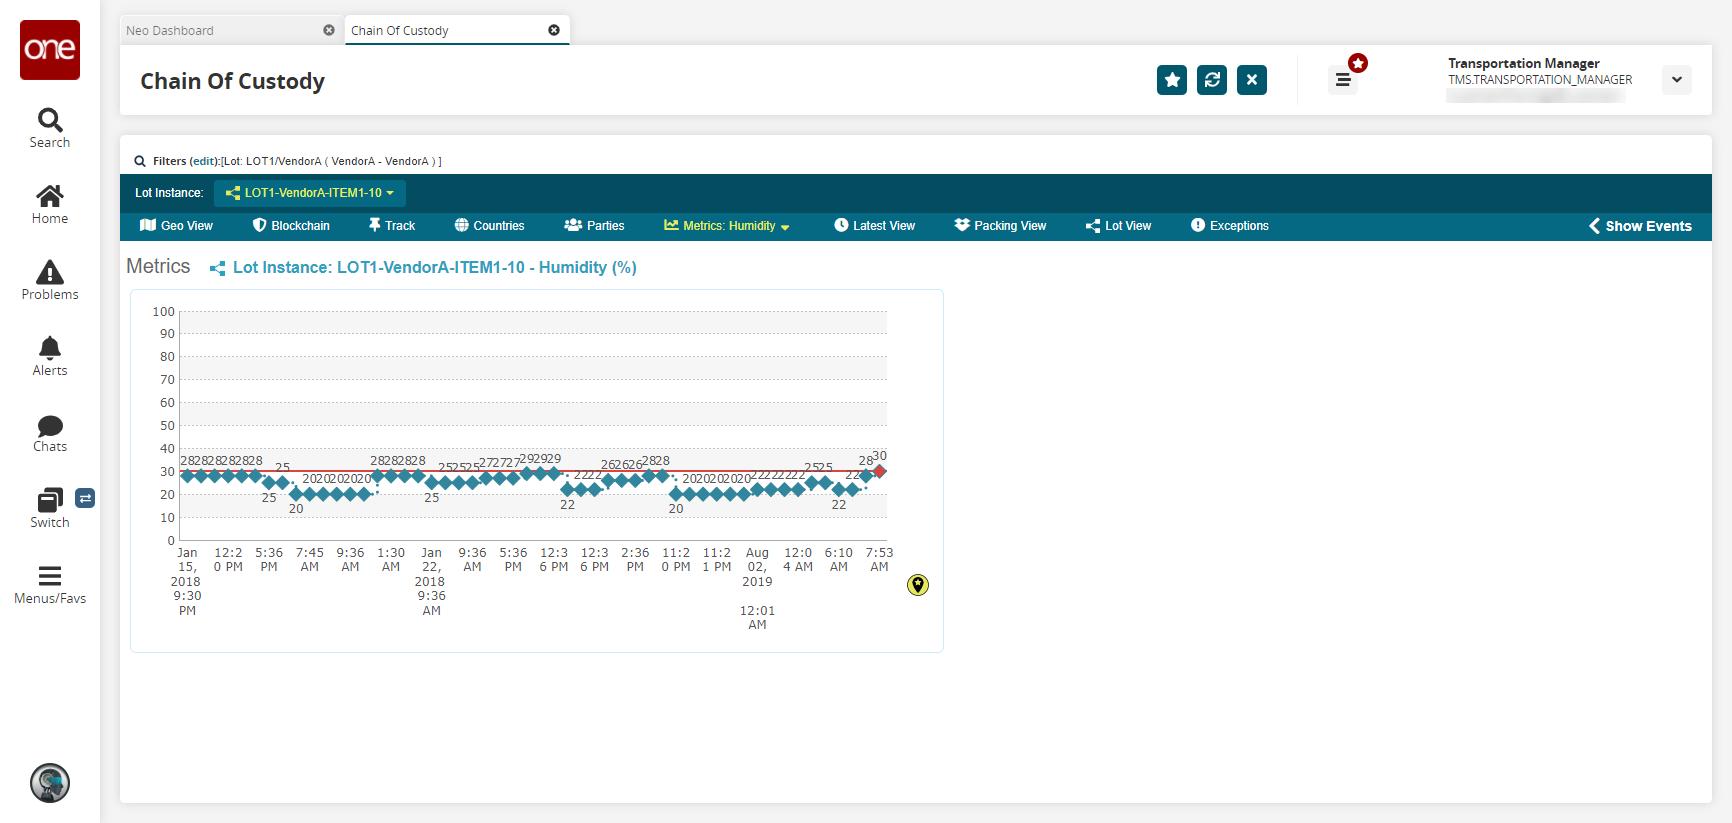
Chain of Custody - Latest View Tab
The Latest View tab displays updated lot and item information, along with current barcodes.

Chain of Custody - Packing View Tab
The Packing View tab displays packing information for the lot. Lines are broken down by item and lot instance with correlating barcodes.

Chain of Custody - Lot Split View Tab
The Lot Split View tab displays lot splitting information, if available.
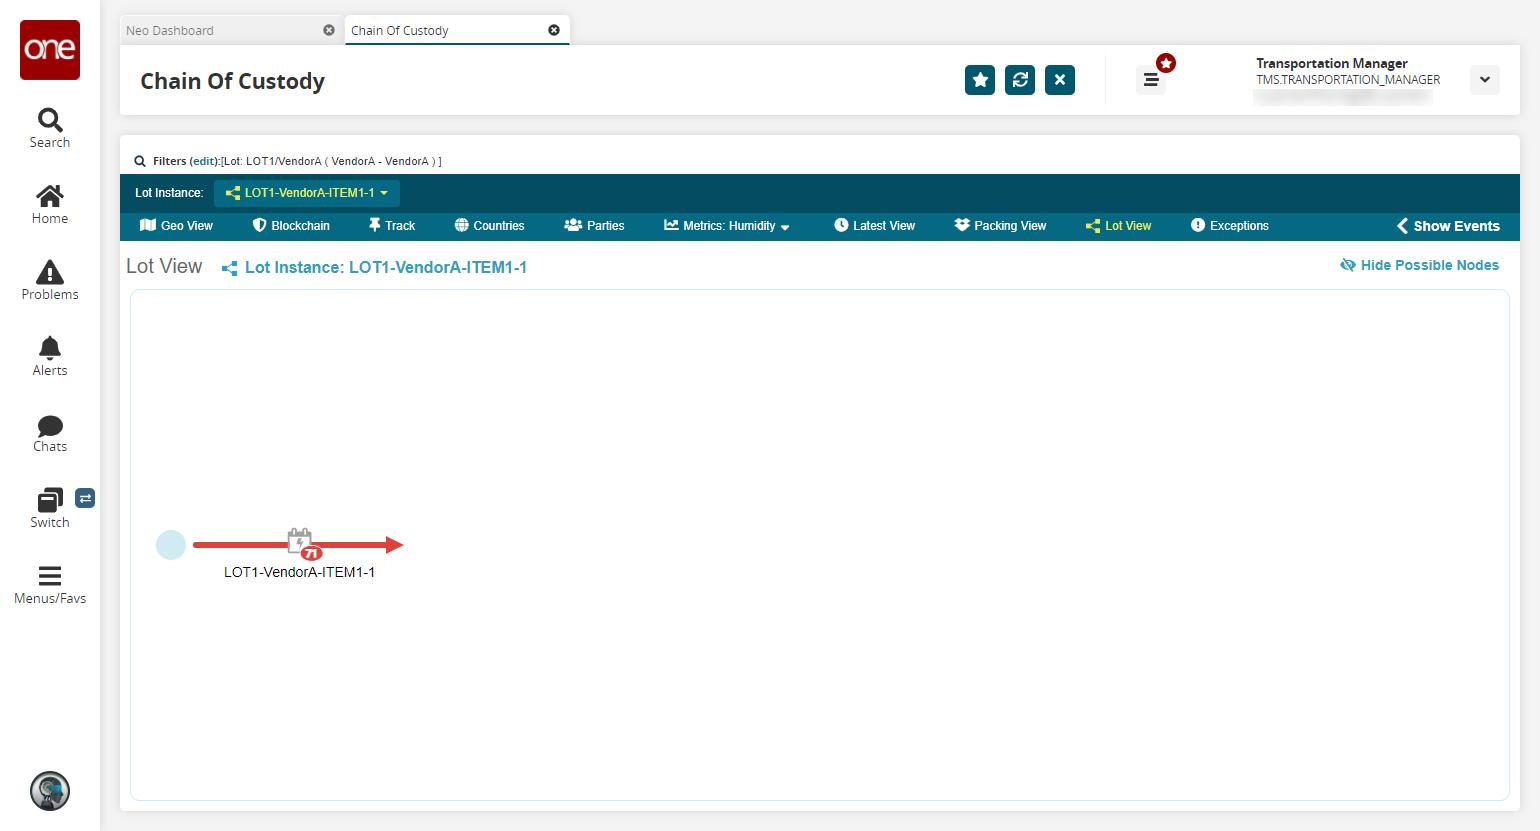
Click the icon for the lot instance to view a list of events in chronological order.
A list of events displays in a window.
Click the < Show Events link to can view more event details.
Events can be sorted by event date and transaction date.
Click > Hide Events to collapse the sidebar.
Chain of Custody - Exceptions Tab
Users can view exceptions in ONE system. Exceptions are system-generated or manually set by users.
Complete the following steps to view exceptions:
Click the Exceptions tab.
The Exceptions tab displays exceptions.
Select or unselect the state checkboxes to filter exceptions.
Recalling Items
Users can initiate a recall process for a lot, lot instance, or item. Users can also identify the location of recalled items and choose to recall items from the selected locations. The user or organization can initiate a recall for a lot, lot instance, or item. The recall process consists of three states:
Initiated: When a user/organization creates a recall request, it starts in the Initiated state.
In-Progress: When a user/organization at the recalled location invokes the Working on Recall action, the corresponding task and the recall request move to the In-Progress state.
Closed: When a user/organization at the recalled location invokes the Completed Recall action, the corresponding recall request moves to the Closed state.
Complete the following steps to initiate a recall request:
Click Menus/Favs > Transportation > Recall.
The Recall screen displays.
Click New Recall to initiate a new recall.
The New Recall window is displayed.
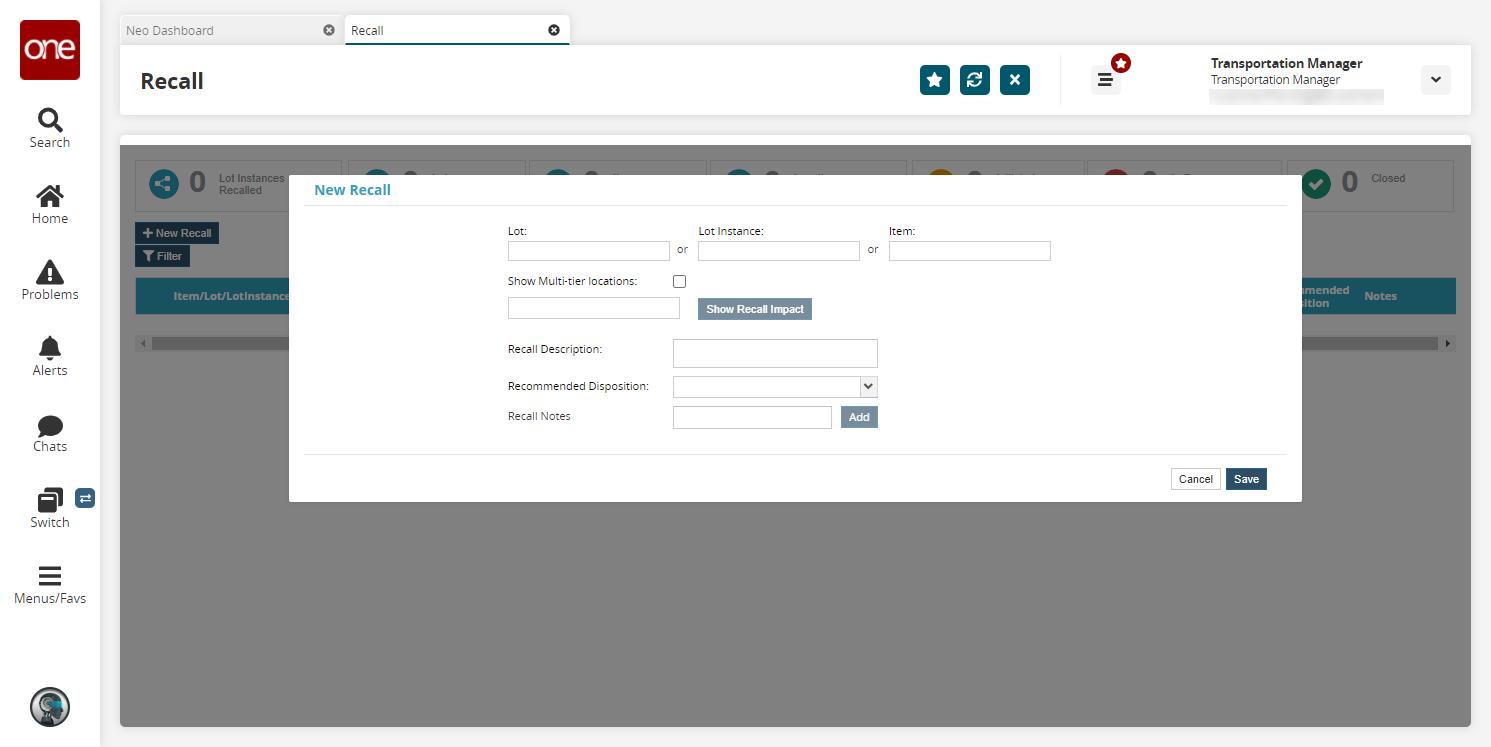
Field
Description
Lot
Select a lot from the drop-down menu.
Lot Instance
Select a lot instance from the drop-down menu.
Item
Select an item from the drop-down menu.
Show Multi-Tier Locations
Select this checkbox to show multi-tier locations.
Recall Description
Enter a description of the recall.
Recommended Disposition
Select either Destroy or Return from the drop-down menu.
Recall Notes
Enter any recall notes and click Add to save them.
Click the Show Recall Impact button to show locations impacted by the recall.
The list of all the impacted locations is displayed.
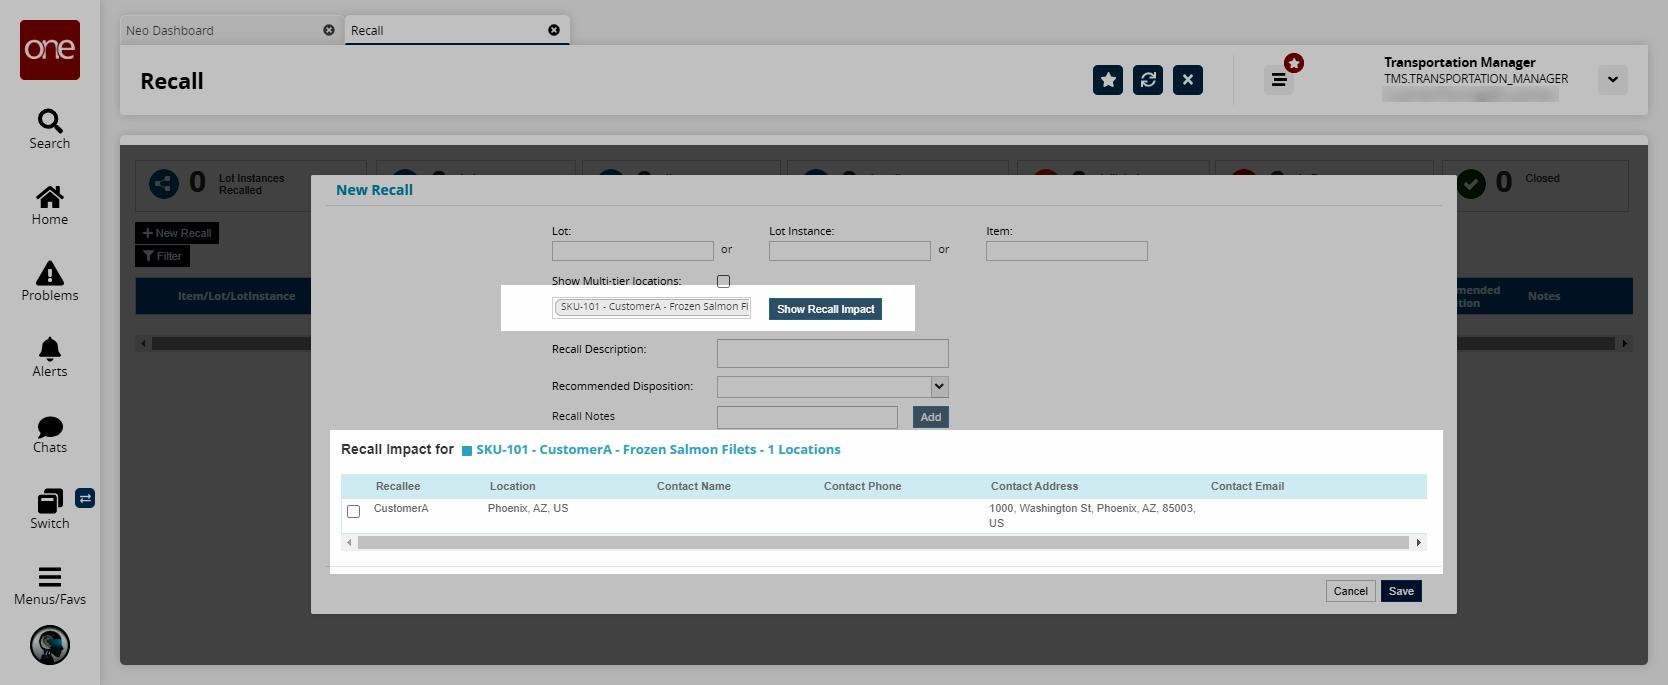
Select the checkbox to choose the locations for recall.
Click Save to initiate the recall.
A success message displays, and the Item/Lot/LotInstance column shows the recall item in the Initiated state.

Complete the following steps to update the recall process:
Expand the required item, lot, or lot instance, and click the Start work on recall task icon.
The Actual Disposition field displays, a success message displays, and the request moves to the In Progress state.
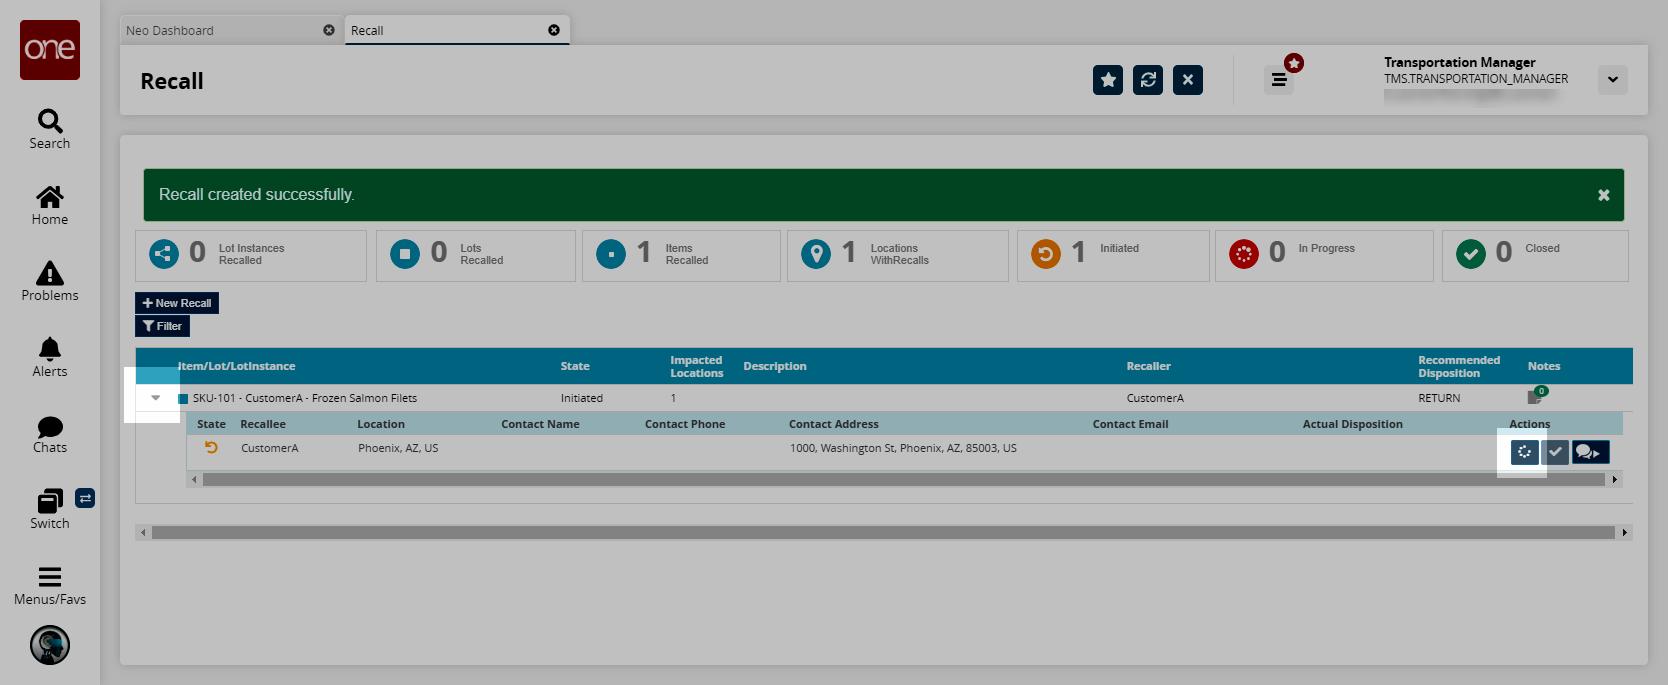
Select a value from the Actual Disposition drop-down menu.
Click the Completes recall task icon (checkmark).
A success message displays, and the request moves to the Closed state.
Searching Shipments
The Search Shipments option allows you to search for shipments using various filters. After, you can view a Shipment State report for all shipments in a state, view details of shipments and movements, apply actions, display shipments and movements in a geographical view, or export the search results to a spreadsheet.
Complete the following steps to search shipments:
Click Menus/Favs > Transportation > Search Shipments.
The Search Shipments filters screen displays.
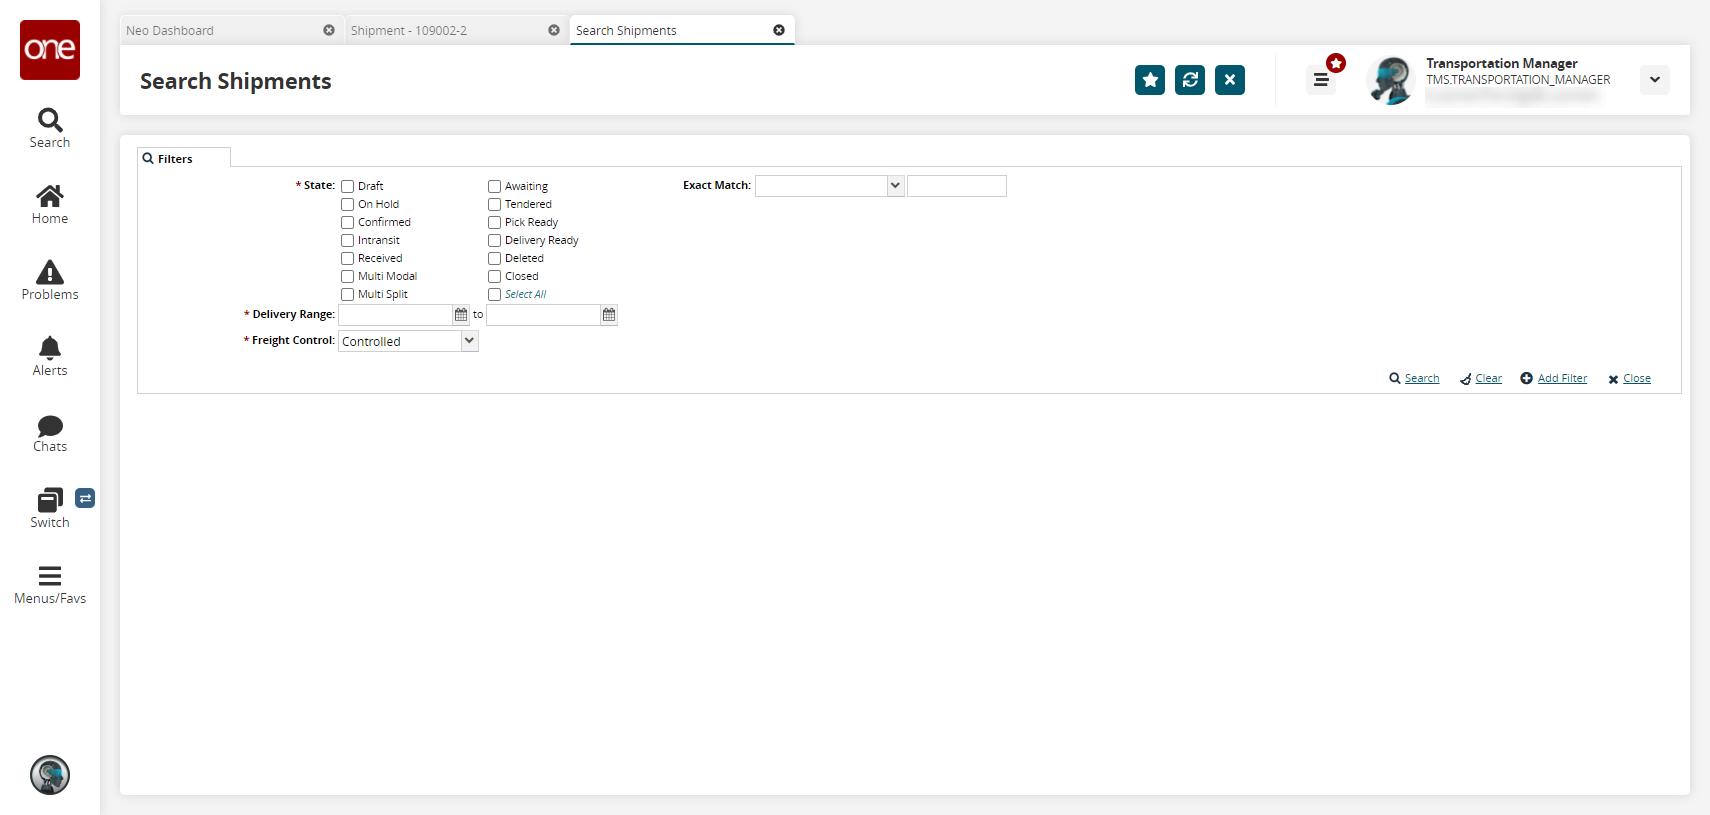
Field
Description
*State
Select one or more state checkboxes for the shipments. These checkboxes correspond to the different states of a shipment in the system.
*Delivery Range
Select a date range for when the shipments will be delivered.
*Freight Control
Select an option from the drop-down menu.
Exact Match
Select an option from the drop-down menu.
Click the Search link.
The search results display.
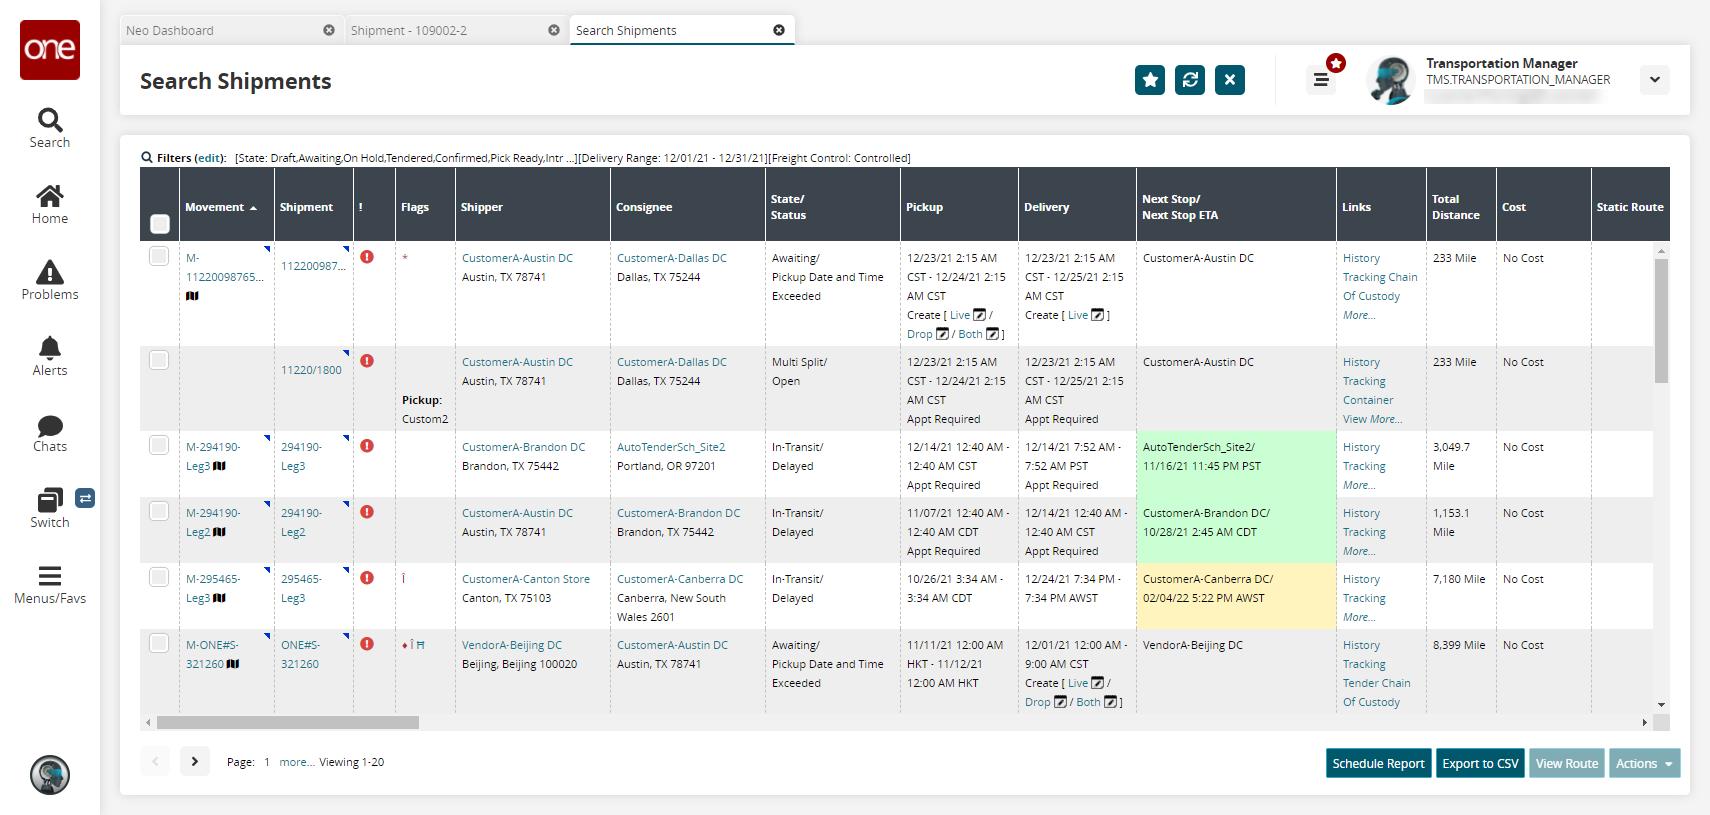
Note
The Flags column shows symbols to indicate if a shipment is overweight, oversized, or hazardous, as well as the status of auto-scheduling. The Overweight symbol and the Over-dimension symbol display if the shipment's weight and size exceed the maximum limits set for the equipment. If the shipment contains hazardous materials, the Hazardous symbol displays. A shipment may have more than one Flag condition. If no shipments on a page have flag conditions, the Flags column will not display.
Select the checkbox in front of the Movement column and click the Actions button to select an action from the list.
Click Export to Excel to export the report to a file.
Note
Depending on the configuration settings of your instance of the ONE system, an additional drop-down menu may display that includes the option to export the data in a CSV file.
Select the checkbox in front of the Movement column and click the View Route button to view a particular movement on a map.
In the Movement or Shipment column, click the triangle button in the corner to open the context menu.
In the Movement column, click the map symbol in front of the movement number to view a particular movement on a map.
Viewing Details for Shipments
In the Shipment column, click a shipment link to view the details of the shipment.
The shipment details screen displays.
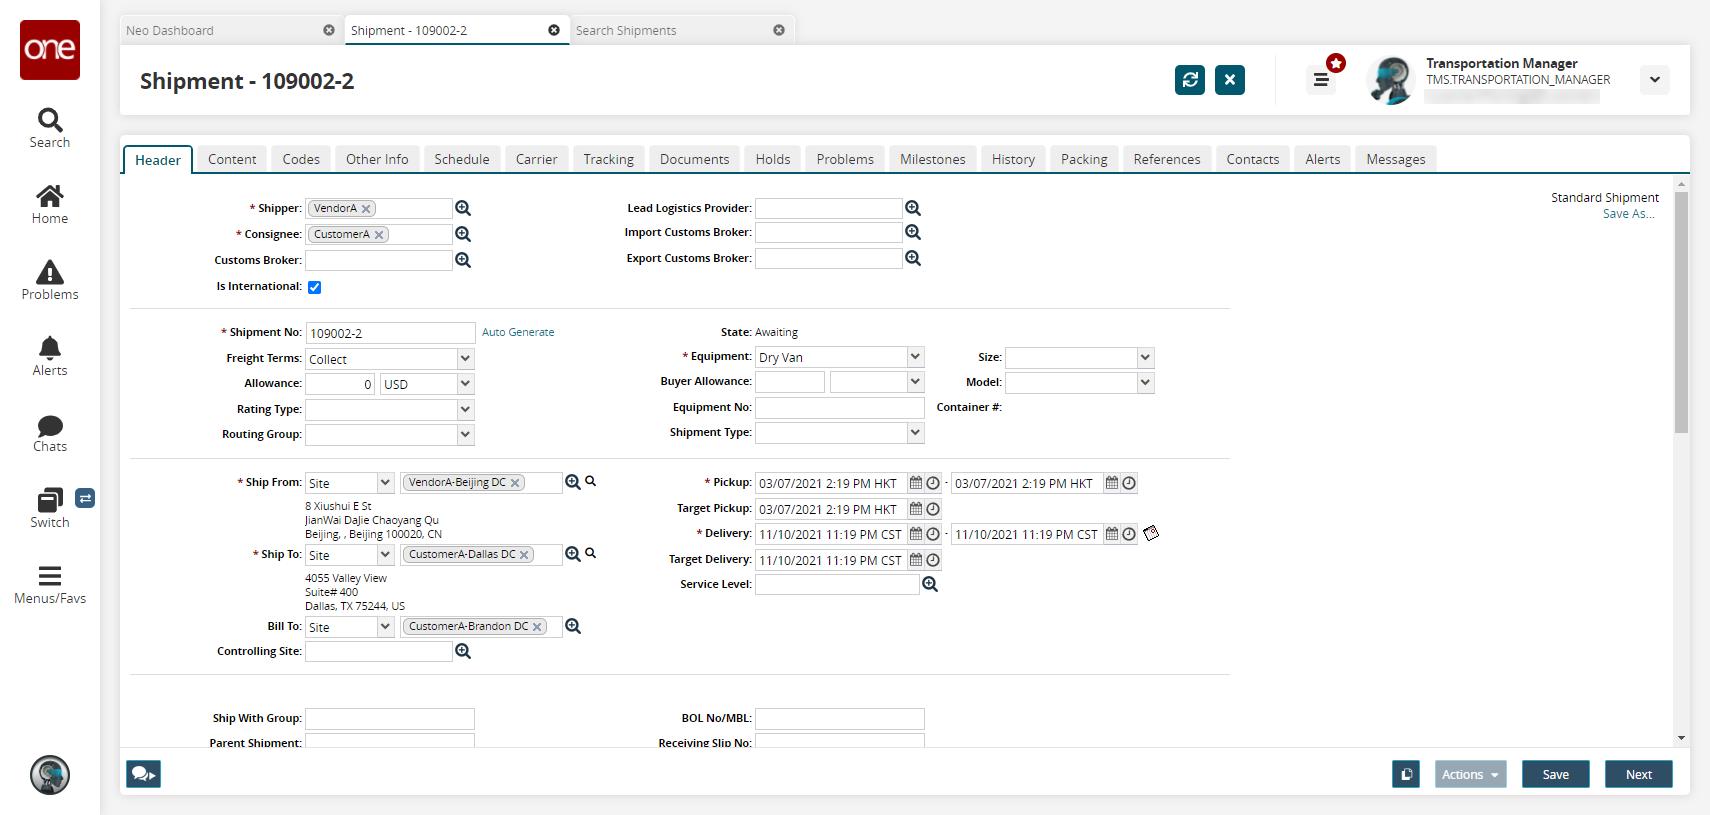
Click the Audit Trail icon.
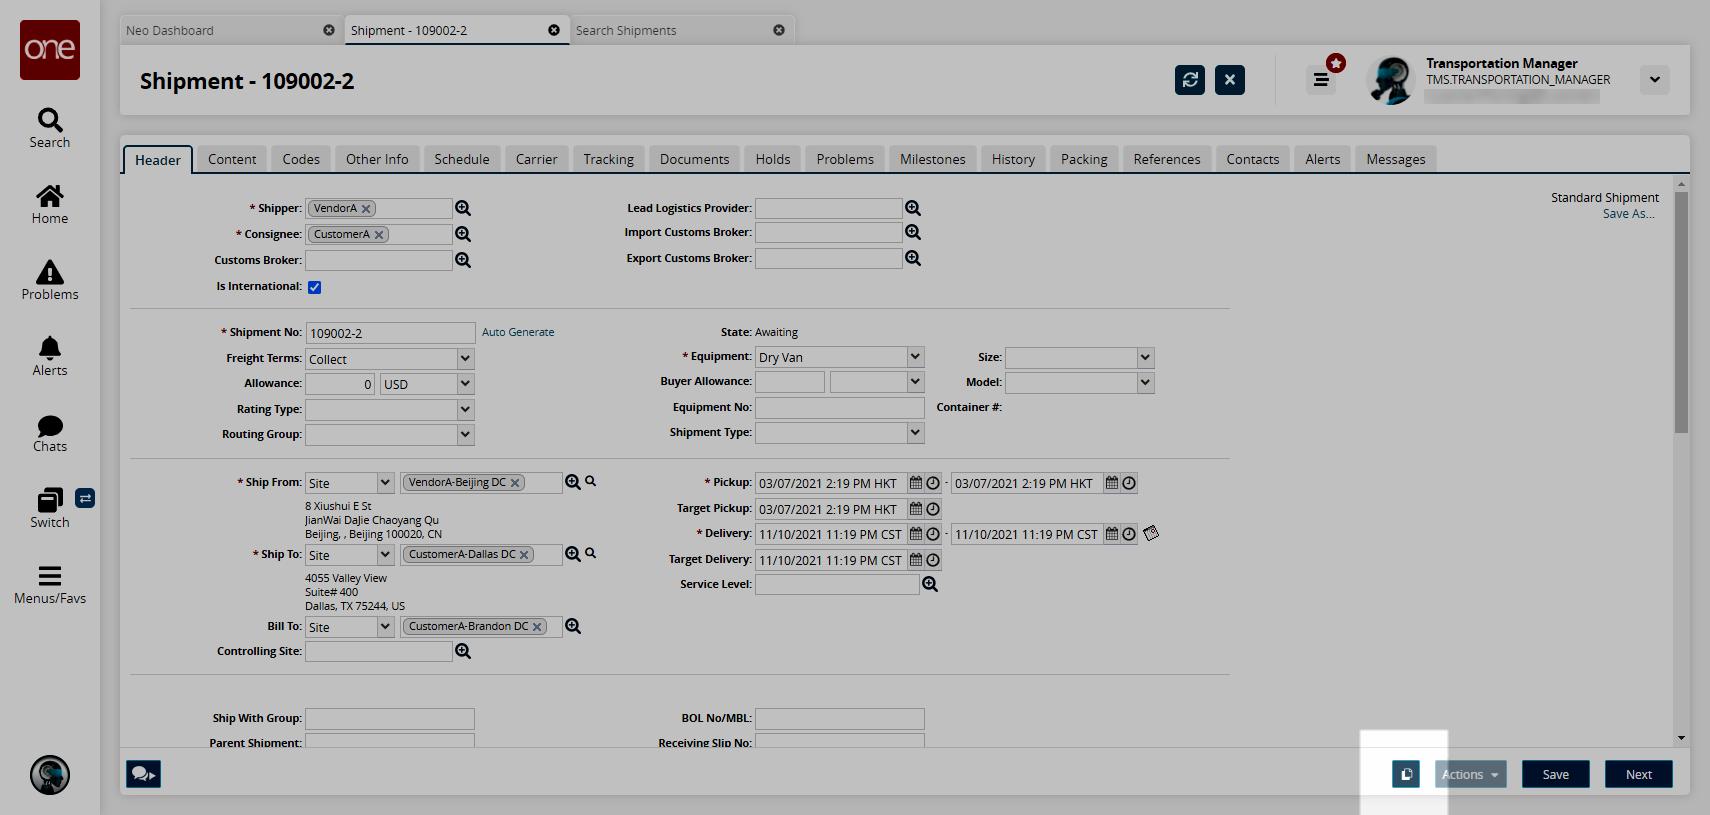
The Audit Trail screen displays.
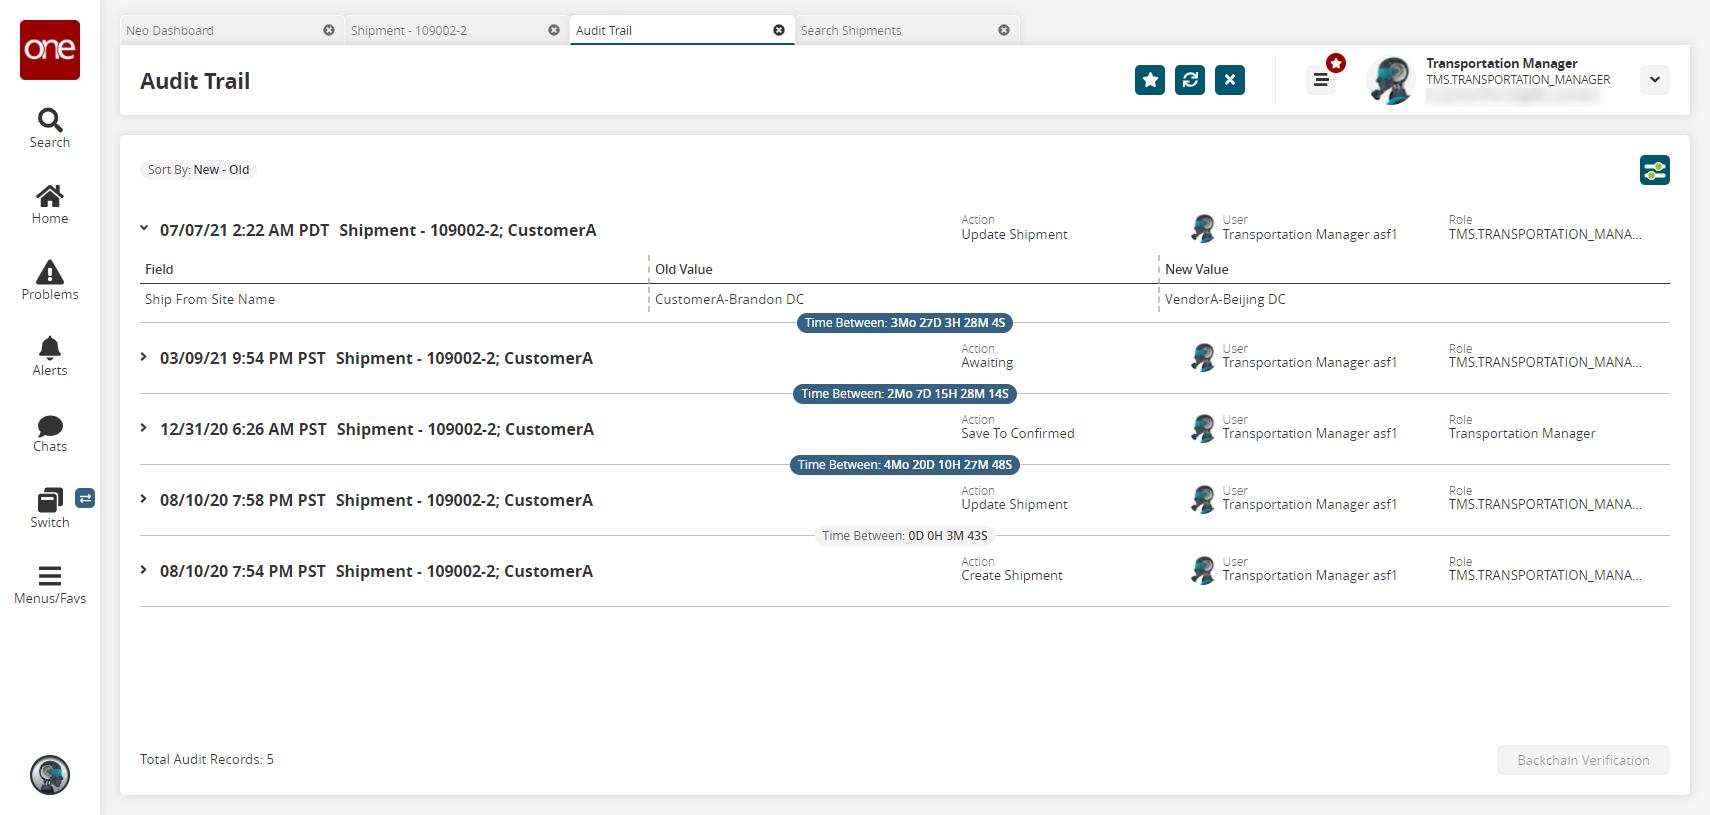
Viewing Movement Details
In the Movement column, click a movement link.
The movement details screen displays.
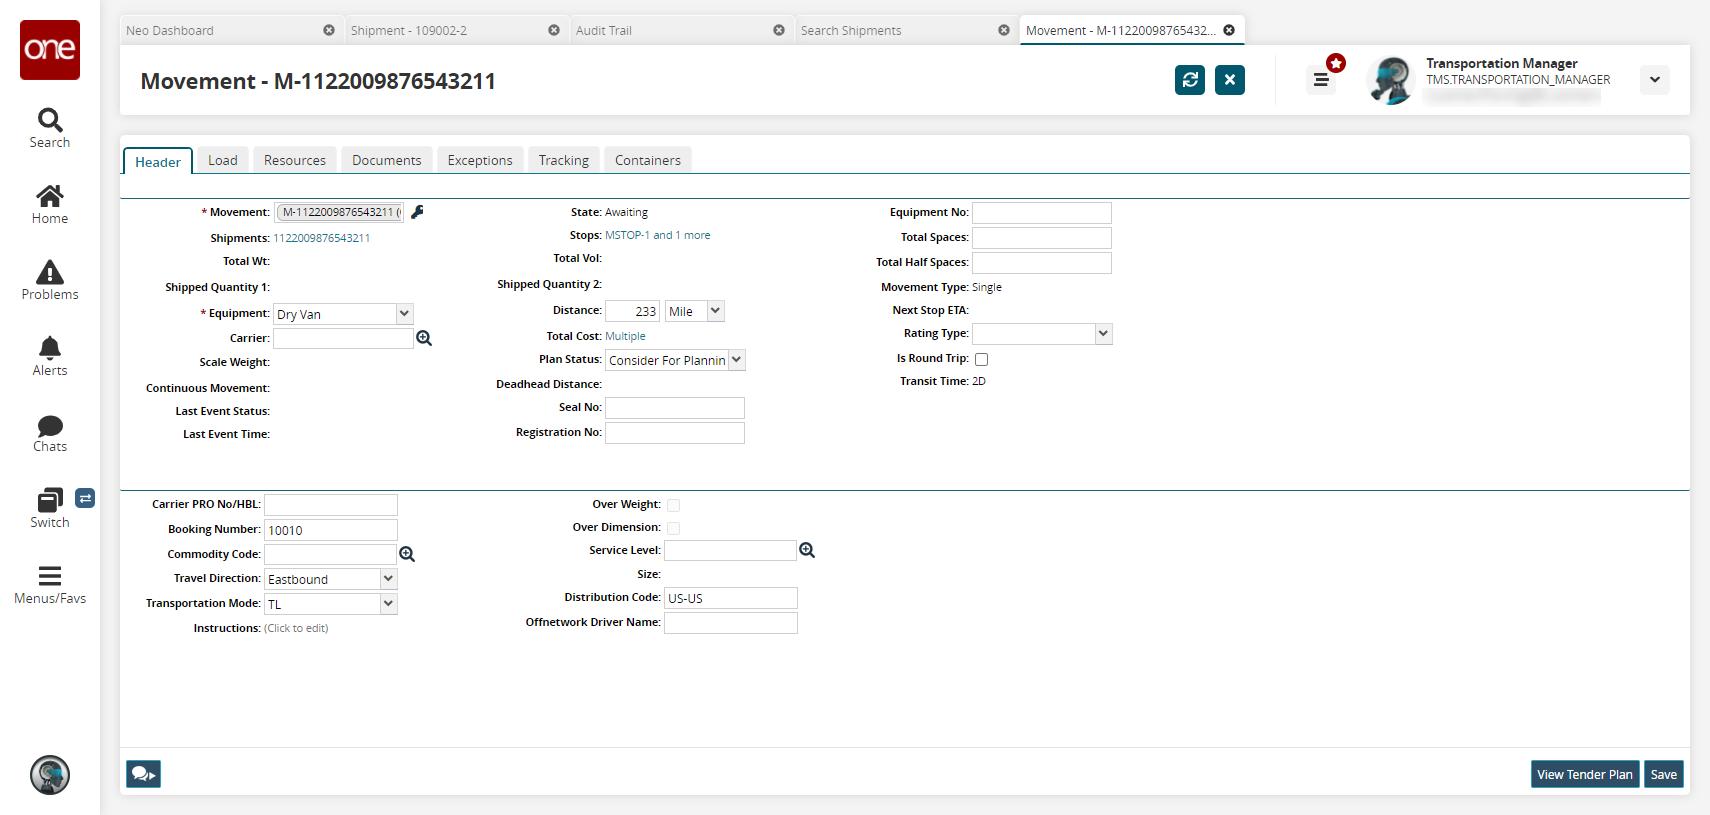
Viewing Links from the Search Shipments Screen
From the search shipments report screen, click the History link under the Links column to view the audit trail for a shipment.
The Movement History screen displays.
In the Links column, click the Tracking link to view the tracking events for a shipment.
The Movement Tracking screen displays.
In the Links column, click the More link to select the following options to view the specific detail screens:
Tender
Chain Of Custody
Container View
Problems
Charges
Itinerary
Commercial Invoice
Searching Non-Controlled Shipments
Users can view all non-controlled shipments. From the Non-Controlled Shipments screen, you can view a Shipment State report for all shipments in a state, view details of shipments and movements, apply actions, display shipments and movements in a geographical view, or export the search results to a spreadsheet.
Complete the following steps to view non-controlled shipments:
Click Menus/Favs > Transportation > Non-Controlled Shipments.
The Non-Controlled Shipments page displays.
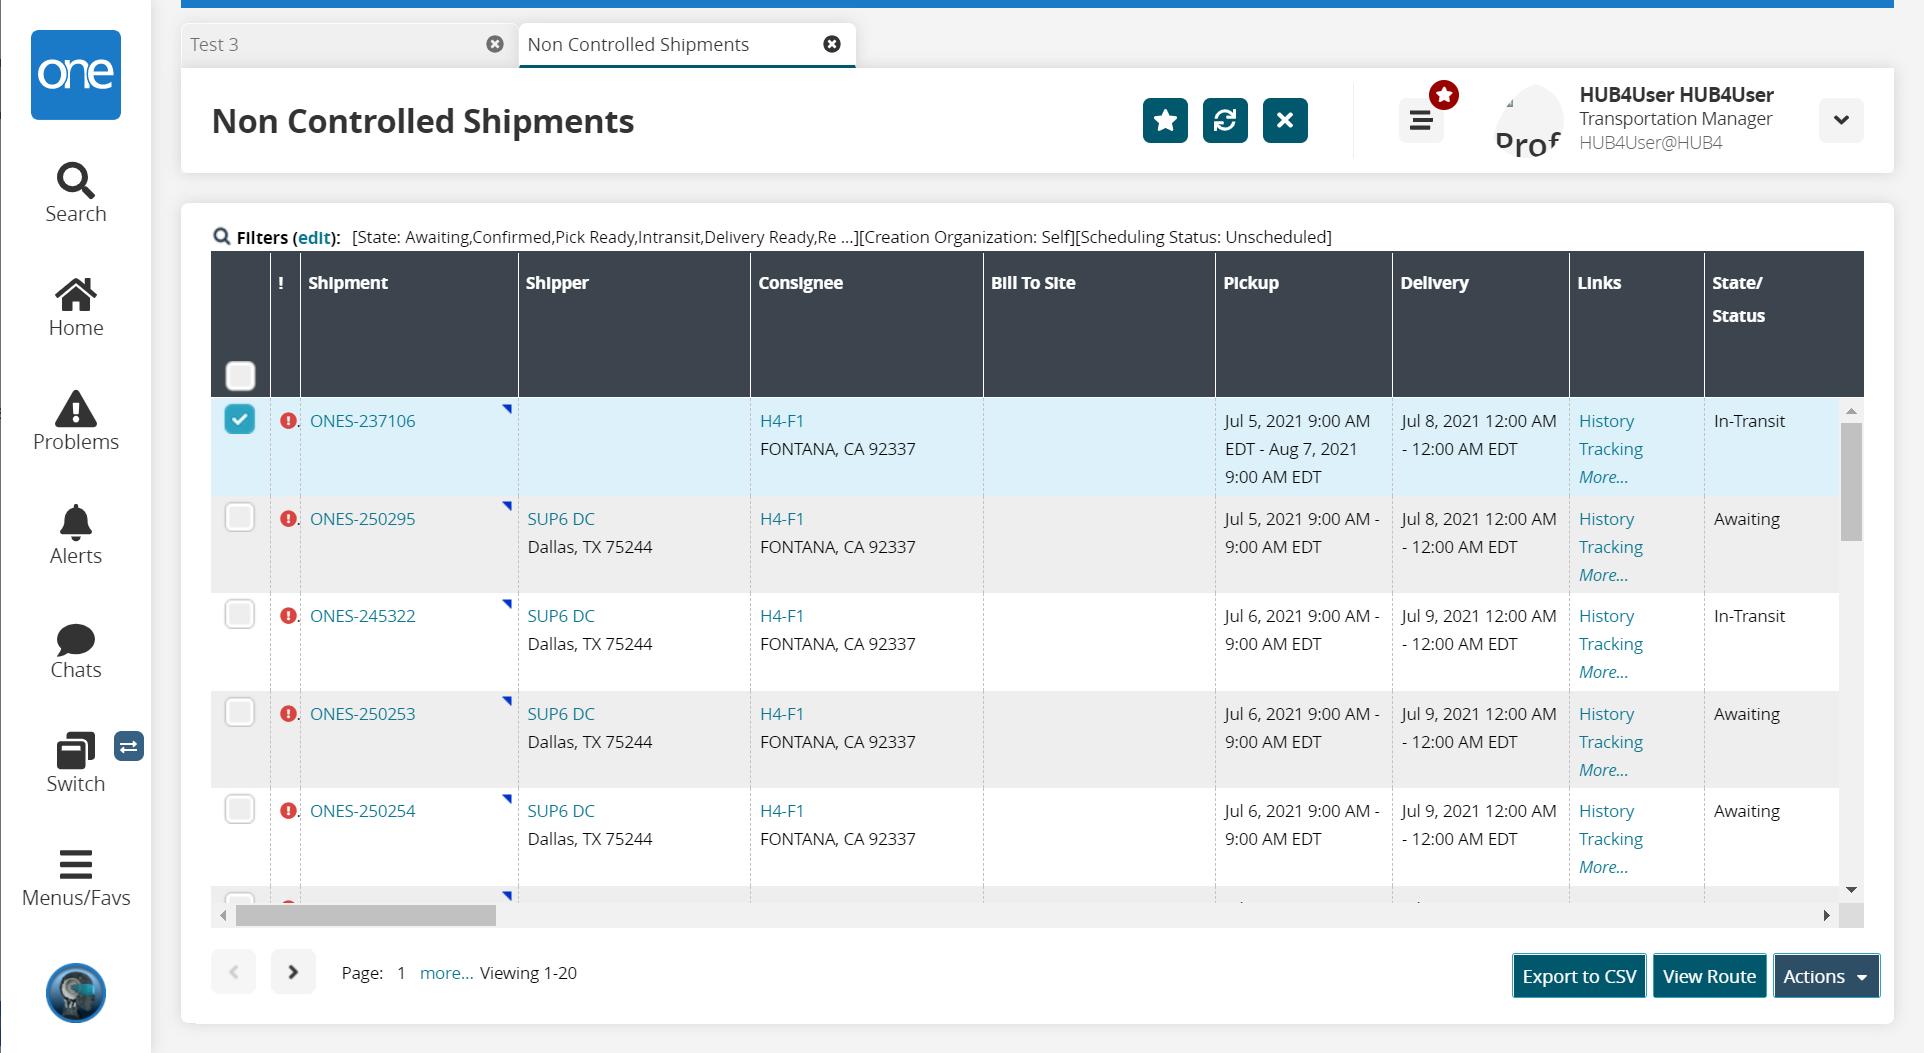
Note
The Flags column shows a symbol to indicate that a shipment is overweight, oversize, or hazardous, as well as the status of auto-scheduling. A shipment may have more than one Flag condition. If no shipments on a page have flag conditions, the Flags column will not be displayed. Hover over the symbol to view the reason for the flag.
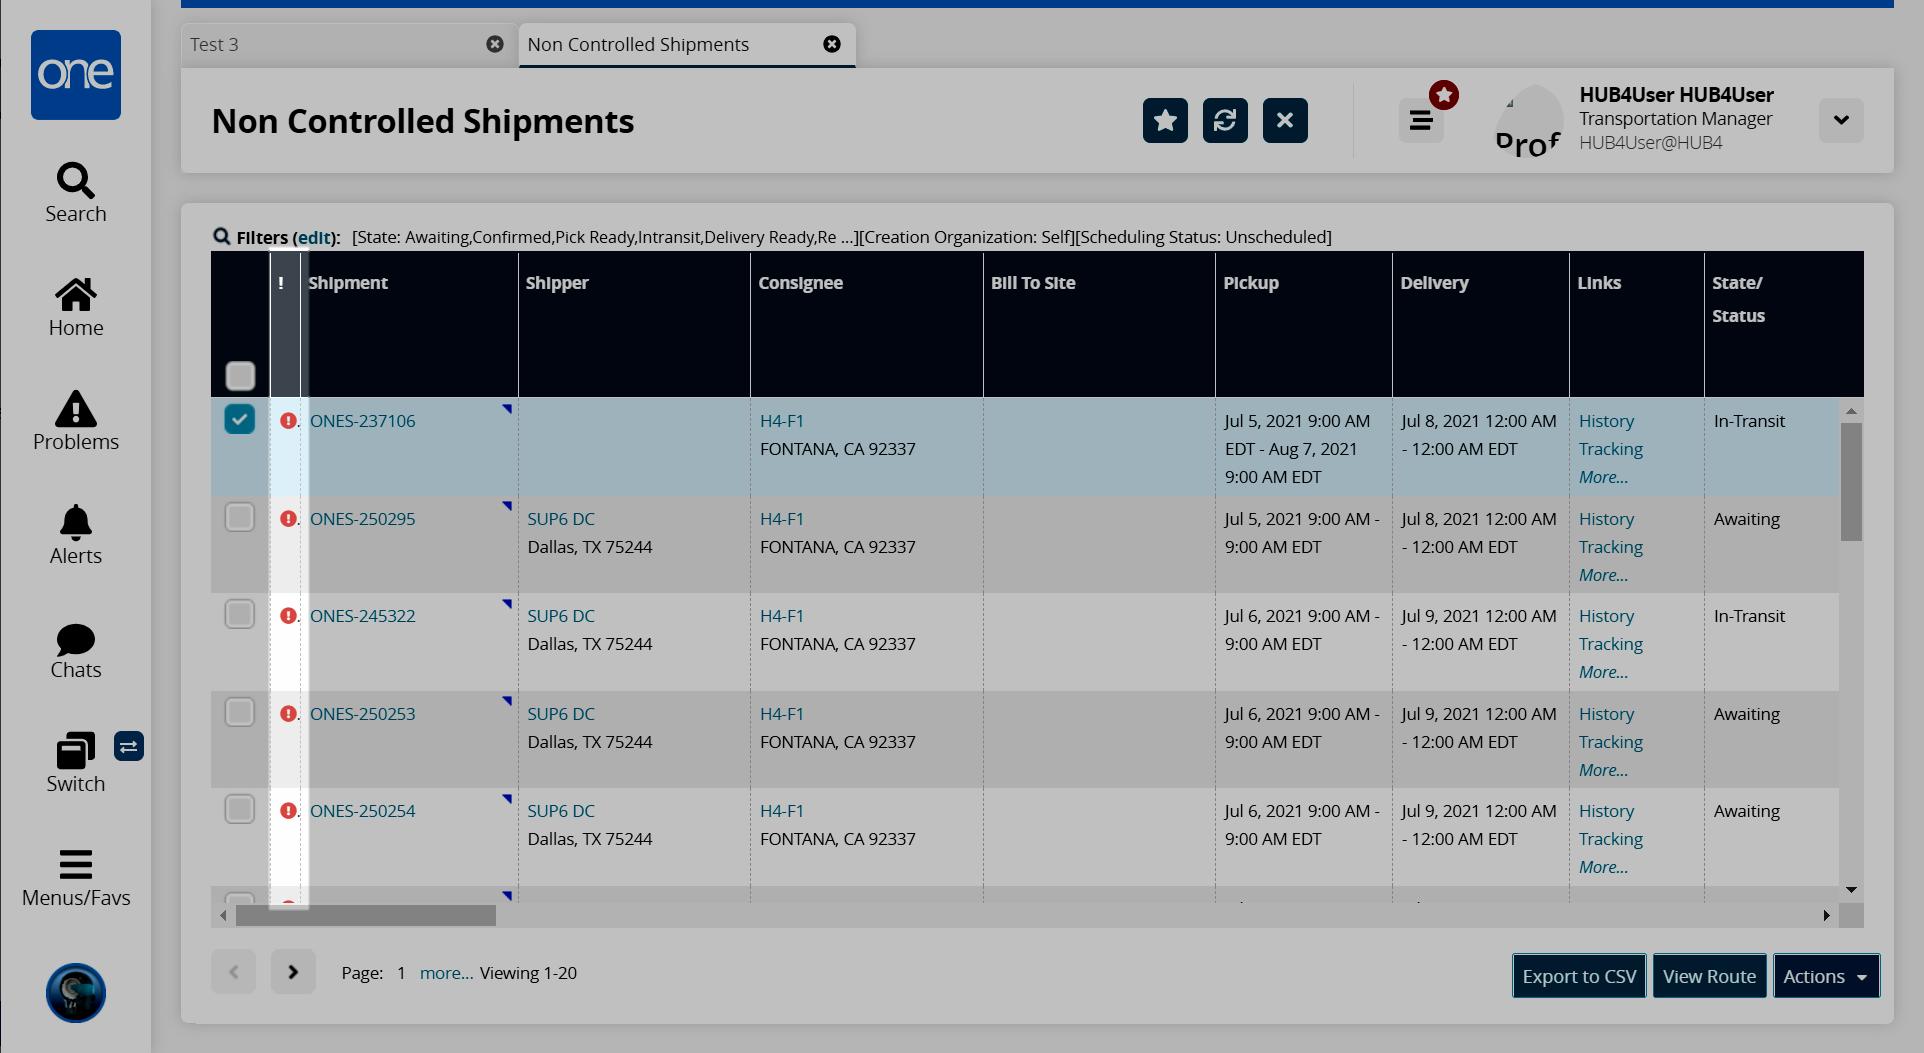
Click the Filters (edit) link to apply search criteria to reduce the number of entries shown.
The Filters menu displays.
Field
Description
*State
Check the boxes of the shipment state included in the search.
*Scheduling Status
Select the scheduling status of the shipment from the drop-down list.
*Creating Organization
Select the organization level from the drop-down liet.
Carrier
Use the picker tool to select the carrier for the shipment.
Click the Search link.
The search results display.
Click Export to Excel to export the report to a file.
Note
Depending on the configuration settings of your instance of the ONE system, an additional drop-down menu may display that includes the option to export the data in a CSV file.
Click the checkbox for a shipment and click the View Route button to see the route for that shipment.
Click the checkbox for a shipment and click the Actions button for the actions available for that shipment.
Scheduling
Cancelling In Progress Appointment Requests
Users can cancel in-progress appointment requests.
Complete the following steps to cancel an appointment request:
Click Menus/Favs > Scheduling > Appointment Requests.
The Appointment Requests screen displays, showing an Explorer panel and a Details panel.
Select one or more appointments to cancel them, and click Cancel Appointment Request.
The Cancel Appointment Request window is displayed details on the selected appointments.
Select a reason for cancellation from the drop-down in the Reason Code column.
Note
If canceling multiple appointment requests, you can specify the reason and comments for one appointment request and click Apply All Reason Codes to apply the same reason code to all other appointment requests selected for cancellation.
If the Hide Reject Reason Code Field for Appointment Request policy is enabled under Scheduling Policies, the Reason Code field is not displayed on the UI when rejecting an appointment request.
Enter any additional information for reference in the Comments column.
Creating Appointment Requests
If no appointments are available in the system when scheduling appointments for controlled and non-controlled shipments or if a different time is required from the appointment times listed, users can create appointment requests. the Create Appointment Request button from any of the following screens: New Live Pickup Appointment, New Live Delivery Appointment, Create Drop Delivery Appointment.The process is the same for live pickup, live delivery, and drop delivery appointments.
Complete the following steps to create an appointment request:
Click Menus/Favs > Transportation > Search Shipments to search for a shipment.
Shipment Search Alternatives
Alternative methods to search for shipments are available. See any of the following sections in the NEO Online Help for more information:
"Searching Shipments"
"Searching for Non-Controlled Shipments"
"Using Filters"
"Performing a Global Search"
Click the link for the shipment number.
The shipment details screen displays.
Click the Schedule tab.
Current appoinment information displays.
Click the link next to Appointment Required on the left for pickup appointment requests and on the right for delivery requests.
The Create Appointment Request window displays. Some fields may vary based on which link you clicked.
Field
Description
*Shipment
This field auto-populates with a shipment number. Users can add more shipments.
Carrier
This field auto-populates with a carrier name.
Location
This field auto-populates with the location for the pickup/delivery.
*Appointment Request Date
Use the calendar and clock tools to select the requested appointment date.
*Reason Code
Select a reason code from the drop-down list.
*Comments
Enter comments into the text box.
Created by
This field is auto-populated with the user's name who is creating the request.
Email
This field is auto-populated with the user's email.
*Phone Number
Enter a phone number.
*Notification
Enter an email recipient for notifications.
Requested Carrier
Use the picker tool to select the requested carrier. This field may not always be available based on values from other fields.
A success window displays.
Click the OK button.
Dispatching Movements to an Off-Network Driver
Carrier managers can use a context menu option to dispatch movements to off-network users via their mobile numbers for controlled shipments. Carriers benefit from the added flexibility to add drivers from a larger pool (off-network) when dispatching controlled shipments.
Complete the following instructions to dispatch movements to off-network drivers for controlled shipments:
Search for a controlled movement using the global Search feature on the left navigation panel or by clicking Menus/Favs > Transportation > Search Shipments.
The search results display.
Click the contextual menu icon (blue triangle) for a single movement in the Movement cell and select Dispatch Movement to Offnetwork Driver, or click the checkbox for multiple movements and click Actions > Dispatch Movement to Offnetwork Driver.
The Dispatch Movement to Offnetwork User window is displayed.
Use the picker tool in the Mobile Number List cell to select the driver's mobile number.
Click the Close and Refresh button.
The movement is dispatched to the off-network driver.
Rescheduling Appointments
Users can reschedule existing appointments for controlled or non-controlled shipments. The steps for pickup and delivery appointments are the same.
Complete the following steps to reschedule an appointment:
Click Menus/Favs > Transportation > Search Shipments for controlled shipments, and click Menus/Favs > Transportation > Non-Controlled Shipments to search for non-controlled shipments.
Shipment Search Alternatives
Alternative methods to search for shipments are available. See any of the following sections in the NEO Online Help for more information:
"Searching Shipments"
"Searching for Non-Controlled Shipments"
"Using Filters"
"Performing a Global Search"
The report for selected shipments displays.
Click the link for the appointment reservation identification number under the Pickup or Delivery column. (Example: [ 553351 Live ])
In this case, the View Live Pickup Appointment screen displays when the live appointment reservation ID link is clicked.
Click the Reschedule Appointment button.
A window displays.
Select a value in the *Reason Code field from the drop-down menu.
Type in the appropriate information in the Description field.
Click the Reschedule Appointment button.
The page refreshes with the original reservation appointment displays under the Reservation section of the screen. Available appointment dates display under Reservation Candidates.
Note
If no reservation candidates exist, a "No Data" message displays. Users can change the target date or click the Create Appointment Request button.
Click the checkbox to select the new appointment time.
A green success bar displays, and the appointment type changes to Rescheduled.
Saving an Appointment as a Pattern for Intelligent Scheduling
While creating an appointment with the preferred time slot, a partner can save it as the preferred candidate for similar future appointments.
Prerequisites
The Activate Intelligent Scheduling flag must be enabled under the Basic Policies tab of Organization-level policies.
The Enable Appointment Request flag must be enabled under the Basic Policies tab of Site-level policies.
Complete the following steps to save an appointment request as a pattern:
Navigate to the Live Pickup Appointment, Live Delivery Appointment, or Drop Delivery Appointment screens.
The appropriate screen displays.
Click the Create Appointment Request button.
The Create Appointment Request screen displays.
Enter the request details in the top of the screen. For more information, please see the "Create Appointment Requests" section.
Click the checkbox for the Save as Pattern field.
Enter a name in the Pattern Name field
Select the recurrence from the Recurrence Type drop-down menu.
Use the calendar tool to select an end date for the pattern in the Repeat Until field.
Click the checkbox that is appropriate for the Match Shipment field.
Click the Create button.
The appointment will now display at the top of the list of system-suggested reservation candidates for all similar appointments in the future.
Scheduling Appointments
Scheduling Appointments for Controlled Shipments
Users can use the ONE network to schedule pickup and delivery appointments for controlled and non-controlled shipments. Instructions for setting live pickup/delivery and drop pickup/delivery appointments for controlled shipments from different screens in the UI are provided below.
Scheduling Appointments from the Search Shipments Screen
Complete the following steps to schedule a live pickup or delivery appointment:
Click Menus/Favs > Transportation > Search Shipments to locate a controlled shipment.
For more instructions on how to search for a specific shipment, see the "Using Filters," "Searching Shipments," or "Performing a Global Search" sections in the NEO Online Help.
The Search Shipments screen displays.
Click the Live or Drop link located under the Pickup (or Delivery) column for a movement/shipment.
In the example below, we clicked the Live link under Pickup.
Note
Users may see the Live link only, the Drop link only, or both, depending on the shipper's configuration.
The Create Live Delivery Appointment screen displays.
Field
Description
*Shipment
This field auto-populates with a shipment number.
Click the Add More link to add more shipments, and then click the Select Shipments option.
The Select Shipments window is displayed.
Field
Description
*Search by
Freight Control?
Check the box if the item is freight-controlled. This field is only available for the Order Ref or Shipment No options.
*State
Check the boxes for the shipment states.
Retrieve For
Select the time bucket from the drop-down list.
Click the Search link.
The search results display.
Check the box(es) for the shipment you want to add to the appointment and click the Add button.
The shipments are added to the appointment. The More link may display if there are several shipments.
Site
This field auto-populates with a site name.
*Type
These fields auto-populate based on what link was used to get to this screen (Live/Drop and Pickup/Delivery).
Target Date
This field auto-populates with the target date.
Click the calendar and clock icons to change the date and time for the appointment.
Click the Reset Target Date icon
to revert back to the original target date.Note
Some shippers have configured appointment scheduling to require a reason for changing the date. If so, the required *Appointment Date Change Reason Code field displays above the Reservation Candidate table.
Notes
Existing notes display.
Click the View/Add Notes to view more information or add a new note.
The Notes window displays.
Complete the following instructions to add a new note:
Click the Add Note button to add a new note.
A new row displays.
Enter information in the Description field.
Click the OK button.
The note is saved.
Click the Close button to close the window.
Reservation ID
This field auto-populates after scheduling the appointment.
Appointment Type
This field auto-populates after scheduling the appointment.
*Contact
Enter a contact name.
*Phone Number
Enter a phone number.
Drop Appt Est Time
Use the calendar and clock tools to select the estimated drop appointment time.
Note
This field only displays with Drop appointments.
Load
This field auto-populates.
Supplier Partners
This field auto-populates.
Max Candidates
Select the maximum number of appointment candidates to display in the Reservation Candidates table.
*Appointment Date Change Reason Code
This field displays if the shipper has configured this parameter. Select a reason code from the drop-down list.
Appointment times display in the Reservation Candidates table, as highlighted below. If there are no appointment times available in the system or if none of the available appointment times work, users can also request a new appointment. See the "Creating Appointment Requests" section in the NEO Online Help for instructions.
Select an appointment time. If there are more than the maximum number of reservation candidates available, an icon displays on the table header to view more options.
The Schedule Appointment button activates.
Click the Schedule Appointment button to schedule an appointment.
A green success bar displays and new action buttons are available at the bottom of the screen. The appointment is also now assigned a confirmation number in the Reservation ID field and the Appointment Type field displays as Confirmed.
Scheduling Appointments from the Shipment Details Screen
Users can schedule live or drop appointments for pickup or delivery from the shipment's details screen. Once here, users follow the same instructions as above.
Click Menus/Favs > Transportation > Search Shipments to locate a shipment. Users can also perform a global search.
The Search Shipments screen displays.
Click the link in the Shipment column.
The shipment details page displays.
Click the Scheduling tab.
The scheduling information displays.
Click the Live or Drop links on the left to set a pickup appointment.
The screens from the instructions above display. Follow the appropriate instructions to schedule the appointment.
Click the Live or Drop links on the right to set a delivery appointment.
The screens from the instructions above display. Follow the appropriate instructions to schedule the appointment.
Scheduling Appointments for Non-Controlled Shipments
Users can use the ONE network to schedule pickup and delivery appointments for controlled and non-controlled shipments. Instructions for live pickups/deliveries and drop pickups/deliveries for non-controlled shipments from different screens in the UI are provided below.
Note
A non-controlled shipment is one in which you typically work directly with your supplier, who provides the information for the load. A non-controlled shipment will not have a movement number associated with it. The supplier or shipper may provide the shipment number.
Schedule a Live Pickup or Delivery Appointment from the Search Shipments Screen
Complete the following steps to schedule a live pickup or delivery appointment from the Non-Controlled Shipments screen:
Click Menus/Favs > Transportation > Non-Controlled Shipments for non-controlled shipments.
Shipment Search Alternatives
Alternative methods to search for shipments are available. See any of the following sections in the NEO Online Help for more information:
"Searching Shipments"
"Searching for Non-Controlled Shipments"
"Using Filters"
"Performing a Global Search"
The Non-Controlled Shipments screen displays.
Click the Live or Drop link located under the Pickup (or Delivery) column for a movement/shipment. In the example below, we clicked the Live link under Delivery.
Note
Users may see the Live link or the Drop link only or may see both based on the shipper's configuration.
The Create Live Delivery Appointment screen displays. The Create Live Pickup Appointment looks the same.
Field
Description
*Shipment
This field auto-populates with a shipment number. Click the Add More link to add more shipments. See the "Adding Shipments to Existing Appointments" section of the NEO Online Help for more information.
Site
This field auto-populates with a site name.
*Type
These fields auto-populate based on the link clicked to access this screen (Live/Drop and Pickup/Delivery).
Target Date
This field auto-populates with the target date.
Click the calendar and clock icons to change the date and time for the target delivery date.
Click the Reset Target Date icon
to revert back to the original target date.Note
Some shippers have configured appointment scheduling to require a reason for changing the date. If so, the required *Appointment Date Change Reason Code field displays above the Reservation Candidate table.
Notes
Existing notes display.
Click the View/Add Notes to view more information or add a new note.
The Notes window displays.
Complete the following instructions to add a new note:
Click the Add Note button to add a new note.
A new row displays.
Enter information in the Description field.
Click the OK button.
The note is saved.
Click the Close button to close the window.
Reservation ID
This field auto-populates after scheduling the appointment.
Appointment Type
This field auto-populates after scheduling the appointment.
*Contact
Enter a contact name.
*Phone Number
Enter a phone number.
Drop Appt Est Time
Use the calendar and clock tools to select the estimated drop appointment time.
Note
This field only displays with Drop appointments.
Load
This field auto-populates.
Supplier Partners
This field auto-populates.
Max Candidates
Select the maximum number of appointment candidates to display in the Reservation Candidates table.
*Appointment Date Change Reason Code
This field displays if the shipper has configured this parameter. Select a reason code from the drop-down list.
Appointment times display in the Reservation Candidates table as highlighted below. If there are no appointment times available in the system or if none of the available appointment times work, users can also request a new appointment. See the "Creating Appointment Requests" section in the NEO Online Help for instructions.
Select an appointment time. If there are more than the maximum number of reservation candidates available, an icon displays on the table header to view more options.
The Schedule Appointment button activates.
Click the Schedule Appointment button to schedule the appointment.
A green success bar displays and new action buttons are available at the bottom of the screen. The appointment is also now assigned a confirmation number in the Reservation ID field and the Appointment Type field displays as Confirmed.
Scheduling Appointments from the Shipment Details Screen
Users can schedule appointments for pickup or delivery from the shipment's details screen. Once here, users follow the same instructions as above.
Click Menus/Favs > Transportation > Non-Controlled Shipments to locate a shipment.
The Non-Controlled Shipments screen displays.
Shipment Search Alternatives
Alternative methods to search for shipments are available. See any of the following sections in the NEO Online Help for more information:
"Searching Shipments"
"Searching for Non-Controlled Shipments"
"Using Filters"
"Performing a Global Search"
Click the link in the Shipment column.
The shipment details page displays.
Click the Scheduling tab.
The scheduling information displays.
Click the Live or Drop link on the left to schedule a pickup appointment.
The screens from the instructions above display. Follow the appropriate instructions to schedule the appointment.
Click the Live or Drop link on the right to schedule a delivery appointment.
The screens from the instructions above display. Follow the appropriate instructions to schedule the appointment.
Creating Standalone Appointments
Users can create delivery or pickup standalone appointments that are not associated with a shipment. The example below is for a pickup standalone appointment.
Complete the following steps to create standalone appointments:
Click Menus/Favs > Scheduling > Standalone Appointments > New Pickup Standalone Appointment.
The method for creating a delivery standalone appointment is similar; instead, simply click Menus/Favs > Scheduling > Standalone Appointments > New Delivery Standalone Appointment.
The New Pickup Standalone Appointment screen displays.
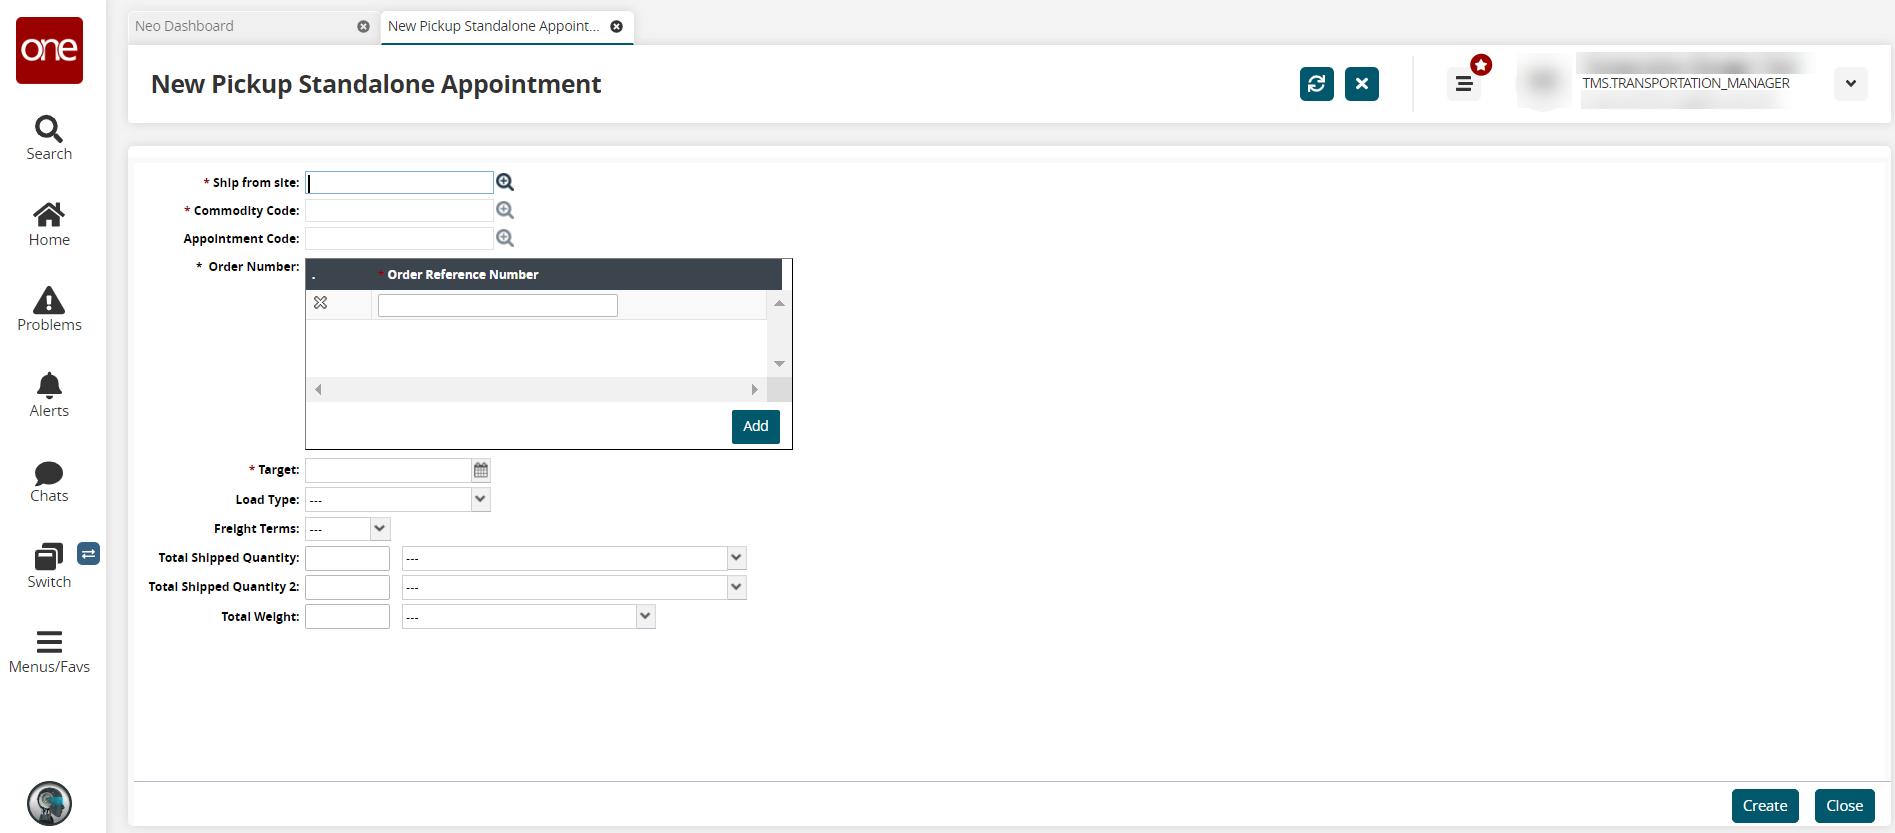
Field
Description
*Ship from site
Select a Ship From site using the picker tool. (This field is Ship To Site for delivery standalone appointments.)
*Commodity Code
Select a commodity code using the picker tool.
Appointment Code
Select an appointment code using the picker tool.
*Order Number
Click the Add button, and enter an order number. Repeat as necessary.
*Target
Select a target date using the calendar tool.
Load Type
Select a load type from the drop-down menu.
Freight Terms
Select freight terms from the drop-down menu.
Total Shipped Quantity
Enter a total shipped quantity, and select a container unit of measure.
Total Shipped Quantity 2
Enter a total shipped quantity, and select a container unit of measure.
Total Weight
Enter the weight, and select a unit of measure from the drop-down menu.
The Create Live Pickup Appointment screen displays. This screen has two tabs, Reservations (default) and Shipments. In the Reservation Candidates section of this tab, the Appointment Scheduling Engine automatically suggests available reservation times for the Dock Door Group based on business rules. Each suggested reservation is identified by Slot Type: whether the slot is due to a Regular available open slot or from a Standing Block. The "Appointment Scheduling in the NEO Workbench UI" section of the NEO Online Help contains the field descriptions and steps for scheduling this appointment. Instructions for other actions (rescheduling, updating, canceling, etc.) are located in the "Working with Appointments" section in the NEO Online Help.
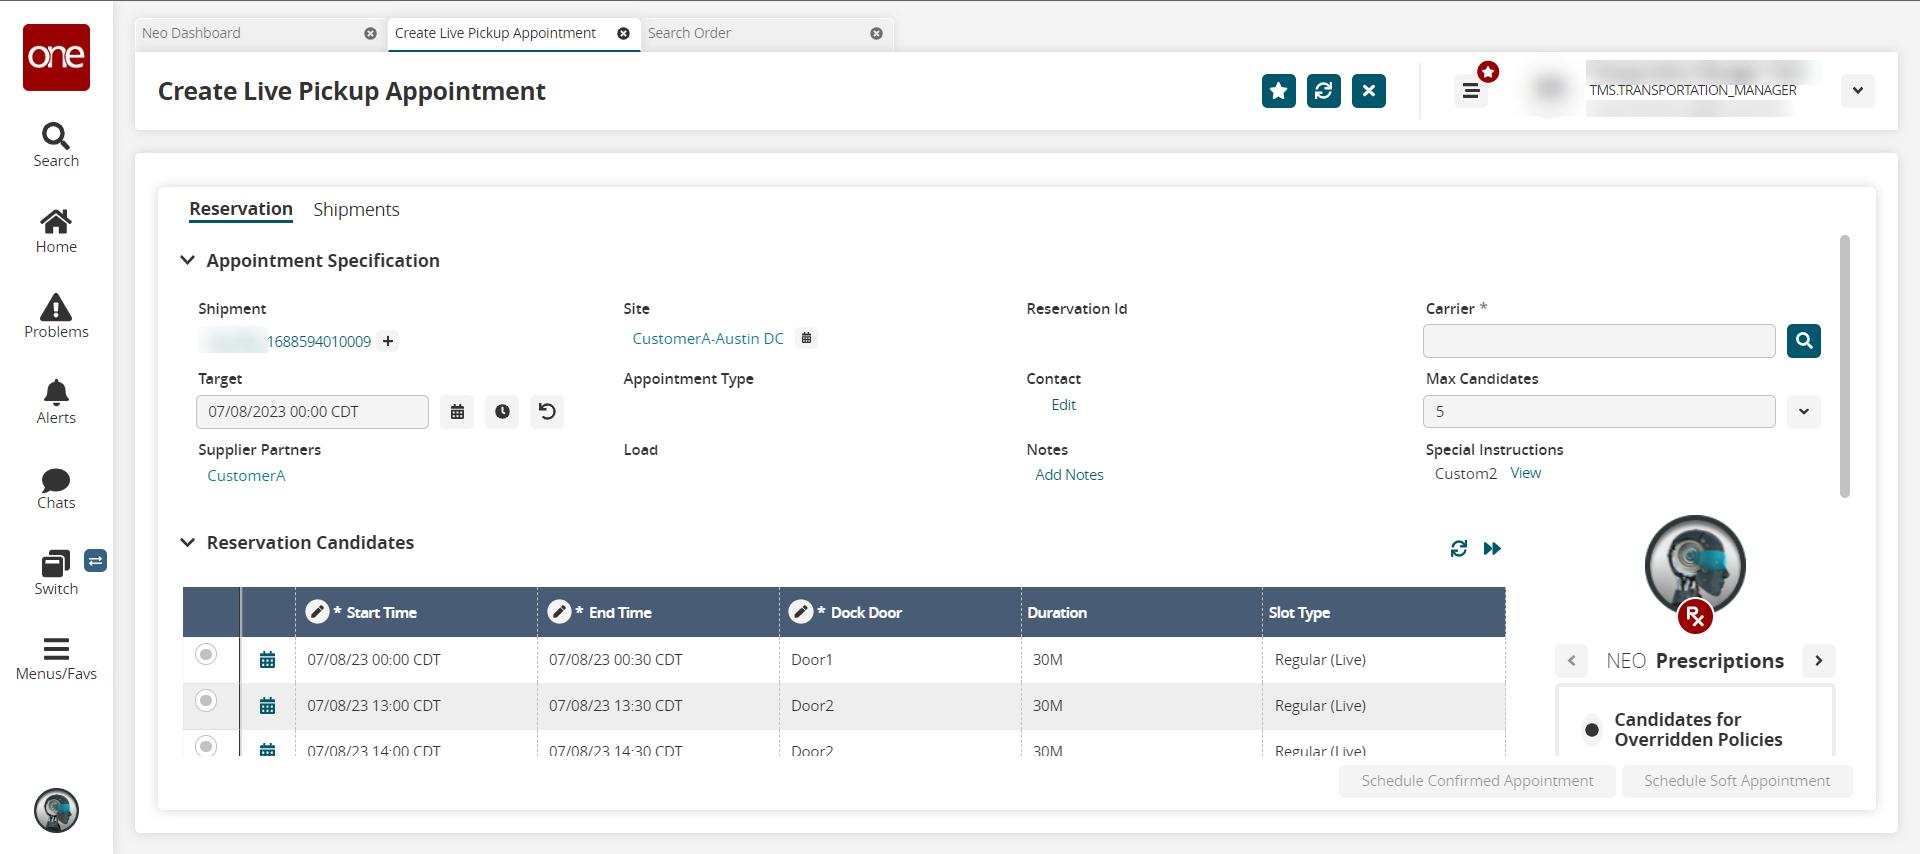
Analytics Reports
Milestones Analytics
Complete the following steps to view the Milestones Analytics screen:
Click Menus/Favs > Reports > Analytics Reports > Milestones Analytics.
The Milestones Analytics screen displays.
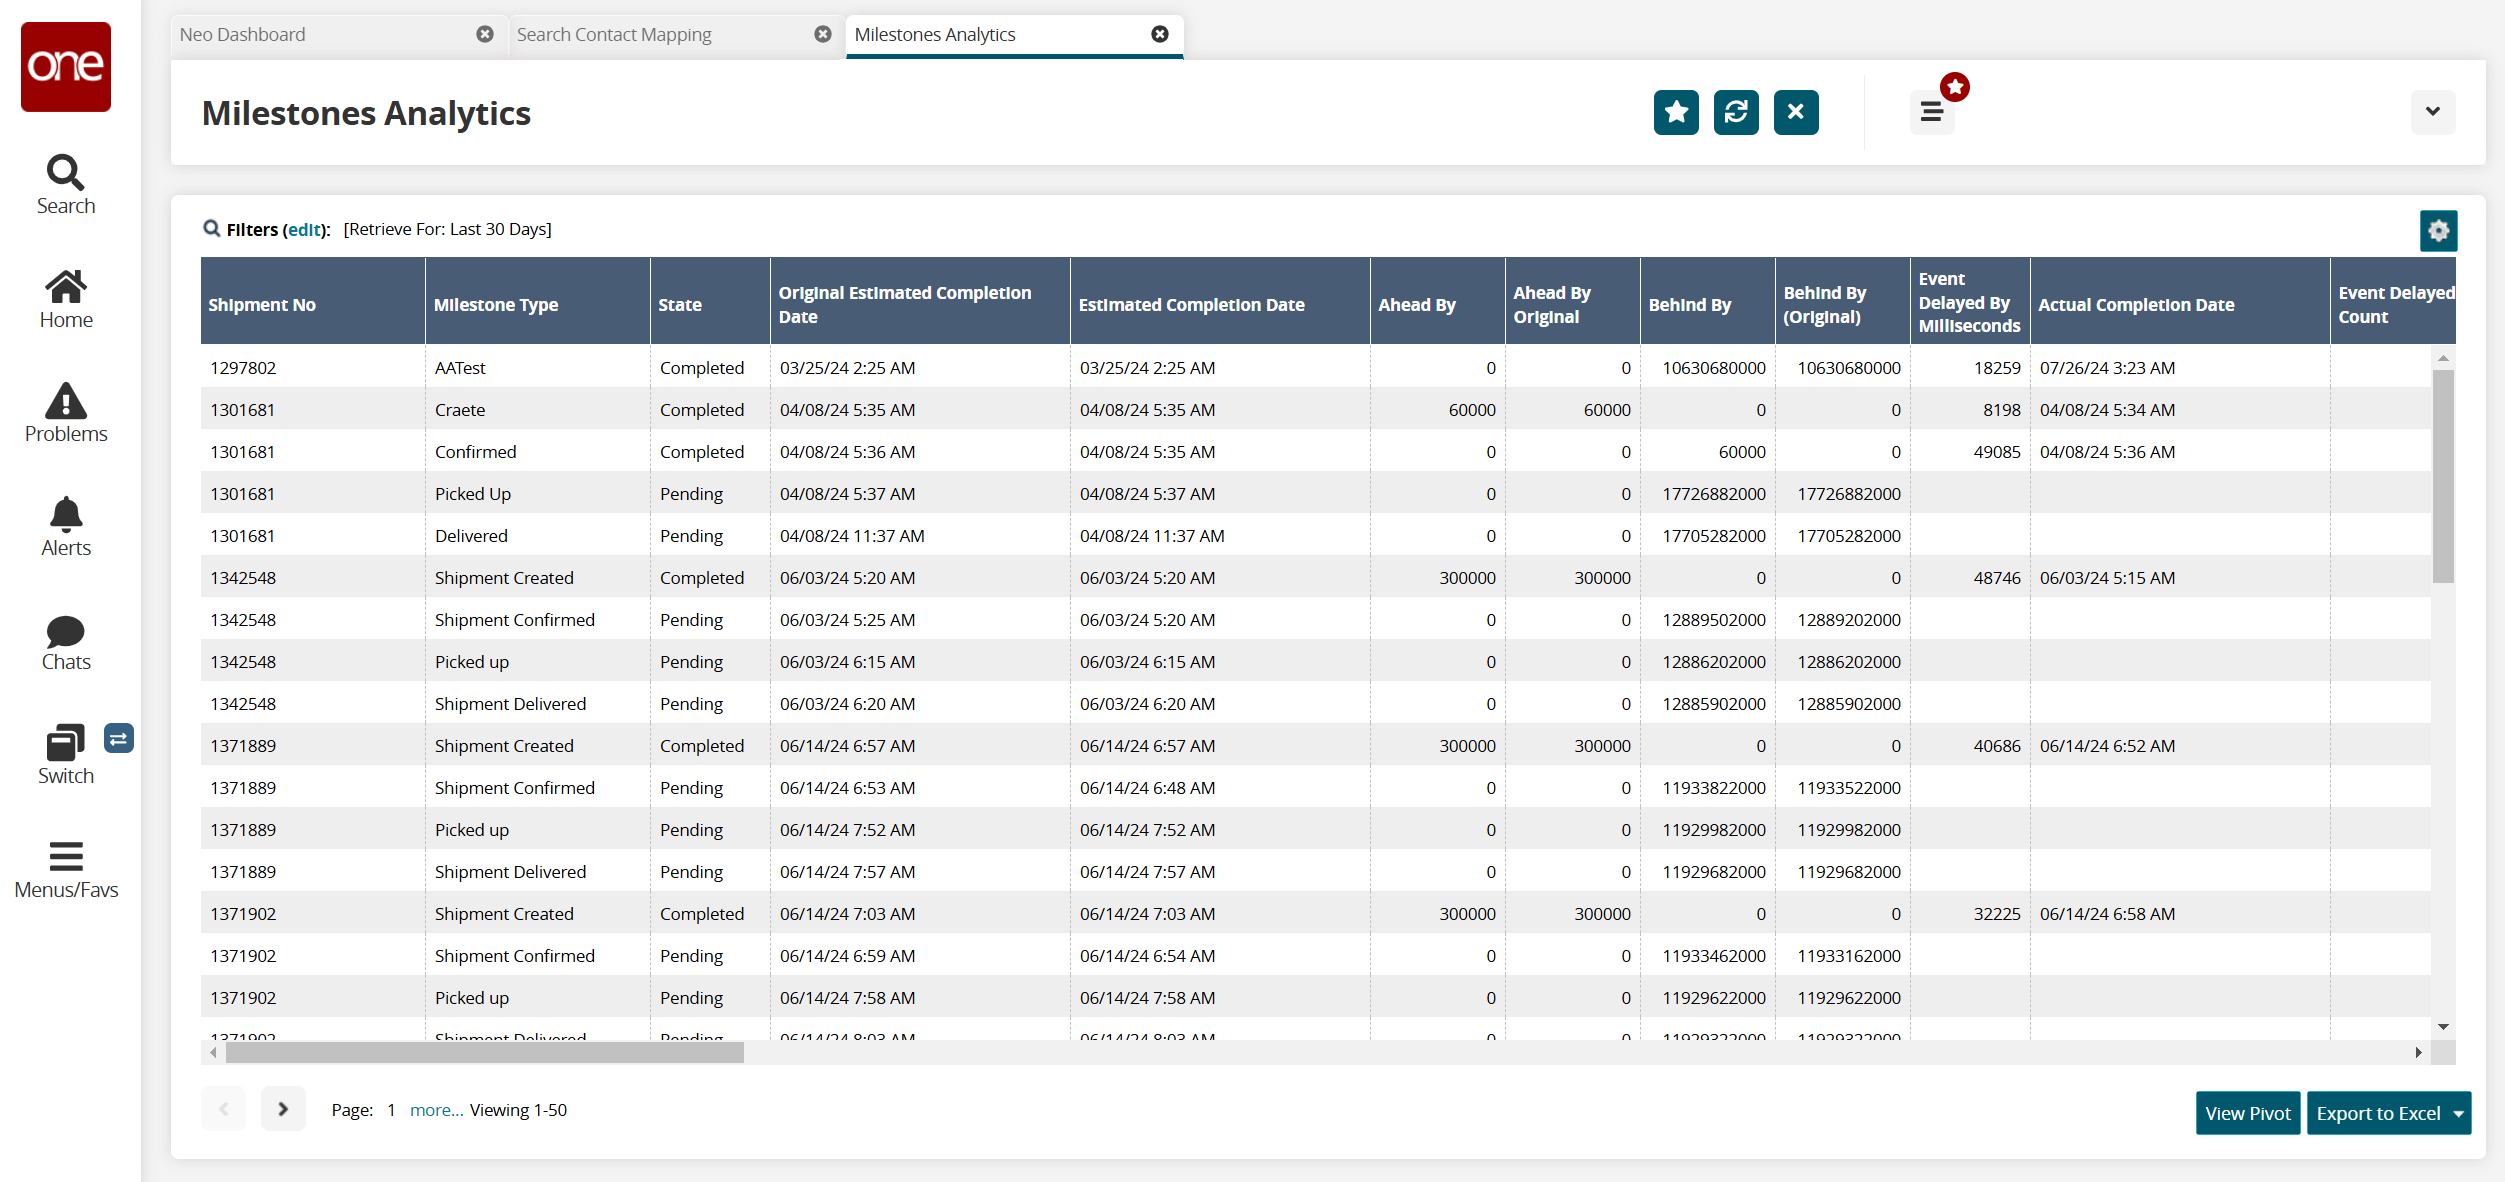
Click Export to Excel to export the report to a file.
Note
Depending on the configuration settings of your instance of the ONE system, an additional drop-down menu may display that includes the option to export the data in a CSV file.
Shipment Analytics
Complete the following steps to view the Shipment Analytics screen:
Click Menus/Favs > Reports > Analytics Reports > Shipment Analytics.
The Shipment Analytics screen displays.
Select one more States, a Delivery Range, and a Freight Control option.
Click Search.
The search results display.
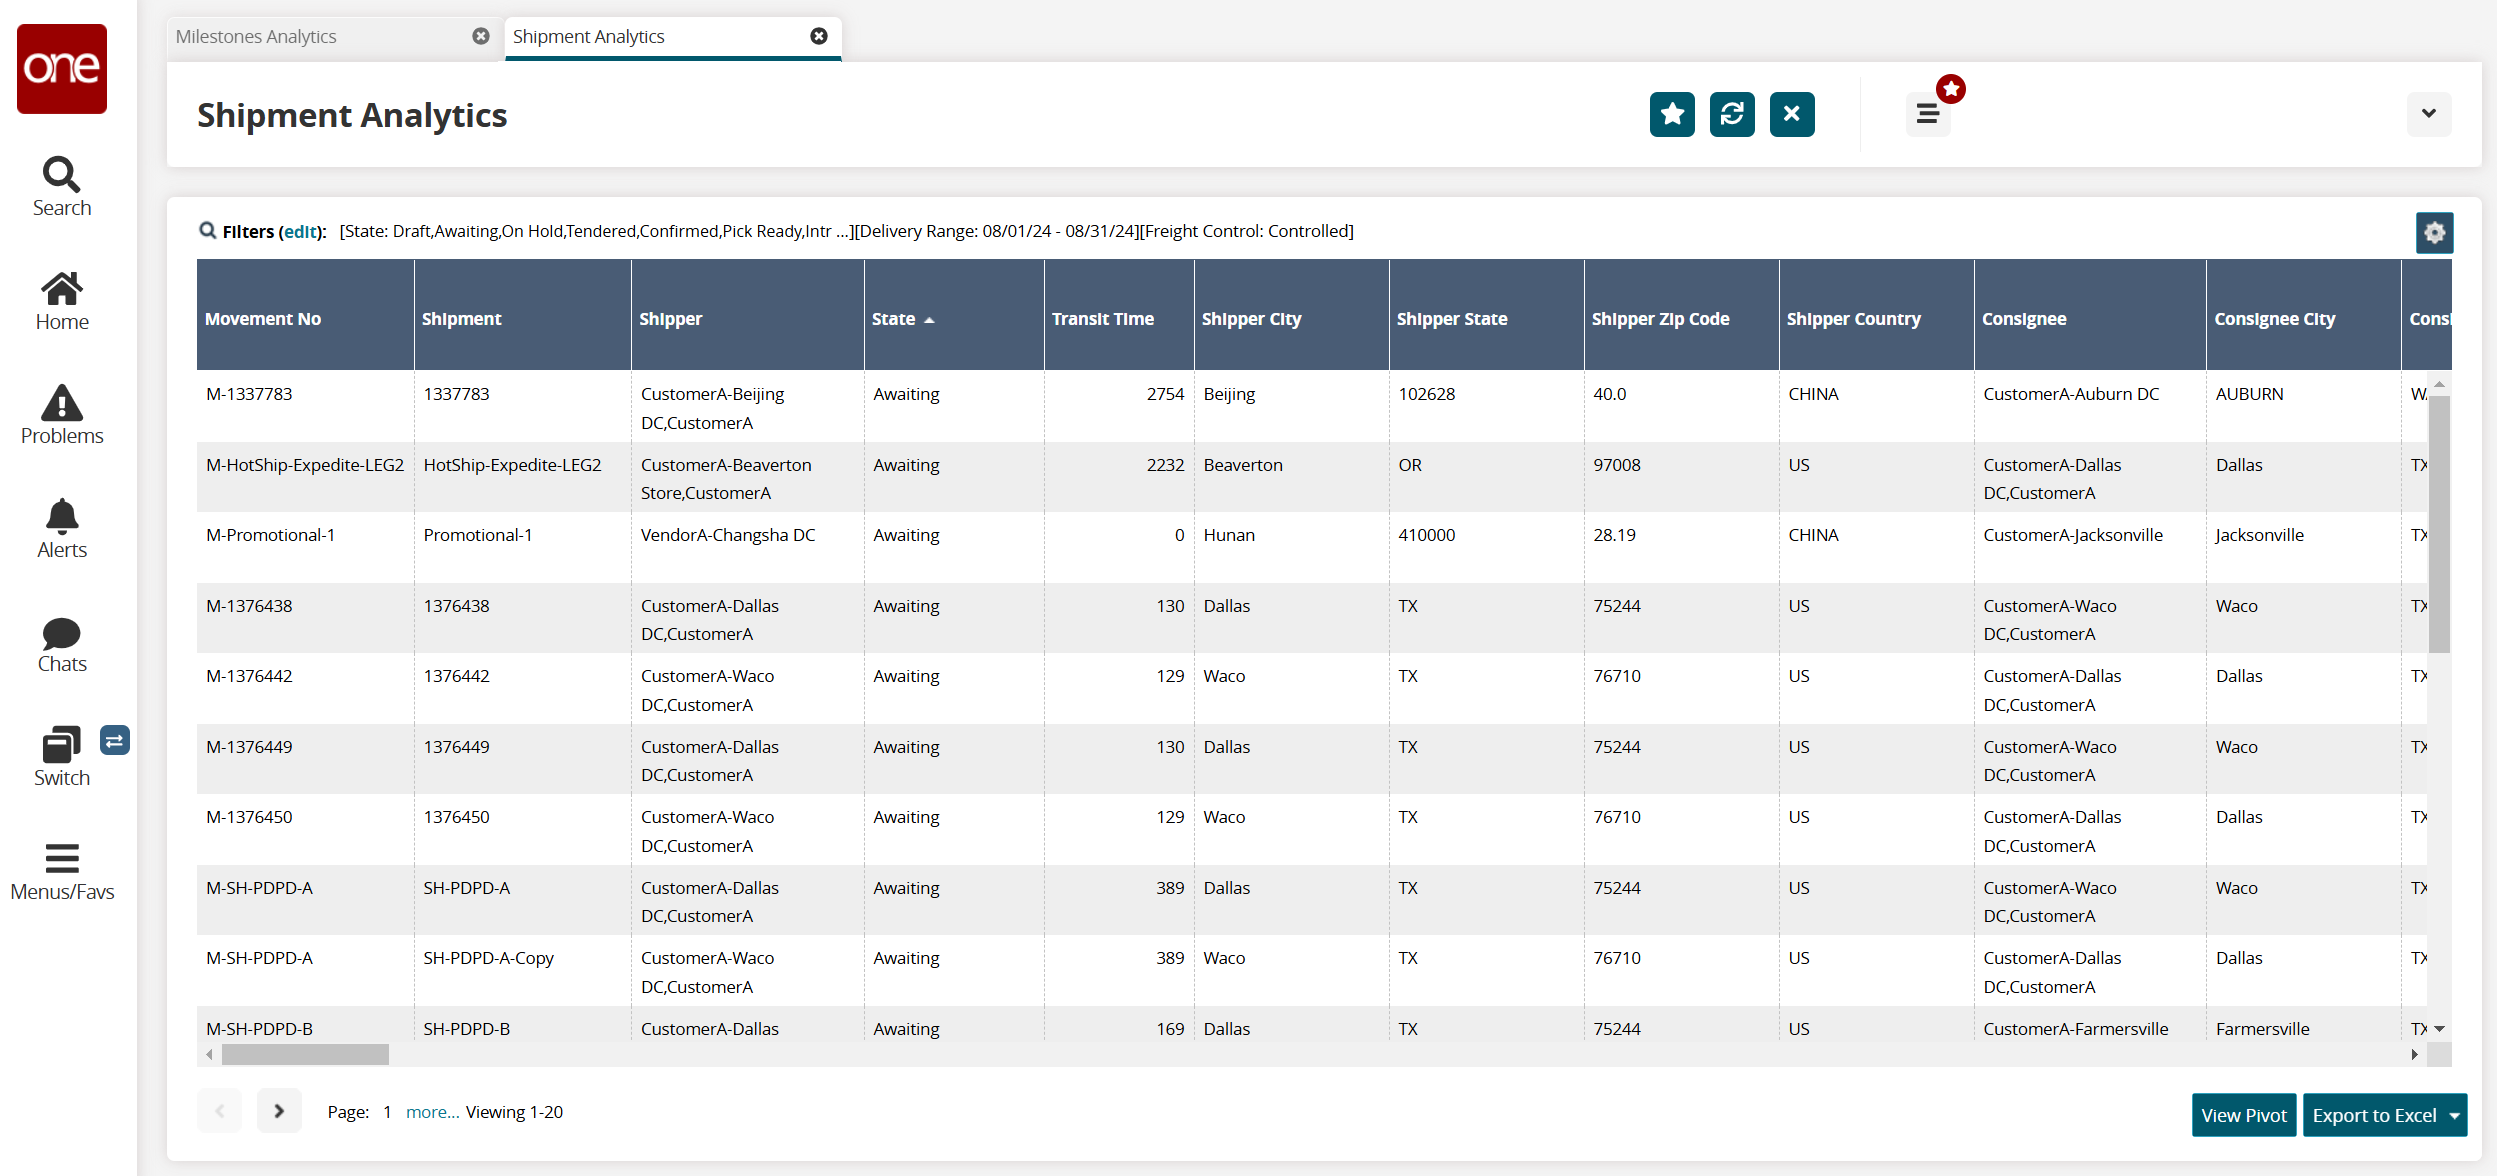
Click Export to Excel to export the report to a file.
Note
Depending on the configuration settings of your instance of the ONE system, an additional drop-down menu may display that includes the option to export the data in a CSV file.
Tools
Problems
Viewing the Problem Analytical Report
The Problem Analytical Report explains the analytics related to a problem.
Complete the following steps to view the Problem Analytical Report:
Click Menus/Favs > Tools > Problems > Problem Analytical Report.
The Problem Analytical Report screen displays.
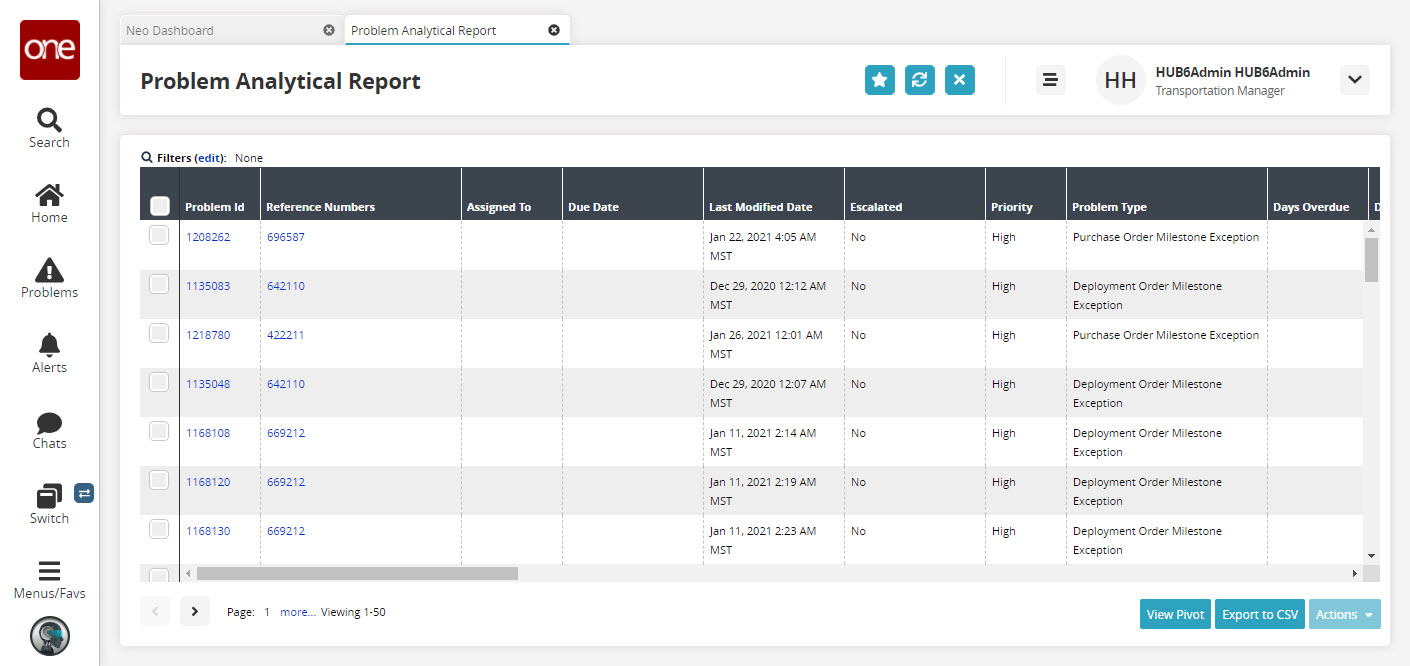
Click the Filters (edit) link, enter the search criteria, and click the Search link.
The Problem Analytical Report displays according to search criteria.
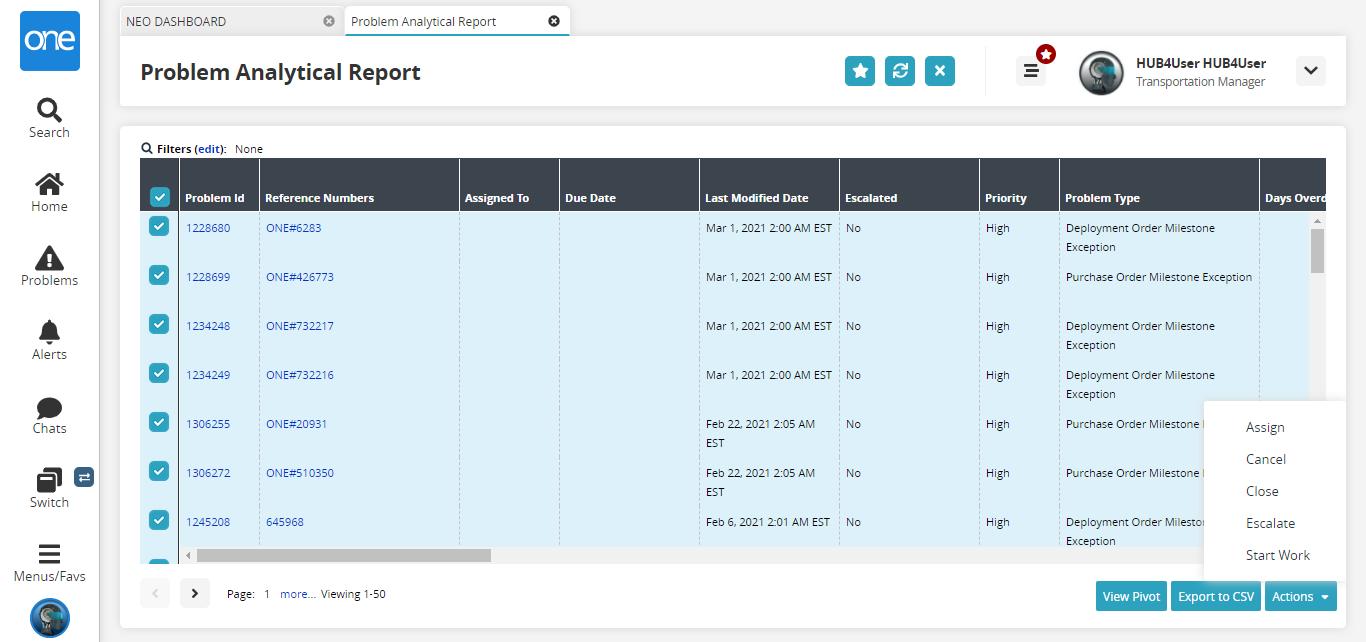
Select the checkbox for Problem ID and click the Actions button to perform an action.
Click Export to Excel to export the report to a file.
Note
Depending on the configuration settings of your instance of the ONE system, an additional drop-down menu may display that includes the option to export the data in a CSV file.
Exceptions
Managing Exceptions
Certain tracking events, such as delayed ETA and updated current position, cause the system to create exceptions. You can search for exceptions using various filters or view a summary of exceptions by state. Afterward, you can view details of exceptions, apply actions, or export the search results to an Excel spreadsheet.
Searching Exceptions
The Search Exceptions option allows you to search for exceptions using various filters. Afterward, you can view details of exceptions, apply actions, or export the search results to a spreadsheet.
Note
The procedures described in this topic are performed by the TCO transportation manager. However, the carrier transportation manager can create exceptions that the system will move to the Pending state. The carrier transportation manager can also appeal Denied exceptions, moving them to the Appealed state. The TCO transportation manager then reopens and reconsiders the appealed exceptions.
Click Menus/Favs > Tools > Exception > Search Exceptions.
The Search Exceptions tab displays.
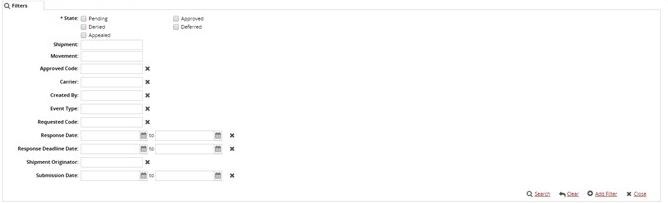
Select one or more State checkboxes.
Type options for Shipment and Movement.
As appropriate, for each filter, specify a filter value.
Click the Search link.
A table showing exceptions matching the search criteria displays in the Search Exceptions tab.
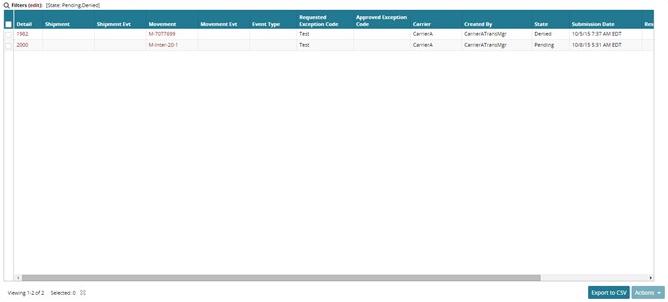
To view details about an exception, click a Detail link.
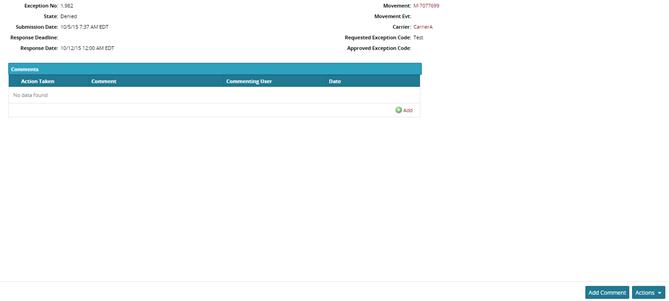
Details for the exception display in a new tab.
To add a comment about the exception, click the Add button.
The Add Comment dialog box displays.
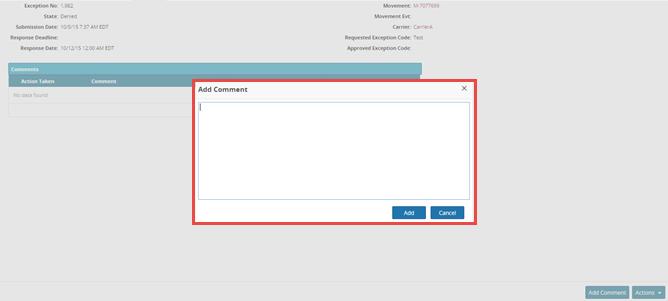
Type a comment, and then click Add.
The new comment displays in the Comments table.
To save the new comment, click Add Comment.
A success message displays.
To apply an action to this exception, click the Actions button, and select an option: Deny, Approve, Cancel, or Defer.
Deny: In the Deny dialog box, type a Comment, then click Submit.
A success message displays. A new comment line displays in the Comments table.
To search for this exception, change the State filter to Denied, and search again. The Search Exceptions tab shows the exception in the search results.
Approve: In the Approve dialog box, select an Approved Exception Code, then click Submit.
A success message displays. The Approved Exception Code shows the selected code.
To search for this exception, change the State filter to Approved, and search again. The Search Exceptions tab shows the exception in the search results.
Cancel: In the Cancel dialog box, type a Comment, then click Submit.A success message displays. A new comment line displays in the Comments table.
Defer: In the Defer dialog box, type a Comment, then click Submit.A success message displays. A new comment line displays in the Comments table.
To search for this exception, change the State filter to Deferred, and search again. The Search Exceptions tab shows the exception in the search results.
To view details about shipments, shipment events, movements, and movement events, on the Search Exceptions tab, click their respective links.
To apply an action to one or more exceptions, select the Detail checkboxes, click the Actions button, and then select an option: Deny, Approve, Cancel, or Defer.
Viewing Exceptions by State
The Exception State Summary option allows you to view exceptions by state. Afterward, you can view a report for all exceptions in a state, view details of shipments and movements, apply actions, or export the search results to a spreadsheet.
Complete the following steps to view exceptions by state:
Click Menus/Favs > Tools > Exceptions > State Summary.
The State Summary tab displays.
Note
Alternate method: You can also view exceptions by state by clicking a State option listed in the Exceptions folder. The following figure shows the Appealed state tab.
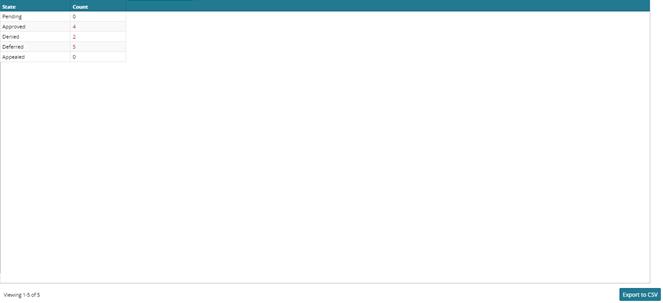
Note
The carrier transportation manager can appeal exceptions that have been denied by the TCO transportation manager. From the Appealed state tab, the TCO transportation manager can open and reconsider exceptions.
To view details of an exception by state, click a Count link.
A tab displays showing all exceptions in the selected state.
Click the Filters link to open the search filter box.
Fill out the filters, and click the Search link.
The search results display.
To view details about shipments, shipment events, movements, and movement events, click their respective links.
Working with Exceptions
Users can search the exceptions, as well as view the state summary and state reports
Searching Exceptions
Complete the following steps to search for exceptions:
Click Menus/Favs > Tools > Exceptions > Search Exceptions.
The Search Exceptions screen displays.
Select the required state checkbox.
Enter the required values in the Shipment, Movement,, and Truck fields.
Click the Search link.

The search result screen displays.
Viewing State Summary
Complete the following steps to view the exception state summary:
Click Menus/Favs > Tools > Exceptions > State Summary.
The State Summary screen displays, displaying the summary of the exceptions in each state.
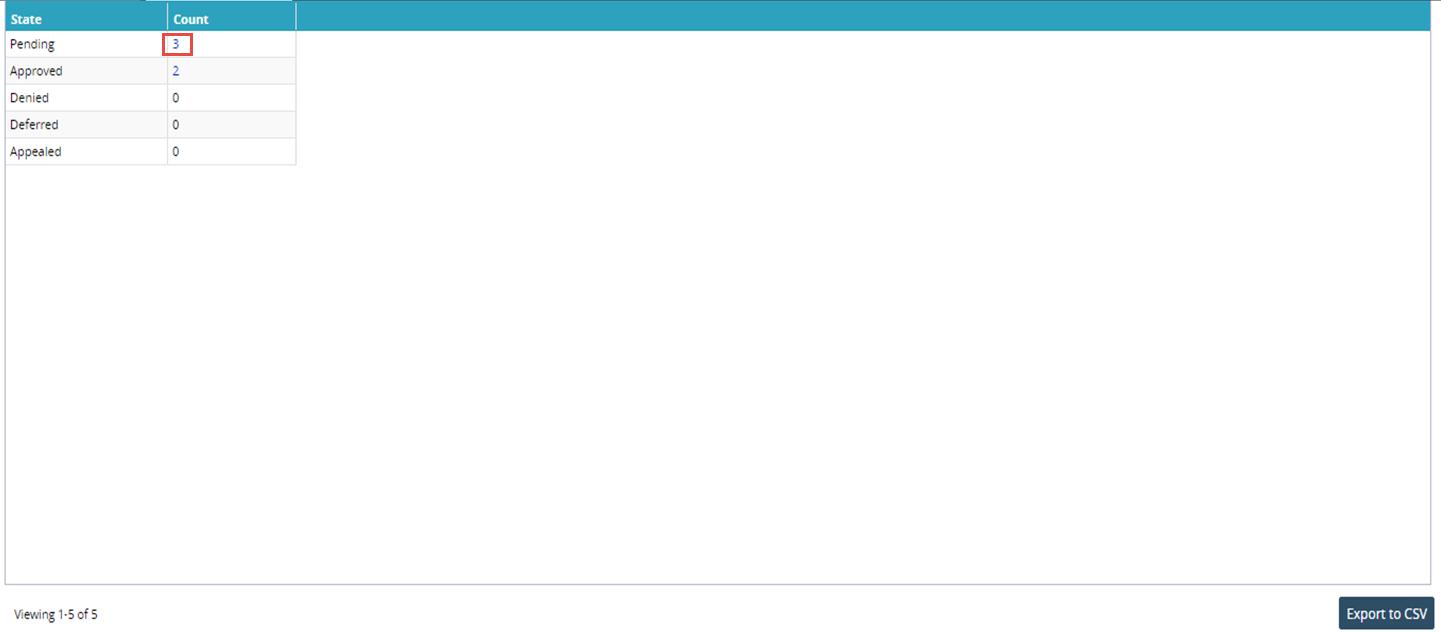
In the Count column, click the number link to view the exception list in that particular state.
Click Export to Excel to export the report to a file.
Note
Depending on the configuration settings of your instance of the ONE system, an additional drop-down menu may display that includes the option to export the data in a CSV file.
Viewing Exceptions in Pending State
Complete the following steps to view exceptions in the pending state:
Click Menus/Favs > Tools > Exceptions > Pending.
The Pending screen displays, displaying all the exceptions in the Pending state.
Select the required exception, and click Actions.
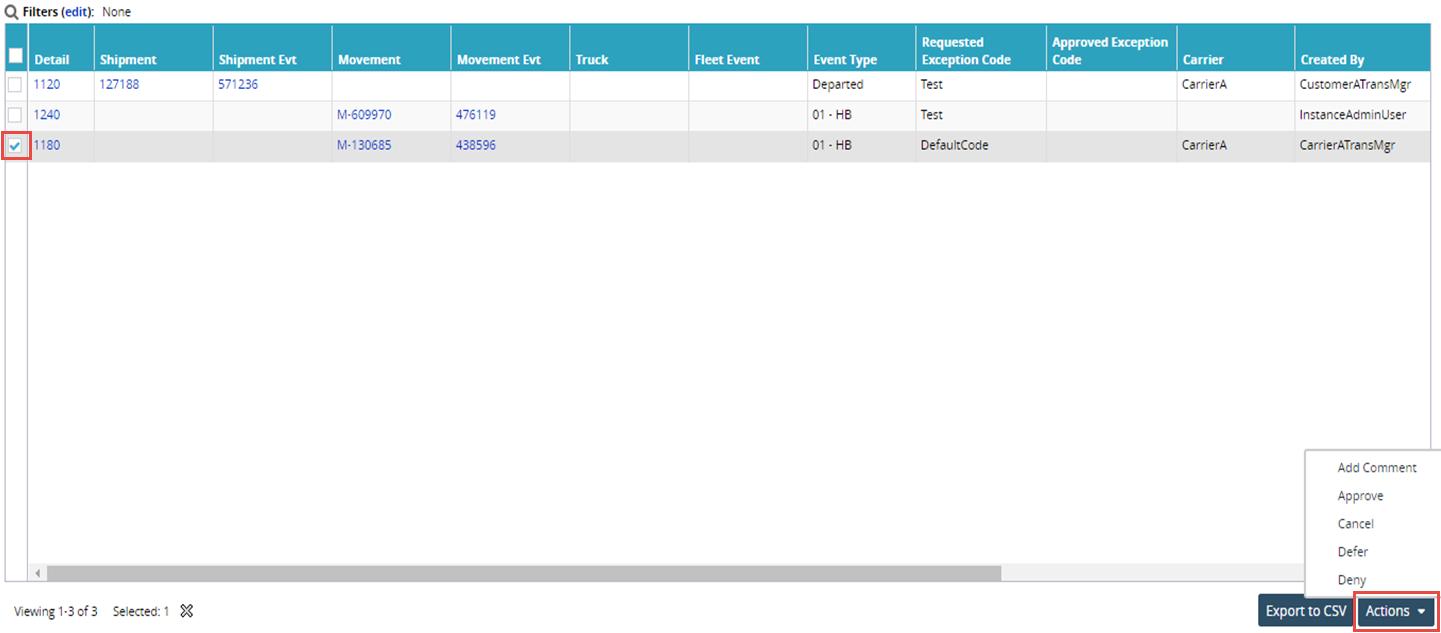
You can perform actions such as Add Comments, Approve, Cancel, Defer,, or Deny.
Complete the following steps to add comments:
Click Add Comment.
The Add Comment dialog box displays.
Enter a Comment.
Complete the following steps to approve exceptions:
Click Approve.
The Approve dialog box displays.
Select the Approved Exception Code using the picker tool.
Complete the following steps to cancel exceptions:
Click Cancel.
The Cancel dialog box displays.
Enter the comment under the Comment column, if required.
Complete the following steps to defer exceptions:
Click Defer.
The Defer dialog box displays.
Enter the comment under the Comment column, if required.
Complete the following steps to deny exceptions:
Click Deny.
The Deny dialog box displays.
Enter the comment under the Comment column, if required.
Note
Users can view reports for Approved, Denied, Deferred, and Appealed states using the same procedure mentioned in the above section.