Creating a New Module
Modules are the building blocks of applications running on a One Network server. As the name implies, modules are designed to be the components of a larger application. Modules built using Studio and the One Network SDK are designed to work together seamlessly to provide a flexible application suite based on a service-oriented architecture.
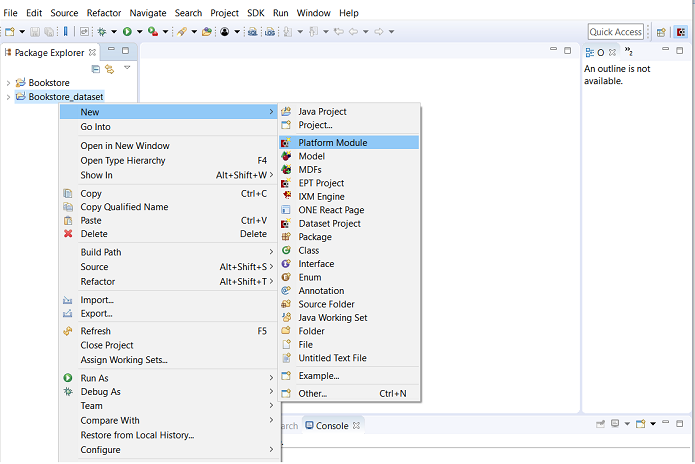
Procedure 3.1. To create a new module:
Select File | New | Platform Module.
Figure 3.4. Creating a new Platform Module
The screen allows you to set up your project.
Figure 3.5. Specify All Information for Your Module Project.
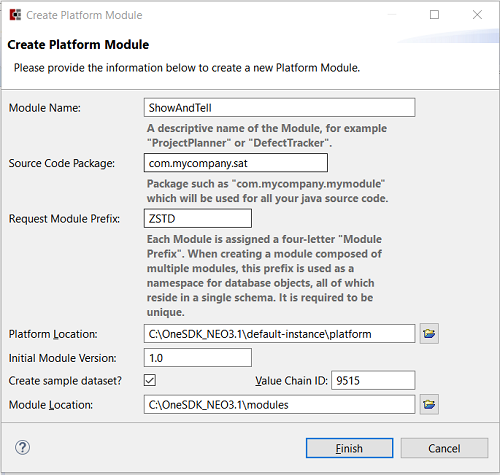
Enter a descriptive name in the Module Name field.
Enter the source code package name you wish to use for your project. Studio automatically creates all of your source packages within this top-level package name.
Every module requires a unique module prefix. These are managed by One Network Developer Network. In the field labeled "Request Module Prefix" select a prefix you would like to use. This prefix will be validated automatically. If you select a module prefix that's already in use by another user, you'll be prompted to use a different prefix. If you want to experiment, you can use a prefix beginning with the letter "Z" and the uniqueness requirement is ignored. This is used for training and demonstrations only and should not be used for production modules.
As you maintain your module, its version number will change. The Initial Module Version box allows you to enter the first version number for your module.
The Create Sample Dataset check box determines whether or not you want to create a stub for your module's dataset. It is possible for modules to share datasets. If you need one generated, make sure this option is checked.
Module Location determines where your local code will be stored. Studio edits code locally0ane then builds and publishes the module to DevNet. DevNet does not maintain code and it does not work as a code repository. You should consider using a third-party version control tool such as Perforce, Git, or Subversion to track and control your source code on large projects.
Procedure 3.2. To remove a Module from Studio
Right-click the project folder in the Navigator view and select Delete.
The Delete Resources dialog box will appear. If you simply want to remove the project from view in Studio, just click the OK button as shown in the figure below.
If you want to delete the contents of the module project from your hard drive, select the check box labeled "Delete project contents on disk". As indicated, this operation cannot be undone.
Figure 3.6. Delete Resources removes the project from Studio. It's possible to re-import the project again later unless you check the box, in which case the project files are deleted from the hard drive.
