Getting Started
Creating a TLV
Create a new .tlvs file in your Module tlvs folder and paste the following TLV definition to it.
<TLVList xmlns="http://www.onenetwork.com/Platform"> <TLV> <Name>MyFirstTLV</Name> <Description>My First TLV Report Example</Description> <Bucketization>DAILY</Bucketization> <BucketsPerPage>7</BucketsPerPage> <SqlDef Name="DummySql" GroupName="TLVs"><![CDATA[ SELECT the_date, quantity, sys_book_id FROM( SELECT TO_DATE('2011-07-01','YYYY-MM-DD') the_date , 1 quantity, 10000 sys_book_id FROM dual UNION ALL SELECT TO_DATE('2011-07-02','YYYY-MM-DD') the_date , 5 quantity, 10000 sys_book_id FROM dual UNION ALL SELECT TO_DATE('2011-07-03','YYYY-MM-DD') the_date , 4 quantity, 10000 sys_book_id FROM dual UNION ALL SELECT TO_DATE('2011-07-04','YYYY-MM-DD') the_date , 10 quantity, 10000 sys_book_id FROM dual UNION ALL SELECT TO_DATE('2011-07-05','YYYY-MM-DD') the_date , 10 quantity, 10000 sys_book_id FROM dual UNION ALL SELECT TO_DATE('2011-07-07','YYYY-MM-DD') the_date , 4 quantity, 10000 sys_book_id FROM dual UNION ALL SELECT TO_DATE('2011-07-08','YYYY-MM-DD') the_date , 20 quantity, 10000 sys_book_id FROM dual) ]]></SqlDef> <Filters bindSqlNulls="true"> <CustomFilterField> <FieldRef category="PDF" levelType="Undefined"> <FieldName>DateRange</FieldName> </FieldRef> <Hidden>false</Hidden> <Editable>true</Editable> <Type>DATE_RANGE</Type> <Optional>false</Optional> <DateRangeMapping fromSqlName="DATE_RANGE_START" toSqlName="DATE_RANGE_END"/> </CustomFilterField> <DateRange start="$NULL$" end="$NULL$"/> </Filters> <DM bucketization="DAILY"> <Name>RequestQuantity</Name> <DisplayName>Request Quantity</DisplayName> <SqlDefName>DummySql</SqlDefName> <SqlQuantityField levelType="Undefined"> <FieldName>quantity</FieldName> </SqlQuantityField> <SqlDateField levelType="Undefined"> <FieldName>the_date</FieldName> </SqlDateField> </DM> </TLV> </TLVList>Your TLV must have filter field called DateRange which defines the time horizon.
Deploying a TLV
To deploy, you can click the "submit" icon in studio, or open the Ant view in the studio and run the
deploy-tlvs
target.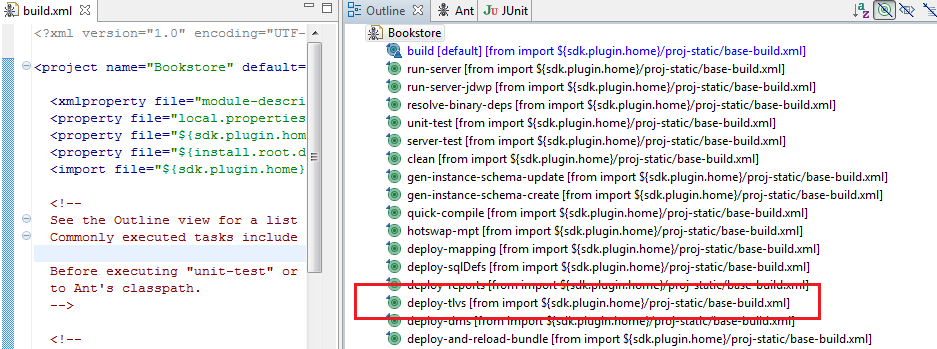
Displaying a TLV on the UI
To display the TLV report in the UI, follow the steps below
Add a WebAction in the WebInfo section of the UI Metamodel and change the TLV name to the one you just created (). Please note that the TLV name is prefixed with the module id.
<WebActionname="MyFirstTLV"><PanelOptions><PanelClass>One.TimelineView</PanelClass><PanelConfig><![CDATA[{timelineViewName: 'ZBKS.MyFirstTLV'}]]></PanelConfig></PanelOptions></WebAction>
For more information on UiMetaModel, Please refer to the "UI Metamodel" section and refer to the JavaScript docs for more information on One.TimelineView PanelClass.Submit the Module MPT.
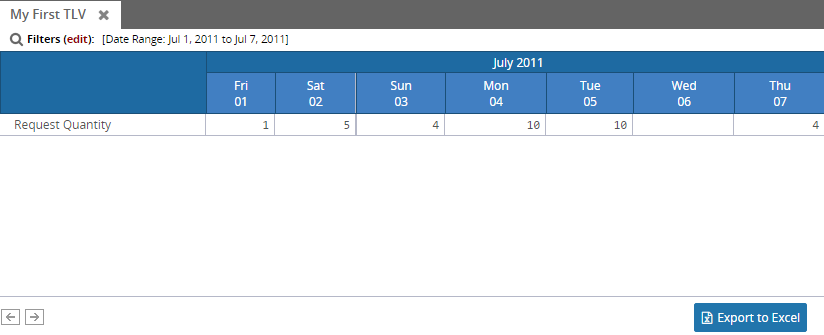
Log in as BookstoreUser and click on the My FirstTLV menu.

Provide a date range field and click on search to execute TLV report.