Managing System Interfaces with the EPT
Table of Contents
Create a new Inbound Interface for a Customer Enterprise (CSV)
Create message queues for processing, Customer Upload via HTTPS
Create an Outbound Interface for a Customer Enterprise (CSV)
Introduction
This document explains how to set up integrations for enterprise networks. The context of this guide is a network owner sharing information with various customer enterprises. The document explains integration transformations, custom inbound integrations, custom outbound integrations, message queues, and custom data formats.
What is the Enterprise Process Template (EPT)?
The Enterprise Process Template (EPT) allows adding functionality to a network. EPT functionality is specific to only one enterprise within the Network.
Like the Standard Process Template (SPT) and Modules, the EPT serves as a store of information and functionality. However, not all users in the network have access to the same EPT. Many users within the same network may actually interact with different EPT's, depending on their role in the Network. Each EPT has its own Enterprise specific functionality.
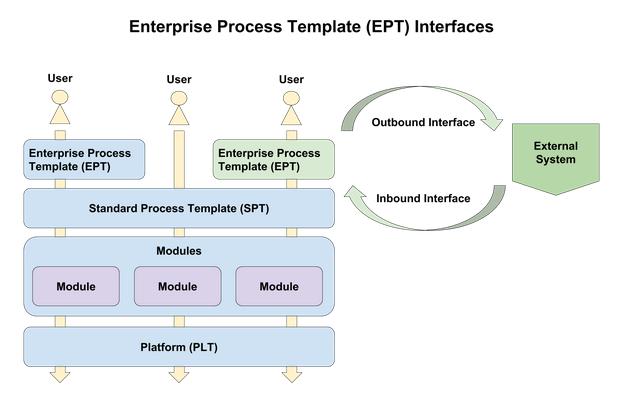
What are Interfaces?
Interfaces are the mechanism through which data is the Network and other systems exchange data. Inbound interfaces allow other systems to send data to the Network. Outbound interfaces allow the Network to send data out to other systems (or users).
Interfaces support a variety of formats. Formats supported without custom programming include:
XML (Extensible Markup Language).
JSON (JavaScript Object Notation).
CSV (Comma-Separated Values).
EDI (Electronic Data interchange).
Interfaces can also use custom Java programming code to handle non-standard data formats.
Existing Interfaces vs. New Interfaces vs. Custom Interfaces.
The ONE Platform supports numerous standard interfaces. Pre-built Modules or Enterprise Process Templates (EPT's) may also have interfaces available for use. These interfaces allow external systems to interact with applications running on the platform. Additionally, developers can create new interfaces using the SDK to interact with data inside the platform through structured pre-set integration formats. Finally, developers can write custom Java based interfaces to interact with data inside the platform.
Message Transforms
Message Transforms are layers which modify the format of data during receipt from or transmission to an external system. For example, a Message Transforms may convert XML formatted data to CSV format before that data is received in by an inbound interface. Or a Message Transform may convert CSV formatted data to JSON format before that data is sent out by an outbound interface. You can use Message Transforms to adapt messages to existing interfaces.
Next Steps
In this document we will learn how to create a new Dataset and EPT. Next, we will learn how to create an Inbound Interface, for data coming into the ONE Platform. After that we discuss how to create an Outbound Interface, for data going out of the ONE Platform. Finally, we will go over how to create custom Interfaces (both Inbound and Outbound) for handling non-standard data types.
Before continuing on, you should familiarize yourself with the basics of ONE's Platform and SDK. A good starting point is the ONE Network Software Development Kit Training Guide, found at the following URL: https://docs.onenetwork.com/devnet/latest/sdk-training-guide
Create and upload an EPT for a Customer Enterprise
The Enterprise Process Template (EPT) provides enterprise-specific customization within a multi-party community. It lets you customize the behavior of the application for a single enterprise. In this guide we will use the Enterprise Process Template (EPT) to create custom integrations for specific enterprises in the network.
Install the Platform SDK
Start with the Platform SDK.
If you do not have the Platform SDK installed, then create an account and follow the instructions here to install the SDK: https://www.onenetwork.com/dev-net/developer-resource-center/
NOTE: If you are using ONE's Real Time Value Network modules, do not download the SDK from that link. Work with your contacts at ONE Network to get an "instance builder" which allows you to get the binaries for the relevant modules.
Create a Dataset
Each EPT needs a Dataset. If you do not already have a Dataset, you can create a new Dataset with the following steps:
Select File -> New -> Dataset Project.
Set the Value Chain ID. In this example we will use 2050.
Set the Dataset Name. We will use "BusinessNet".
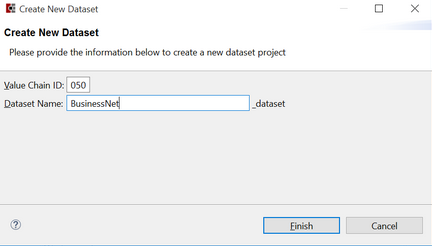
Click Finish.
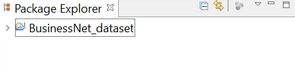
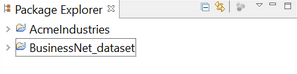
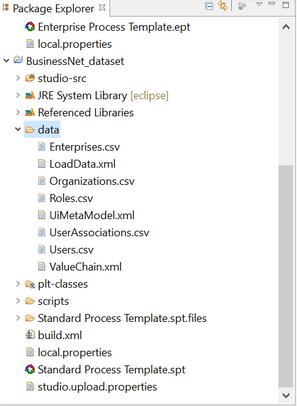
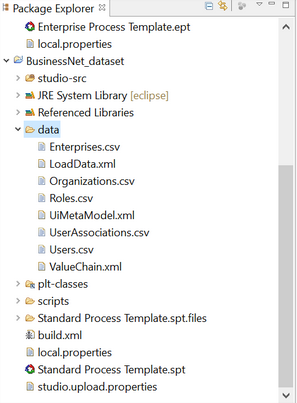
Our new Dataset will now be visible in the Package Explorer on the left of the Platform SDK:
Create an EPT
Create a new EPT project by going to File -> New -> EPT Project.
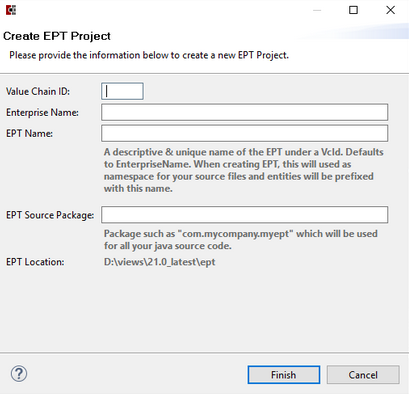
Fill in values for Value Chain ID, Enterprise Name, EPT Name, and EPT Source Package. For example:
Value Chain ID: 2050
Enterprise Name: AcmeIndustries
EPT Name: AcmeIndustries
EPT Source Package: com.acmeindustries.myept
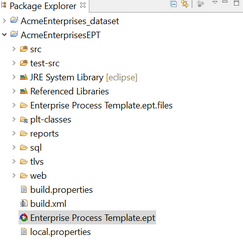
Your EPT project will now be visible in the Package Explorer in the upper left of the Platform SDK.
Next, we need to add the build files:
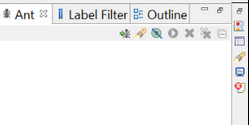
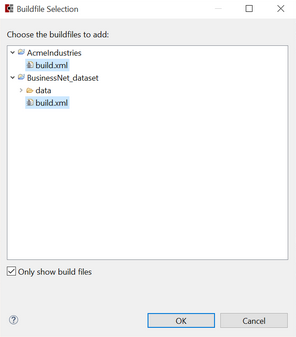
Click on the Ant tab in the upper right of the Platform SDK.
Click on the Add Buildfiles button inside the Ant view (leftmost button).
Expand both the EPT and the dataset.
Select both buildfiles by holding Ctrl and clicking on each.
Then click OK to add the buildfiles.
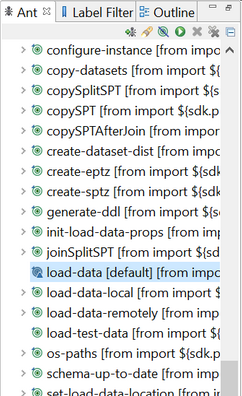
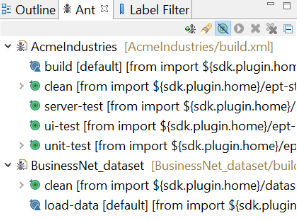
The buildfiles will now appear inside the Ant view in the upper right of the SDK.
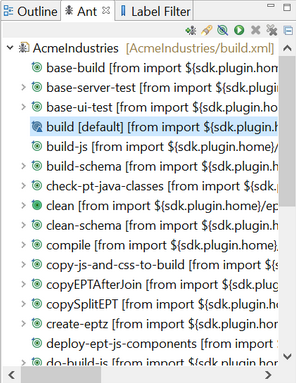
Expand the buildfiles in the Ant view by clicking on the arrows next to the buildfile names.
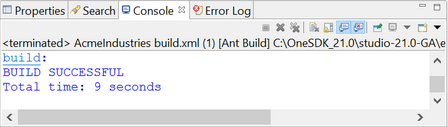
Double click on the "build" file to run the build process.
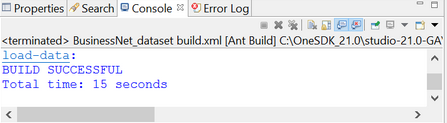
The Console window will show the message "BUILD SUCCESSFUL" when the build process is complete.
Start the server.
To start the server first open Windows File Explorer by typing "file explorer" in the search box and selecting the application.
Navigate to the directory: "C:\OneSDK_21.0\default-instance\platform\bin"
Double click on the file "run.bat". This will open a new Command Prompt window with the server running in it. Note that it may take a couple of minutes for the server to start.
Note: You can alternatively, double click on "run-jdwp.bat". "run-jdwp.bat" starts the server in "Debug" mode, which displays additional notifications in the Command Prompt.
Wait for the server to start. You can tell that it has started when the text in the Command Prompt stops scrolling. You can also confirm that the server has started by navigating to the URL "http://localhost" in a web browser. If the server is running then the application sign in page with display.
In the Ant tab in the upper right of the Platform SDK, double click on the "load-data" file to load the dataset.
If using SDK version 21.0, then use the following work around for a problem in this step:
If the error message "The specified JRE installation does not exist." appears, then do the following:
Run->External Tools->External Tools Configurations->JRE:
Click on the Separate JRE radio button.
Click on Apply.
Click Run.
If the build process fails, then do the following:
Double click the "local.properties" file under the dataset in the Package Explorer section of the Platform SDK.
Find the line with the following text: "web.server.parent.dir=webserverparentdir"
Change that text to: "web.server.root.dir=${install.root.dir}/tomcat"
Save the changes.
Double click on "load-data" in the Ant tab again to re-run the process.
If using SDK version 22.0, then use the following work around for a problem in this step:
If the build process fails, then do the following:
Double click the "local.properties" file under the dataset in the Package Explorer section of the Platform SDK.
Add the following text to the bottom of the file: "web.server.root.dir=${install.root.dir}/tomcat"
Save the changes.
Double click on "load-data" in the Ant tab again to re-run the process.

Submitting Changes to the Server
During the development process, you must upload changes you make to the server. There are two ways to do this:
Option A - Submit through Studio
One method of uploading the EPT is doing so using the Platform SDK's "Submit to Server" button. It will publish all changes made in the EPT Project to a running server. You can either use the ValueChainAdmin context or EnterpriseAdmin context to load the EPT. For example, I used "BusinessNetAdmin", because this is a default username with ValueChainAdmin permission.
This is the "Submit to Server" button. It can be found in the upper left of the Platform SDK.

Option B - Using the load-data file
You can also use load-data to publish changes made in the EPT Project by adding an EnterpriseProcessTypeFolder entry to the LoadData.xml of your dataset.
<LoadData xmlns="http://www.onenetwork.com/Platform"> <ValueChain>data/ValueChain.xml</ValueChain> <StandardProcessType>Standard Process Template.spt</StandardProcessType> <UiMetaModel>data/UiMetaModel.xml</UiMetaModel> <EnterpriseProcessTypeFolder>AcmeIndustries</EnterpriseProcessTypeFolder> </LoadData>More info about EPTs
For more information about the Enterprise Process Template (EPT), see: https://devnet.onenetwork.com/oms/apps/DeveloperNetwork/www/docs/guides/SdkUsersGuide/help/content/modeling-ept.html
Create an Enterprise Admin User
By default, our new Dataset has an example user with Value Chain Admin permission. However, since we are working with Enterprise level data, let's create a new user account with the appropriate level of permissions. We want to create an Enterprise Admin user, which is a user with administrator privileges at the Enterprise level. Since this is the first time we've set this up, we will need to create: an Enterprise, a Role, a User, and a User Association.
Add an Enterprise
In the Package Explorer section of the Platform SDK, expand the Dataset.
Expand the folder "data".
Right click on "Enterprises.csv".
Choose Open With → Text Editor.
You should see two lines of data. The top row contains the column headers. The second row is an example enterprise. Add a third row with the following data:
AcmeIndustries,Acme Industries,1,US~TX~Dallas~~~~455Valley View~~~75056~~~,US~TX~Dallas~~~~455Valley View~~~75056~~~,,,,MONDAY,America/ChicagoClick the Save button.
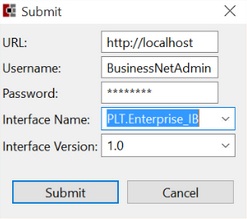
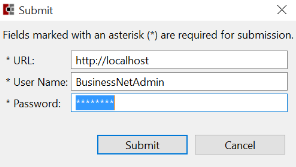
Click the Submit To Server button. The Submit dialog will open:
Set the URL to: http://localhost.
Set Username to: BusinessNetAdmin (This is a default Value Chain Admin account which gets created with the Dataset.)
Set Password to: password
Set Interface Name to: PLT.Enterprise_IB
Set Interface Version to: 1.0
Click Submit.
The toast in the bottom right of the Platform SDK should display "Successfully uploaded". An Enterprise named "Acme Industries" has now been created.
Add a Role
Right click on "Roles.csv.
Choose Open With → Text Editor.
You should see three lines of data. The top row shows the column headers. The second row is an example Value Chain Admin role. The third row is an example user role. Add a fourth row with the following data:
AcmeIndustriesAdminRole,ENTERPRISE_ADMIN,AcmeIndustries,,,1Click the Save button.
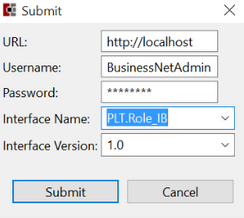
Click the Submit To Server button. The Submit dialog will open:
Set the URL to: http://localhost.
Set Username to: BusinessNetAdmin
Set Password to: password
Set Interface Name to: PLT.Role_IB
Set Interface Version to: 1.0
Click Submit.
The toast in the bottom right of the Platform SDK should display "Successfully uploaded". A Role called "AcmeIndustriesAdminRole" has now been created.
Add a User
Right click on "Users.csv".
Choose Open With → Text Editor.
You should see three lines of data. The top row shows the column headers. The next two rows are example users. Add a fourth row with the following data:
AcmeIndustriesEntAdmin,AcmeIndustries,All,example@email.com,Jane,,Doe,1,US,enClick the Save button.
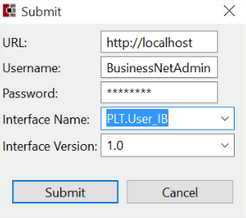
Click the Submit To Server button. The Submit dialog will open:
Set the URL to: http://localhost.
Set Username to: BusinessNetAdmin
Set Password to: password
Set Interface Name to: PLT.User_IB
Set Interface Version to: 1.0
Click Submit.
The toast in the bottom right of the Platform SDK should display "Successfully uploaded". A User called "AcmeEnterpriseEntAdmin" has now been created.
Add a User Association
Right click on "UserAssociations.csv".
Choose Open With → Text Editor.
You should see three lines of data. The top row shows the column headers. The next two rows are example user associations. Add a fourth row with the following data:
AcmeIndustriesEntAdmin,2050,AcmeIndustries,AcmeIndustriesAdminRole,2050,AcmeIndustries,,,1Click the Save button.
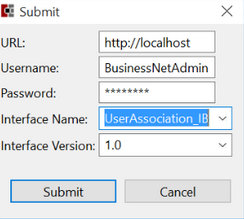
Click the Submit To Server button. The Submit dialog will open:
Set the URL to: http://localhost.
Set Username to: BusinessNetAdmin
Set Password to: password
Set Interface Name to: PLT.UserAssociation_IB
Set Interface Version to: 1.0
Click Submit.
The toast in the bottom right of the Platform SDK should display "Successfully uploaded". The user "AcmeIndustriesEntAdmin" is now associated with the "AcmeIndustriesAdminRole", which has the "ENTERPRISE_ADMIN" Role Type.
Enable UI Permissions
Make the ENTERPRISE_ADMIN Role Type available for UI permissions:
Double click on "Enterprise Process Template.ept" in the Package Explorer section of the Platform SDK.
Click on the Overview tab in the center of the Platform SDK.
In the Role Types section, check the checkbox next to "ENTERPRISE_ADMIN". This will allow us to use the ENTERPRISE_ADMIN Role Type when setting permissions for the User Interface in a later section.
Note: You may need to resize the windows in order to see the Role Types section's content.
Save changes by clicking the Save button.
Click the Submit to Server button.
The Submit dialog will appear.
Set the URL to: http://localhost
Set the User Name to: BusinessNetAdmin
Set the Password to: password
Click Submit. The dialog will disappear and it may take a moment for the server to process the changes to the EPT.
We now have a user with Enterprise Admin privileges. We will use this user account when configuring our interfaces in later sections.
Create a new Inbound Interface for a Customer Enterprise (CSV)
The ONE Network platform can accept inbound information in a variety of formats, including custom formats. This section will provide an example of how to set up an inbound interface with Comma Separated Value (CSV) format.
Inside the Package Explorer on the left of the Platform SDK, expand the EPT.
Double click on "Enterprise Process Template.ept". This will open up a tab for the Enterprise Process Template.
Submitting Changes to the Server
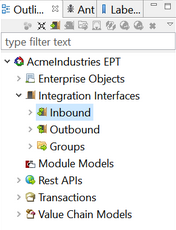
Click on the "Outline" tab in the upper right of the Platform SDK.
Expand the "Integration Interfaces" item in the Outline view.
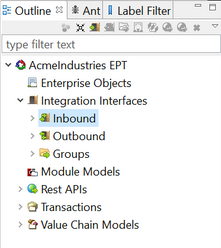
Right click on "Inbound". Then select "Add Inbound Interface". This will start a new custom interface for the EPT.
Populate the form with information about the new interface:
Change the Name to a descriptive name, such as EPT.AcmeIndustries.Item_IB
Add a description.
Set the Format Type drop-down to "CSV".
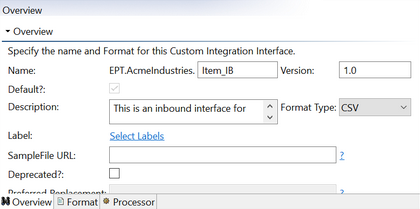
Click on the "Format" tab at the bottom. This will open up the "Format" sub tab.
The data fields in Comma Separated Value (CSV) file imports can map directly to ONE "models". We will now select which fields to add an in which order. Add fields to the Inbound Interface:
Click the Add Fields button.
Set the Model Type. In this example, we are using the Model Type "Item".
Set the Model Level if applicable.
Note: This will be grayed out in this example.
Set the Action Name. In this example, let's select PLT.Create. This means that new records will be created based on information from our Inbound Interface.
Click on the fields to interact with. (Hold shift and click to select multiple fields.) For this example, let's set the following fields:
EnterpriseName
Name
PriceAmount
ValueChainID
Click the Add Fields button.
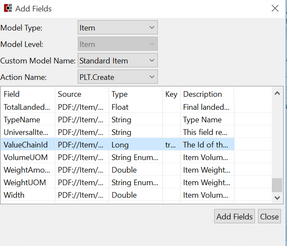
Click Close to close the dialog.
If any of the fields are required, then set the Required value for those fields. This will default to "Y" for fields which are Keys in the database.
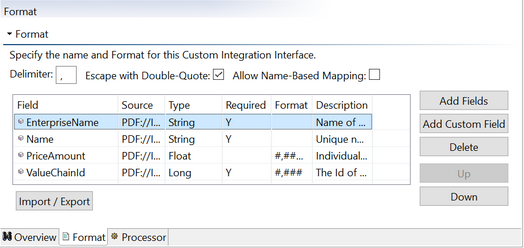
Note: We are leaving the field "Allow Name-Based Mapping" unchecked in this example. This means that the system will import fields from the data file in the order that is displayed in the Format tab. If the "Allow Name-Based Mapping" box was checked, then the system would attempt to match fields based on their name in a header row.
Click on the "Processor" tab at the bottom of the Platform SDK. This is where we will set information about the type of processor to use.
We are setting up an interface to process a CSV file, so set the Processor drop-down field to "Default Model CSV Processor".
Set the Default Custom Model Name to "Standard Item".
Set the Default Action Name to "PLT.InsertOrUpdate".
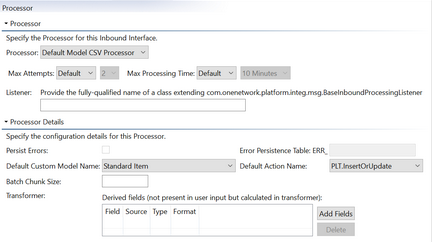
The Processor tab has other options for configuring how the file will be processed. Leave these as their default settings for now.
Save the Inbound Processor by clicking on the Save button.
Submit the EPT:
Click on the Submit to Server button. The Submit dialog will appear.
Set the URL to: http://localhost
Set the User Name to: BusinessNetAdmin
Set the Password to: password
Click Submit.
At this point, we now have a CSV "data format" which external systems can use when sending data.
Create message queues for processing, Customer Upload via HTTPS
Create an Inbound MessageQueue
In order to receive messages, we must set up a queue where these messages will be temporarily stored. ONE typically processes inbound messages asynchronously; that is, we receive the message to a queue, and then process in FIFO order from the queue as computing resources allow.
We will give our MessageQueue the following properties:
We will name it "inbox/Widget". (A good practice is to prefix inbound queues with "inbox" and outbound with "outbox".)
We will indicate its Classification as "Inbox", meaning it processes inbound messages.
In the Package Explorer view on the left of the Platform SDK, expand the Dataset.
Expand the "data" folder.
If there is not already a "PLT.MessageQueue_IB.csv" file present, then add one:
Right click on the "data" folder.
Select New->File.
Name the new file "PLT.MessageQueue_IB.csv".
Click Finish.
Depending on your preference settings, the Platform SDK may try to open the file in Microsoft Excel. However, we want to open this file in a text editor:
Close Excel.
Right click on "PLT.MessageQueue_IB.csv".
Select Open With→Text Editor.
The file should now be open in the middle of the Platform SDK.
Add the following content to the new file:
#* Name,Enterprise Name,Classification,"Exclusive Consumer (0 or 1 (0=false, 1=true))","Paused (0 or 1 (0=false, 1=true))"inbox/Widget,AcmeIndustries,Inbox,1,0Save the file by clicking on the Save button.
Click the Submit to Server button.
The Submit dialog will appear.
Leave URL set to: http://localhost
For Username enter: BusinessNetAdmin
For Password type: password
For Interface Name type: PLT.MessageQueue_IB
For Interface Version type: 1.0
Click Submit.
Once this is loaded, we can log in and verify that this MessageQueue was created successfully:
Open a web browser.
Navigate to the URL: http://localhost
Sign in with the username "InstanceAdminUser" and the password "password".
Click on Integration→Message Queue Summary in the upper left menu of the web page. You should see "inbox/Widget" listed as one of the Queue Names.
Set up MsgProcessingContext
To upload data through EPT interfaces, you will need to load MsgProcessingContext. This is because by default message processing is handled using a "Value Chain Admin" context. However, a "Value Chain Admin" context does not have awareness of EPT processes. We need to associate your queue with the Enterprise Admin to be used to process it.
In the Package Explorer view on the left of the Platform SDK, expand the Dataset.
Expand the "data" folder.
If there is not already a "PLT.MsgProcessingContext_IB.csv" file present, then add one:
Right click on the "data" folder.
Select New->File.
Name the new file "PLT.MsgProcessingContext_IB.csv".
Depending on the preference settings, the Platform SDK may try to open the file in Microsoft Excel. However, we want to open this file in a text editor:
Close Excel.
Right click on "PLT.MsgProcessingContext_IB.csv".
Select Open With→Text Editor.
The file should now be open in the middle of the Platform SDK.
Add the following content to the new file:
#OwningQueueEnterpriseName,OwningQueueName,InboundInterfaceName,InboundInterfaceVersion,ProcessingContextRoleValueChainId,ProcessingContextRoleEnterpriseName,ProcessingContextRoleOrganizationName,ProcessingContextRoleSiteName,ProcessingContextRoleName,ProcessingContextUserValueChainId,ProcessingContextUserEnterpriseName,ProcessingContextUserName,OutboundQueueEnterpriseName,OutboundQueueName,OutboundQueueVcId,Sender,ResolverClassAcmeIndustries,inbox/Widget,,,2050,AcmeIndustries,,,AcmeIndustriesAdminRole,2050,AcmeIndustries,AcmeIndustriesEntAdmin,,,,,Save the changes.
Click the Submit to Server button.
The Submit dialog will appear.
Leave URL set to: http://localhost
For Username enter: BusinessNetAdmin (or an appropriate user with Value Chain Admin permission)
For Password type: password
For Interface Name type: PLT.MsgProcessingContext_IB
For Interface Version type: 1.0
Click Submit.
Note that the queue should be enterprise-scoped (ent_name non-null in message queue csv).
For more information about "Message Processing Context", see: https://docs.onenetwork.com/devnet/neo_3.7/platform-user-s-guide/data-and-process-modeling-with-studio/working-with-the-enterprise-process-template-ept/working-with-interfaces/working-with-msgprocessingcontext
Test Our Inbound Interface
We want to test that our HTTPS interface is working. Let's do this using an application called Postman.
Download and install Postman following the instructions found here: https://www.getpostman.com/downloads/
Set up a new Collection.
In Postman, select: File->New→Create New→Collection
Name the Collection "ONE Network Tests".
Click Save.
Create a new Request:
In Postman, select: File->New→Create New→Request
Name the request "ONE Inbound Test".
Select the Collection "ONE Network Tests".
Click Save.
Expand the "ONE Network Tests" collection.
Select the "ONE Inbound Test" request.
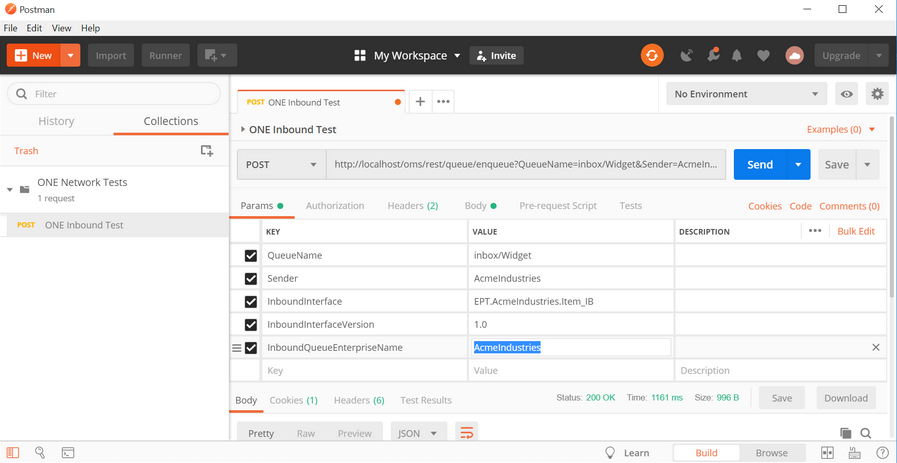
Change the method from GET to POST.
Set the URL to http://localhost/oms/rest/queue/enqueue
Add the following Keys and Values to the Params section of the Request.
Key
Value
QueueName
inbox/Widget
Sender
myExternalApp
InboundInterface
EPT.AcmeIndustries.Item_IB
InboundInterfaceVersion
1.0
InboundQueueEnterpriseName
AcmeIndustries
To connect to the server, we need to authenticate that we are allowed to do so. There are two methods of authentication: Basic and OAuth. In this example, we will connect with the Basic method:
In Postman, click on the Headers sub tab of our Request.
Add a new Key Value pair with "Authorization" as the Key and "Basic QnVzaW5lc3NOZXRBZG1pbjpwYXNzd29yZA==" as the Value.
Note: The Value for Basic authentication is "Basic username:password", where "username:password" is encoded with Base64 encoding. In this example, we are using the username "BusinessNetAdmin" and the password "password". The Base64 encoded value of the string "BusinessNetAdmin:password" is "QnVzaW5lc3NOZXRBZG1pbjpwYXNzd29yZA==". Therefore, the Value to use in the Authorization Header is "Basic QnVzaW5lc3NOZXRBZG1pbjpwYXNzd29yZA==".
We also need to add a Message Body, with the information that we want to send:
In Postman, click on the Body sub-tab.
Choose "raw" as the body type.
Select Text from the drop down.
Add the following text to the Body section:
AcmeIndustries,NewWidget,123.54,2050Click Save.
Click Send.
Postman should show a Status: 200, indicating a successful transmission of the message.
Note: This doesn't mean that it was processed successfully; it just means that the message has been enqueued by ONE.
We can confirm that the message was processed successfully by viewing the message status through the user interface:
Open a web browser.
Navigate to the URL: http://localhost
Sign in with the username "InstanceAdminUser" and the password "password".
Click on Integration→Message Queue Summary in the upper left menu of the web page. You should see "inbox/Widget" listed as one of the Queue Names.
Click on inbox/Widget. This will open up the Messages tab.
Our transmission will be listed in the table. The State column will display "Processed" if the message was processed.
Go back to the Message Queue Summary view. There will be another Queue named "outbox/Widget/Success". Our transmission will also appear in this Queue as "Processed" if the record was successfully added to the database.
Note: We could also verify that a database record was created by running the command "SELECT * FROM Item" in a SQL editor.
For information about additional Parameters or OAuth authentication, see: Integration Capability Summary#MessageQueuesandMessages
Create a Transform for an Existing Inbound Interface
Introduction to Message Transforms
Message Transforms are features which allow data to be formatted (or transformed) when exchanging that data with an external computer system. Message Transforms can be used to transform an inbound message before processing by the ONE Platform. Or Message Transforms can be used to format an outbound message before delivery to an external system or user.
Message Transforms can be used with either pre-built Interfaces or with Interfaces built through the Platform SDK. In this example, we will look at using a Message Transform with an Inbound Interface. You can use the following steps to see a list of Interfaces:
In the Package Explorer section in the left of the Platform SDK, expand the Enterprise Process Template.
Double click on Enterprise Process Template.ept.
Click on the Outline tab in the upper right of the Platform SDK.
Expand Integration Interfaces. You should see both Inbound and Outbound listed here.
Expand Inbound. You should now see a list of any EPT specific Inbound Interfaces. You should also see PLT, which if expanded will show a list of Inbound Interfaces common to all applications built on the Platform SDK.
In this section, we will set up a Message Transform for an Inbound Interface, EPT.AcmeIndustries.User_IB.
Create an Inbound Interface
Let's create an Inbound Interface to work with. (Note that if EPT.AcmeIndustries.User_IB already existed, then we could skip this step.)
Create a new Inbound Interface like we did in the "Create a new Inbound Interface for a Customer Enterprise (CSV)" section above.
Call the interface: EPT.AcmeIndustries.User_IB
Set the Format Type to: CSV
Instead of Item fields, add the following User fields:
Name
EnterpriseName
Email
FirstName
MiddleInitial
LastName
Active
LocaleCountry
LocaleLanguage
Arrange the fields in the order shown above. You can do this from the Format tab by clicking field names and then using the "Up" and "Down" buttons.
Note: If you do not rearrange the fields to your desired order, then they will automatically populate in alphabetical order.
Set Processor to: Default Model CSV Processor
Set Default Custom Model Name to: Standard User
Set Default Action Name to: PLT.InsertOrUpdate
Save the changes.
Submit the changes to the server.
Create an Inbound MessageQueue
Create an Inbound MessageQueue like we did in the section "Create an Inbound MessageQueue" above. Except, create this MessageQueue to be used with the Inbound Interface "EPT.AcmeIndustries.User_IB".
We will name it "inbox/User". (A good practice is to prefix inbound queues with "inbox" and outbound with "outbox".)
We will indicate its Classification as "Inbox", meaning it processes inbound messages.
We will add a line to the file "PLT.MessageQueue_IB.csv".
The line to add to the file is:
inbox/User,AcmeIndustries,Inbox,1,0Save the changes.
Submit the changes to the server.
Set up a MsgProcessingContext
Set up a MsgProcessingContext like we did in the section "Set up MsgProcessingContext" above. Create this MsgPRocessingContext for the new MessageQueue created in the previous step.
We will add a line to the file "PLT.MsgProcessingContext_IB.csv".
The line to add to the file is:
AcmeIndustries,inbox/User,,,2050,AcmeIndustries,,,AcmeIndustriesAdminRole,2050,AcmeIndustries,AcmeIndustriesEntAdmin,,,,,
Save the changes.
Submit the changes to the server.
Add a Transform
As an example, we are going to create a Transform which will convert XML formatted data to CSV formatted data before the data gets processed. These are the steps to create the Transform:
Navigate to the Package Explorer view in the left of the Platform SDK.
Right click on "src".
Select New → Other → Java → Class.
Name the Package "com.acmeindustries.myept.xforms".
Name the Class "UserIBTransformer".
Click Finish. The new Java Class will be added to the Src tree.
Click on the Class in the Package Explorer view to open up the code editor.
This is sample data to show what we want to send in from an outside system as XML formatted data.
<users><user><name>jcorbin</name><email>jcorbin@acmeindustries.com</email><first>Jeremy</first><middle>L</middle><last>Corbin</last></user><user><name>slewis</name><email>slewis@acmeindustries.com</email><first>Stacy</first><middle>M</middle><last>Lewis</last></user><user><name>djones</name><email>djones@acmeindustries.com</email><first>David</first><middle>H</middle><last>Jones</last></user></users>This is sample data to show how we want the data to look after being converted by the Transform
jcorbin,AcmeIndustries,All,user1@acmeindustries.com,Jeremy,L,Corbin,1,US,en slewis,AcmeIndustries,All,user2@acmeindustries.com,Stacy,M,Lewis,1,US,en djones,AcmeIndustries,All,user3@acmeindustries.com,David,H,Jones,1,US,enNote: In this example we want our Transform to assume the Enterprise Name, the Active Status, the Country, and the Language to be the same for all incoming data.
Replace the Java code with the following example:
packagecom.acmeindustries.myept.xforms;importcom.onenetwork.platform.integ.msg.MessageTransform;importcom.onenetwork.platform.integ.msg.MessageTransformContext;importcom.onenetwork.platform.tools.io.Streams;importjava.io.*;//For converting a String to an InputStreamimportjava.nio.charset.StandardCharsets;//For converting a String to an InputStreamimportjavax.xml.parsers.*;//For parsing XMLimportorg.w3c.dom.*;//For parsing XMLpublicclassUserIBTransformerextendsMessageTransform {@Overridepublicvoidtransform(InputStream in, OutputStream out,MessageTransformContext ctx)throwsException{String input = Streams.readFully(newInputStreamReader(in));String output = input;output = convertXMLtoCSV(input);out.write(output.getBytes("UTF-8"));}publicstaticString convertXMLtoCSV(String XMLInputString){String CSVOutput ="";//To store the output.//Convert the String parameter to an InputStream for use by the Document libInputStream stream =newByteArrayInputStream(XMLInputString.getBytes(StandardCharsets.UTF_8));//Parse the XML to a Java Object Arraytry{DocumentBuilderFactory factory = DocumentBuilderFactory.newInstance();DocumentBuilder builder = factory.newDocumentBuilder();Document document = builder.parse(stream);//Create an array of CSV strings to outputNodeList nodeList = document.getElementsByTagName("user");for(inti =0; i < nodeList.getLength(); i++){//Initialize empty variables to hold the values we readString newUserName ="";String newUserEmail ="";String newUserFirst ="";String newUserMiddle ="";String newUserLast ="";NodeList childList = nodeList.item(i).getChildNodes();for(intj =0; j < childList.getLength(); j++){Node childNode = childList.item(j);switch(childNode.getNodeName()){case"name":newUserName = childNode.getTextContent();break;case"email":newUserEmail = childNode.getTextContent();break;case"first":newUserFirst = childNode.getTextContent();break;case"middle":newUserMiddle = childNode.getTextContent();break;case"last":newUserLast = childNode.getTextContent();break;}}CSVOutput = CSVOutput + newUserName +",AcmeIndustries,"+ newUserEmail +","+ newUserFirst +","+ newUserMiddle +","+ newUserLast +",1,US,en"+"\n";}}catch(Exception ex){ex.printStackTrace();}returnCSVOutput;}}
Note: We modified the class to extend MessageTransform.
Create a Message Transform Setting
The last step in setting up our Message Transform is to tell the Platform SDK to use our Transform Class:
In the Package Explorer view on the left of the Platform SDK, expand the Dataset.
Expand the "data" folder.
If there is not already a "PLT.MessageTransform_IB.csv" file present, then add one:
Right click on the "data" folder.
Select New->File.
Name the new file "PLT.MessageTransform_IB.csv".
Depending on your preference settings, the Platform SDK may try to open the file in Microsoft Excel. However, we want to open this file in a text editor:
Close Excel.
Right click on "PLT.MessageTransform_IB.csv".
Select Open With→Text Editor.
The file should now be open in the middle of the Platform SDK.
Add the following new text to the bottom of the file:
# TransformOn,InboundQueueName,InboundQueueEnterpriseName,InboundInterface,InboundInterfaceVersion,OutboundQueueName,OutboundQueueEnterpriseName,OutboundInterface,OutboundInterfaceVersion,TransformClass,Precedence,ConfigDequeue,inbox/User,AcmeIndustries,EPT.AcmeIndustries.User_IB,1.0,,,,,com.acmeindustries.myept.xforms.UserIBTransformer,,{}Save the file by clicking on the Save button.
Click the Submit to Server button.
The Submit dialog will appear.
Leave URL set to: http://localhost
For Username enter: BusinessNetAdmin (or an appropriate user with Value Chain Admin permission)
For Password type: password
For Interface Name type: PLT.MessageTransform_IB
For Interface Version type: 1.0
Click Submit.
Test Our Interface
Test the interface like we did in the "Test Our Inbound Interface" section above.
Change the QueueName in the POST Parameters to "inbox/User" (to match the name of the MessageQueue created in this section).
Change the InboundInterface in the POST Parameters to EPT.AcmeIndustries.User_IB. Also change the message body to be XML formatted.
Change the Body to the XML example:
<users><user><name>jcorbin</name><email>jcorbin@acmeindustries.com</email><first>Jeremy</first><middle>L</middle><last>Corbin</last></user><user><name>slewis</name><email>slewis@acmeindustries.com</email><first>Stacy</first><middle>M</middle><last>Lewis</last></user><user><name>djones</name><email>djones@acmeindustries.com</email><first>David</first><middle>H</middle><last>Jones</last></user></users>Send the request and then verify that the new User requests were processed successfully.
Create an Outbound Interface for a Customer Enterprise (CSV)
To send data from the ONE Network platform to a client's system, we will need to set up an Outbound Interface. Each Outbound Interface has a Generator. The Generator produces data in the given format so it can be put into an outbound queue. These are the steps to create an Outbound Interface Generator:
Double click on the "Enterprise Process Template.ept" file in the Package Explorer view in the left of the Platform SDK.
Click on the "Outline" tab on the right of the Platform SDK.
Expand the EPT in the Outline view.
Expand the Integration Interfaces section in the Outline view.
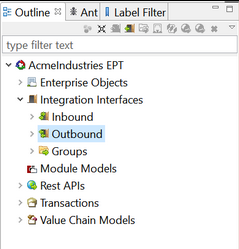
Right click on Outbound.
Click on Add Outbound Interface.
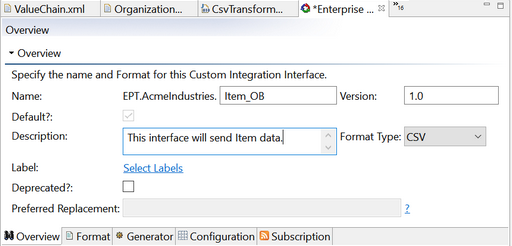
A new Outbound Interface will be created. Populate the Overview sub-tab in the center of the Platform SDK.
Set the Name of the new Outbound Interface to something descriptive. In this example let's use "EPT.AcmeIndustries.Item_OB"
Set Format Type to "CSV".
Add an appropriate Description.
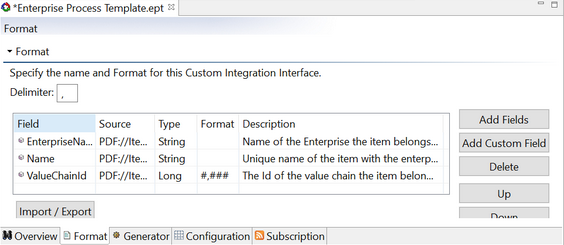
Click on the Format sub-tab in the center of the Platform SDK.
Add Fields to the Outbound Interface:
Click the "Add Fields" button.
Select the Model Type. Set this to Item for this example.
Select the Model Level. This will be grayed out in this example.
Highlight the Fields that you want to send by holding Shift and click on the field names. Select:
EnterpriseName
Name
ValueChainId
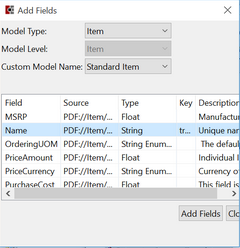
Click "Add Fields".
Click "Close".
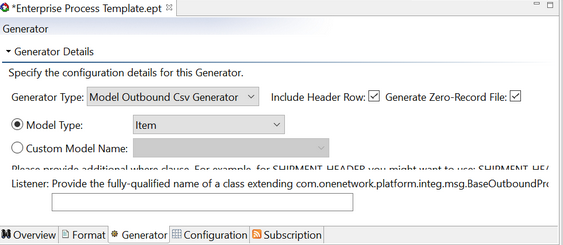
Click on the Generator sub-tab in the center of the Platform SDK.
Under Model Type, select the data model that we want to send through the interface.
Click on the Configuration sub-tab in the center of the Platform SDK. This is where we would could configure options regarding sending data such as max attempts, max processing time, or a custom data transformation layer.
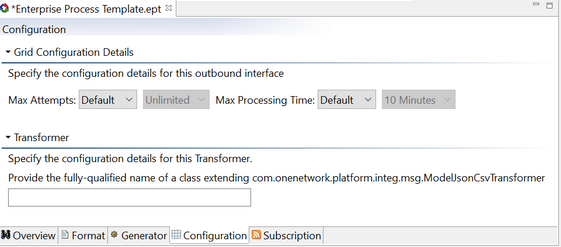
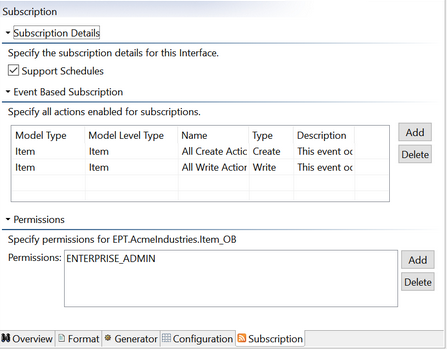
Click on the Subscription sub-tab in the center of the Platform SDK. This is where we can enable Schedules, add Event Based Subscriptions, or modify Permissions for the Outbound Interface Generator.
Check the "Support Schedules" check box in the Subscription sub-tab. This will be important later when we set up a message destination.
Note: We will add Subscriptions and Permissions in a later section.
Save your changes.
Submit the changes to the server.
Create Outbound message queues for processing
Just like with Inbound Interfaces, Outbound Interfaces also need MessagesQueues.
Create a MessageQueue for an Outbound Interface
Creating a MessageQueue for an Outbound Interface is very similar to creating a MessageQueue for an Inbound Interface.
We will give our MessageQueue the following properties:
We will name it "outbox/CustomWidget".
We will indicate its Classification as "Outbox", meaning it processes outbound messages.
In the Package Explorer view on the left of the Platform SDK, expand the Dataset.
Expand the "data" folder.
If there is not already a "PLT.MessageQueue_IB.csv" file present, then add one. (There should be one present from when we set up an Inbound Interface earlier in this guide.)
Open this file in a text editor.
Add the following content to the new file:
outbox/Widget,AcmeIndustries,Outbox,1,0Save the file by clicking on the Save button.
Click the Submit to Server button.
The Submit dialog will appear.
Leave URL set to: http://localhost
For Username enter: BusinessNetAdmin
For Password type: password
For Interface Name type: PLT.MessageQueue_IB
For Interface Version type: 1.0
Click Submit.
Once this is loaded, we can log in and verify that this MessageQueue was created successfully:
Open a web browser.
Navigate to the URL: http://localhost
Sign in with the username "InstanceAdminUser" and the password "password".
Click on Integration→Message Queue Summary in the upper left menu of the web page. You should see "outbox/CustomWidget" listed as one of the Queue Names.
Subscribing to Generate Outbound
Integration Subscriptions allow users to define when they want to receive Outbound messages. Message delivery can happen in response to model actions or on a scheduled basis. Enabling the Integration Subscription flow is a two-step process: the first step is creating meta-data to describe the subscription options, and the second step is for users/enterprises to choose their subscription options.
Create the Subscription Options
If the Outbound Interface is not already pulled up in the view, then open it in the Platform SDK:
Double click on "enterprise process template.ept" in the Package Explorer on the left side of the Platform SDK.
Click on the Outline on the upper right of the Platform SDK.
Expand the EPT.
Expand Integration Interfaces.
Expand Outbound.
Expand the Interface.
Double click on the version number (This is probably 1.0).
The Outbound Interface generator should now be in view. Click on the Subscription sub-tab in the center of the Platform SDK.
Determine if this Outbound Interface should be Schedule-based or Event-based:
Note: At this point we can choose to make our Outbound Interface either Schedule Based or Event Based. In this example, we are going to make it Event Based.
Set up an Event Based outbound process:
Check the "Support Schedules" checkbox if it is not checked.
Click the "Add" button in the "Event Based Subscriptions" section. This will open the "Add Actions" dialog for adding event-based subscriptions.
Select a Model Type. Set this to "Item" for this example.
Select a Model Level if available (if the select box is not grayed out).
Select the name(s) of the action(s) to add. Note that the Description column will tell when a given action will run. Let's choose all actions available to us by holding Shift and clicking on each item.
Click "Add Actions".
Click "OK" to close the dialog. The selected actions should now be visible in the Event Based Subscriptions section.
Add Permissions:
Click "Add" in the Permissions section. This will open the Select Role Types dialog.
Check the checkbox next to the role "ENTERPRISE_ADMIN".
Click OK to close the dialog. "ENTERPRISE_ADMIN" should now show up in the box in the Permissions section.
Add the subscription to an Interface Group:
Double click on "Enterprise Process Template.ept" in the Package Explorer view on the left of the Platform SDK.
Click on the "Outline" tab in the upper right of the Platform SDK.
Expand the EPT.
Expand Integration Interfaces.
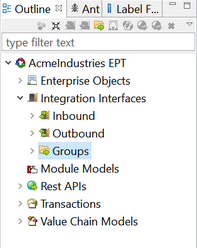
Right Click on Groups.
Select Add Group.
A new group will now be visible in the Outline. Click on the new group to view the details.
The Interface Group details will be visible in the center of the Platform SDK. Set the details:
Set Name to a descriptive name. In this example, let's use the name "EPT.AcmeIndustries.ItemChanges".
Set Description to a short description of the Interface Group. In this example, set it to "This group tracks changes to Items."
In the Interfaces sub-tab, click the Outbound tab.
Click Add.
Select the Outbound Interface that we created in earlier. (We named this "EPT.AcmeIndustries.Item_OB".)
Click Add.
Check "Is subscription category?". This is found in the Overview section.
Save the changes.
Submit the changes to the server.
At this point we enabled a subscription option. However, we still need to login to the user interface and create a subscription. We will create the subscription in the following section.
Set Up a Subscription
Introduction to Subscriptions
Subscriptions allow users to subscribe to Outbound Interfaces in order to receive messages. Message delivery can happen in response to model actions or on a scheduled basis. Enabling the Integration Subscription flow is a two-step process: the first step is creating meta-data to describe the subscription options, and the second step is for users/enterprises to choose their subscription options.
Add the Subscription UI
Note: We checked "Support Schedules" in the Outbound Interface when we created the Outbound Interface. This is needed to allow users to add Subscriptions through the User Interface.
Note We checked "Is Subscription Category" when we created the Interface Group. This is also needed to allow users to add Subscriptions through the User Interface.
Add a Web Action to create an Integration Subscription UI with the following steps:
In the Package Explorer section on the left of the Platform SDK, select "Enterprise Process Template.ept".
Click on the Outline tab in the upper right of the Platform SDK.
Click on the name of the EPT ("Acme Industries EPT") in the Outline tab.
In the center view of the Platform SDK, click on the UiMetaModel sub-tab.
Copy the following code and paste it into the UiMetaModel XML, replacing any content that is already there.
<ModuleUiMetaModel xmlns="http://www.onenetwork.com/Platform"><WebInfo><WebAction name="IntegrationSubscriptions"><PanelOptions><PanelClass>One.Report</PanelClass><PanelConfig>{reportName:"PLT.IntegrationSubscriptionsReport", filters: {}, autoExecute:true}</PanelConfig></PanelOptions></WebAction><WebAction name="NewIntegrationSubscription"><PanelOptions><PanelClass>One.IntegrationSubscriptionDetailPanel</PanelClass><PanelConfig>{}</PanelConfig></PanelOptions></WebAction><WebActionGroup name="Subscriptions"><WebActionRef name="IntegrationSubscriptions"/><WebActionRef name="NewIntegrationSubscription"/></WebActionGroup><RoleTypeUiConfig menuType="tree"><RoleTypeRef><IntrinsicRoleType>ENTERPRISE_ADMIN</IntrinsicRoleType></RoleTypeRef><WebActionGroupRef name="Subscriptions"/></RoleTypeUiConfig></WebInfo></ModuleUiMetaModel>
Click the Save button to save the changes.
Click the Submit to Server button. The Submit dialog will open.
Set the URL to: http://localhost
Set the Username to: BusinessNetAdmin
Set the Password to: password
Click Submit.
Create the Subscription From the UI
At this point we have options in the User Interface which will allow us to set up and configuration subscriptions to our Outbound Interface. In this section we will go through the steps to set up one of these subscriptions.
Log into the UI:
Open a web browser, such as Google Chrome.
Navigate to: http://localhost
Log in as:
Username: AcmeIndustriesEntAdmin
Password: password
In the upper left of the web page there will be a menu option labelled "Subscriptions". Click on this button.
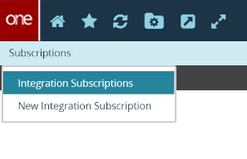
You will see two options. "Integration Subscriptions" and "New Integration Subscription". Click on "New Integration Subscription". A tab will open with options for creating a new subscription.
Set Category to: EPT.AcmeIndustries.ItemChanges
Set Outbound Interface to: EPT.AcmeIndustries.Item_OB
Set Version to: 1.0
Leave Active checked.
Create a Destination:
Under Destination click New Destination.
Set a Name for the Destination. In this example, I set this to "ItemChangedEmail".
Set the Destination Type to Email.
Note: An alternative delivery option is SFTP.
Note: Emails will not generate from the server, unless you add your email server's SMTP options in the following file: C:\OneSDK_21.0\default-instance\platform\setup\dvce-app-config.xml
Set Email to your email address.
Set the Subject. In this example, let's use the subject "Item Changed".
Set the Message. In this example, set it to "An item was changed."
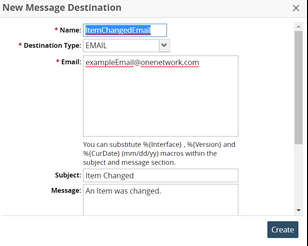
Click "Create".
Close the dialog by clicking on the X icon in the upper right of the dialog.
Check the checkbox next to the new destination.
Leave ExecuteAs set to the default setting (the logged in user).
Leave Ignore Changes Made By blank.
This would be used if you wanted to only changes by some, but not all, users.
Check the boxes next to Events. In this example, these boxes are labelled "Item: On All Creates" and "Item: On All Updates". This will send us a message for each new Item or change to an existing Item.
Leave the Schedule section blank.
This would be used if you want the notifications to come at predetermined dates or times.
Leave Active Date Range blank.
This would be used if you want to limit the notifications to a certain date range.
Click "Create" to finish setting up the Subscription.
Test the Outbound Interface by sending a new Item to the application. One way to create a new item is to send item information to the Inbound Interface we created earlier. You can follow the example in the section "Test Our Inbound Interface". If an email server is configured then you should receive an email with a message when a new item is created or an item is changed.
Note: configuring an email server is not included in this guide.
More Information
Note: For more information see: https://devnet.onenetwork.com/oms/apps/DeveloperNetwork/www/docs/guides/SdkUsersGuide/help/index.html
Create a Transform for an Outbound Interface.
Introduction to Outbound Message Transforms
Just like with Inbound Interfaces, we can also create Message Transforms for Outbound Interfaces. This gives us the ability to add custom code to alter the contents of an outbound message before the messages are sent. Message Transforms can be used with either pre-built Interfaces or with Interfaces built through the Platform SDK. In this example, we will look at using a Message Transform with an Outbound Interface. You can use the following steps to see a list of Interfaces:
In the Package Explorer section in the left of the Platform SDK, expand the Enterprise Process Template.
Double click on Enterprise Process Template.ept.
Click on the Outline tab in the upper right of the Platform SDK.
Expand Integration Interfaces. You should see both Inbound and Outbound listed here.
Expand Outbound. You should now see a list of any EPT specific Outbound Interfaces. You should also see PLT, which if expanded will show a list of Outbound Interfaces common to all applications built on the Platform SDK.
In this section we will add a Message Transform to the Outbound Interface, EPT.AcmeIndustries.Item_OB. Since this interface already exists, we do not need to create a new Outbound interface. To illustrate the Message Transform process, we will add a Message Transform which replaces the comma delimiter with a custom character.
Add a Transform
Navigate to the Package Explorer view in the left of the Platform SDK.
Right click on "src".
Select New → Other → Java → Class.
Click Next.
Name the Package "com.acmeindustries.myept.xforms".
Name the Class "ItemOBTransformer".
Click Finish. The new Java Class will be added to the Src tree.
Click on the Class in the Package Explorer view to open up the code editor.
Replace the Java code with the following example:
packagecom.acmeindustries.myept.xforms;importcom.onenetwork.platform.integ.msg.MessageTransform;importcom.onenetwork.platform.integ.msg.MessageTransformContext;importcom.onenetwork.platform.tools.io.Streams;importjava.io.*;//For converting a String to an InputStreamimportjava.nio.charset.StandardCharsets;//For converting a String to an InputStreamimportjavax.xml.parsers.*;//For parsing XMLimportorg.w3c.dom.*;//For parsing XMLimportcom.onenetwork.platform.tools.log.PlatformLogger;publicclassItemOBTransformerextendsMessageTransform {privatestaticPlatformLogger LOG = PlatformLogger.get(ItemOBTransformer.class);@Overridepublicvoidtransform(InputStream in, OutputStream out,MessageTransformContext ctx)throwsException{LOG.info("Transforming outbound content...");String input = Streams.readFully(newInputStreamReader(in));String output ="";// Add code here to transform the content.output = replaceCommas(input);out.write(output.getBytes("UTF-8"));}/****************************************************************************************************** Name: replaceCommas* Description:* This function accepts a string as a parameter.* It then returns the same string with commas replaced by pipes.******************************************************************************************************/publicstaticString replaceCommas(String inputString){String outputString ="";intstringLength = inputString.length();for(inti =0; i < stringLength; i++) {if(inputString.charAt(i) ==',') {outputString = outputString +'|';}else{outputString = outputString + inputString.charAt(i);}}returnoutputString;}}
Create a Message Transform Setting
The last step is to tell the Platform SDK to use our Transform Class for Outbound messages:
In the Package Explorer view on the left of the Platform SDK, expand the Dataset.
Expand the "data" folder.
If there is not already a "PLT.MessageTransform_IB.csv" file present, then add one:
Right click on the "data" folder.
Select New→File.
Name the new file "PLT.MessageTransform_IB.csv".
Depending on your preference settings, the Platform SDK may try to open the file in Microsoft Excel. However, we want to open this file in a text editor:
Close Excel.
Right click on "PLT.MessageTransform_IB.csv".
Select Open With→Text Editor.
The file should now be open in the middle of the Platform SDK.
Add the following new text to the bottom of the file:
# TransformOn,InboundQueueName,InboundQueueEnterpriseName,InboundInterface,InboundInterfaceVersion,OutboundQueueName,OutboundQueueEnterpriseName,OutboundInterface,OutboundInterfaceVersion,TransformClass,Precedence,ConfigEnqueue,,,,,ISQ_ItemChangedEmail,AcmeIndustries,EPT.AcmeIndustries.Item_OB,1.0,com.acmeindustries.myept.xforms.ItemOBTransformer,,{}Save the file by clicking on the Save button.
Click the Submit to Server button.
The Submit dialog will appear.
Leave URL set to: http://localhost
For Username enter: BusinessNetAdmin (or an appropriate user with Value Chain Admin permission)
For Password type: password
For Interface Name type: PLT.MessageTransform_IB
For Interface Version type: 1.0
Click Submit.
Custom interfaces (XML, JSON, etc.)
There might be times where neither an out of the box model is suitable for processing a certain type of message. In this case, you can create a Custom processor to handle the data.
Custom Inbound Interface
Let's say that we want to create an Inbound Interface that does something in a custom way. In the following example we will create a customer Inbound Interface. It will accept a HTTP POST with JSON formatted data. That data will then be parsed and inserted into the database as a new Item.
These are the steps to create the new custom inbound interface:
Let's define what the incoming data will look like. In this example, we are going to receive new item information in a JSON format like the following. We want this data to be inserted into the database as a new Item.
{"enterprise":"AcmeIndustries","itemName":"NewWidget2","price":123.54,"valueChainID":2050}First create a new Inbound Interface with the type set to Custom:
Expand the EPT in the Package Explore view on the left of the Platform SDK.
Double click on "Enterprise Process Template.ept".
In the upper right of the Platform SDK, click on the "Outline" tab. Expand the EPT and Integration Interfaces in the Outline tab on the right of the Platform SDK.
Right click on "Inbound".
Select "Add Inbound Interface".
Set the Name. In this example, we will use: "EPT.AcmeIndustries.CustomItem_IB"'
Set the Description. Let's describe it as: "This is a custom inbound interface for items."
Choose "Custom" in the Format Type drop down.
Click the Save button to save the new Inbound Interface.
Click the Submit to Server button to submit the new interface to the server.
We now need to create a java class which extends AbstractInboundProcessor (or directly implements com.onenetwork.platform.integ.msg.InboundProcessor):
In the Package Explorer view on the left side of the Platform SDK, right click on the EPT folder name.
Select New→Class. The "New Java Class" dialog will open up.
Leave Source Folder as the default.
Click Browse next to Package. This will open the "Package Selection" dialog.
Select your EPT's Package name. In this example: "com.acmeindustries.myept"
Click OK to close the Package Selection dialog.
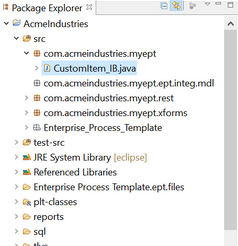
Enter a name for your class in the Name field. For example "CustomItem_IB".
Leave the other values at their defaults.
Click Finish. A new Java file will be created in your EPT's "src" sub-directory. The new Java file will also automatically open in the Platform SDK.
Now we need to add code to handle the custom data format:
packagecom.acmeindustries.myept;importjava.io.*;importjava.util.ArrayList;importjava.util.List;importorg.json.*;importcom.onenetwork.platform.common.Item;importcom.onenetwork.platform.data.model.ModelList;importcom.onenetwork.platform.common.usercontext.PlatformUserContext;importcom.onenetwork.platform.data.model.ModelDataService;importcom.onenetwork.platform.env.servicelocator.Services;importcom.onenetwork.platform.grid.GridTaskContext;importcom.onenetwork.platform.integ.msg.AbstractInboundProcessor;importcom.onenetwork.platform.integ.msg.Message;importcom.onenetwork.platform.tools.io.Streams;importcom.onenetwork.platform.tools.log.PlatformLogger;publicclassCustomItem_IBextendsAbstractInboundProcessor {privatestaticPlatformLogger LOG = PlatformLogger.get(CustomItem_IB.class);@OverridepublicvoidprocessMessage(Message msg, GridTaskContext gridCtx, File fileForErrors, PlatformUserContext ctx)throwsException {InputStream in =null;OutputStream out =null;try{in = msg.readPayload();LOG.info("Will process message "+ msg.getId());String contents = Streams.readFully(newInputStreamReader(in));LOG.info("The message contents are: "+ contents);//Read values from the POST body.JSONObject obj =newJSONObject(contents);//convert the JSON string into an objectString enterprise = obj.getString("enterprise");String itemName = obj.getString("itemName");Float price = (float) obj.getDouble("price");Integer valueChainID = obj.getInt("valueChainID");//Initialize a ModelListModelList<Item> modelList =newModelList<Item>();modelList.setActionName("PLT.InsertOrUpdate");modelList.setValueChainId(valueChainID);//Initialize an Item using data from the POST body.Item newItem =newItem();newItem.setName(itemName);newItem.setValueChainId(valueChainID);newItem.setPriceAmount(price);newItem.setEnterpriseName(enterprise);List<Item> items =newArrayList<Item>();items.add(newItem);//Add the Item to the ModelListmodelList.getModels().addAll(items);//Write the ModelList to the databaseModelDataService mds = Services.get(ModelDataService.class);ModelList returnedList = mds.write(modelList, ctx);if(returnedList.getListError() !=null|| returnedList.getErrors().size() >0) {thrownewException("Unable to insert or update record : "+ returnedList.getListError().getValue());}}finally{Streams.close(in, out);}}}Save the file.
Double click on "Enterprise Process Template.ept" in the Package Explorer.
Click the Submit to Server button.
Add the Java Class to the Inbound Interface.
Double click on "Enterprise Process Template.ept" in the Package Explorer view on the left of the Platform SDK.
Click on the Outline tab in the upper right of the Platform SDK.
Expand: AcmeIndustries EPT → Integration Interfaces → Inbound → EPT.AcmeIndustries.CustomItem_IB
Click on 1.0 under "EPT.AcmeIndustries.CustomItem_IB" in the Outline view.
Select the Processor sub-tab in the middle of the Platform SDK.
In the Processor Details section, under "Provide the fully-qualified name of a class...", enter: com.acmeindustries.myept.CustomItem_IB
Click the Save button.
Submit the change to the server.
Create a Message Queue for the custom interface as described in the "Create an Inbound MessageQueue" section above.
Set up a MsgProcessingContext for the custom interface as described in the "Set up MsgProcessingContext" section above.
Test the interface like we did in earlier sections.
Be sure to change the Value for the "InboundInterface" Key to "E PT.AcmeIndustries.CustomItem_IB".
Set the POST body type to "raw" and "text", with the following content:
{"enterprise":"AcmeIndustries","itemName":"NewWidget2","price":123.54,"valueChainID":2050}
Custom Outbound Interface
We can also create custom Outbound Interfaces to perform actions. In this example, we will create an Outbound Interface which will generate JSON formatted data when a record in the "User" Data Model is created or changed.
These are the steps to create the new custom outbound interface:
Create an Outbound Interface:
Expand the EPT in the Package Explore view on the left of the Platform SDK.
Double click on "Enterprise Process Template.ept".
In the upper right of the Platform SDK, click on the "Outline" tab. Expand the EPT and Integration Interfaces in the Outline tab on the right of the Platform SDK.
Right click on Outbound.
Select Add Outbound Interface.
Name the new Outbound Interface "EPT.AcmeIndustries.CustomUser_OB".
Set Format Type to "Custom".
Select the Subscription sub-tab.
Check Support Schedules.
Save the changes.
Submit the changes to the server.
Create a Java Class with the Listener:
In the Package Explorer view on the left side of the Platform SDK, right click on the EPT folder name.
Select New→Class. The "New Java Class" dialog will open up.
Leave Source Folder as the default.
Enter a package name. In this example let's use: "com.acmeindustries.integ"
Enter a name for your class in the Name field. For example, "UserCustomOutboundGenerator".
Leave the other values at their defaults.
Click Finish. A new Java file will be created in your EPT's "src" sub-directory.
Add code to for your Generator:
packagecom.acmeindustries.integ;importjava.io.IOException;importorg.json.JSONArray;importcom.onenetwork.platform.common.User;importcom.onenetwork.platform.common.usercontext.PlatformUserContext;importcom.onenetwork.platform.data.model.ModelDataService;importcom.onenetwork.platform.env.servicelocator.Services;importcom.onenetwork.platform.integ.msg.SysIdOutboundGenerator;importcom.onenetwork.platform.integ.msg.SysIdOutboundProcessingContext;importcom.onenetwork.platform.tools.log.PlatformLogger;publicclassUserCustomOutboundGeneratorimplementsSysIdOutboundGenerator {privatestaticPlatformLogger LOG = PlatformLogger.get(UserCustomOutboundGenerator.class);@Overridepublicvoidgenerate(SysIdOutboundProcessingContext outboundProcessingContext){LOG.info("Generating outbound content...");JSONArray outputMessage =newJSONArray();// Initializing a new JSONArray to store output.// Iterate through each record inserted or updated.for(Long sysID : outboundProcessingContext.getSysIds()) {// Get the record data from the system.PlatformUserContext userContext = outboundProcessingContext.getPlatformUserContext();ModelDataService modelDataService = Services.get(ModelDataService.class);User currentRecord = modelDataService.readById(User.class, sysID, userContext);// Build a JSON object with the data.JSONArray jsonArray =newJSONArray();// Initialize a temporary JSON array to store data about just this one user.jsonArray.put(currentRecord.getName()); jsonArray.put(currentRecord.getEmail());jsonArray.put(currentRecord.getFirstName()); jsonArray.put(currentRecord.getMiddleInitial());jsonArray.put(currentRecord.getLastName());outputMessage.put(jsonArray);// Add this iteration's JSON object to the larger array.}try{LOG.info("The transformed outbound message is: "+ outputMessage.toString());outboundProcessingContext.getOutputStream().write(outputMessage.toString().getBytes("UTF-8"));}catch(IOException e1) {LOG.info("Error writing to output stream.");e1.printStackTrace();}LOG.info("Finished generating outbound content.");}}Save the file.
Double click on "Enterprise Process Template.ept" in the Package Explorer.
Click the Submit to Server button.
Link the Java Class to the Outbound Interface:
Double click on "Enterprise Process Template.ept" in the Package Explorer view on the left of the Platform SDK.
Click on the Outline tab in the upper right of the Platform SDK.
Expand: AcmeIndustries EPT → Integration Interfaces → Inbound → EPT.AcmeIndustries.CustomUser_OB
Click on 1.0 under "EPT.AcmeIndustries.CustomUser_OB" in the Outline view.
Select the Generator sub-tab in the middle of the Platform SDK.
In the Generator field, under "Provide the fully-qualified name of a class implementing one or more...", enter: com.acmeindustries.integ.UserCustomOutboundGenerator
Click the Save button.
Submit the change to the server.
Create a MessageQueue for the custom interface.
See the "Create a MessageQueue for an Outbound Interface" section above for an example.
Create an Interface Group.
See the "Create an Outbound Interface for a Customer Enterprise" section above for an example.
Add subscription options and user role permissions to the Interface Group.
See the "Create an Outbound Interface for a Customer Enterprise" section above for an example.
Set up a Subscription to the Outbound Interface.
See the "Create the Subscription From the UI" section above for an example.
Test the interface by creating a new user. This can be performed using the same steps as the "Test Our Inbound Interface" and changing the user data .
Note: You should be able to confirm from the Message contents that the data was reformatted properly by logging into http://localhost as InstanceAdminUser.
More Information about Custom Interfaces
For more information about Custom Interfaces see:
https://devnet.onenetwork.com/oms/apps/DeveloperNetwork/www/docs/guides/SdkUsersGuide/help/index.html#Integration/Custom