Reports
Now that you've created a view, you might be wondering how to pull more specific information from the database. If you want to do something like joining on multiple tables, you will want to use a report, which gives you the full power of SQL. We'll detail a simple example below which shows you the basic format, and if you want more detail, you can check out the Reports Section.
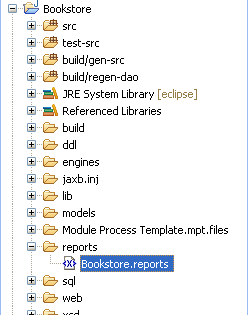
In the Bookstore project under the Package Explorer, open up reports/Bookstore.reports:
Copy and paste this report XML inside the ReportList tag, after the report that's already stored there:
<Report><Name>AllBooks</Name><SqlDefName="AllBooks"GroupName="SampleSqls"><![CDATA[select TITLE, AUTHOR, ISBN, PRICE_AMOUNT, PRICE_UOM, QUANTITY_SOLD, USERS.USER_NAME from ZBKS_BOOKinner join USERS on ZBKS_BOOK.SYS_SALES_REP_ID = USERS.SYS_USER_IDwhere ($TITLE_FILTER$ is null or upper(TITLE) like upper($TITLE_FILTER$) || '%')]]></SqlDef><Filters><CustomFilterField><FieldReflevelType="ZBKS.Book"category="PDF"><FieldName>Title</FieldName></FieldRef><Type>STRING</Type><SimpleMappingsqlName="TITLE_FILTER"/></CustomFilterField></Filters><Retrieval><CustomRetrievalField><FieldReflevelType="ZBKS.Book"category="PDF"><FieldName>Title</FieldName></FieldRef><Type>STRING</Type><ColumnWidth>200</ColumnWidth><SimpleMappingsqlName="TITLE"/></CustomRetrievalField><RetrievalFieldlevelType="ZBKS.Book"category="PDF"><FieldName>Author</FieldName></RetrievalField><RetrievalFieldlevelType="ZBKS.Book"category="PDF"><FieldName>ISBN</FieldName></RetrievalField><RetrievalFieldlevelType="ZBKS.Book"category="PDF"><FieldName>QuantitySold</FieldName></RetrievalField><CustomRetrievalField><FieldReflevelType="ZBKS.Book"category="PDF"><FieldName>PriceAmount</FieldName></FieldRef><Hidden>true</Hidden><Type>STRING</Type><SimpleMappingsqlName="PRICE_AMOUNT"/></CustomRetrievalField><CustomRetrievalField><FieldReflevelType="ZBKS.Book"category="PDF"><FieldName>PriceUOM</FieldName></FieldRef><Hidden>true</Hidden><Type>STRING_ENUMERATION</Type><EnumerationType>CurrencyCode</EnumerationType><SimpleMappingsqlName="PRICE_UOM"/></CustomRetrievalField><CustomRetrievalField><FieldReflevelType="ZBKS.Book"category="PDF"><FieldName>Price</FieldName></FieldRef><Type>COMPOSITE</Type><Sortable>false</Sortable><CompositeFieldTypename="PRICE"><Componentname="PriceAmount"type="STRING"/><Componentname="PriceUOM"type="STRING_ENUMERATION"/></CompositeFieldType><ColumnWidth>110</ColumnWidth><SimpleMappingsqlName="PRICE"/></CustomRetrievalField><CustomRetrievalField><FieldReflevelType="ZBKS.Book"category="PDF"><FieldName>SalesRep</FieldName></FieldRef><Type>STRING</Type><SimpleMappingsqlName="USER_NAME"/></CustomRetrievalField></Retrieval></Report>Click
 Save to save the report.
Click
 Submit to Server to submit the report to the server. In case Submit button is disabled, please open MPT (this will enable the button) then go back to report tab and click Submit.
Now we need to add an entry to the UiMetaModel to access this report from NEO. Open the Module Process Template.mpt, make sure in the Outline tree that the root element (Module Process Type) is selected, and then click the UiMetaModel tab.
Add the following WebAction to the existing list:
<WebActionname="AllBooks"><OneReactPage><ModulePath>PLT/NeoReport</ModulePath><Properties>{"reportName": "ZBKS.AllBooks","autoExecute": true}</Properties></OneReactPage></WebAction>Then add a menu reference inside the WebActionGroup tag:
<WebActionRefname="AllBooks"/>Click
Save to save the MPT.Click
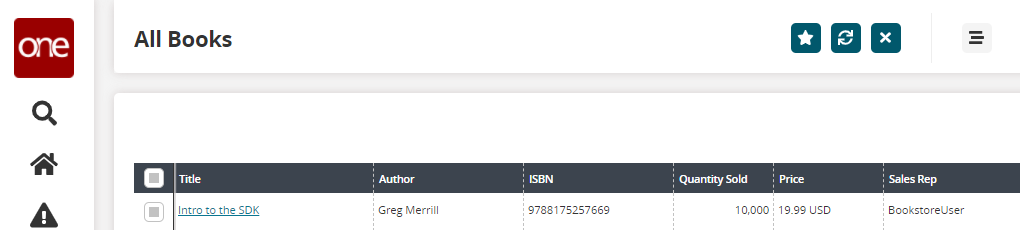
Submit to submit it to the server. Then refresh NEO completely (or log in if not already) to see the new menu item, All Books. Open it to see the report: