SQL-based
In addition to simple CSV based integration, the One Network Platform also allows a more customized approach using its CSV SQL Processor. This type of integration allows inbound CSV files to be integrated using an SQL statement against the CSV file. This affords a great deal of control over the data as well as transformation capabilities using the full power of the SQL language.
The CSV SQL Processor supports two modes of execution. Those are staging table mode and Oracle external table mode.
The CSV SQL Processor processes inbound files in two steps. First, an Oracle-based external table or staging table is created which refers to the inbound CSV file. Then one or more user-defined SQL statements are executed to copy data from the external table/staging table to the database. Before we can use the CSV SQL Processor, we must define an interface. Once that's done, we can define a new CSV SQL Processor to operate using the interface.
Procedure 16.6. To define an interface that can use the CSV SQL Processor:
Begin by creating a new inbound interface. Open the SPT. In the outline view, click Integration Interfaces | Inbound.
Click the New Inbound Interface button.
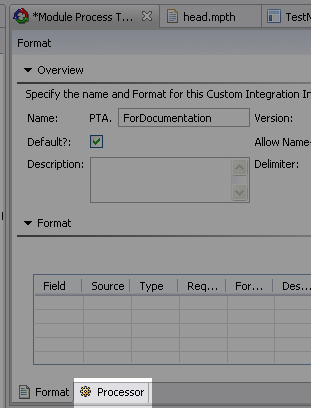
Using the Format tab, give the newly created interface a suitable name.
Define an input field to represent each field in the inbound CSV file.
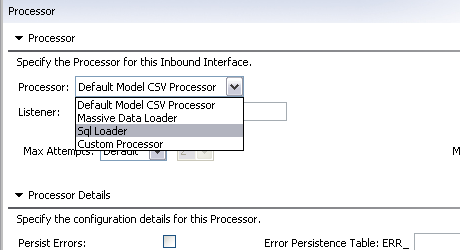
Click the Processor tab.
Change the Processor field to Sql Loader.
The tab will change to display the settings for Sql Loader:
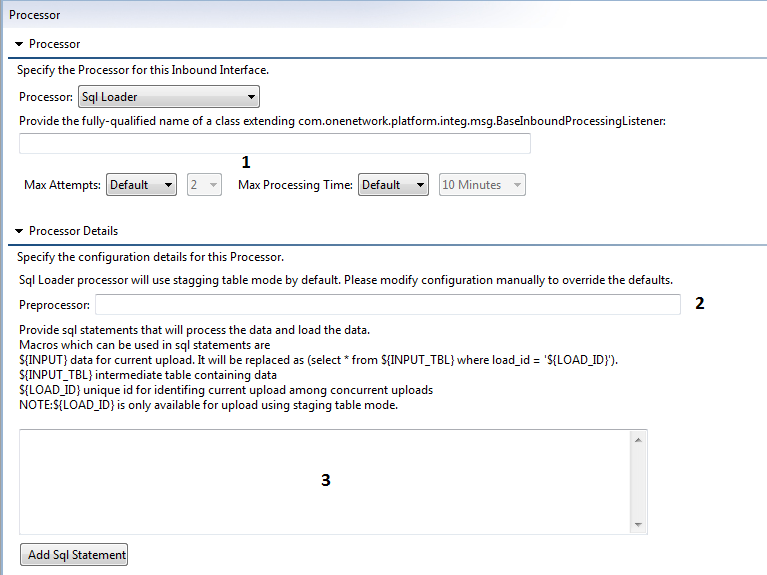
Staging table mode is used by default for newly created SQL loader processor. For using Oracle external table execution mode, the developer has to manually edit the configuration file head.mpth or head.spth to override this default setting.
This can be achieved by removing <StagingTable> tag from <CsvSqlProcessor> of interested inbound interface.
[Optional] You can define the maximum number of attempts or the maximum processing time for the input load using the settings labeled (1).
[Optional] Use the optional Preprocessor box (labeled 2) to use any custom preprocessor. A preprocessor is a feature of Oracle's external table capability and are programs that can be run on the data before its passed to the access driver. They can range in complexity from shell scripts to sophisticated software written in virtually any language. In the above sample we are executing a local shell script designed to detect zipped files. When the script finds a zipped file, the file is unzipped and any files that are not CSV data are deleted. Again, this is executed before the files are processed so its the perfect time to perform these kinds of tasks. To use a preprocessor specify a path to the script to be used as the preprocessor.
Enter the SQL in the large text area labeled (3).
Available built-in variables for this SQL are as below:
${INPUT}
Data for current upload.
In case of staging table execution mode, this is replaced as (select * from ${INPUT_TBL} where load_id = '${LOAD_ID}'). It isolates data for an upload execution, if multiple uploads using same staging table are executing concurrently.
In Oracle external table execution mode, it will be replaced with value of ${INPUT_TBL}.
${INPUT_TBL}
Intermediate table containing data. It can be either staging table or Oracle external table.
${LOAD_ID}
Unique id for identifying current upload among concurrent uploads. It is available only in staging table execution mode.
Below is a sample SQL statement for the CSV file in the previous section.
INSERT INTO ENTERPRISE (SYS_ENT_ID, ENT_NAME, VC_ID, DESCRIPTION)
          (SELECT ENTERPRISE_SEQ.NEXTVAL, $MY_VC_ID$, Name, Description FROM ${INPUT})
In these SQL statements, current user-specific variables such as $MY_VC_ID$, $MY_ENT_ID$ etc. can also be used, but not macros like filterIfNull
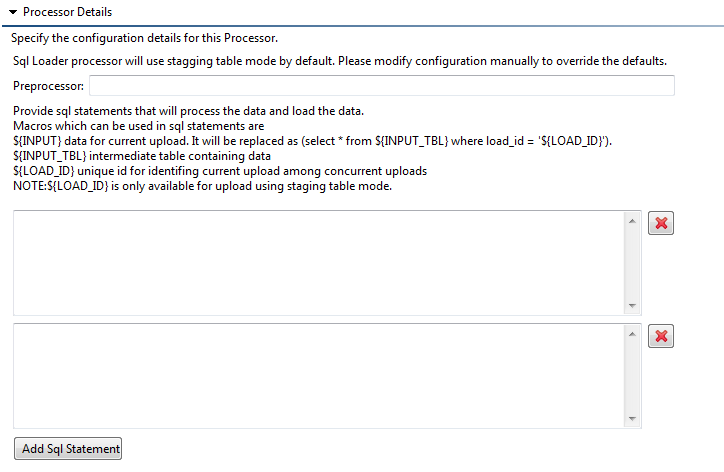
[Optional] If you want to use multiple SQL statements, click the Add SQL Statement button. This adds additional boxes where you can enter additional queries. The queries are executed in the order entered. If you want to remove one of the boxes, click the delete button marked with a red "X".
If required, SQL select query can be also used to retrieve the data from the database. This retrieved rows are available as error rows.
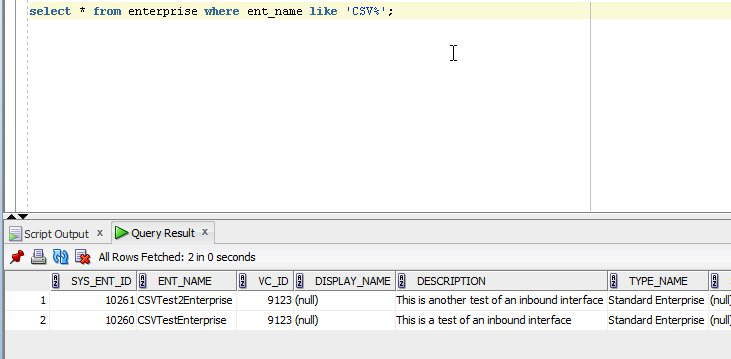
SELECT ENT_NAME, DESCRIPTION FROM ENTERPRISE WHERE ENT_NAME LIKE 'CSV%' AND VC_ID = $MY_VC_ID$Save the MPT by clicking the Save button or pressing Ctrl—S.Save the MPT by clicking the Save button or pressing Ctrl—S.
Save the MPT by clicking the Save button or pressing Ctrl—S.
Now that you have defined the CSV SQL Processor, you should test it.
Procedure 16.7. To Test Your CSV Processor
Save and deploy your MPT to a running server
Within Studio, go back to the Format tab and click the Export Sample CSV button.

This will produce a sample CSV which you can populate with some test data. The actual spreadsheet sample will depend on the structure you defined, so we'll revisit our sample spreadsheet from the earlier CSV examples. In this case, the sample spreadsheet is allowing you to load Enterprises into the database. Your spreadsheet will instead match the format you defined but work in the same way.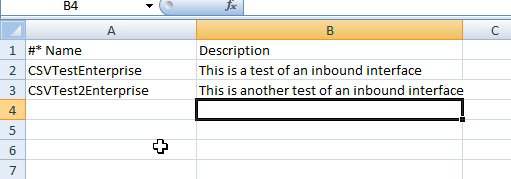
Save the CSV file in data/ as EnterpriseFile.csv. We can load this CSV using the dataset's load-data target. To achieve this, add an InboundInterface entry to your LoadData.xml file:<InboundInterfaceFileinboundInterface="ZBKS.EnterpriseLoad">data/EnterpriseFile.csv</InboundInterfaceFile>After loading data, query the table you were targeting and verify your test data loaded properly.
If any of the statements return a result set, the rows of the result set are written to the results file. Each row in the result set produces one line in the results file. Columns in the result set are separated with commas. If any SQL statements throw an exception, the exception is written to the Platform Server log file and the results file. If the CSV SQL Processor encounters an improperly formatted record in the inbound file, it is copied to the results file.
After every successful run of the CSV SQL Processor, the external table is dropped and the standard inbound file clean up operations occur as they normally would.