Adding Site Lanes
The Enterprise Admin user can add site lanes for their enterprise as needed.
Complete the following steps to add a site lane to your enterprise:
L og in to the ONE system.
Click Menus/Favs > Administration > Search Site Lane. In the NEO UI, users can click on the Menus/Favs icon on the left sidebar and type in the name of the screen in the menu search bar. For more information, see "Using the Menu Search Bar."
The Search Site Lane screen opens.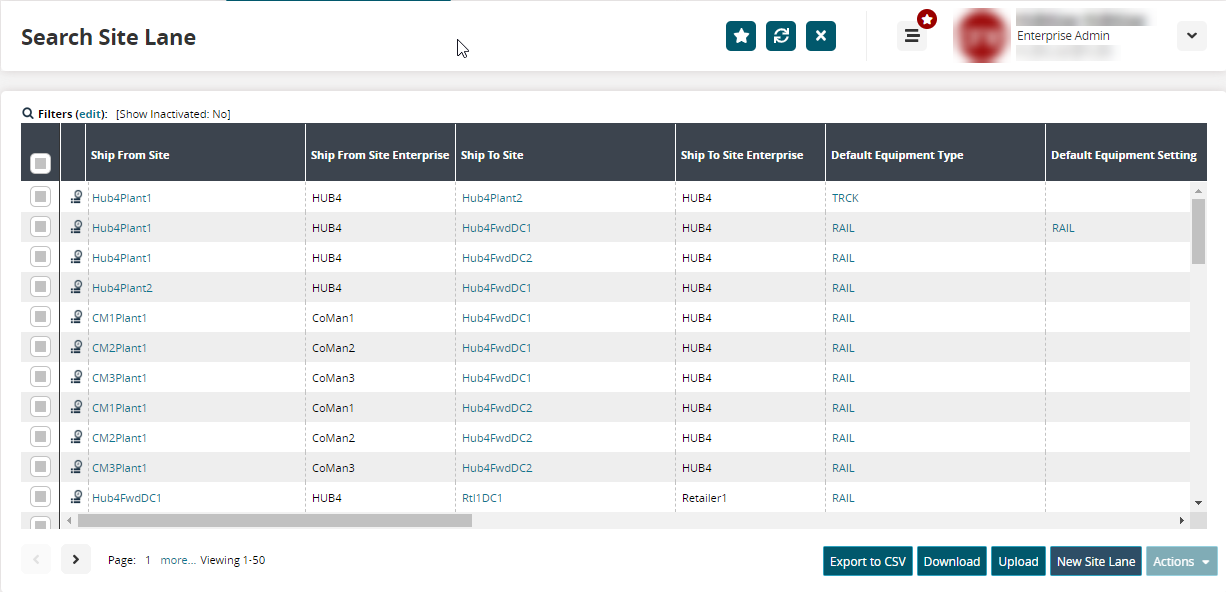
Click New Site Lane at the bottom of the page.
The New Site Lane screen opens.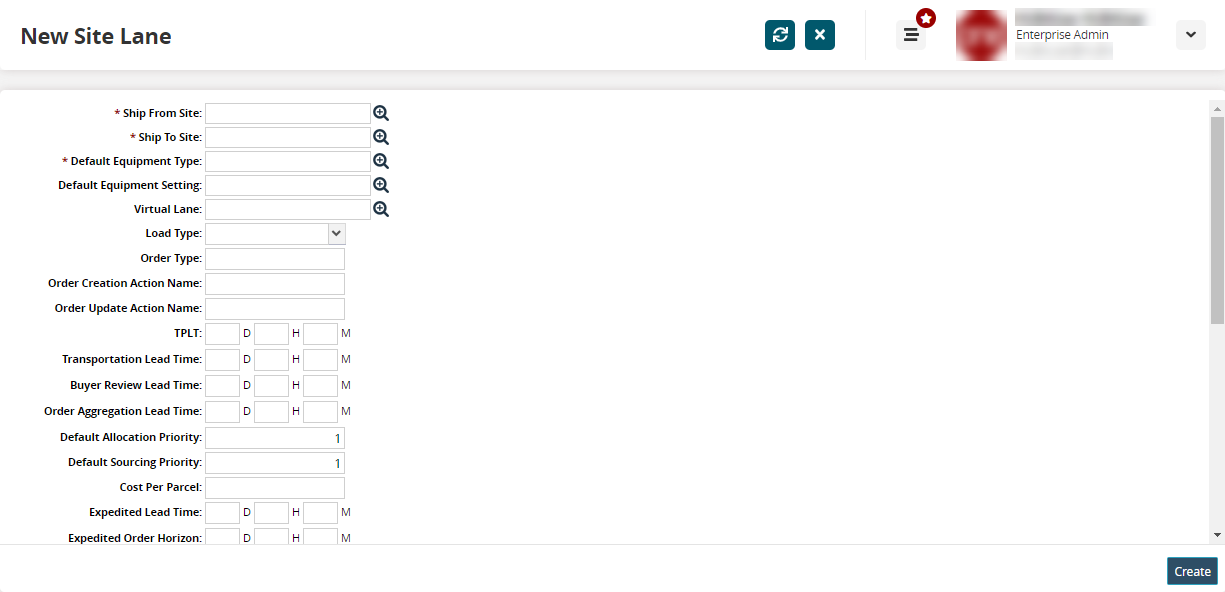
Enter values for fields described in the table below. Fields with an asterisk ( * ) are required.
Field
Description
* Ship From Site
Use the picker to select a Ship From site.
* Ship To Site
Use the picker to select a Ship To site.
* Default Equipment Type
Use the picker to select the default equipment type.
Default Equipment Setting
Use the picker to select the default equipment setting. See the "Adding New Equipment Settings" section in Online Help for more information.
Virtual Lane
Use the picker to select a virtual lane.
Load Type
Use the drop-down menu to select the load type for the new site lane.
Order Type
Enter the order type model. Most often, this will be “Standard SCC.EnhancedOrder.” It could be “Standard OrderForecast” in certain configurations, such as with the use of the Standard Replenishment Engine.
Order Creation Action Name
Enter the internal action name for creating orders used by engines such as the Order Aggregation Engine. "PLT.Create" is the default value. The action name dictates both the type of order and the possibility of the initial state of that order.
Order Update Action Name
Enter the internal action name for updating orders. "PLT.Update" is the default value. Enter OMS.Create BO Release to make the creation of a BO release the internal action that occurs when an order is created.
TPLT (Transportation Preparation Lead Time)
Enter the value indicating the time needed to prepare a shipment in days/hours/minutes format.
Transportation Lead Time
Enter the value indicating the time needed to complete a shipment in days/hours/minutes format.
Buyer Review Lead Time
Enter the value indicating the time needed for a buyer review in days/hours/minutes format.
Order Aggregation Lead Time
Enter the value indicating the time needed for order aggregation in days/hours/minutes format.
Default Allocation Priority
Specify the numeric value indicating the priority for lane allocation.
Default Sourcing Priority
Specify the numeric value indicating the priority for lane sourcing.
Cost Per Parcel
Enter the value of a parcel along the shipment line.
Expedited Lead Time
Enter the expedited lead time for a shipment in days/hours/minutes format.
Expedited Order Horizon
Enter the value indicating the expedited order horizon in days/hours/minutes format.
Cost To Expedite
Enter the extra cost added to an expedited shipment followed by a currency UOM. Use the drop-down menu to select an appropriate unit of measure.
Shipping Days Of Week
Select which days of the week a shipment can be handled. Use the checkboxes to select days of the week.
Active?
Select the checkbox to indicate whether or not the Site Lane is active.
Min Order Quantity And UOM
Enter the minimum quantity allowed, followed by a UOM. Use the drop-down menu to select an appropriate unit of measure.
Round Up Partial Orders
Select the checkbox to round up a partial order to the nearest acceptable value.
Must Ship Horizon Days
Enter the number of days to aggregate any order or order forecast with the latest creation date between now and this number of days.
Pull In Horizon Days
Enter the number of days to pull an order or order forecast early by this number of days to be aggregated with orders aggregated under the Must Ship Horizon.
Scale Up Must Ship Horizon Days
Enter the number of alternate days to use for Must Ship Horizon when running Order Aggregation in Scale Up mode. Scale Up is when the engine attempts to take existing orders and add order forecasts to fill up equipment. The Must Ship value is often kept the same, but the Pull In Horizon is extended dramatically.
Scale Up Pull In Horizon Days
Similar to Scale Up Must Ship Horizon Days.
ScaleUp Policy
Enter a policy. An internal class that describes how to rank possible order forecasts that may be pulled in early to fill equipment. By default, this is blank and sorts by time; the earliest order forecast is brought in first. This value may be set to Priority And Days Of Supply Comparator to make this choice based on the relative priority of the order forecasts; it will bring in order forecasts that are needed most first.
Policy Subnet Name
Enter a policy subnet name. The policy subnet name is an arbitrary grouping mechanism for sites allowing them to be part of a Replenishment Policy. A replenishment policy is an alternate replenishment configuration technique where replenishment settings (such as order policy or lead times) may be set in a single object (like a site lane policy object) and dynamically evaluated during run time rather than having to be explicitly set in every site lane object.
Policy Subnet
Use the picker to choose a policy subnet. This value links to a specific policy subnet. Similar to a policy subnet name, but rather than a generic name, it links the site lane directly to a set of replenishment policies that may apply. This is used to reduce the set of possible policies from every policy in the network to only those that may apply to this site.
Site Lane Template
Use the picker to choose a template. The default template to use for replenishment.
Large Equipment Threshold
Enter a value for the maximum space allotted for a shipment; this is used in conjunction with the Maximize Smallest Equipment value to maximize space and smaller equipment.
Maximize Smallest Equipment
Check to maximize smaller equipment space to the fullest potential.
Click the Create button.
A success message appears.