Consolidating Shipments (Load Building)
Consolidating shipments, or load building, allows you to add loads (shipments) to a movement to improve operational efficiency by consolidating products to fill equipment to full capacity. The option to consolidate shipments is available from the following screens under the Transportation menu: Awaiting, Shipment Summary, Search Shipments, Search Movements, and Non-Controlled Shipments. The following procedure shows the Consolidate Shipments option originating from the Awaiting UI. These procedures are similar to those originating from the UI screens listed above.
Complete the following steps to consolidate shipments (load building):
L og in to the ONE system.
Select Menus/Favs > Transportation > Awaiting. In the NEO UI, users can click on the Menus/Favs icon on the left sidebar and type in the name of the screen in the menu search bar. For more information, see "Using the Menu Search Bar."
The Awaiting screen displays.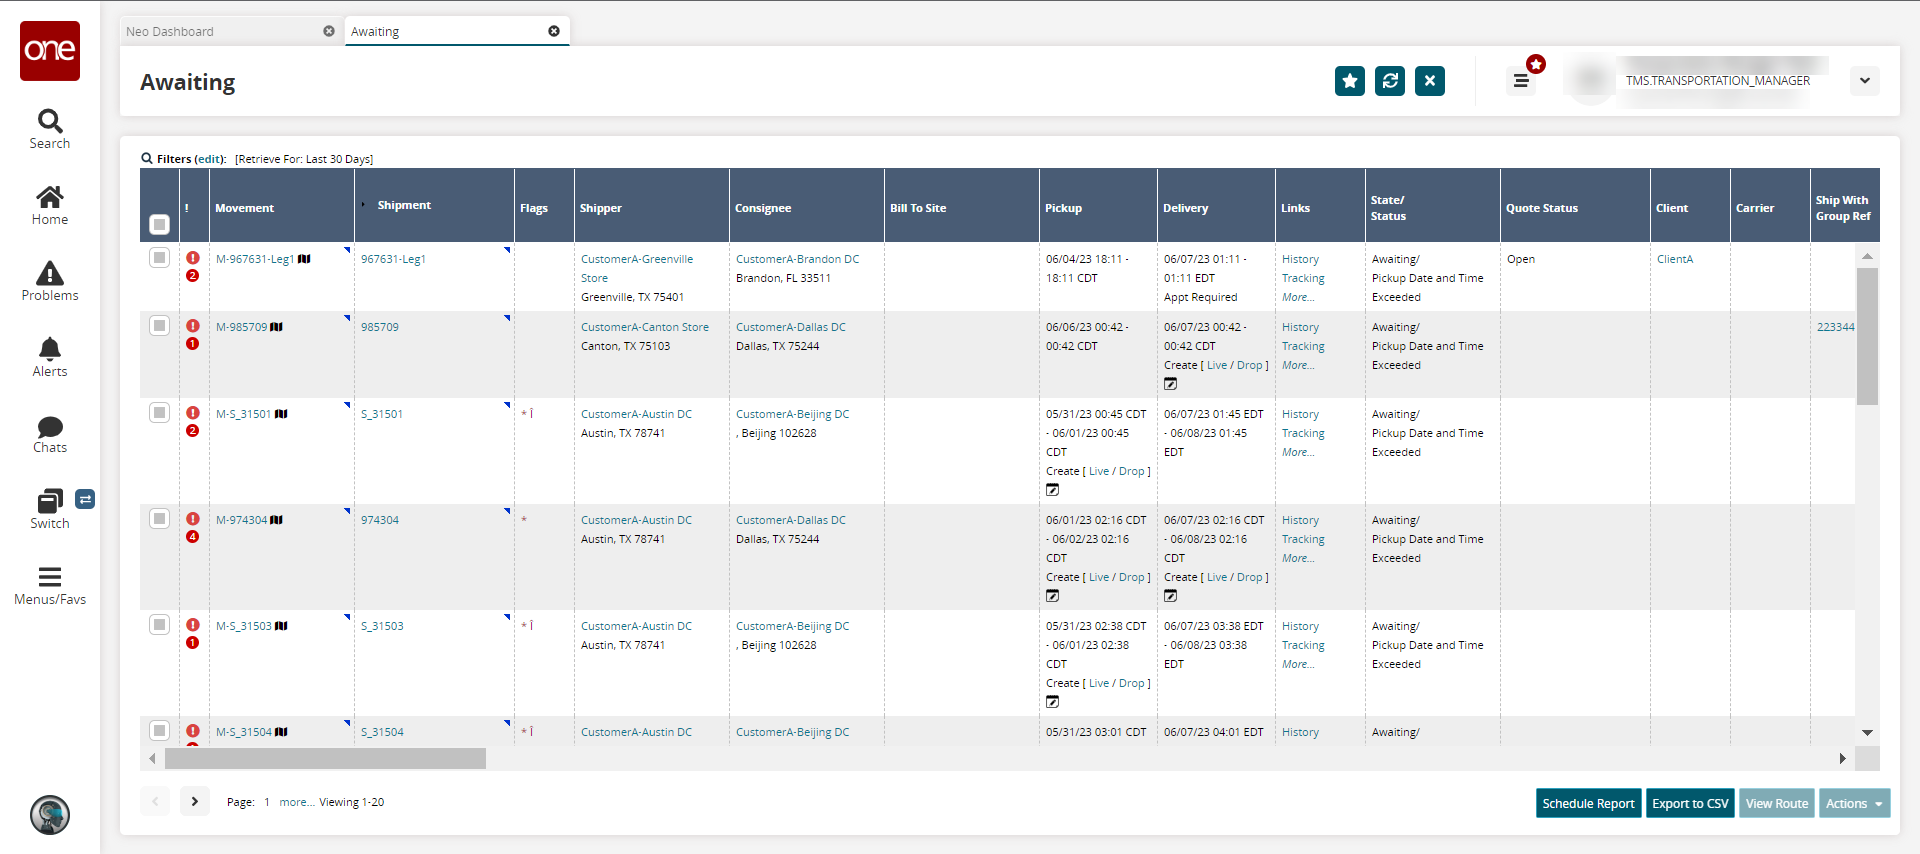
Click the contextual menu (blue triangle) in the upper right-hand corner of a Movement , and then select Consolidate Shipments.
The Consolidate Shipments screen displays with the Header tab displayed.
Header Tab
The Header tab has summary details for total weight, overweight status, carrier, scale weight, state, stops, total volume, over-dimension status, total cost, size, movement type, and next stop ETA.
The summary tab has editable fields for equipment type, service level, instructions, distance, booking number, equipment number, PRO number, total spaces, travel direction, transportation, commodity code, and rating type.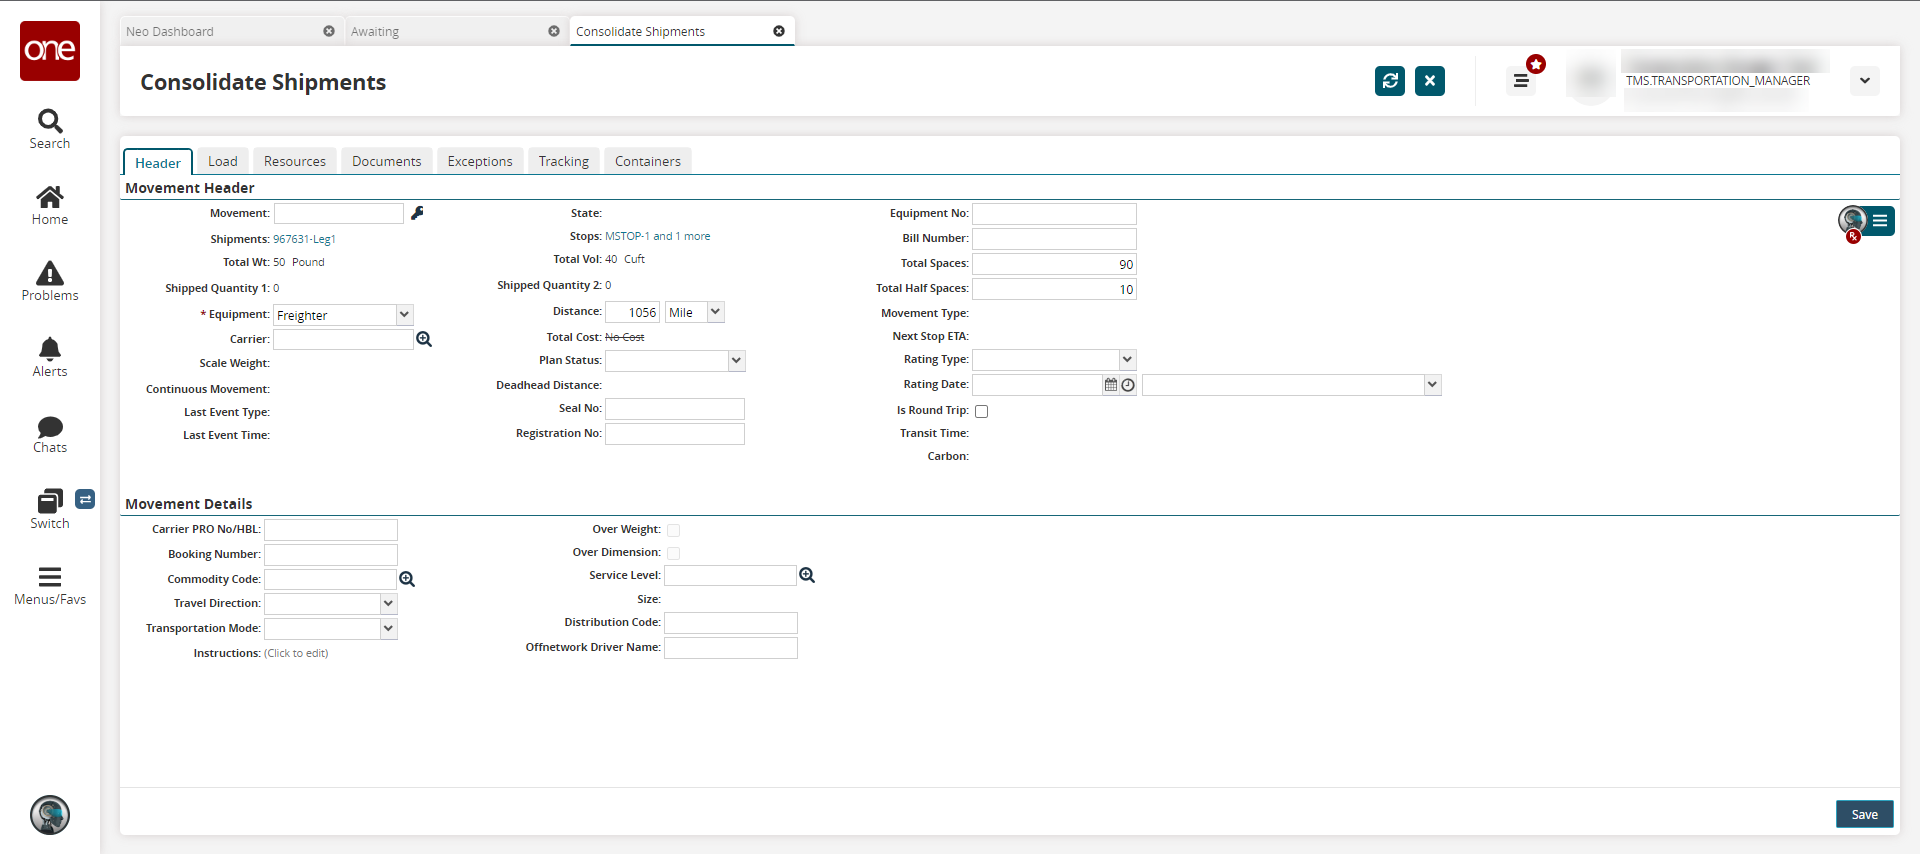
Enter values for fields described in the table below. Fields with an asterisk ( * ) are required.
Section
Field
Description
Movement Header
Movement
Enter an ID or click the key icon to auto-generate a movement number.
Shipments
This field is populated by the system. Click the link to view the shipment details page.
Total Wt
The field is populated by the system.
Shipped Quantity 1
The field is populated by the system.
* Equipment
Select an equipment type from the dropdown list.
Carrier
Select a carrier using the picker tool.
Scale Weight
The field is populated by the system.
Continuous Movement
The field is populated by the system.
Last Event Status
The field is populated by the system.
Last Event Time
The field is populated by the system.
State
The field is populated by the system.
Stops
The field is populated by the system. Click the link to view the stops on the Load tab.
Total Vol
The field is populated by the system.
Shipped Quantity 2
The field is populated by the system.
Distance
Enter a numerical value in the first field, and select a unit of measure from the dropdown list in the second field.
Total Cost
The field is populated by the system.
Plan Status
Select a plan status from the dropdown list.
Deadhead Distance
The field is populated by the system.
Seal No
Enter a seal number.
Registration No
Enter a registration number.
Equipment No
Enter an equipment number.
Total Spaces
Enter the total number of spaces.
Total Half Spaces
Enter the total number of half spaces.
Movement Type
The field is populated by the system.
Next Stop ETA
The field is populated by the system.
Rating Type
Select a rating type from the dropdown list.
Rating Date
Use the calendar and clock tools to select the date and time in the first field. Select the timezone from the dropdown list in the second field.
Is Round Trip
Select the checkbox to indicate this shipment is a round trip.
Transit Time
The field is populated by the system.
Carbon
The field is populated by the system.
Movement Details
Carrier PRO No/HBL
Enter a carrier PRO number or house bill of lading.
Booking Number
Enter a booking number.
Commodity Code
Select a commodity code using the picker tool.
Travel Direction
Select a travel direction from the dropdown list.
Transportation Mode
Select a transportation mode from the dropdown list.
Instructions
Click the (Click to edit) link and enter instructions.
Over Weight
Users cannot edit this checkbox. The system will automatically select this checkbox if the shipment's weight exceeds the maximum limits set for the equipment.
Over Dimension
Users cannot edit this checkbox. The system will automatically select this checkbox if the shipment's dimension exceeds the maximum limits set for the equipment.
Service Level
Select a service level using the picker tool.
Size
The field is populated by the system.
Distribution Code
Enter a distribution code.
Offnetwork Driver Name
Enter an off-network driver's name.
Click the Save button.
You do not have to click the Save button while you are on the Consolidate Shipments screen and moving between tabs. You can click the Save button once you have completed all of your load building tasks.
Load Tab
Click the Load tab.
The values for Weight , Volume , Quantity, and Space show the totals from the shipments listed in the Shipments tab. These values are automatically updated as shipments are added or removed.
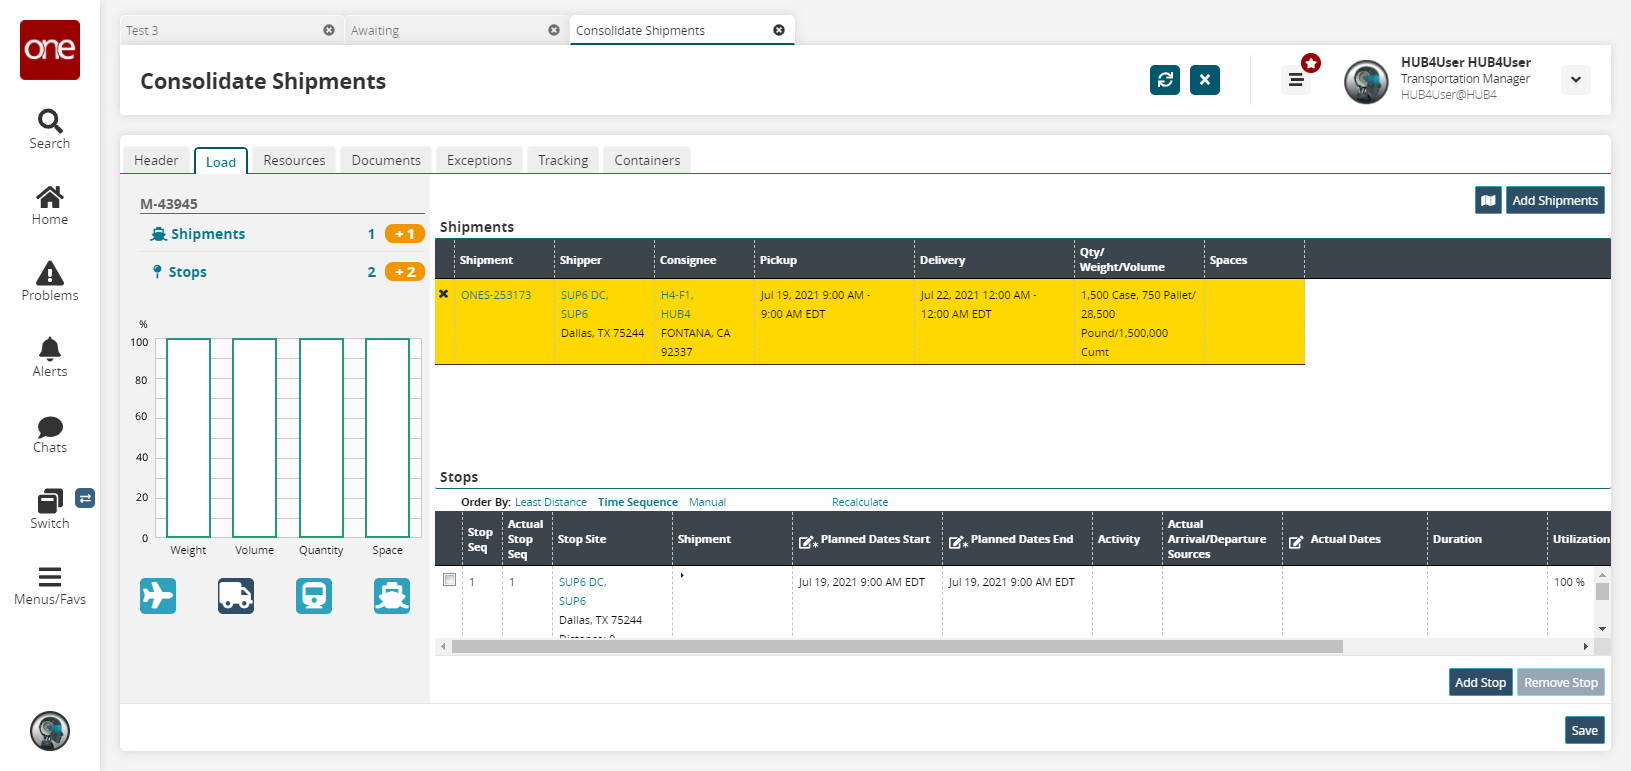
Click the map icon.
A map displaying the shipment routes and stops displays.Click the list icon to return to the previous view.
Click the Add Shipments button to add a shipment.
The Add Shipment Candidates popup displays.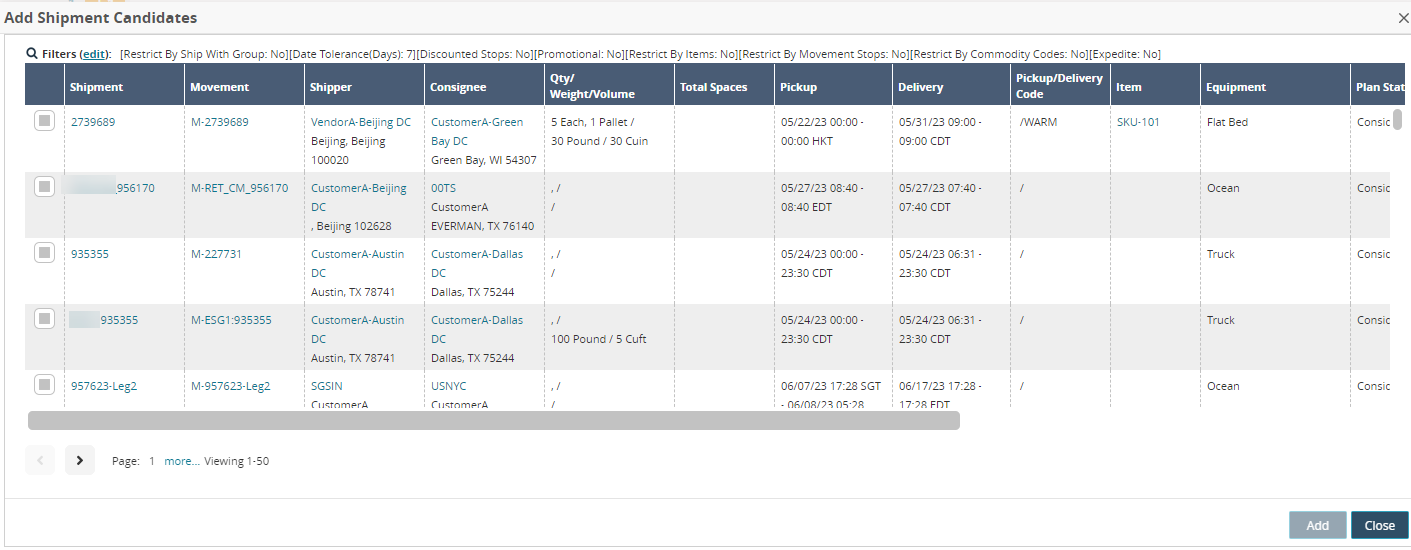
Check the box next to one or more shipments, and click the Add button.
The shipments are added to the Shipments sections.
Please note that the new shipment added to the load must fall within the general route of the original destination and origin sites (Ship From and Ship To), or an error displays.
Click the Add Stop button.
The Add Movement Stop popup displays.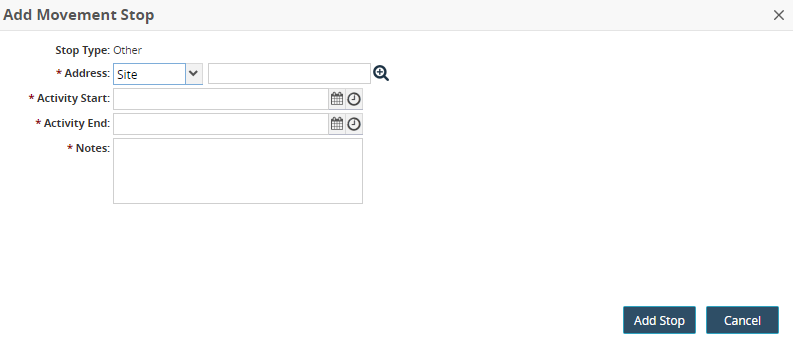
Enter values for fields described in the table below. Fields with an asterisk ( * ) are required.
Field
Description
Stop Type
This field is populated by the system.
* Address
Select the address (location) type from the dropdown list in the first field, and use the picker tool to select the specific location in the second field.
* Activity Start
Use the calendar and clock tools to select the start date and time.
* Activity End
Use the calendar and clock tools to select the end date and time.
* Notes
Add notes for this stop.
Click the Add Stop button.
The stop is added to the Stop section.Click one of the following links for the Order By options: Least Distance, Time Sequence, or Manual. If the Manual option is selected, stops can be re-ordered by dragging and dropping the rows to the desired order.
Check the box for one or more stops, and click the Remove Stop button.
The stop(s) are removed from the table.Click the Save button.
Resources Tab
Click the Resources tab to select resources (drivers, skills, equipment, etc.) for the shipment.
The Resources tab displays.Select an option from the Resource Template dropdown list.
Any existing resource types display under the Requirement Name column. In this example, we have selected Gas Delivery.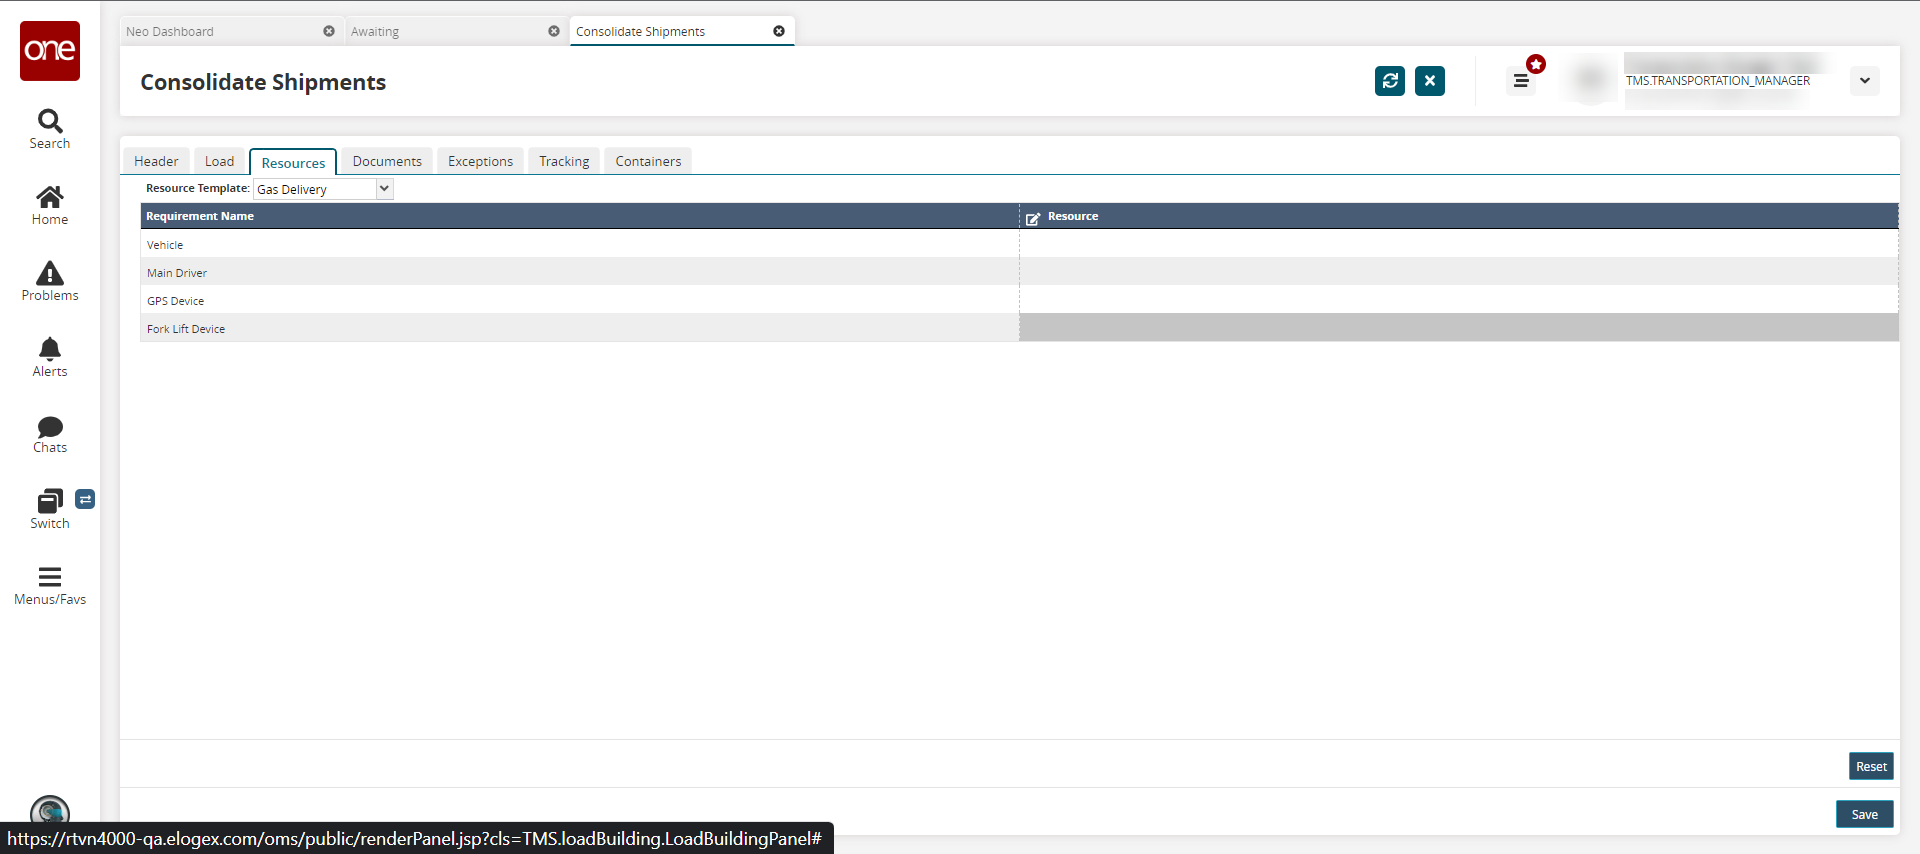
Click the cell for a requirement name under the Resource column.
Use the picker tool to select a resource.
Click the Reset button to remove all resources.
Click the Save button to save the resources.
Documents Tab
Click the Documents tab.
The Documents tab displays.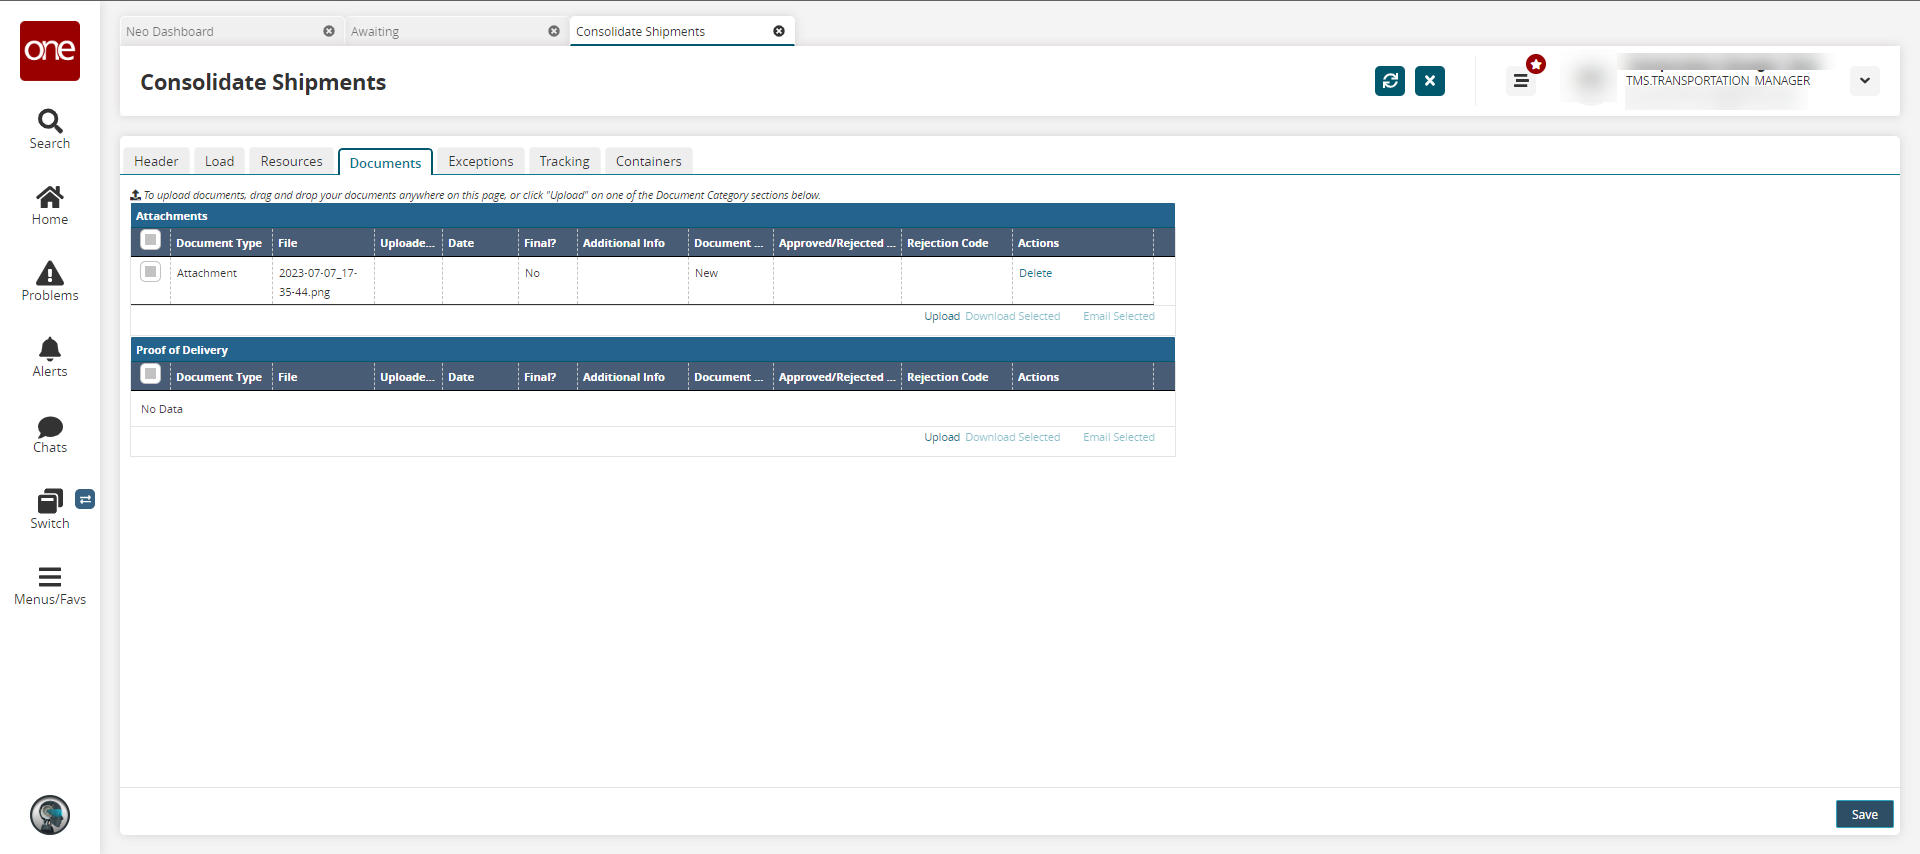
Click the Upload link under any section.
The Upload popup displays.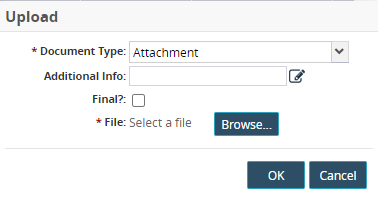
Select an option from the * Document Type dropdown menu.
The options are based on the section where you clicked the Upload link.Click the edit icon (pencil) to add text in the Additional Info field.
Click the checkbox in the Final? field if this is the final version of this document.
Click the Browse button for the * File field and select a document from your computer.
Click the OK button.
Click the checkbox for a document, and then click the Download Selected link to download a document to your computer.
Click the checkbox for a document, and then click the Email Selected link to email this document.
The Email popup displays.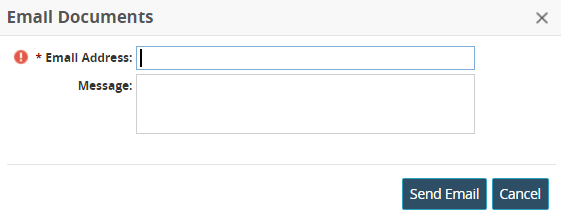
Enter an email in the * Email Address field.
Type a message in the Message text box.
Click the Send Email button.
A confirmation message displays.Click the OK button.
A success message displays.
Exceptions Tab
Click the Exceptions tab.
The exceptions display.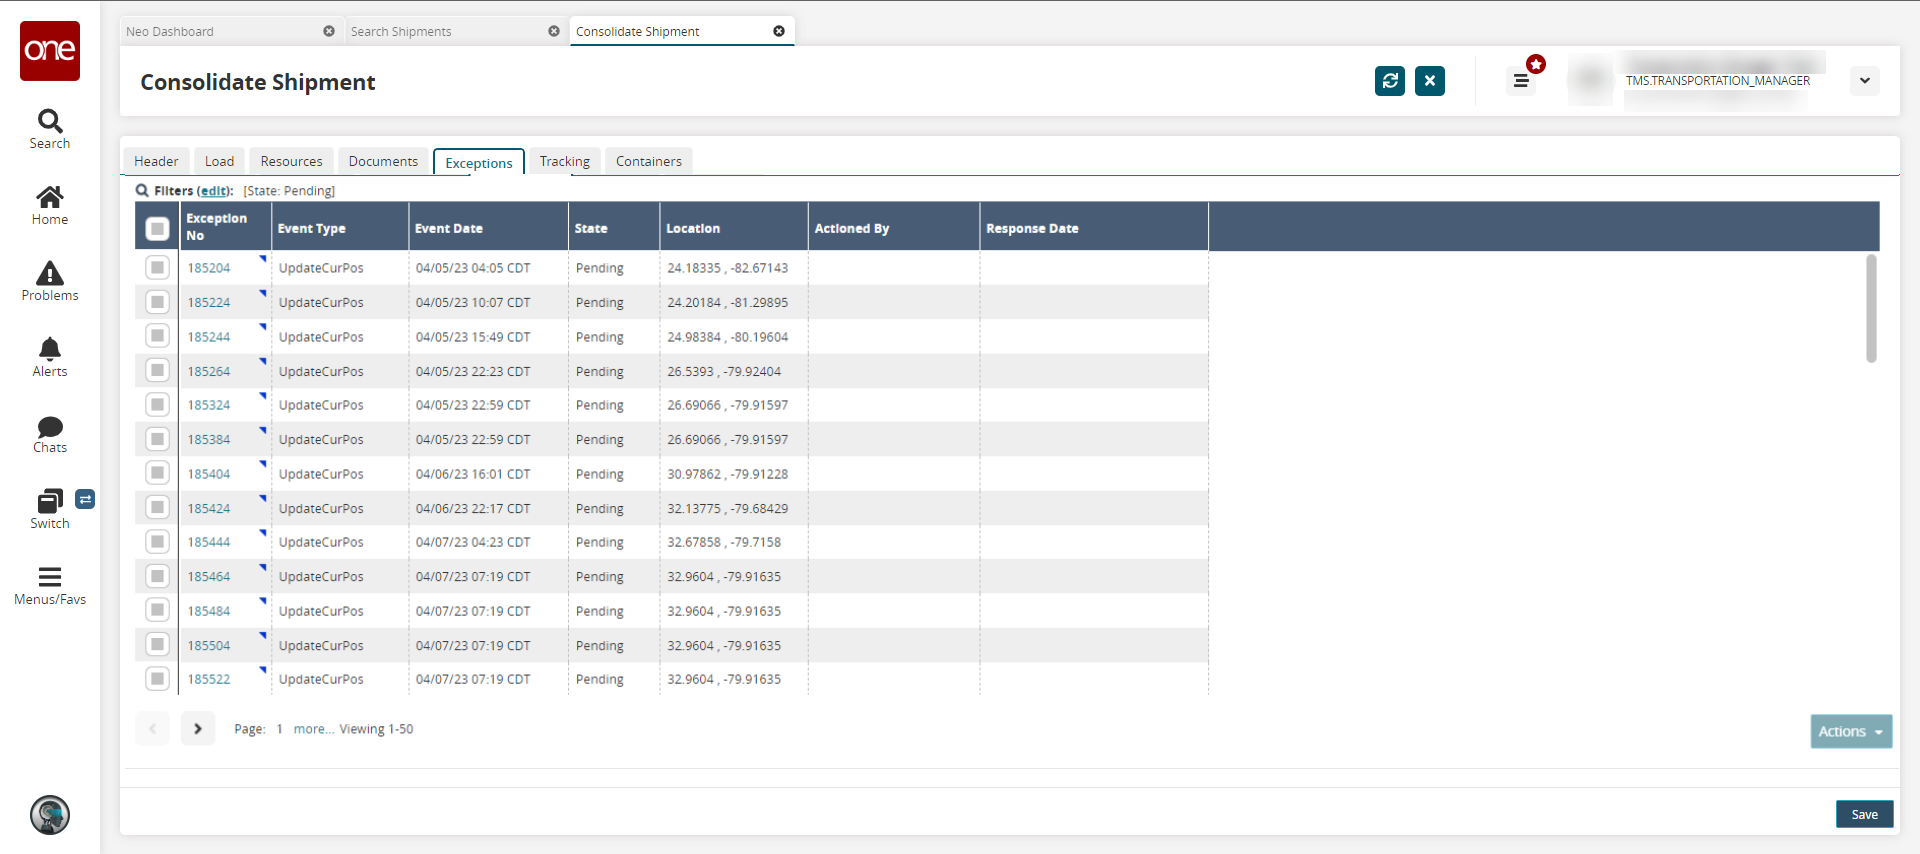
Click the Exception No link to view the exception details page.
Click the contextual menu (blue triangle), and select View Map.
A map view of the movement and shipments displays.Check the box for one or more exceptions, and click the Actions button.
A menu of available options displays.Select Add Comment.
The Add Comment popup displays.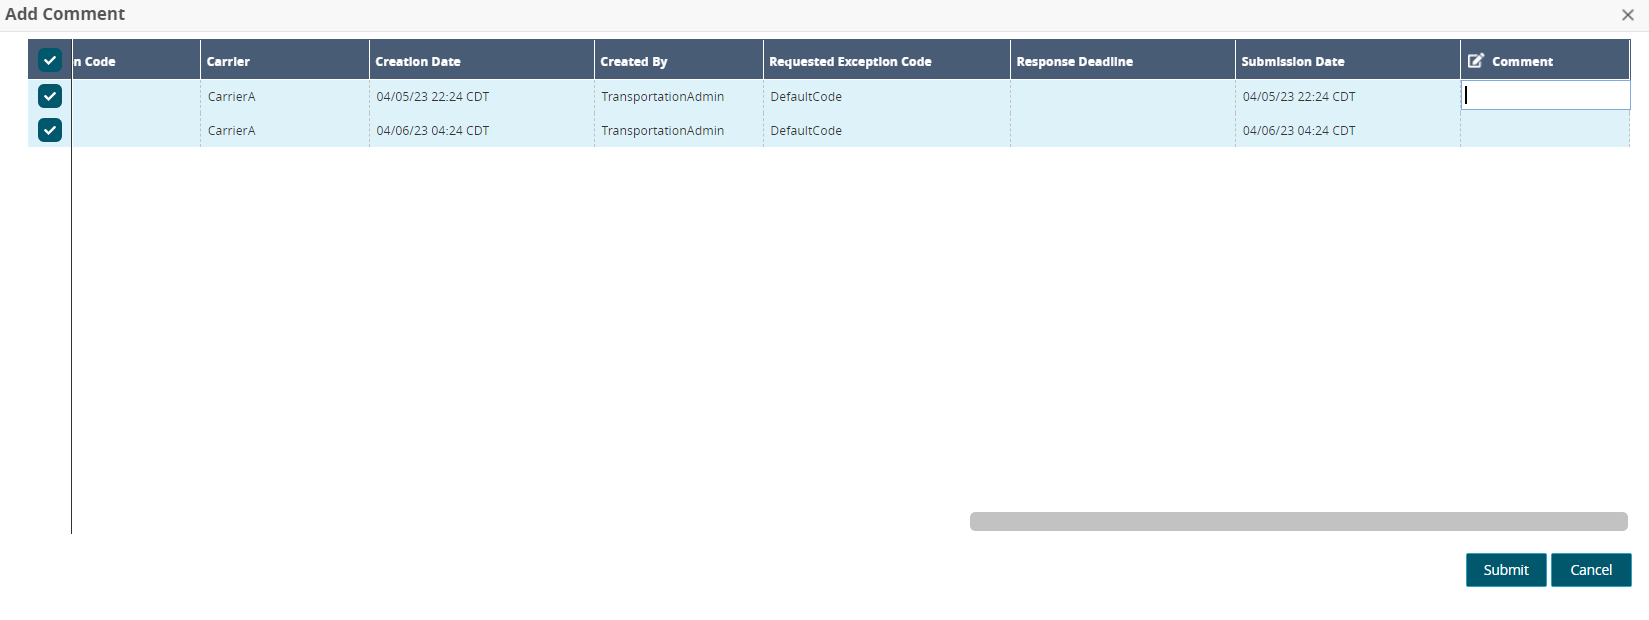
Enter any comments.
Click the Submit button.
A green success message displays.The Cancel, Defer, and Deny options under Actions display a similar popup with a comment box.
Check the box for one or more exceptions, and click the Actions button.
A menu of available options displays.Select Approve.
The Approve popup displays.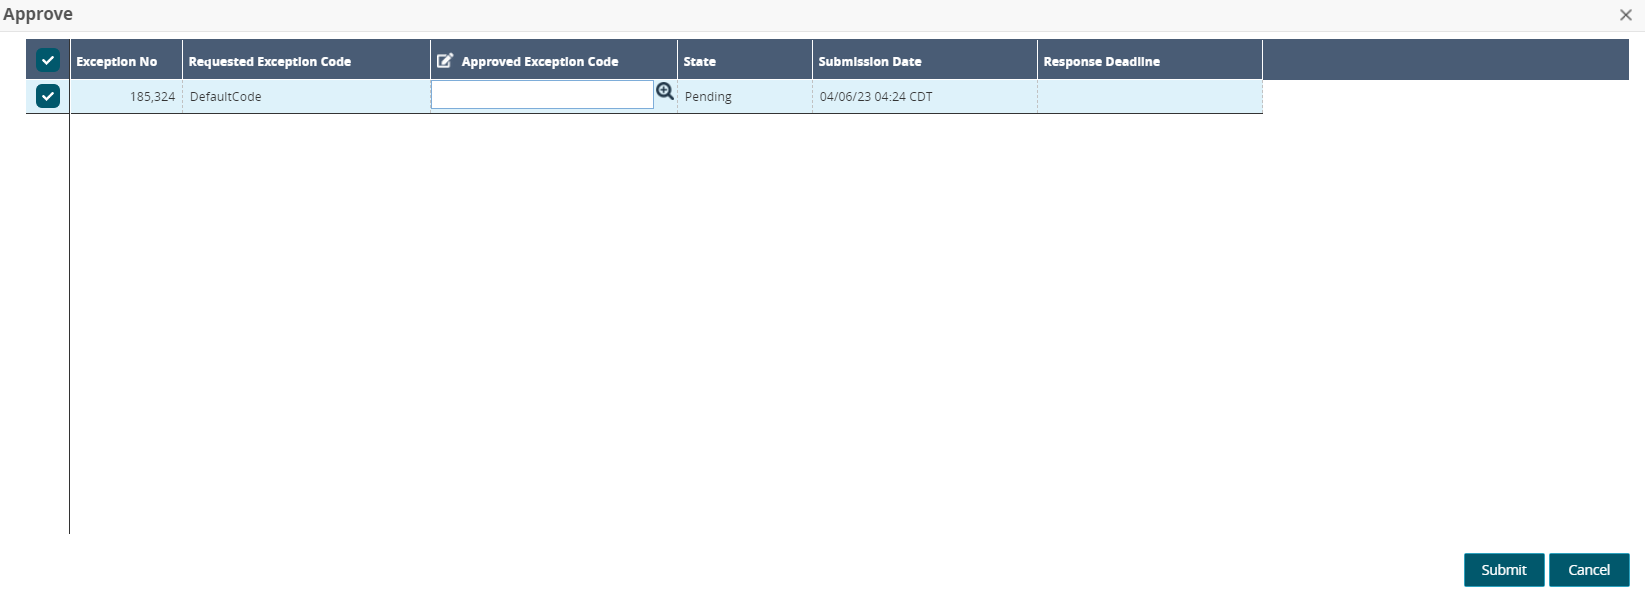
Use the picker tool to select a code for Approved Exception Code.
Click the Submit button.
A green success message displays.
Tracking Tab
Click the Tracking tab.
The Tracking tab displays.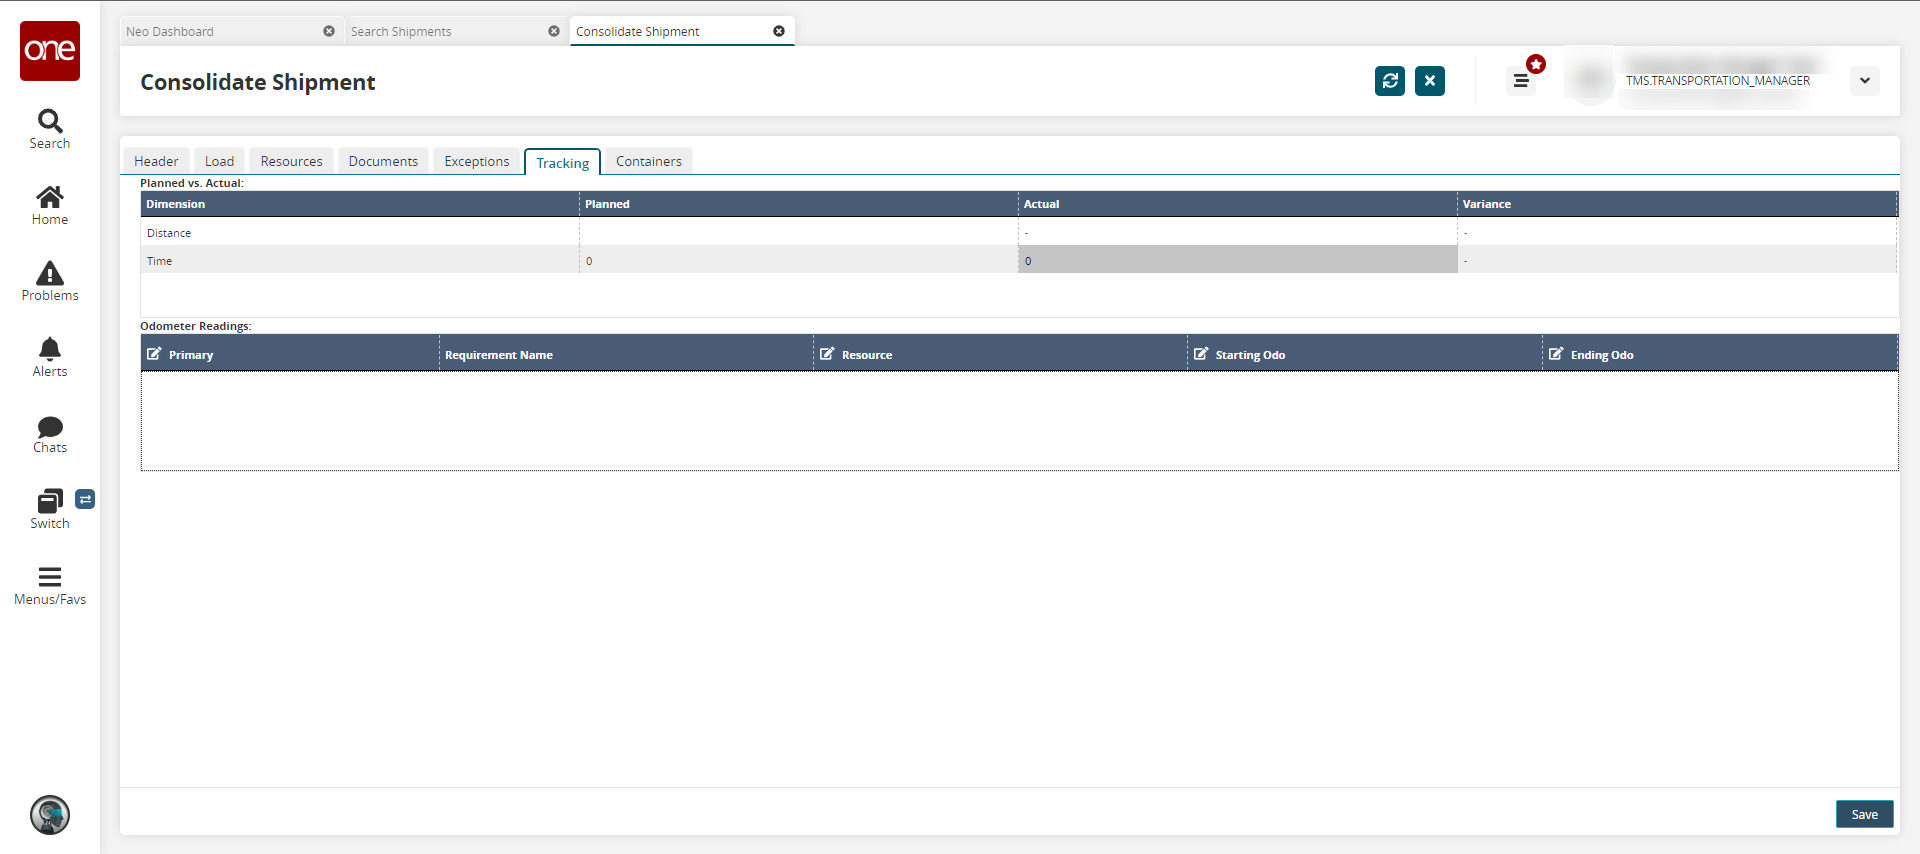
Click the following fields to edit odometer information: Primary, Resource, Starting Odo, and Ending Odo.
Click the Save button to save any changes.
A success message displays.
Containers Tab
Click the Containers tab.
The container details display in a read-only report.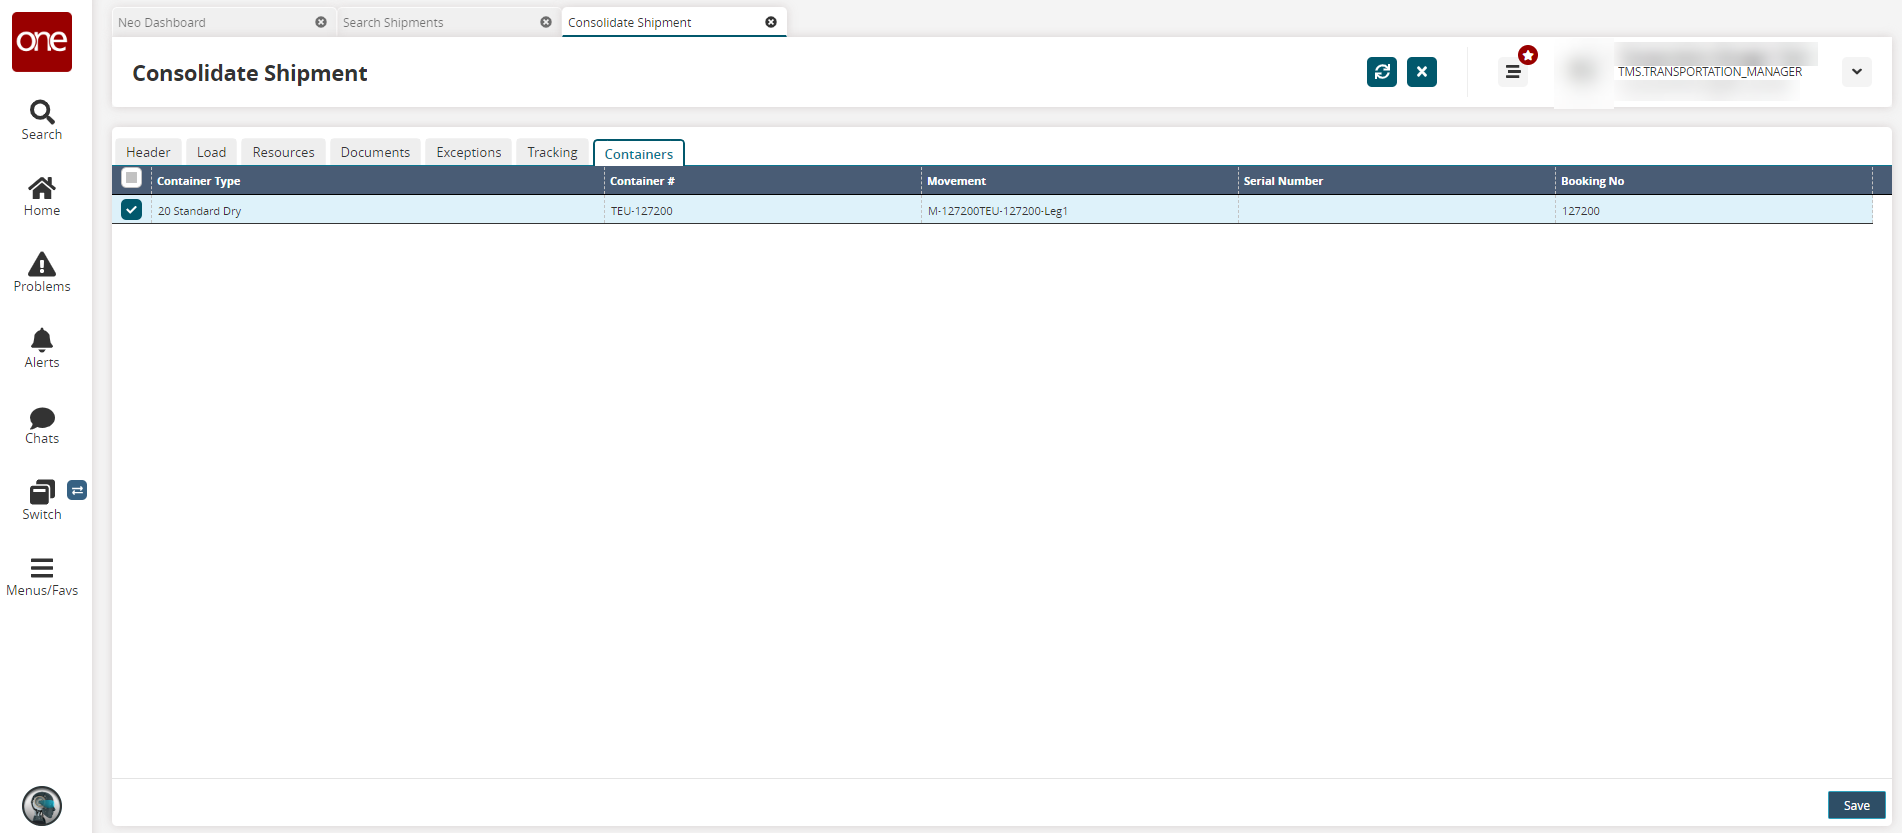
Click the Save button.
A green success message displays.