Creating Singletons
Complete the following steps to create singletons:
L og in to the ONE system.
Click Menus/Favs > Administration > Singleton > Search Singletons.
In the NEO UI, users can click on the Menus/Favs icon on the left sidebar and type in the name of the screen in the menu search bar. For more information, see "Using the Menu Search Bar."
The Search Singletons screen opens.Click the New Singleton button.
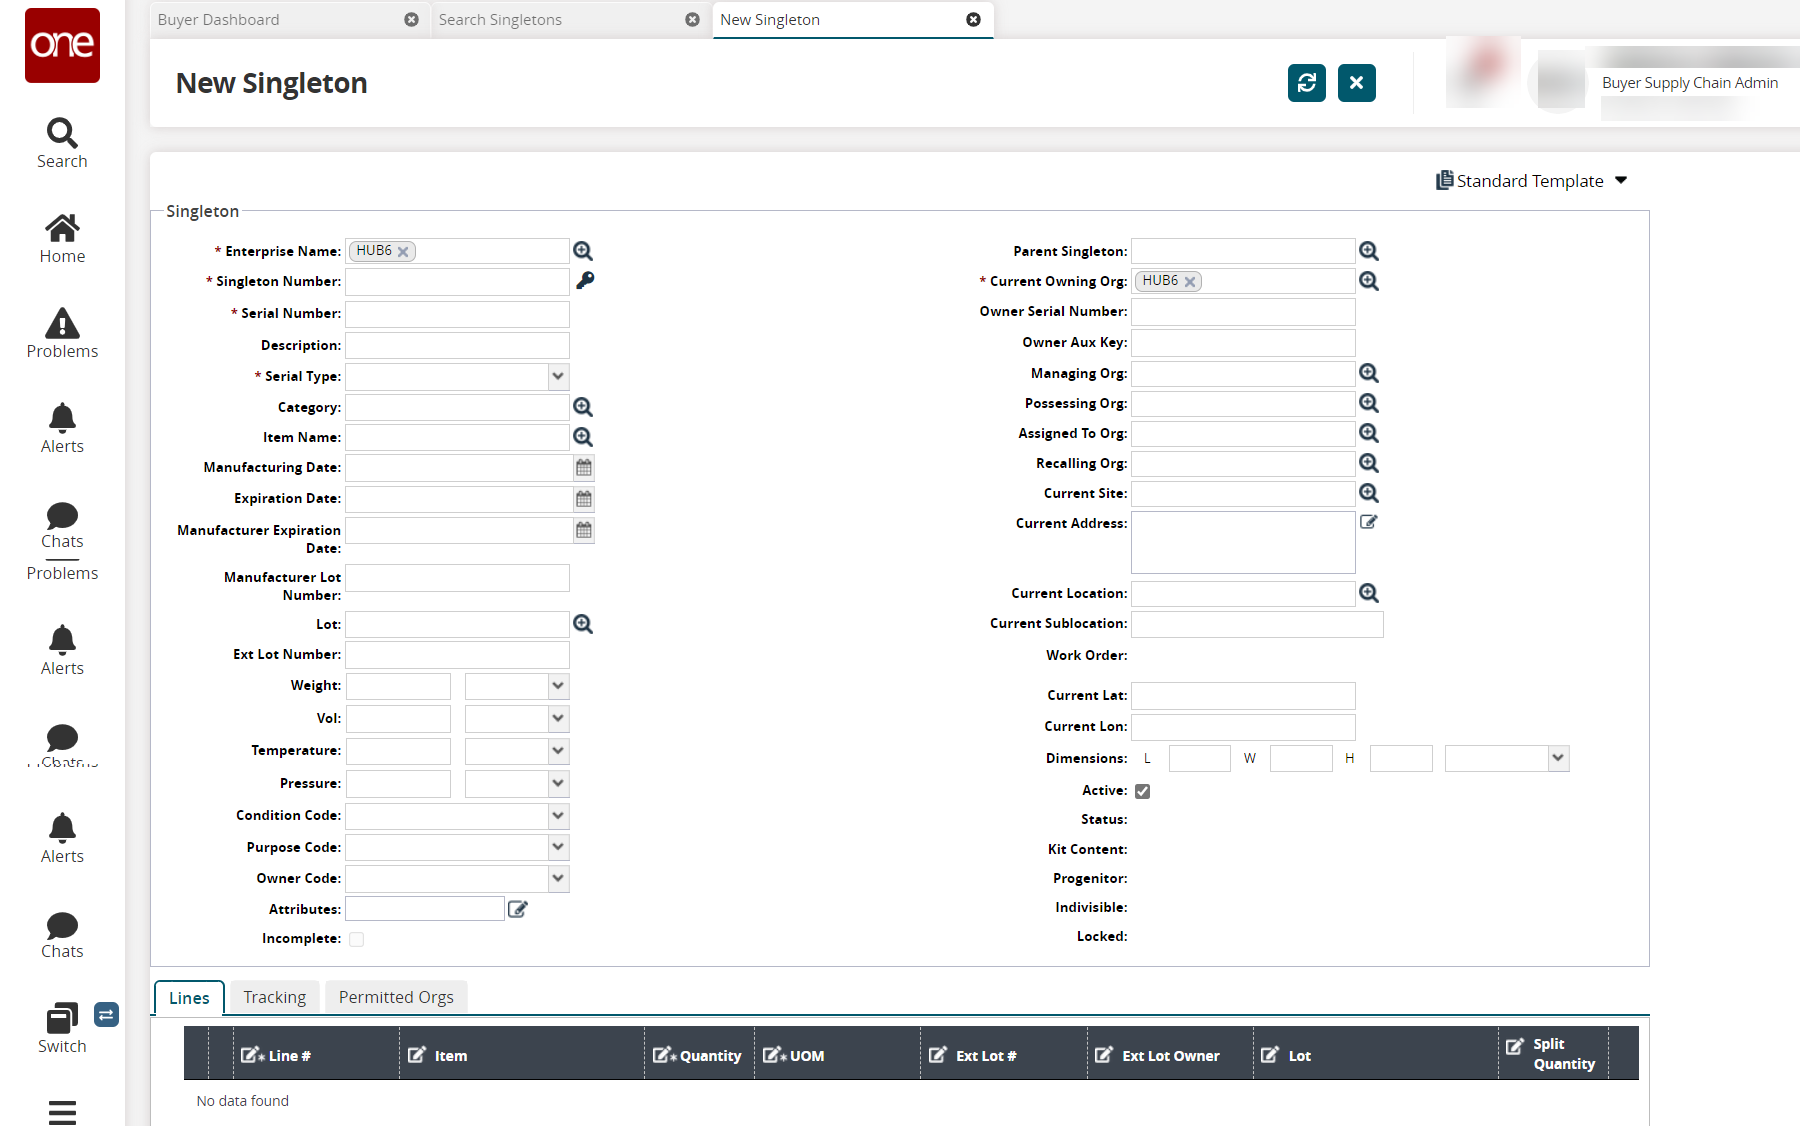
The New Singleton screen opens.
Enter values for fields described in the table below. Fields with an asterisk ( * ) are required.
Field
Description
* Enterprise Name
Begin typing the enterprise name and select an option from the auto-complete suggestions. Or, use the picker tool to select one.
* Singleton Number
Click the key icon to enter a singleton number or type in a singleton number (alphabetic, numeric values, decimal values, and special characters are accepted here).
* Serial Number
Click the key icon to auto-populate the serial number or type in a serial number (alphabetic, numeric values, decimal values, and special characters are accepted here).
Description
Enter a description here.
* Serial Type
Select the serial type from the dropdown list.
Category
Use the picker tool to select from a list of categories or type in a known category name.
Item Name
Use the picker tool to select from a list of item names or type in a known item name.
Manufacturing Date
Use the calendar icon to select a manufacturing date or type in a known date.
Expiration Date
Use the calendar icon to select an expiration date, or type in a known date.
Manufacturer Expiration Date
Use the calendar icon to select a manufacturer expiration date or type in a known date.
Manufacturer Lot Number
Enter a manufacturer lot number.
Weight
Enter a numeric value for weight and select a dimension for the value from the dropdown list.
Vol
Enter a numeric value for volume and select a dimension for the value from the dropdown list.
Temperature
Enter a numeric value and select a dimension as Celsius or Fahrenheit from the dropdown list.
Pressure
Enter a numeric value and select a dimension from the dropdown list.
Condition Code
Select a value from the dropdown list.
Purpose Code
Select a value from the dropdown list.
Owner Code
Select a value from the dropdown list.
Attributes
Use the pencil tool to select from a list of attributes or type in a known attribute name.
Parent Singleton
Use the picker tool to select from a list of parent singletons or type in a known parent singleton name.
* Current Owning Org
Use the picker tool to select from a list of current owing organizations or type in a known current owing organization name.
Owner Serial Number
Enter an owner serial number.
Owner Aux Key
Enter an owner auxiliary key.
Managing Org
Use the picker tool to select from a list of current owing organizations or type in a known current owing organization name.
Possessing Org
Use the picker tool to select from a list of processing organizations or type in a known processing organization name.
Assigned To Org
Use the picker tool to select fro m a list of assigned organizations or type in a known assigned to the organization name.
Recalling Org
Use the picker tool to select from a list of recalling organizations or type in a known recalling organization name.
Current Site
Use the picker tool to select from a current site or type in a known current site name.
Current Address
Use the pencil tool to select a current address or type in a known current address.
Current Location
Use the picker tool to select from a current location or type in a known current location name.
Current Sublocation
Enter a current sublocation.
Current Lat
Enter the current latitude.
Current Lon
Enter the current longitude.
Dimensions
Enter the values of length (L), width (W), and height (H) values and select the dimension from the dropdown list.
Active
Select the checkbox to activate the singleton.
Lines tab
Click the Add link to add a line to the Lines tab. The fields like Line, Item, Quantity, UOM, Ext Lot Owner, Lot, and Split Quantity are editable
Tracking tab
The Tracking Events are available after the singleton is created. This tab lists the Tracking Events available for the Singleton. Click the Export to CSV and Refresh button to export the events into a spreadsheet and refresh the tab
Permitted Orgs
This tab lists the Permitted Orgs available for the Singleton. Click the Export to CSV and Refresh button to export the list into a spreadsheet and refresh the tab
Click the Create button at the bottom of the screen.
The singleton is added to the system.