GLG: Creating Appointment Requests
If no appointments are available in the system when scheduling appointments for controlled and non-controlled shipments or if a different time is required from the appointment times listed, users can create appointment requests. The process is the same for live pickup, live delivery, and drop delivery appointments.
Complete the following steps to create an appointment request:
L og in to the ONE system.
Click the Create Appointment Request button from any of the following screens: New Live Pickup Appointment, New Live Delivery Appointment, Create Drop Delivery Appointment. In the NEO UI, users can click on the Menus/Favs icon on the left sidebar and type in the name of the screen in the menu search bar. For more information, see "Using the Menu Search Bar."
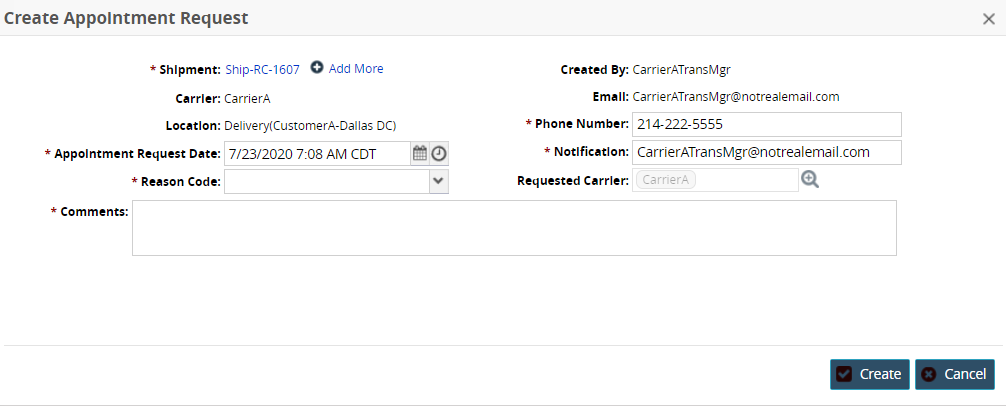
The Create Appointment Request popup window displays.
Fill out the following fields. Fields with an asterisk ( * ) are required.
Field
Description
* Shipment
This field auto-populates with a shipment number. Users can add more shipments by completing the following instructions:
a. Click on the Add more link.Carrier
This field auto-populates with a carrier name.
Location
This field auto-populates with the location for the pickup/delivery.
* Appointment Request Date
Use the calendar and clock tools to select the requested appointment date.
*Reason Code
Select a reason code from the dropdown list.
* Comments
Enter comments into the text box.
Created by
This field is auto-populated with the user's name who is creating the request.
Email
This field is auto-populated with the user's email.
* Phone Number
Enter a phone number.
* Notification
Enter an email recipient for notifications.
Requested Carrier
Use the picker tool to select the requested carrier. This field may not always be available based on values from other fields.
Click the Create button.
A success popup window displays.
Click the OK button.