Header Tab
On the Header tab, users can select a template for the new shipment that controls the fields and tabs that appear on the screen. The instructions below display the fields and tabs for a standard shipment template. Click the Switch link in the top right to select a different template.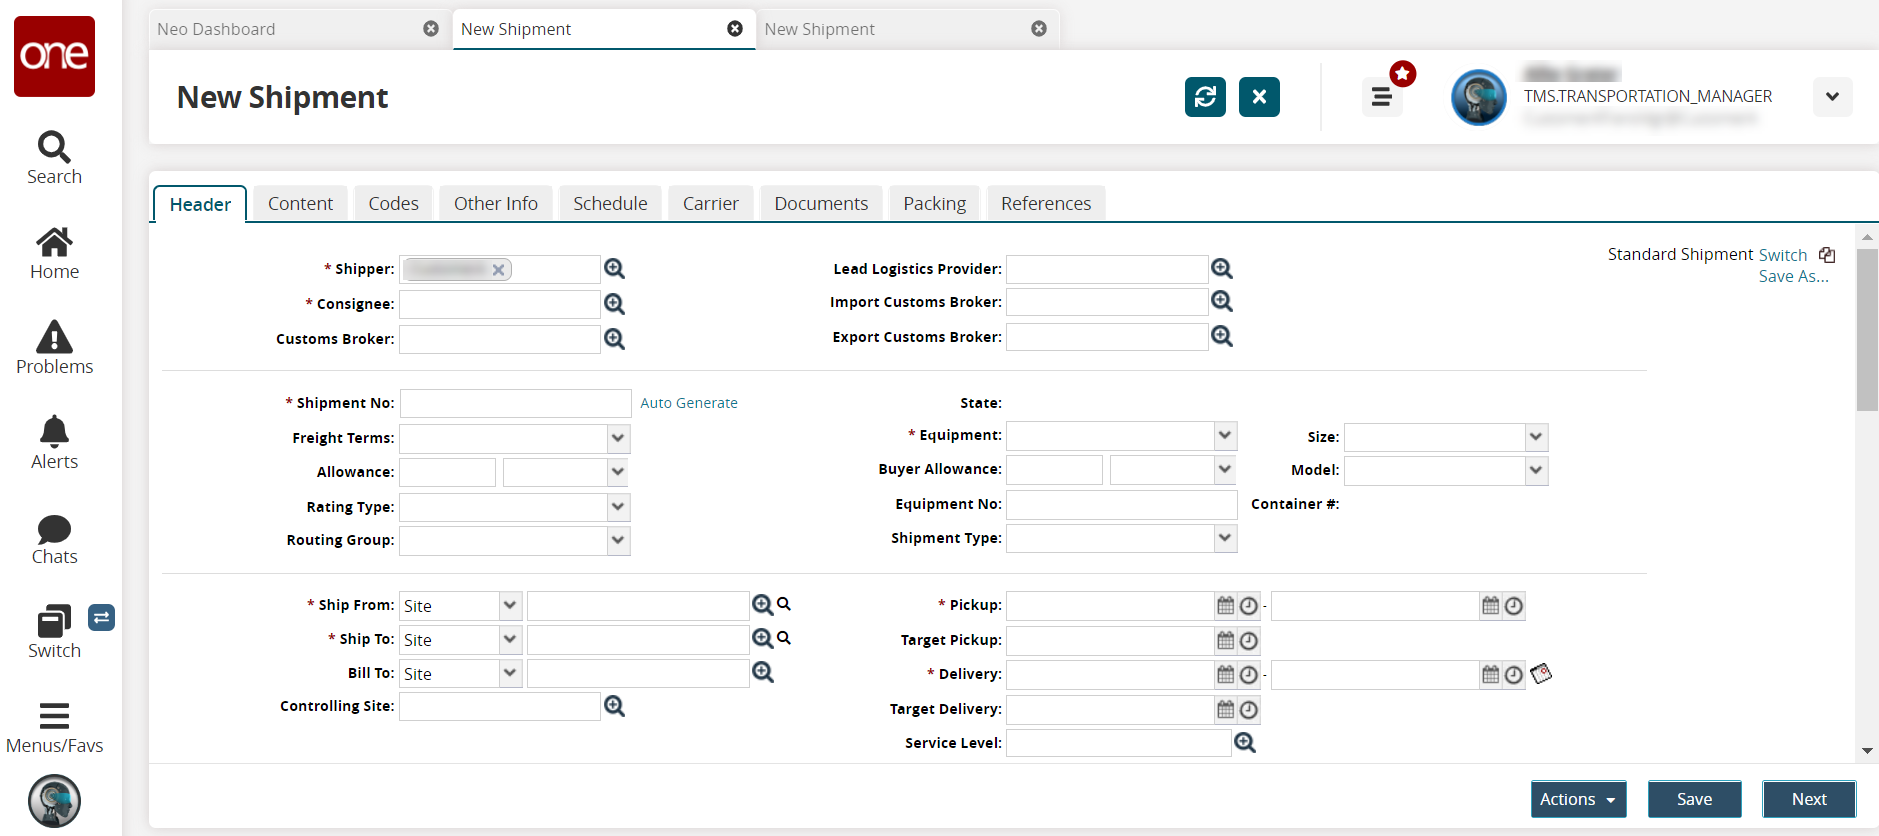
Enter values for fields described in the table below. Fields with an asterisk ( * ) are required.
Section
Field
Description
First section (no title)
* Shipper
Begin typing, and a list of available options will appear, or click the picker tool to select from a list of options.
* Consignee
Begin typing, and a list of available options will appear, or click the picker tool to select from a list of options.
Customs Broker
Begin typing, and a list of available options will appear, or click the picker tool to select from a list of options.
Lead Logistics Provider
Begin typing, and a list of available options will appear, or click the picker tool to select from a list of options.
Import Customs Broker
Begin typing, and a list of available options will appear, or click the picker tool to select from a list of options.
Export Customs Broker
Begin typing, and a list of available options will appear, or click the picker tool to select from a list of options.
Second section (no title)
* Shipment No
Type a shipment number for the new shipment, or click the Auto Generate link for a system-generated number.
Freight Terms
Select a freight term option from the dropdown list.
Allowance
Enter a numerical value for the allowance and select a currency from the dropdown list.
Rating Type
Select a rating type from the dropdown list.
Routing Group
Select a routing group from the dropdown list.
State
The shipment state is displayed here. This field is blank until the shipment is saved and/or moved to a different state.
* Equipment
Select the equipment needed from the dropdown list.
Size
This field auto-populates with the size specified on the Equipment Settings screen for the selected equipment. You can also manually select a size option from the dropdown list. The available size options vary based on the equipment sizes configured in the system.
Buyer Allowance
Type the value of the buyer allowance and select a currency from the dropdown list.
Model
Select a model from the dropdown list.
Equipment No
Type an equipment number.
Container #
The container number will auto-populate once the shipment has been processed.
Shipment Type
Select a shipment type from the dropdown list.
Third section (no title)
* Ship From
Select a ship from location type: Site, Address, or Location.
Begin typing, and a list of available options will appear, or click the picker tool to select from a list of options. In the case of public sites, an additional field becomes available where users can enter the full public site address.
Click the second magnifying glass/picker tool to select the nearest location based on postal code, country, state, or city.
* Ship To
Select a ship to location type: Site, Address, or Location.
Begin typing, and a list of available options will appear, or click the picker tool to select from a list of options. In the case of public sites, an additional field becomes available where users can enter the full public site address.
Click the second magnifying glass/picker tool to select the nearest location based on postal code, country, state, or city.
Bill To
Select a bill to location type: Site or Address.
Begin typing, and a list of available options will appear, or click the picker tool to select from a list of options.
Controlling Site
Begin typing, and a list of available options will appear, or click the picker tool to select from a list of options.
* Pickup
Select a start date and time and an end date and time using the calendar and clock buttons.
Target Pickup
Select a date and time using the calendar and clock buttons.
The Target Pickup date can be derived and populated by clicking the Compute link if enabled in the Transit Time Policy settings. For the Compute link to be available, the From, To, Equipment, and Pickup fields must be populated.
* Delivery
Select a start date and time and an end date and time using the calendar and clock buttons.
Target Delivery
Select a date and time using the calendar and clock buttons.
The Target Delivery date can be derived and populated by clicking the Compute link if enabled in the Transit Time Policy settings. For the Compute link to be available, the From, To, Equipment, and Delivery fields must be populated.
Service Level
Begin typing, and a list of available options will appear, or click the picker tool to select from a list of options.
Fourth section (no title)
Ship With Group
Type a reference number. If this shipment needs to be grouped with other shipments, use the same reference number for all shipments in the group.
Parent Shipment
Type a parent shipment number.
Movement
Select a movement to associate the shipment with.
Followup Shipment
The follow-up shipment number is displayed.
Milestone Process
Begin typing, and a list of available options will appear, or click the picker tool to select from a list of options.
TCN Number
Type a Transportation Control Number.
BOL No/MBL
Type a bill of lading number or master bill of lading number.
Receiving Slip No
Type a receiving slip number.
PRO No/HBL
Type a PRO (progressive) number or house bill of lading.
Order Ref No
Type an order reference number.
Load Reference
Enter a load reference number.
Customer Order Number
Type a customer order number.
Fifth section (no title)
External Contract No
Type an external contract number.
Incoterms
Select an option from the dropdown list and enter a value for the Incoterm (International Commercial Terms) .
Broker Service Level
Select a broker service level from the dropdown list.
SWPM Certified
Select an option from the dropdown list for the Solid Wood Packaging Materials (SWMP) certification.
Container Type
Click the Add link to add a line to the Container Type table. Enter values for the fields described below.
Field
Description
Sequence Number
The sequence number is auto-generated, but the field is editable, and any numerical value is accepted.
Container Type
Enter the container type or use the picker tool.
Count
Enter a numerical value for the count.
Weight
Enter a numerical value for the weight and select a unit of measure from the dropdown list.
Volume
Enter a numerical value for the volume and select a unit of measure from the dropdown list.
Lading Quantity
Enter a numerical value for the lading quantity.
Lading Description
Enter a lading description.
Hazardous
Check the box to indicate that the cargo is hazardous. The field will display Yes or No.
Shipper Owned
Check the box to indicate that the shipper owns the container. The field will display Yes or No.
Container Status
Select the container status from the dropdown list.
Sixth section (no title)
Vehicle No
Enter an alphanumeric value for the vehicle number. You can also enter the vessel's International Maritime Organization (IMO) or Maritime Mobile Service Identity (MMSI) number for easier identification.
IMO is a unique seven-digit reference number assigned to each ship for identification purposes. The IMO number is mandatory for all propelled seagoing vessels with a gross tonnage of 100 tons and above. The IMO number is permanent, meaning it remains unchanged throughout the vessel's life cycle irrespective of changes in ownership, country of registration, name, or flag.
MMSI is a nine-digit number used with marine traffic monitoring systems to identify a vessel. The rules for assigning MMSI are set by International Telecommunications Union (ITU). Unlike the IMO number, MMSI changes when the vessel's flag changes.
To find a vessel's IMO and MMSI numbers, log onto the Vessel Finder website and search for the vessel by name, flag, type, or other attributes like length and gross tonnage (GT). You can see the IMO and MMSI numbers on the vessel details page.
Booking Number
Enter an alphanumeric value for the booking number.
Port Of Loading
Begin typing, and a list of available options will appear, or click the picker tool to select from a list of options.
Port Of Discharge
Begin typing, and a list of available options will appear, or click the picker tool to select from a list of options.
Port Of Entry
Begin typing, and a list of available options will appear, or click the picker tool to select from a list of options.
Stuffing Location
Begin typing, and a list of available options will appear, or click the picker tool to select from a list of options.
Contract Number
Enter an alphanumeric value for the contract number.
Off-Network Schedule
Type an off-network schedule.
EKAER Number
Enter an alphanumeric value for th e Electronic Trade and Transport Control System (EKAER) number.
Cargo Ready Date
Select a date and time using the calendar and clock buttons for the cargo cut-off time.
Ship From Close Time
Select an option from the dropdown list.
Seal No
Enter an alphanumeric value for th e seal number.
ETD Port Of Loading
Select a date and time using the calendar and clock buttons for the estimated time of departure from the port of lading.
ETA Port Of Discharge
Select a date and time using the calendar and clock buttons for the estimated time of arrival at the port of discharge.
ETA Port Of Entry
Select a date and time using the calendar and clock buttons for the estimated time of arrival at the port of entry.
Cargo Cut-Off Time
Select a date and time using the calendar and clock buttons for the cargo cut-off time.
Customs Filling Cut-Off Date
Select a date and time using the calendar and clock buttons for the cargo cut-off time.
Export Customs Number
Enter an alphanumeric value for th e export customs number.
Regulation Type
Select a regulation type from the dropdown list.
Transshipment
Click the Add link. The Transshipment Details popup window appears.
In the Transshipment Port column, click inside the field and use the picker tool to select the port.
In the ETA Transshipment Port column, click inside the field, then click the calendar and clock icons to select the estimated time of arrival (ETA).
In the ETD Transshipment Port column, click inside the field, then click the calendar and clock icons to select the estimated time of delivery (ETD).
In the Vessel Name column, click inside the field and enter the vessel name.
Click the Next button.
The Content tab displays.
See the "Content Tab" section for further instructions.