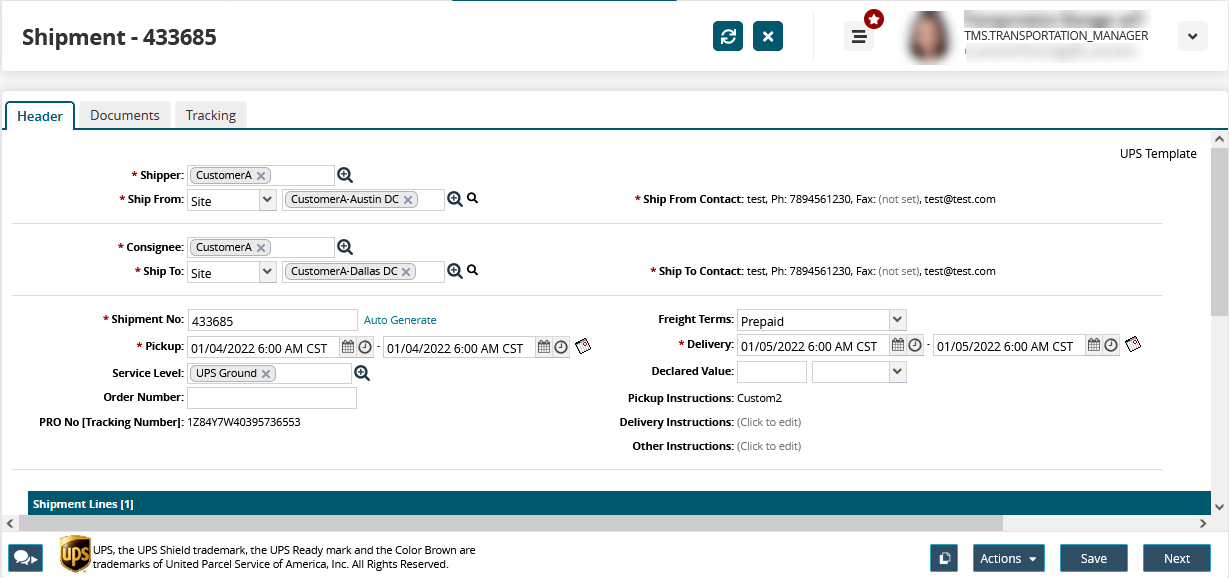
Header Tab
On the Header tab, users provide the basic information required to create a shipment.

Enter values for fields described in the table below. Fields with an asterisk ( * ) are required.
|
Field |
Description |
|
* Shipper |
Type the shipper name or click the picker tool to select one. |
|
* Ship From |
Select a Site, Address, or Location as the shipment origin from the dropdown list. Type the name and address or use the picker tool to select one. |
|
* Ship From Contact |
Enter the name and contact information for the shipper point of contact. You must enter the contact name and phone number. You can provide additional information like Fax and Email. |
|
* Consignee |
Type the consignee name or click the picker tool to select one. |
|
* Ship To |
Select a Site, Address, or Location as the shipment destination from the dropdown list. Type the name and address or use the picker tool to select one. |
|
* Ship To Contact |
Enter the name and contact information for the shipper point of contact. You must enter the contact name and phone number. You can provide additional information like Fax and Email. |
|
* Shipment Number |
Type a shipment number or click Auto Generate to generate a shipment number. |
|
* Pickup |
Use the calendar tool to select the pickup date range. |
|
Service Level |
Type the service level name or use the picker tool to select one. |
|
Order Number |
Type the associated order number, if applicable. |
|
Package Type |
Select a package type from the dropdown list. |
|
PRO No (Tracking Number) |
This field is auto-populated after the shipment is created. |
|
Freight Terms |
Select freight terms from the dropdown list. Available options are Prepaid and Collect. |
|
* Delivery |
Use the calendar tool to select the delivery date range. |
|
Declared Value |
Enter the declared value of the goods shipped and select the desired currency from the dropdown list. |
|
Pickup Instructions |
Enter additional instructions for pickup, delivery, or anything else. |
|
Delivery Instructions |
|
|
Other Instructions |
Adding Shipment Lines
Scroll down to the Shipment Lines section and click Add Line.
The system auto-populates the Line No.
Enter values for fields described in the table below. Fields with an asterisk ( * ) are required.
Field
Description
* Line No
This field is auto-populated by the system. You can edit the system-generated line number if required.
* Wt
Type the shipment line weight and select a unit of measurement from the dropdown list.
Content
Type the line content. Select the appropriate option from auto-complete.
Description
Type a brief description of the line contents.
Hazardous
Click the field to display the Hazardous popup. Select the Hazardous checkbox and enter the following details and click Save:
Contact Info: Enter the name and phone number of a point of contact.
Number: Type the hazardous material number or use the picker tool to select one.
PSN: Type the proper shipping name for the hazardous material or use the picker tool to select one.
Class: Type the hazardous material class or use the picker tool to select one.
Hazmat Packaging Group: Type the applicable hazmat packing group or use the picker tool to select one.
LxWxH
Enter length, width, and height measurements and select a unit of measurement from the dropdown list.
Vol
Enter the line volume and select a unit of measurement from the dropdown list.
Declared Value
Enter the declared value of the shipment line and select a currency from the dropdown list.
Cost Codes
Type the applicable cost codes.
Repeat Step 2 to add more shipment lines.
In the Additional Services field, select additional UPS services.
Click Carrier Options and select a suitable UPS service level.
Click Save to save the new shipment and come back to it later. Or,
Click Next to go to the Documents tab.