Managing Sites
Complete the following steps to search sites:
Log in to the ONE system.
Click Menus/Favs > Administration > Sites > Search Sites.
The Search Sites screen opens.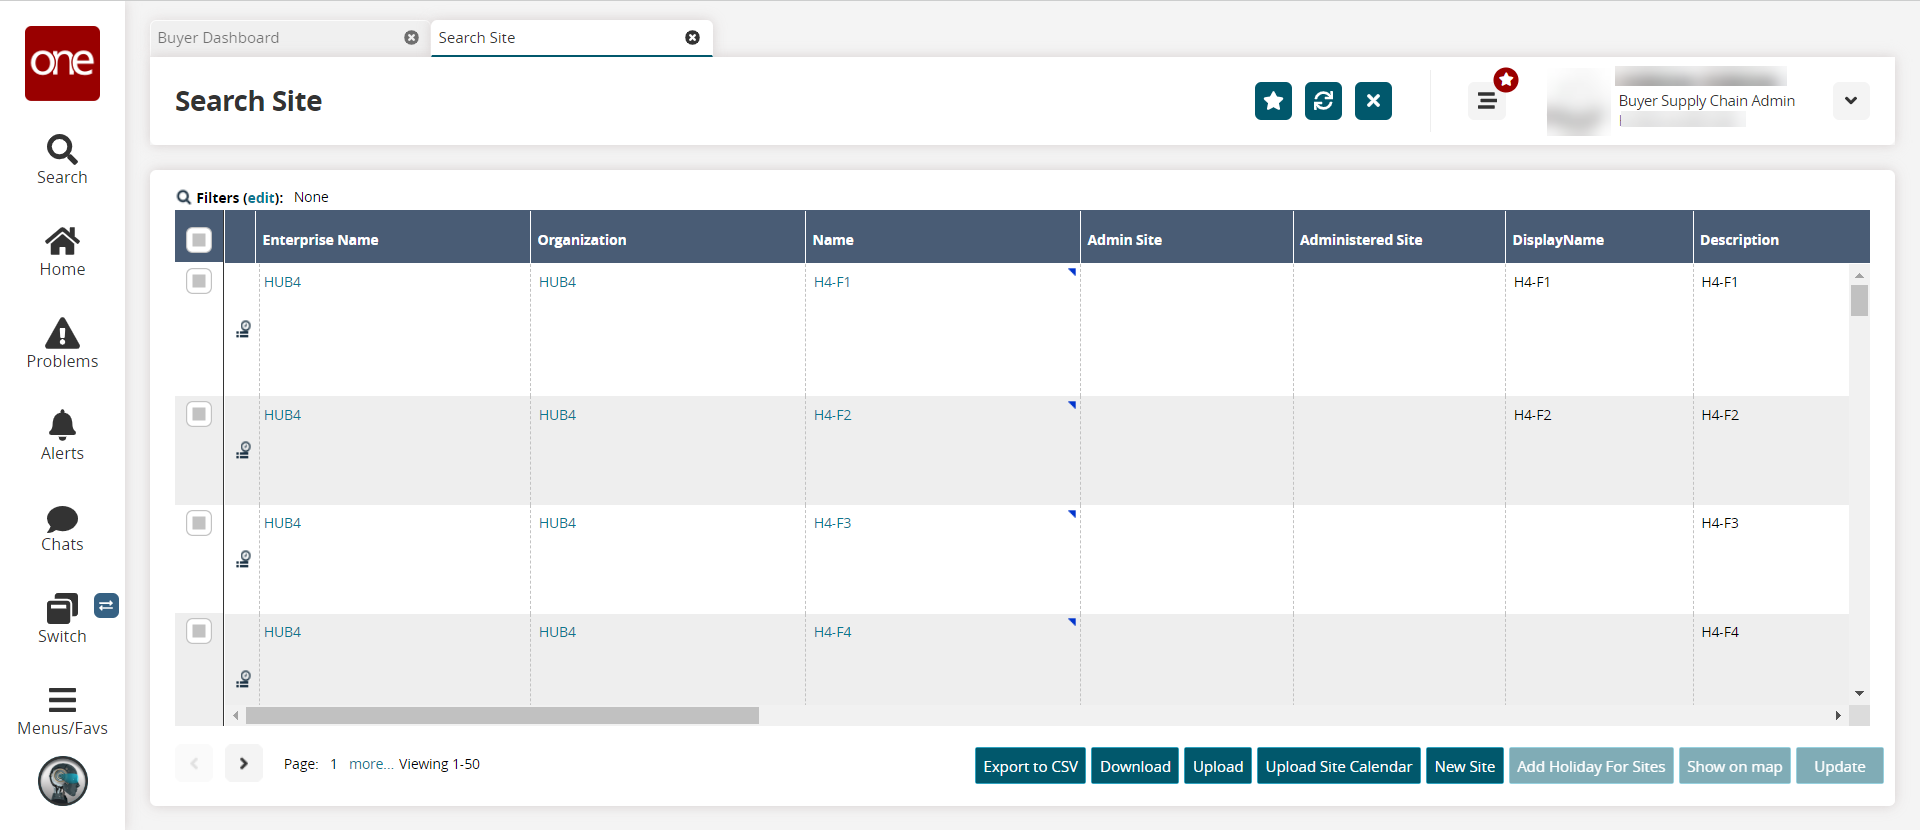
To reduce the quantity of sites in the list, click the Filters button.
The filter box appears.In the Site Name box, type the site name of a site.
In the Loc Reference box, type the local reference of the site.
In the Country operator list, select an option: Equal or Not Equal.
In the Country box, type a country option.
Select the State and City.
In the Billing, Shipping, and Active? lists, select an option: Yes, No, or blank.
Click the Search link.
A table showing sites matching the search criteria appears in the Sites tab.You can view and edit details about site policy settings.
Click a Site link for a site.
The <site name> tab appears showing details about the selected site with the default policy setting.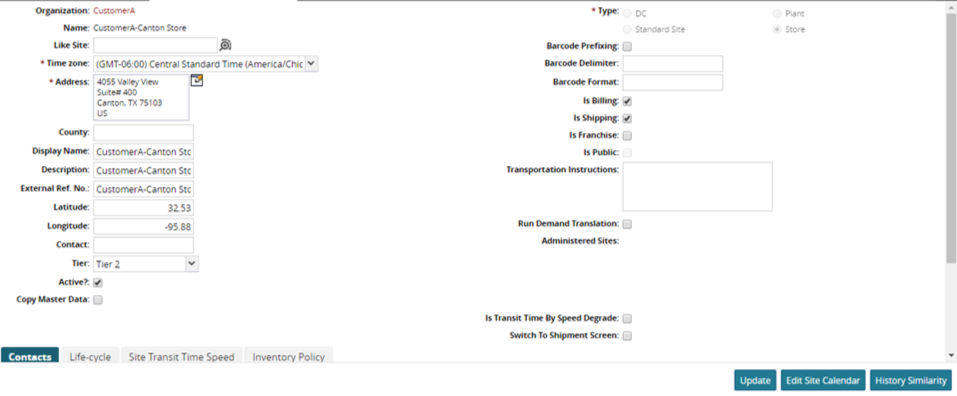
General
As required, you can edit the Time Zone, Description, External Ref. No., Address, Longitude, Latitude, and the selection for the Shipping and Billing check boxes.
In the Facility Fee Amount box, type the fee amount for the site.
In the Facility Fee Currency box, type the fee currency for the site.
In the Facility Fee Per UOM box, type the fee per UOM for the site.
In the Throughput Rate, type a rate value for the site.
In the Throughput Rate UOM, type a UOM for the throughput rate.
In the Throughput Rate Duration list, select a rate duration option for the site.
If pickup appointments are required for the site, select the Pickup Appointment Required check box.
If delivery appointments are required for the site, select the Delivery Appointment Required check box.
In the Shipping Contact Name box, type the name of the shipping contact.
In the Shipping Contact Phone Number box, type the phone number of the shipping contact.
In the Shipping Contact Mobile box, type the mobile phone number of the shipping contact.
In the Shipping Contact Email box, type the email of the receiving contact.
In the Shipping Contact Fax box, type the fax number of the shipping contact.
In the Receiving Contact Name box, type the name of the receiving contact.
In the Receiving Contact Phone Number box, type the phone number of the receiving contact.
In the Receiving Contact Mobile box, type the mobile number of the receiving contact.
In the Receiving Contact Email box, type the email of the receiving contact.
In the Receiving Contact Fax box, type the fax number of the receiving contact.
In the Billing Contact Name box, type the name of the billing contact.
In the Billing Contact Phone Number box, type the phone number of the billing contact.
In the Billing Contact Mobile box, type the mobile number of the billing contact.
In the Billing Contact Email box, type the email of the billing contact.
In the Billing Contact Fax box, type the fax number of the billing contact.
In the Special Instructions box, type a note about the site.
Note
If tender expiration time is not defined at the enterprise level, then the tender expiration time for a given load is based on the first pickup site's tender expiration time.
Select a duration for Tender Expire Time Duration. Type values for Days, Hours, and Minutes, and then click OK.
In the Default Dock Door Count, type a default value for the dock door count.
Click Save.
Basic Policies
This policy defines that when combining orders or shipments for a single appointment, the order or shipment with either the earliest target delivery date or the largest weight drives the application of policies by the Appointment Scheduling Engine.
Click the Basic Policies tab.
The Basic Policies form appears.In the Shipment Combination Rule list, click an option for shipment combination rule:
Earliest target delivery date
Largest by weight
Largest by volume
Largest by piece
Note
The Shipment Combination Rule specifies whether to drive the appointment time calculation based on the shipment with the heaviest load or earliest target delivery date.
The appointment time calculation is based on the attributes associated with the primary shipment.
Example: Only the appointment code from the shipment with the heaviest weight is taken into account.
Example: If two shipments from multiple vendors travel on the same truck, vendor rules based on the vendor or vendor ID associated with the shipment with the heaviest weight are applied.
The target delivery dates for all combined orders or shipments must be within the time tolerance of the dock door group.
In case of a tie, the Appointment Scheduling Engine picks the first shipment.
Click Save.
A success message appears in an information box above the Basic Policies form.
Shipping Hours
This policy defines the shipping hours for the site.
Click the Shipping Hours tab.
The Shipping Hours form appears.Add a new shipping hours setting using one of the following options:
To add a new shipping hours setting, click New.
To add a new shipping hours setting based on an existing template, click New From Template.
Click New or New from Template. The shipping hours form appears.
Note
If you clicked New from Template, click the Select from Template list, and then select a template option. The template will populate the schedule.
In the Name box, type a name for this shipping hours setting.
Select start and end dates for the Date Range.
In Partner, select a partner.
For each date pattern under the Day of Week, click the Start Time Time button to display the Time list, and then click a time from the list.
Repeat the previous step for End Time.
You can quickly copy and paste a date pattern to another row using the Copy and Paste buttons on the right side of each row.To add a date pattern to a day of the week, click the Add Pattern button.
Another date pattern row appears for the selected day of the week.Repeat the previous steps to select Start Time and End Time for the new date pattern.
As required, repeat the previous steps for each additional date pattern.
Click Save.
The new shipping hours setting name appears in the Shipping Hours table.
Exception Calendar: Certain sites may have limited labor or resource availability for specific days, such as weekends. Because of this, they may need to prioritize the hours dedicated to loading or unloading shipments for specific partners by operating extended hours for these partners. Exception Calendars are defined for a particular partner on a given site. If an Exception Calendar exists for the partner on a shipment being planned, this calendar will extend the default shipping or receiving calendar. To define an exception calendar for shipping, select a partner by typing a partner name in the Partner box or searching for a partner name on the Select Partners dialog box, and then add a new shipping hours setting using the procedures described in steps 42 through 53.
Receiving Hours
Click the Receiving Hours tab.
The Receiving Hours form appears.As required, add receiving hours settings.
Site Holidays
You can define holidays that are observed at a site.
Click the Site Holidays tab.
The Site Holidays form appears.To add a new site holiday, click Add Line.
A new holiday row appears on the form.
Select a date for the Holiday Date.
In the Description box, type a description for this holiday.
Click Save.
A success message appears above the list of holiday dates.
Static Routes
You can define static routes at a site.
Click the Static Routes tab.
The Static Routes form appears.To add a static route, in the Static Routes form, click the Actions button, and select the Create Static Route option.
The New Static Route tab appears.In the Directionality list, select a directionality option: Inbound or Outbound.
In Equipment, select an equipment type.
In Resource, select a resource .
In the Schedule Day list, select a day of the week option.
In the Schedule Time list, click the Time button to display the Time list, and then click a time from the list.
Click Save.
A success message appears.To add stops to the route, click the Add Line button.
A new stop line appears.In Stop, select a stop site.
In Arrival Day, Arrival Time, Departure Day, and Departure Time, select the desired days and times.
Click Save.
The new stops appear on the Static Route tab.
Deactivate Sites
You can deactivate a site.
To deactivate sites:
In the Site: <site name> tab, click Deactivate.
A success message appears in the information box.Click Close to close the tab.