Creating a New Message Destination
Users can select SFTP, HTTP, or EMAIL destination types which can be used as Integration Subscription destinations. For convenience, message destinations can also be created within the Integration Subscription screen using the "Add new destination" link.
Complete the following steps to create a new integration subscription:
Log in to the ONE system.
Click Menus/Favs > Integration Subscription Group > Create Integration Subscription.
The Create Integration Subscription screen displays.See the "Creating a New Integration Subscription" procedure in the Developer Network Documentation.
In the Destinations field, click the Add new destination link to create a new message destination.
The New Message Destination popup window displays.By default, the Destination Type field value is EMAIL.
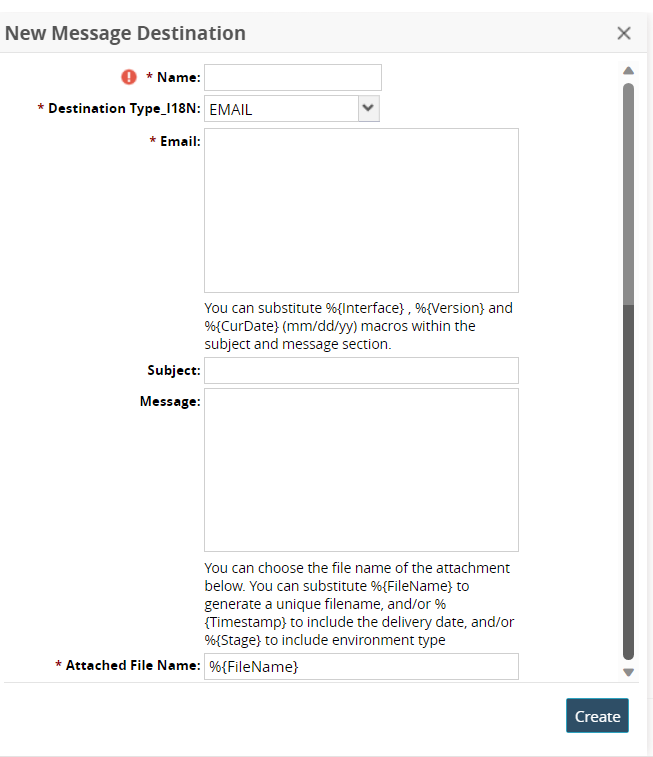
Enter values for the fields as described in the table below. Fields with an asterisk ( * ) are required. The below table describes the fields when the Destination Type is EMAIL.
Field
Description
* Name
Enter a name for the message destination.
* Destination Type _I18N
The EMAIL option is selected from the dropdown menu.
* Email
Enter an email.
Subject
Enter a subject.
Message
Enter a message.
* Attached File Name
Enter the attached file name.
Select SFTP from the dropdown list in t he Destination Type field.
The New Message Destination popup window displays different fields related to SFTP.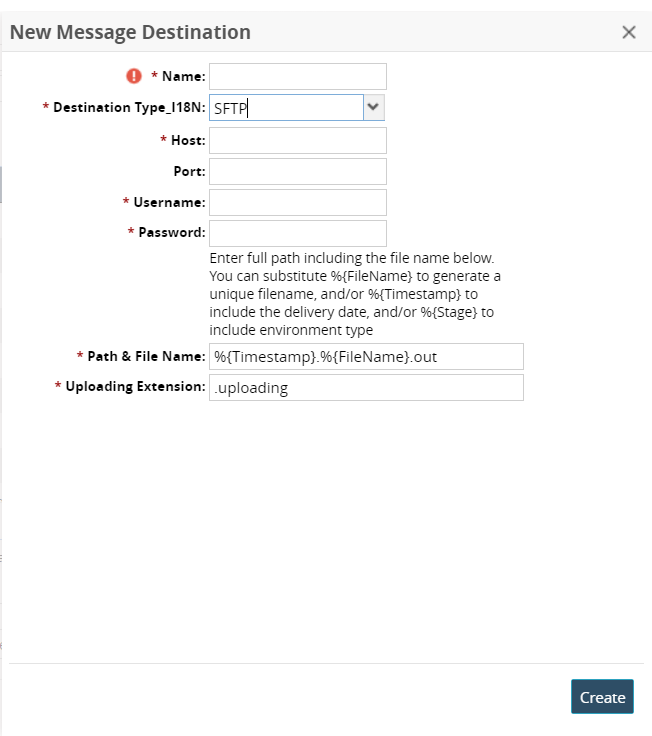
Enter values for the fields as described in the table below. Fields with an asterisk ( * ) are required. The below table describes the field when Destination Type is SFTP.
Field
Description
* Name
Enter a name for the message destination.
* Destination Type _I18N
The SFTP option is selected from the dropdown menu.
* Host
Enter a host name.
Port
Enter a port.
* Username
Enter a username.
* Password
Enter a password.
* Path & File Name
Enter a path and file name.
* Uploading Extension
Enter an extension for uploading the file.
Select HTTP from the dropdown list in t he Destination Type field.
The New Message Destination popup window displays different fields related to HTTP.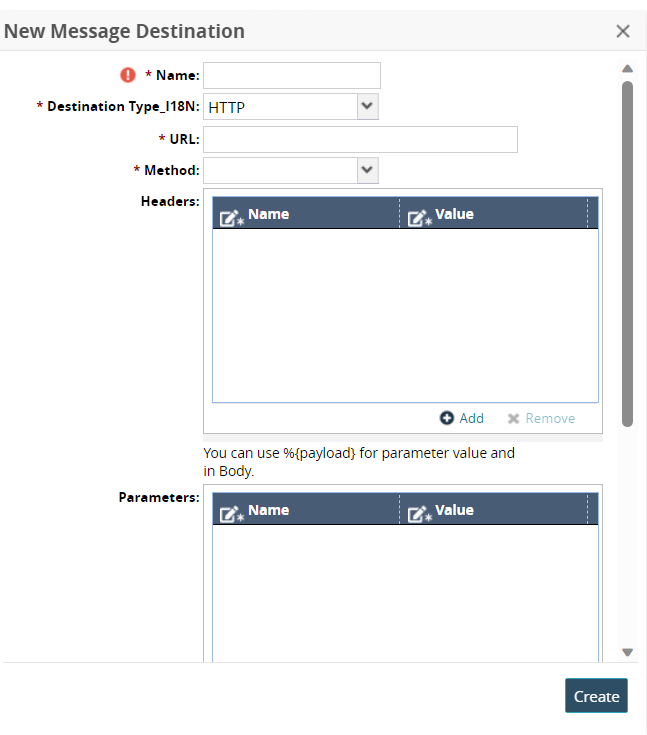
Enter values for the fields as described in the table below. Fields with an asterisk ( * ) are required. The below table describes the field when Destination Type is HTTP.
Field
Description
* Name
Enter a name for the message destination.
* Destination Type _I18N
The HTTP option is selected from the dropdown menu.
* URL
Enter a URL for the message destination.
* Method
Select a method from the dropdown menu.
Headers
Click the Add link to add headers.
Select a name and value in the Name and Value column.
Parameters
Click the Add link to add parameters.
Select a name and value in the Name and Value column.
Authenticate with OAuth 2.0
Select the checkbox to authenticate the request with OAuth 2.0 authentication.
* Client ID
This field is enabled if Authenticate with OAuth 2.0 checkbox is checked. Enter a client ID for the HTTP request.
* Client Secret
This field is enabled if Authenticate with OAuth 2.0 checkbox is checked. Enter a client secret for the HTTP request.
* Access Token URL
This field is enabled if Authenticate with OAuth 2.0 checkbox is checked. Enter the access token URL for the HTTP request.
Body
Enter a Body for the HTTP request.
Click Create.
A success message displays.