Alert Subscriptions - Demand Planning
The Demand Planning Alert Subscription feature allows users to subscribe to specific Demand Planning (DP) reports. Once a user is subscribed, the alerts for the subscribed reports are emailed to the user.
To subscribe to a Demand Planning report to receive alerts:
From the Tools menu, select New Report Subscription.
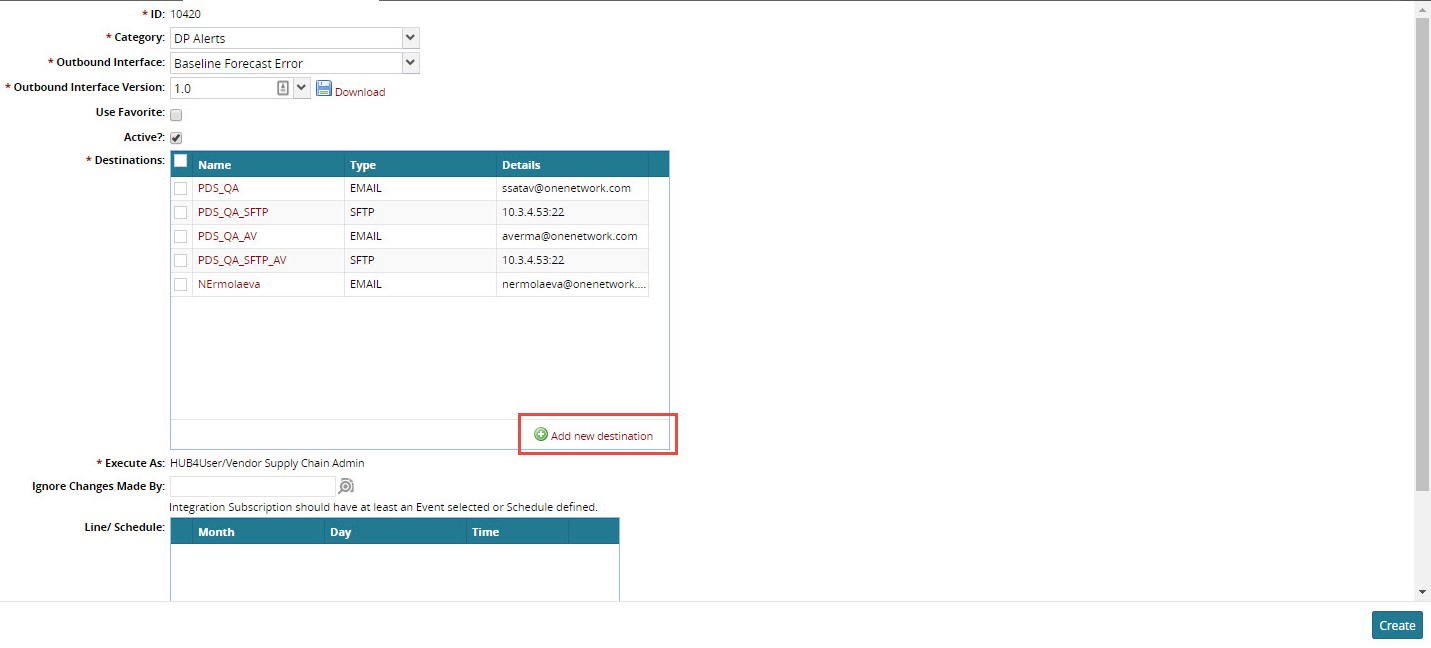
The New Report Subscription screen appears. Use the Category drop-down menu to select DP Alerts.Select a report from the Outbound Interface drop-down menu. See the following table for the available reports and their descriptions.
Alert Subscription
Description
Previous Week Forecast Accuracy Error
Provides a list of active items having high forecast accuracy error for previous week.
Baseline Forecast Error
Provides a list of active items having significant deviation between deseasonalized, actual data and baseline forecast data. Does not include Items which have events running during the previous four weeks.
Item Seasonality Wrong Allocation
Provides a list of active items which have a high deviation error between history and allocated seasonality templates. Analyzes history for last 6 months.
Significant CF Adjustment
Provides a list of active items having significant CF(continuous forecast) adjustment compared to initial forecast value generated by the DP engine for the current week.
Weekly Forecast Vs. Weekly Sales Deviation
Provides a list of active items which have a significant deviation between average weekly sales and average weekly forecast.
Forecast Without Sales Alert
Provides a list of active items that have no sales for a defined period of time.
Sales For Disabled Forecast Alert
Identifies items having sales but not being forecasted.
Running Problematic Promotions
Returns set of events running on current moment (started before and finish after today) having significant deviation between actual sales and forecast value.
If the subscription is to be active immediately, fill the Active? check box.
Add a destination for the alert by clicking the Add New Destination link.
The New Message Destination window appears.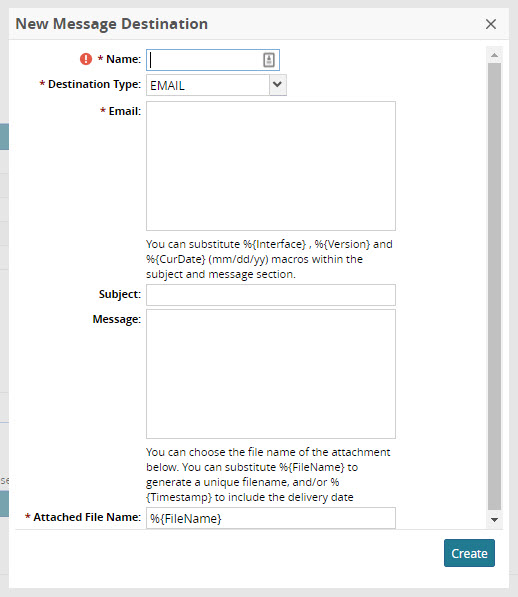
Enter a name for the new destination in the Name field.
Select the destination type (Email or SFTP).
Enter the email address(es) to send the alert to in the Email field.
Enter a subject for the email in the Subject field.
Enter a message for the email in the Message field.
Using the instruction on the New Message Destination window, enter a name for the attached file in the Attached File Name field.
Click Create.
A success message appears.Close the New Message Destination window.
The new destination appears in the destinations window.Select the destination check box to send alerts to a destination.
If you want to have the alert ignore changes made by a certain user, use the Auto-complete Data Entry and Pickers to enter the user in the Ignore Changes Made By field.
In the Line/Schedule field, you can add an event time to define a schedule for the report alert.
Click the Add link to add a time to the schedule.
Click Create.
A success message appears.