Business Log Analysis
The Business Log Analysis Interface works with certain Demand Planning (DP) engines to provide users with a view of logged system data related to the Demand Planning engines. The DP Engine Business Log allows users to find and fix the data issues which cause engines to fail or produce undesirable results. Users can determine if an engine ran successfully, if any required data is missing, which engine in a chain failed, and which specific engine tasks failed and why. The DP Engine Business Log is supported by the DP Forecast Generation, Continuous Forecasting, and Split Ratio engines and is available to Buyer and Vendor Supply Chain Administrator users. Users can disable business logging for an individual engine using the DP Engine Custom Configuration UI; the config name is "Disable Biz Logger Write."
Complete the following steps to view the DP Engine Business Log Analysis report:
From the Demand Planning Menu, select Engine Business Logging.
The Engine Business Logging screen appears.
First, define a log date range in the Log Date fields using the calendar icons next to the date fields.
Next, select a minimum log value from the drop-down menu. These limit the scope of the results by setting a minimum level of log value to include in the report. There are four log level options:
• DEBUG
• ERROR
• INFO
• WARNIn the search field, enter words or phrases to use for limiting search results. The report exclude any results which do not include a match to the entered word or phrase.
You can limit the report results to a particular dimension such as limiting results to a specific item, site or enterprise. Adding a dimension also adds another column to the report.
Click Add + to open the Add Dimension dialog window.
Select a dimension from the Dimension Type drop-down menu. Each option reveals an additional field in which you define the parameter. You can add multiple dimensions.
Enter a parameter for the selected Item, Enterprise, Site, Organization, Product Group Level, Site Group Level, or Transaction Date.
Click Add. The parameter appears on the main screen.
You can limit results to a specific document type by entering the document type in the Document Type field. Document Types are listed in the Document Column.
Enter a document version in the Document Version field as desired.
You can add and remove columns from the report from the Table Columns area.
To remove a column, click the "x" next to the name.
To add a column, type the name into the lower field and press Enter. The column name appears in the upper Table Columns field.
Click Search to view the report with the entered parameters.
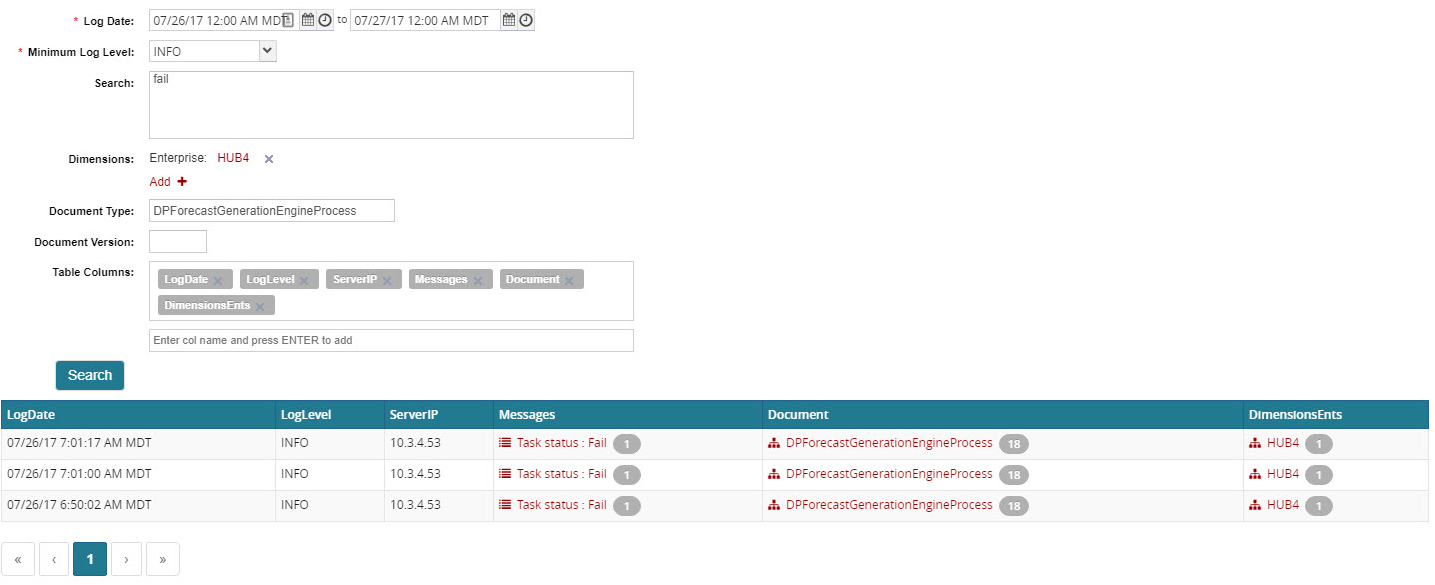
In the example below, you can see how the Log Date limits the LogDate column, the Minimum Log Level selection limits the LogLevel column to INFO, the Dimensions field limits the results to the HUB4 Enterprise, the Document Type is limited to the entered parameter, and the report contains only the columns listed in the Table Columns field.
The numbers listed to the right of each Message and Document indicate the number of imported messages or the number of documents in a message. Both Messages and Documents are clickable links which lead to more detailed information for the Message or Document.