Creating Partner Sites
Complete the following steps to create partner sites:
Log in to the ONE system.
Click Menus/Favs > Administration > Partner Admin > Partner > Search Partner Site. Other user roles with access to this screen may have a slightly different menu path. In the NEO UI, users can click on the Menus/Favs icon on the left sidebar and type in the name of the screen in the menu search bar. For more information, see "Using the Menu Search Bar."
The Search Partner Site screen appears.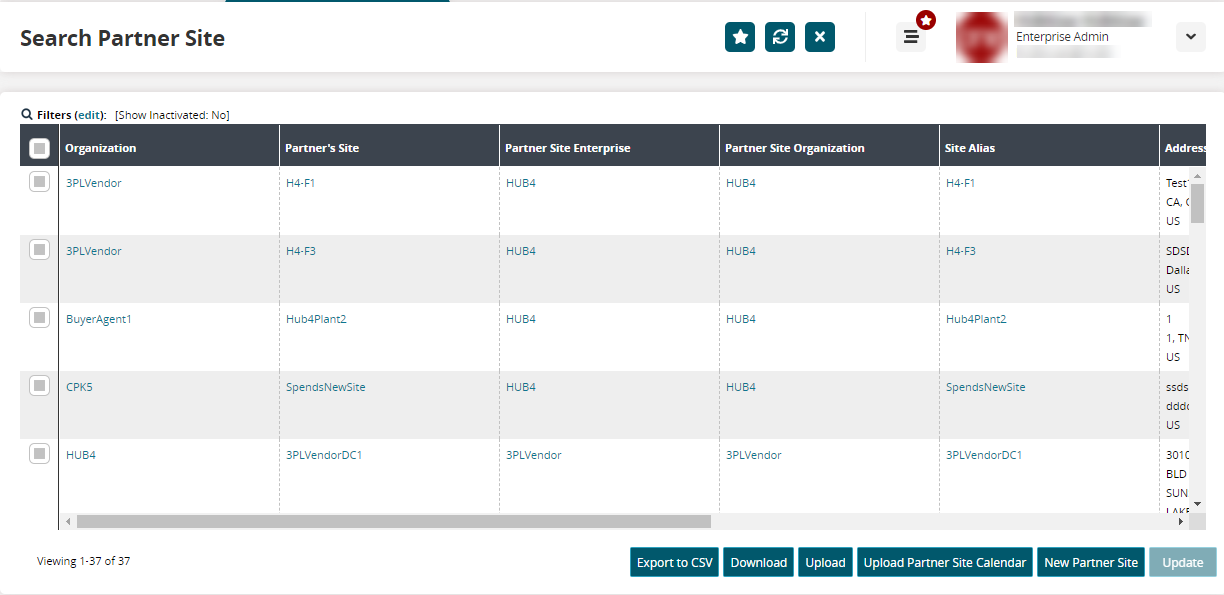
Click the New Partner Site button at the bottom of the screen.
The New Partner Site screen appears.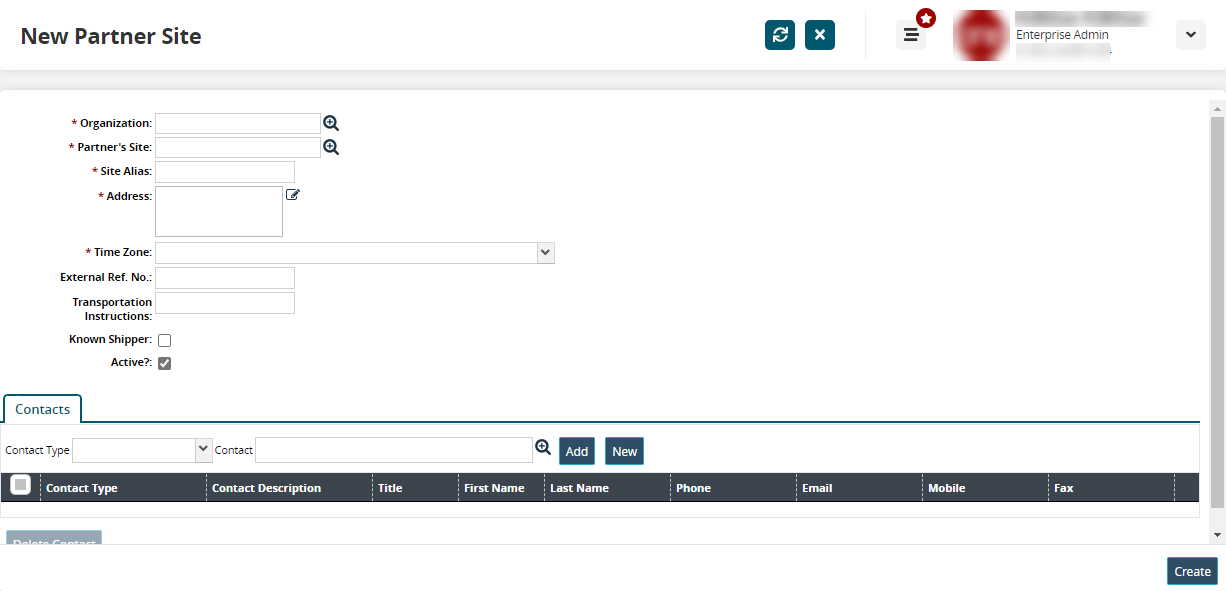
Fill out the following fields as needed. Fields marked with an asterisk ( * ) are required.
|
Field |
Description |
|
* Organization |
Begin typing, and the system automatically shows organizations that match your text. Or use the picker tool to select an organization. |
|
* Partner's Site |
Begin typing, and the system automatically shows the partner's site that matches your text. Or use the picker tool to select a partner's site. |
|
* Site Alias |
Enter a site alias for the partner site. |
|
* Address |
Click the pencil icon and select the Country from the dropdown list. A popup displays.
|
|
* Time Zone |
Select the time zone for the partner site from the Time Zone dropdown list. |
|
External Ref No |
Enter an external reference number. |
|
Transportation Instructions |
Enter any transportation instructions for the new site here. |
|
Known Shipper |
Check the box if the new partner site is a known shipper. If a carrier partner has the Only For Known Shipper Sites flag set, it will pick up loads only at known shipper sites. |
|
Active? |
Check the box to make the partner site Active. |
Contacts Tab
Select the contact type from the Contact Type dropdown list.
Select the Contact with the picker tool.
Click the Add button to add a contact to the table below.
The created contact is added to the Contact field.Select the checkbox for the contact, and select the Delete Contact button to delete the contact.
Click the New button to add a new contact to the system.
The New Contact popup displays.
Enter values for fields described in the table below. Fields with an asterisk ( * ) are required.
Field
Description
* Owning Ent
This field is auto-populated with the owning enterprise for the partner site.
* Contact Description
Enter a brief description of the new contact.
Title
Enter a title for the contact.
First Name
Enter the first name of the contact person.
Last Name
Enter the last name of the contact person.
Middle Name
Enter the middle name of the contact person.
Address
Click the field to enter the contact address in the popup.
Phone
Enter the phone number of the contact person.
Mobile
Enter the mobile number of the contact person.
Fax
Enter the fax number of the contact person.
Email
Enter the email ID of the contact person. Click Add to add more than one email.
Person
Use the picker tool to associate a person with the new contact.
User
Use the picker tool to associate a user with the new contact.
Public
Select the checkbox to mark the new contact as public.
Click the Create button on the popup.
The new contact is added to the contact table.Click the Create button at the bottom of the screen.
A success message appears.