Entering Purchase Order Details
Complete the following steps to create purchase orders:
L og in to the ONE system.
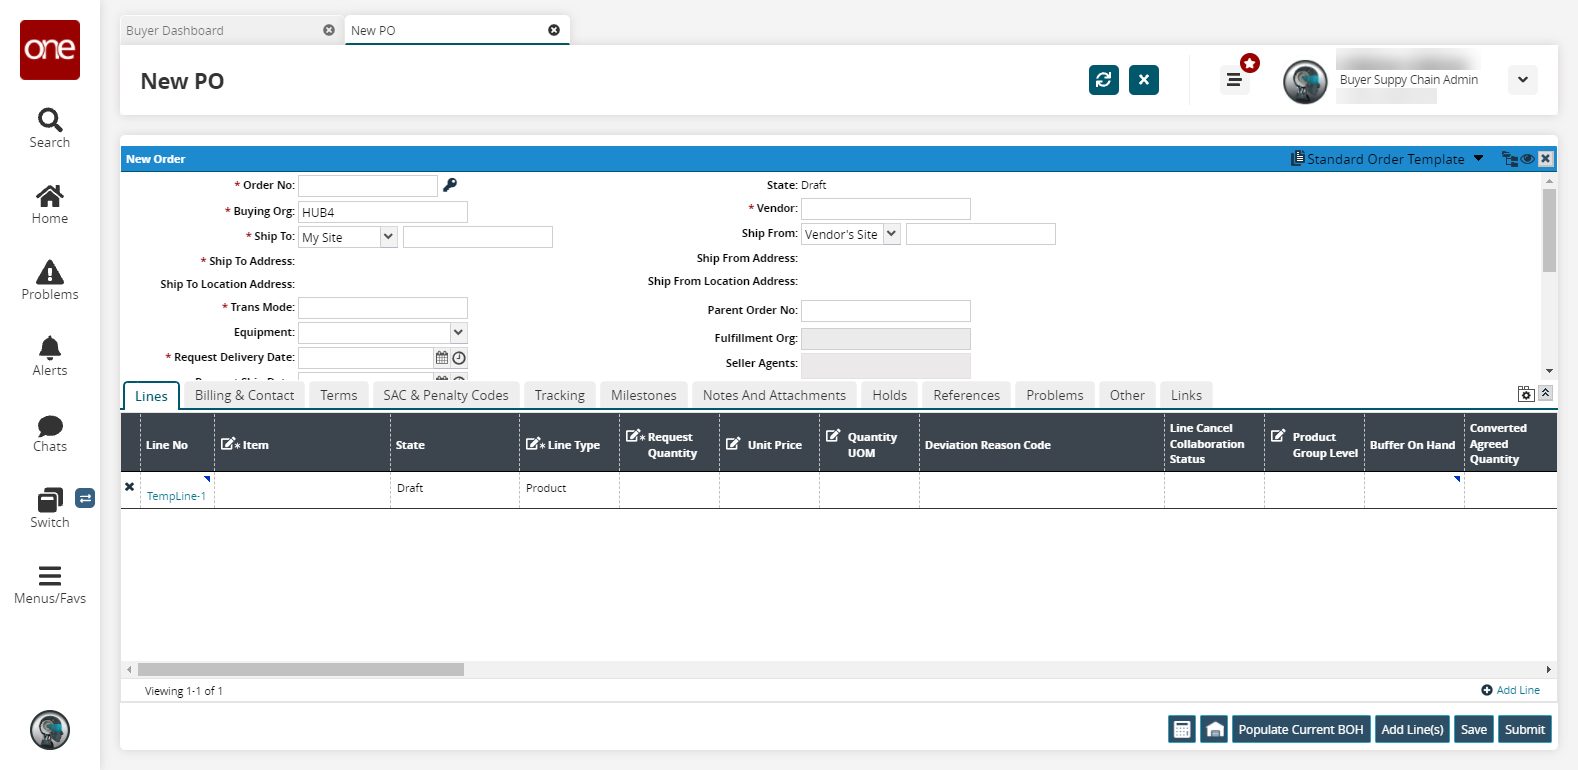
Click Menus/Favs > Order Mgmt > New PO.
In the NEO UI, users can click on the Menus/Favs icon on the left sidebar and type in the name of the screen in the menu search bar. For more information, see "Using the Menu Search Bar."
The New PO screen displays.
If you don't know the required fields to complete an order, provide selected details, and the system will auto-populate some fields.
Fill out the following fields. Fields with an asterisk ( * ) are required.
Field Name
Description
Order Number
Unique number for the order assigned by the system.
* Buying Org
The organization that is buying goods using the purchase order.
* Ship To (Drop-down menu)
Filter for the Ship To Site. The available options are My Site, My Partner Site, and My Location.
* Ship To (Text box)
The name of the site/location receiving the order.
Ship To Address
Non-editable Ship To address field. Populated by Ship To selection.
Ship To Location Address
This field is auto-populated from the location when the ship to is a Location instead of a Site.
* Trans Mode
The mode of transport for the purchase order.
Request Delivery Date
The date on which the purchase order is requested to be delivered.
Request Ship Date
The date on which the purchase order is requested (by the buyer) to be shipped (by the vendor).
Ext Transaction
Enter an external transaction number here.
3PL's Order Number
Third-Party Logistics order number
OMO's Order Number
The order number of the Order Management Organization.
Total Amount
The total cost of the order.
Total Weight/ Quantity/Volume
The total weight, quantity, or volume of the order.
Authorization
Indicates order is authorized.
Order Subtype
This field indicates the subtype of the order. Select an option from the drop-down menu. The available options are Blank, Consignment, Rebalance, Standard, or VMI.
State
The state of the purchase order.
* Vendor
The vendor associated with the purchase order. The vendor must be listed on the Vendor Master List.
* Ship From (Dropdown menu)
Filter for the Ship From location. The available options are Vendor's Site, Vendor's Partner Site, and Vendor's Location.
* Ship From (Text box)
The name of the location sending the shipment.
Ship From Address
Non-editable Ship From address field. Populated by Ship From selection.
Ship From Location Address
This field is auto-populated.
Parent Order No
The order number of a parent order, if it exists.
Fulfillment Org
The name of the fulfillment organization.
Seller Agents
The name of the seller agent.
OMO Org
The order management organization.
Buyer Agents
The name of the buyer agent.
BPO No
Blanket Purchase Order number.
Currency (Dropdown menu)
Select the currency used for this purchase order. The field is pre-populated but editable.
Owning Site
A pre-populated, editable field to track the site which owns the order.
Planner Notes
The planner can add notes here.
Vendor Notes
The vendor can add notes here.
Is Expedite
Select the checkbox if the purchase order needs to be accelerated or hurried.
Is Emergency
Select the checkbox if the purchase order is in an emergency or very important
Tip
Users can order generic items in place of specific items. For example, a user might want ten 40" televisions but does not care about the manufacturer. To order using generic items, users must select the Generic Item Order template. For more information on generic items, see the "Generic Item Orders" section in the Online Help.
Users can add duplicate items to multiple lines on the same order if enabled by the Duplicate Items on Order feature. If enabled, items are identified by both item name and line number throughout the system. This eliminates the possibility of any confusion resulting from having duplicate items with the same name in the same order. Contact ONE Network support to enable or disable this feature.
To continue the workflow, see the "Adding Lines and Items" section of Online Help.