Generic Item Orders
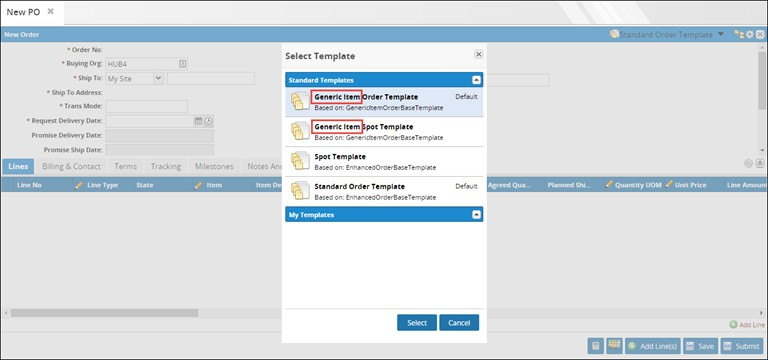
Generic item models allow you to place an order for a type or category of item instead of a specific item. For example, you might need a 50-inch LCD TV and do not care what manufacturer makes the TV. In this instance, you would place a generic order for a 50-inch LCD TV as opposed to ordering a specific make and model of television. The generic item option is available for most types of order, including Deployment Orders, Purchase Orders, Requisition Orders, and Return Orders. To order a generic item you must select the Generic Item Order Template.
See Order Templates and Order Field Visibility for more information on selecting templates.
It is important to select the proper template before filling in the fields; switching templates will clear any unsaved data.
Once the Generic Item Order Template is selected, both generic and specific item fields appear in the line of the order.
Generally, when the vendor promises or fulfills the order, they will enter a specific item on the order.
Substitute and Interchange items which match the entered line item can be selected using the contextual menu.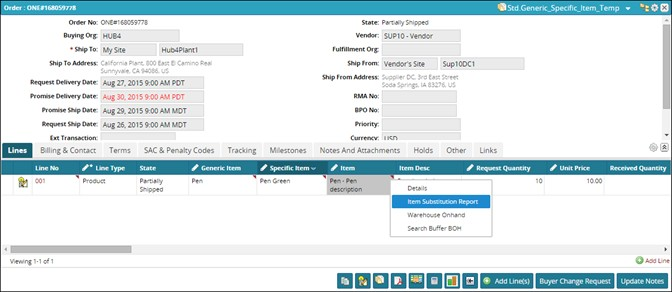
Generic Item - Create Orders
The following procedure is applicable for all other kinds of orders (PO Release, Sales Order, Return Order, Deployment Order, VMI PO, and VMI PO Release).
To create a PO Release, make sure you have created a New Contract for a Generic Item.
From the Order Mgmt menu, select New PO Release.
The New PO Release tab appears.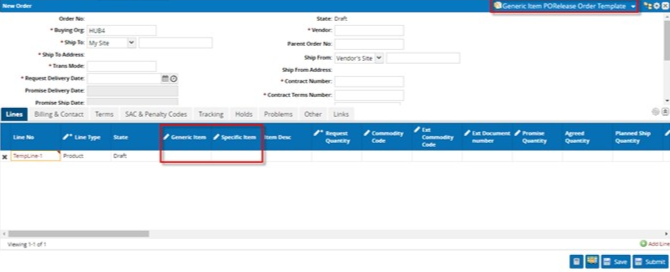
The Buying Org field is initially populated by the system; however, it can be changed as needed.
Click inside the Ship To Site box and type characters to automatically match ship-to sites that appear in a list below the box. Click a ship-to site from the list.
The Ship To Address is populated based on the Ship To site.Using Auto-complete Entry and Pickers, select Trans Mode, (Optional) Ext Transaction, Vendor, (Optional) Ship From, Contract Terms Number, Contract Number, RMANo, (Optional) BPONo, and (Optional) Owning Site.
Note
The Vendor should be listed on the contract.
Select the Request Delivery Date and the Request Ship Date.
Using the drop-down menu for each field, select an option for Priority and Currency.
Perform the following steps to add an Generic Item to the order: Add Line
If a line does not already exist on the order screen, or you need more than one line, click Add Line.
The new line appears.Note
Fields marked with a pencil are editable.
Fields in the new line which are marked with an asterisk are required fields.Tip
You can add duplicate items to multiple lines on the same order if the Duplicate Items on Order
feature is enabled. Contact One Network support to enable or disable this feature.Note
If the Duplicate Items on Order feature is enabled, items are identified by both item name and line number throughout the system. This eliminates the possibility of any confusion which may result from having duplicate items with the same name on the same order.
Use the Auto-complete Data Entry and Pickers to select an Item.
The Generic Item, Specific Item, and Item Desc are automatically populated based on the selected item. Enter a Request Quantity.
The Line Amount is calculated when the request quantity is entered.Click Submit.
A success message appears and the tab changes to the Update Order tab.
To approve the order, click Approve at the bottom of the screen.
A success message appears, and the order is now approved.Note
For any contract, when an order is approved, the total quantity is impacted, including Consumed Quantity, Remaining Quantity, and Received Quantity.
Note
You can save shipments in a Planned state before transitioning the shipment to a New state.
This feature allows you to plan your order as needed and move the order to the New state when you have finished setting up the shipment.