Organization Policies
At the organization level, you can define templates, load time settings, and dock door settings for dock door groups and dock doors. In addition, you can define standalone appointment creation, primary search permissions for carriers and trading partners, and planning policies. Setting organization policies is typically performed by transportation manager roles.
Complete the following steps to set organization scheduling policies:
L og in to the ONE system.
Select Menu/Favs > Scheduling > Scheduling Policies.
In the NEO UI, users can click on the Menus/Favs icon on the left sidebar and type in the name of the screen in the menu search bar. For more information, see "Using the Menu Search Bar."
The Scheduling Policies screen displays.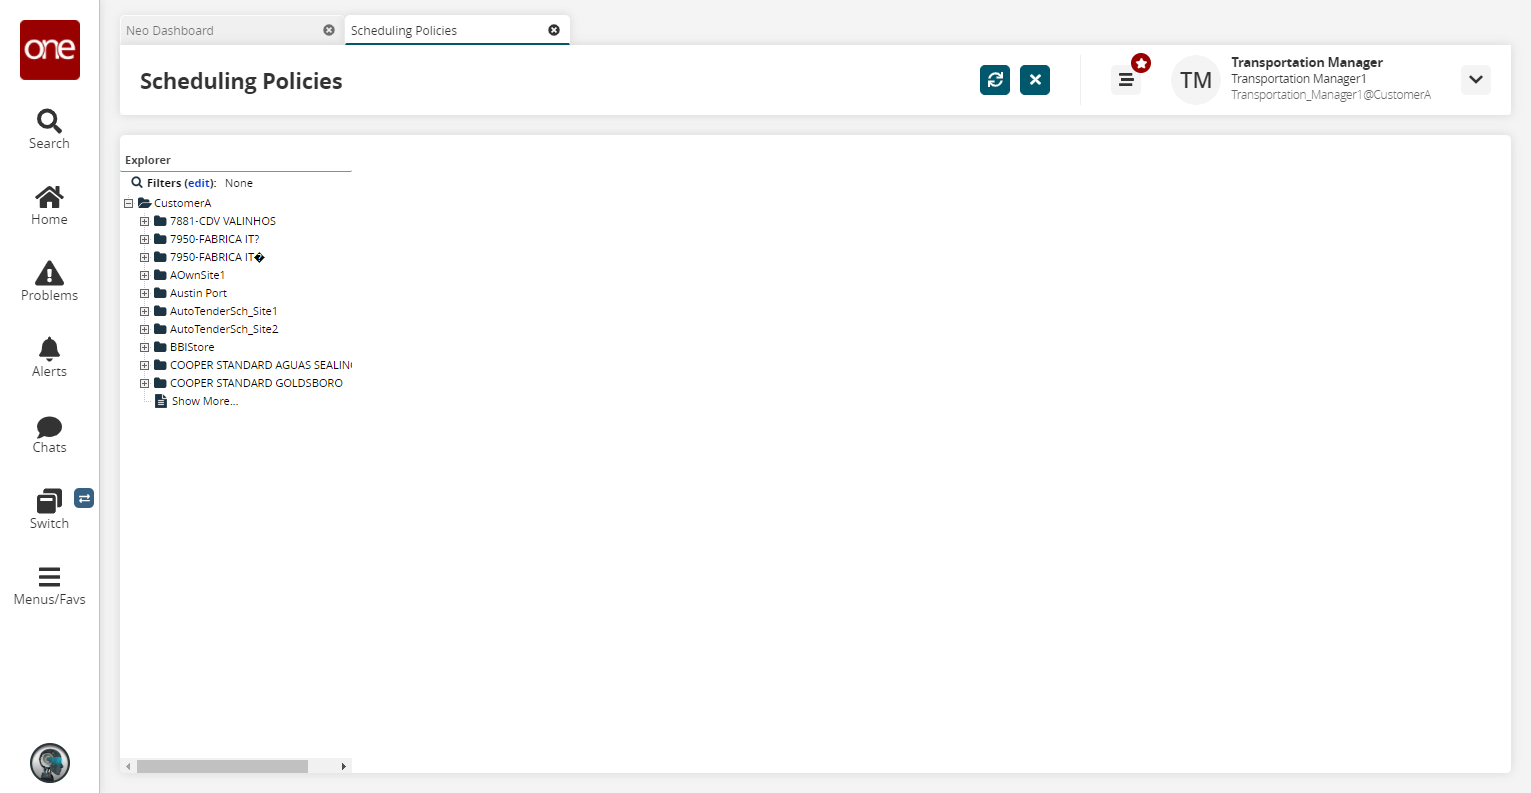
Click the Filters (edit) link to apply search criteria to reduce the number of entries shown.
The Filters menu displays.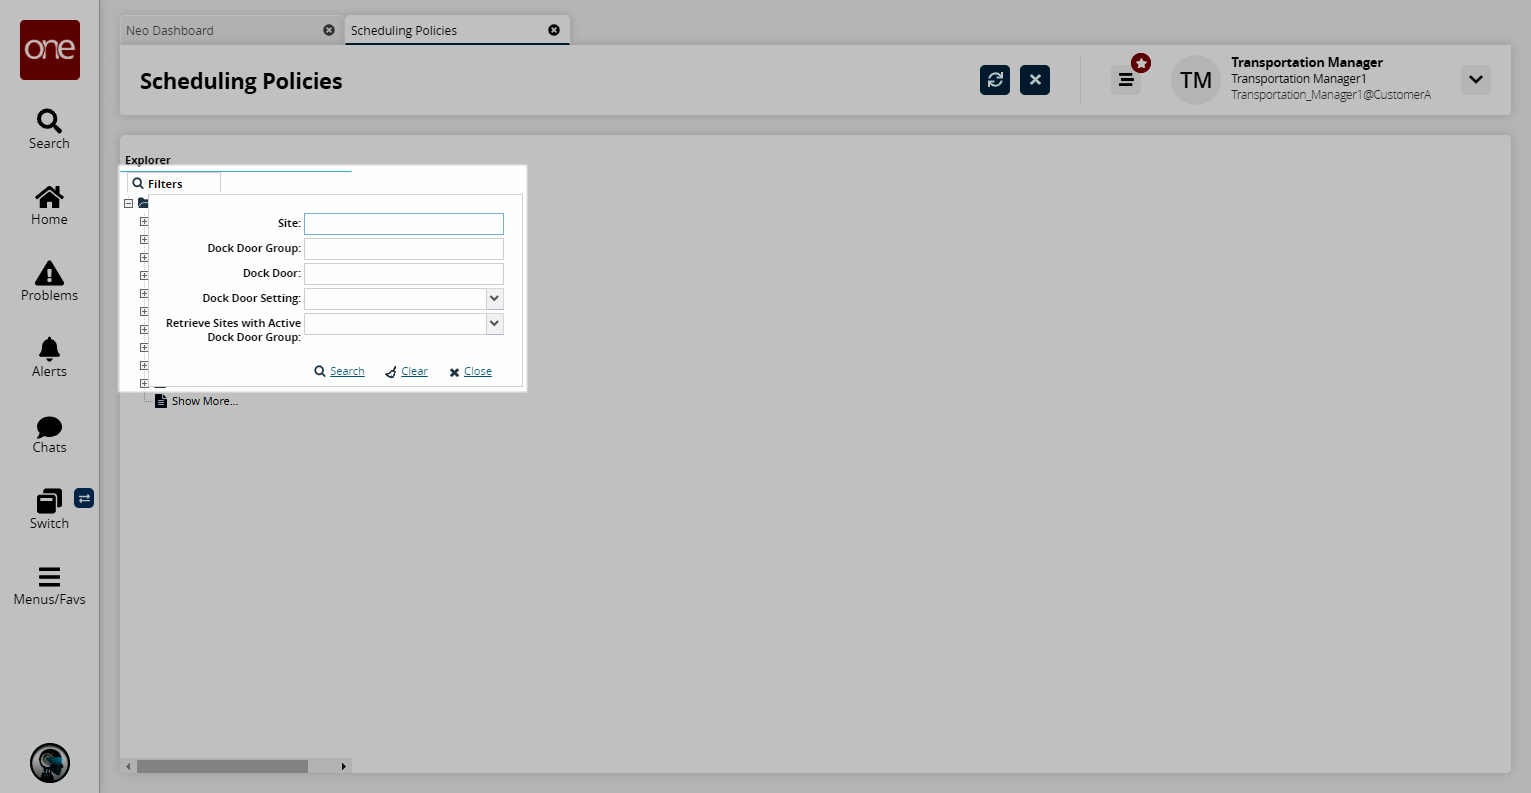
Fill out the following fields. Fields with an asterisk ( * ) are required.Field
Description
Site
Enter a site.
Dock Door Group
Enter a dock door group.
Dock Door
Enter a dock door.
Dock Door Setting
Select a dock door setting from the drop-down menu.
Retrieve Sites with Active Dock Door Group
Select either Yes or No from the drop-down menu. Selecting Yes will retrieve sites with active dock door groups.
Click the Search link.
The desired results display.
Basic Policies Tab
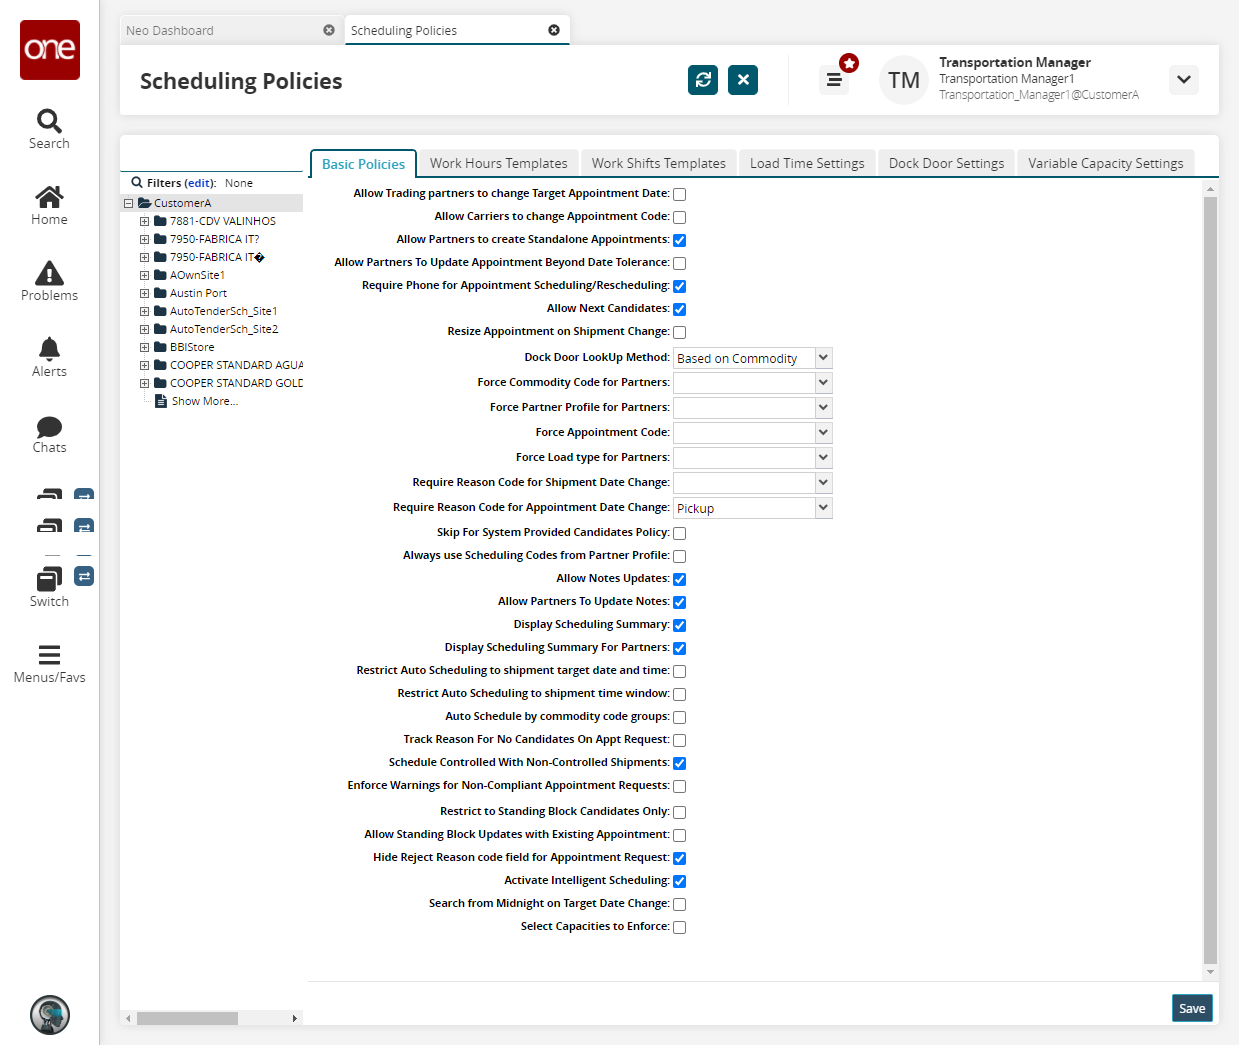
Complete the following steps to define basic policies for organizations:
Fill out the following fields. Fields with an asterisk ( * ) are required.
Field
Description
Allow Trading partners to change Target Appointment Date
Select this checkbox to allow all trading partners to change target appointment dates for this organization.
Allow Carriers to change Appointment Code
Select this checkbox to allow all carriers to change target appointment dates for this organization.
Allow Partners to create Standalone Appointments
Select this checkbox to allow all carriers and all partners to create standalone appointments for this organization.
Allow Partners to Update Appointment Beyond Date Tolerance
Select this checkbox to allow all trading partners to update appointments beyond the date tolerance.
Require Phone for Appointment Scheduling/Rescheduling
Select this checkbox to require appointments to be scheduled or rescheduled by phone.
Allow Next Candidates
Select this checkbox to allow the next appointment candidates to be suggested.
Resize Appointment on Shipment Change
Select this checkbox to allow the appointment duration to be updated when shipment quantities are changed. The change in duration will depend on the Load Time settings that are applicable. Similarly, if a shipment is removed from a movement, then the appointment associated with the shipment(s) still in the movement is updated. When this policy is not selected, an appointment will be automatically canceled if any shipment associated with the appointment is deleted or canceled. Appointments will also be canceled if all shipments under a movement have been consolidated to another movement, if the pickup site for a pickup appointment has changed, or if the delivery site for a delivery appointment has changed.
Dock Door LookUp Method
Select a dock door look-up method from the drop-down menu. The available options are:
First Dock Door Group: Shipments will pick the first Dock Door Group available.
Based on Commodity Code: The Dock Door Group is selected based on the Commodity Code referenced on the shipment and the Dock Door Group.
Force Commodity Code for Partners
Select a force commodity code for partners option from the drop-down menu. The available options are Delivery, Pickup, or Pickup And Delivery.
Force Partners Profile for Partners
Select a force partners profile for partners option from the drop-down menu. The available options are Delivery, Pickup, or Pickup And Delivery.
Force Appointment Code
Select an option for the forced appointment codes from the drop-down menu. The available options are Delivery, Pickup, or Pickup And Delivery.
Force Load Type for Partners
Select an option for the forced load type for partners from the drop-down menu. The available options are Delivery, Pickup, or Pickup And Delivery.
Require Reason Code for Shipment Date Change
Select an option from the drop-down menu. The available options are Delivery, Pickup, or Pickup And Delivery.
Require Reason Code for Appointment Date Change
Select an option from the drop-down menu. The available options are Delivery, Pickup, or Pickup And Delivery.
Skip For System Provided Candidates Policy
Select this checkbox to skip for system-provided candidates.
Always use Scheduling Codes from Partner Profile
Select this checkbox to always use scheduling codes from the partner profile.
Allow Notes Updates
Select this checkbox to allow notes updates.
Allow Partners To Update Notes
Select this checkbox to allow partners to update notes.
Display Scheduling Summary
Select this checkbox to display scheduling summaries.
Display Scheduling Summary for Partners
Select this checkbox to display scheduling summaries for partners
Restrict Auto-Scheduling to Shipment Target Date and Time
Select this checkbox to restrict auto-scheduling to the shipment target date and time.
Restrict Auto-Scheduling to Shipment Time Window
Select this checkbox to restrict auto-scheduling to shipment time windows.
Auto-Schedule by Commodity Code Groups
Select this checkbox to auto-schedule by commodity code groups.
Track Reason for No Candidates on Appt Request
Select this checkbox to track reasons for the number of candidates on appointment requests.
Schedule Controlled with Non-Controlled Shipments
Select this checkbox to schedule controlled and non-controlled shipments together.
Enforce Warnings for Non-Compliant Appointment Requests
Select this checkbox to enforce warnings for non-compliant appointment requests.
Restrict to Standing Block Candidates Only
Select this checkbox to only allow standing block candidates.
Allow Standing Block Updates with Existing Appointment
Select this checkbox to allow standing block updates with existing appointments.
Hide Reject Reason Code Field for Appointment Request
Select this checkbox to hide the reject reason code field for appointment requests.
Activate Intelligent Scheduling
Select this checkbox and the system uses an intelligent scheduling mechanism for appointments.
Search From Midnight on Target Date Change Policy
Select this checkbox to search starting from midnight when a target date is changed.
If this policy is enabled, when a user adjusts the target due date of a purchase order to another calendar day, the system searches for carrier candidates starting from midnight of the new target due date.
If this policy is disabled, when a user adjusts the target due date of a purchase order to another calendar day, the system searches for carrier candidates starting from the original time of the original target due date.
Select Capacities to Enforce
Select this checkbox to select capacities to enforce. Options will appear when selected.
Click Save.
A success message displays.
Work Hours Templates Tab
This policy defines templates for shipping and receiving hours, which can be referenced when defining work hours for an individual dock door.
Complete the following steps to define work hours templates for an organization:
Click the Work Hours Templates tab.
The form displays. Existing work hours templates will appear in a list.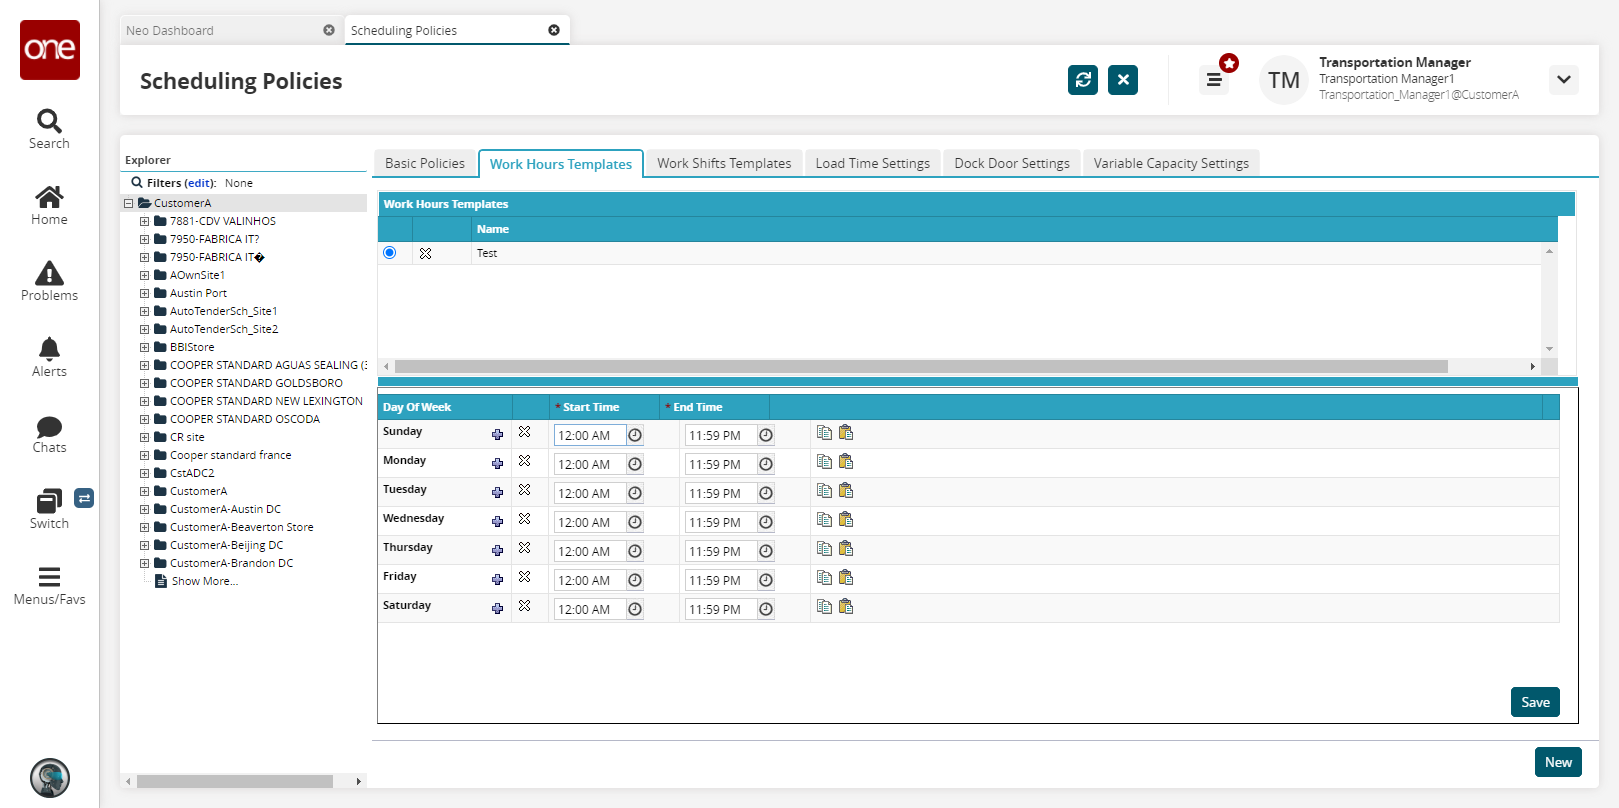
To add a new work hours template, click New.
The work hours template form displays.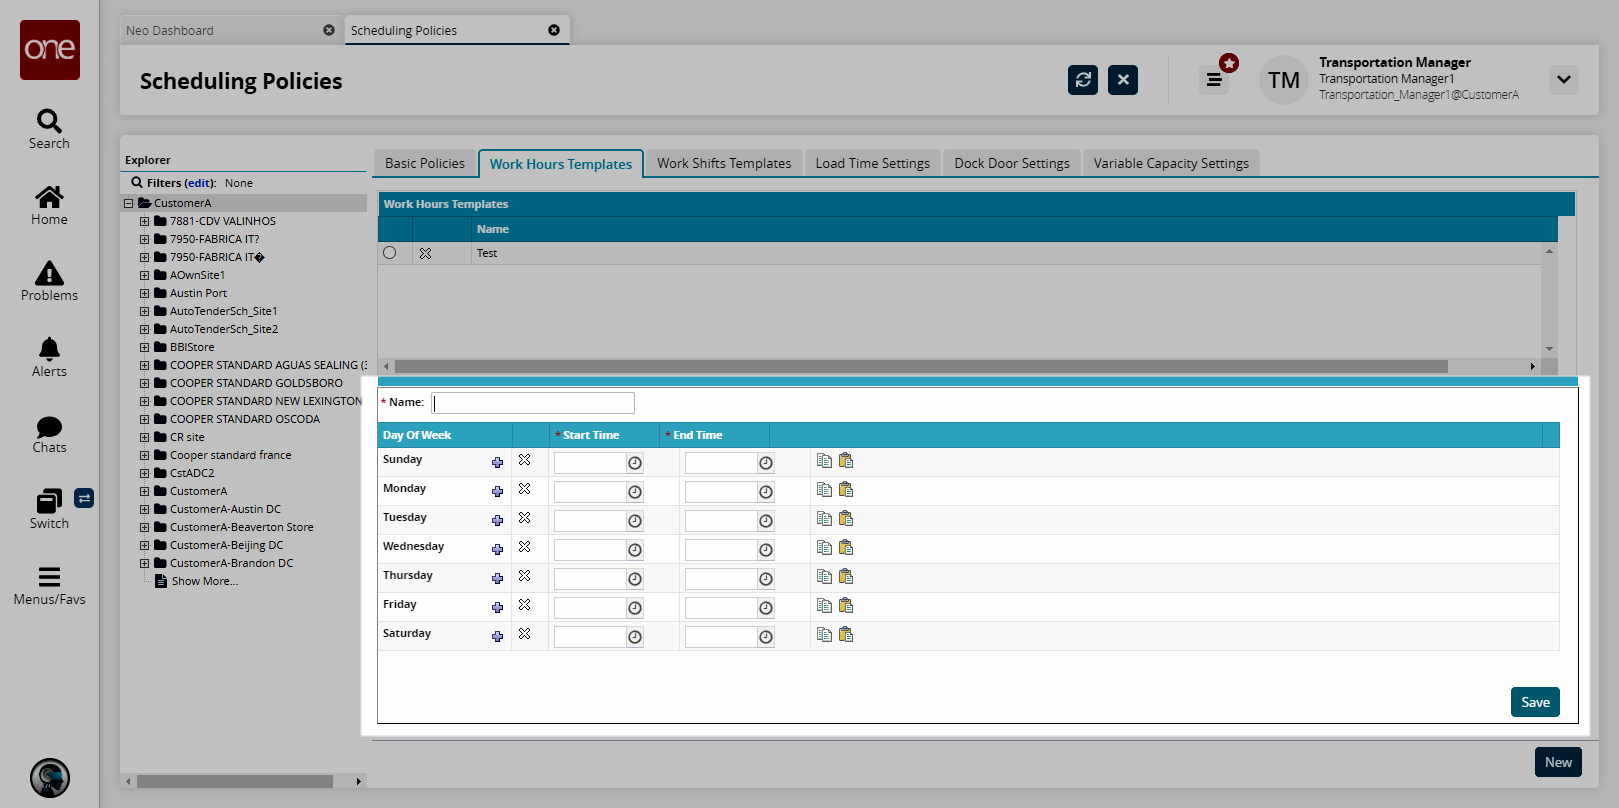
Enter a Name.
For each date pattern under the Day of Week, enter a Start Time and an End Time with the clock icons.
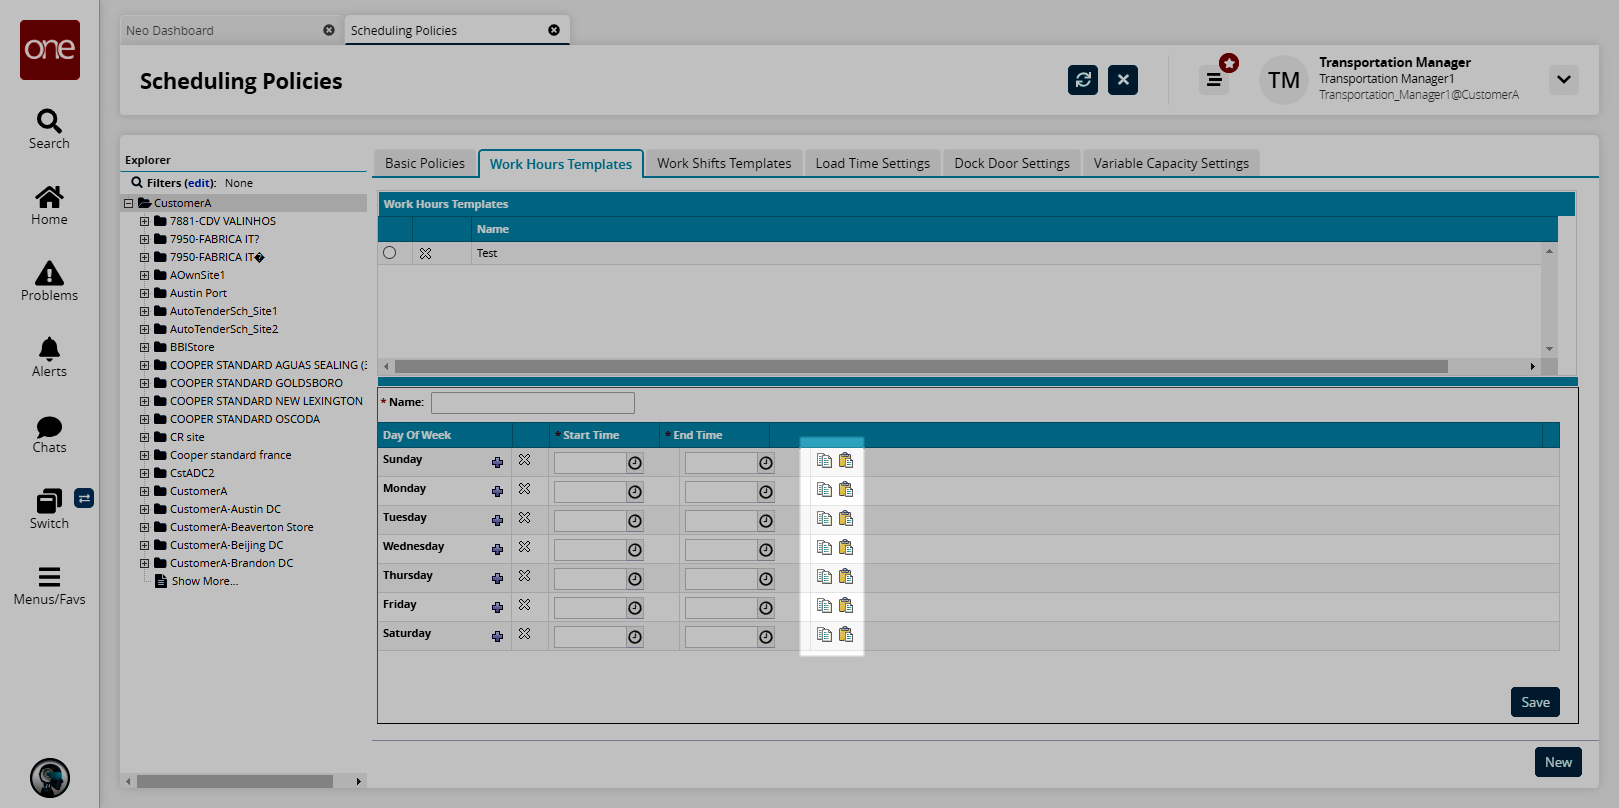
Tip
You can quickly copy and paste a date pattern to another row using the Copy and Paste buttons on the right side of each row.
To add a date pattern to a day of the week, click the Add Pattern button.
Another date pattern row displays for the selected day of the week.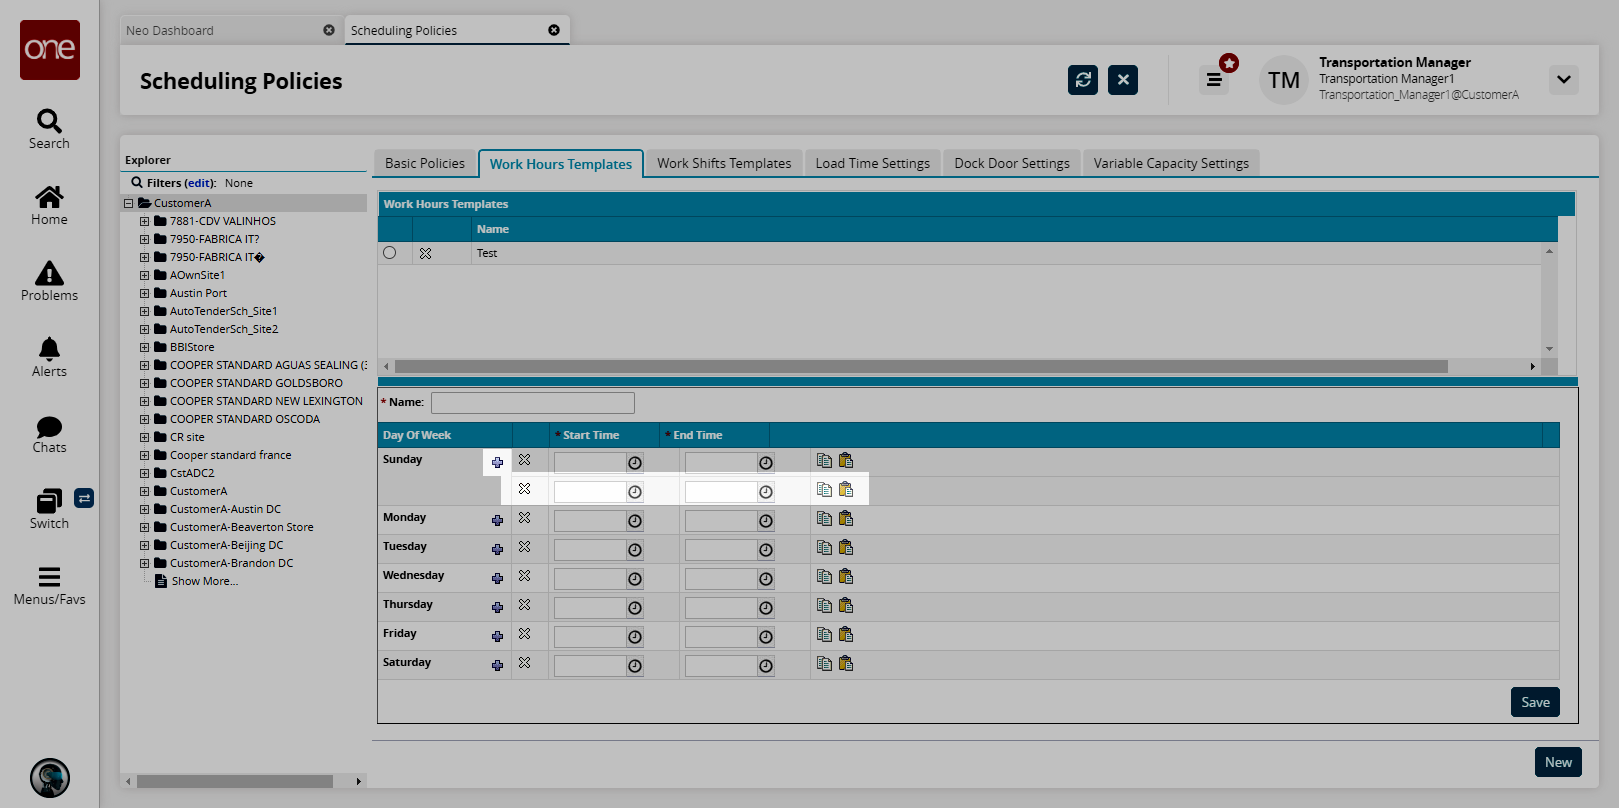
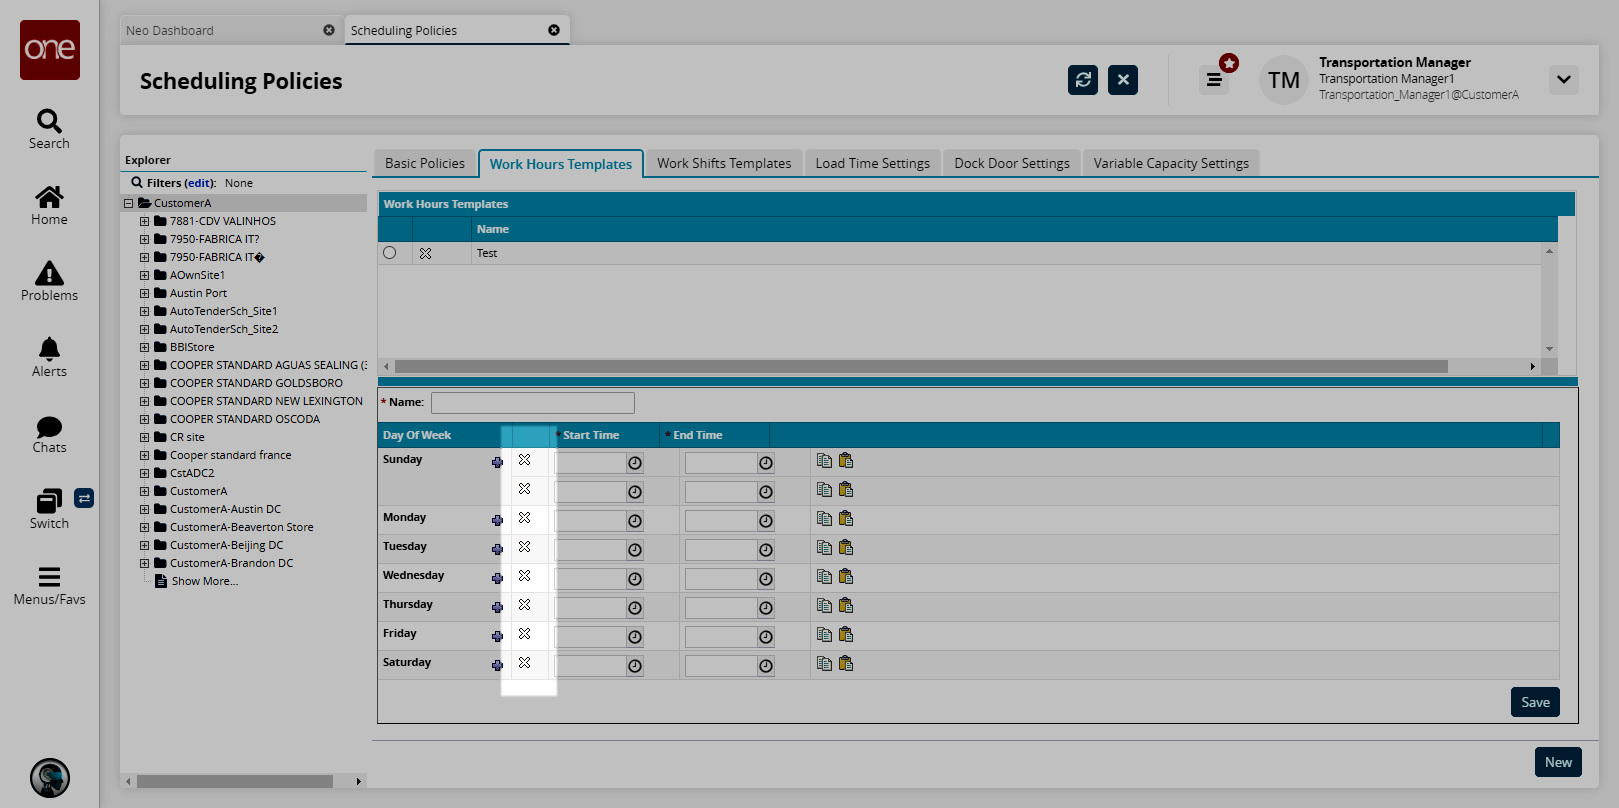
To delete a date pattern, click the Delete Row button.
Click Save.
The new shipping time schedule name displays in the Work Hours Templates list.
Work Shifts Templates Tab
This policy defines templates for work shifts, which can be referenced when defining shifts for a dock door group. The number of shifts per day is unlimited. Shifts may span midnight but may not overlap. Shifts may be disjointed. Capacity and priority may be allocated among multiple shifts (date patterns) per day. An example of shift usage is to balance workload within the available capacity.
Complete the following steps to define work shift templates:
Click the Work Shifts Templates tab.
The Work Shifts Templates form displays.
To add a new work shift template, click New.
The work shift template form displays.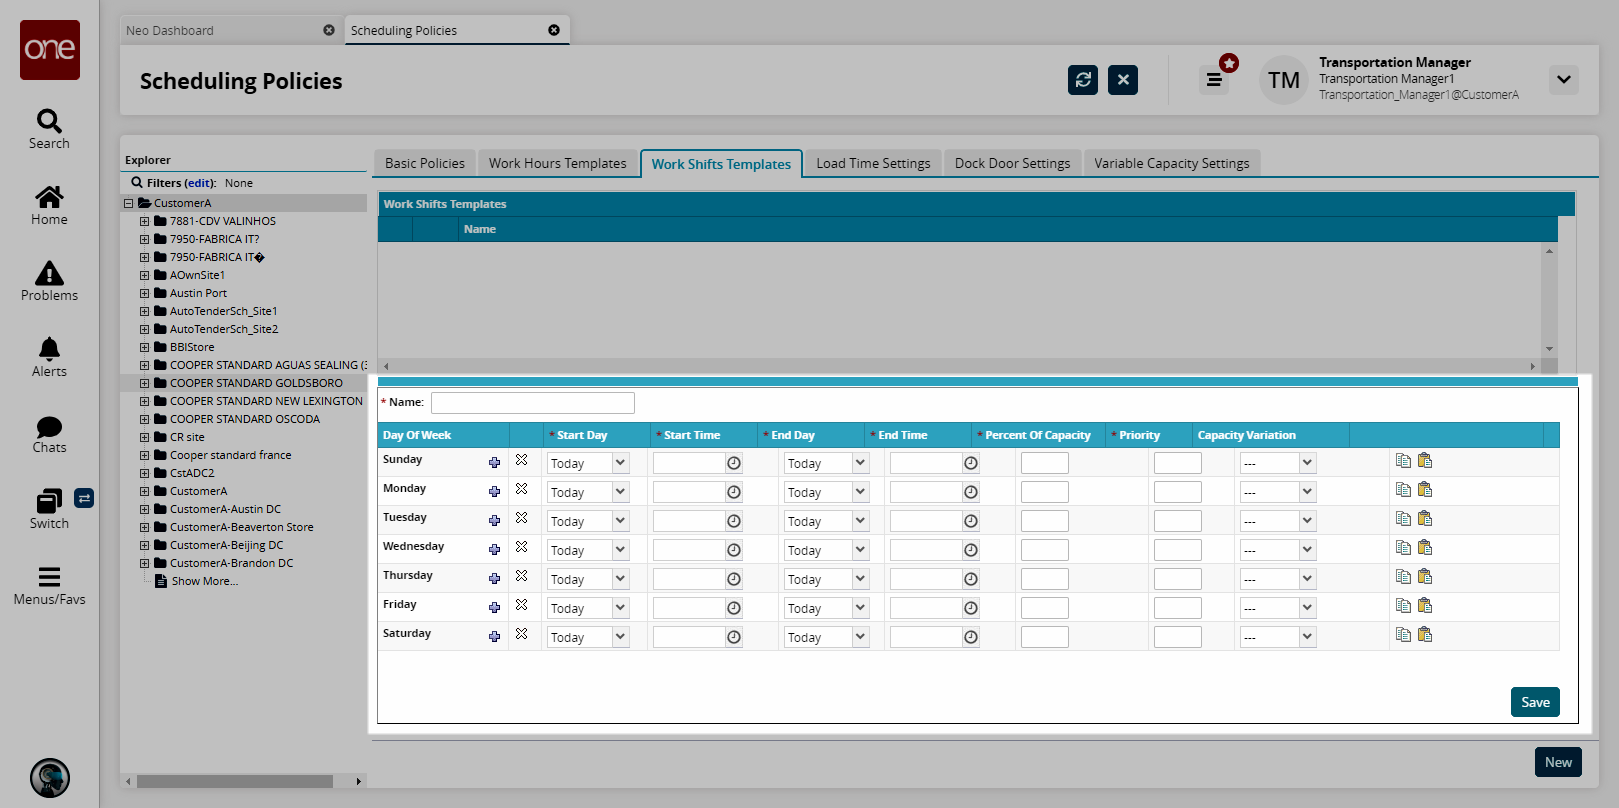
Fill out the following fields. Fields with an asterisk ( * ) are required.
Field
Description
* Name
Enter a name for the work schedule.
* Effective Date Range
Select a start and end date using the calendar icons.
* Start Day
Select Toda y or Yesterday from the drop-down list to specify when the work shift begins.
* Start Time
Click the clock icon to select a start time.
* End Day
Select Today or Tomorrow from the drop-down list to specify when the work shift ends.
* End Time
Click the clock icon to select an end time.
* Percent of Capacity
Enter a capacity value (in percent) for the date pattern. For days with only one shift (date pattern), capacity is assumed to be 100 percent.
* Priority
Enter a priority value. For example, a day with three shifts (date patterns) will have priorities of 1, 2, and 3. When the Appointment Scheduling engine searches for time slots, slots during the shift assigned priority 1 will be selected over slots during the shift with priorities 2 and 3. Similarly, slots with priority 2 will be selected over slots with priority 3.
Capacity Variation
Select a capacity variation from the drop-down menu.
To add a date pattern to a day of the week, click the Add Pattern button.
Another date pattern row displays for the selected day of the week.To delete a date pattern, click the Delete Row button.
Click Save.
The new shipping time schedule name displays in the Work Shifts Templates list.
Load Time Settings Tab
This policy defines the load time settings, which are referenced when defining rules for appointment time length calculation for a dock door group.
Complete the following steps to define fixed load time settings:
Click the Load Time Settings tab.
The Load Time Settings table displays.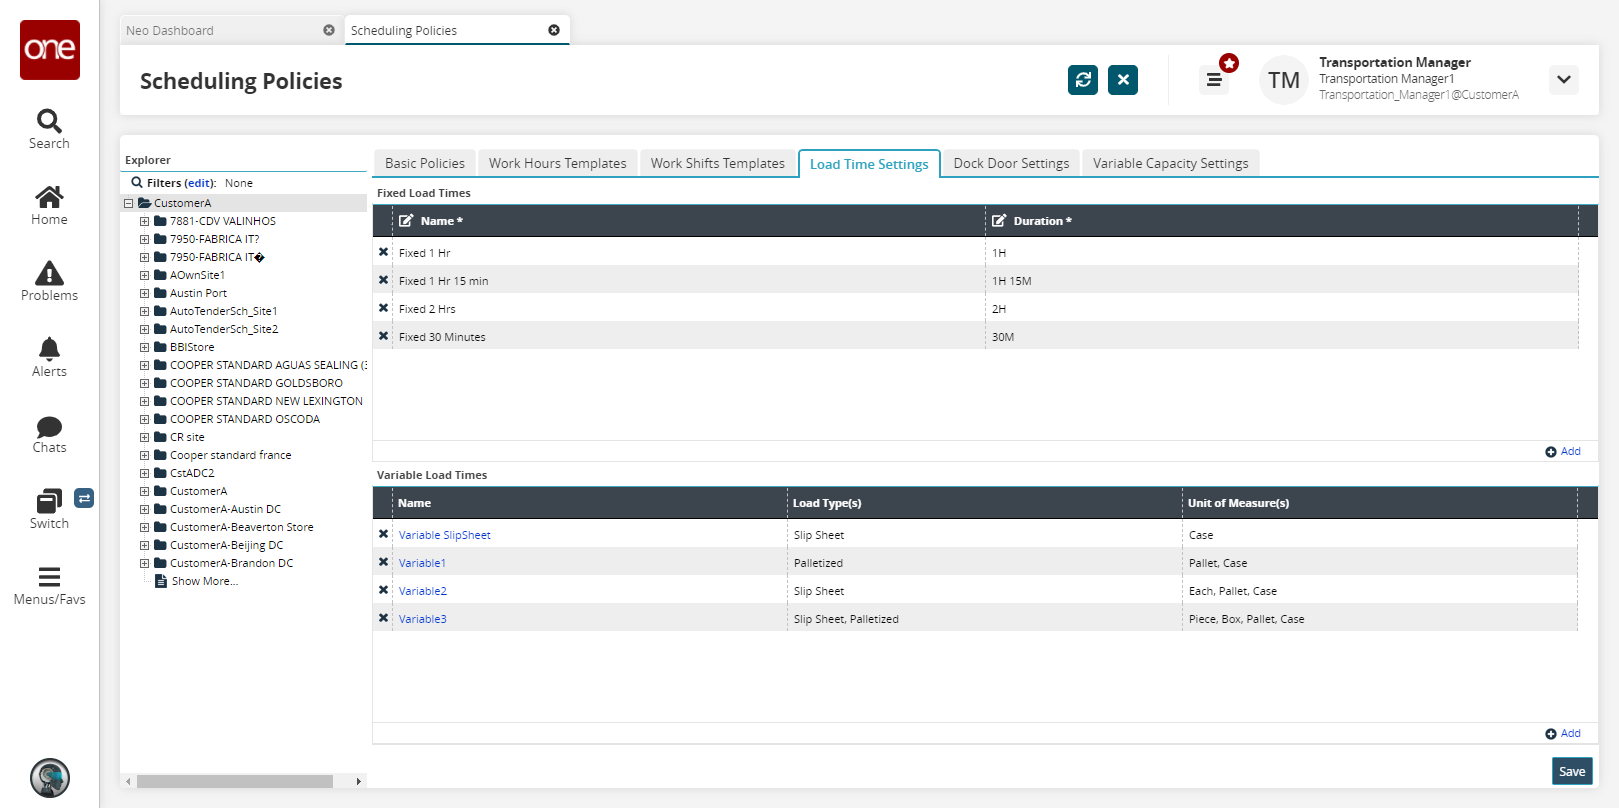
Click the Add link to add a new fixed load time setting in the Fixed Load Times table.
A new row displays.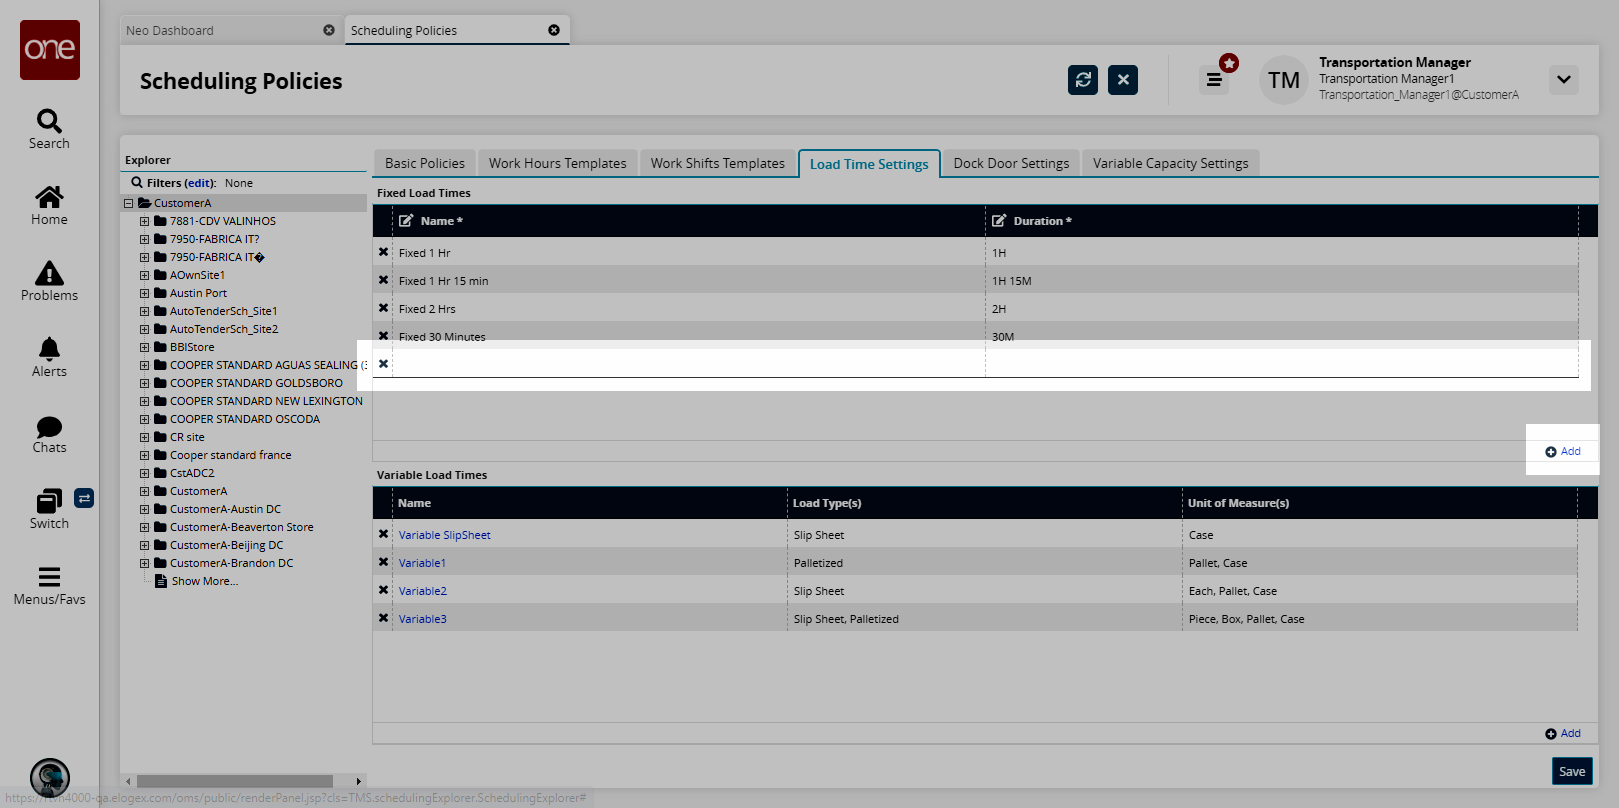
Enter a Name for the fixed load time setting.
Click inside the Duration cell, and enter values for Days, Hours, and Minutes.
Click Save.
The new fixed load time setting displays in the Load Time Settings table.
Complete the following steps to define variable load time settings:
Click the Add link in the Variable Load Times table.
The Variable Load Time Setting popup window displays.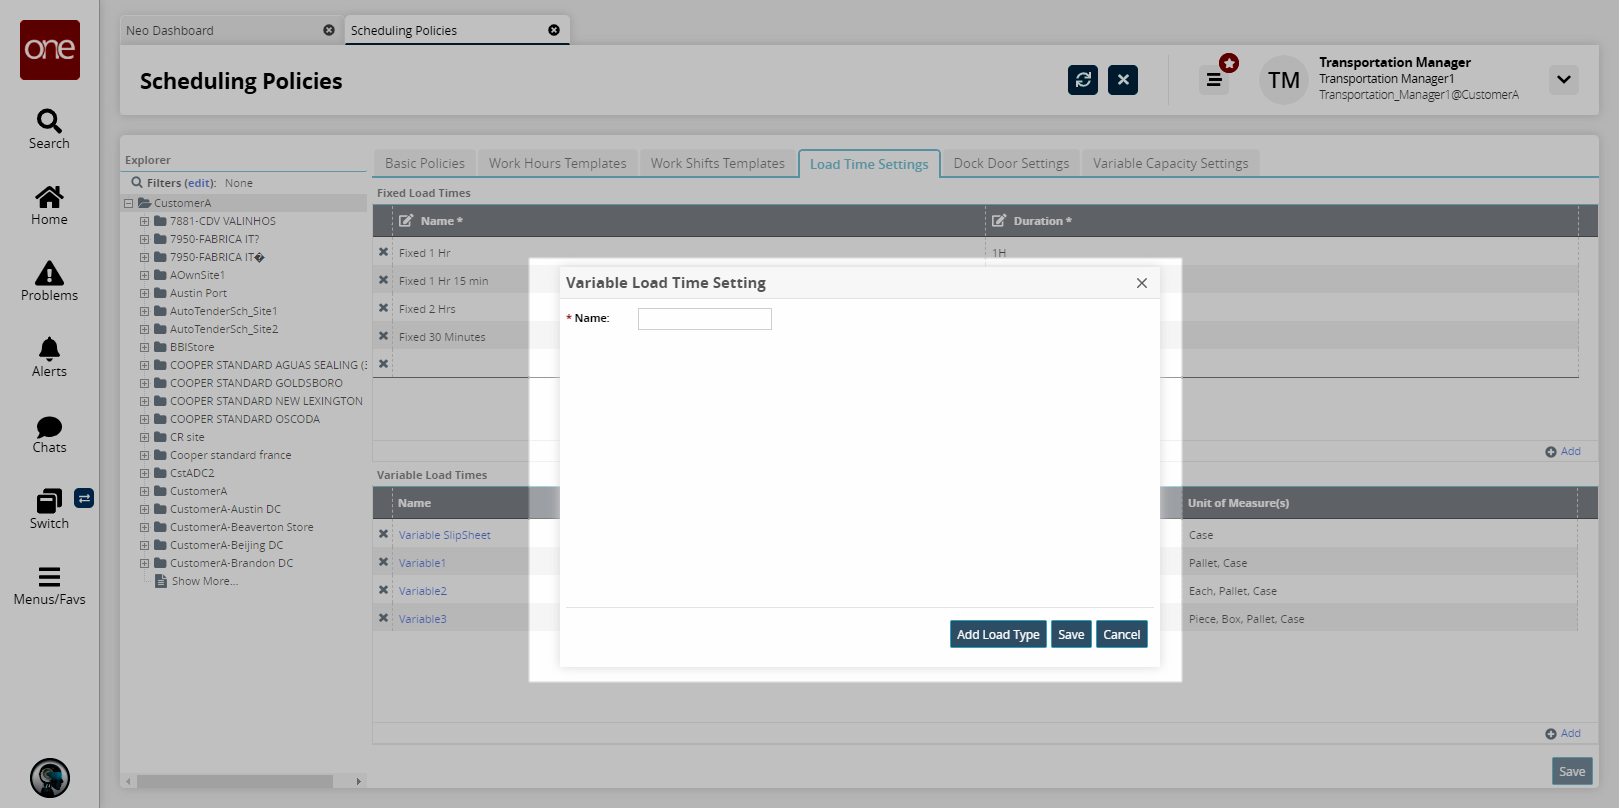
Enter a * Name for the variable load time setting. Fields with an asterisk ( * ) are required.
Click the Add Load Type button.
More fields appear.
In the Load Type drop-down, select a click a load type option.
Click the Add link to add a variable load time setting.
A new row displays. Fields with an asterisk ( * ) are required.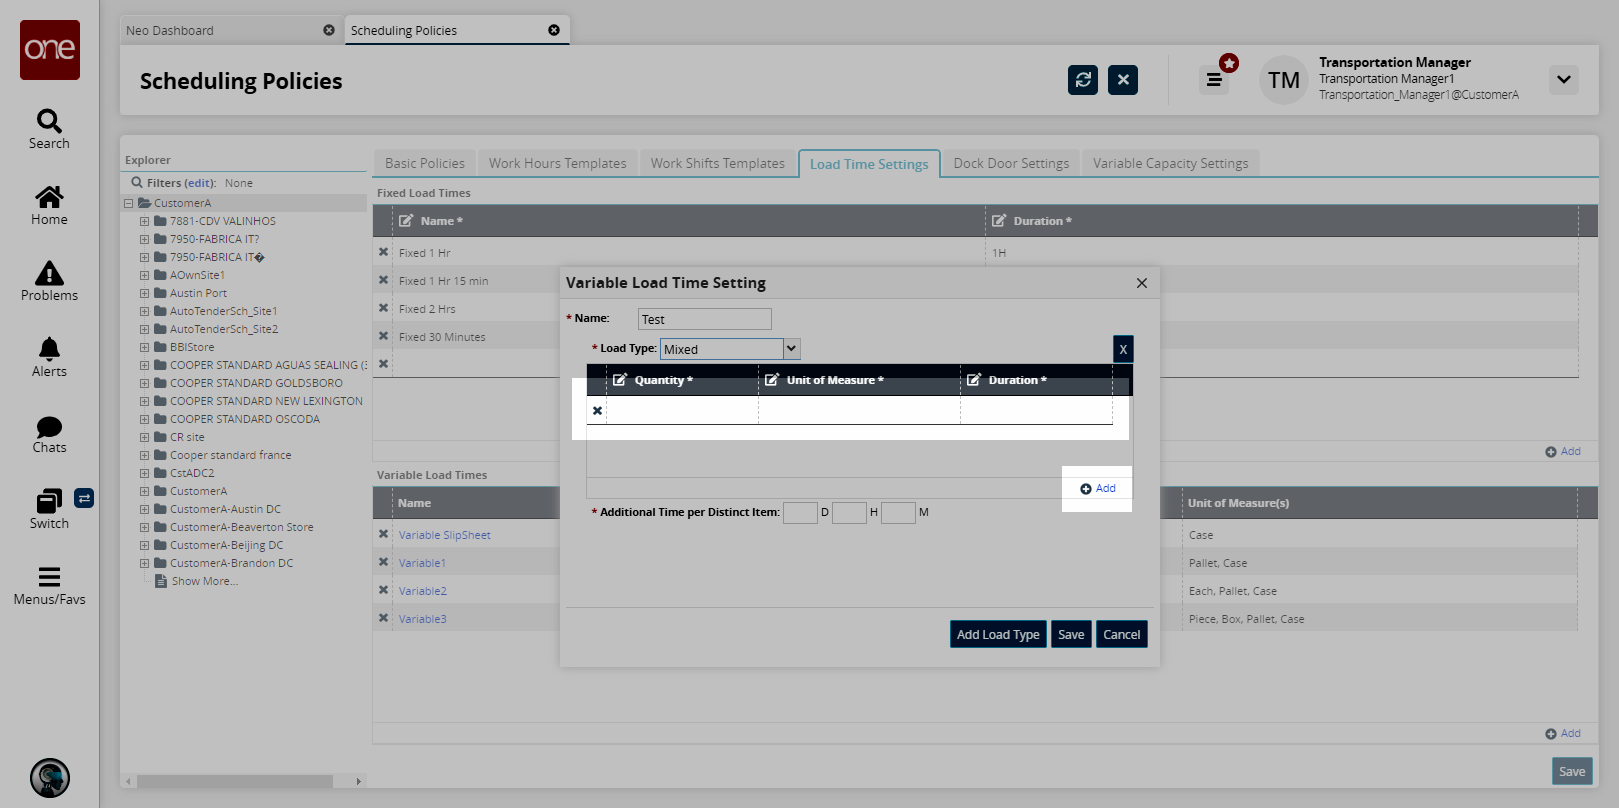
Enter a Quantity*.
Enter a Unit of Measure*.
Click inside the Duration* cell, and enter Days and Hours.
Enter a duration in Days, Hours, and Minutes in the Additional Time per Distinct Item field.
To add another variable load time setting, click Add Load Type, and then repeat the previous steps.
Click Save.
The new variable load time setting displays in the Variable Load Times table.
Dock Door Settings Tab
This policy defines the dock door settings, which are referenced when defining rules for individual dock doors when matching shipment attributes for shipping, receiving, or both. Shipment attributes can be a combination of one or more load types, appointment codes, carrier or vendor partners, and/or vendor profiles.
Complete the following steps to define dock door settings:
Click the Dock Door Settings tab.
The Dock Door Settings tab displays.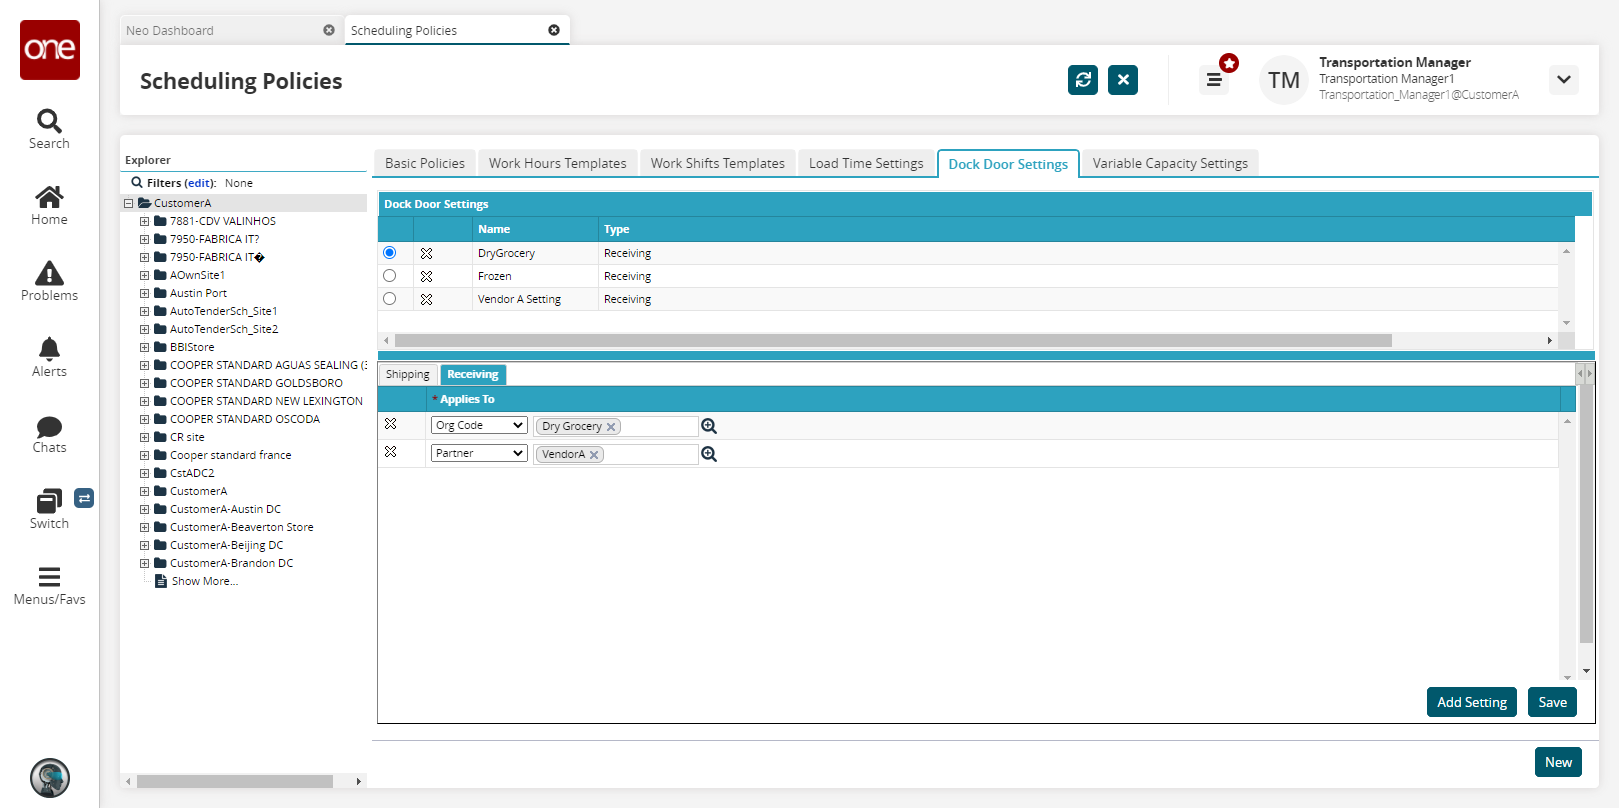
To add a new dock door setting, click the New button.
The Receiving form displays.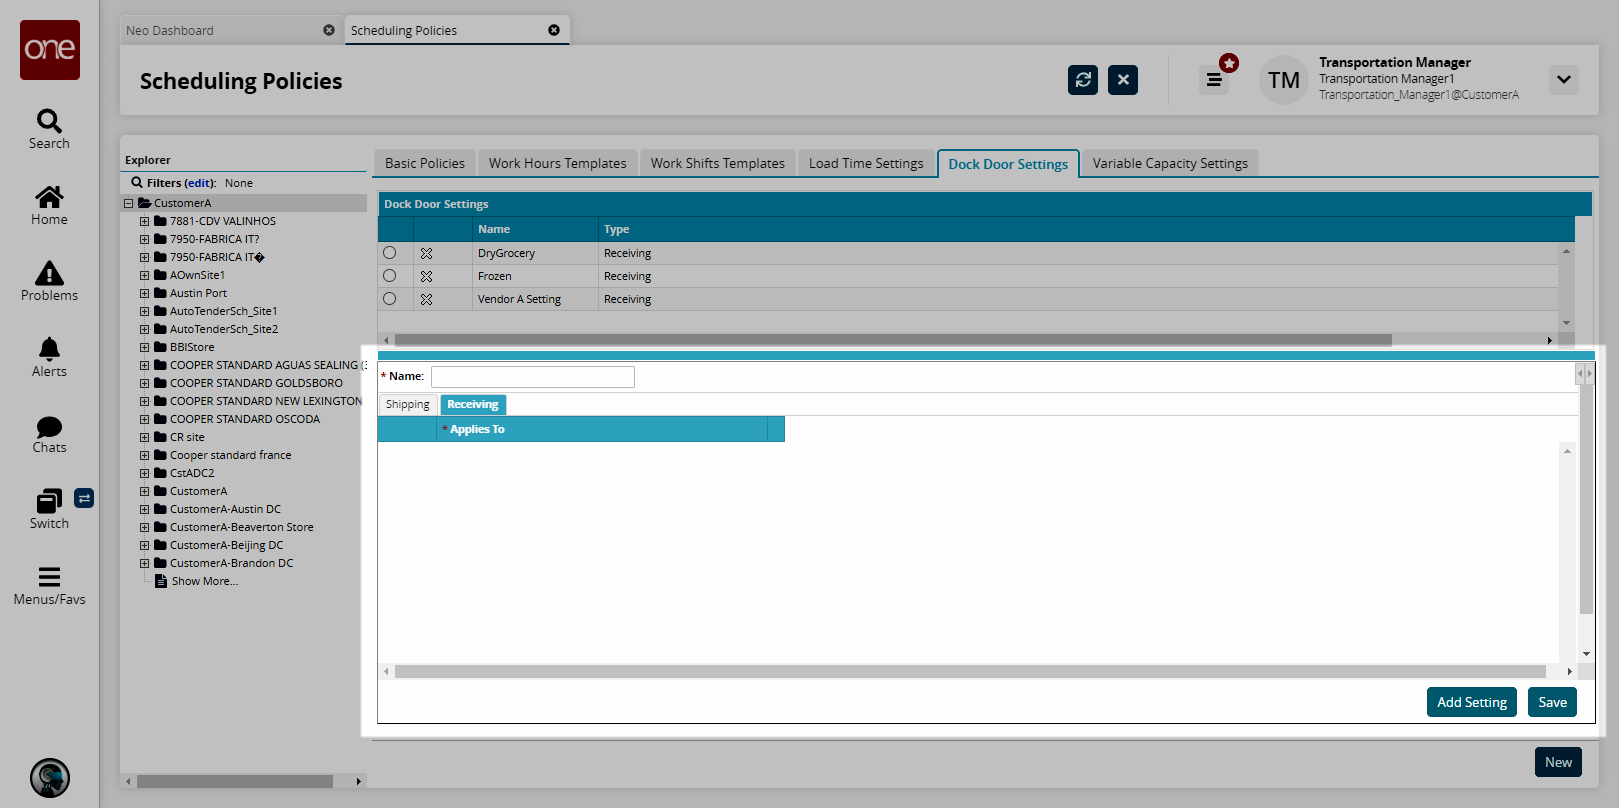
Enter a * Name for the dock door setting. Fields with an asterisk ( * ) are required.
To add a new setting, click the Add Setting button.
The Receiving form shows a new setting row.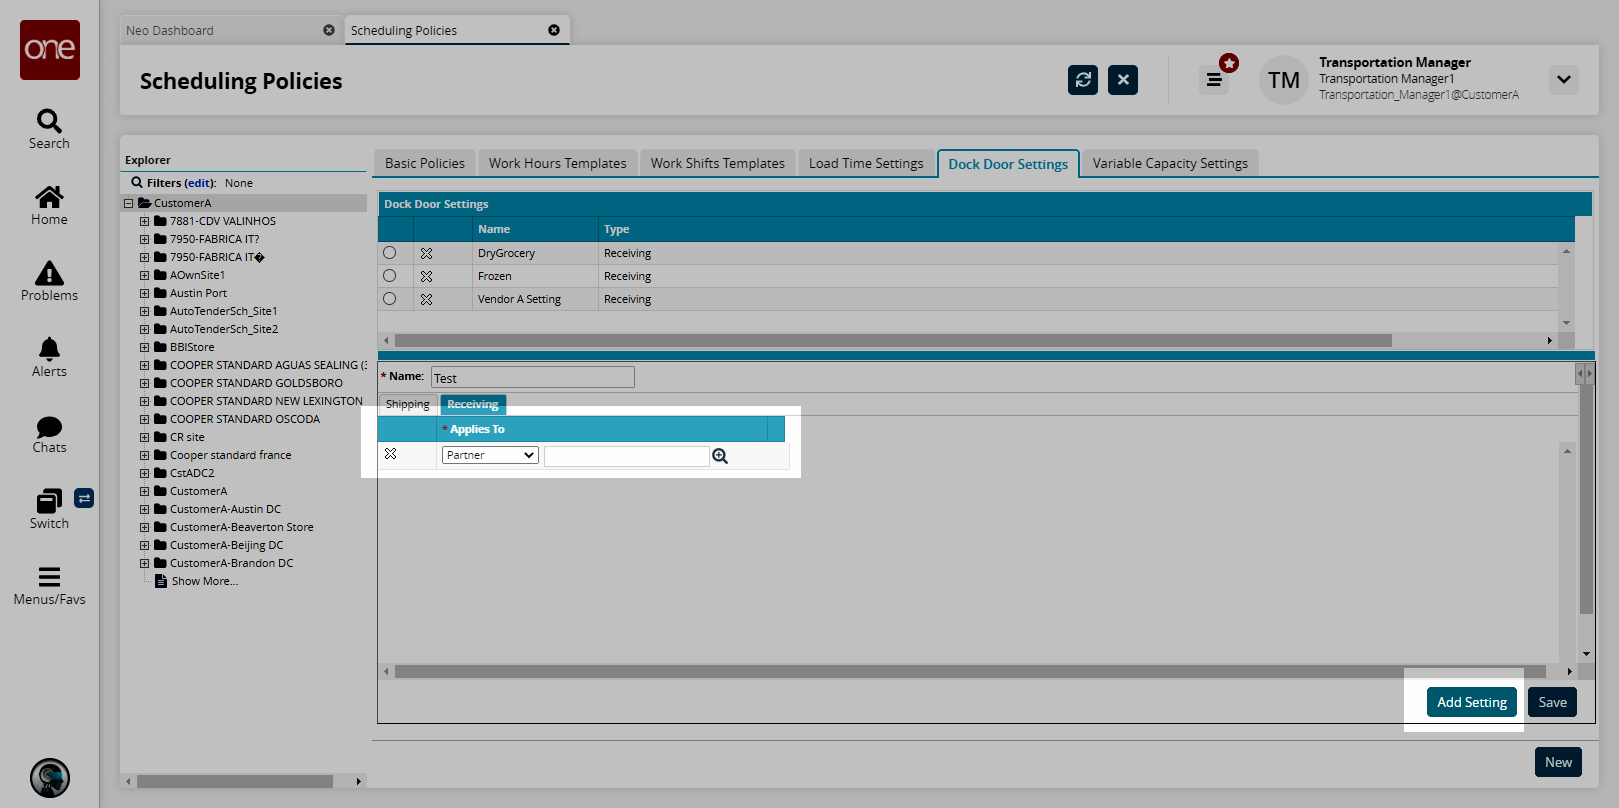
In the Applies To drop-down list, select the relevant option:
Partner: select a partner using the search functionality.
Partner Profile: select a partner profile using the search functionality.
Load Type: select a load type from the drop-down list.
Org Code: select an organization code using the search functionality.
As required, repeat the previous steps for each additional dock door setting for receiving.
To add a dock door setting for shipping, click the Shipping tab, and then click the Add Setting button.
The Shipping form displays.As required, repeat steps the previous steps for each dock door setting for shipping.
Click Save.
The new dock door setting displays in the Dock Door Settings table.
Variable Capacity Settings Tab
Complete the following steps to define variable capacity settings:
Click the Variable Capacity Settings tab.
The Variable Capacity Settings tab displays.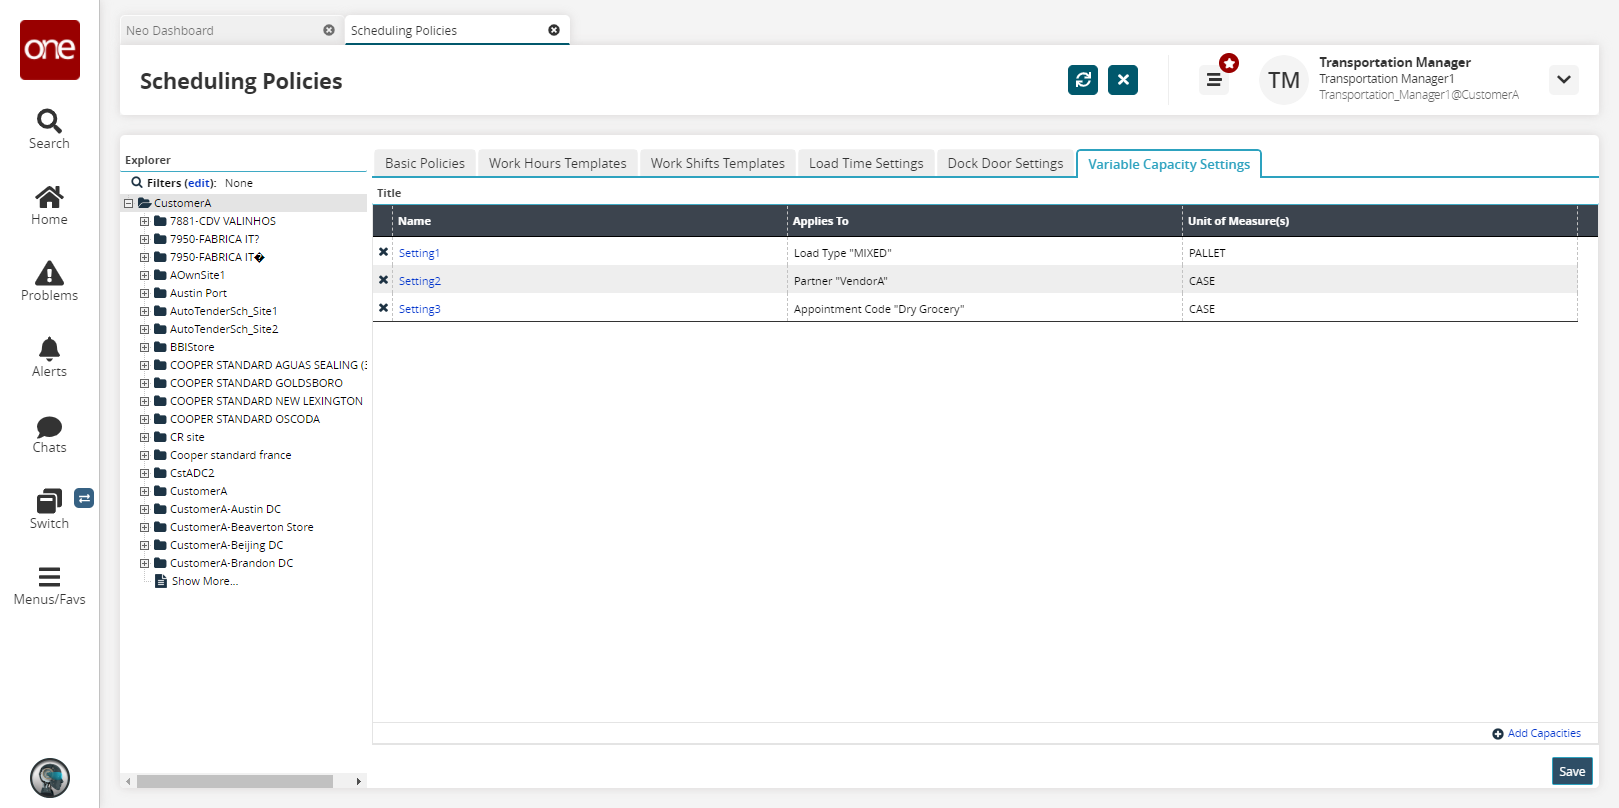
Click the Add Capacities link.
The Variable Capacity Limit popup displays.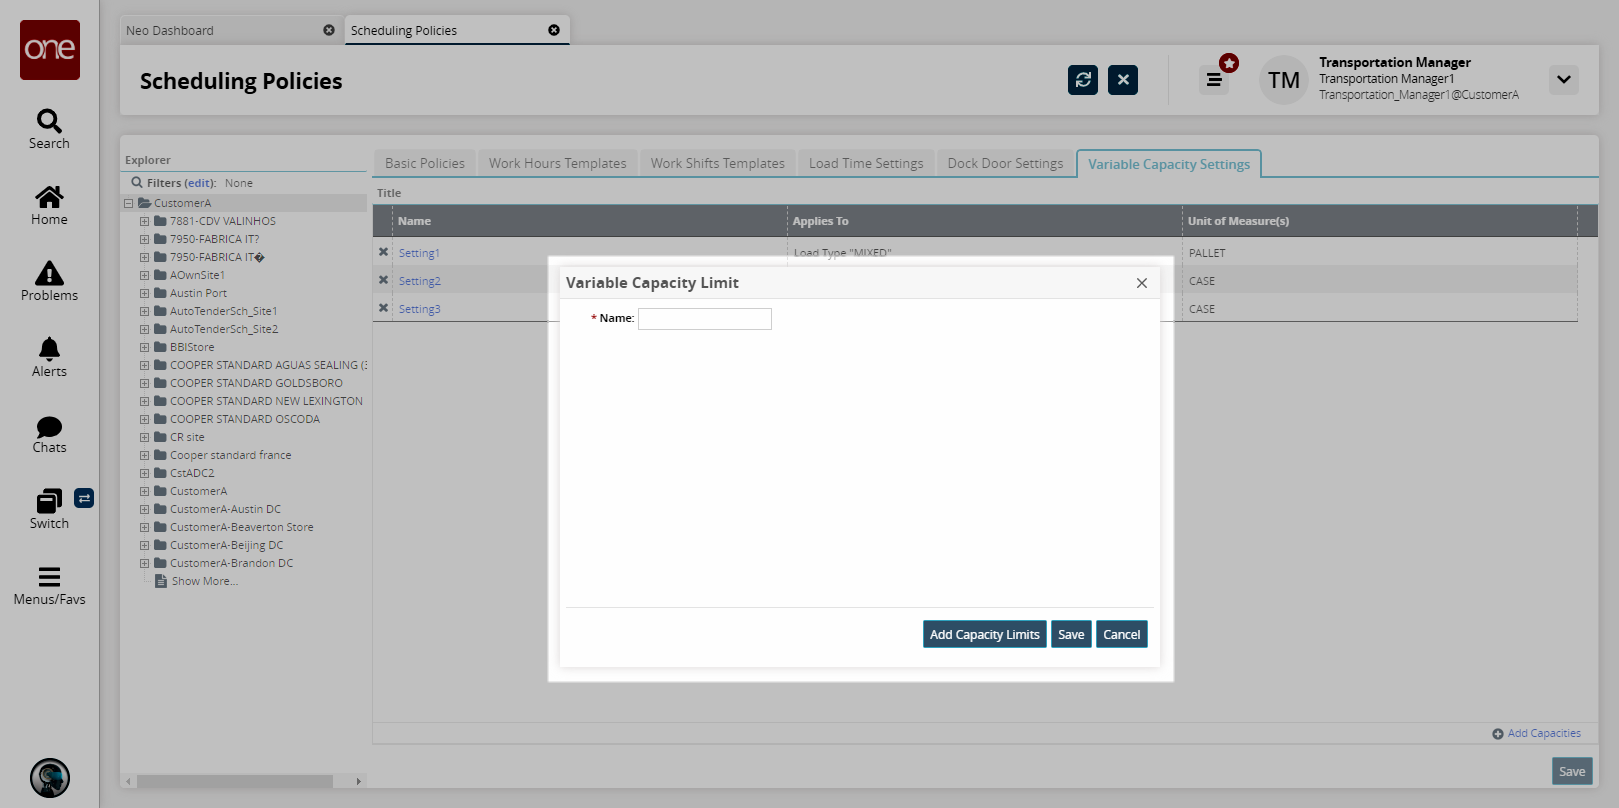
Enter a * Name for the variable capacity limit. Fields with an asterisk ( * ) are required.
Click Add Capacity Limits.
More fields appear.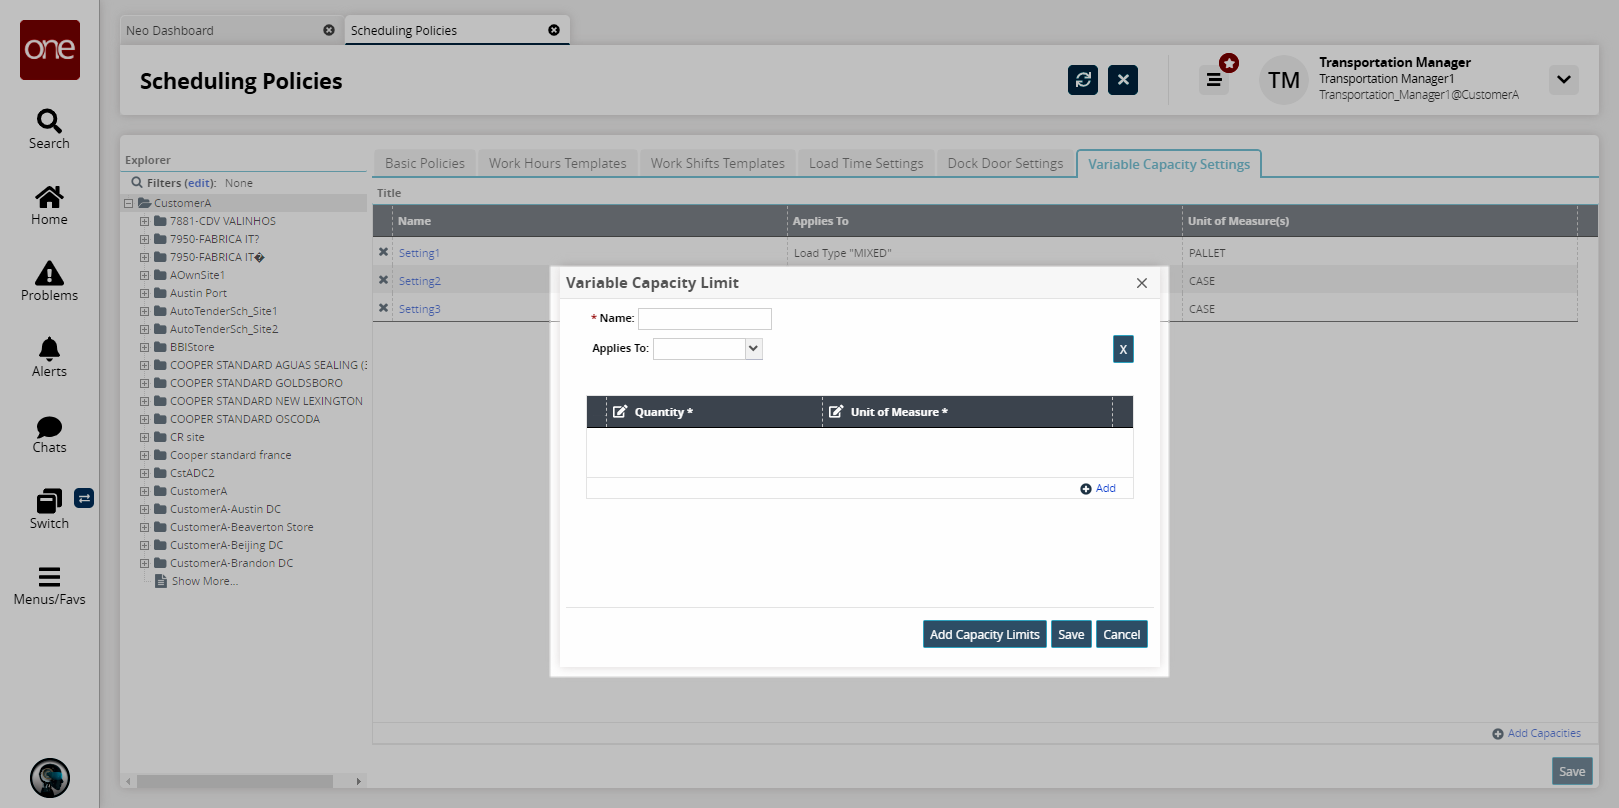
In the Applies To drop-down list, select the relevant option:
Partner: select a partner using the search functionality.
Partner Profile: select a partner profile using the search functionality.
Load Type: select a load type from the drop-down list.
Org Code: select an organization code using the search functionality.
Click the Add link.
A new row displays.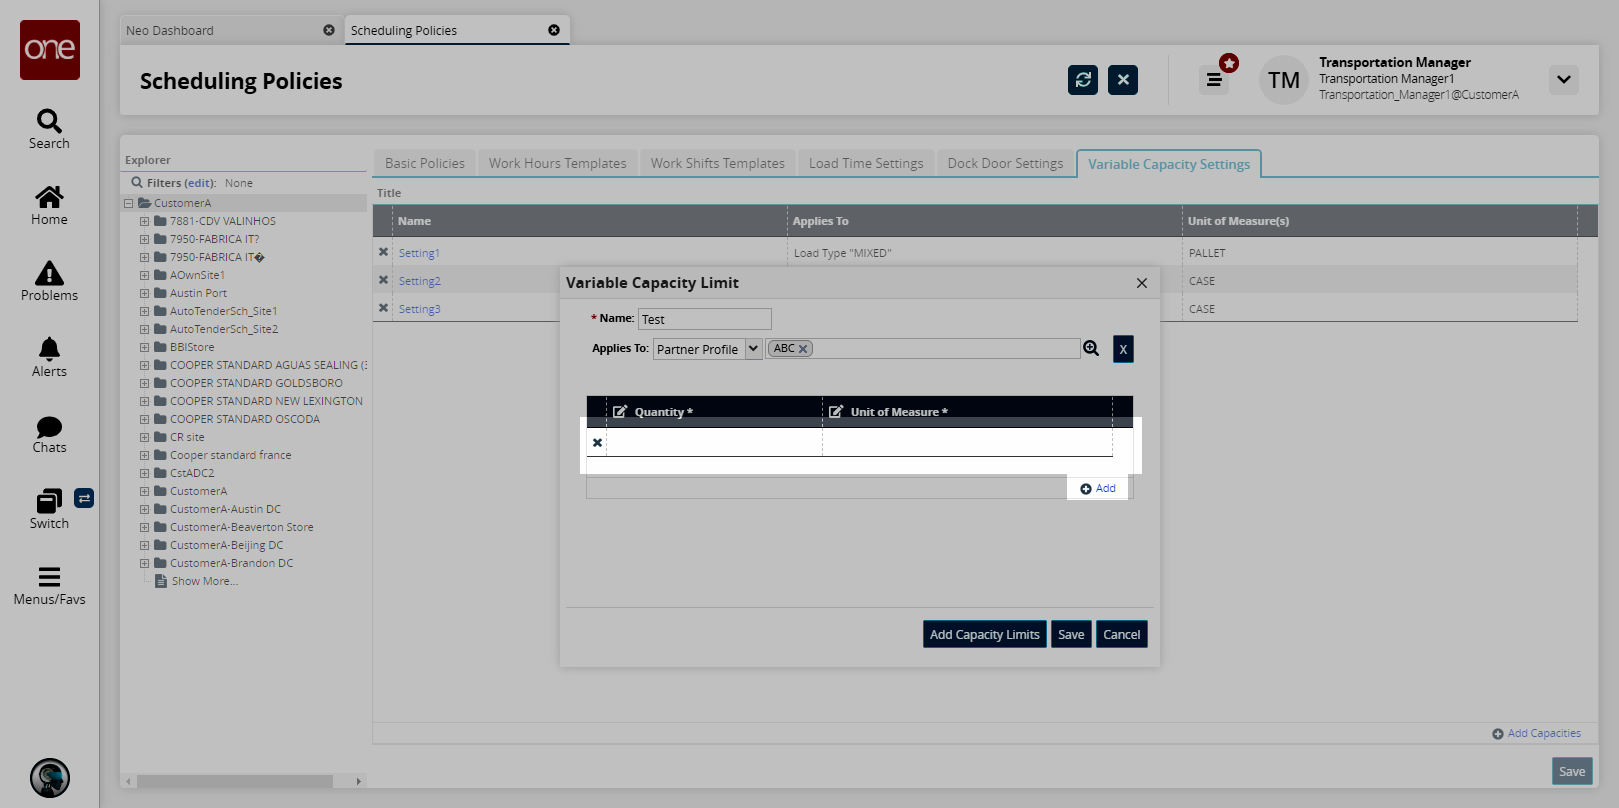
Enter a Quantity*. Fields with an asterisk ( * ) are required.
Enter a Unit of Measure*.
To add another variable capacity limit setting, click Add Capacity Limits, and then repeat the previous steps.
Click Save.
The new variable capacity limits appear in the table.