Transportation Policies
This topic describes various transportation policies and how to configure them.
L og in to the ONE system.
Click Menus/Favs > Transportation > Policies > Transportation Policies.
In the NEO UI, users can click on the Menus/Favs icon on the left sidebar and type in the name of the screen in the menu search bar. For more information, see "Using the Menu Search Bar."
The Transportation Policies screen displays.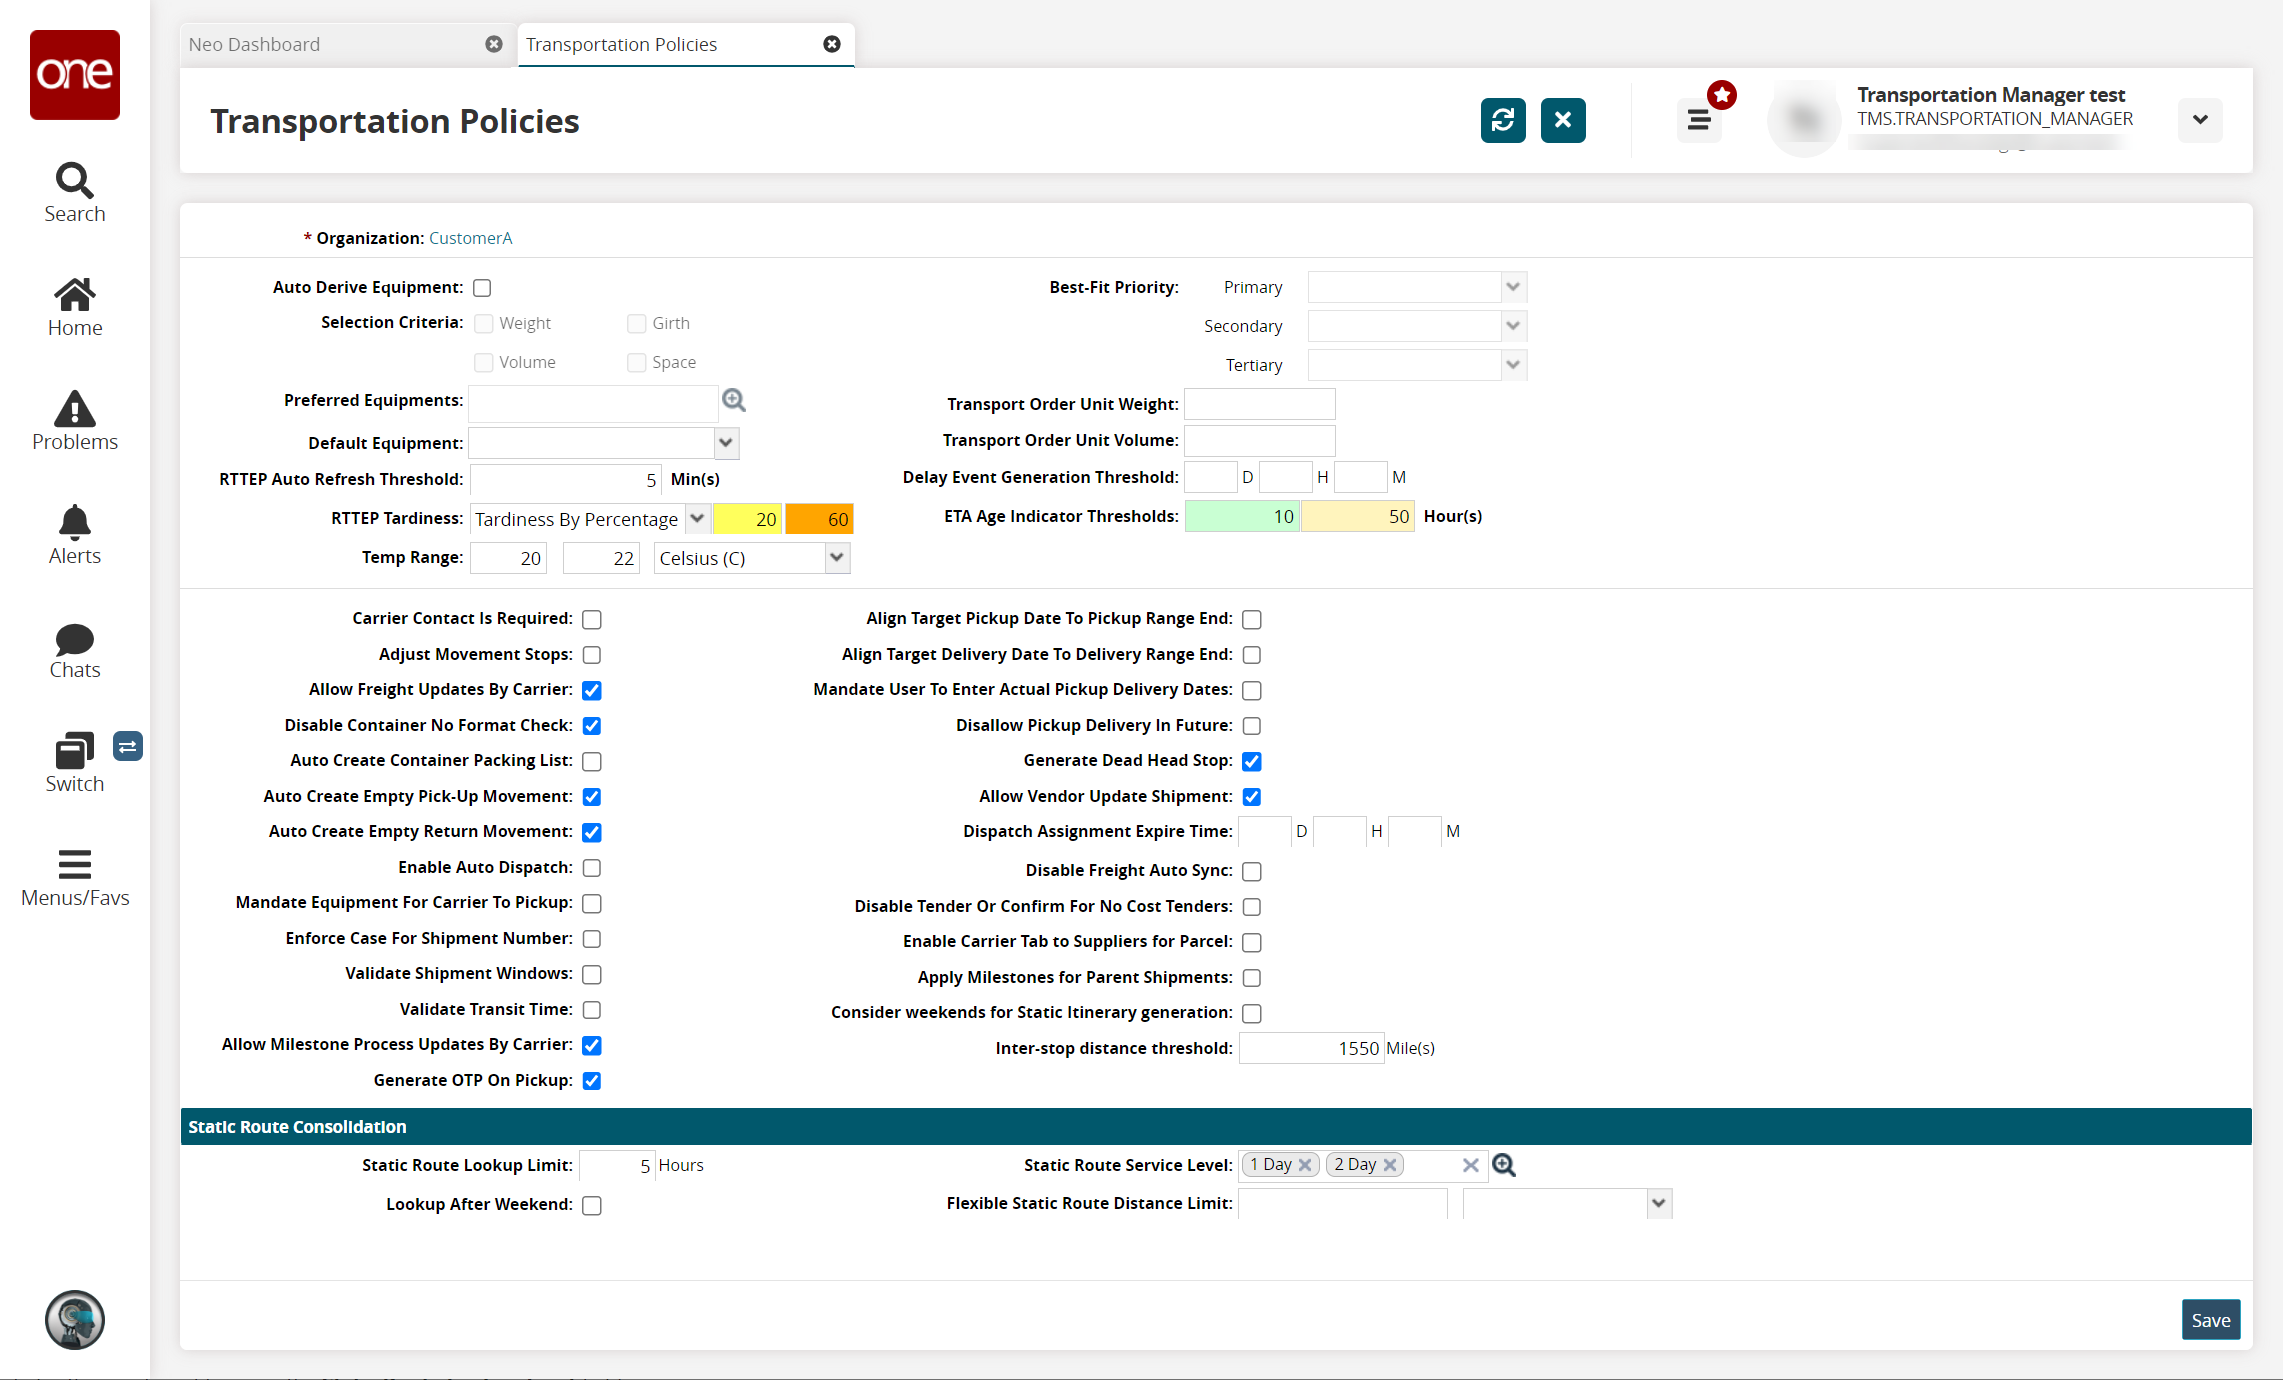
Fill out the following fields. Fields with an asterisk ( * ) are required.
Field
Description
Auto-Derive Equipment
Selecting this checkbox allows the system to identify the equipment best suited to carry a shipment. The calculation is based on the weight, volume, girth, and space characteristics of the shipment and the available equipment. The calculation is performed during shipment creation.
If selected, the Selection Criteria checkboxes, the Best-Fit Priority drop-down menus, and the Preferred Equipments fields become accessible.
Selection Criteria
Select the appropriate checkbox for the desired selection criteria. The available checkboxes are Weight, Girth, Volume, and Space. This field is only active when the Auto-Derive Equipment checkbox is selected.
Preferred Equipments
This field allows you to establish preferred equipment for auto-equipment derivation. Use the picker tool to select preferred equipment. This field is only active when the Auto-Derive Equipment checkbox is selected.
Default Equipment
Select an equipment type to be automatically populated in the equipment field of any newly created shipment.
RTTEP Auto-Refresh Threshold
Enter a value (in minutes) for the RTTEP auto-refresh threshold.
RTTEP Tardiness
Select one of the following values to measure tardiness: Tardiness By Percentage and Tardiness By Hours. Enter values for the upper (orange) and lower (yellow) thresholds. The default is Tardiness By Percentage.
Temp Range
Enter the acceptable temperature range in the text fields and select the unit of measure (UOM) from the dropdown list.
Best-Fit Priority
This collection of fields has three drop-down menus, Primary, Secondary, and Tertiary. Use these menus to establish the order in which the selection criteria are applied to the shipment. In each drop-down, the available options are Weight, Girth, Volume, and Space. This field is only active when the Auto-Derive Equipment checkbox is selected.
Transport Order Unit Weight
Enter a unit weight for the transport order.
Transport Order Unit Volume
Enter a unit volume for the transport order.
Delay Event Generation Threshold
Enter the time duration to wait before generating a delay event.
ETA Age Indicator Thresholds
Enter the minimum and maximum ETA age thresholds. This policy provides shipper users with the ability to define upper and lower thresholds in hours calculating the age of the estimated time of arrival (ETA). The thresholds are calculated using the system time and the last event update time and will display in green, yellow, or red in the Next Stop/Next Stop ETA and Final Stop/Final Stop ETA columns of the shipment, shipment states, and movement reports. The colored display helps users to easily view movement and shipment ETAs. The following calculations determine the green, yellow, or red status of the movement/shipment:
Green: If the system time minus the last event update from the current position time is less than the lower threshold, then the Next Stop/Next Stop ETA and Final Stop/Final Stop ETA times are displayed in green.
Yellow: If the system time minus the last event update from the current position time is greater than the lower threshold and less than the upper threshold, then the Next Stop/Next Stop ETA and Final Stop/Final Stop ETA times are displayed in yellow.
Red: If the system time minus the last event update from the current position time is greater than the upper threshold, then the Next Stop/Next Stop ETA and Final Stop/Final Stop ETA times are displayed in red.
Carrier Contact Is Required
Select this checkbox to require all shipments to have a carrier contract.
Adjust Movement Stops
Select this checkbox to enable the adjustment of movement stops during shipment.
Allow Freight Updates By Carrier
Select this checkbox to allow the carrier to submit the actual weight.
Disable Container No Format Check
Select this checkbox to disable container no-format checks.
Auto Create Container Packing List
Select this checkbox to auto-create container packing lists.
Auto Create Empty Return Movement
Select this checkbox to auto-create an empty return movement for the vessel.
Auto Create Empty Pick-Up Movement
Select this checkbox to auto-create an empty pick-up movement for the vessel.
Enable Auto-Dispatch
Select this checkbox to enable auto-dispatching.
Mandate Equipment For Carrier To Pickup
Select this checkbox to mandate equipment the carrier must pick up.
Enforce Case For Shipment Number
Select this checkbox to enforce case for shipment numbers.
Validate Shipment Windows
Select this checkbox to have the system validate shipment windows.
Validate Transit Time
Select this checkbox to have the system validate transit times.
Allow Milestone Process Updates By Carrier
Select this checkbox to allow carriers to update the milestone process.
Generate OTP On Pickup
Select this checkbox to generate OTP on pickup.
Align Target Pickup Date To Pickup Range End
Select this checkbox to auto-populate the target shipment pickup date with the same date as the end of the entered pickup date range. Deselect this option to auto-populate the target shipment pickup date with the same date as the start of the pickup date range.
Align Target Delivery Date to Delivery Range End
Select this checkbox to auto-populate the target shipment delivery date with the same date as the end of the delivery date range. Deselect this option to auto-populate the target shipment delivery date with the same date as the start of the entered pickup date range.
Mandate User To Enter Actual Pickup Delivery Dates
Select this checkbox to require users to manually enter dates and times on Pickup and Delivery pop-up windows.
Disallow Pickup Delivery In Future
Select this checkbox to require users to add a pick/delivered future date tracking events.
Generate Dead Head Stop
Select this checkbox to allow the system to generate deadhead stops.
Allow Vendor Update Shipment
Select this checkbox to allow vendors to update shipments.
Dispatch Assignment Expire Time
Enter a dispatch assignment expire time in days, hours, and minutes.
Disable Freight Auto-Sync
Select this checkbox to disable the auto-sync of freight.
Disable Tender Or Confirm For No Cost Tenders
Select this checkbox to disable tender or confirm for no-cost tenders.
Enable Carrier Tab to Suppliers for Parcel
Select this checkbox to enable the Carrier tab for suppliers.
Apply Milestones for Parent Shipments
Select this checkbox to apply milestones for parent shipments.
Consider weekends for Static Itinerary generation
Select this checkbox if you want the system to consider weekends when generating static itineraries.
Static Route Lookup Limit
Enter the static route lookup limit in hours.
Lookup After Weekend
Select this checkbox to enable a lookup after the weekend.
Static Route Service Level
Use this picker tool to select various static route service levels.
Flexible Static Route Distance Limit
Enter a numeral and select a unit of measure for the flexible static route distance limit from the drop-down menu.
Click Save.
A success message appears.
Enabling the Static Route Consolidation policy:
Enter the number of hours in the Static Route Lookup Limit field.
Select the checkbox for the Lookup After Weekend to look it up after the weekend.
Select the Static Route Service Level with the picker tool to edit the Default selection.
Enter the flexible static route distance in the Flexible Static Route Distance Limit field and select the unit of measurement from the drop-down lists.
Click the Save button to save the changes.