Working with the Control Tower Workbench
The Control Tower Workbench (CTW) provides users with a single point of contact in the UI to track and optimize standard and multi-modal shipments within global trade. The workbench learns the transnational behavior of shipments and movements within the system and suggests a milestone template (which will be continuously refined based on new transnational patterns) in addition to generating problems and alerts. It provides visibility to the order, BOL, booking, and container numbers, as well as the container details for each shipment. Order milestones are not only provided on their own timeline but they are linked to shipment timelines and appended to the shipment milestone timeline with the following conditions:
Prefix order milestone with a milestone group as Order Confirmation.
Suffix order milestone with a milestone group as Delivery Closure.
Users can monitor the progress of cargo from packing to clearing export customs along a progress bar with status indicators for each step. They also have the ability to drill down into shipment information to view tracking and milestone events, problems, and a map view of the shipment's location. Most importantly, the CTW provides users with the NEO It option that performs recommendations for the next step in solving any problems or optimizing the shipment.
Complete the following steps to access the Control Tower Workbench:
Log in to the ONE system.
Click Menu/Favs > Transportation > Control Tower Workbench.
The Control Tower Workbench screen appears.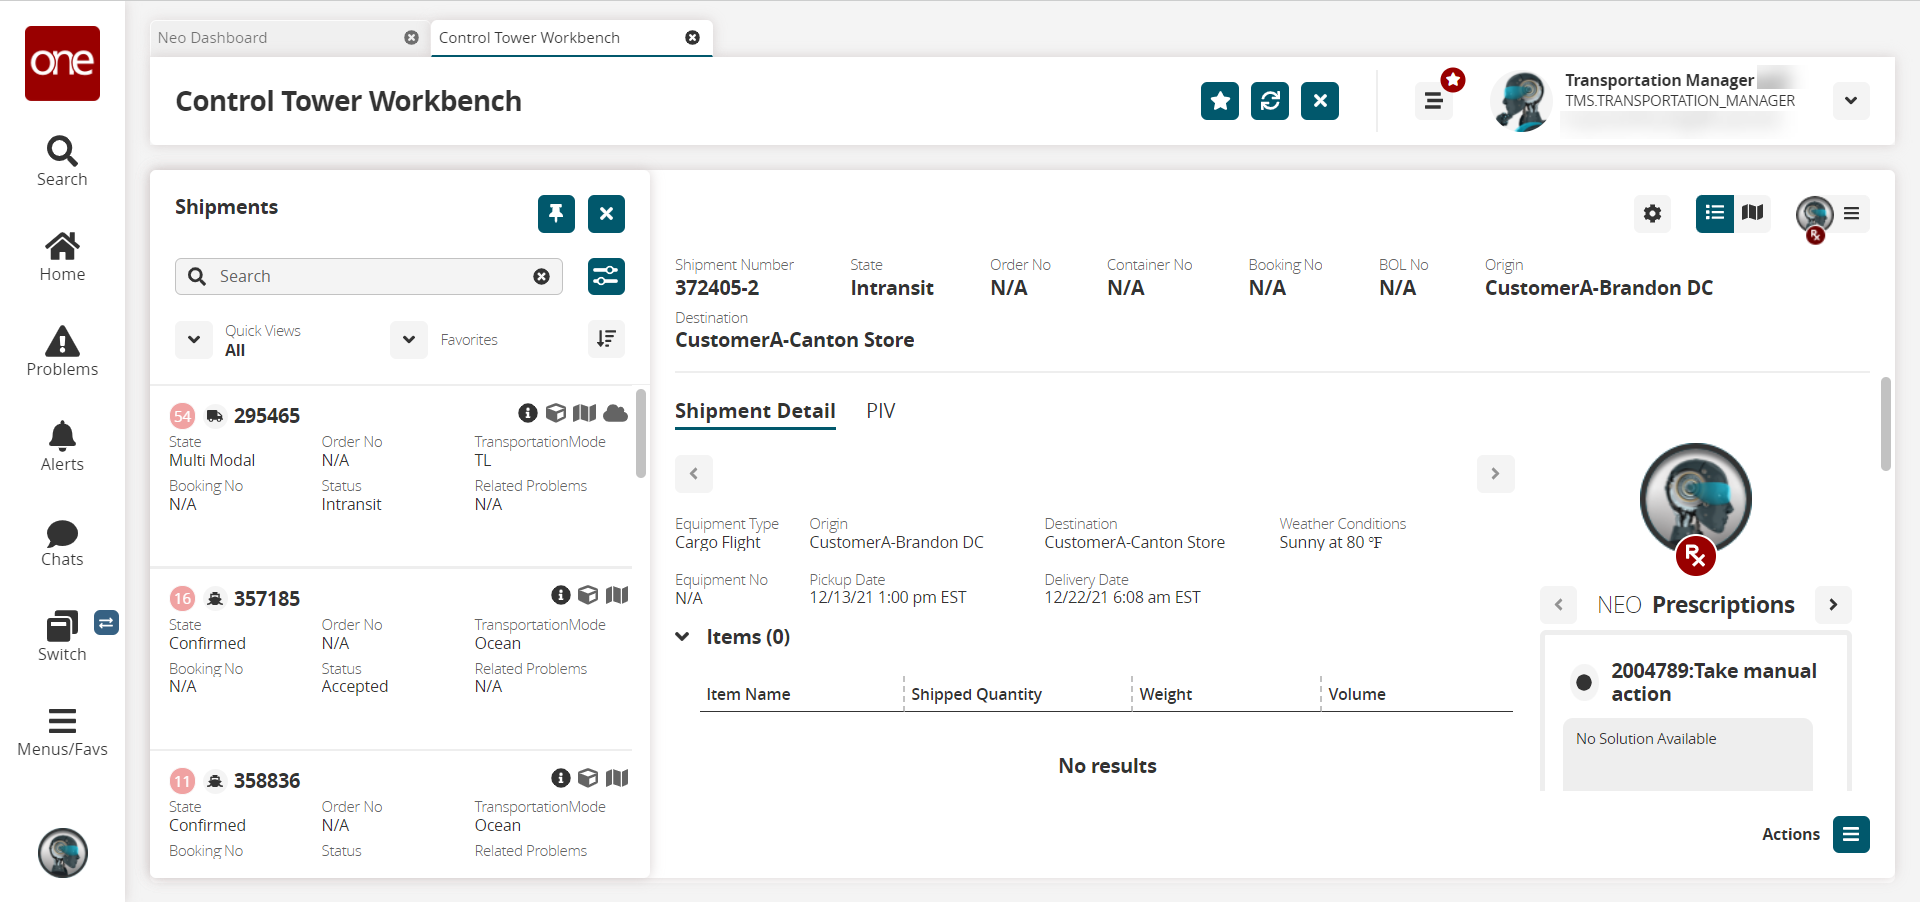
The following sections define functionality found in the CTW.
Customization Tools
The CTW customization tools allow users to set the following attributes:
Favorites - Users can add views to the Favorites list.
Quick Views - Users can select In Air, On Ocean, On-Road, At Port, Delivered, or Reset.
Filter - Users can filter by shipment number, origin, destination, item number, warnings only, and problems only.

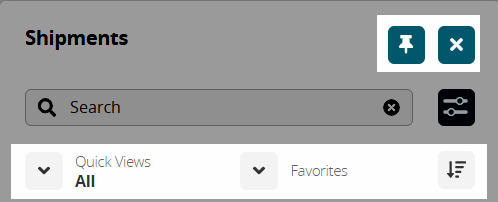
Shipments Slideout
The Shipments slideout is located on the left side of the CTW.

Customization Tools in the Shipments Slideout
The CTW customization tools allow users to set the following attributes:
Pin icon - Users can pin the Shipments slideout to an open position.
X icon - Users can close the Shipments slideout.
Favorites - Users can add views to the Favorites list.
Quick Views - Users can select In Air, On Ocean, On-Road, At Port, Delivered, or Reset.
Filter - Users can filter by shipment number, origin, destination, item number, warnings only, and problems only.
Shipment Information in the Shipment Slideout
The Shipments slideout provides shipment information and weather conditions as well as an indicator for critical problems that need attention or suggestions for optimization. As shown in the example, the following items are displayed for shipments:
Shipment Number
Order Number
State
Transportation Mode
Status
Booking Number
Related problems
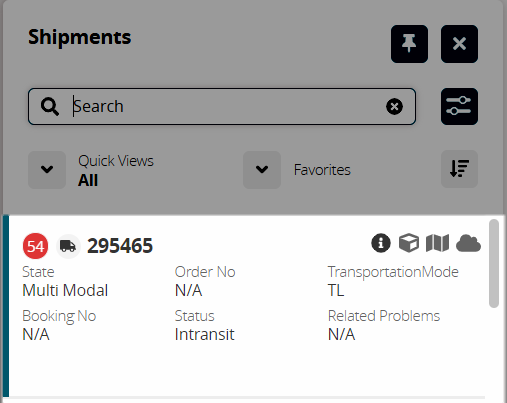
Click one of the icons indicated below for more information on the shipment: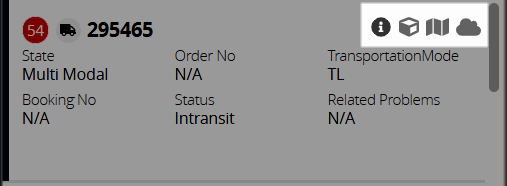
The information icon displays more shipment information in the pane to the right.
The cube icon displays container information.
The map icon displays the map view.
The cloud icon displays animated weather information for the shipment's location.
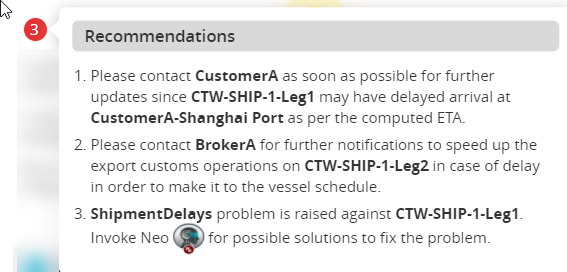
Recommendations in the Shipments Slideout
The red circle to the left of a shipment number in the Shipments slideout (shown below) indicates that there are critical recommendations that require immediate attention for the shipment. A blue circle indicates suggested recommendations that will improve optimization.
Shipment Information and Detail
In the Shipments slideout, click a shipment number to display the shipment details in the pane to the right on the CTW.
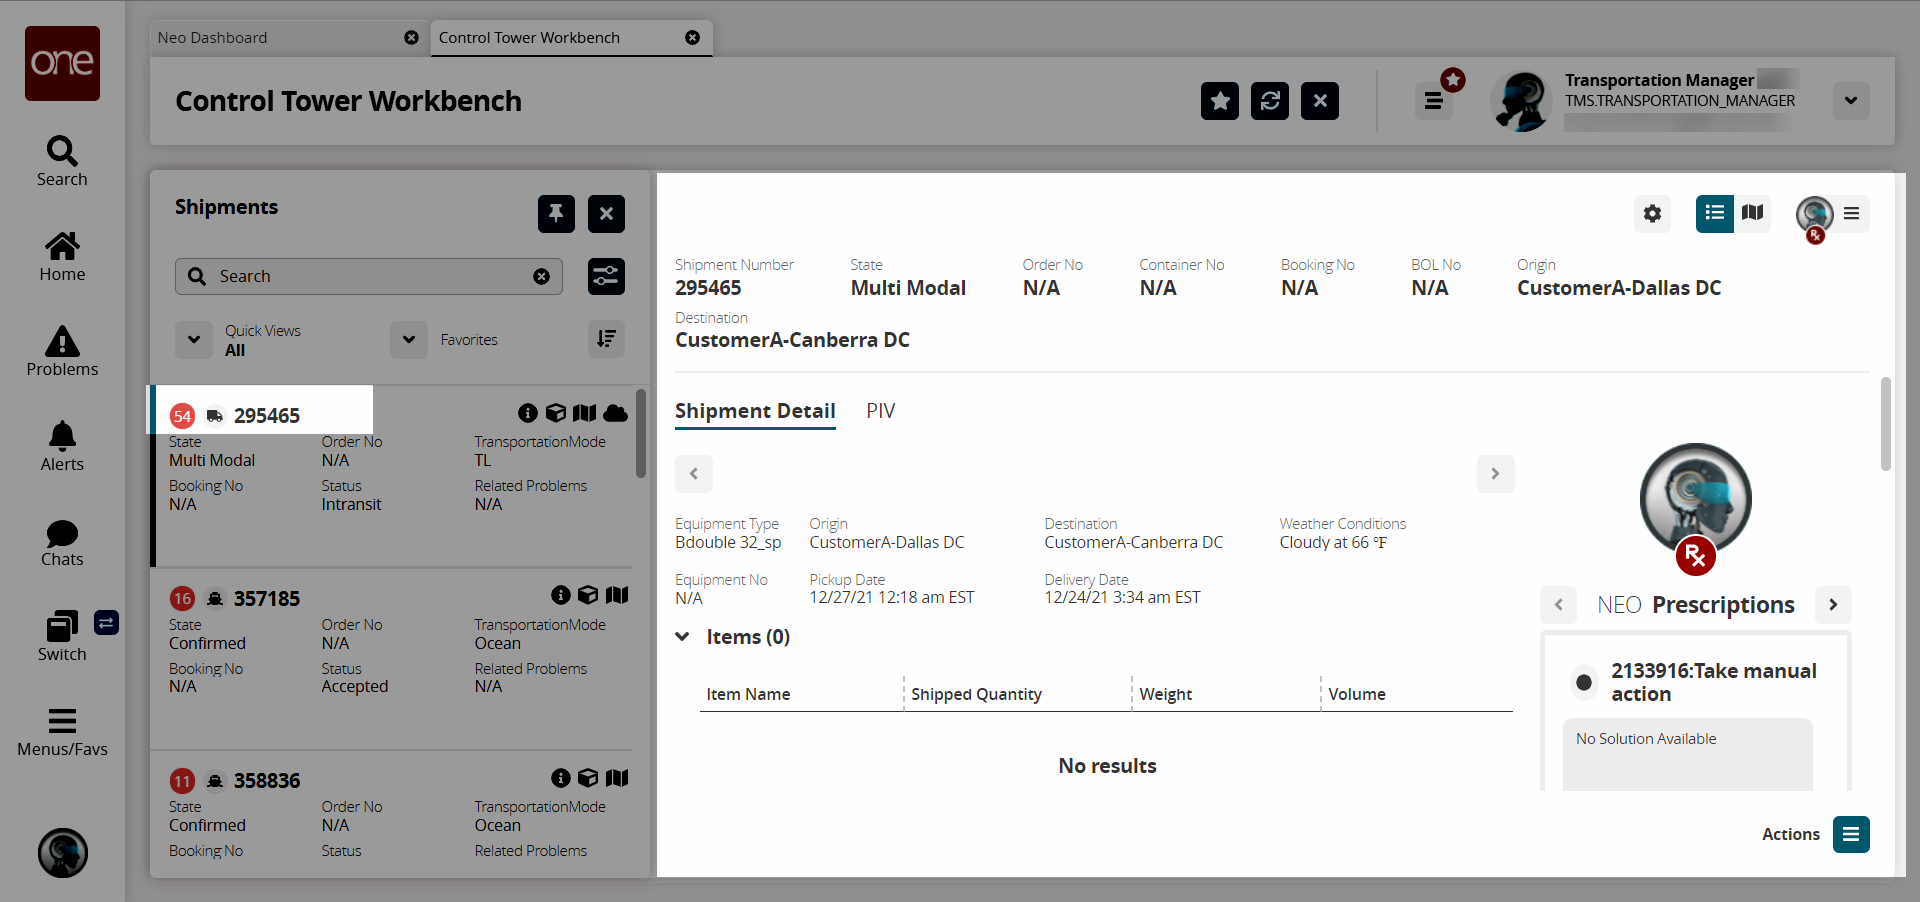
Tabs View
The shipment information opens with the Tabs view selected (bullet list icon). Users can switch between the Shipment Detail tab or the PIV tab.
The Shipment Detail tab displays an Items, Problems, Tracking Events, and Milestones section for the selected shipment.
The PIV tab (shown in the image below) provides details for items and sites with specific data measures and anticipated dates. Users can swap locations (using the Swap Locations button) and apply more specific filters (using the filter icon) on this view. Filters include site, location, item, program, planner code, variation, date range, my preference, and a timeframe bucketization.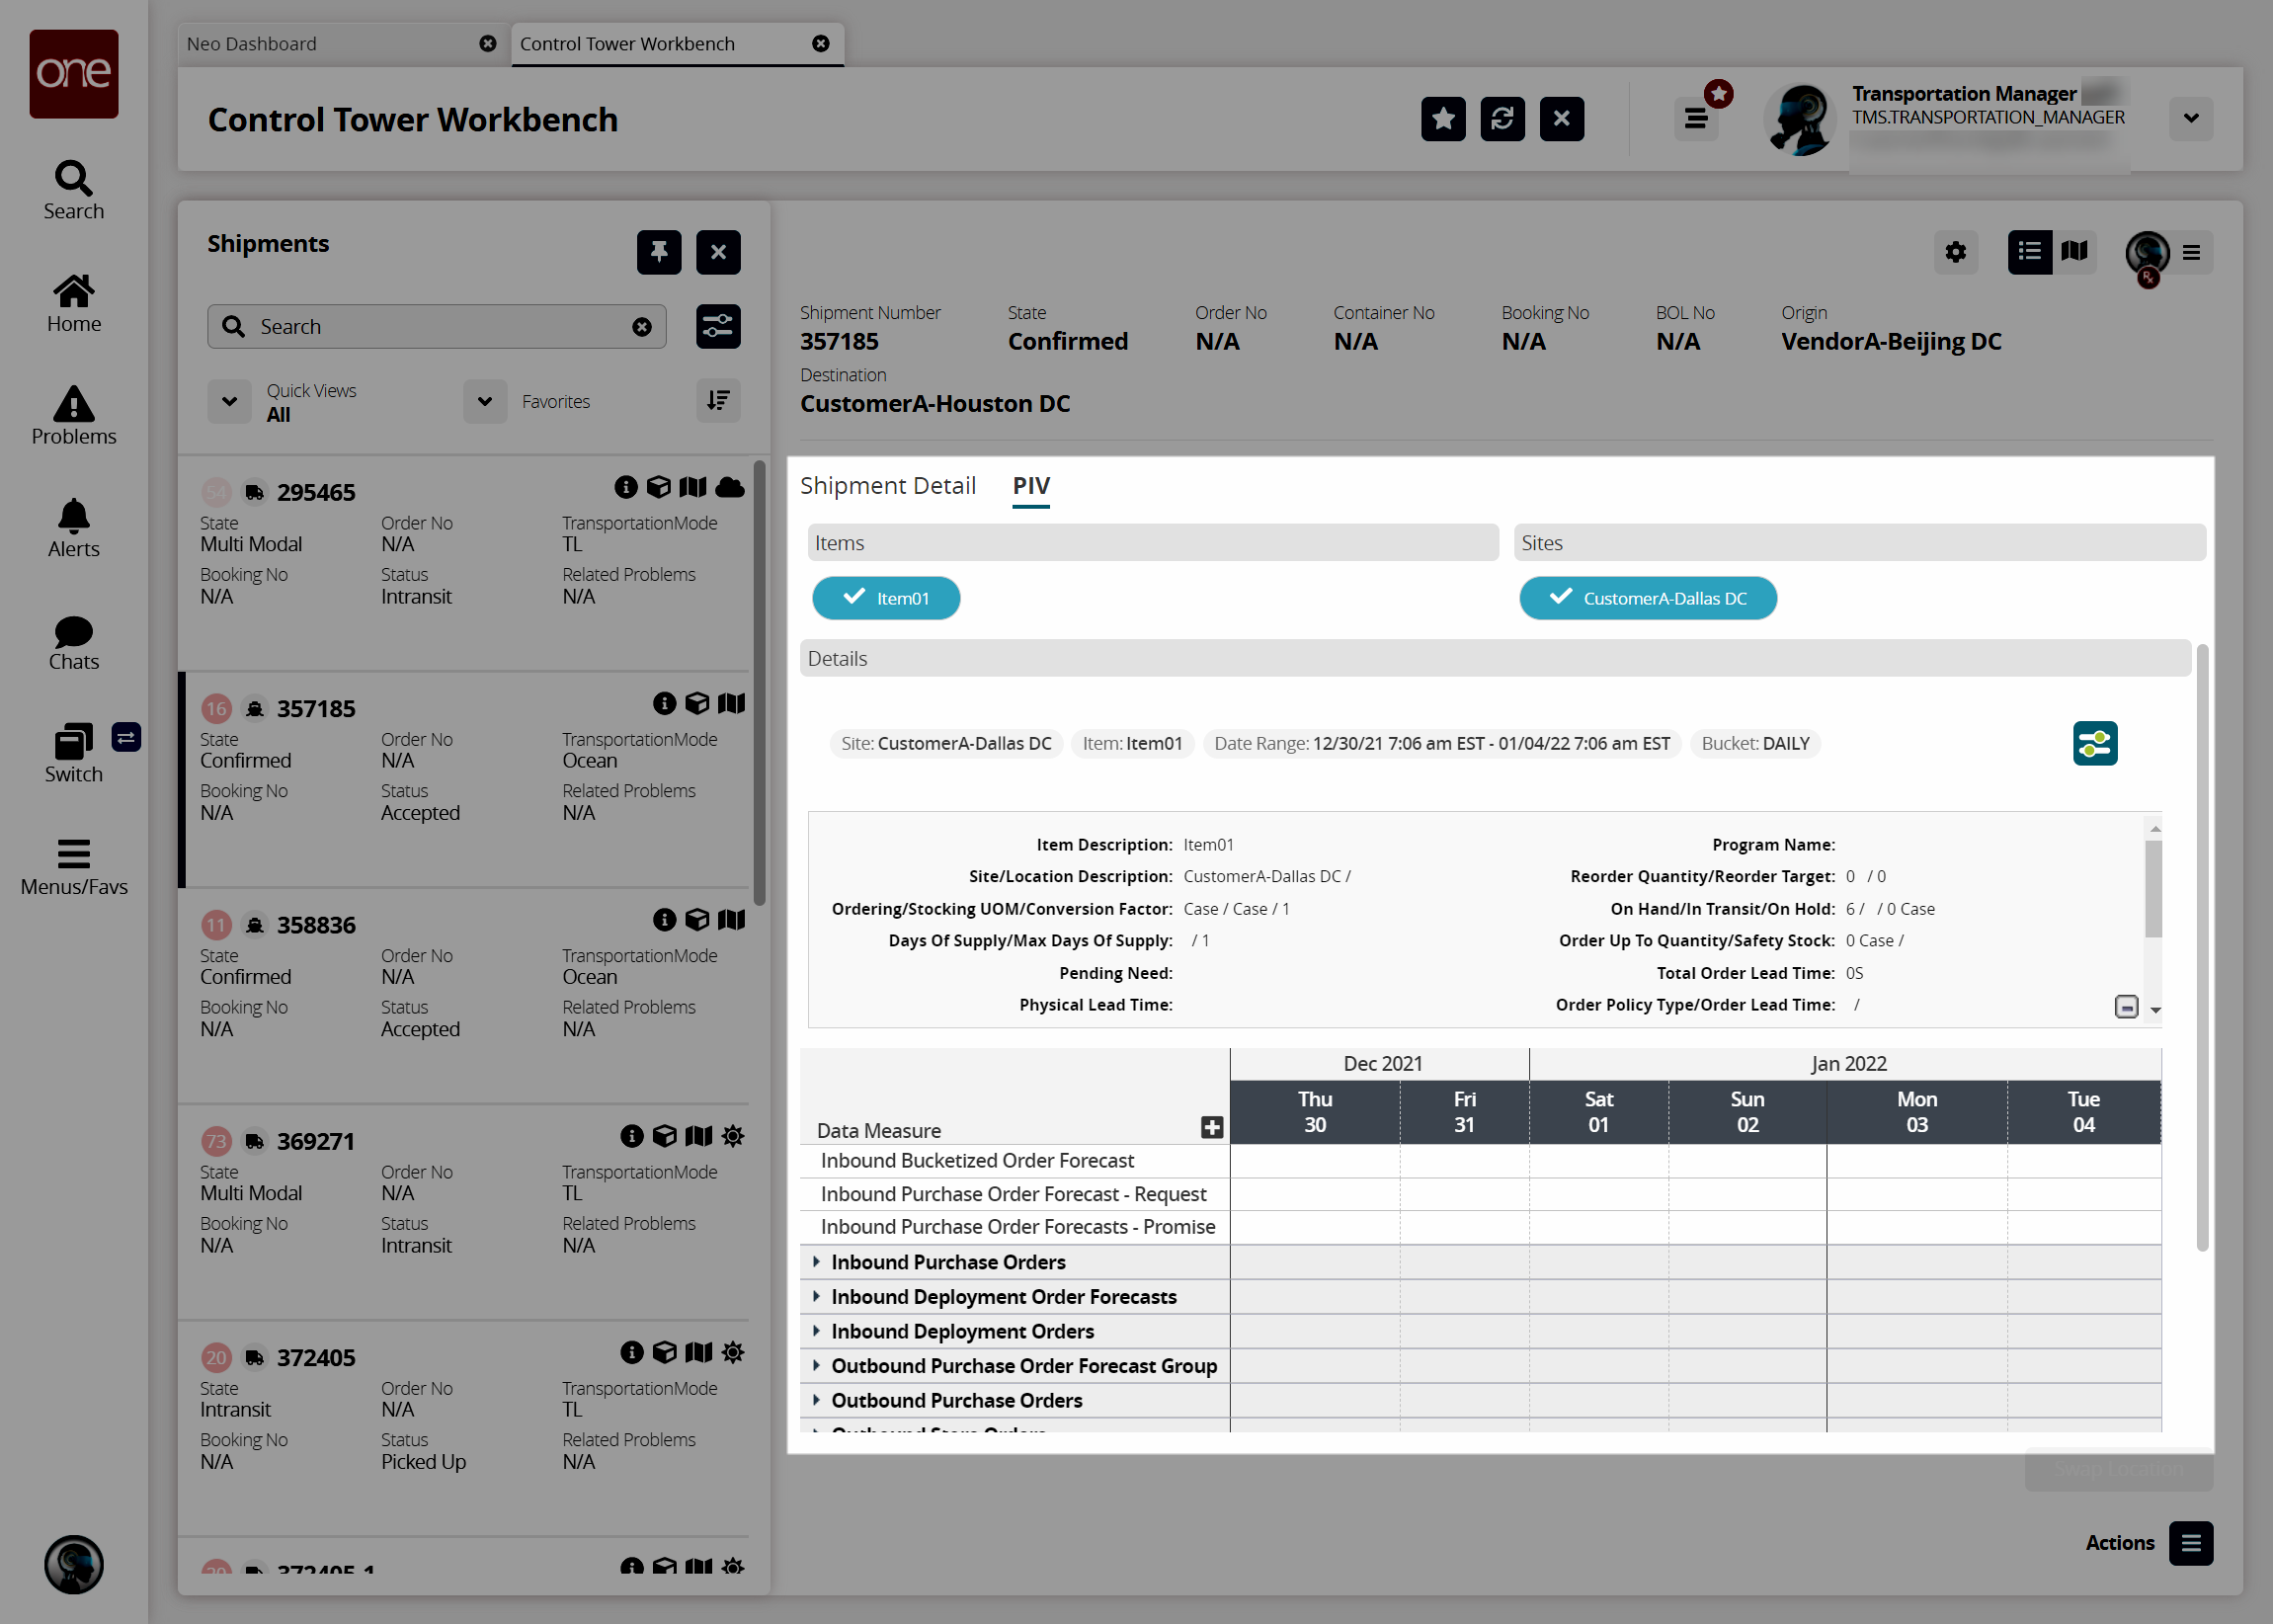
Map View
Click the map icon to display the shipment information in map view.
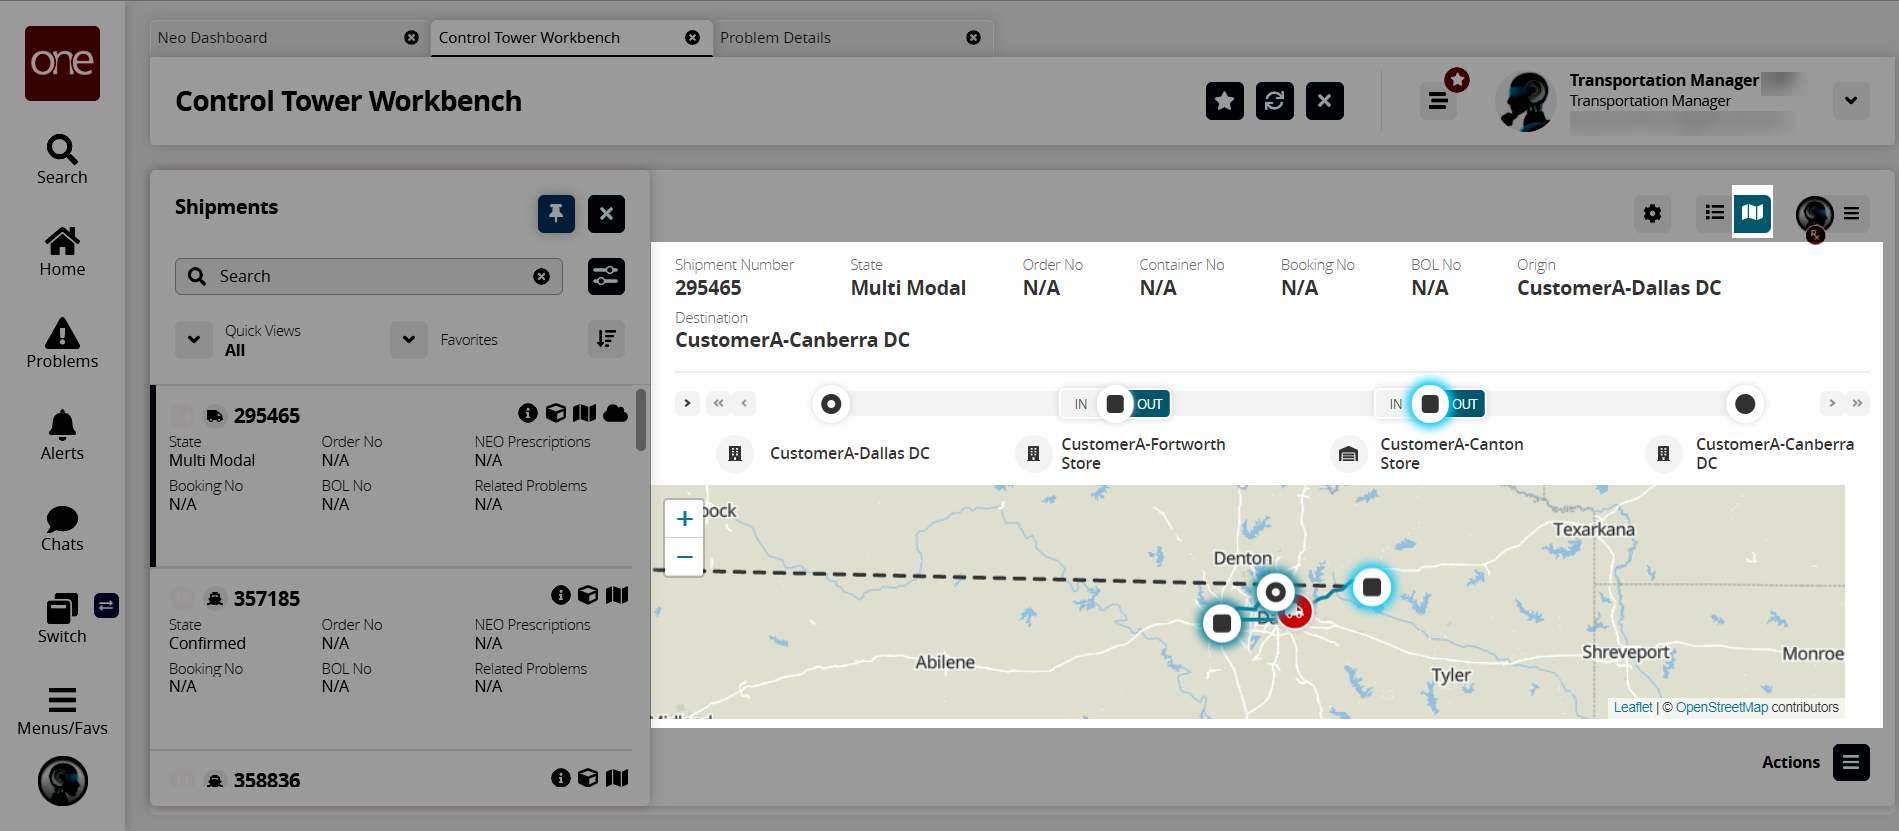
Click the arrow to the left to expand the information about each leg.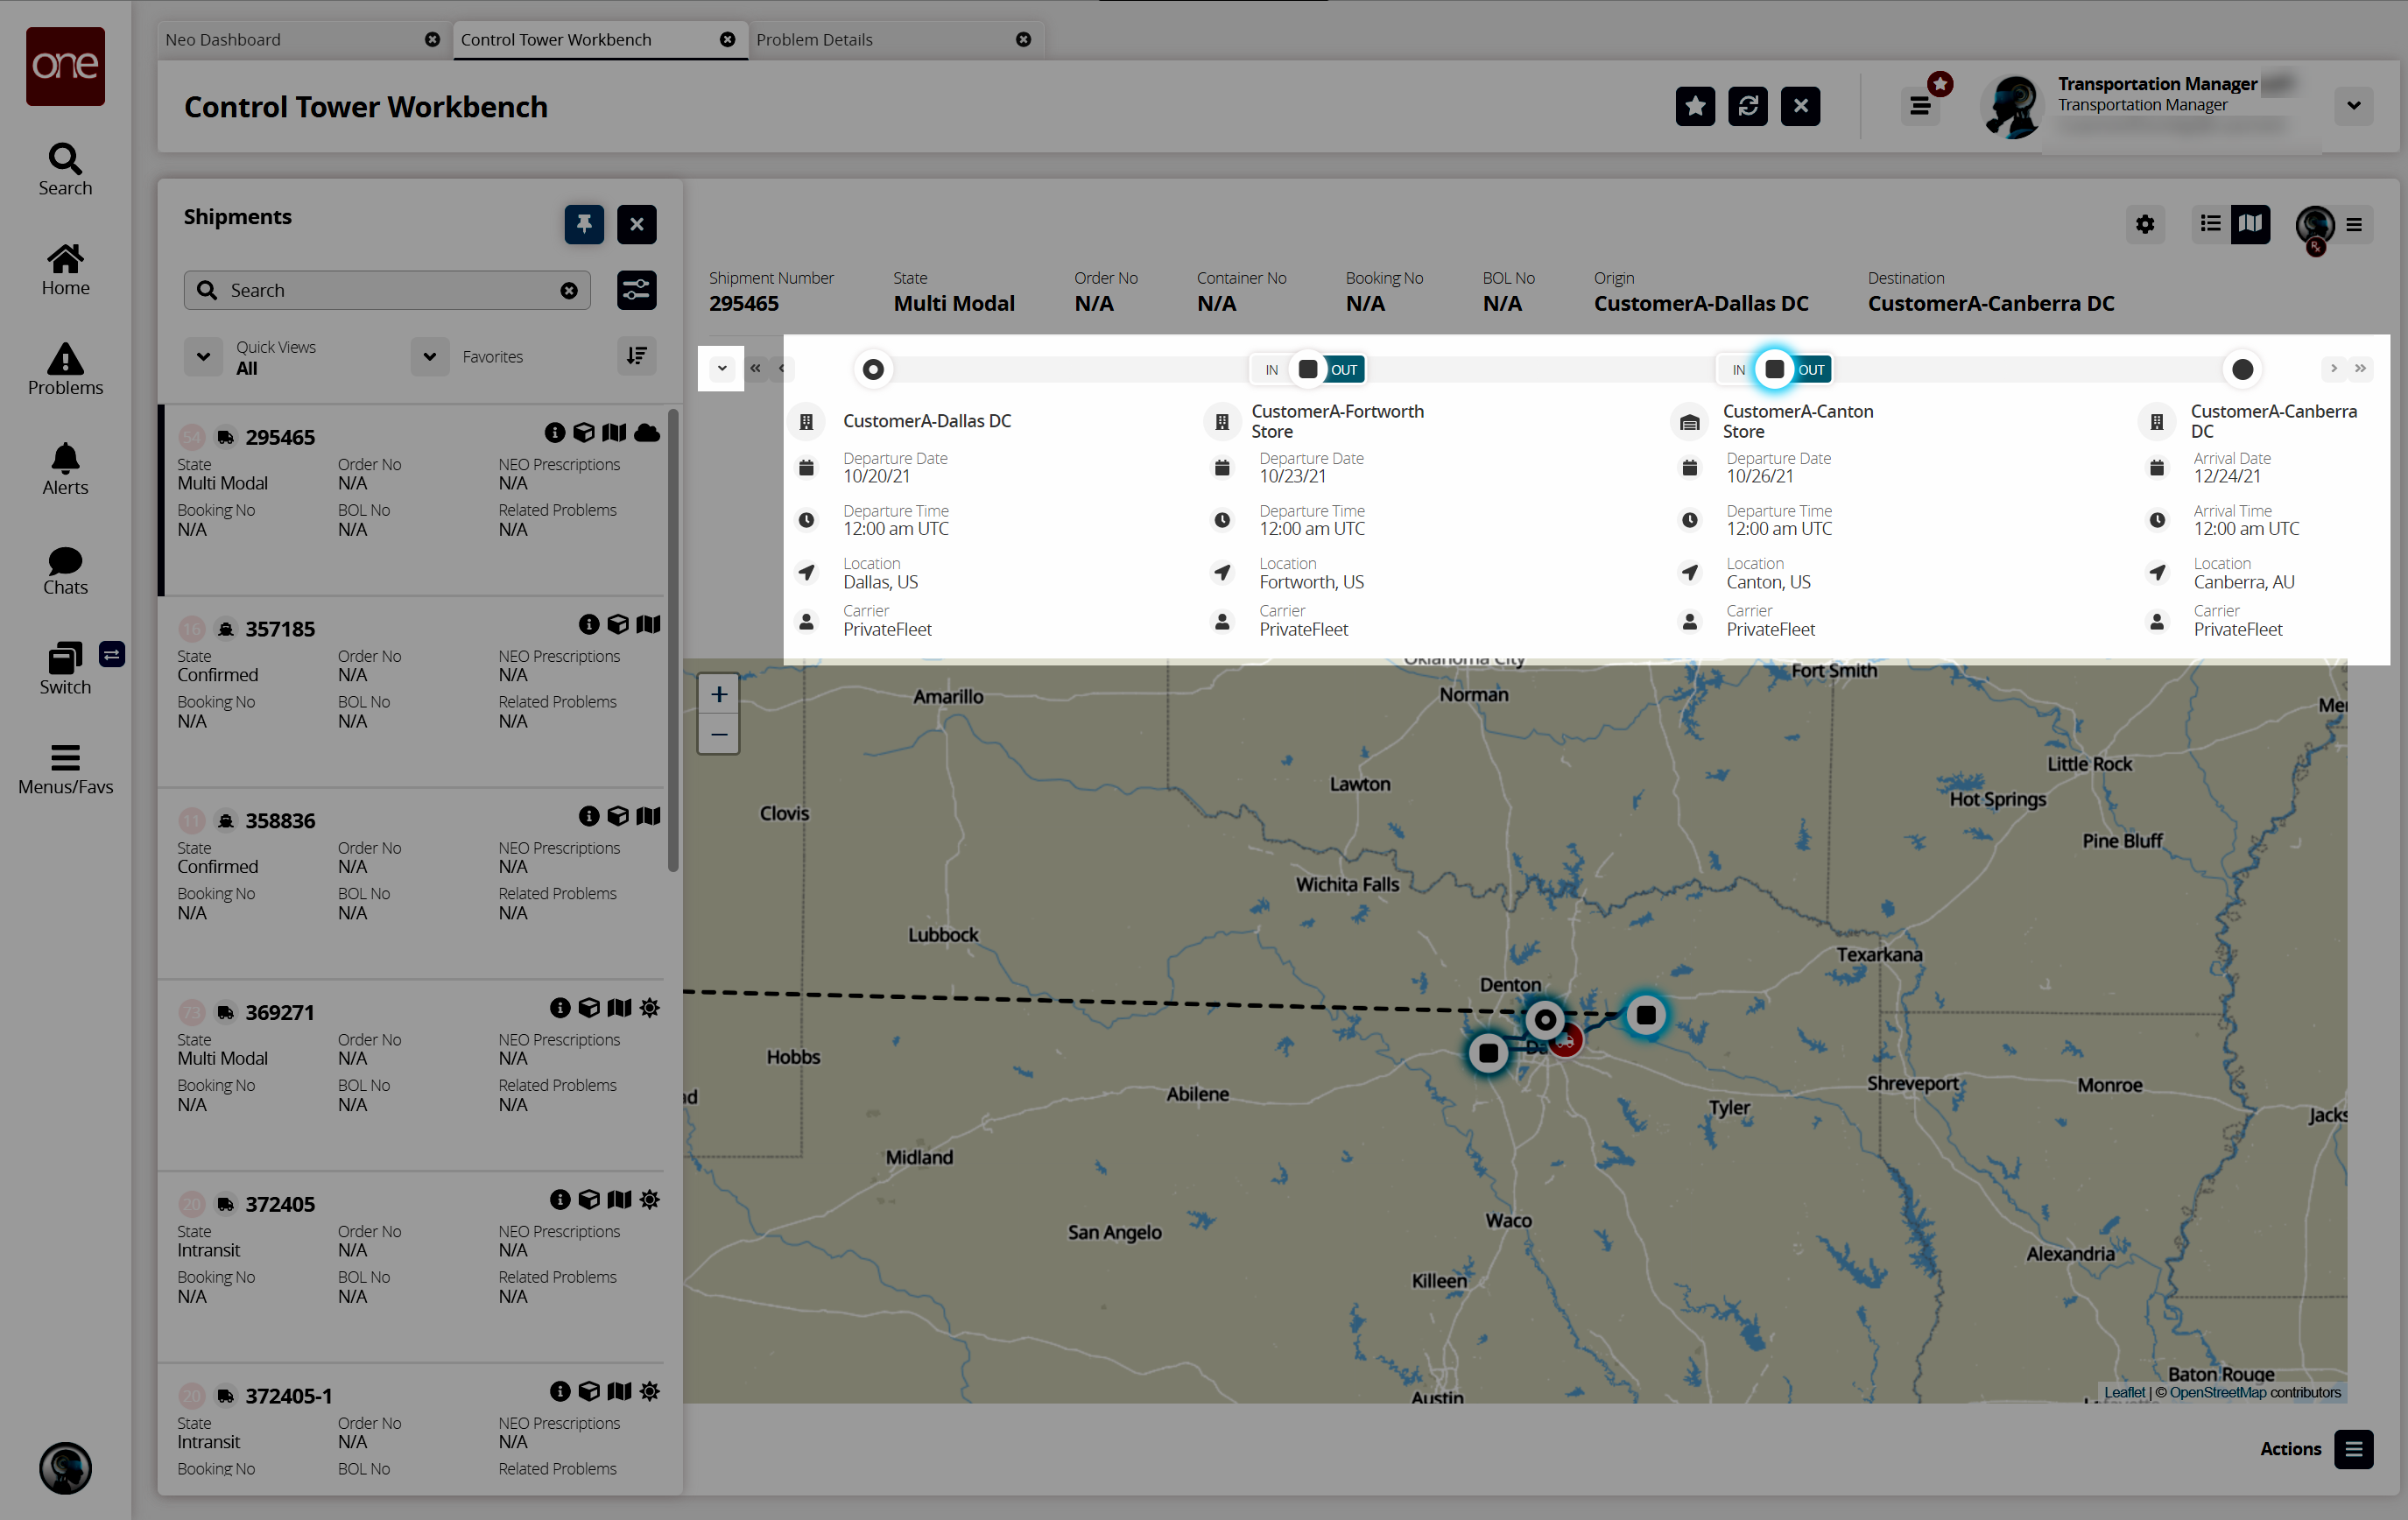
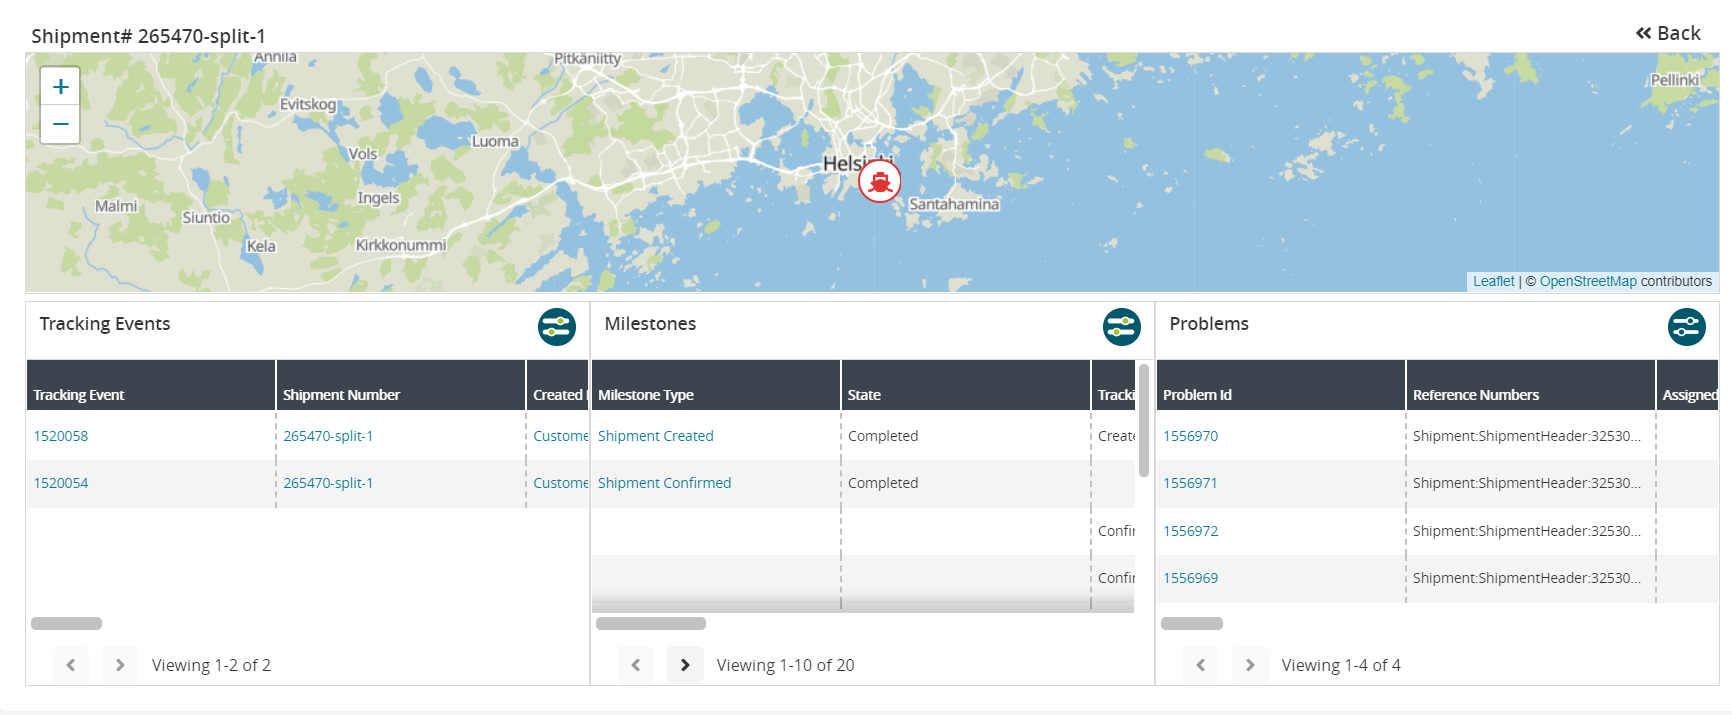
Vessel Tracking
When users click on the Vessel Tracking icon, a new view displays with multiple functional areas. The top area shows a map with the current location of the shipment. Users can track this shipment and get more information on the popup window. Other areas include Tracking Events, Milestones, and Problems, which all include filters and clickable links. The CTW is i ntegrated with Vessel-Finder external APIs for calculating ETA, current position to vessel mapped with IMO/MMSI details.
Milestone Information
The Milestone Information display on the main CTW screen displays legs along with the shipment by milestone. A green segment indicates that the milestone was reached within the expected parameters, and a red segment indicates a critical leg with problems that require immediate attention. Gray segments indicate legs and milestones that have not been met. Users can move forward and backward along the shipment milestones with the left and right navigational arrows.

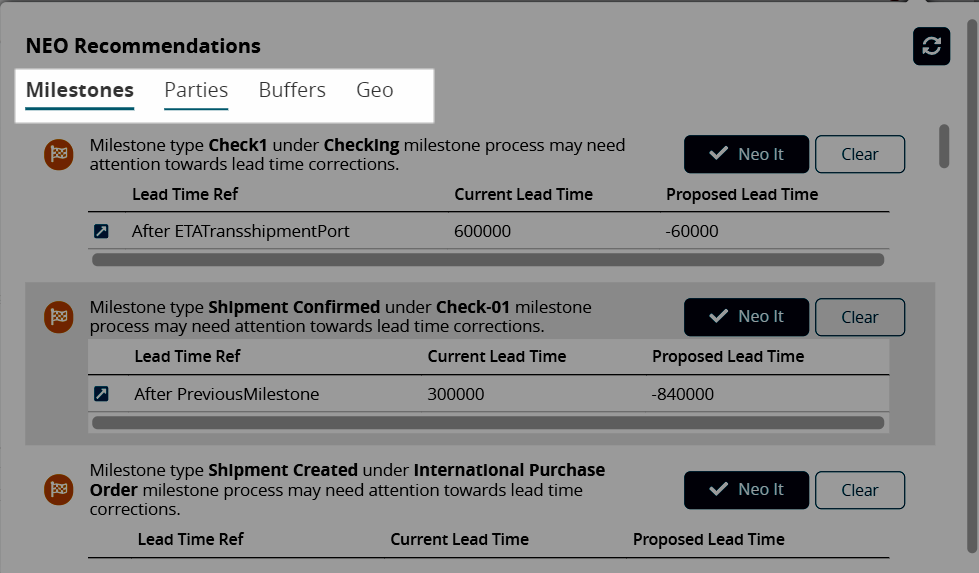
NEO Prescriptions
Click the NEO Prescriptions icon (top right) to display the NEO Recommendations slideout, which provides recommendations for parties associated with the shipment as well as milestones.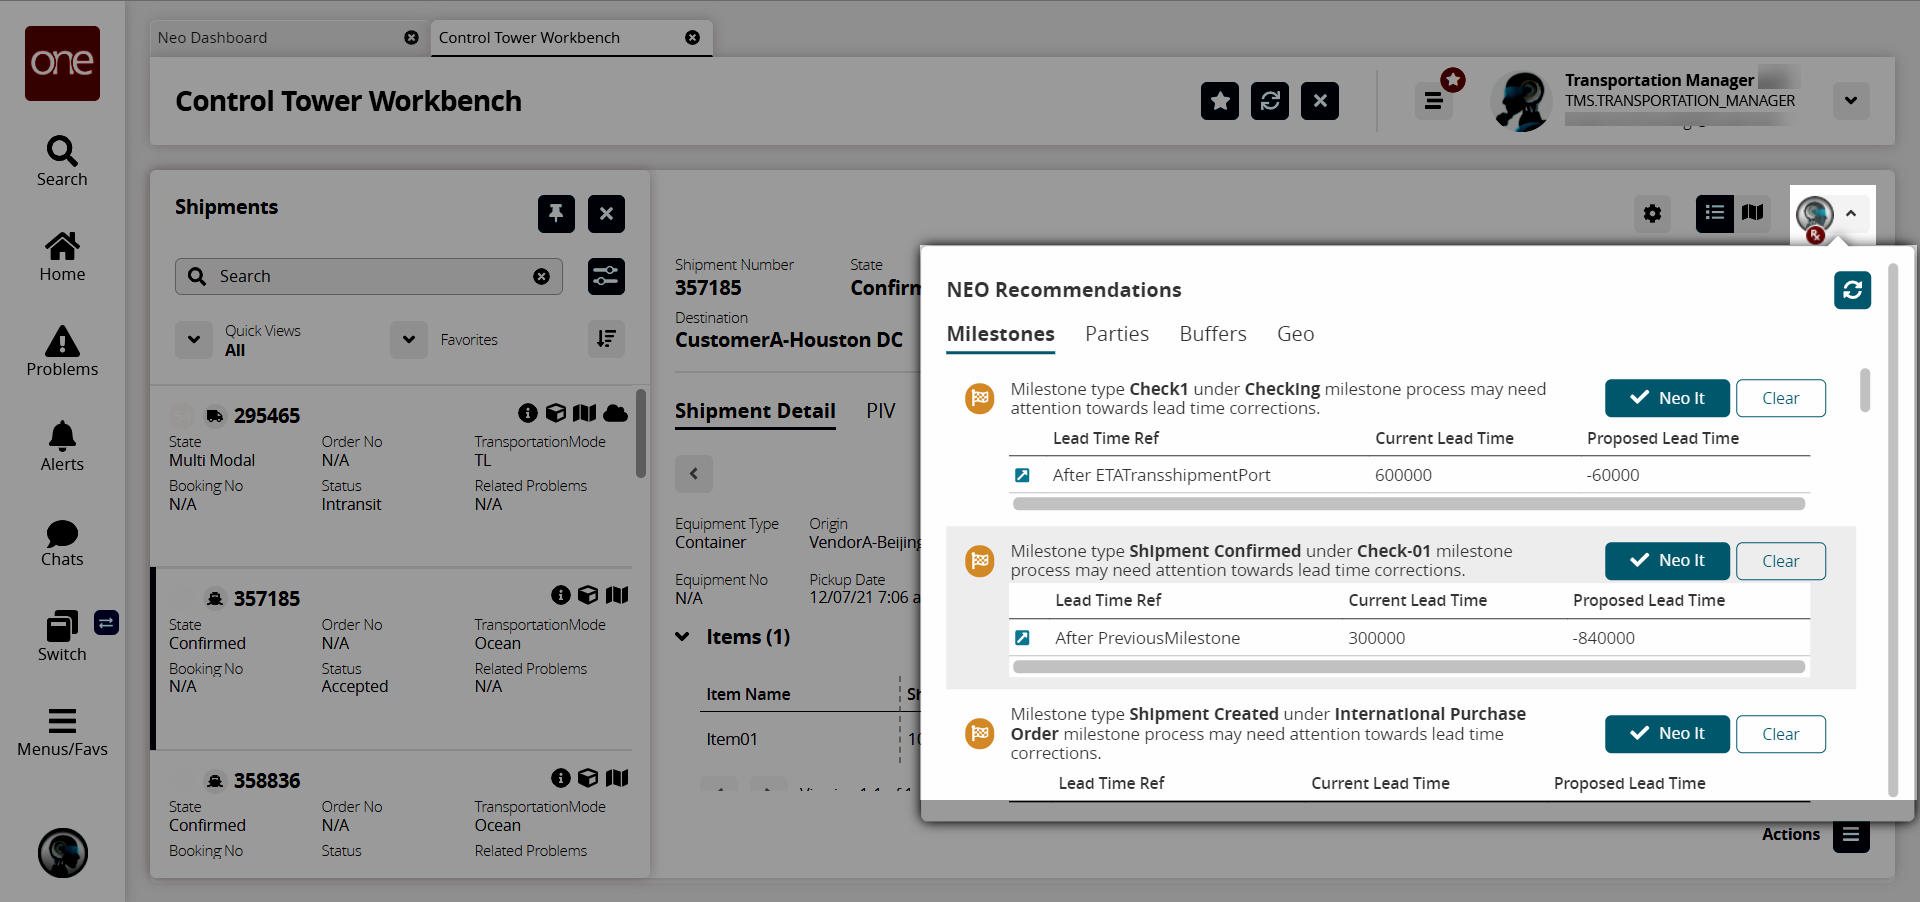
Click the tabs across the slideout to view the NEO recommendations for each of the following: Milestones, Parties, Buffers, or Geo.
Milestones - Analyze current milestones and determine the corrections that are needed.
Parties -Analyze the carrier and broker performances and suggest alternatives to parties having the worst performance (i.e. overall performance less than 40%).
Geo (Site Geofence) - Analyze the past Arrived and/or Departed events and, if required, recommend that geofence of the site be extended.
Buffers - If the on-hand buffer quantity is below the safety stock quantity, NEO will recommend that the user place an order.
Click the Neo It button to accept a NEO recommendation on any tab.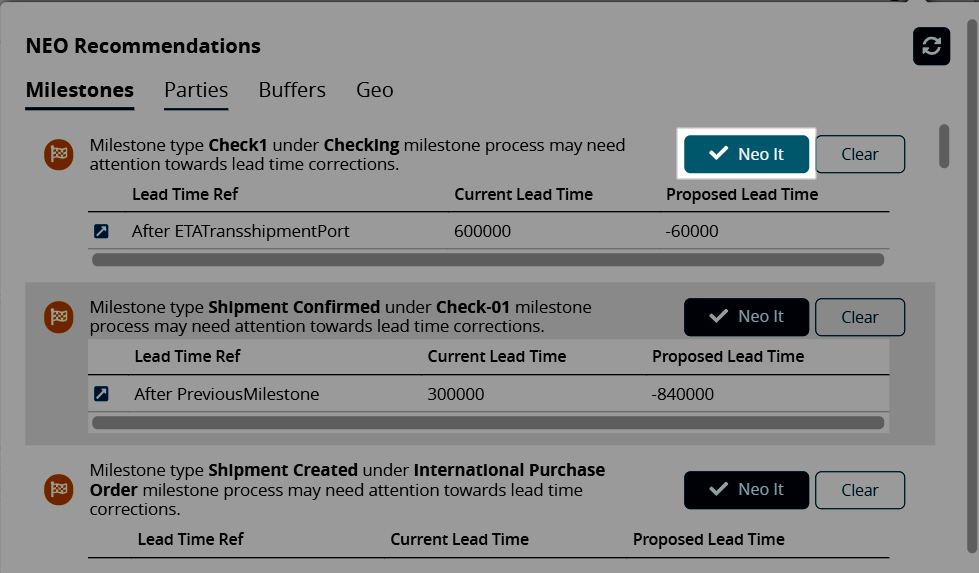
You can also view and accept NEO recommendations from the NEO Prescriptions section in the Tabs view.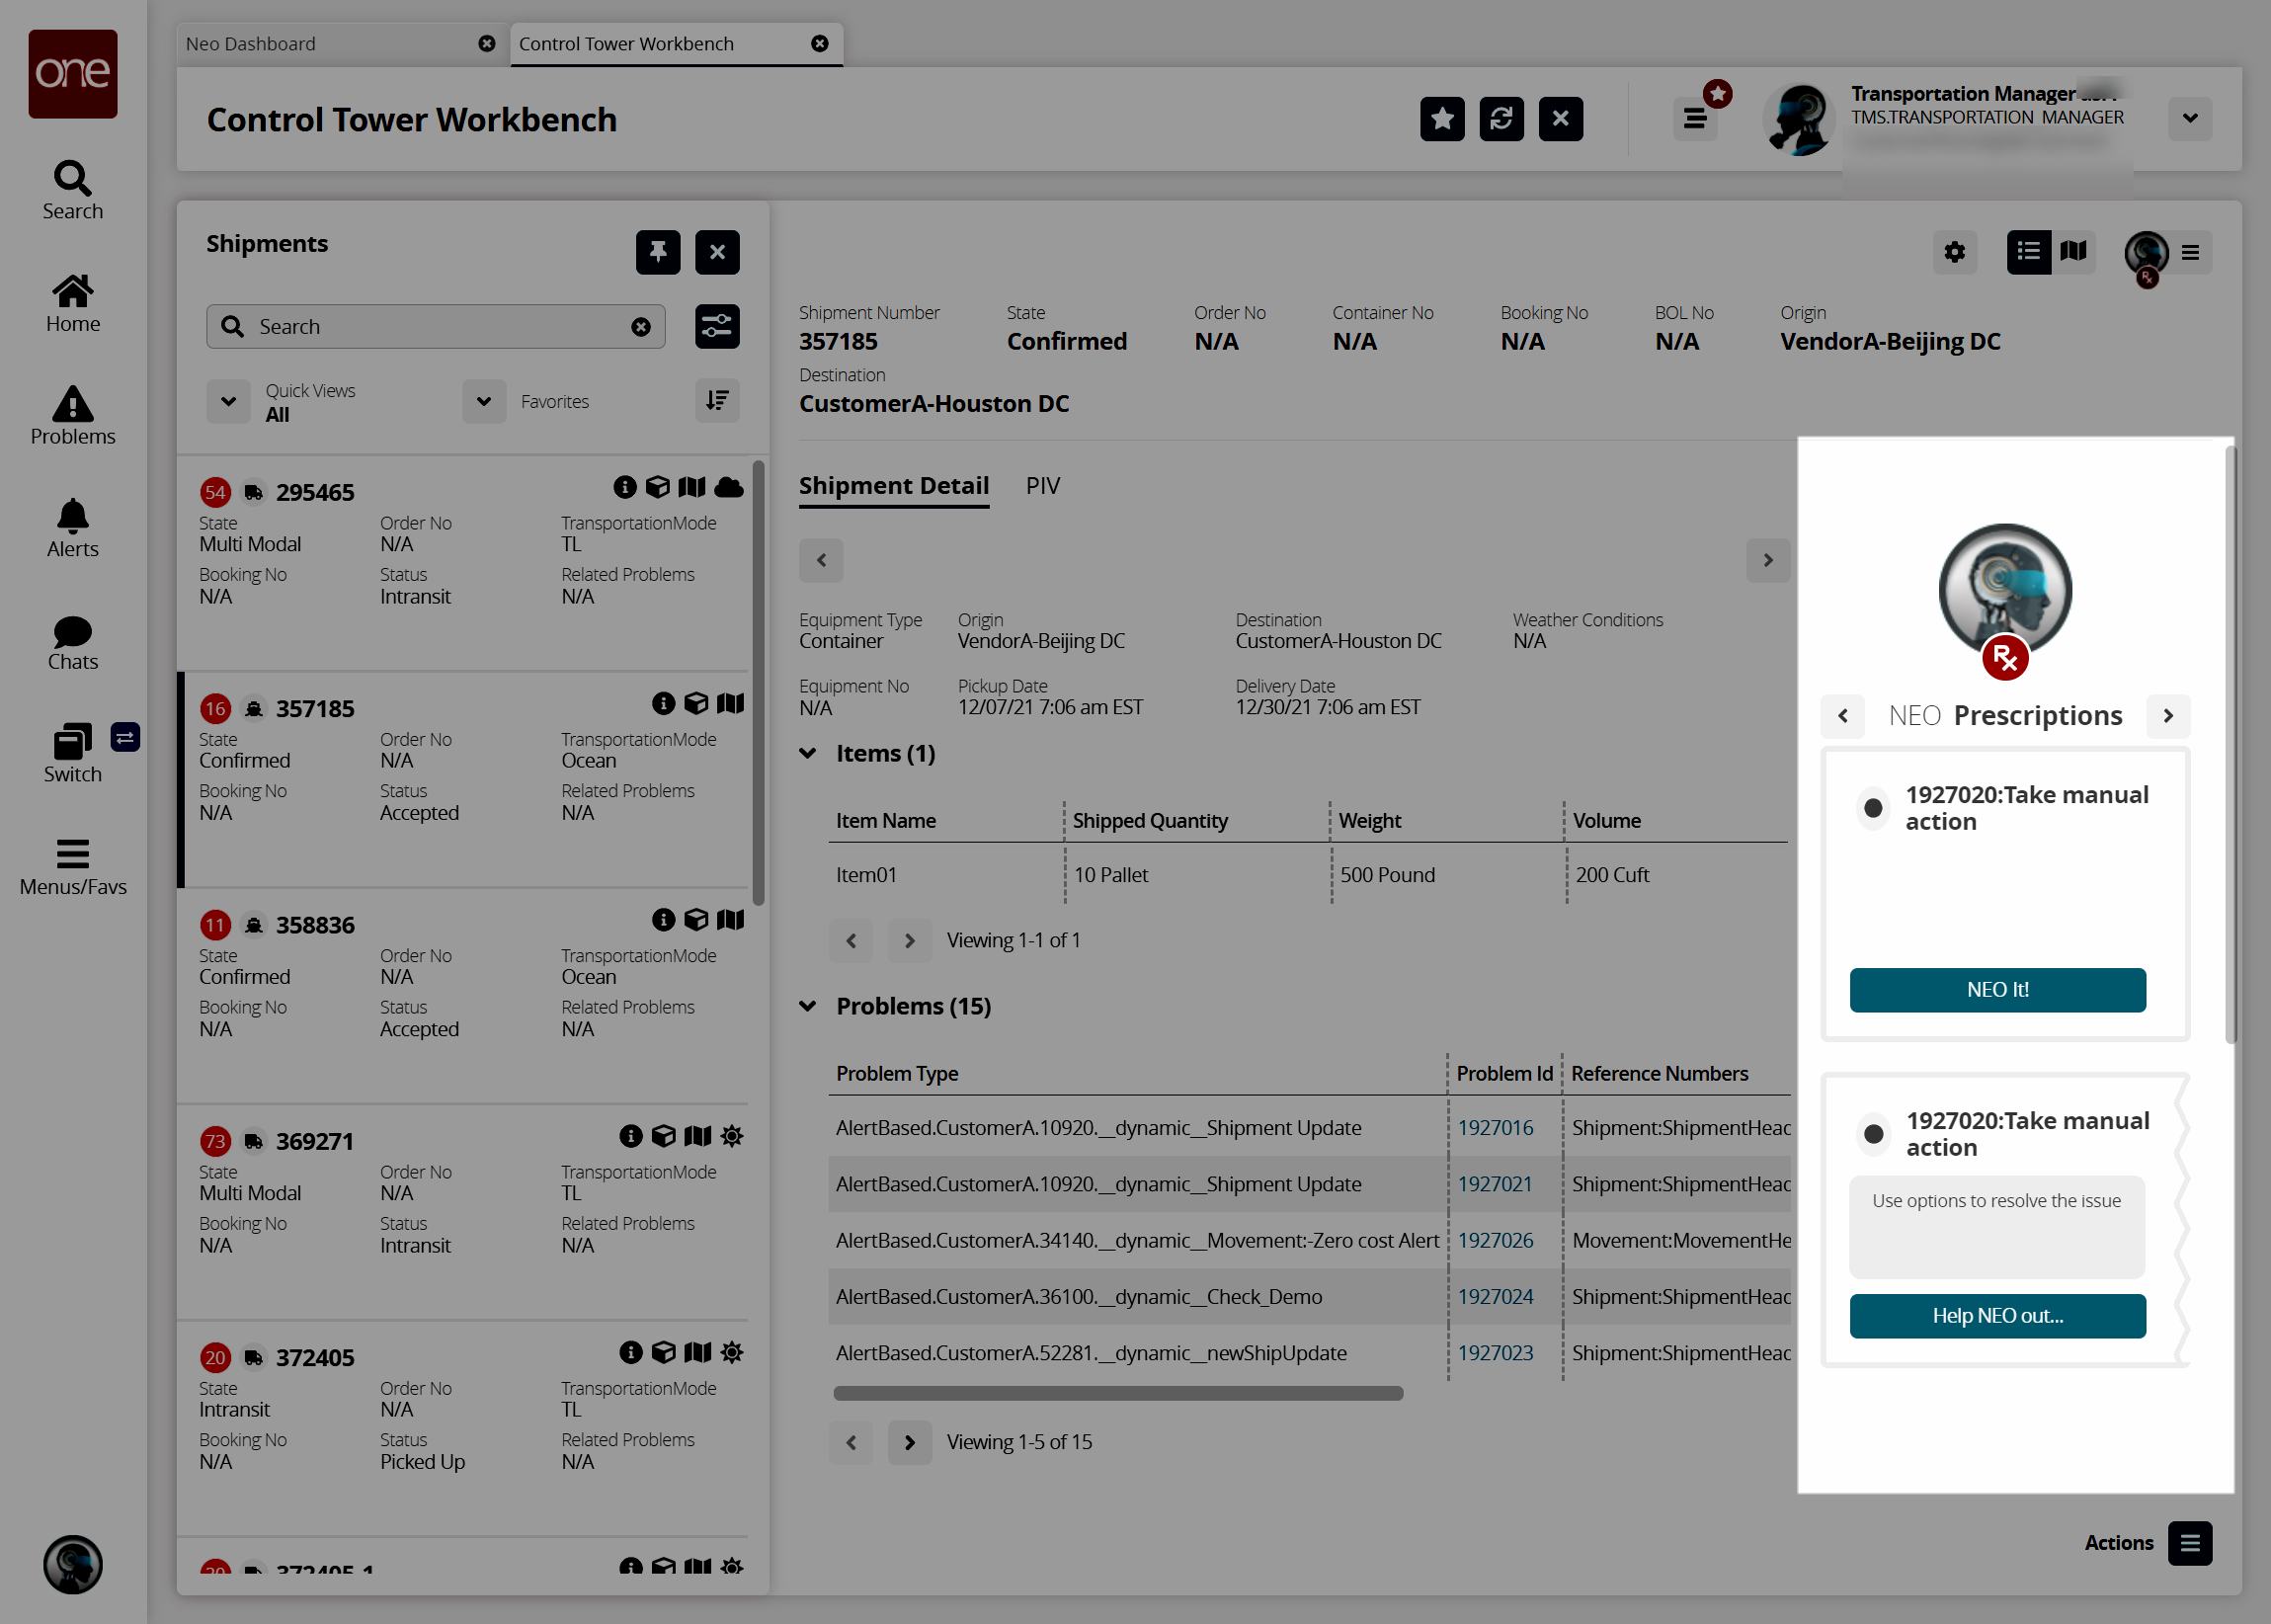
Actions
Click the Actions icon in the bottom right corner to view and perform actions on the selected shipment. The available actions shown depend on the shipment selected.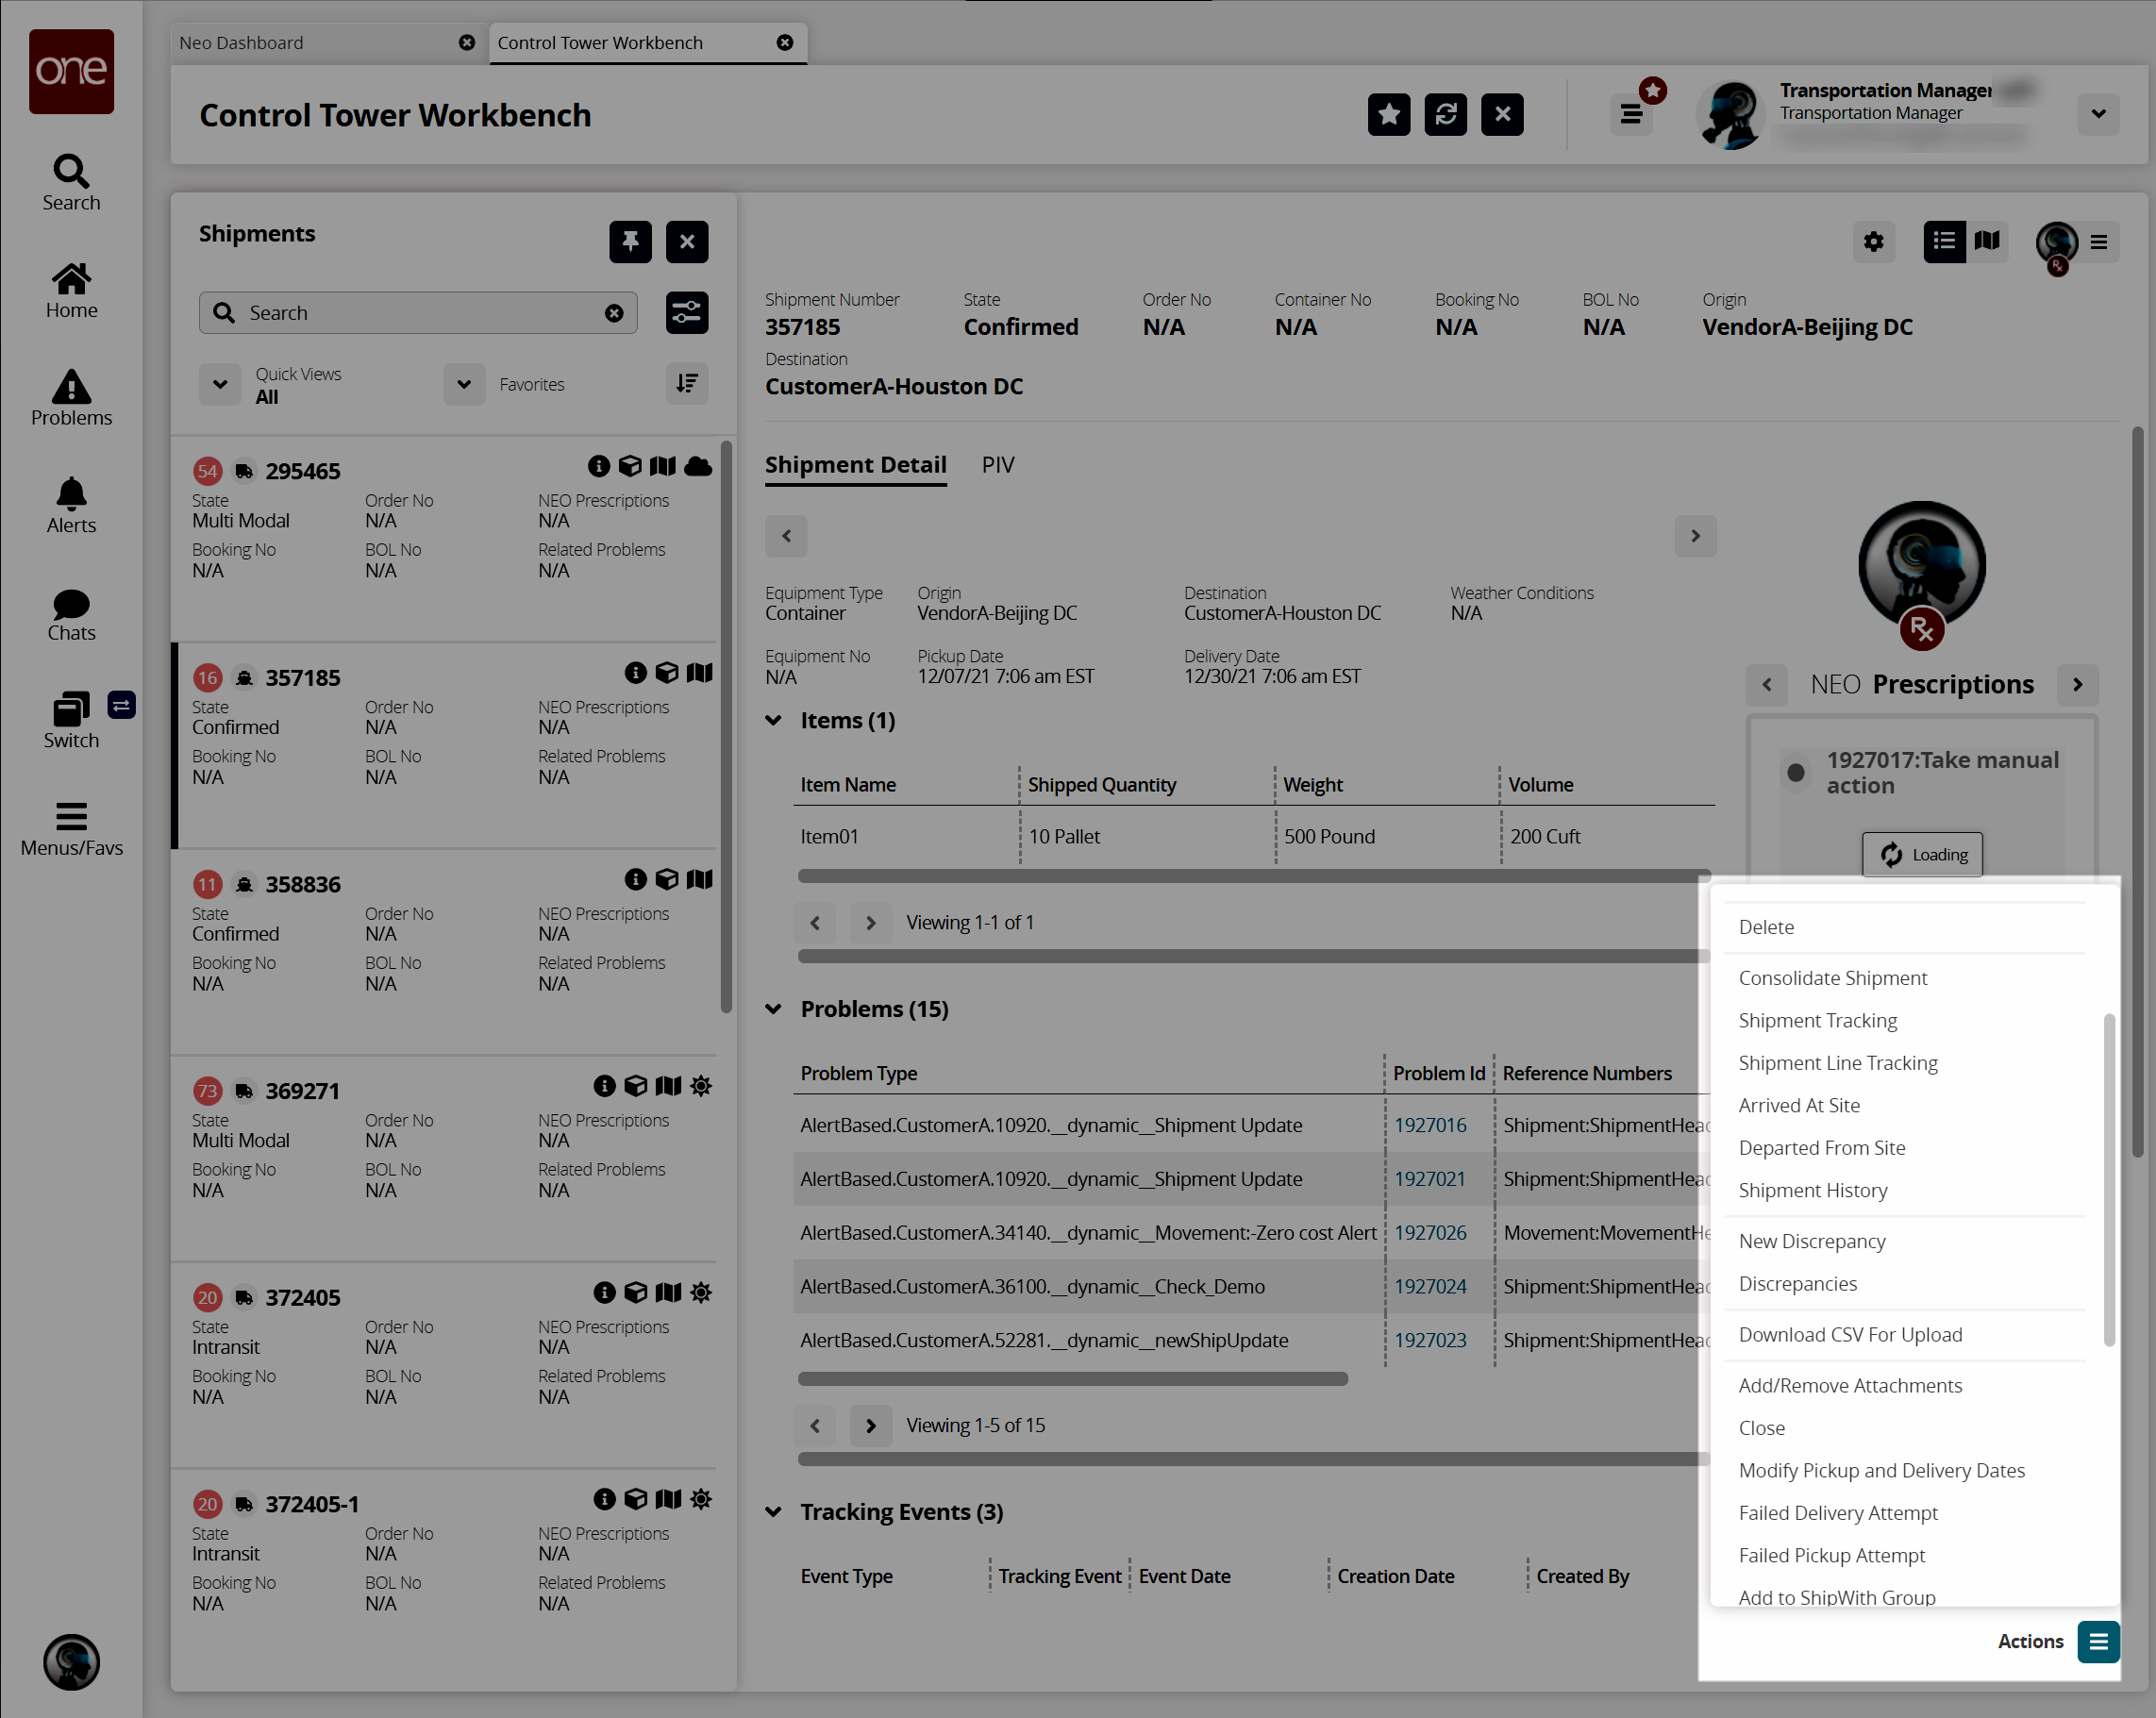
Uploading Historical Shipment Milestone Data
The CTW analyzes historical transportation data to develop optimization suggestions. The more data provided, the better the ONE system can optimize shipments with NEO recommendations.
Complete the following steps to upload historical shipment milestone data:
L og in to the ONE system.
Click Menu/Favs > Transportation > Shipment Milestones > Milestone Processes.
The Milestone Processes screen appears.Navigate to the customer in the left Explorer panel.
If necessary, click Show More...
More links display for processes.Click AutoNeoMilestoneProccess-1.
The Milestone Process Summary displays milestone types and related details.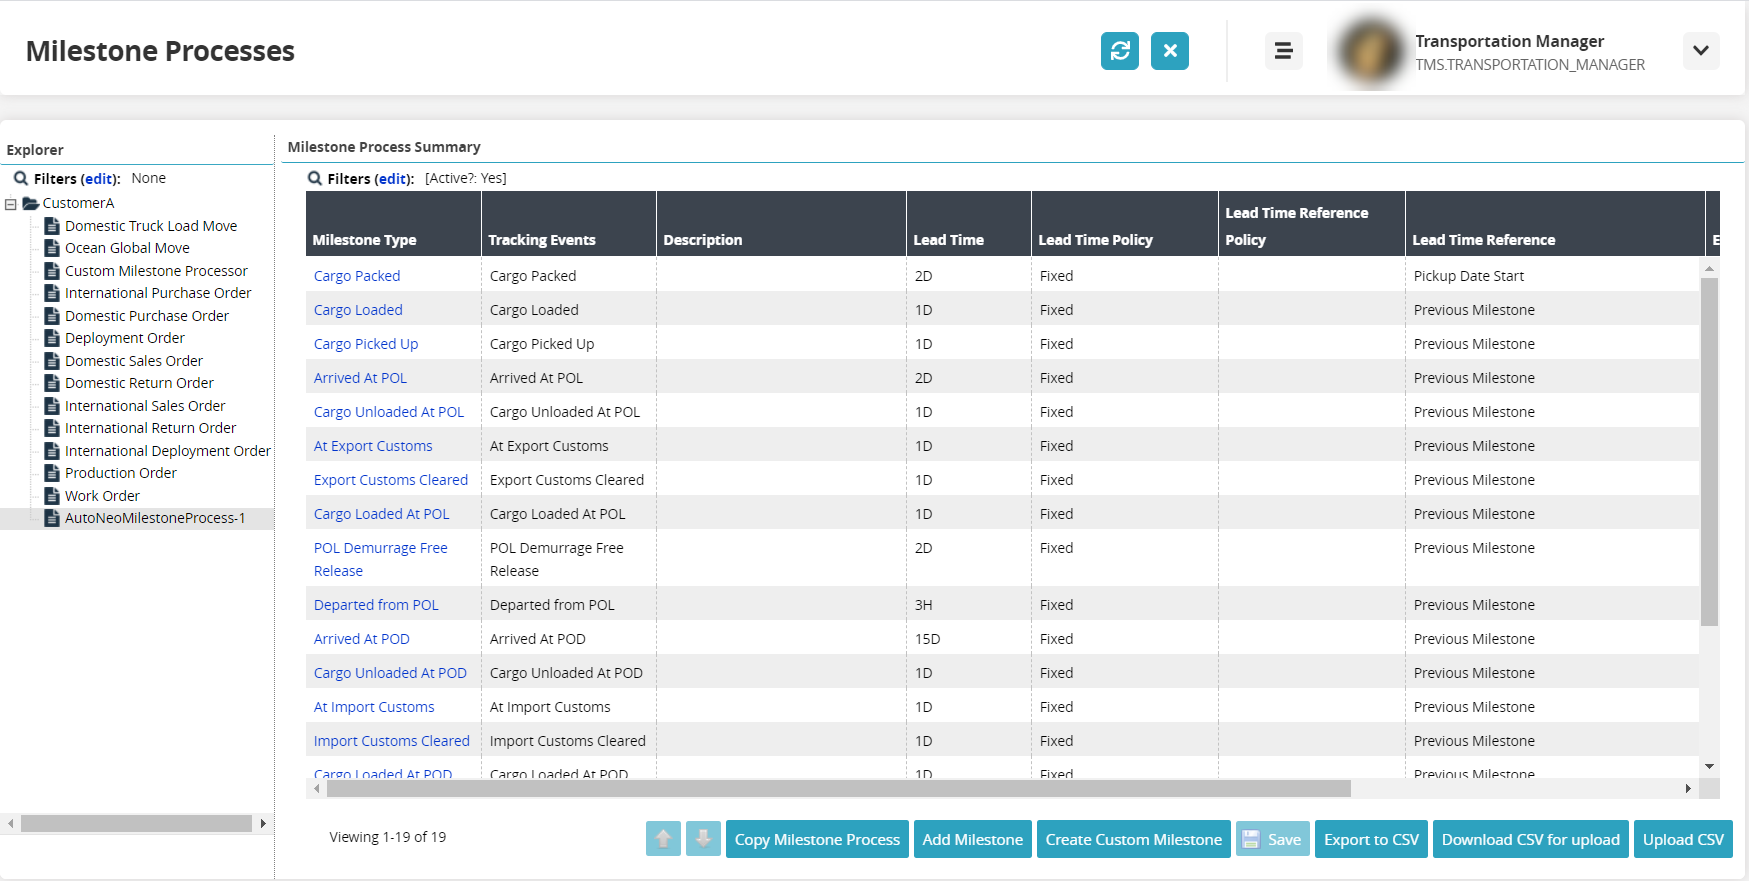
Click the Upload CSV button.
The Select File to Upload popup window displays. Users can download a Format Description File and/or a Template File to assist with creating a correctly formatted CSV file. See the "Uploading Files" section in the Online Help for more information.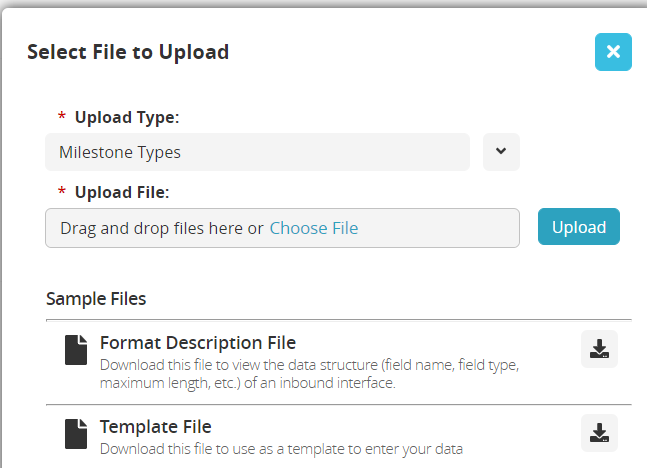
Click the Choose File link to select a CSV file from your computer.
Click the Upload button.
The uploads and jobs status page displays the status of the upload.