ReportWidget with Column Configs
New ReportWidgets can be created within the SDK that uses explicit column configurations. This provides a developer more flexibility in creating ReportWidgets if the need arises. To accomplish this, we will add a new NeoWidgetType and NeoWidgetCategory within the tail.mptt file of our module.
For our example, we will be using the PlatformTestModule and inserting the code snippet below into our tail.mptt. When creating a ReportWidget in a different module, ensure that the module prefix is updated correctly.
<NeoWidgetType name="ItemReportWidget" componentPath="PLT/Widgets/ReportWidget"> <PreviewImagePath>/oms/img/neo/widgets/summarylist/summarylist1.png</PreviewImagePath> <Config>{ "reportName": "PTA.ItemReportOnOracle", "height": 200, "columns": [ {"fieldId": "Item$ItemName"}, {"fieldId": "Item$DisplayName"}, {"fieldId": "Item$Description"} ], "title": "Item List" }</Config></NeoWidgetType> Let us start by breaking down the tags within the XML above to provide a better understanding of what is occurring.
Name – This is the name of our new widget, ItemReportWidget for our example. This will be referenced later in the documentation
componentPath – This is the widget component we will be referencing. In this example, we will be referencing an existing widget component named ReportWidgets located within PLT
PreviewImagePath – This refers to the thumbnail icon that the widget will display. We use an existing .png file called “summarylist1”.
Config – The config tag allows you to configure different attributes to help pre-configure your widget. We can set the reportName, default attribute values found within the report, returned columns, etc.
Once our code snippet above has been added to the tail.mptt, we will include it in a “NeoWidgetCategory”. This will allow our widget to be grouped with similar widgets to make it easier to find. For our example, we will create a new “NeoWidgetCategory" entry, named “ItemWidget”. To do this, we add the following code snippet within the tail.mptt file.
<NeoWidgetCategory name="ItemWidget"> <RoleTypeRef> <IntrinsicRoleType>Default For Enterprise Role Types</IntrinsicRoleType> </RoleTypeRef> <RoleTypeRef> <IntrinsicRoleType>Default For Organization Role Types</IntrinsicRoleType> </RoleTypeRef> <RoleTypeRef> <IntrinsicRoleType>Default For Site Role Types</IntrinsicRoleType> </RoleTypeRef> <RoleTypeRef> <IntrinsicRoleType>Default For ValueChain Role Types</IntrinsicRoleType> </RoleTypeRef> <NeoWidgetTypeRef name="ItemReportWidget"/> </NeoWidgetCategory> Now that we have added our entries into the tail.mptt, we can create our labels by adding entries into the message.properties file within our module. To do this, open the message.properties file and add the following entries into the file:
meta.NeoWidgetCategory.PTA.ItemWidget=Item Widgets meta.NeoWidgetType.PTA.ItemReportWidget.name=Oracle Item Report Widget meta.NeoWidgetType.PTA.ItemReportWidget.description= Shows existing Items in Oracle DB For our example, our module has the prefix “PTA”, you will need to update the module prefix to match the module you are working in. The entries above set the name of our category, the name of our widget, and the description of our widget.
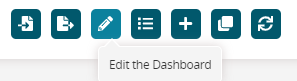
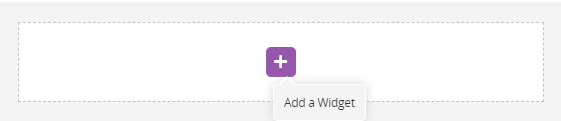
At this point, we can submit our tail.mptt and message.properties changes to the server and view our new ReportWidget on the UI. Open your application and edit/create the dashboard. Then click the “+” symbol to add a new widget. You should see a new widget category named “Item Widgets” with a new widget named “Item Report Widget”.
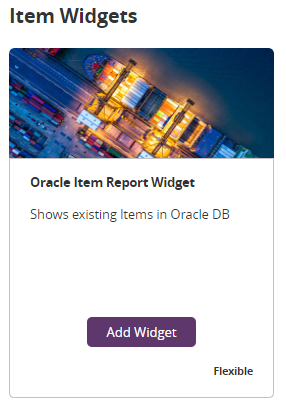
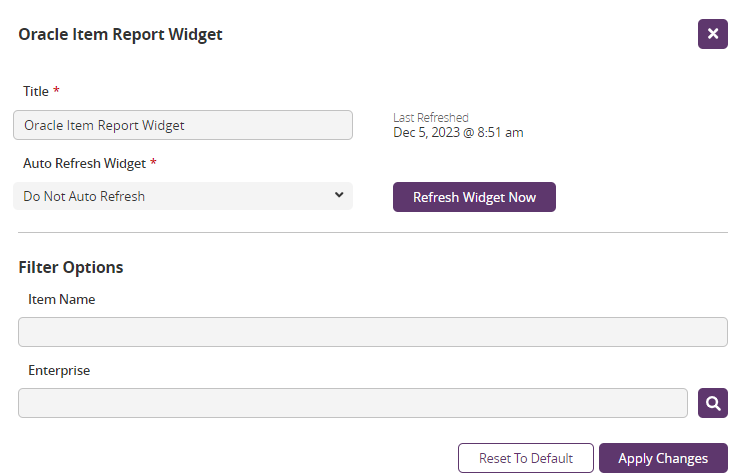
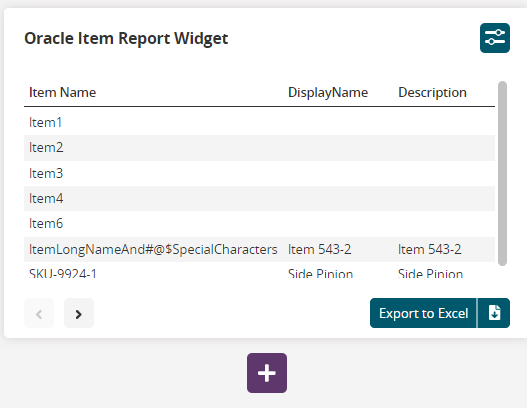
Click “Add Widget” to add our Item Report Widget. We should now see our ReportWidget with our Column Configurations present.
You can also apply existing report filters to your ReportWidget by clicking on the vertical ellipses, then clicking “Settings”. Within the pop-up, the report filters are displayed, which allow further customization of your widget, allowing you to apply filters as needed.