Adding Routes to Routing Guides
Complete the following steps to add routes to routing guides:
L og in to the ONE system.
Click Menus/Favs > Contract Mgmt > Routing Guides.
In the NEO UI, users can click on the Menus/Favs icon on the left sidebar and type in the name of the screen in the menu search bar. For more information, see "Using the Menu Search Bar."
The Routing Guides page displays.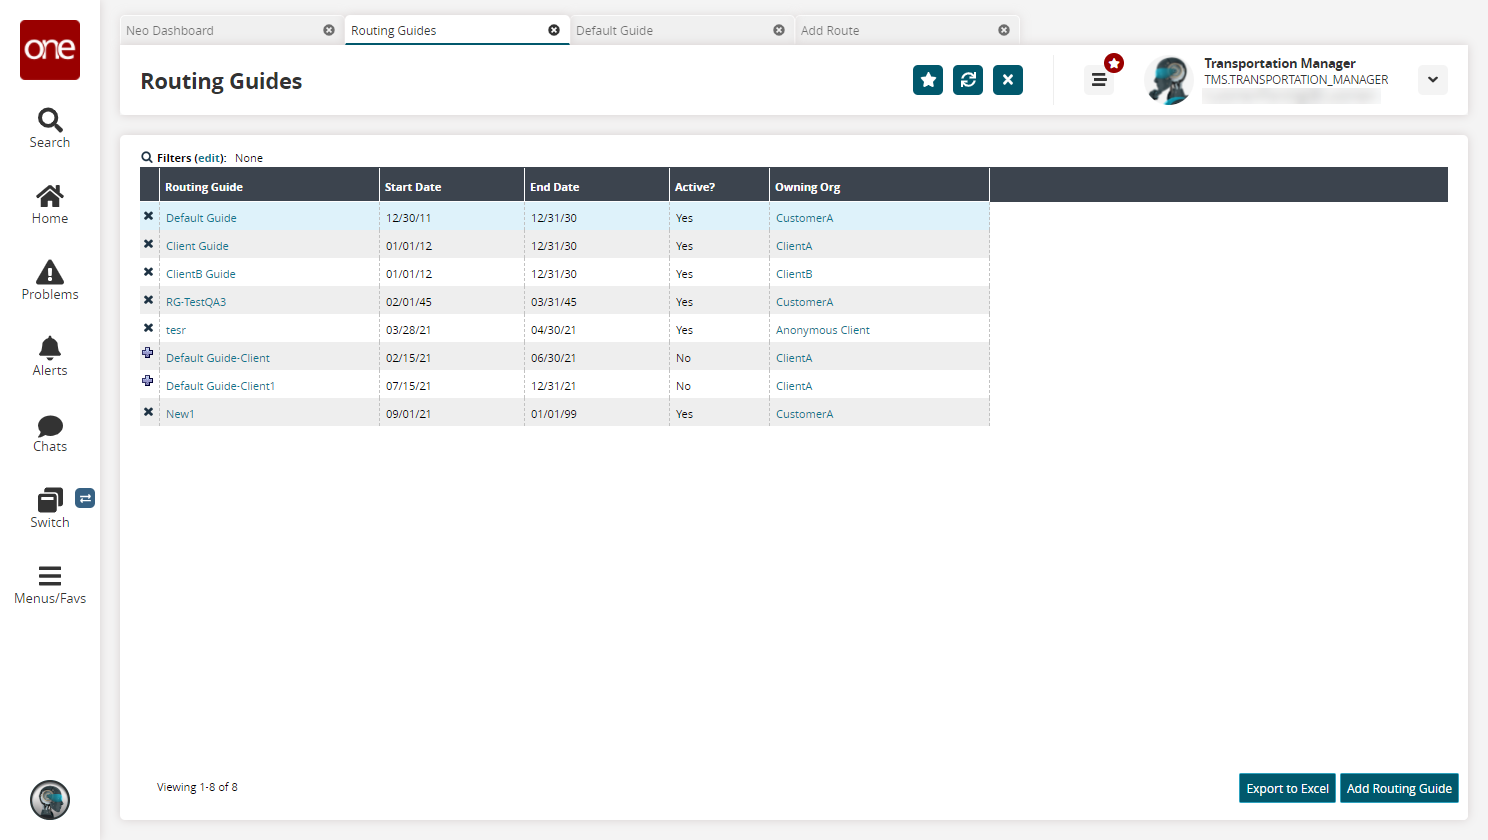
Click the name of the route under the Routing Guide column.
A screen for the selected route appears.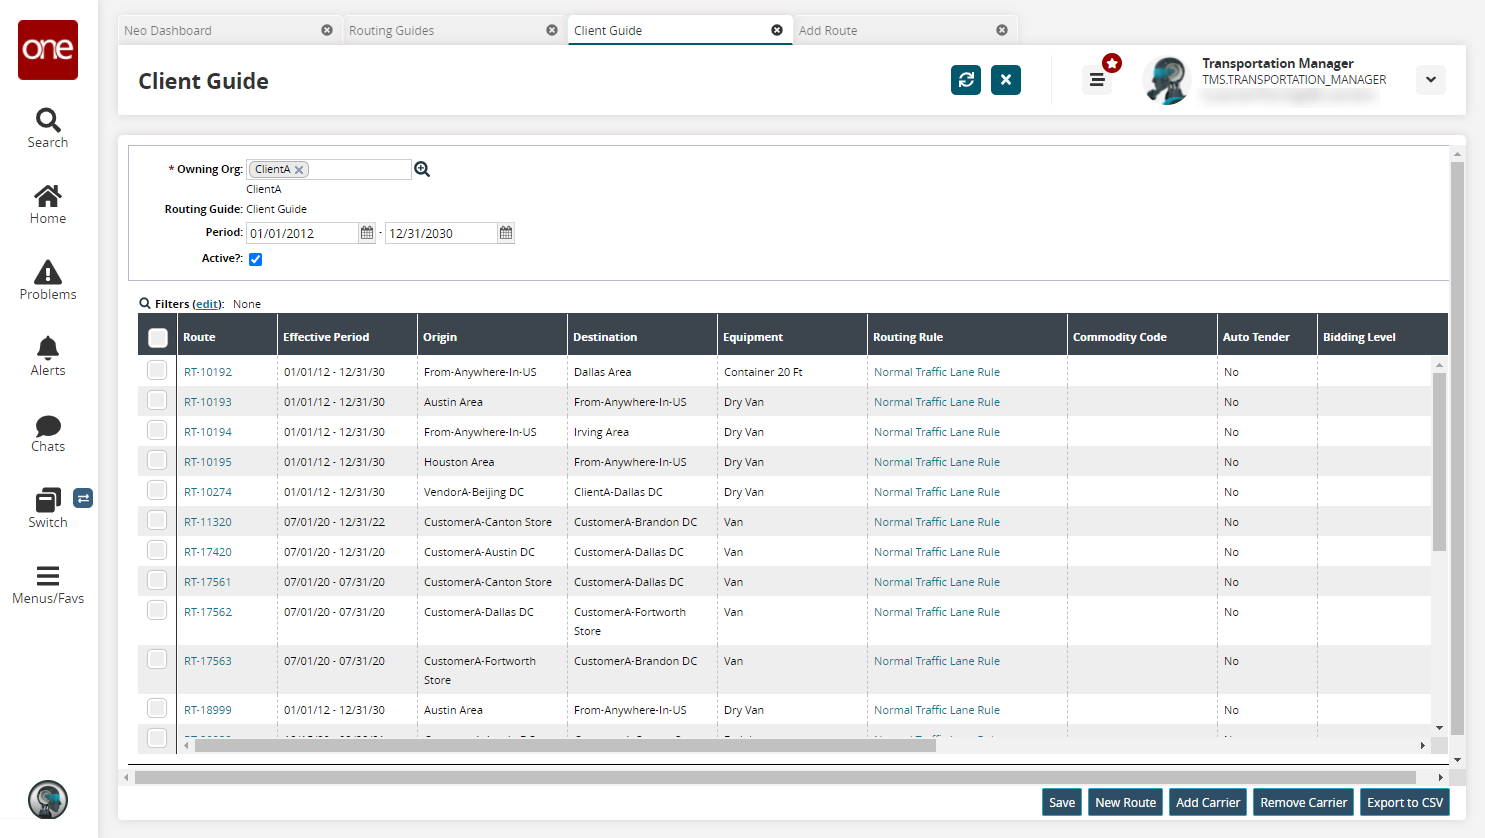
Click the New Route button.
The Add Route screen appears.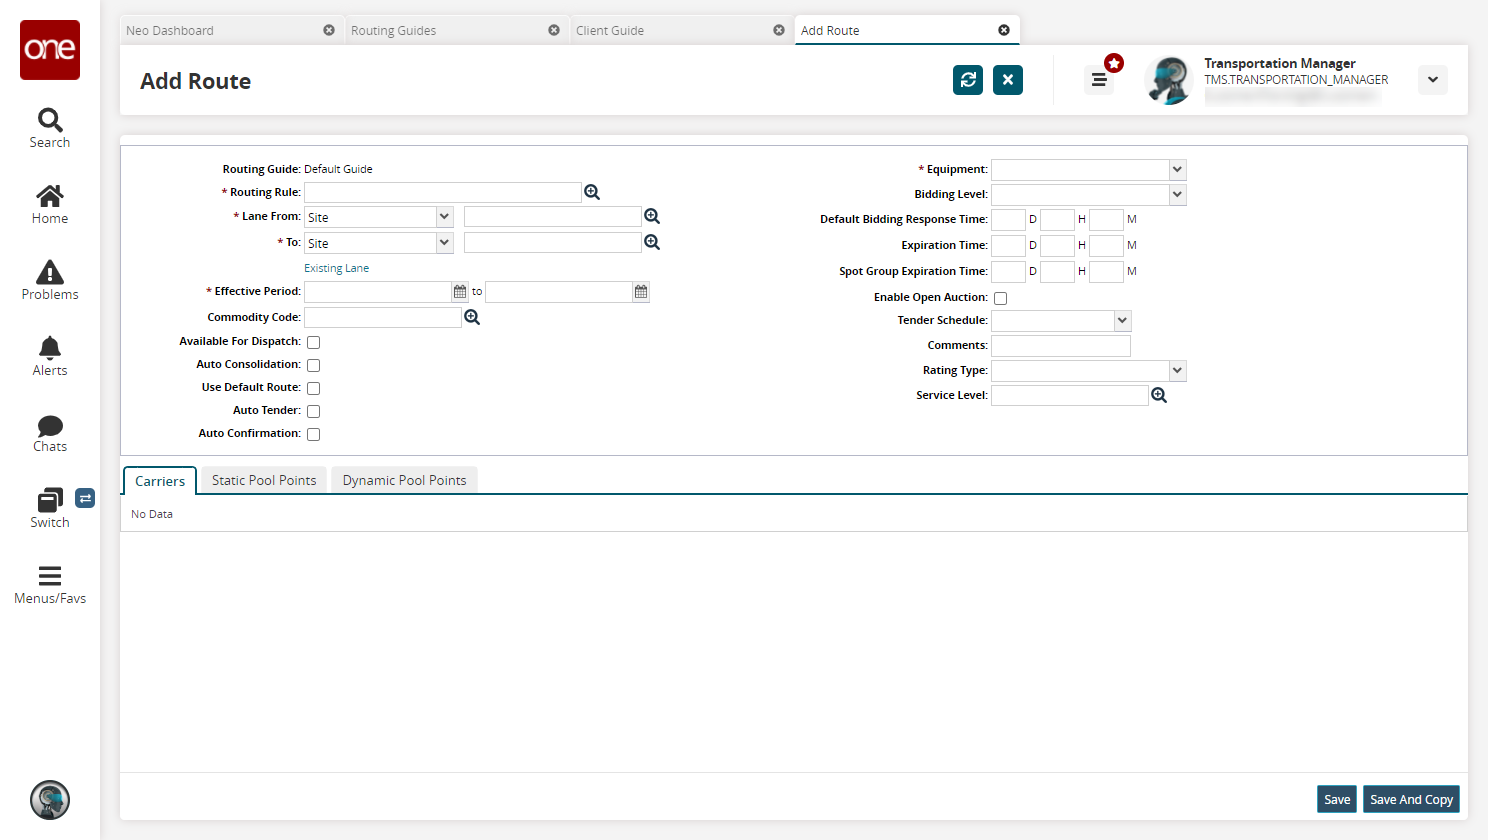
Fill out the following fields. Fields with an asterisk ( * ) are required.
Field
Description
* Routing Rule
Use the picker tool to select a routing rule.
* Lane From
Select a lane type from the dropdown menu, and then select a value with the picker tool in the next field.
* (Lane)To
Select a lane type from the dropdown menu, and then select a value with the picker tool in the next field.
Existing Lane
Click the link to select an existing lane. The Lane From field changes to Lane. Use the picker tool to select a lane from the Geo Lane popup window.
* Effective Period
Use the calendar tool to select the date range for the route's effective period.
Commodity Code
Use the picker tool to select a commodity code.
Available For Dispatch
Check the box to make this route available for dispatch. This checkbox cannot be selected if the Auto Tender or Auto Confirmation checkboxes have been selected.
Auto Consolidation
Check the box to ensure consolidation.
Use Default Route
Check the box to use the default route.
Auto Tender
Check the box if this route will auto tender. This checkbox cannot be selected if the Auto Confirmation or Available For Dispatch checkboxes have been selected.
Auto Confirmation
Check the box to automatically confirm the carrier when the details of a shipment and the route match. This checkbox cannot be selected if the Auto Tender or Available For Dispatch checkboxes have been selected.
* Equipment
Select equipment from the dropdown menu.
Bidding Level
Select the bidding level from the dropdown menu.
Default Bidding Response Time
Enter the default bidding response time in days (D field), hours (H field), and minutes (M field).
Expiration Time
Enter the expiration time in days (D field), hours (H field), and minutes (M field). Route-level expiration time gets higher priority over the expiration time specified in the tendering policy and the Allowed Response Time field on Tender Plan is auto-populated.
Spot Group Expiration Time
Enter the spot group expiration time in days (D field), hours (H field), and minutes (M field). Route-level expiration time gets higher priority over the expiration time specified in the tendering policy and the Allowed Response Time field on Tender Plan is auto-populated. This field is used only if there are spot-enabled tenders.
Enable Open Auction
Check the box to enable the open auction option.
Tender Schedule
Select a tender schedule from the dropdown menu.
Comments
Type in comments.
Rating Type
Select a value for the rating type from the dropdown menu.
Service Level
Use the picker tool to select a service level.
Carriers Tab
The Carriers tab will refresh based on the options selected in the general route definition above.
Complete the following steps to add carrier groups or individual carriers to the route:
User the picker tool to select an existing carrier group.
Click the Choose Individual Carriers... link to select individual carriers.
A new table displays.
Click the Add Carriers... link to select additional carriers.
The Add Carrier Partners popup window displays.Click the box to select a carrier.
Click the Add button.
The carrier is added to the table.Click the Choose an Existing Carrier Group... link to go back to the original carrier group field.
Static Pool Tab
Complete the following steps to add pool groups and pool points:

Click the Static Pool Points tab.
Click the plus sign to add a Pool Point Group.
A new row appears.Click in the following fields to enter values. Fields with an asterisk (*) are required.
Field
Description
Group Name
Select a pool point group name from the drop-down menu.
*Starting Equipment
Select the starting equipment from the drop-down menu.
*Starting Transportation Mode
Select the starting transportation mode from the drop-down menu.
Last Stop Transit Time
Enter a number and then select a time period value from the drop-down menu for the last stop transit time.
Starting Carrier Name
Use the picker tool to select the starting carrier name.
Lead Logistics Provider
Use the picker tool to select the lead logistics provider.
Default
Check the box for Yes or uncheck the box for No to make this group the default.
Click the plus sign to add a Pool Point.
A new row appears.Click in the following fields to enter values. Fields with an asterisk ( * ) are required.
Field
Description
*Pool Point
Use the picker tool to select a pool point value.
Route Type
Select a route type from the dropdown menu. The available options are Default and Static Route. When a shipment is created and if the shipment route has static pool points, the system evaluates the Route Type field as follows:
If the Route Type field is set to Default, then the system creates shipment legs with pool points and converts the original shipment to a multi-modal shipment. This is how the system behaved before this update.
If the Route Type field is set to Static Route, then the system does not create a multi-modal shipment but instead searches for matching static routes with the same stop sequence. If a matching static route is not found, the system adds ferry points as stops of type OTHER to the shipment. If a matching static route is found, the system incorporates the newly created static route shipment into the pre-existing static route and generates middle stops as ferry points of type OTHER for the shipment.
Description
Type in a description.
Transit Time
Enter a number and then select a time period value from the drop-down menu for the last stop transit time.
Stop Duration
Enter a number and then select a time period value from the drop-down menu for the last stop transit time.
*Equipment
Select the equipment from the drop-down menu.
Transportation Mode
Select the transportation mode from the drop-down menu.
Carrier
Use the picker tool to select a carrier.
Dynamic Pool Points
Complete the following steps to add dynamic pool points to the route: 
Click the Dynamic Pool Points tab.
Click the plus sign to add a pool point.
A row is added to the table.Click the * Pool Point field and use the picker tool to select a pool point. This field is required.
Click and type in a description for the Description field.
Click on the Save button to save this route.
A green success bar will display.Click the Save and Copy button to create a new route.
A new route screen with the same details displayed. Some details will need to be altered before the new route can be saved.