Creating Integration Message Monitor Alert Subscriptions
The Integration Message Monitor is used to fire alerts when integration messaging issues occur such as missing messages, messages taking too long, or messages producing too many errors, among others. Users can also specify how frequently to receive these alert messages. For more information on the message queue, please see the "Message Queue Summary Report" section of the Online Help.
Complete the following steps to create alert subscriptions for integration message monitoring:
L og in to the ONE system.
Click Menu/Favs > Tools > Alert Subscription.
The Alert Subscription screen appears.Click the New Subscription button.
The New Subscription screen appears.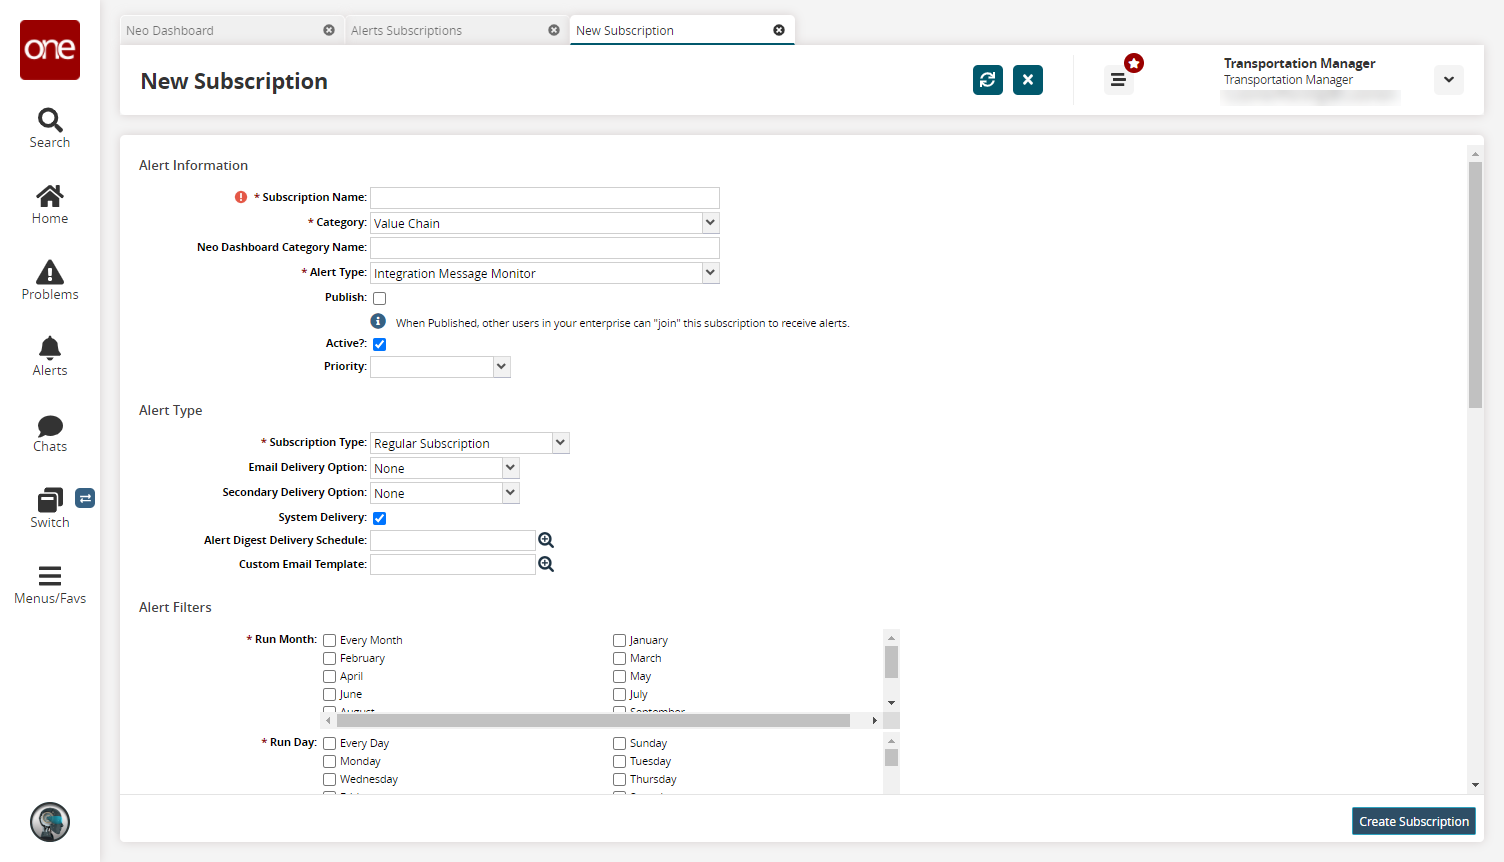
Fill out the following fields. Fields with an asterisk ( * ) are required.
Section
Field
Description
Alert Information
* Subscription Name
Enter a subscription name.
* Category
Select Value Chain from the dropdown menu.
NEO Dashboard Category Name
Enter a category name.
* Alert Type
Select Integration Message Monitor from the dropdown menu.
Publish
Select this checkbox to publish this alert so that others in your enterprise network can subscribe to it.
Active
Select this checkbox to remove the active status.
Priority
Select a priority from the dropdown menu.
Subscription Details
* Subscription Type
Select a subscription type from the dropdown menu.
Email Delivery Option
Select a primary email delivery option from the dropdown menu.
Secondary Delivery Option
Select a secondary email delivery option from the dropdown menu.
System Delivery
Check the box to remove system delivery in the user's Alert Inbox.
Alert Digest Delivery Schedule
Use the picker tool to select a delivery schedule.
Custom Email Template
Use the picker tool to select a custom email template.
Scroll down to the Alert Filter section. These fields are specific to the selected Category and Alert Type.
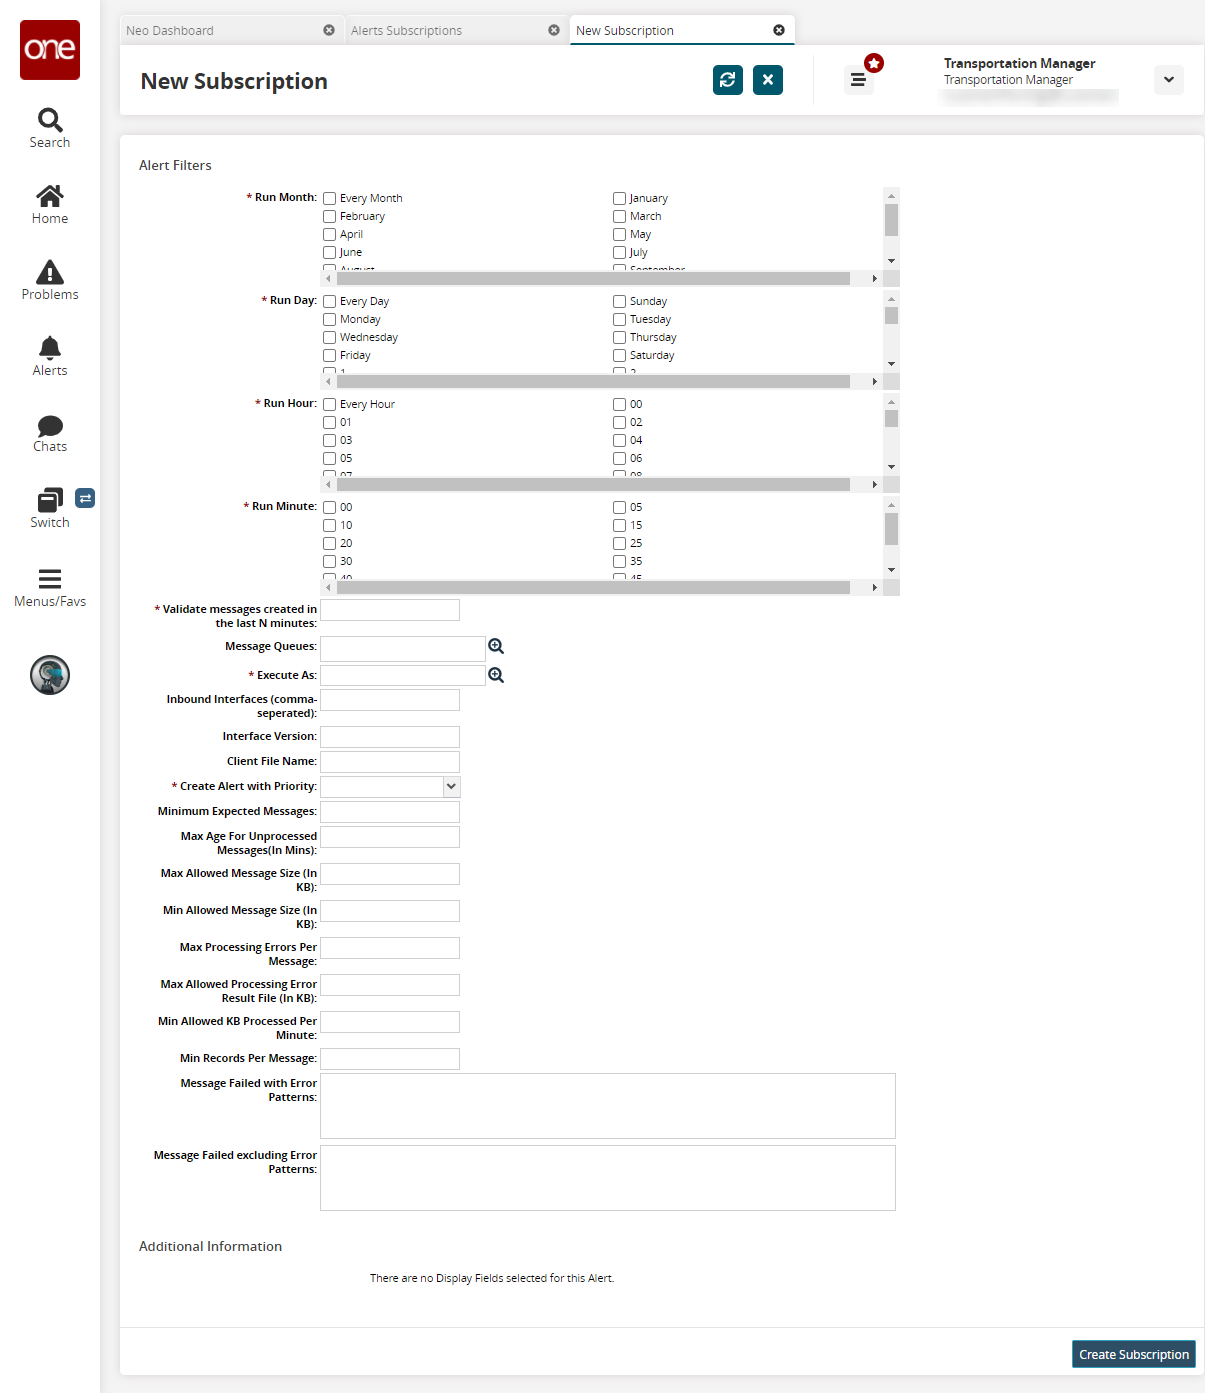
Fill out the following fields. Fields with an asterisk ( * ) are required.
As an example, let's say you expect to receive at least one message per hour to a queue called “MyQueue” on an inbound interface called “SCC.MyInterface_IB version 1.0". In addition, you want to be notified each day if, on the previous day, you did not get a message each hour. To create this alert, you should set up the following parameters as such:
Run Month: Every Month
Run Day: Every Day
Run Hour: 01
Run Minute: 00
Validate messages created in the last N Minutes: 1440 (1440 minutes = 24 hours)
Message Queues: MyQueue
Execute As: my user + my role
Inbound Interfaces: SCC.MyInterface_IB
Interface Version: 1.0
Create Alert with Priority: High
Minimum Expected Messages: 24
Field
Description
* Run Month
Select any number of months for the alert to run. Selecting Every Month is the same as selecting every month individually and will cause the alert to run every month of the year.
* Run Day
Select any number of days for the alert to run. Selecting Every Day is the same as selecting every day individually and will cause the alert to run every day of the week in the selected months.
* Run Hour
Select any number of hours of the day for the alert to run. Selecting Every Hour is the same as selecting every hour individually and will cause the alert to run every hour of the selected days.
* Run Minute
Select any number of minutes for the alert to run. The alert will run at the 5-minute mark of every selected hour if 05 is selected.
The Run Month, Run Day, Run Hour, and Run Minute fields are used in conjunction. For example, to have the alert run every hour on the hour, you would select Every Month in the Run Month field, Every Day in the Run Day field, Every Hour in the Run Hour field, and 00 in the Run Minute field.
* Validate messages created in the last N minutes
Enter a number, in minutes. This is the number of minutes the alert will look back and include all messages in that time frame. For example, if 60 is entered in this field and an alert is sent every hour, then each alert message will show all validated messages in the last hour.
Message Queues
Use the picker tool to select one or more message queues. If left blank, the alert will consider all messages the current user has access to in the last N minutes, where N is the value specified in the Validate messages created in the last N minutes field.
* Execute As
Use the picker tool to select the user who will execute the alert. Generally, this is yourself. Only one option can be entered in this field.
Inbound Interfaces (comma-separated)
Enter a comma-separated list of inbound interfaces to consider. If left blank, then all inbound interfaces are considered. The * wildcard is supported in this field.
Interface Version
Enter an interface version. Only one interface version is supported.
Client File Name
Enter a client file name. The * wildcard is supported in this field.
* Create Alert with Priority
Select a priority from the dropdown menu.
Minimum Expected Messages
Enter the minimum number of expected messages. For example, if 3 is entered in this field and the alert is set to run once an hour, this means the user expects three messages an hour. If there are less than three messages per hour, the user is alerted.
Max Age For Unprocessed Messages (in Mins)
Enter the maximum age, in minutes, for an unprocessed message. This field is intended to notify when the queue is backed up. For example, if 10 is entered in this field, then an alert is generated when a message remains unprocessed after 10 minutes.
Max Allowed Message Size (in KB)
Enter the maximum allowed message size, in KB. For example, if 1000 is entered in this field, an alert is generated if a processed message is over 1 MB in size.
Min Allowed Message Size (in KB)
Enter the maximum allowed message size, in KB. For example, if 10 is entered in this field, an alert is generated if a processed message is less than 10 KB in size.
Max Processing Errors Per Message
Enter the maximum number of processing errors per message. For example, if 50 is entered in this field, then an alert is generated only if a file has over 50 processing errors. This field is useful for files with millions of lines being processed; it allows the user to specify that some number of errors is acceptable.
Max Allowed Processing Error Result File (in KB)
Enter the maximum allowed file size of the error file. This field can be used instead of the Max Processing Errors Per Message field if you only care about the total size of the error file and not the number of errors.
Min Allowed KB Processed Per Minute
Enter the minimum allowed processing time, in KB per minute. For example, if 100 is entered in this field, then an alert is generated only when a message file is processing slower than 10 KB per minute. This field is useful to know if the system is running slow.
Min Records Per Message
Enter the minimum number of records per message.
Message Failed with Error Patterns
Enter a regex pattern to be notified when specific error patterns appear within the message file. This field works in conjunction with the Message Failed excluding Error Patterns field.
Message Failed excluding Error Patterns
Enter a regex pattern to exclude specific error patterns from the alert. This field works in conjunction with the Message Failed with Error Patterns field. For example, if the Message Failed with Error Patterns field is specified to include a very broad error pattern, any pattern input in this field will be excluded from the final alert.
The above alert conditions do not supersede each other and are wholly independent. The aggregate alert received by the user will list all instances of an alert condition being violated.
Click on the Create Subscription button.
A green success bar displays. The new alert subscription shows on the Alert Subscription page.