Actions
Actions encapsulate operations on models and can be defined in either the MPT or SPT. The ultimate objective of these operations is the model's persistence in the database. When an action completes it will create, update or delete at least record in the database.
Actions allow you to control which fields are editable on your model and allow you to directly map business actions to the models. They can also give you more fine-grained control over permissions by limiting actions to certain roles and limiting which fields those actions are able to write.
Model actions tie in to other parts of the model API, specifically workflows and state machines.
Actions are managed using the Action tab for any model you've selected in either the MPT or the SPT. A number of default actions are attached to them, such as an action that handles inserts and updates, another to handle deletes, etc. The default action names are preceded with the characters "PLT." to distinguish them from those you add yourself.
Figure 4.8. Actions are managed using the Action tab for any selected model in either the MPT or the SPT.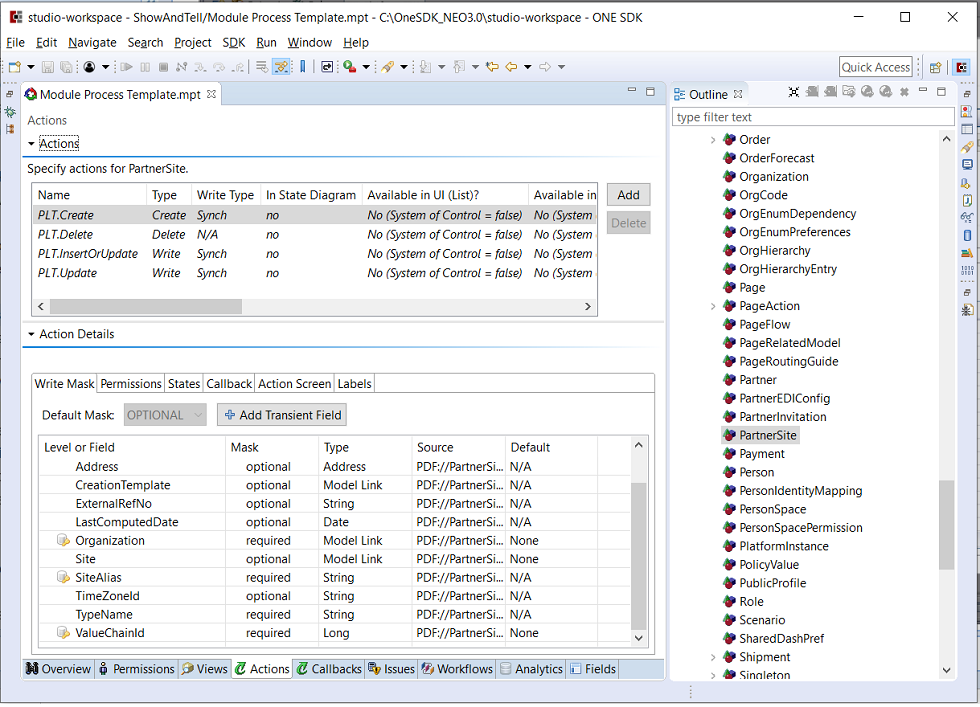
Procedure 4.7. To Create an Action:
Click the Add button.
Figure 4.9. The Action Type Properties dialog allows you to configure a new or existing action.
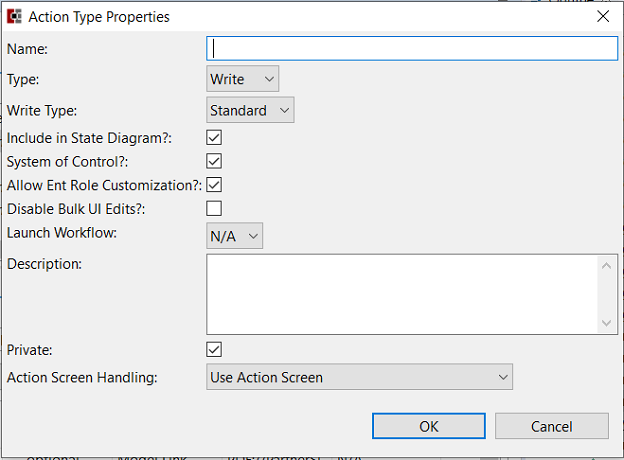
Give the action a name unique to the model. For example, you can have an action called "Create" on multiple models, but each model can only have one action called "Create".
Click the type of action. There are three possibilities:
Create — Use Create if you know the record you are creating does not already exist in the database. If the action results in a record that already exists, an error will occur to this effect.
Write — Use Write if you want to either create a new record or update an existing one. Alternatively, you can configure a Write action to fail if the record doesn't already exist using settings in the write mask.
Delete — Deletes a single record.
All three operations affect the audit trail if the model is configured to use one.
If you selected Write as the type, you may also specify a Write Type based on three possibilities:
Standard— Takes the model's current origin state and moves it to an end state defined by the model's state diagram. You can lock the action such that only certain origin states are allowed to invoke the action.
Loop— Models end up in the same state they were in when the action was invoked.
Synch— This allows you to specify the state of the model at the completion of the action. This is most commonly used when an action is invoked as part of an integration.
If you want to include this action in the state diagram, check the box labeled Include in State Diagram.
If the action you are creating is designed to be used as part of an integration with an external system, and that external system is designed to manage the state of your model, you should deselect the System of Control check box. If the model's state is controlled internally using a state diagram, leave it checked.
If you intend to launch a workflow, you can select the workflow to launch from the Launch Workflow combo box. For more details on creating workflows, see the section in this chapter titled "Creating Workflows".
Type an optional description in the description field. The description field is used for documentation purposes.
By default, all actions are private. Dependent modules will not be able to override the action. If you want a dependent module to override the action (override permissions, field masks, state, and action screen) then un-check the private box.
For more information on Module Publication, Please refer to the chapter titled Module Publication.
Click Action Screen Handling. There are three possibilities:
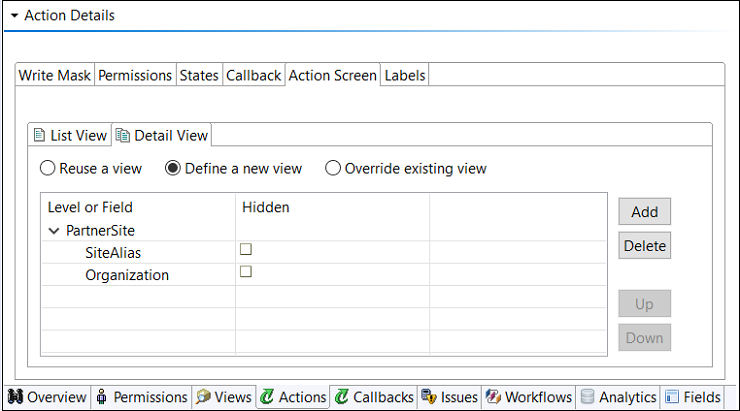
Use Action Screen - You should be able to associate a view to an action using the ActionScreen tab. You can define a new view, re-use an existing view or override an existing view (only for detail views independent modules). The view you choose will be executed when you click on the action in the report or model form detail page Actions button. You can update the field values (depending on the field mask) before executing an action.
Skip Action Screen (With Confirm) - Use this when you don't want to show an action screen for the detail screen, but you do want the user to confirm the action ("OK/Cancel"). You can optionally provide a label pattern to override the default confirmation message provided by Platform.
meta.SkipActionScreen.<ModelLevelType>.<ActionName>meta.SkipActionScreen.<ActionName>Skip Action Screen (Without Confirm) - Same as "With Confirm" except there will not be a confirmation message at all - clicking the action will execute it immediately.
Once you have configured the action to your satisfaction, click the OK button and the action will appear in the actions list.
B efore using the new action, you must configure its write mask settings and its permissions. See section 3.4.3 Working with Write Masks and 3.44 Action Permissions in this chapter for details.
Procedure 4.8. To Remove Existing Actions:
To remove an existing action, select it in the list and click the Remove button.
If you remove an action that is called programmatically and you fail to address the calling code, a run-time error will occur.